
Maurice M. Hebert's Blog
January 6, 2017
Step by Step
As a Self Publisher it would be quite reasonable to want to be the sole proprietor of your own self publishing business, because after all, you want to do it yourself. Here are the steps to take to begin the process.
First,and foremost and perpetually after, you should be asking yourself questions. They will be questions like:
What am I doing?
Why am I doing this?
What is the point?
What will the business be called?
Will the name of the business help people know what I do?
What is my product?
Who is my market?
How will I know if the business will succeed?
OK -times up! you have pondered these questions long enough. You will revisit some of these questions quite often and perhaps some day be able to answer them!
Second, after you have established the name of your company you will need to open a business account at your bank.
This is needed in order to file important papers establishing and registering your business with either or all of the following; Town Clerk, County Clerk, City Hall. It’s always helpful to ask each entity if there are other entities you should visit and forms you will need to fill out.
Third, you will need to register your business with the State where your business is located. While you are working through this process you will be required to fill out the forms for collecting local and state sales tax.
Let’s review. You have a;
Business name
Business location
Business bank account
And you have;
Registered with the Local Officials
Registered with the State Officials
Registered with IRS
Authority to collect sales tax
So now you see when you go into business as a Sole Proprietor you are not really on your own. You have friends at the bank, your local town, county and state office and soon at the IRS. Don’t forget to keep your business accounts and all business related expenses, information, property and transactions separate from your personal life. This will make things much easier for you when you come to file your annual tax forms with your friends at the IRS. Here is the IRS link.
https://www.irs.gov/businesses/small-...
Somewhere along this timeline, perhaps before you begin the process, you may want to recruit the aid of legal, financial and spiritual advisers. You will find that as you take this step by step your business will eventually become a reality and then you will be ready to sail.
Also sign up to win a free autographed children’s book “What Would I Do?” Visit goodreads and find this book in giveaways.
These are great links for more detail about what was briefly covered here. Check back soon and keep up with our progress!
https://www.thebookdesigner.com/2009/...
https://kindlepreneur.com/how-to-star...
https://www.entrepreneur.com/article/...
https://janefriedman.com/author-taxes/


January 5, 2017
Step by Step!
It’s a New Year and you have arrived at the decision to build your business from the ground up. This is a good place to start. The foundation you build on will be your business structure. As mentioned in previous post there are several options for your business structure. You will find links that discuss these options below. For this post we will look at the Sole Proprietor.
As a Self Publisher it would be quite reasonable to want to be the sole proprietor of your own self publishing business, because after all, you want to do it yourself. Here are the steps to take to begin the process.
First,and foremost and perpetually after, you should be asking yourself questions. They will be questions like:
What am I doing?
Why am I doing this?
What is the point?
What will the business be called?
Will the name of the business help people know what I do?
What is my product?
Who is my market?
How will I know if the business will succeed?
OK -times up! you have pondered these questions long enough. You will revisit some of these questions quite often and perhaps some day be able to answer them!
Second, after you have established the name of your company you will need to open a business account at your bank.
This is needed in order to file important papers establishing and registering your business with either or all of the following; Town Clerk, County Clerk, City Hall. It’s always helpful to ask each entity if there are other entities you should visit and forms you will need to fill out.
Third, you will need to register your business with the State where your business is located. While you are working through this process you will be required to fill out the forms for collecting local and state sales tax.
Let’s review. You have a;
Business name
Business location
Business bank account
And you have;
Registered with the Local Officials
Registered with the State Officials
Registered with IRS
Authority to collect sales tax
So now you see when you go into business as a Sole Proprietor you are not really on your own. You have friends at the bank, your local town, county and state office and soon at the IRS. Don’t forget to keep your business accounts and all business related expenses, information, property and transactions separate from your personal life. This will make things much easier for you when you come to file your annual tax forms with your friends at the IRS. Here is the IRS link.
https://www.irs.gov/businesses/small-businesses-self-employed/starting-a-business
Somewhere along this timeline, perhaps before you begin the process, you may want to recruit the aid of legal, financial and spiritual advisers. You will find that as you take this step by step your business will eventually become a reality and then you will be ready to sail.
Products from Amazon.com

-2%
How to Self-Publish a Children's Picture Book: The Easy and Inexpensive Way to Create a Book and eBook: For Non-Designers
Price: $16.66
Was: $16.95
How to Write a Children's Book: Tips on How to Write and Publish a Book for Kids
Price: $14.95
Was: $14.95
-38%
Self Publishing: How to Write, Publish and Sell Your Own Children's Book: A beginner's guide on how to write, and self publish your very own children book
Price: $3.70
Was: $6.00
The Business of Writing for Children: An Award-Winning Author's Tips on Writing Children's Books and Publishing Them, or How to Write, Publish, and Promote a Book for Kids (Kidwriting 1)
Price: Check on Amazon
Self Publishing Books 101: Helping You Get Published and Noticed!
Price: $318.14
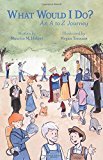
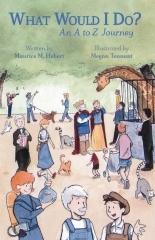
What Would I Do?: An A to Z Journey
Price: $10.95
‹
›
0?z-b.scroll:z+b.scroll)}),b.auto&&h()}function h(){A=setTimeout(function(){c(z+b.scroll)},b.auto)}function i(){return s.slice(z).slice(0,w)}function j(a){var c;a=y-w+1&&(c=a-x-b.scroll,q.css(o,-(c*t)+"px"),z=c+b.scroll)}function k(a){0>a?z=0:a>y-w&&(z=y-w)}function l(){a(b.btnPrev+","+b.btnNext).removeClass("disabled"),a(z-b.scrolly-w&&b.btnNext||[]).addClass("disabled")}function m(c){n=!0,q.animate("left"==o?{left:-(z*t)}:{top:-(z*t)},a.extend({duration:b.speed,easing:b.easing},c))}var n,o,p,q,r,s,t,u,v,w,x,y,z,A,B=a(this);d(),e(),f(),g()})},a.fn.jCarouselLite.options={btnPrev:null,btnNext:null,btnGo:null,mouseWheel:!1,auto:null,speed:200,easing:null,vertical:!1,circular:!0,visible:3,start:0,scroll:1,beforeStart:null,afterEnd:null}}(jQuery);
These are great links for more detail about what was briefly covered here. Check back soon and keep up with our progress! Also sign up to win a free autographed children’s book “What Would I Do?”
https://www.thebookdesigner.com/2009/12/how-to-create-your-publishing-company/
https://kindlepreneur.com/how-to-start-a-publishing-company/
https://www.entrepreneur.com/article/38822
https://janefriedman.com/author-taxes/
December 5, 2016
Illustrator Guest Post!
What a joy to introduce Megan as our guest blogger for this post! I hope all of you aspiring authors and artist get to work with someone as talented and gracious as she is. Thanks Megan.
 Hello! I’m Megan Tennant, illustrator of “What Would I Do?”, and I am popping in to share what my role was like in collaborating with Moe on this children’s book.
What I have to say is by no means the textbook operation of how books get published; but I hope that through this journey, you are inspired and informed to go write/illustrate your own story!
Early Stages – Book proposal, Contract (March – April)
When I decided to leave my full-time job to pursue a freelance career in illustration, Moe approached me about collaborating on his book. I immediately said yes because when you are a starving artist you accept every offer. But in all seriousness, I knew Moe and knew his work would be just wonderful. And I was right! I was charmed with his whimsical and funny manuscript.
The initial step was not at the drawing board, but at the bookkeeping desk: I created a contract between Moe and me that clarified the dates for deadlines on rough drafts, revised sketches, and final art, how much I was to be paid, royalties, and other helpful items. This is a really important step. It’s vital to make sure you have good and clear communication about things (like money and deadlines) at the beginning so both you and the author are on the same page and have the same expectations. This is also to protect both of you from getting in a sticky situation should either one of you fail to deliver – e.g., if Moe paid me but I failed to deliver final art. If you aren’t sure how to begin drawing up a contract, there are some helpful templates online like this one: http://www.illustrationcastle.com/blogimages/Contract_Template.pdf
Once we both agreed and signed the contract, I marked on my calendar the dates for the various deadlines. I can’t emphasize enough how important it is to be timely and punctual with delivering the work when you say you will. That reflects a great deal on the kind of artist you are to work with and level of professionalism.
Drawings – Rough drafts, Revised sketches, Final art (April – October)
Once the bookkeeping was done, I sat down with a cup of coffee and read the manuscript. My first reading was kept casual so that I didn’t overthink it….trying instead to just let whatever came to my imagination. Then I re-read the manuscript with a sketchbook handy to catch any thoughts and ideas. Some illustrations came immediately in my mind’s eye when I read them and some were long and agonizing labors of love. I’ll leave it up to you to guess which ones were which!
From there, I sketched rough drafts: loose pencil drawings to show my ideas for each illustration. I marked the size of the page, where the text would be placed, and the gutter (where the two pages come together). Then I scanned each drawing and emailed them to Moe for thoughts/approval.
Probably my best advice during this stage is not to get discouraged if there are lots of edits and revisions at this stage. It’s not supposed to be polished yet and you want this stage to be the one when you really iron out all the problems. Having the author be another set of eyes is extremely helpful. I also consulted with a local illustrator friend. She was very helpful to see things with an artistic eye and offer ideas to make things visually more engaging. When I compare some of my rough drafts to the final art, it’s amazing how much better they became because of other people’s input.
Two weeks after the rough drafts were discussed, I sent revised drafts and repeated the process.
Then the best part came! The final art! Using the approved revised sketches as my guide, I inked and painted the final paintings that would be in the book. It’s also critical at this step to know exactly your printer’s specific requirements for bleeds: this just means that your illustration extends a little extra on all borders with non-essential images so that you have a clean crop (without the risk of white showing). Most printers are fine if you have a 0.125 inch bleed all the way around.
There are as many styles of illustrating as there are artists, but my process for this book was to start with a pencil underdrawing on Arches 140 lb. cold-pressed watercolor paper, then do the inking with technical Prismacolor pens. Once that was done, I applied the watercolor. Some of the illustrations also lent themselves very nicely to doing some airbrush work with gouache (an opaque watercolor) to add effects like smoke or dust clouds.
Doing the 27 illustrations plus the cover took about a month.
Submission to Printer – CreateSpace and Imaging (November)
Familiarize yourself with all the printing specifics for your self-publisher. Since we self-published with CreateSpace, I made sure to write down every detail: measurements for bleeds, trim areas, PDF file size, etc. This is important to do before you start layout of your final art.
Once the final art was painted, there was still lots to do. I was responsible for turning the final art into a PDF file for uploading to CreateSpace. This required getting my illustrations “digitized” or “imaged” so that they would be high-quality, high-resolution files able to be sent to the printer. This was done by a frame shop who had the equipment to do this – I was not able to do it myself. Once they had the JPGs for me, I uploaded them into InDesign, added the text necessary and saved them as “Press Quality” PDFs. This InDesign file included the Cover, Dedication Page, Title Page, Interior Pages, and Author/Illustrator Profiles. If you are unfamiliar with this software, you could hire a graphic designer to do this for you.
Once you upload and approve your files for print, you will receive a hard copy proof in the mail. Holding the book in your hands is very exciting and it gives you the ability to final check that all the images, text, and spacing looks good. If not, you can make the adjustments and resubmit the files.
And that’s about it! I hope this was in some way helpful to see “behind the curtain” of illustrating a self-published children’s book.
Megan
This book is now available here – CreateSpace and here! Amazon.com
Hurry you will want this before Christmas!
November 18, 2016
Off To The Printer!
We’ve done it, the book “What Would I Do?” is finished and the file is being uploaded to the printer.
In this post I would like to encourage you in your work by reviewing the steps we have taken to get to this point and commenting on these steps in general.
Write the book:
“What Would I Do?” is a children’s book written in rhyme and each page is a scene to itself. Following the Alphabet from A-Z an occupation and a short scenario is described with the question asked and to be answered “What Would I Do?” See the sneak peek preview of the Violinist.
Some books are easier to write than others. Let me encourage you here. There are times of the day when words seem to flow unto the pages almost effortlessly. Find out when that is for you.
For me, inspiration comes from many sources but I find that for the most part it is drawn from a well of memories, images, feelings, experiences and beliefs. When you are moved by the recollection and or contemplation of any of these, write. (Personally, writing will often be easier after times of prayer and seeking after creative inspiration from my Lord Jesus.) Write with abandon and continue until the well dries up. Now it is time to be still and rest. This process in practice almost becomes cyclic. By diligently preparing for and scheduling these times of writing you will find it becomes second nature and you will subconsciously be writing when the well of inspiration is filled up again.
Read the book and take stuff out:
This children’s book started out in a light and playful tone with some funny scenarios and a few serious ones. Initially I had a heavier hand on the more serious scenarios and had to dial back a bit and change the scene to something a bit lighter. This was a suggestion that my editor friend had for me regarding some of the scenes. I was asking the reader to make decisions while burdening them with deeper moral implications that was not in consistent with the rest of the scenes.
Who better understands what you are trying to say than you. Read what you wrote and throw the stuff out that doesn’t work. You will know what it is. The words that don’t fit exactly within the context of your meaning, the run on sentences, typos, organizational structure etc. Be merciless, if the sentence or chapter is unnecessary glean the best of it for use elsewhere and toss the rest out. If you are developing characters, use your creative genius in the process but maintain consistency within the character. Try not to develop all the characters at once, introduce them in different ways at different times and expound on their characteristics and personalities as the story unfolds, within the circumstances and dialogue. Look for inconsistencies within the characters and use them as part of the story or restore the integrity of the character you have created.
Find an illustrator and editor
In this case I had an illustrator in mind when I began writing the book. She had already agreed to illustrate the book before even reading. Once she read the manuscript it was a certainty in her mind that this would work out. If you are seeking an illustrator have some idea about the type of art work that will work best for the target age group, theme, setting and character of your story.
If you are in need of illustrations for your book, inquire politely about the possibility of illustrating your book. Contact someone who has the style of work you would like to see in your book. Send a copy of the manuscript to the illustrator or to several and set up a preliminary meeting with the illustrator and discuss the book.
Find an editor in the same manner. A professional editor is best or contact someone you trust who at least has some editorial credentials or training.
Continue reading and rewriting and editing
Read and reread each sentence and each chapter and make revisions as needed. If you are working with an illustrator keep in touch and make sure the illustrator is aware of these changes. During the rough sketches and initial drafts of the first drawings I was still making changes to the text and context of a few of the scenes. Staying in touch with the illustrator helped to maintain the integrity of the drawings to the revised text. You want the text and the art work to work together describing the same thing.
The Art of Writing is in the Rewriting
You will find something new to change or eliminate almost every time you do this. This does not mean you messed up the first time. What you are doing is fine tuning and embellishing. You are restructuring and designing and redesigning. You are building chapters and direction towards a climax and resolution. You are building cliffhangers and page turners for your plot, your characters and your readers.
Prepare the manuscript for the printer
In this case because of the amount of artwork involved the preparation of the manuscript was made mostly by the illustrator. If you have text only you will need to study and be sure that you are following the guidelines prescribed by the printer. You will also need to make decisions about a cover and title page etc. If you have gotten this far this should be an easy matter of research and decision making.
If you are using a Print On Demand service like Createspace you will need to follow their guidelines for submission. They have very easy to use system which walks you through the whole process. You will be learning new words and meanings while you complete the finished work. Be prepared to present an author’s biography and to make decisions about marketing and distribution. You will also need to decide whether you will publish under your own publishing company acquiring an ISBN number from Bowker or use Createspace’s ISBN number.
6 Secrets to Writing a Killer Author Bio
Upload the book and start selling
So, this is where we are at this point. As I mentioned earlier the book is being uploaded to the printer. Because of the volume of artwork in this book the data for the upload is huge. It may need to be compressed and sent as a Zip file. A non-picture book or one with little artwork would be easier and faster to upload. Once the book is approved by both the printer and myself it will be made available for sale at Amazon.com. This is the place to market the book and draw attention to yourself and your illustrator. The author and illustrator bios will be very important to have here. These links will be helpful for you as you decide how to price your book and where to sell them.
As you approach the final steps to submitting your book you will want to be promoting your book at as many channels as possible. I have created both a Facebook and Twitter page for Mograce Publishing as well as this website. These sites have tools that are very helpful in pursuing the market for your book. Posting frequently at all these sites with engaging and interesting content is a challenge but it is all part of the marketing aspect of your work. If you are the publisher it is all up to you to make your book a success. Friends are a big help also!
self-publishing-a-book-25-things-you-need-to-know
Thanks for following me through this briefly detailed overview of the writing experience. Check back soon for more pointers on selling and updates on the progress of “What Would I Do?” Also check out our Facebook Page for your chance to win this wonderful children’s book!
Don’t forget to click on the links above for more helpful details on these topics!
October 30, 2016
Progress?
Oh my, it’s the end of October and I am afraid. I’m afraid I have not posted in almost a month. I imagine that some of you have returned to check on my progress with this web-site. I also imagine that you are progressing in your work and may have even found a Web Host and installed WordPress.org, I hope you are doing well with this.
If you are like me, you have limited time to spend trouble shooting web design features from page builder plugins that promise quick and easy installs. To their credit however, they deliver links to forums where people vent their frustration with features that other users have no problem with.
That sums up my experience so far with Web Page Building. But the good news is that there is a light that shines once you can visualize the web page as a larger assembly of smaller pieces.
WordPress.org’s page builder plugin “Live Composer” calls these smaller pieces modules. The web page is like a puzzle and the pieces are segments called modules. If you look at a typical page from top to bottom you will find;
The Header
The Title
The Body or Content
The Comment Section
Social Sharing Widgets
Side Bar Content or Widgets
The Footer
These modules are created and formatted separately and then later installed into your page. Some modules will include additional information such as “Date” – “Author” – “Comment Counts” etc.
As you create more pages you will realize that you can design a template for all your blog post, and pages. Remember to treat each module as a separate piece of the puzzle and format it to be plugged into your template as you proceed.
Here are links to some sites that explain in greater detail.
WordPress Tutorial For Beginners Part 2
What is the Difference Between Post vs Pages in WordPress
My favorite is the one that tells me what the difference is between a “page” and a “post”.
You will find more info at the WordPress.org user manual site as well.
https://make.wordpress.org/support/user-manual/content/posts-vs-pages/
From your Dashboard and Live Composer you should now be able to assemble and edit a page and or a post. There are features available for each module type and as you experiment with creating and editing these modules you will find that they become easier to manage. I am still experimenting with pull down list and linking categories etc.
Eventually, I believe I will be able to manage a rework of this web site and be able to take orders for books and other written material as well as post guest blogs and videos and other interesting content. Check back soon and find out!
( My next project will be figuring how to size the video segment to fit within the margins of this post, wish me luck!)
Update – I figured it out and as you can see the video segment now fits. What I had to do was install a WordPress plugin called “simple You Tube embed” from the plugin list. You can find many plugins when you select “add new” from the plugin menu on your dashboard. After you have selected, installed and activated this plugin you will be able to share your You Tube videos in your post. Try it out!
(Featured image above from illustrator Megan Tennant rough sketches for our new book “What Would I Do?”)
September 30, 2016
Business Structure
I hope you found the resources provided in the previous post helpful for considering the reasons for self-publishing. These are my reasons for self-publishing;
I am not willing to do all the leg- work to find a publisher who may be interested in my work and then wait for months if not years to finally become involved with a publisher whose main interest is making money. Beyond the creative and influential interest I have, making money is also my main interest.
Secondly, self-publishing allows me to have more control over my product and the creative roads I would like to travel.
Thirdly, I enjoy the challenge of building a business from the ground up driven by the potential that perhaps it will be a successful venture.
Finally, self-publishers share an independent spirit that I feel allows for freedom of expression without the constraints of PC and Corporate bias.
If your reasons for self-publishing are similar to mine, I am glad we share these sentiments.
The next step in your business development plan is to decide what type of business model works best for you. As you contemplate your business structure you will want to consider several types of business entities. Each has their peculiar benefits and associated costs. Regardless of what structure you choose, you will want to seek financial and legal counsel before taking the plunge into building your publishing kingdom.
You will find these particular articles helpful in making your decision.
• How To Start Your Own Self-Publishing Company – 10 Essential Steps by Shelley Hitz
• 8 Answers That Help Self-Publishers Get Up and Running by Joel Friedlander
• Set Up for Self Publishing by Helen Sedwick
• What Every Self-Published Author Needs to Know About Taxes by Helen Sedwick, Jane Friedman
• Best Business Structure: LLC vs. S Corp. vs. C Corp. & Others By Priyanka Prakash
I find that at the entry level of self-publishing operating as a Sole Proprietor and DBA is the best place to start. As you research these options you will find one that works for you. Don’t let the red tape monster slow you down. If you are inspired to create and publish go for it!
(Featured image above from illustrator Megan Tennant rough sketches for our new book “What Would I Do?”)
September 20, 2016
“What Would I Do?”
 (If you have arrived here from our Facebook page because you clicked on “Get Offer” – Thank You! We have a Winner for our Free Book Giveaway! – It will be shipped out to arrive before Christmas!
If you order a book please share it, write a review and be sure to let your friends know they can order from CreateSpace and Amazon.com !
Also while you are here please explore our web site, share with friends and check back often for new post and perhaps new items!) Update 12/09/16
As I have mentioned elsewhere on this site we are currently in the process of creating a new children’s book. I describe it as a playful and imaginative romp through occupations and situations. This book explores occupations in alphabetical order, the rhyming text and the colorful illustrations are pleasantly engaging for ears and eyes. From Astronaut to Zookeeper the delightful illustrations by Megan Tennant will encourage young readers to use their imaginations in forming questions and answers regarding situations they may find themselves in. We hope you plan to buy this book and encourage your friends and family to as well. The book is scheduled to be available by December 2016. I can’t wait to sit with my grandchildren and read it to them.
You will want to return and read more about the details of creating a book such as this. I will leave you with some links you may find helpful .
How to Create a Successful Self-Published Children’s Book
Four Reasons to Self-Publish Your Children’s Book
5 People You Need on Your Team When You Self-publish a Kids’ Book
Getting an Illustrated Book Published
September 18, 2016
Getting Started
There are some projects that seem so complicated. So many things need to be in place before you can make any progress towards your goal. Building a web-site is a lot like chasing 50 rabbits through your kitchen and putting them back in their hutches. You may have noticed the wonderful illustrations used as thumbnails for these post. I am borrowing them from Megan Tennant a good friend and illustrator. These are the rough drawings for our soon to be available book “What Would I Do?” You can read all about that in the post under the heading “Building a Book”.
The post topics here have to do with building a web site. This site is created with WordPress.org. There are several reasons I am using WP.org. I have used WP.com for my other blog site with good results and found it easy to learn and use. However there are drawbacks and limitations to WP.com that make WP.org a much better platform to build a versatile e-commerce site.
I have been juggling blog post and journaling, along with web site building and find it a very rich field for post content. However, I do not wish to go into great detail here about the techniques and tools for building a great website. Instead, I will refer you to those places where I have found the best and easy to understand information regarding this mysterious and creative art form.
Getting started in any endeavor takes planning and answering some basic questions. WP.org provides you with the outline to help you use the answers to this question in building your site. I recommend going to WordPress.org main page and review the information you will find there.
There is a lot to learn there, but if you are like me you can make progress and learn as you go. You will certainly be toggling often to and from the WP.org page.
Basically there are steps you need to take before you begin your WP.org web building project.
You will need to read a lot of stuff
Make a plan
Find and install a Web Host and install WordPress
Set Up WordPress
So by the time you have done all that you will be ready to check back on my progress with this site and comment on how wonderfully easy WordPress.org is to learn and use! ;>) Don’t forget to check out the post on creating a children’s book and starting your own publishing company. Are we having fun yet?
I have created an emoji to alert you to sarcasm ;>) it is meant to be a lighthearted reminder that learning curves sometime seem like a mountain trail. If you get stuck in the tech language, don’t feel alone I’m right there with you. WP.org and Google are your best friends in this case, ask a question and you will most likely find yourself at a forum where many others have asked the same question and have found sufficient answers. Hang in there!
September 12, 2016
Building A Web Site?
These post will allow you to follow along with my efforts to build this web-site. I am certain that many of you will be as frustrated with my ignorance about web page building as I am. If you do leave this post let it be because you would like to purchase our (Mograce Publishing) first children’s book,“What Would I Do?” After all, this is what the web site is all about! If you decide to stay and keep reading please understand my fumbling and turtle like progress form the content of these post.
Let me first tell you that working with WordPress.org has been an exciting experience. The learning curve is not quite as steep if you have had experience with WordPress.com. Yes, they are two different animals from the same jungle. WordPress.com is an excellent blogging platform. They make it rather easy to create and customize your own blog site. The Dashboard menu is easy to navigate and you will quickly learn how to edit and change the appearance of your post. I have a site there as well, ( momeaning.com ) however, I have yet to discover all the features, tools and techniques that would make me a much more productive blogger. What WordPress.org offers is more control, options and a way to monetize your site by installing their own e-commerce plugin “WooCommerce” or others like “My Book Table” .
You will find more details on the differences between WP.com and WP.org here at these links links.
WordPress.com and WordPress.org
WordPress.org vs WordPress.com: A Definitive Guide For 2015
If you are like me, you probably learn and apply what you learn on an as needed basis. In other words, I will not read the entire instruction manual. I will skim over the topics and select which is relevant to my need and then forge ahead to learn and apply only that. This is perhaps to my detriment, because in WordPress.org many of the features and settings seem to overlap and effect the overall look and functionality of the site. My latest crisis is figuring out why even though I have given each post a category, they do not link from the sidebar or navigation drop down list. At some point I will fill you in on what happened and why. Until then, stick around, these post will soon have some chronological and categorical order to them and you will be able to find them when you need to.
(Featured image above from illustrator Megan Tennant rough sketches for our new book “What Would I Do?”)
September 2, 2016
How It All Began
One day inspiration hit me, just hard enough to jog some rhymes into place. I had been following a writing pattern I’ve used to encourage creative thinking and establish structure and direction for my writing, the alphabet.
What resulted was a pleasant romp through various occupations and situations while inviting the young reader to explore choices with his or her imagination.
I called the children’s book “What Would I Do?” Inspired by the creative ability of a very talented young illustrator, I completed the manuscript and asked her for comments and if she would illustrate this book.
With great enthusiasm she agreed to illustrate my book and thus began the adventure of self-publishing. Being totally inexperienced about self-publishing, I researched articles about the topic and compared the pros and cons of both process with traditional publishing and self-publishing methods.
What I found was an amazing amount of material which I will link to for your benefit. I am thoroughly convinced I am on the right track pursuing self-publishing, only time and experience will tell.
The material I looked through convinced me that the best strategy at this time would be to create my own publishing company and roll with the POD (Print On Demand) system available at Amazon through Create Space.
As you can see by the title of this home page this company is called “Mograce Publishing” I extend a hearty welcome to you and hope you will find some helpful ideas here and among the links to resources at other sites.
(Featured image above from illustrator Megan Tennant rough sketches for our new book “What Would I Do?”)


