
Marc Silber's Blog, page 3
January 4, 2022
5 Steps for Setting Photography Goals to Push yourself this Year
 Feelin’ it at Bixby Creek Bridge, Big Sur
Like everything in life, if you don’t set your photography goals, they’re not likely to just happen on by and knock on your door.
Let me ask you, when was the last time you thought about your goals as a photographer? Lots of us keep going out and shooting the same pictures over and over — you know the ones I’m talking about. Nice shot the first few times you got it, but after a few hundred, even you’re tired of seeing it! How does that happen? You get good at a certain type of photography and keep on going out and finding that shot again.
This is a signal that it’s time to tune up your skills, or turn your photography “on its head” and do something totally different.
An assignment I always give students at my workshops is to “go out and get images that you normally wouldn’t — get out of your comfort zone.”
This takes us back to the subject of your goals. It’s a brand new year and a good time to set your goals. Here’s a effective way to approach it by asking yourself questions about your photography:

1. What areas would you like to improve? You might be aware of a few that you know you want to get on top of instead of stumbling over for another year.
2. Are there genres of images you’d like to capture that you haven’t been (nudes, black and white, landscapes, artificial light, etc?)
3. What are your plans to study other’s work? I always recommend that you get out often to museums, exhibitions, or where not possible, look in books. Use your notebook to write down what resonates for you and how the artist captured their subject, used framing, lighting, etc.
4. Are there any skills such as processing or use of equipment you’d like to master to this year?
5. Now here’s the best and most fun step: Write in your notebook all the photos you really want to capture this year (an extension of 2. above, but get down to specific images). Throw logic and self-criticism out the window on this–don’t overthink it–just write them down. Even go crazy and let your imagination have free rein and put down whatever comes to mind. This is in your notebook and no one has to read your fantasies here.
Then just put these all together and set yourself a goal. Oh, one more thing I bet each of us needs to do: Make (not take) more photographs. Unless you’re out there shooting daily, you’re probably not photographing enough, even if it’s with your iPhone.
Do me a favor after you’ve done the exercise above, leave me a comment and let me know what you came up with.
Join me live Thursday 6th at 10 am PST.Use this link to set a reminder and be sure to join me in the chat. Bring your own goals to discuss and any questions you may have.
Next week I’ll talk about the steps to take after you set your goals — to make them an actuality and not just be another page in your notebook.
The post 5 Steps for Setting Photography Goals to Push yourself this Year appeared first on Advancing Your Photography.


June 13, 2021
Tips and Tricks for Landscape Photography to Take Better Photos Today! – Photographer Marc Silber
Tips and Tricks for Landscape Photography to Take Better Photos Today! – Photographer Marc Silber
Let’s discuss landscape photography. This is personal to me because I started as a landscape photographer. It was my first genre. Although I do a lot of environmental portraits, landscapes have a special place in my heart. So, I can tell you this for a fact: it’s a tool you’re always going to want to know about. The tips I am going to share with you are from my two books Advancing your Photography and The Secrets to Creating Amazing Photos Composition.

By the way, these two books have some amazing ideas to transform your photography. You can get them at a huge discount just by clicking here.
You can watch Marc’s Youtube Video on this subject below.
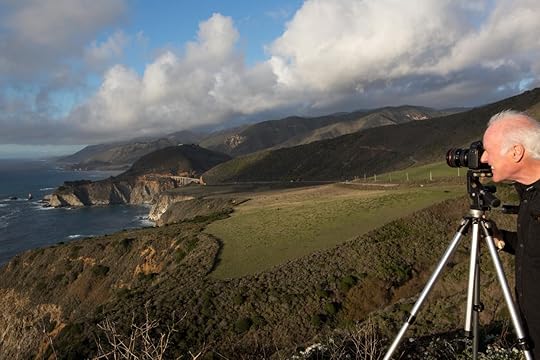
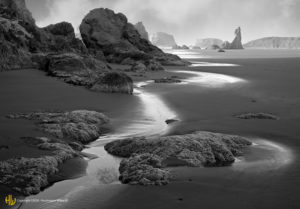
The Starting Point – VisualizationThe first thing, as I will always say, is visualization. Visualization is the power of forming a mental picture or vision of something not actually present to the sight. It turns out the photography starts with you, not with your camera. It starts with you getting a vision of what you want to photograph. Here is a visual of me visualizing a photograph on our rugged coastline called Big Sur, California. I don’t have a camera in my hand, but I was visualizing what I wanted the photograph to look like. Then having done that I said, well I don’t want to be that close. I want to go way farther back; I want clouds and I want to capture the bridge in the next image.
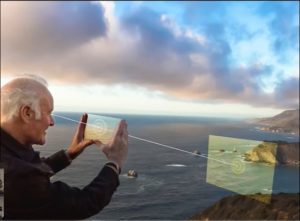
Marc Visualizing Landscape Image Marc took capturing Bixby Creek Bridge
In the above case, I was using a tripod. They are actually really handy when you’re shooting landscapes. In terms of landscapes, tripods make you slow down. Most of the time when you’re shooting, it isn’t like a split-second thing. You’ve got a little time on your hands and the tripod adds that element of carefully looking and slowing down. Also, in the old days of big cameras, we always used tripods and you can emulate that. Also, you may want to put yourself in the frame using a self-timer to capture while you walk into the frame. In which case, you also need a tripod. So, always take your tripod with you.

Visualizing with the aid of a tripod
Developing Your Visual LibraryA lot of people ask me how they can develop their visual library. Well, one of the best ways is to look at art. They give valuable insights. You can go to Museums physically when they open up or you can go to online galleries. You can also get great insight from books. Study the art you see in these sources, don’t just take a glance. When you find the artists that resonate with you the most, study how they did it. You will learn a lot.
Take for example the image below you find in Rijksmuseum in Amsterdam. This is the amazing work of our friend Rembrandt. Look at the use of the clouds, the lighting, and l how he placed the stone bridge. This is called a balanced composition. You can emulate this with your photographs: you can get those dark moody skies and you can look for the lighting that is striking your center subject. There’s a lot to learn from these artists. By the way, there are many great works from different artists in Rijksmuseum and the museum allows you to download high-resolution prints.
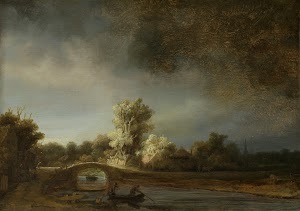
Landscape with a Stone Bridge, Rembrandt
Train Your Eye to See ImagesImages don’t just jump out at you. You have to use a framing device to train your eye to see photographs. This is a very very important skill that you can develop and continue to use. Just like when you are playing any sport; basketball, tennis, golf, surfing, or whatever. You do a lot of practice many times. You have to do the same thing with your eye. Train your eye to find images because they will never jump out at you and wave big flags and say hey come on mark press the shutter.

Using two fingers as a framing device
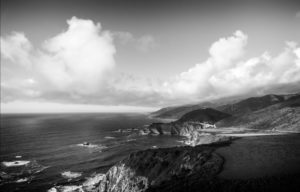
Composition and Landscape PhotographyWhen we talk about composition we are referring to capture. Once again, it’s important to note that framing is a basic tool you need here. In fact, you are going to use it over and over again as it gives you layers, compass, and gives contrast. It leads the person’s eye to where you want it to go. In the landscape photograph below, you can see a frame built from the fence and the edge of the tree. This gives a foreground layer and adds contrast and depth.
One basic thing to know is that we’re trying to make our photographs which ordinarily are two-dimensional appear three-dimensional. With the frame in the foreground, we can then look into the background. Framing is the key tool we use to make this happen. There are a lot of frames out there such as natural frames (trees, rocks, etc) and artificial frames (such as buildings, bridges, fences, etc. You have to look for them.
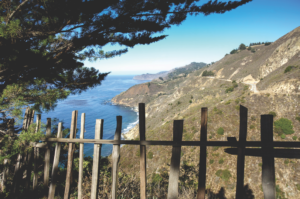
Landscape photograph of Big Sur using a fence, and tree as the frame
Another compositional tool that has great use in landscape photography is called group shape composition. Here is what the tremendously talented photographer Camille Seaman said:
“Think of everything as shapes. You’re arranging shapes in such a way to interact and to activate space, to push things forward and pull things back, to draw your eye here or guide your eye there. When you understand that, and you do it in that way; composition becomes like a ballet, it really becomes choreography.”
The Beauty of Group Shape Composition In Landscape PhotographyWhat she’s saying is that you have to look at the shapes and move around until those shapes come together. This is important because you may have to move around. Your landscape isn’t going to move for you. It’s not like a person where you can say “hey, would you mind moving over next to that tree.” You can do that with people, landscapes.
Here is a photograph I took in Hermanas Bay, South Africa. You can see a lot of shapes here. You have the clouds and that’s a whole set of shapes right there. Then we have the mountains on the left; another set of shapes. We have the mountains on the right; another set of shapes. Putting all these together, we get a group shape composition. I moved into where I framed it the way I wanted it. I had to move around a little bit because I wanted to get that sunset. The sunset is pretty amazing there as it adds depth and dimension. Always look for how you can group those different compositional elements together.

Landscape photo Marc took in Hermanas Bay, South Africa
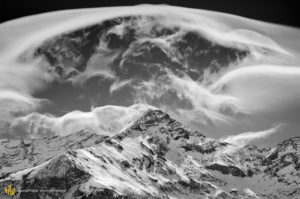
Another group-shaped composition with the added bonus of clouds is the Matterhorn and the birds. The birds form what we call a punctuation point. A punctuation point gives you exactly what a punctuation point does in writing. It just helps highlight what your image is about. In this case, these two birds soaring really added to the image for me and I waited for them.
I try to use birds a lot in landscapes or people or animals or even a car. I want some other element in there besides just the mountain. Now imagine this photograph with no clouds, blue sky, and just the mountain. It may be okay, right? But it would look like a postcard. If you wanted a postcard why not just buy a postcard? But if you want your own stamp on it; or you want to put your thumbprint on your photograph then you look for these other elements.
Join the AYP Club!
Find all our past podcasts and blogs
The post Tips and Tricks for Landscape Photography to Take Better Photos Today! – Photographer Marc Silber appeared first on Advancing Your Photography.

May 31, 2021
The Key to Understanding Photography and Composition feat. Master Photographer Huntington Witherill
The Key to Understanding Photography and Composition feat. Master Photographer Huntington Witherill
We’re bringing you composition and photography tips from Master Photographer Huntington Witherill an award-winning photographer who also shares his experiences working with Ansel Adams. He simplifies and brings clarity to how to make outstanding images. He’s also is quoted in Marc Silber’s book Advancing Your Photography, which you can read for some more insight from Huntington and advice to help you Advance your Photography.
In the meantime, here is some insight from Huntington:
How Your Camera SeesFirst, knowing exactly what your camera sees is vital for capturing outstanding images. One of the keys to composition and photography, in general, is to learn how to see as your camera sees. This means that you’re taking your time to pay attention to what you’re photographing. To do this, you need to learn a number of things. One of which is that camera does not see as you see. A perfect example of this is when you can go out on a bright sunny day. It’s great to the eyes and we love to see a nice bright sunny day. But that’s not necessarily the best light for the camera to see.
So, learning to see as the camera sees enables you to take a scene and understand how to translate that through the photographic process to produce a photograph that has the emotional and visual content you desire.
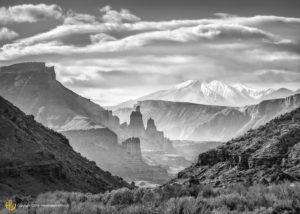
Fisher Towers, UT, 2014
Formulating and Resolving CompositionWhen we talk about photography and composition, the most enticing aspect is the puzzle of formulating and resolving composition. This is the deciding part of your photography. I love doing that and I tend to do it, whether I’m photographing or not. As I sit here and look out the window or whatever it is that I do, I’m constantly framing up the world, and kind of organizing it in my mind. And I just love doing that.
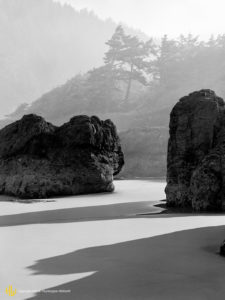
Morning Mists, Oregon Coast, 1979
Ansel does this well while training photographers during his workshop. He would hand out framing cards on the first day of his workshop. He would ask everybody to put their camera away and hands out these cardboard cutouts with a rectangle in them just to train the eye.
I used to do something similar as well to train my eyes. I walked around for years with what was called a spectra-monochromatic viewing filter. It was a very small dark brown filter that I had taped off with some electrical tape into a small rectangle. When I put it up to my eye it would take the color out of the scene and then frame up the scene. What it does is that it teaches you how to see what’s going on at the edges of the frame.
Looking for Composition?Here’s another great tip on photography and composition I learned from Ansel. He pointed out that too often when students are out looking for a composition, they would take their camera, put it here next to them and they’d start setting it up. Then they would take a picture. But by looking through the camera they discover that they don’t have the right scene. Then they change position so many times until they get the best scene. This is what Ansel called the pogo-stick approach to photography. It is the approach where you put the tripod here try it and if that didn’t work, put the tripod elsewhere and if that didn’t work, you try it many times over until it works. But the easiest thing which is key is to just decide on the basis of the one eye that you’re looking with where does it best.
The Right ApproachYou know, when the scene looks right to you on the basis of that, you put the lens right there – where your eye is. That is where the camera needs to be exactly. So, that keeps you from having to jump around trying a lot of different compositions. The rule is, where the lens actually is in space determines what the composition is. If you move the lens even an inch or two to one side or up or down it can quickly change the composition.
Bandon Beach, OR, 2006.
I used to take those cards that Ansel hands out at this workshop. Usually, depending on how far you place it from your eye, you can tell if you want to get the effect of a telephoto. Depending on the distance you place it from your eye, you can have different focal lengths. You could do this without having to set up the camera and change lenses all the time. You could figure out exactly what you needed just by using that little card. That’s why it was so effective.
Cropping and CompositionHere’s what I also normally do when composing a photograph: I always do some form of cropping. The reason for this is that not every natural scene on the planet fits into the 8 by 10 format. Some scenes require a little bit more this way and a little bit more that way.
Storm Clouds, San Juan Mountains, CO, 2007.
So, when I’m composing the images, I use the lens or the point of view which produces the image right out to the edge of the frame. I do this depending upon which is the larger of the two in terms of whether it’s the top to bottom proportion or the left. Then I end up cropping the other dimension after. What this does is that it allows you to work with the reality that not every scene fits into the 8×10 proportion. It also allows you to use the scene to its maximum on at least one dimension; whether it’s the horizontal or the vertical. And then crop out the others later so that you can get the best optical quality with your camera.
Final Piece of Advice
Here’s my final piece of advice to help you advance your photography. I think patience and persistence are the keys to producing good photographs. You know I’ve spent more than 50 years now photographing and I’ve done so every day for the past 50 years plus. If you do something that much, even somebody like me can do it fairly decently. So persistence and patience are vital; just don’t give up. Keep shooting; that’s the key.
Connect with Huntington Witherill:
Here’s a special OFFER for Advancing Your Photography –it’s free! Just pay shipping and handling. Click to get it!
Join the AYP Club!
Find all our past podcasts and blogs
The post The Key to Understanding Photography and Composition feat. Master Photographer Huntington Witherill appeared first on Advancing Your Photography.

December 4, 2020
AYP+ Cyberweek sale extended
Education is the best way a photographer can learn new skills and hone existing ones. A membership in AYP+ provides you with valuable resources to continue your learning over the upcoming year.
Cyber Week is almost over but we are bringing back incredible savings on all our courses! Be sure to check out our deals because they will be gone after this weekend! That includes the amazing prices on our AYP+ memberships!
To learn more about the great opportunities a membership in AYP+ will provide, please check out this and other educational resources offered by Marc Silber.
https://courses.silberstudios.com/ayp+
The post AYP+ Cyberweek sale extended appeared first on Advancing Your Photography.

November 12, 2020
Add Interest. Add People.
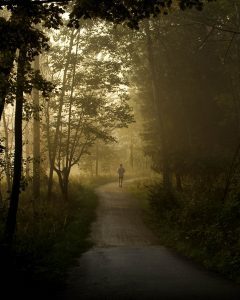
One sure way to make your photographs more interesting is to add people to the picture. You may not always need or want to put a human figure in your image if you are shooting a grant landscape or an Ansel Adams type composition. But adding a person can certainly add interest to many compositions.
The human eye is always drawn to a human image. A human figure can serve as a punctuation point in your image. Like commas, you must use this punctuation wisely so as to not put the emphasis in, the wrong place.
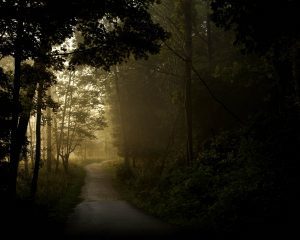
Lets take a look at two pictures I made at Peninsula State Park in Wisconsin one fall morning. This first image has good leading lines, but there is no payoff for the eye as it is led deeper into the scene.
A few moments later, a jogger came into view. It gave this image the punctuation point it needed, resulting in a much more satisfying composition.

Now for a little self critique. The photograph is better with the person in view, but still more improvement is needed. I should have waited for the jogger to come closer to me, so he would have been more prominent. If I did this, then the jogger might not have been in the brighter part of the scene and lost in the shadows. I did try a longer lens, but no more people appeared in the scene in more than an hour of waiting. By cropping the image I was able to eliminate some of the dead space on the right side of the picture, while making the jogger a more prominent part of the image.
Be sure to follow our blog, sign up for our newsletter and subscribe to our YouTube channel to keep up to date with all our content! If you’re interested in more about Wedding photography, be sure to check out Wedding Photography playlist of interviews.
The post Add Interest. Add People. appeared first on Advancing Your Photography.

October 28, 2020
Adapting to COVID Wedding Photography
Any wedding photographers that are still getting shoots during COVID life will certainly attest that things have dramatically changed. Most states have set stringent limits to social gatherings. Some couples have simply decided to move their weddings to their backyards, while others have found other options. It is too soon to predict how long this new normal will keep going. It might be that we are in the midst of a fundamental shift in the industry. Speculating about that now can drive a person crazy. Photographers cannot spend precious time worrying about long-term shifts when things are still in flux. But being adaptable is an essential life skill. Photographers have had to adapt all along given how disruptive new technology can be. Any film shooters reading this? (I still shoot a roll here and there).
The new normal of outdoor COVID weddings (photo by Jared Tremper)
Having shot a few weddings in 2020, my wife and I learned quickly that we had to adapt. That said, when does any live event go as planned? Being adaptable is central to an event photographer. Yet 2020 is different. Couples today are under a lot more stress. So here are a few key take-aways from the new normal that might help others.
Adaptation: Stay Calm and Carry On
When meeting with the couple, there’s no getting around it that 2020 is different. Some couples delayed their wedding, hoping things would get back to normal. Those who soldiered on had to make difficult decisions:
Whom to invite and not invite
Proceed with a larger reserved venue or go small
Will there be a wedding party
What about social distancing, not only for the guests but for family and others involved
The key takeaway is to maintain a calm and professional attitude at every stage. Do not be a source of stress for the couple. Let them feel your confidence that everything will turn out great!
Adaptation: Size Matters
Some weddings have made the news this year as “super spreader” events. When it comes to shooting weddings where they have somehow been able to have a fairly large number of guests, only you can decide how much risk you are willing to take. Before you finalize your contract with the couple, this question needs to be a priority. It’s imperative to ask specific questions about the size of wedding party, group shots, and social distancing requirements.
My wife and I shot a wedding in August with over 100 in attendance. We spoke in person to the church staff to see the venue (always a best practice anyway). The critical question was how social distancing would play out in the church. We also visited the banquet hall, bringing those same questions. Visiting the venues is more important than ever because you will need to see if there are unanticipated risks that the couple needs to address.
Adaptation: Key Questions
Whether or not the couple is working with a wedding coordinator, the photographer will wear the hat as a problem solver and project manager. Anticipating issues relating to posing people in the COVID new normal is particularly important. Traditional group shot poses may not fly with some folks. Be prepared to ask some key questions:
Does the venue have a COVID policy and plan? What risks do you see to their implementation and are you comfortable with it?
Has the couple talked to all those they desire to be in group shots about their risk tolerance and social distancing expectations?
How close are you expecting to be to various subjects, especially during the reception?
Will you wear a face mask the entire time? That is difficult if your viewfinder fogs up! Also, your style of engagement with your subjects may be limited if you are wearing a mask.
Adaptation: Post-wedding New Normal
Are you prepared to self-isolate after the shoot? Our last wedding had a guest testing positive. We had to self-quarantine until we learned it was a false positive. That caught us unprepared! While so much more can be said about preparing for the new normal of a COVID wedding shoot, this could be the most critical: be prepared to hunker down after the shoot. It might be wise to assume you have been exposed. Plan ahead to avoid unnecessary people contact just after the wedding. Have ample provisions at home. Know in advance about COVID testing options.
The new normal of COVID weddings may convince some wedding photographers to quit. With an uncertain future and the seismic shifts taking place, it is understandable that anxiety is growing. But adapting to the new normal is possible. Honestly, one’s skill in adaptation can be a deciding factor as to the longevity of one’s photography career. And since folks will continue to get married and want their day documented, there will always be opportunities.
Keep calm and carry on!
Be sure to follow our blog, sign up for our newsletter and subscribe to our YouTube channel to keep up to date with all our content! If you’re interested in more about Wedding photography, be sure to check out Wedding Photography playlist of interviews.
The post Adapting to COVID Wedding Photography appeared first on Advancing Your Photography.

October 13, 2020
5 Tips for Capturing that ‘National Geographic Style’ feat. Bob Holmes and Andrea Johnson – Ep 54
Robert Holmes career as one of the world’s most successful and prolific travel photographers has extended over 35 years. He was the first photographer to be honored twice by the Society of American Travel Writers with their Travel Photographer of the Year Award and he is the only photographer to be given the award 5 times, most recently for 2017.
About Andrea Johnson
Andrea Johnson is a photographer and director specializing in the wine, agriculture, and adventure travel industries. With a base in Portland, Oregon surrounded by abundant natural beauty, she has traveled the globe creating custom photography image libraries, magazine stories, documentary films, video campaigns, and leading photography tours.
Important Links
Use our link here to get 25% off your next Bay Photo order.
Connect with Bob Holmes
Website | Instagram | Facebook | Twitter
Connect with Andrea Johnson
Website | Instagram | Facebook | Twitter
Find out more about Bob Holmes new Online Class
Connect with Marc Silber
Website | Instagram | Facebook | Twitter | YouTube
Check out our new FREE course which gives an introduction to the Cycle of Photography!
Buy Create book here
Check out our merchandise
The post 5 Tips for Capturing that ‘National Geographic Style’ feat. Bob Holmes and Andrea Johnson – Ep 54 appeared first on Advancing Your Photography.

Why You Should Keep Your Equipment Simple feat. Documentary Photographer Daniel Milnor – Ep 53
Daniel Milnor spent twenty-five-years as a full-time photographer but is currently “Creative Evangelist” for Blurb, Inc. the world’s premiere print-on-demand publishing platform. He splits his time between the smog-choked arteries of Southern California and the spiritual landscape of New Mexico where he’s been known to hike, paddle, climb, ski, ride and explore all the spaces in between. Milnor is a complete and total nonbeliever in social media and feels these platforms have done irreparable damage to human communication skills and attention span while unleashing a level of consumerism the planet simply cannot survive.
Show Notes
Why have simple equipment?
It’s less expensive
It’s less to carry
Lot’s of equipment gives you less access
The less you have, the more you think about the images
You’ll be more consistent
Five versions of my equipment:
Camera (50mm lens) and a notebook
Camera (50mm lens), notebook and a audio recorder
Camera (50mm lens), notebook, audio recorder, and a vlog camera
Camera (50mm lens), notebook, audio recorder, vlog camera, and an extra camera
Camera (50mm lens), notebook, audio recorder, vlog camera, extra camera, and a drone
Important Links
Use our link here to get 25% off your next Bay Photo order.
Connect with Daniel Milnor
Website | Twitter | Shifter
Connect with Marc Silber
Website | Instagram | Facebook | Twitter | YouTube
Buy Create book here
Check out our merchandise
The post Why You Should Keep Your Equipment Simple feat. Documentary Photographer Daniel Milnor – Ep 53 appeared first on Advancing Your Photography.

September 28, 2020
5 Things I Learned About Photography—and Life—on My Road Trip feat. Marc Silber Ep 52
5. Visualization
4. Go Back to Where You’ve Been Before
3. Multi Media Trip
2. Have a Soundtrack
1. Find Your Treasure!
“It’s not having what you want, It’s wanting what you got.” Sheryl Crow
Important Links
Get Marc’s book Advancing Your Photography FREE!
Connect with Marc Silber
Website | Instagram | Facebook | Twitter | YouTube
Join the AYP Club and become part of the community!
Check out our new FREE course which gives an introduction to the Cycle of Photography!
Buy Create book here
Check out our merchandise
The post 5 Things I Learned About Photography—and Life—on My Road Trip feat. Marc Silber Ep 52 appeared first on Advancing Your Photography.

September 18, 2020
The Big Secret of Composition

Photo by Anna Kuperberg
Big Secrets of Composition
Have you ever been thrown off by composition? Or more exactly, been challenged by use of the same composition that you’ve used in dozens (if not 1000s) of images? Another way of putting it is, how can you avoid plagiarizing yourself and come up with fresh images?
If so, you’re not alone: how to compose images came up recently in a survey as the number one challenge our community had.
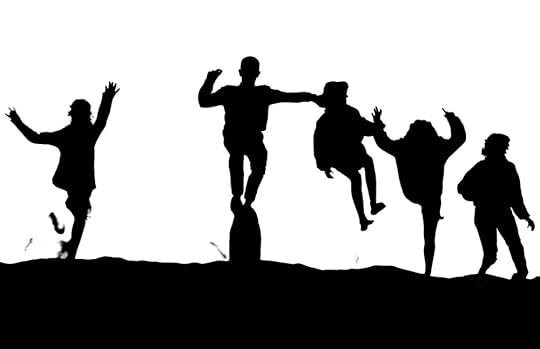
Friends Jumping Off Sand Dune, Moro Bay, CA
And there’s a reason for it: there are two big false beliefs I’ve found that cut right across learning composition. See if you’ve encountered either or both.
There’s no way to teach composition since there are no rules or guides. It is something you just have to feel. I’m not going to name, names here, to protect the guilty, but I’ve heard if often, how one has to just develop this sense of what makes for good composition.
On the other side of this pendulum lives the school of the rules of composition: The rule of thirds being the leading law cited by this camp. It’s almost as though the photo-police will issue you a citation for any violations – ooh, your subject is right in the center, how could you?
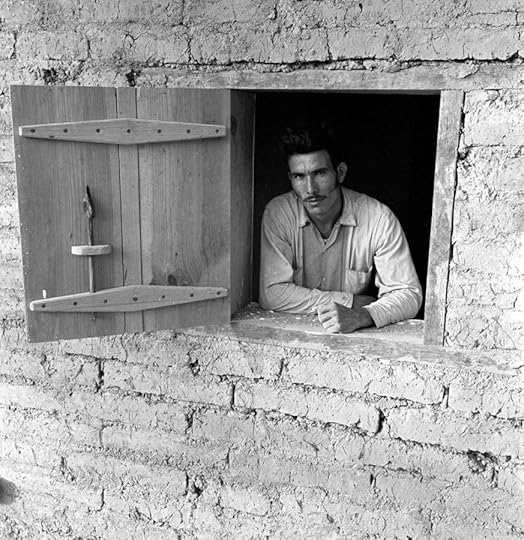
Fausto in Window, Sierra Madre, Mexico
As with most things in life, it turns out the answer lies somewhere in the middle. What I have found to be true is, yes, there are no rules. But there are guides that you can follow and from these are able to develop your visual vocabulary.
Broaden Your Composition Vocabulary
Think of learning to cook: Maybe you have a cooking vocabulary of five dishes: you can make French toast, a decent salad, not a bad steak, pasta with tomatoes and chocolate pudding. While these five could get your through a few meals, you and your friends will soon will tire of the same five over and over again. The answer is a cookbook with many recipes to broaden your vocabulary.
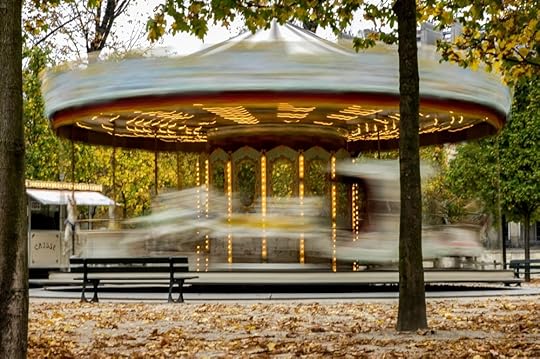
Carrousel, Tuileries Gardens, Paris, France
The reason many photographers are challenged by composition is they are caught in this same trap of having maybe five compositional tools that they cycle though and get tired of their same old meal of steak, salad and pudding!
With this idea, I basically dug really deep to find what are the formulas. What are the tools, or the recipes if you will, for composition that masters, not just in photography, but painting, have used over the years. Because if you can learn those, you can expand your vocabulary as an artist.
Patterns
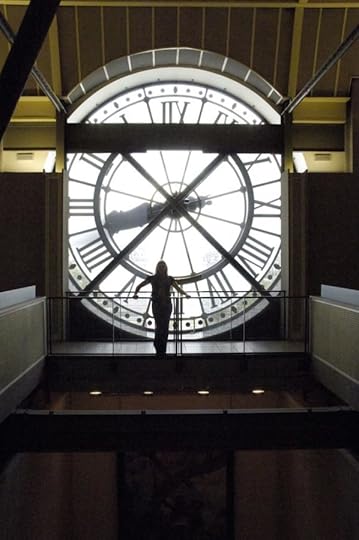
Clock, Musée d’Orsay, Paris, France
This image is an example of a few of these tools. BTW when I was on The Grid with Scott talking about my composition book (which is now an online course as well) he said:
“I love the cover shot because it screams compositional.”
Well, that happens to be one of the compositional techniques that I talk about, which this is an example of. We love patterns, patterns intrigue the eye and catch the eye. But something even better than a pattern is where you break the pattern.
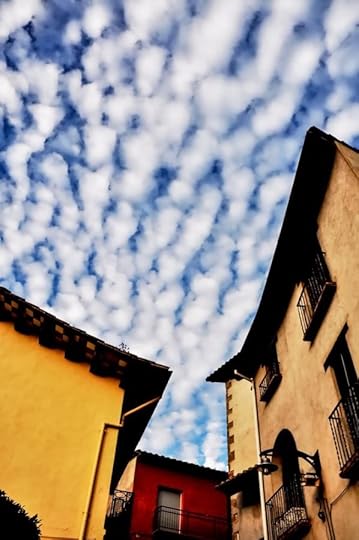
Santa Pau, Spain
First, we are drawn to it because of that repeated pattern. But this is one of the compositional tools where you break the pattern to bring about an intriguing image. The clock is the pattern but my wife (the subject and art director) was off-center which breaks the pattern.
Take Pictures You’ve Never Taken Before
That’s the point. I’m trying to give a broader vocabulary. I think unfortunately, many photographers walk around, take the same five images over and over again. I’m guilty of that. I’ve taken so many sunsets. I just won’t even do it anymore. But if you can broaden that vocabulary. If you have more tools or more recipes, you’re going to be better at your craft.
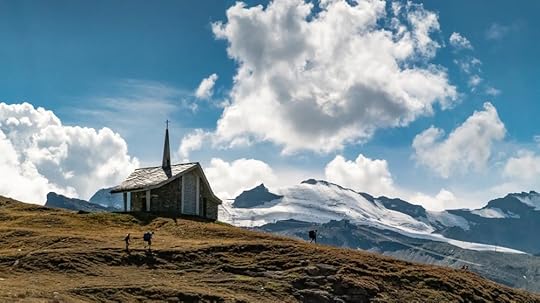
Chapel, Matterhorn, Zermatt, Switzerland
My course gives you examples of each of these tools that the masters of photography have known for decades. And going earlier, they have been known to master painters for centuries. This is another point that I found some photographers might have a disconnect of not realizing the guides that classical painters used were also known to early photographers. They are in fact the same tools used for a different visual medium, but form the same vocabulary.
If you share the same challenge of making the same images over and over, you will find it refreshing to take a step back and learn a new set of tools. After all, no matter how much we love steak and pasta, it’s nice to expand your menu with dozens of other dishes!
The course Secrets to Amazing Photo Composition From the Masters is available as part of a special bundle. Get this special offer when you get my book Advancing Your Photography for free, just pay shipping and handling. Find more tips for Composition on our podcast, this blog or our YouTube channel.
The post The Big Secret of Composition appeared first on Advancing Your Photography.


