
Marc Silber's Blog, page 18
July 22, 2016
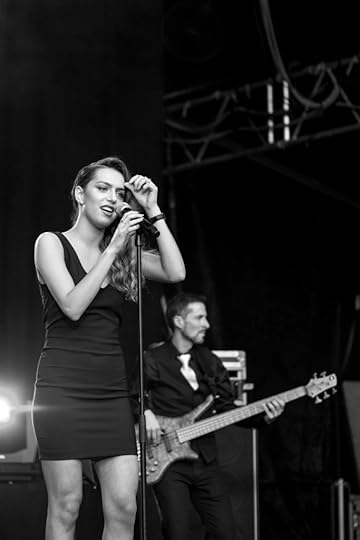
Concert Photography – Easy guide
How to photograph during concerts

Thomas Dutronc Concert – Photo Credit : Jerome Milac
Summer is usually a very good time for concerts and festivals, such as the Fête de la Musique , a very well known event in France which is also reproduced in the Big Apple as “Make Music New York“, a real opportunity for photographs. To make a concert as fun to watch, as it is to make photographs of it, here is a quick hands-on guide on how to make Your concert photography worthwhile.
1. About Gear
As you my guess, concert photography has nothing to do with a camera brand in particular. It has more to do with where you stand making photographs, i.e. how far you are from the stage. You won’t need the same focal length if you’re located next to the stage or further off, within the crowd. So, unless you’ve been granted privileged access to the stage, or made your way to the front, where a fast 35mm or DSLR and a medium tele-lens (such as 105mm) will be fine, you will want to pick any long zoom you have (18-200mm, 28-300mm, 70-200mm etc).
You’ll be seriously advantaged, if you’re using any APS-C or Micro 4/3 camera, simply because the multiplication factor of roughly x 1.5 will give you more focal length, thus longer picture reach, than any other full frame camera. Anyhow, due to difficult lighting condition, the faster the lens, the better.
I also wouldn’t bother carrying too much equipment, because it’s difficult and also rather hazardous to your gear to switch lenses in the middle of a wild crowd carrying beverages, food, smoking etc. On the other hand, make sure your memory cards are empty and ready to use, and batteries are fully loaded, and spare ones packed.
This leads to the question, on how to carry equipment in the first place? Avoid any backpacks which will bother your surroundings, and prefer bags like shoulder-bags, like the ones from Thinktank which blends anywhere, won’t cause attention, and won’t bother anyone when carried in front of you.
Finally, comes the question about the flash use, strobes in particular. Unless the stage is completely in the dark (good luck with that, even with a strobe), I don’t use any of them, because this type of lighting is only very useful on set or when used off-camera, which is impossible in the concert conditions cited above.
Here’s is my own checklist for concert photography :
Shoulder bag
Camera body
105mm lens & 35mm when close enough
70-200mm or 28-300mm when far away from the stage
Spare battery
Spare memory card
Little flash light / Smartphone : To see indications of the camera or inside the shoulder-bag in the dark.
Ear plugs : For very loud concerts
Raincover like the ones in Thinktank’s Shoulderbags to protect from the rain

Derya Concert – Photo Credit : Jerome Milac
2. Camera settings
Here’s the best advice you’ll ever get in regard to concert photography :
In a perfect world, prepare your camera and its settings PRIOR to the event, under similar lighting conditions.
But you might also get away with test shots of the stage, before you start composing any other photograph, only, of course, if the concert conditions allow it in the first place (being there during the rehearsals, is a good advice.)
As Bob Holmes used to say over and over again, “get to know your camera“, especially when it comes to ISO. Because the available light is usually weak and subject to a lot of changes during concerts, you will want to pick up the highest possible ISO without compromising your images. Thus, lenses should be set to the highest aperture opening if you want to get a chance to shoot faster than 1/250th of a second, knowing that you’ll be without a tripod.
In our case, for Thomas Dutronc‘s Concert, with a Nikon D800E and a 105mm, 3200 ISO max, f/2.8 and 1/500th of a second worked liked a charm, which were settings that could be used later in manual mode. Of course, some of the images were a little off exposure, but than could be fixed later on, and like Bob Holmes said, Aim for the highlights and leave the blacks to themselves

Thomas Dutronc Concert – Photo Credit : Jerome Milac
3. Composition
Without getting to much in depth into photography composition, here’s another advice:
A concert is long enough to get used to the way lighting appears throughout the songs, to forecast how the singer might sing, where the guitar player might stand, when the drummer might hammer like crazy… This being said, it should allow you to give your photographs that little something, other photographers won’t put into theirs, like for instance Derya‘s guitar player, Stéphane Bonacci, moving in front of a star-shaped spotlight right before his solo.

Derya Concert – Photo Credit : Jerome Milac
4. Post-processing
We’re not going to go the long way into post-processing, but remember :
If your photograph wasn’t any good in the first place, composition wise, then, post-processing isn’t going to save it, merely camouflage a few defaults. This being said, you will probably make extensive use of following tools :
Crop (In concert, your angles are rather limited and wide shots need to be cropped to keep the essential composition).
Straighten (it’s hard to keep a perfect horizontal line in concert conditions).
Exposure correction.
And the usual sliders such as Highlights, Shadows, Whites, Blacks and Clarity. See Marc Silber’s recent video covering all these points.
5. Final advice
Be prepared. The better, the less you’ll have to worry about your photography, lost in a crowd engulfed in darkness, and the easier concert photography gets. Finally, the more you’ll enjoy the concert in itself.
Derya Concert – Photo Credit : Jerome Milac

Thomas Dutronc Concert – Photo Credit : Jerome Milac
More :
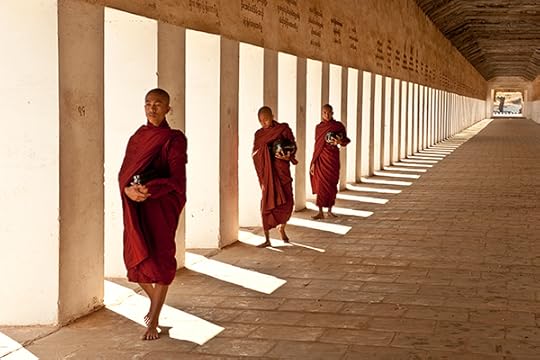
How to create a stunning image in Black & White
The post Concert Photography – Easy guide appeared first on The Marc Silber Show.


July 21, 2016
Learn Lightroom Basics in 6 Minutes
Watch and learn how to create stunning “before and after” photographs in Lightroom
In Advancing Your Photography Show’s latest video, host Marc Silber walks us through a quick lesson in Lightroom basics. The easy-to-follow tutorial will leave you feeling confident, comfortable and ready to edit your own photographs. Marc starts by sharing his work flow with us. It’s simple: work from the top to bottom on the “Develop” panel. You begin editing by adjusting the white balance with the eye dropper tool if necessary. Then head down the panel, checking your exposure, contrast, clarity etc. Marc says the important thing to remember is this the “development stage” of your photograph. You will, and should, adjust and re-adjust the different sliders on the panel until you are satisfied with your image. The process can take awhile, but the more you experiment with the Lightroom Develop Panel, the more comfortable you will get. Once you’re satisfied with the image, Marc recommends exporting the file as a .jpeg and looking at the image outside of Lightroom. Marc also suggests printing the image out so you can fully examine how the picture will look in prints. Feel free to watch the video and follow along with your own image in Lightroom. Good luck!
What Video Covers

Lightroom Basics: Develop Panel
White Balance
Contrast
Highlights
Shadows
Clarity
Clipping
Presence
Leveling
Texture
Saturation
Vibrance
The Big Reveal: If you’ve been following along with the video while editing your own image in Lightroom, now’s the time for the big reveal. Hit the forward slash key (/) on your Mac to see the dramatic before and after!

Lightroom Basics _Photo Credit: Marc Silber
Stayed Tuned:We hope you enjoyed our video “Learn Lightroom Basics in 6 Minutes,” stay tuned for our next Lightroom tutorial.
Go out and capture your own images of life!
The post Learn Lightroom Basics in 6 Minutes appeared first on The Marc Silber Show.
June 30, 2016
Joe McNally’s Photography Tips
Composition and lighting tips from Joe McNally
Award-winning photographer Joe McNally, master of lighting, who shot for Life, Sports Illustrated and National Geographic, tells us more about the underpinnings of being a good photographer, or simply put, how to get better photographs.
In our latest video, Joe McNally shares a few insights with us, and goes back to some of his legendary photographs. Composition-wise, he emphasizes on trying new angles, changing viewpoints, like this photograph with the Hollywood sign. This photograph from a helicopter only took roughly half an hour for the shot itself, but months of preparation. Even if you don’t go to such an extent, Joe McNally insists on getting prepared thoroughly prior to a shoot. Imagine the job, pre-visualize your shoot in the first place, and do your research. Finally, checklist your equipment, and make sure you pack some redundant equipment, especially for assignments where you don’t get a second chance. Here is the photograph that went through all this preparation :

Hollywood sign – Photo Credit : Joe McNally
On this next photograph, is an example where Joe McNally changes usual angles :
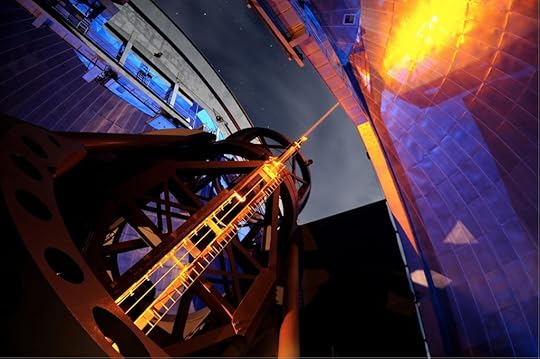
Industrial – Photo Credit : Joe McNally
Photography Composition sure has its rules, but Joe McNally also tells us about it as a fluid art form, and others ways to compose, with only half the face for example :

Portrait – Photo Credit : Joe McNally
And here is a photograph, where Joe McNally made use of some of traditional composition rules, like the rule of thirds, and his particular care of the edges of the frame.

Industrial – Photo Credit : Joe McNally
Video Digest :
Composition : Try new angles, get the camera in a new position.
Composition : There are rules (Rule of thirds, Edges of the frame) to know about, but it’s also a fluid art form.
Mental approach to photography : Imagine the job, or the assignment, pre-visualize it.
Make some research prior to the assignment.
Checklist your equipment.
Get to talk to the people, your subject, before you even think about picking up your camera. Build a bond with them to make them feel more comfortable.
Shoot multiple frames in a portrait situation, in order to catch that one picture which just works, which has that Mojo
Lighting : Light is Language.
Final advice : “Stick with it”. You’ve got to love photography and be tenacious.
More about it
Joe McNally Books
Joe McNally Playlist
Joe McNally Photography
Most watched Tips
The post Joe McNally’s Photography Tips appeared first on The Marc Silber Show.
June 16, 2016
Travel Photography Tips: What Should You Keep in Your Camera Bag?
Award-winning photographer Bob Holmes shows us what’s inside his camera bag plus do’s and don’ts of travel photography
Imagine. It’s sweltering hot outside. You’re on a photoshoot. You’re carrying your camera bag, with at least two different cameras inside, along with a tripod, maybe a light filter, batteries, a laptop, plus some water bottles to keep you hydrated. The sweat is dripping down your face and you don’t even have a free hand to wipe it off your brow. It’s hard to visualize and focus on the perfect photography under these conditions. That’s why we asked former National Geographic photographer Bob Holmes to share his secrets for travel photography, in our new video, “Travel Photography Equipment Tips from Bob Holmes,” Bob says the key is to keep it simple. He gives us a look inside his camera bag and shares the top 10 items every travel photographer must have in their bag. So before you head out on your next photoshoot, take a couple minutes to watch these latest tips from Marc Silber’s Advancing Your Photography Show.
Travel Photography Tip: Bring multiple camera bodies _Photo Credit: Bob Holmes

Travel Photography Tip: Bring extra batteries, memories cards and hard drives _Photo Credit: Bob Holmes

Travel Photography Tips: Bring multiple lenses, for example wide-zoom, macro _Photo Credit: Bob Holmes
We put together a travel photography packing list for you:
-At least 2 types of camera bags: one big, one small/tote (Bob highly recommends ThinkTANK gear –BTRW click and yopu’ll get a free gift.)
-Laptop for on-location editing
-Multiple camera bodies (Bob uses Nikon D810 & Nikon D4)
-Multiple Lenses: 28-300mm, Macro, Wide Zoom 24-70,2.8
-Flash Gun
-Multiple hard drives
-Memory Cards
-Batteries
-Cleaning Cloth
-Blower
-Water
-Snacks
-Extra clothing
-Bob Tip: Never “check” your equipment at the airport
Want more. Watch more. If you liked this video, we think you’ll like our “Travel Photography” video playlist.
AYP Show Won a People’s Telly Award
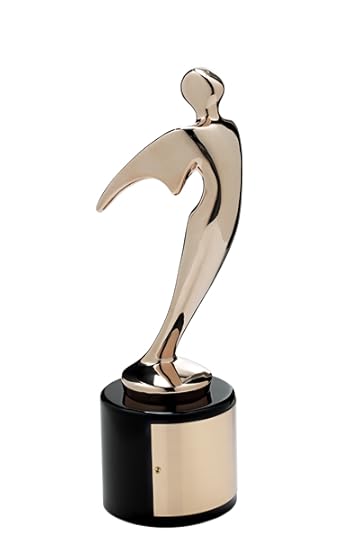
Advancing Your Photography won a 2016 People’s Telly Award.
Since we wrote you last, we won a People’s Telly Award! The Telly Awards allows the online community to rate videos and help decide this year’s award winners. It gave Advancing Your Photography Show a chance to earn recognition from industry leaders, producers, and enthusiasts from around the world. Being named a People’s Telly winner validates the work we do and gives us that important stamp of approval within our audience as one of the best at what we do! Advancing Your Photography Show took home the bronze medal for our latest video. If you haven’t watched it yet, click on our Youtube Channel, Marc Silber’ Advancing Your Photography Show. We want to send a big ‘thank you’ to all of our friends who voted for us. We are beyond grateful for all your continued love and support. Now go out and “capture your own images of life!”
The post Travel Photography Tips: What Should You Keep in Your Camera Bag? appeared first on The Marc Silber Show.
June 9, 2016
Outdoor Photography: Capture Your Adventures on Camera
Chris Burkard is an Instagram sensation, surf enthusiast and extreme photographer!
In our latest video, “Chris Burkard’s Tips for Taking Great Outdoor Photos,” Chris shares at least a dozen tips for taking great outdoor photographs. His use of lighting and composition take us inside the waves. He gives us the feeling we’re riding the surfboard alongside him. In our new video, Chris reveals his secrets for capturing the action and adventure on camera. He says he looks for scenes that inspire him; “the moments in between.” His pictures tell a story. Chris says the keys to a great photo are: composition, lighting, depth, contrast and the MOJO!

Outdoor Photography Tip: Use natural light _Photo Credit: Chris Burkard

Outdoor Photography Tips: Challenge yourself to shoot from different angles _Photo Credit: Chris Burkard
VIDEO DIGEST
Chris had some great advice, so we wanted to write it down for you! Here’s some of the big tips for taking great outdoor photos:
Find what inspires you. Then shoot it.
Simple moments make best photographs
Use natural lighting
Know why you are taking the photo
Spark an interest
Study the moments in between. Build the story. Tell the story. Candid moments are as important and planned pictures
Capture reactions of people around you. Tell the story through people.
What is the most significant part of the scene? Take a step back and observe.
Good lighting is in the eye of the beholder
Study black and white photography
Compose shots to lead your eye
Framing is key. Use branches, twigs, trees to frame photographs.
Challenge yourself to find new angles
Great photos: composition, light, depth, contrast and MOJO!
Be prepared. Research your scene. Study your subjects, landscape and environments
Develop your style
Translate your style into a variety of photography (landscape, action, portrait, outdoor, black and white)
IF YOU LIKED THIS VIDEO, CHECK OUT OUR “SURFING PHOTOGRAPHY PLAYLIST.” COWABUNGA DUDES.
PLUS, FOR MORE AMAZING OUTDOOR PHOTOGRAPHY PICTURES FROM CHRIS, HEAD TO HIS WEBSITE WWW.CHRISBURKARD.COM.
The post Outdoor Photography: Capture Your Adventures on Camera appeared first on The Marc Silber Show.


