
Marc Silber's Blog, page 12
July 2, 2019
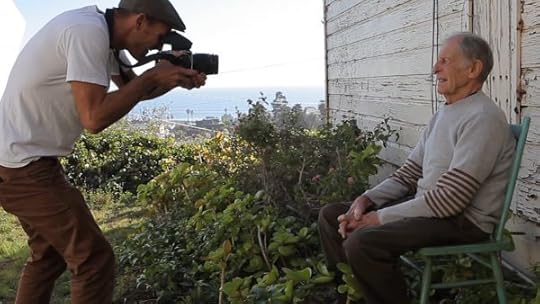
Putting People at Ease
I’m Jessica Sterling, the portrait and event photographer based in Los Angeles. And today I wanted to talk about helpful tips to put people at ease when you’re photographing them.
Putting People at Ease
First thing, know that very few people enjoy having their photo taken. So you have to make it as quick an experience as possible. It doesn’t mean you have to put out a nervous energy but just that you need to know your tools and keep moving.
A lot of people say, “oh, I hate having my picture taken.” There are a couple of things I say to that: I say “me too! Why do you think I’m on the other side of the camera!?” Or I just say, “You know what? It’s so common. Most people don’t like having their picture taken.” Not that you’re degrading what they said when they say it, but I do think it can be helpful if you tell them they’re not alone.
Some photographers make the people they’re photographing uncomfortable on purpose. They call them their “subjects.” They make them ill at ease uncomfortable, worried, concerned, irritated, upset. There’s a lot of classic stories about that type of thing.
But here’s a little trick: find something that you actually like about what they’re wearing or something about them and compliment them about it. Whatever comes natural and doesn’t come off fake or too heavy or put on. But just put the shoe on the other foot, if you’re worried about how you look and somebody says,”Hey, I like your sweater!” It makes it you feel good.
Another thing, if you get people talking about something that they really like or listening to music that they enjoy, it’s a more pleasant experience for them.
All these things help bring out their best.
Smile and Genuinely Like Them
I think smiling and being genuine in your smile and really honestly liking people the people that you’re photographing goes a long way to making them feel comfortable. They’ll feel like you like them, and who doesn’t like to be liked? They know they’re going to have a nice time because you seem approachable. Allowing that person to tell you stuff and listening to them opens it up a bit, and lets them feel that they can communicate stuff to you.
In a way, you’re two people sharing a space for a period of time. It’s a much more pleasant experience if it’s friendly. I love Will Rogers saying, “I never met a man I didn’t like.” And I think that if you honestly like people and you are honestly interested in them, people blossom and they enjoy being photographed. And I think that they bring their best to you. And they’re their most beautiful and handsome that way too.
Be Confident
It is very reassuring to see somebody who is confident. And if you are stressed out in your shoot or worried about something, it makes the person you’re photographing feel like maybe things aren’t going to go well. That calmness that you’re projecting and putting out there is super important, and go a long way to putting them at ease.
This is not brain surgery, this is not life and death. This is creating something wonderful. And so you don’t have to have your game face on. This is a joyous experience. Even if you have to think hard about the shoot or you’re going, “oh, I don’t know what I’m doing.” Just realize that this is something cool. I always think about Cary Grant and his relaxed, casual demeanor. With him everything is totally fine and silly, and even if the worst things happen, it’s not like it is a huge deal. I think that is the type of understated elegance I try and bring to my shoots… LOL!
Directing
Some photographers get into really directing people that they’re photographing. I think that can be a good thing. But it’s important to be clear about what you need and want from the person you’re photographing. If you get too cerebral, too many words, it’s just too much… “I want you to think about seahorses like you’re under the sea,” and so forth. It’s way too much to think about. It is better to just say “turn your head to the right a little.” Give them physical directions. It’s much more effective than giving them a mental exercise that hopefully they’ll kind of figure out.
Sometimes if you direct people a lot while you’re photographing them, they can just relax since they know that you’re going to make them look great. And you really do need to make them look great. And if you’re not getting the shot that you want, keep shooting if you can. Keep moving it, adjusting the lights or whatever you need to do to make it better. You can tell them, “hey, we’re going to take a ton of shots and we’re just going to keep going until we get lots of good ones.” Always keep it positive and take the stress off of each image.
So those are some thoughts on how to make people a bit more at ease. I hope you found it helpful and be sure to subscribe to our channel and keep up with the blog for all our new content. Be sure to put any comments or questions you have down below. And remember to get out and capture your own images of life. Thanks for watching.
The post Putting People at Ease appeared first on Advancing Your Photography.


June 29, 2019
How John Lund Creates Fantastic Images with Photoshop
John Lund is a master of compositing and creating illusions in Photoshop, like seeing elephants surfing. But his advice, like how to direct a photo shoot, is applicable for any photographer watching. Listen, as he tells us about his photography secrets.
Directing a Shoot
I’m the type of person that if I’m not getting the expression I want, I’ll jump in and say, “No, raise your eyebrows more.” I’m very direct. “No, I need a bigger smile. Oh, too much smile.” I don’t consider myself particularly skilled in eliciting expressions, but I’m patient and I’m expressive in my prodding the people to give me what I want. With the animals, it really boils down to patients and having a good animal trainer helps too. I think anybody who creates a photograph rather than takes a photograph is a director. Some people are more animated in their direction and others are less animated. I tend to fall more in the animated side of things.

Image by John Lund
Starting Images
If I had to put a label on my photography, I’d say it’s a clean graphic conceptual style, in which I create new photographic realities to illustrate concepts. And a major thing for me is that I want people to really enjoy looking at the image. Normally the process would be first, I come up with the concept. Now keep in mind that I’m a stock photographer, so I have a passion for it, but there’s also a mercenary aspect to me. So I’ll do a search and make sure that that image is either not out there or not already over done. Or that I can create a version that’s going to be new and different.
Be Aware of All Parts
Once I’ve established that idea is the one that I want to run with, I’ll pre-visualize it in as much detail as possible. I’ll even create a sketch, because I want to look at each part in that picture and figure out how am I going to accomplish that. In the case of the lion, for example, where am I going to come up with a circus ring that I’m going to be shooting it in? So I have to take the overall set in mind. Then as I’m shooting for it, I have to make sure each part is going to be the right angle, the right lighting, everything’s going to be consistent to create that final image that’s convincing.

Image by John Lund
I’m thinking in terms of parts, I’m thinking, is this background going to work with this image. Let’s say I’m shooting the the a lion for the lion trainer image. I’ve got to make sure that the lighting is going to fit in with the overall lighting for the picture. Every part I do, I have to be sure that that lighting is going to work, that the angle is going to work, that what lens I’m using is gonna fit in with all the rest of the parts. So for me, I have to be aware of all these different nuances.
Lighting Images
Supplemental lighting for me is extremely important. Whether you’re shooting outdoor and mid-day or we’re in some dark room. Being able to light it the way you want by having your lighting you. That to me is really important. That being said, when I’m shooting for compositing, often I’m trying to get very flat lighting, because I know I can add direction. I can add a dimensionality in Photoshop and if I have flat lighting, those parts are more flexible. I can flop it and still make it work.
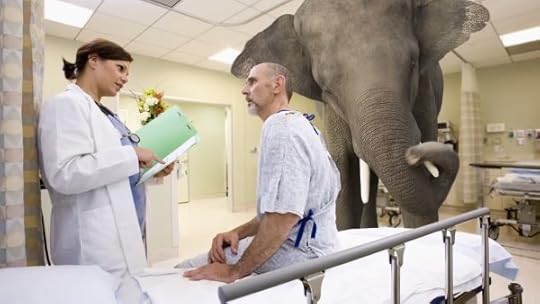
Image by John Lund
About a year and a half ago, I was shooting elephants in Thailand and I hired a film crew to bring a great big silk screen. I think it was like 20 feet by 20 feet. It was placed between the sun and the elephants and the sun was at my back, so I had a very flat, soft lighting on these elephants. Which means that as I come back to my studio and I’m trying to make them work in different environments, all those different shots will work. I don’t have to worry about the lighting’s in their own direction.
Improving Your Craft
If you want to become better at your craft, obviously you want to look at images. You want to look at them with a critical eye though. You don’t want to just look at that image and say, “Oh, I really liked that.” Find out why you like it and then see if you can incorporate that kind of work into your own work. The other thing is: set the bar extremely high for yourself. You have to be your own worst critic, I guess is the way you’d say it. If there’s anything at all mediocre in your work, get it out. Get it out of your book, get it out of your mind, shoot for the very highest thing you can on every level of it.
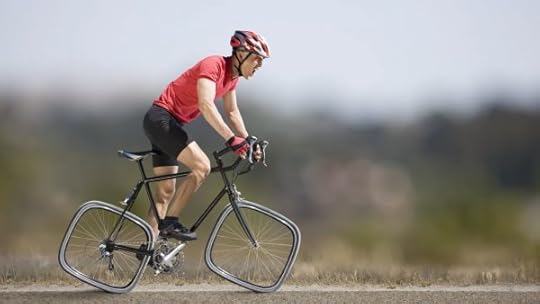
Image by John Lund
I hope you enjoy John’s tips on creating fantastic images and we’ll go out and put them to use. Be sure to subscribe to our channel and follow our blog so you don’t miss any of our content. Also please leave your comments about what you learned from John’s tips, I love hearing from you. Until we see you again on our next show, remember to get out and capture your own images of life.
The post How John Lund Creates Fantastic Images with Photoshop appeared first on Advancing Your Photography.

June 27, 2019
Tips for Outstanding Sports Photography
John Todd is a dynamic sports photographer who’s managed to capture some of the biggest sporting events from surfing, to golf, to soccer. His work has appeared in Sports Illustrated, ESPN, the New York Times, and the list just goes on. I sat down with him and asked him for his inside tips for outstanding sports photography that you can go right out and use.
Get Low, Get High
I always tell students that I teach: get low, get high. So if you’re shooting soccer, football or any field sport, try to get as low as you can. If I could, I would lay down on the field every game because a lot of times the players are looking down at their feet. They’re looking down at the ball or they have their helmets on. You want to get as low as possible and get that low angle looking back up the athlete. That kind of gives them that superhero feel as well. It makes them look like giants. So that’s one of the biggest keys.
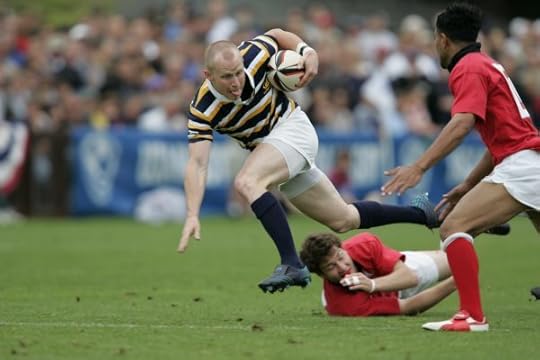
Photo by John Todd
The other one is to get high. That’ll help you clean up your backgrounds. Go up into the stands, shoot down on the field, get a nice green background as a backdrop. It also gives you a little bit of different perspective.

Photo by John Todd
Capturing Emotion
If you’re doing a portrait, I think the smartest thing to do is to just talk with people for awhile. Get to know them, get them to trust you. Really show them who you are. And in turn they will show you who they are. If you walk into a shoot with a lot of attitude or demanding that somebody just turn it on for you, they can’t do it. But if you walk in and establish a rapport with them, really show them the honest personality of who you are, you’re going to get the same in return. And that’s what I try to capture.

Photo by John Todd
Practice and Be Prepared
Another one is, I think all the video games and played as a kid really helped me out. Because that high hand eye coordination is really important and practice makes perfect. So a lot of times I’ll just go out to the backyard and just practice focusing. Just like you’re going to kick the ball around in the backyard or throw the football. If you’ve had your lenses, spend a half an hour just practicing quick focusing. Because that’s really the key to sports photography.
I took one photo of USA versus Ghana at the World Cup in Germany 2006. I was at that point I was working on a tip that I got from David Bergman, who’s a sports photographer photographer out in New York. It was kind of a one hand and grab. So in soccer or football, you’re always shooting with two lenses. Usually a 428 and then you have your 7200 on your hip. And his key was that he would reach down, grab the 7,200 when he would see action right in front of them, bringing up with one hand and be able to photograph one handed. And that gave him a lot faster reaction.
So I started trying out this tip. And so the players were running towards me, too tight for the 400. So I went down and grabbed with one hand, reached up, grabbed it and got a picture of a player doing almost a bicycle kick right in front of me. It’s a fantastic image, really shows the emotion and the power of the sport. And a funny thing about that shot is one of our other photographers was on the other side of the field photographing us, and it was only me shooting. And two of the photographers were just had their jaw dropped, watching the action because they couldn’t get their cameras up fast enough. So using the one hand up fast gave me one of my best shots that I love.

Photo by John Todd
Visualize
There’s two points I use for every photo. One is I like to think about what the client wants. And the other one is I like to think about the images I’m trying to produce. Ansel Adams talked about, when he was photographing, that he would think about the image in his mind’s eye. And then he would use all the tools that he had to create that image. So if I’m shooting for a client, I’m going to say, “Hey, what do you guys want?” They say, “Well, I want it to be a sports figure to show the emotion and the action.” So I’m going to take all the tools that I have, my cameras, my lenses, my computer, my software, and, and think about the end result before even starts shooting.
It’s the same thing when I’m shooting images for myself. I think about what it is I’m trying to do today. What am I trying to show? And then I line up all the tools I have to try to reach that goal. So I’m really thinking about the image before I even take it. When I’m on a shoot though, a photo will develop and I’ll see an image I didn’t think existed. Or one image will lead me to another image. But really before I go to a shoot, I’m trying to think about what is it I’m trying to produce. And then I try to capture that.

Photo by John Todd
I hope you enjoy John’s tips and we’ll go out and put them to use right away. Be sure to subscribe to our channel and keep an eye on the blog to keep up with all of our content. And remember to get out and capture your own images of life.
The post Tips for Outstanding Sports Photography appeared first on Advancing Your Photography.

June 25, 2019
How Much Should I Charge for My Work?
I’m Jessica Sterling, a portrait and event photographer based here in Los Angeles. Today I want to talk a little bit about how to set your pricing. The question “how much should I charge?” It would be so fantastic if you could just live. Not have any handling of money and just be wonderful if everything was free. I like free stuff. Everybody likes to get things for free. But you’re a professional artists. That means that you need to get paid. It’s part of the balance of life. Many artists are just too modest and they don’t charge enough to make a living wage. There are some artists out there that are huge megalomaniacs and they want to get paid five grand a day just because they rolled out of bed. This is a really touchy subject I feel, for a lot of artists particularly, because it starts to get really emotional.

You Deserve a Fair Exchange
If you do good work, you deserve to get a fair exchange. You need to know that down to your toes. “Yes, I am producing something that’s valuable and I should get return for it in a business environment.” A business relationship should be fair to everyone involved. It’s not an emotional thing. It’s not “Oh, well they really don’t like me that much” and “I’m really not that good, so they probably shouldn’t pay me that much.” It’s not about that. If you give somebody something that they need and want, it’s only fair that they pay you for it. Of course, it’s important to be really good at what you do and pay your dues.
But you don’t have to be a masochist about it and work 80 hour weeks and get paid what you should have earned by working two hours. That’s ridiculous, how can anybody survive like that? You have to have a little bit of attitude, be a little bit of a pirate. Say, “Hey, I did this.” “I deserve some fair exchange.” If you only charge a 10th of what you should charge, then you won’t be making enough money to have any free time. And I’m not saying you have to be like crazy pie in the sky, but for actual hard costs. How much you should be worth? If you start to work for less than you feel that you’re worth, you just won’t be able to survive. So here’s what you do.
How to Find the Right Price
You find out what people charge in your area and you see if you match their level of awesomeness and experience and expertise. Smart thing to do is figure out how much things cost you to produce. How many hours does it take to produce this particular product that you’re selling? If you go to a job, there’s travel time, there’s preparation time. There’s picking up extra rental equipment. You have to factor this all in. If you have to pay somebody to help you with certain things, an assistant or retouching or anything. Obviously, if you’re a one man band, you have to factor it in as if you were paying somebody to do those things for you. And if you’re the one who has to do them, how much do you want to get paid on an hourly rate?
I think that’s very smart to then set your prices based on that. This way if somebody asks you to work for a rate that just isn’t fair, you know it because you’ve already worked out the numbers. Personally, I have a number I know if I start to work for less than, I feel like it’s just not fair.
Why You Need to Find the Right Price
If you take a job that you feel like you’re not getting paid enough for, it’s not fair to your clients because you might feel like you wish you weren’t there. You might start begrudgingly doing the job. You always have to do top level work too. Because you don’t want somebody to see your shot and think “oh, they’re not that good.” Because they don’t know that you only charged a third of what you normally charge just to produce that. They’ll just see this low quality picture.
If you’re going to produce the product, and you know you’re going to put in this amount of time, you have to charge for it so that way you feel that it’s fair. If you take a job that’s below your normal rate, you have to just put your all into it anyway. No matter what because that’s what you agreed to do. That’s just the basis you agree to do it. Stick to it and say, “You know what? Suck it.” So that’s my advice. Put your all into every job that you do, but be fair to yourself too.
I hope that was helpful for you to find the right price for your work. Be sure to subscribe to our channel and follow our blog to keep up with all of our content. And remember to get out and capture your own images of life.
The post How Much Should I Charge for My Work? appeared first on Advancing Your Photography.

June 20, 2019
How a Patagonia Photographer Gets Amazing Images
Imagine your job is to travel the world capturing gorgeous surfing scenes or climbing big walls like El Capitan in Yosemite. That’s what Jeff Johnson does for Patagonia, and he has a catalog of work that would make anyone envious. Watch and listen as he tells us about his secret sauce as a photographer.
Patagonia Photographer Jeff Johnson
Composition
I think it’s just really basic, just simplicity. You want your photographs, or at least I want mine, to be really simple. I think the best photographs is where the last thought when someone is looking at the photograph is the photographer. It’s not something people are thinking of, “how did he get that shot?” They’re looking at that photo and they’re in it and they’re not even thinking about a photographer.

Photo by Jeff Johnson
Difficulties of Climbing or Swimming and Shooting
It is challenging to climb and shoot. It depends on where you’re doing it. But going up on a wall is equivalent of swimming out a pipe or something. You know it’s really involved. I think there’s photographers and even some magazines paying more money for water shots than they do for land shots because there’s more that goes into it. You’re sitting on land with your 600 or you’re in the water with your fisheye. They both look beautiful. But one’s a little more involved. Plus you’re high up there on a wall like El Capitan. Sometimes you’re up there sometimes for five days or something. It’s not just a one day thing. So there’s a lot of rigging involved and getting away from the party that’s climbing. That’s the most important thing, getting away from them. Because you’re so close to them on a ledge.
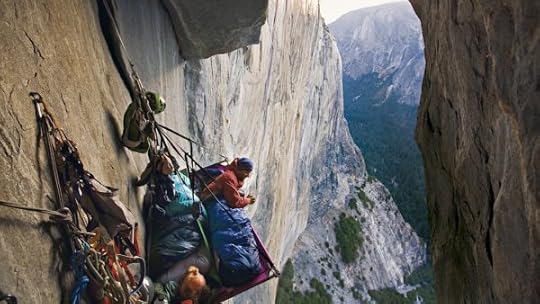
Photo by Jeff Johnson
It’s physically demanding, like swimming out in the water with your housing. It’s like the same kind of thing with the housing’s a little simpler. You just have your housing, your swim fins. It’s not as gear intensive, but it is a physical thing and harder to really compose your shot. But climbing you have time, the wall’s not going anywhere. Whereas the wave only happens once. So they both have their challenges.
Capturing Emotion
What I like best is people, and getting some sort of emotion out of the people. It’s hard to pinpoint that thing that’s happening but when you get it, it’s usually not what you expected. When you’re setting something up, you have this idea, you go and you set it up. And then something else happens and that’s your shot and that’s the Mojo. That shot that you thought about, that you set up, is not the shot, from my experience. It’s what you didn’t plan on. Hopefully you capture that thing that you didn’t plan on.

Photo by Jeff Johnson
If I’m shooting people on the street, it’s about getting close. I think getting right up in there with the people and getting them used to you being around. So they’re not looking at the camera and with that you’re going to get some sort of real feeling in there, because it’s real.
The Elements
I think on a day to day basis is the elements that’s challenging. Especially if you’re working with natural light. I don’t work with any kind of lights or flashes or anything, so I’m really dependent on the environment. It’s the biggest challenge for me, which can get tough on trips is the elements not working with you.
Practice and Finding Subjects
The best thing you can do to improve your photography is to shoot, shoot, shoot, shoot, shoot. And finding subjects. Every outdoor photographer needs somebody to shoot. And that’s the hardest thing, is having somebody shoot. A lot of times you can be a great photographer, but if you have nothing to shoot, you don’t have a photograph.
Photo by Jeff Johnson
Thanks for joining us again. I hope you enjoyed hearing from Jeff and will go out and put his advice to use for yourself. Be sure to subscribe to our channel and follow our blog to keep up to date with all of our content. Also, please share like, and leave your comments. I love hearing from you, and remember to get out and capture your own images of life.
The post How a Patagonia Photographer Gets Amazing Images appeared first on Advancing Your Photography.

June 18, 2019
What NOT to Say at a Photo Shoot (and What to Say Instead!)
I’m Jessica Sterling and I’m a portrait and event photographer based in Los Angeles. Today we’re going to talk about what NOT to say in a photo shoot, and what you should say instead.

Be Sensitive
First off, if someone is a little self conscious about something, you have to be sensitive to that. Saying something like “this is more flattering” or “this is a better angle,” is much better than saying, “oh, don’t do that” or “that doesn’t look good.”
Be Positive
Don’t say “don’t.” (LOL)
“Don’t,” “no,” “bad,” etc. And try not to get a look on your face that says that somebody’s doing something wrong. If you see something that doesn’t look good, say to them, “Hey, this would look better.” “Hey, try this.” “Oh that’s great, try this.” “That’s more flattering.” Stick to words that are more positive. Because if it’s a positive experience, the person will start to work with you. Which is much better than them feeling like the whole world is against them and that they’re looking really dumb in these pictures. They want to look great. So if you keep reinforcing that idea, they’ll help you get there. They’ll actually look better in the photos because they’re more connected and “plugged in” to the whole experience.
Don’t Talk About Yourself
Don’t talk about yourself too much. Maybe a couple of sentences while you’re chit-chatting, but keep it chit-chatty. Don’t get into your life’s drama or things that you hate. Even if you’re having problems with your equipment, just don’t even get into it. It’s not about you. It’s about them, their experience and how they’re doing. This is the client show.
Don’t Talk Trash
Don’t talk trash about people. Think about it: if you say to them, “Oh man, I have this client I was photographing the other day, and they were so annoying…” What is the person who is right in front of you going to think? They’ll think that if they do anything annoying, you’re going to tell somebody something bad about them. You’re not making any friends.
So in short, keep it light. Keep it positive. You want to stay interested and excited to work with that person in front of you. It goes a long way to making things easier in the shoot. If you’re genuinely happy that they’re there, it makes them more happy to be there. Stick with the things that are great!
I hope you liked these tips! We’d love to hear your stories! To keep up with all our content, subscribe to our YouTube channel and keep an eye on our blog. And as always, be sure to get out and capture your own images of life
The post What NOT to Say at a Photo Shoot (and What to Say Instead!) appeared first on Advancing Your Photography.

June 17, 2019
The Strongest Way of Seeing

The Strongest Way of Seeing
Article by Huntington Witherill
“Consulting the rules of composition before taking a photograph is like consulting the laws of gravity before going for a walk.” — Edward Weston
When it comes to the art of creating successful photographs, formulating an effective composition must surely be at (or near) the top of the list in terms of relative importance. As it turns out, where you point your camera is a substantial part of achieving any successful photograph. (I know… that seems fairly obvious, doesn’t it?)
As it also turns out, knowing where best to point your camera requires a skill set whose precepts appear to be instinctively derived, rather than intellectually prescribed. What might work in one situation can often prove disastrous in another. As such, employing a formulaic approach to composition will, more often than not, prove ineffectual.
Weston’s quote (above) seems to imply that consciously following a set of compositional rules will make little sense because the rules themselves – immutable as they may or may not be – do not necessarily dictate the quality of result. Knowing how and why gravity works as it does will probably not help you to determine the best direction to proceed as you begin to walk (unless of course you find yourself standing at the edge of a cliff).
So, the question becomes… How does one determine the most optimal composition each time they are presented with a particular scene they’d like to photograph? Unfortunately, the most helpful answers to that question will nearly always include the admonition that one simply cannot predetermine the best direction to follow because successful composition is, in large part, a matter of instinct and intuition.
Edward Weston has also noted that “Composition is the strongest way of seeing.” Concisely summed up in those seven words is not only a succinct description of what the art of photographic composition truly is, but also – given his specific use of the word strongest – the implication that there is but a single best solution available for each unique photographic situation.
Well that seems simple enough. All we need do is find the single best composition inherent within each individual photographic scene, press the shutter release… and then wait for the exhibition offers to start rolling in. (Doesn’t the camera do the rest of the work?) Right. And wouldn’t it be nice if the process was that simple?
Obviously there is more to photographic composition than precise aim, alone. The specific quality of light under which each scene is photographed will also contribute (significantly) to the overall success or failure of the resulting composition. In short, quality of light is every bit as important as one’s chosen point of view. Don’t forget, we’re recording light and not simply cataloging an array of physical objects.
Admittedly, there are any number of oft-prescribed compositional rules that one might consider (i.e.- the rule of thirds, the golden mean, leading lines, symmetry, asymmetry, positive/negative space, and so on) to serve as rough guidelines in helping to formulate a potentially successful composition. Yet, as is the case with most every rule associated with photography, none of those prescribed rules will work in all instances. To again borrow from Weston: “Following rules of composition can only lead to a tedious repetition of pictorial clichés.”
While there are, indeed, some relatively pragmatic ways to approach the art of composition (and I hope to explore a couple of those potential strategies, herein) in practice, achieving the most effective composition is simply not going to be the kind of problem that can be resolved through wrote memory, or a prefabricated list of instructions. It is a puzzle that must be resolved through visual perception, spatial instincts, situational awareness, and emotional intuition. And as an aside, it is this very conundrum that actually provides one of the most enjoyable and satisfying puzzles that photography has to offer.
Though there are no steadfast rules applicable to the act of creating a successful composition, there are a couple of working strategies that I’ve found to be quite helpful in identifying and resolving some of the issues related to initially establishing the most advantages viewpoint from which to formulate an effective composition.
The first strategy is fairly easy to implement and is best described as follows: Squint your eyes at the scene until you are no longer able to see all of the minute details inherent in the scene, itself. What this will do is then allow you to view the scene as a more simplified array of basic geometric shapes and spatial relationships that can more easily be arranged and resolved (through strategic camera placement and specific lens choice) in order to more quickly and accurately establish the optimal point of view from which to further refine your composition.
The second strategy is a bit more involved but, in my opinion, well worth the extra effort. The strategy, itself, centers upon keeping in mind that the human eye is able to focus only a relatively narrow field of view at any given point in time. To illustrate what I mean, I invite you to hold out your hand at arm’s length (as though you are directing someone to “Stop!” in front of you). With your arm outstretched, spread your fingers apart, close one eye, and with the other eye, focus specifically on your thumbnail. What you will immediately notice is that, while your thumbnail remains in sharp focus, the rest of your fingers will be completely out of focus. What this tells you is that the eye is capable of accommodating only a relatively narrow field of precise focus at any given time. As such, we are normally unable to view photographs (or much of anything else for that matter) with a single fixed glance (as the camera is so uniquely able to do). Our eyes tend to continuously scan around and throughout the overall scene – while the brain endeavors to store those bits and pieces of gathered visual information – and it is the brain that then assembles that information to inform us about the collective nature of the overall scene, itself. And of course, the entire process happens so quickly that we normally don’t pay much attention to what’s actually occurring.
In practice, the above described narrow field focus limitation can be used as an effective means to help direct the eye throughout its visual journey (the actual scanning process) that occurs when one is viewing a photograph. By how and where you place and arrange objects within the photographic frame, you can essentially help to encourage (to orchestrate) a more deliberate and focused path for the human eye to follow during its journey to gather information about the photograph, itself. As but one rather simplistic (though clearly not invariable) demonstration of this phenomenon, you may have noticed that the eye will often tend to be initially attracted to the brightest objects in the frame, prior to being attracted to darker areas within the overall scene. In short, the technique, here, is to pay close attention to the actual journey that your eye takes as it is initially gathering visual information about the scene you intend to photograph. By doing so, your composition can then be adjusted to encourage a more strategically mapped-out path for the eye to follow, so that the viewer is then forced to see (to pay greater visual attention to) whatever it is that you actually want the viewer to see and perceive.
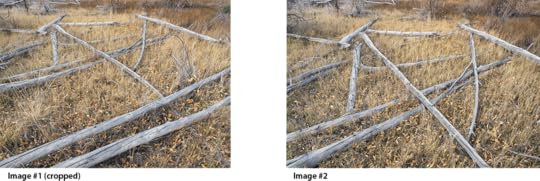
Admittedly, the act of orchestrating a prescribed visual journey for the eye to follow might seem a bit esoteric. With your indulgence, allow me to offer a couple of photographic examples to help explain what I mean. Consider the following two photographs:

You may note that the image on the left (Image #1) tends to initially draw the eye into the frame at or near the lower left corner of the frame, itself. The eye will then have a tendency to travel diagonally, up and to the right, following the line of the foreground logs until they terminate at the center right-hand edge of the overall composition. So far… everything seems OK. However, the moment the eye arrives at the right-hand edge of the composition, it will immediately notice (and then fixate upon) a rather prominent, fragmented, and visually discordant tree stump located at the extreme right edge of the frame. Unfortunately, it is at this specific point that the composition – and therefore the photograph, itself – has ultimately failed. The severed tree stump not only appears to be contextually inharmonious (by comparison to the rest of the scene) its placement at the extreme edge of the frame causes it to attract a significant amount of unwanted visual attention. Once you notice the stump, your eye will continue to be drawn to it, and it will then become the unintended focal point of the overall composition. With this particular image, it is of course the unique arrangement of fallen trees (and not the errant tree stump) to which I am hoping to draw your attention.
Now let’s consider the image on the right (Image #2). In this instance I have moved the camera several paces forward and a bit to the left so that I am able to achieve a composition of similar visual structure (to that shown in Image #1) while, at the same time, effectively bypassing the errant stump problem, altogether. You may note that Image #2 contains (essentially) the same information as is contained in the top half of Image #1. By the way, at this point neither image has been cropped or otherwise altered in terms of its original content.
With Image #2, the eye will tend to enter the scene toward the lower right of the frame and it will then follow the line of that longer receding log, up and to the left, until it arrives at the intersection of the short (perpendicularly situated) log which is serving (together with a couple of other logs converging at that same approximate point) as the intended focal point of the composition, itself. Once the eye has reached the focal point, it will then tend to continue its journey along a path that is, more or less, similar to that illustrated in the diagram, below.

At this stage, having concluded that Image #2 clearly displays a stronger composition than does Image #1, the job is now complete, right? Well… not exactly. There are of course a variety of post processing strategies which could be brought to bear in order to mitigate the problem associated with Image #1. As but one example, I could simply crop off the entire right-hand edge of the frame in Image #1 (as shown below) thereby effectively removing the unwanted stump. And in so doing, I would then be faced with a considerably tougher decision about which composition might, at that point, be the stronger of the two. While I continue to favor Image #2, the decision is not quite as clear-cut as it was prior to the act of cropping Image #1. Suffice it to say that each implemented change will precipitate new and different considerations to be taken into account.
Now at this point you might ask… what was the final outcome in terms of how I eventually determined the most effective composition to settle upon? What actually happened in this case is that I ended up going with an entirely different image (taken in the same area, during the same shooting session) which I continue to feel more effectively portrays the choreographed nature of random patterns associated with the array of fallen trees. After all, it was those attributes that had attracted me to the area in the first place. In my opinion, the final chosen image (displayed below and titled: Fallen Trees, Great Sand Dunes National Park, CO, 2016) not only celebrates the unique and random character of the fallen trees, it also conveys a better sense of the overall environment (the surroundings) within which the trees, themselves, were situated. And frankly – and certainly not inconsequentially – the specific quality of light (which of course was constantly changing as I continued to photograph) is considerably more dynamic in the final chosen image. In the end, the choice seemed clear and unequivocal. The quality of light in the final image helps to enhance the composition by conveying a greater sense of depth and dimension, thereby resulting in a more visually and emotionally compelling result than might otherwise have been the case with either of the two initially considered images.
The ultimate question… Does my final chosen composition represent the “strongest way of seeing”? Fortunately for me, that is a decision that is normally made by the viewer, not the photographer. So in that respect, I’m afraid you’re on your own.

If you would like to find more about Huntington Witherill, you can find more of his work on his website or watch our recent video where he discussed 3 secrets to taking eye catching photos.
The post The Strongest Way of Seeing appeared first on Advancing Your Photography.

June 15, 2019
Tips for Telling Stories with Your Camera
Do you ever feel you need to get unstuck? Or learn a new approach for telling stories with your camera instead of just random images? Then listen to Dan Milnor, an outstanding documentary photographer, as he describes his process and approach that you can instantly put to use.
Transitional Pictures
In terms of telling stories, I think you have to make some decisions as a photographer. You have to make some rather painful realizations about telling stories with photographs. Which doesn’t necessarily mean that every image you make is aesthetically unbelievable or beautiful. A book of 25 beautiful photos might not tell any story at all. So when you realize, “okay, the primary goal of this project is to get the point, my concept across” it means you might have to shoot images that are what I call transitional pictures.

Photo by Daniel Milnor
They may not be aesthetically beautiful, but they give the viewer a little piece of information. Something that they might not know about or might not understand and it links them back to those really powerful images that are your best work. So again, a book that could be a portfolio more than it is telling a story. And that that’s a decision you have to make early on.
Establishing Questions
A lot of times when I do documentary work today, it’s very different than it was 10 years ago or 15 years ago. I would go into the field and rarely was I ever stopped or questioned by anyone saying, “what are you doing here?” Today, that’s a very much a part of doing documentary work. So in many cases when I’m working in the field, there’s an initial conversation before I can begin to shoot. Who am I? What am I doing? What’s the purpose of the work? Those are things that you have to establish before you start, in some cases.
Once those are established, I try to pull back. Because I’m looking for real people doing real things in the real world. I’m not orchestrating. I don’t necessarily even want to talk to people because I know that it will control and influence the scene in front of me doing documentary work.
Composition and Light
You have to be prepared to go in the field for long periods of time and get, you could potentially get a lot of work or you could potentially get very few strong images. The light is the primary dictating factor for me. And composition, because I use the 35 and even with the 50, I’m always looking for a foreground and mid ground and a background. Because I want that lens to build depth. I don’t want a one dimensional flat photo. I want something close, something in the middle and something in the background that are all related and the light working on those three planes. And when you get that, it just gives you a sense of three dimension on a one dimensional photograph. That’s really the key for me.

Photo by Daniel Milnor
Do Research
I do my research. I think that’s one thing that gets a little bit lost these days is when you do documentary work, a lot of times you know you can go and just wing it. You can go somewhere and shoot and that’s a lot of fun. But if you have a specific theme in mind or a specific story that you’re going to tell, I think in some cases it’s better to do some research up front. Which can really maximize the potential you have when you’re in the field, especially if you have limited time. So I’ll do my research. I’m always taking the same cameras with me. For the most part, I try to keep it simple.
Change is the Nature of Documentary Photography
I nail my stories down every single time, and then five minutes after I’m in the field it changes. So I think that’s just the nature of doing documentary work. Unless it’s an event. If you’re covering a political convention or you’re covering a religious festival that’s four days long. Then you have an idea of what you want to do that that’s kind of a story that has what I call it has borders on it that I can see the borders. I can feel the borders, I know what I’m going to, what I can expect to see.
Daniel Milnor in the Field
A lot of the projects I do documentary wise don’t have borders. I have an idea or a concept, I do some research and then I feel my way around in the field. What typically happens is five minutes after I’m in the field I meet someone, I see something that takes me in another direction. Stories expand and the difficult part is keeping some sort of restriction on how big the story gets. Because otherwise you can basically shoot and never have the sort of intensity that you need to tell stories.
Don’t Rush It
I think today we live in a fast world. We’ve all got our mobile phones and computers and we’re connected all the time. Time frames have been cut and cut and cut and cut, but there is no substitution for time and access in the field. The longer you can spend, the better your photos are going to be. And if you rush it, it’s going to show in the work. And the people, the significant people within the photography world, whether it’s a curator or a gallerist or a publisher, they will see that immediately whether or not you have that connection.

Photo by Daniel Milnor
Thanks for joining us again. I hope you enjoyed hearing from Dan about storytelling with your camera and will go out and put it to use for yourself. Be sure to subscribe to our channel and follow our blog so you don’t miss any of our content. Also, please share like, and leave your comments. I love hearing from you! Remember to get out and capture your own images of life.
The post Tips for Telling Stories with Your Camera appeared first on Advancing Your Photography.

June 13, 2019
3 Secrets to Taking Eye Catching Photos
There are only a few people alive as qualified to give photography and composition advice as Huntington Witherill. A former artist of the year, he studied under Ansel Adams. He has an amazing way of finding beauty in some of the most unexpected places. Here’s what he said when I asked him to describe his approach to composing his eye catching images.

Huntington Witherill at his home talking with Marc Silber
What is Visualization?
To me, visualization means what Edward Weston described as “the strongest way of seeing.” Whenever you’re looking at a scene you want to photograph, he considered it to be, as he titled it, “the flame of recognition”. And basically it’s a matter of you looking at a scene. Then you see something about the scene that attracts you to photograph it.

Photo by Huntington Witherill
What I try to do with visualization and what it actually means to me is using my imagination to take what is already out in the world that we are photographing, via the camera than all the other tools that go along with it. And then I try to arrange the scene in such a way that it’s going to produce interesting and compelling results. The strongest way of seeing. Whenever you approach any subject matter, there are obviously infinite number of viewpoints that you can take. Well finding that best viewpoint is often the key to visualization.
Secret 1: Finding the Best Viewpoint
This is a photograph of, for lack of a better way to describe it, cracked mud and a little puddle of water. I’m looking nearly straight down on this photograph. What attracted me was not the fact that it was mud and a puddle. It was that when I looked down at it with the reflection of the sky, I thought to myself, “This is a big arch. And I’m looking through a tunnel.” That’s what attracted me to this photo.

Photo by Huntington Witherill
That’s what I mean by visualization. It’s not only finding the best point of view. You’re also trying to find something that makes the scene become something other than what it actually is. It’s as if the subject matter is really a vehicle to view the subject in a different way. Now not all photographs are like that. However, the ones that I find are most successful for me, you look at them and they’re often abstract and you see something in them that maybe is totally unlike what it actually was. That that interests me.
Secret 2: Placement of the Camera is Key
This is a rest stop along I-80. It’s just outside of Wendover, Utah. It’s a beautiful, unusually shaped building that is basically a veranda with a very long roof. The idea with this for me is the placement of the camera is the key. Because if you were a quarter of an inch higher or quarter of an inch lower, you’d lose the fact that these railroad cars look like they’re sitting on top of that wall. So that’s kind of the essence of it, is the placement of it.

Photo by Huntington Witherill
So the composition is really important in this particular photograph. What I liked about it was not only this idea of this train moving along this narrow wall, which makes it look kind of like a model train in a way. And then the shapes of the building and how it forms with the use of a fairly wide angle lens.
Secret 3: Look for Clouds and Weather
I took this photo out in the Owens Valley. It’s a photograph of the eastern Sierra and I think that it’s a result of the clouds forming the base of the image itself, it looks almost like an aerial view. I’m standing on Highway 395 looking up at the mountains.

Photo by Huntington Witherill
If this was shot with a clear sky, it’d be pretty boring. I do look at a satellite maps when I’m traveling. And if I see a storm coming in the northwest, I’m not afraid to travel 300 miles to head into it.
With landscape photography in particular, it almost matters just as much what’s going on in the sky as what’s going on the land. Because a bright blue sky is great for being outside, but it isn’t interesting for taking photos. So when you get clouds in the sky, and particularly when you get clouds kind of hang around close to the ground, that’s a real opportunity.
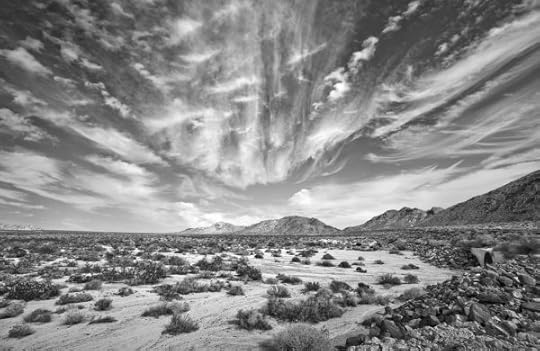
Photo by Huntington Witherill
Thanks for joining us again. I hope you enjoyed Huntington’s wisdom and will go out and put it to use for yourself. When was a time that you took a picture that made the scene something other than what it was? We’d love it if you shared the photo and the story behind it!
Be sure to subscribe to our channel and keep up to date on our blog so you don’t miss any of content. And of course, remember to get out and capture your own images of life.
The post 3 Secrets to Taking Eye Catching Photos appeared first on Advancing Your Photography.

June 11, 2019
Speedlights and Why I Love Them
I’m Jessica Sterling, a portrait and event photographer based here in Los Angeles! Today I wanted to talk about Speedlights… and why I loved them.

1. Small and Lightweight
First of all, they are small. You can put them any place, you can kind of go, “Hey, I would like to have some light over here.” And you can just put a little Speedlight there. In a basket or a can or something or just tuck it behind something. They’re very handy that way. They’re tiny. I’ve shot in very small spaces with them.
Because they’re so small, they’re easy to pack so you can bring a bunch of them. And because they’re so lightweight they’re a bit safer than a regular studio strobe head in a very crowded, busy, bustling environment. Let’s say the stand gets knocked over (a real bummer if it hits the ground), but the good thing is is that if it bonks somebody, it’s not like a big hit.
2. Self Powered and Don’t Get Hot
They don’t require outside electricity. Which is awesome because you can bring them outdoors, you can bring them to the park, to the beach… wherever. Anywhere you want some light, just stick a Speedlight there. It’s really handy.
They don’t get hot like continuous, movie lights do. Nowadays with LEDs and such, it’s less of an issue. But Speedlights, they don’t get so hot to the touch where they’re going to burn you.
3. Look more Pro and Add to Existing Light
Because strobes freeze motion, your pictures look sharper. They look more professional; they look more magazine quality. It’s way better way to work, in my opinion, than only using natural light. You can augment natural light. You can make strobes look natural. They are a fantastic tool. And they are the photographer’s best friend.
Tips for Speedlights
I am a Nikon Speedlight person. I’ve been using them for years. They are workhorses. I have put them through their paces for over a decade, and they last a long time. So here are some tips:
1. Don’t Set Your Power Too High
Number one, don’t set your Speedlight up in the plus side, above zero. Don’t do it because you’ll burn out your flash. I did many times years ago, and I kept asking myself, “Why is my flash keep exploding and breaking?” And it’s because I was just making that little guy work too hard. It’s better to set it at 1/2 or 1/4, or something lower. It is best to bring the power down and use multiple Speedlights to bring in more light. So that is the tradeoff of Speedlights is that you can’t always produce as much light as you might like to.
2. Use Rechargeable Batteries
I always use Eneloop rechargeable batteries. First off because you’re not constantly throwing batteries away into the landfill and polluting our oceans and streams, but you also get a lot of consistent power and they hold their charge for a long time once they’re charged. If you have any problems with your flash, the first thing you should check is your batteries. Because if they start going bad, the flash will start acting up. So that’s why having really great batteries on hand, always is the biggest, most important thing with using Speedlights.
3. Be Aware of Indoor Lighting
The color of light that comes out of them is the same color as the sun light. So for outdoor use, it looks fine. But if you bring it inside and then white balance to your flash, the other lights inside the building (say, incandescent bulbs or LEDs or fluorescent) will have a different color.
4. Don’t Shoot Too Fast
Another thing. Don’t shoot too fast with your flash. And I hate when people have told me that in the past, but it really is true. The limitation with Speedlights, and I hate to say it, is the recycling time for when they’re fully powered and ready to rock. It goes from good, to okay, to not so good. And that’s especially true if your batteries are running low.
5. Modify Your Speedlights
Oh, the next thing about Speedlight is always, always modify it. Bounce it off the ceiling, etc. Think of it like a bare light bulb. I love my LumiQuest Quik Bounce, put it on there. You want to do something more fancy with it. More fun. Put a couple of them in an umbrella or a soft box.

Jessica with a LumiQuest Quik Bounce on her Speedlight
I hope you found this helpful. Please like, subscribe to our YouTube channel and mark down any comments or questions you have below. And don’t forget to keep an eye on the blog for more articles. Be sure to get out and capture your own images of life.
The post Speedlights and Why I Love Them appeared first on Advancing Your Photography.


