
Thomas Heaton's Blog, page 4
February 12, 2017
My Gear
It’s 2017 and a lot has changed, so I have created this new up to date kit blog. Below is almost everything I use and I shall try my best to keep on top of it.
I have included links to all of my kit, some of the links will take you to Amazon. These Amazon links are “affiliate links” which means if you click on it and buy it, I make a small 3% – 8% commission. Thank you for your support.
[image error]
Landscape Photography Gear
Canon 5D MK IV – I love this camera. Great image quality and excellent dynamic range. GPS & touch screen are welcome additions. The face detection AF is amazing for making Youtube videos.
Canon 70-200L f4 (None IS) – A great lens and very affordable. It’s lightweight and tack sharp. I always use a tripod so rarely need the IS.
Canon 24-70L f2.8 MKII – Probably my most used lens. It’s very expensive, but offers amazing image quality throughout the focal range and is perfect for a lot of landscape situations. Also comes in handy for portraits & events.
Zeiss Distagon 21mm – This is a great lens. Fully manual and tack sharp with great contrast. This is great when I need to go a little wider or when shooting night images. Infinity is all the way to the left, so focusing at night is a doddle.
Manfrotto 055CXPRO3 Tripod – A lightweight & sturdy tripod. I have used this for years and it has stood up to my no nonsense rough use and handling.
Manfrotto Arca Swiss Ball Head – A well made and well designed tripod head. I have no issues with it at all.
L-Bracket – This allows me to instantly rotate my camera 90º and is one of those accessories: Once you have it, you’ll never be without it.
Intrepid Large Format 4×5 Camera – This is a new venture for me. So far I am enjoying all the benefits that come with shooting LF film. This camera is very affordable, but be warned, you will need to invest in a lot of accessories to be able to go out and shoot large format properly.
Nikkor 180mm LF lens – This lens is tack sharp and has the 35mm equivalent focal length of 60mm.
Sekonik 758DR Light Meter – Couldn’t shoot LF without it.
Film Changing Tent – This is a ‘must have’ accessory when shoot LF in the field.
Lee Filters – I use a range of Lee graduated ND filters, ND filters, a polarising filter and some mist filters. All of these are used with the Lee Foundation Holder. The quality of the filters are second to none. The polariser causes minimal vignetting even at 16mm.
Filter Pouch – Keeps all my filters together and safe.
LowePro Pro Runner 450 – A really solid bag. I use other bags too, but this is the boy! Holds everything and so far, it is withstanding years and years of rough handling.
LowePro Tactic 450 – Another great bag. Solid with a shell like construction, versatile and is the best bag for overseas travel due to it’s moderate, yet generous size.
LowePro Pro Rover 45 – Sadly this bag has been discontinued, but I love it. I have comfortably trekked miles with 3 lenses, body, filters, tripod, tent, sleeping bag, food, water and all the other bits and pieces we need for the wild.
Manfrotto Off Road 30ltr – Very similar to the above Pro Rover, but smaller and more lightweight. Great for day hiking, but would not carry enough for an over night trip.
[image error]
Making my Youtube Videos
Canon G5X – This is my main “Vlogging” camera. Small, great image quality, great AF and good audio recording (not in windy conditions). It also takes an excellent photograph, so great for when creating blogs and articles.
DJI Phantom 4 – This is one f two drones I use for B-Roll. The image quality is excellent and it takes a great RAW file, but it is terrible to travel/hike long distances with as it’s too bulky.
DJI Mavic Pro – My second drone. What this thing lacks in quality is more than made up for in portability. No bigger than my lens, it fits in all of my bags and travels well. P.S. The quality is actually ok.
Rode Smart Lav – This small mic clips on the my shirt and allows me to record audio separately from the camera. Very good for working on location and in the outdoors.
Zoom1 Audio Recorder – This is what the mic plugs in to. Small, good qiuality and a battery life that lasts forever.
Adapter – Annoyingly the Rode Smart Lav requires this small adapter to work with the Zoom1.
Rode Video Micro – This little mic offers amazing quality when plugged in to my Canon 5DIV. Mainly used when filming pieces in my office.
Rode Stereo Video Mic X – When filming something really special I will use this. It offers excellent wind protection and professional stereo audio recording. Amazing for picking up ambient sound and really makes the viewer feel like they’re there.
GoPro Hero 4 – Used mainly as a back up to the G5X, this camera has had a new lease of life injected as I now use it with the below ‘Gimbal’, which offers excellent smooth footage; perfect for B-Roll.
My Gimbal – This is a handheld, battery powered steady cam for the GoPro. This things is amazing! I can run with this at full speed and it looks like I am floating. Excellent battery life too.
[image error]
Post Work
WD 4tb Hard Drive – This is used exclusively as a backup drive and works with ‘Time Machine” on my iMac.
Lacie Rugged Hard Drive – This holds all of my media, Lightroom Catalogs and Adobe Premier Project files. This system allows me to seamlessly switch from laptop to desktop without ever having to sync folders or re-edit images.
Adobe Photoshop – I don’t need to say much about this.
Adobe Lightroom – Used to edit and organise my library of images.
Adobe Premier Pro – A great piece of editing software. I probably utilise about 3% of what it is capable of.
Photo Printer – I use a Canon Pixma Pro 10s. This produces amazing quality prints, up to A3 size and is very simple to calibrate, which means it’s easy to print what you see on the screen. Most of my Ltd Edition prints come from this machine.
[image error]
The Outdoors
GPS Watch – My Garmin Fenix 3 is a real life saver. I always have it with me, I can plot routes, find my exact GPS location and cross ref with my map and I can navigate back to safety.
Hand Held GPS – This GPS relies on AA batteries, so I can always have spares and it has built in maps, so if I get lost, I can rely on this to get me back to civilisation.
Vango Banshee 200 Tent – Compact, lightweight, quick and easy to erect and big enough for 2, this tent is excellent. What sold it for me was the double doors, offering amazing views.
Thermarest Neo Air X-Lite – Expensive, but a purchase you will not regret. Small, super light, incredibly comfortable and warm; this camping mat is better than most beds.
Camping Pillow – Wait, don’t go anywhere! This is my most important piece of camping kit. I am one of those people who can’t sleep without a good pillow. Nothing cut the mustard until I found this. It really does tick all of the boxes.
Leatherman Skeletool – Well made, lightweight and incredibly handy when away from civilisation. You should always carry a tool with you when enjoying the outdoors.
The post My Gear appeared first on Thomas Heaton.


March 4, 2016
Arctic Norway – Travel Report
Tromsø – Senja – February 2016
The idea had been brewing for a while. A couple of years ago whilst visiting northern Sweden, I found myself with an afternoon free. Naturally the explorer in me meant that I ended up driving across the boarder to Norway. I only had 2 hours to explore and I was so impressed with the scenery that I vowed to return. This winter I would finally make the journey.

Locations Guide – Tromso

Locations Guide – Senja
Booking flights was a bit of a faff and after several days of searching, the best cost:time ratio was to fly from: NCL>AMS>OSL>TRO
(Newcastle, Amsterdam, Oslo, Tromsø)
Each flight is relatively short, so the traveling would not be arduous.

Why February?
For me, winter is what draws me to this type of landscape. Sub-Zero temperatures, ice white landscapes and sunrises that last for hours. The northern lights would be a bonus, unfortunately when booking the trip I did not take in to account the moon phase & during my time in Norway, the moon would be full.
How I pack for Travel Landscape Photography
There is probably a much better answer that the one I am about to give, which may not be helpful at all: I take EVERYTHING! Full size tripod, 5D III, 3 lenses, all filters, 2 GoPro’s + Mounts, laptop, all chargers, spare batteries, warm clothing, boots, food & beer! I am not very good at traveling light & so far I have got away with it. I don’t worry about hand luggage allowance (Unless flying with Ryan Air) because it always fits & never gets weighed. I mean, seriously, have you seen some of the people on airplanes these days? They are now rocking full size cases, my Lowepro is nothing compared to some of the monstrosities I see when traveling. All of my camera kit is included in my carry on with the exception of my tripod & Laptop charger.
My Rough Itinerary
I like to keep things flexible, but when traveling it always helps to have a little structure.
3 days in Tromsø, explore & shoot during the day, shoot key locations at dusk & dawn. Also, I try to squeeze in a little culture too as to not become grossly over consumed in photography, which can be counterproductive.
2 days on Senja. Shoot & explore the entire time (2 sunsets & 2 sunrises).
1 Day in Tromsø. If good light, get out & shoot final sunset. If no light, relax & unwind (I did the latter).
The Result
I had a lot of success as well as a few failures. My biggest error was to drive 1.5hrs in the wrong direction, only to end up at a ferry crossing, which would not be in service until summer. This cost me a potential sunset shoot in Tromso, luckily the weather took a turn for the worse & the hot tub made the agenda rather than the boots & tripod.
Here are the images, with EXIF data. If you enjoy the images/blog post/videos please do share with other internets using your social medias.

Canon 5D MKIII | 70-200L f4 | f9 | 1/15sec | ISO 100 |Heliopan Polariser

Canon 5D MKIII | 70-200L f4 | f9 | 1/13sec | ISO 100

Canon 5D MKIII | Zeiss Distagon 21mm | f9 | 10sec | ISO 100 |Heliopan Polariser | Nisi 3 stop ND | Nisi 2 stop NDHE

Canon 5D MKIII | Zeiss Distagon 21mm | f9 | 10sec | ISO 100 |Heliopan Polariser | Nisi 3 stop ND | Nisi 2 stop NDHE

Canon 5D MKIII | 24-70L MK I | f9 | 0.8sec | ISO 100

Canon 5D MKIII | Zeiss Distagon 21mm | f7.1 | 0.8sec | ISO 100 |Heliopan Polariser

Canon 5D MKIII | Zeiss Distagon 21mm | f9 | 1/4sec | ISO 100 |Heliopan Polariser

Canon 5D MKIII | Zeiss Distagon 21mm | f9 | 0.5sec | ISO 100 |Heliopan Polariser

Canon 5D MKIII |24-70L MK I | f8 | 1/60sec | ISO 100

Canon 5D MK III | Canon 70-200L MK I (none-IS) | f4 | 1/200Sec | iso 400

Canon 5D MK III | Zeiss 21mm | f9 | 235Sec | iso 100 | Nisi 10Stop | Heliopan CP

Canon 5D MK III | Zeiss 21mm | f2.8| 6Sec | iso 1250

Canon 5D MK III | Zeiss 21mm | f9 | 10Sec | iso 100 | Heliopan CP

Canon 5D MK III |Canon 24-70L MK I | f11 |30Sec | iso 100 | Nisi 10Stop | Heliopan CP

Canon 5D MK III | Zeiss 21mm | f9 | 1/80Sec | iso 100 | 5 Vertical Images Stitched

Canon 5D MK III | Canon 24-70mmL MK I | f9 | 1/50Sec | iso 100 | Heliopan CP

Canon 5D MK III | Zeiss 21mm | f7.1 | 0.3Sec | iso 100 | Nisi NDH Grad 2 Stops | Heliopan CP

Canon 5D MK III | Zeiss 21mm | f2.8 | 30Sec | iso 1600
For more info check out my Kit Blog, but here is a summery of kit used:
Canon 5D MK III
Zeiss Distagon 21mm Lens
Canon 24-70L f2.8
Canon 70-200L f4 (None-IS)
Manfrotto 055CXPRO3
Garmin Fenix 3 (For navigation)
LowePro Filter Pouch
Lee Foundation Filter Holder
A Range of Nisi Filters
A Heliopan 105mm Polariser
A 105mm Attachment Ring for it to fit on to my Holder
HotShoe Bubble Level (Love this)
A Waterproof Camera Cover always comes in handy
As Does my Leatherman Skeletool
I Always Take a Head Torch
I Make my Videos Using the Kit Below:
Canon G7X
GoPro Hero 4 Silver
TimeLapse Head
GoPro 3 Way Mount
GoPro Jaws Clamp
13,461 total views, 21 views today
January 26, 2016
FAQ
How old are you?
My DOB is 26/4/84
Where do you live?
I live in a small coastal town in the north east of England, called Whitley Bay.
That Manfrotto Ball Head.
Yes, I made a terrible mistake & showed my incompetence when using my own kit. The knob pulls & rotates. I take back all that I said about my tripod head.
**Update** I now have a new Manfrotto Arca-Swiss Ball Head, which I love: Here it is on Amazon and I now have an “L” bracket, which has changed my life! Best £20 I’ve ever spent Here
What camera should I buy?
I don’t know. I only use my Canon 5D III & it’s great for my needs. There is a wealth of information on the web and I certainly can’t tell you anything new. One thing I do know is that your camera is not as important as how, where & when you use it.
Why don’t you do post processing on your videos?
The main reason I steer clear of PP videos is because I find them so dull & I can’t get excited about making a video showing my editing process. Most of the time, I do very little; simply adjust the highlights, shadows, contrast, vibrance & WB to push the RAW file to a nice finish. I believe that every user & every image is different, therefore my editing would be irrelevant and inconsistent. For me, it’s all about the journey & being in the outdoors.
What are Nisi filters?
Nisi sent me some filters to test out, review & send back. I said that it will take me months to thoroughly test & review them, so they agreed to let me keep the filters. They are great, but not perfect. Compared to Lee filters, they are a little lighter, therefore a 2 stop doesn’t quite reduce the exposure by 2 stops. There is no colour cast, apart from the 10 stop. They are expensive, but high quality. The polariser really lets the system down, therefore I don’t use it as it’s not a patch on my Heliopan. I now use Lee filters as my Nisis are all scratched.
What kit do you use?
For more info check out my Kit Blog, but here is a summery:
Canon 5D MK III
Zeiss Distagon 21mm Lens
Canon 24-70L f2.8
Canon 70-200L f4 (None-IS)
Manfrotto 055CXPRO3 (New Version)
My New Arca Swiss Manfrotto Ball Head
An “L” Bracket for above Head
Garmin Fenix 3 (For navigation)
LowePro Pro Rover 45ltr Hiking Camera bag
LowePro Filter Pouch
Lee Foundation Filter Holder
A Range of Nisi Filters
A Heliopan 105mm Polariser
A 105mm Attachment Ring for it to fit on to my Holder
HotShoe Bubble Level (Love this)
A Waterproof Camera Cover always comes in handy
As Does my Leatherman Skeletool
I Always Take a Head Torch
I Make my Videos Using the Kit Below:
DJI Phantom4
Canon G7X
GoPro Hero 4 Silver
TimeLapse Head
GoPro 3 Way Mount
GoPro Jaws Clamp
What do you do for a living?
I am a full time photographer with a studio. I shoot landscapes for Visit England, sell images to the national press, photograph the odd wedding, shoot events & write occasional articles for various magazines.
Can you critique my work?
I am happy to pass my eye over your work, however I get this request a lot and it’s not possible for me to look at all images. Besides, what do I know?
Can you make a tutorial on…?
Nooo. My videos are about the journey, they are about inspiration, they are about my process and what I’m thinking when looking for a shot. Although I do offer tips & techniques, I do try to keep well away from actual “Tutorials”. It’s not why I make videos, I make videos to inspire & to entertain.
Why didn’t your dog go with you?
Sadly Monty has been diagnosed with Elbow Dysplasia, which means he can’t join me on long walks up big hills. We are working on building up his stamina & hope that he will be able to come on longer journeys as he gets a little older.
Can we shoot together?
I love meeting fellow photographers & Youtubers. The main obstacle is my schedule. I have a full time business, a dog, a fiancé and I live & shoot in the UK whereby the weather can put a halt to a trip at a moments notice. With all of this, planning is difficult so most of my photography is planned at the last minute depending on what the weather is doing the next day.
What do you use for your GoPro audio?
I used to use a PolarPro Mic, but it was too unreliable. The slightest knock, bump or rapid movement and the mic disconnects from the USB without me knowing. The GoPro internal mic is fine, the only problem is its complete inability to handle even the slightest breeze. So I purchased a Wind Slayer. This is a foam casing, which wraps around my GoPro and eliminates wind noise. It’s not perfect though, it covers my screen & buttons, which is irritating. Who would have thought in 2016, with all this tech that something as simple as audio recording in a breeze would be so difficult?
Why don’t you have a TV show?
I’m working on it…
33,463 total views, 49 views today
November 24, 2015
What’s in my Bag/Office/Life?
This blog is intended to shed a little more information on the items mentioned in my YouTube Video.
Below you will find a list of all kit mentioned in my video. Some kit will have further details, such as why I think it is important. Although I do love my gear, I do not believe all of it will improve my photography, however some of it will help improve my photography and it is these items that I will talk about most.
Photography Equipment List
DJI Phantom 4
Garmin Fenix 3 GPS Watch
Lowe Pro Runner 450AW Bag
Lowe Pro Rover 45AW Bag. Holds everything you need & more, but comes at a price.
Canon 5D MK III
Zeiss Distagon 21mm Lens
Canon 24-70L Lens MK I
Canon 70-200L f4
Manfrotto 055CXPRO3 Tripod (New Version Here)
Manfrotto Arcas Swiss Ball Head – This is awesome.
L Bracket
Jobby Sling – Very Handy for ‘On the Go’, better than a standard strap.
Nisi Filters – ND 0.3, 0.6, 0.9, Little Stopper, Big Stopper, ND Graduated 0.6 Hard & Soft and a 0.9 Reverse Graduated Filter
LowePro Filter Pouch
Lee Foundation Holder – The best filter holder on the market.
Heliopan 105mm Polariser (The most important filter I own) and to attach it to the front of my Lee Foundation Holder, I use one of these.
A Cheap 3rd Party Cable Release. Benefits include reducing camera shake & taking exposures longer than 30 seconds when in Bulb mode.
Hot Shoe Spirit Level. Keeps my camera level.
Lens Cleaning Kit.
Macbook Pro. Used for working on location/Traveling.
Spares. Always pack spare memory & spare batteries.
Waterproof Camera Cover. Mine is a simple, cheap cover bought from Amazon.
Some Lee Lens Caps. Amazing. Why did it take me so long to get these?
Kit that Bridges the Gap Between the Outdoors & Photography
There are many things that can put an end to your shoot, a lot of which can be avoided if you are prepared and have a few essential tools. Below is my list of such items.

A few essentials.
Electrical Tape or Duct Tape. This item can fix almost anything.
Leatherman Skeletool. Any multitool will suffice.
Berghaus Packlite Waterproof Jacket & Lowe Alpine Gloves. Even in the summer the weather can turn, so keep war and dry where ever possible. When buying gloves, try to purchase those with rubber grips.
Map & Compass. Find new locations & prevent yourself getting lost on the fells.
Garmin E-Trex 30 GPS. A very handy devise and always make sure you have spare AA batteries.
Garmin Fenix 3 GPS Watch
A Small Umbrella.
Food & Water. I can’t do anything when I’m hungry.
Black Diamond Storm Head Lamp. It’s bight, waterproof & incredible handy when shooting dusk & dawn.
Wellies & Waders

Hip Waders; Get Over It.
Yes… I own some hip Hip Waders, get over it. Why did I buy these? I am always finding compositions on the coast, in rivers or by a lake that I simply can’t access. Buy wearing some hip Hip Waders nothing can stop me now.
My Modern Day Darkroom. My Office.
I wanted to create a space where I could work, relax and contemplate all things photography. It had to be functional as well as an inspiring & relaxing place to be. I also had to do it on a budget.
The first thing I wanted was a desk, which could span the length of my office, unfortunately desks of this size do not come cheap. After giving it a little thought, it came to me that I could fashion such a desk using components from Ikea. For the desk, I used 3 simple cupboards with shelving inside. Placed on top of the cupboards was a kitchen worktop. The whole thing came in at approximately £110.

DIY Desk
I used the same cupboard system for my printer, with the shelving being perfect storage for prints, paper, tools etc.

Lots of Shelving for Print Stuff.
I fitted a daylight balanced, high wattage bulb to ensure consistent lighting and accurate colour representation on my prints. I painted 3 walls white, these walls would act as a mini gallery of my work and of other works that inspired me. I also fitted floating shelves for more storage.
There is nothing better to get your photography juices flowing than a good read.
I have many books & magazines, all of which make for great reading and truly inspire me to get out & get shooting. Below are just a few suggestions.
Full Frame by David Noton
Waiting for the Light by David Noton
Mad, Bad & Dangerous to Know by Ranulph Fiennes
Cold by Ranulph Fiennes
Wild Africa by Alex Bernasconi
The Man Who Cycled the World by Mark Beaumont
Wild Life by Simon King
Galen Rowell – A Retrospective
Planet Iceland by Sigurgeir Sigurjonsson
The Light Elsewhere by David Pickford
What I use to make videos
DJI Phantom4
GoPro4 Silver
Canon G7X
GoPro 3 Way Mount
GoPro Jaws Clamp
iPhone 6
Canon G7X
Blackbolt Timelapse Head
iMovie
Adobe Premier Pro CC
I hope this blog & video have been helpful.
33,984 total views, 48 views today
November 5, 2015
Yosemite Valley – I am People.
I need to get this off my chest; Yosemite Valley was stunningly beautiful, but it was one of the worst places I have ever visited as a photographer.
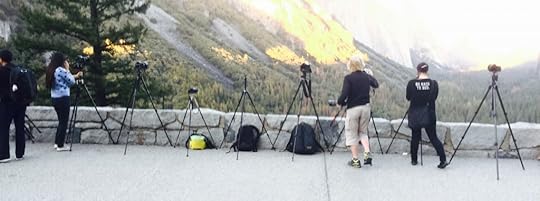
A Typical Viewpoint
A bold statement, I know. As a tourist, Yosemite is amazing. I enjoyed the sights, hiked up to waterfalls, found myself engrossed in the Ansel Adams Gallery and enjoyed some amazing picnics. As a man with a camera & tripod, I found Yosemite Valley to be busy, noisy, expensive & stressful. The best way for me to describe Yosemite Valley is like a theme park for photographers; the best view points being like the biggest, fastest rides. I have been to busy locations before, but none like this. I have never had to queue for a spot to put my tripod before and I have never had to sit in traffic, watching as the light falls behind the trees, knowing that there is a perfect shot just meters down the road… if only I could get there, how am I in gridlock traffic in one of the most beautiful places on earth? Is Yosemite Valley a victim of its own success? I don’t know. Maybe I was unlucky and arrived during a busy period. I was frustrated during my time there, however I kept telling myself that I am also part of the problem, I am people.
Anyway, now I have that off my chest, I can move on to the positives, for which there are many!
Below is the first image I took. This was taken from Tunnel View and I had to really fight for a spot as you can see by the image at the top of this page. This is a classic view point and I was lucky enough to have clear skies to the west, which allowed for the very last rays of sunlight to catch the top of El Capitan & Half Dome.

Canon 5D MKIII | 24-70L | F13 | 1/80SEC | ISO 100 | Heliopan Polariser
The next day the Bridalveil Fire, an on going forest fire, was causing smoke to be blown in to the valley, which offered some much needed atmosphere. Unfortunately this did not last long and by the time sunset had come around the winds had changed and the smoke had dissipated, although I am not sure I would have fancied another go at Tunnel View.

Canon 5D MKIII | 70-200L | F9 | 1/60SEC | ISO 100 | Heliopan Polariser
Although California was going through one of the worst droughts in years, the Merced River was healthy and I soon started to realise that it was here that I was likely to find that seclusion, which I so desired. At sunrise, sunset & under dark skies classic view points such as Tunnel View, Glacier Point & Valley View were out of the question if you wanted to be alone. Now, don’t get me wrong, I am not a sad loner, in fact I love shooting with other people. The problem is that I like to wonder, I like to explore, I like to test different perspectives and when you are surrounded by 15 other photographers, this is not possible because you will encroach in to someones shot or you will lose your position from 5 minutes ago, which you actually realised was the best spot to start with. The Merced River & the meadows are what I would concentrate on. The river is long and winding, which allows for exploration off road & away from view points and the meadows are vast open spaces where, strictly speaking, people are prohibited; cue the long lens.
The 2 images below were taken whilst exploring the banks of the Merced River. With each turn, a new viewpoint is offered. As an avid climber, a shot of El Cap was a must. I knew what I wanted, a clean, simple image which shows of the form of El Capitan.

Canon 5D MKIII | Zeiss 21mm | F9 | 1/80SEC | ISO 100 | Heliopan Polariser
This image is a combination of 2 shots taken with a 21mm lens. The first image looking up & the 2nd image looking down. The light on the top of El Cap is early morning sunlight, which really helps lift the image, giving it more interest.
For the image below (See Video) I had to wade in to the Merced River to get the composition needed. Again, the first light on the top of the 3 Brothers really helps lift the image, making it pop.

Canon 5D MKIII | Zeiss 21mm | F9 | 0.3SEC | ISO 100 | Heliopan Polariser
Although I was in Yosemite Valley during Autumn, because of the drought, a lot of the foliage had long since desiest. The dry weather also meant that any mist or fog was out of the question, which was such a disappointment as I believe Yosemite Valley can look no better than when covered with a dense, low hanging mist. Looking at other images taken in the meadows of Yosemite Valley, my heart sank a little as each morning I awoke to dry, arid conditions.
The image below has been converted to black and white because the original simply has no colour. This group of Cottonwood trees should have vibrant yellow foliage, however due to the drought, this was not the case. I do still enjoy this image and taking it was a pleasure. There’s not much better than waiting for the light to be just right and then pressing that shutter. Magic. There was a slight breeze on this afternoon, so I ramped up my ISO to 250, which ensured a fast enough shutter speed to capture a nice sharp image.

Canon 5D MKIII | 70-200L | F7.1 | 1/40SEC | ISO 250 | Heliopan Polariser
Mist was out of the question, however the Bridalveil Fire would be my saving grace and help me to capture my favourite image from Yosemite Valley. You can see in the image below, the smoke illuminating the sunlight as it streams across the meadow, side lighting the mighty Elm tree.

Canon 5D MKIII | 70-200L | F9 | 1/13SEC | ISO 100 | Heliopan Polariser
Summary
Yosemite Valley is jaw dropping, but it is busy, a little chaotic and has a very manufactured feel to it. I would most certainly return, but I would do so in the deepest depths of winter in the hope that the madding crowds would be less and the weather would be more dramatic & atmospheric. I would also stay for longer to allow for more exploration and have a greater window for weather. I am in no doubt that the problems I talk about are not actually with Yosemite Valley, but are with me, my expectations & my own prejudices. I think I had built it up too much and was very naive about what to expect. Next time.
For more info check out my Kit Blog, but here is a summery of kit used:
Canon 5D MK III
Zeiss Distagon 21mm Lens
Canon 24-70L f2.8
Canon 70-200L f4 (None-IS)
Manfrotto 055CXPRO3
Garmin Fenix 3 (For navigation)
LowePro Filter Pouch
Lee Foundation Filter Holder
A Range of Nisi Filters
A Heliopan 105mm Polariser
A 105mm Attachment Ring for it to fit on to my Holder
HotShoe Bubble Level (Love this)
A Waterproof Camera Cover always comes in handy
As Does my Leatherman Skeletool
I Always Take a Head Torch
I Make my Videos Using the Kit Below:
Canon G7X
GoPro Hero 4 Silver
TimeLapse Head
GoPro 3 Way Mount
GoPro Jaws Clamp
16,986 total views, 9 views today
October 24, 2015
Shooting in the Alabama Hills
I have never had the pleasure of shooting in a desert before and certainly not one like the recreation area of the Alabama Hills. Being from the UK, this type of landscape is completely alien to me.
I was staying in the small town of Lone Pine, which was a stop off en-route to Yosemite. I knew the town had the beautiful Sierra Nevada mountains as a backdrop, but I knew little more as I was focused on Death Valley, which was primarily closed due to flash floods. Having arrived at Lone Pine, a fellow photographer, Heath Barbier, had been kind enough to email me a few locations nearby. One of the locations was the Alabama Hills and looking at a map I could see it was a mere 5 minute drive from my motel. Perfect!

Motel
I was not comfortable scouting out the area in the darkness of pre-dawn, so I thought it wise to check it out the evening before. The place is a maze of enormous granite boulders littering the desert. It was phenomenal, however finding a composition was difficult because there was a lot going on. The boulders lie at the foothills of the Sierra Nevada mountains and you can clearly view Mount Whitney, which is stunning, so once a composition was found within the boulders, the rest was easy.
Whilst exploring, I started to get a familiar feeling. But how? I had never been here before. Then, it dawned on me; I had watched a photography video a couple of years ago, shot by a fantastic large format photographer Nick Carver. The funny thing is, when I watched his video, I remember thinking how much I’d love to visit Alabama. Ha, my knowledge of America is poor. As the light started to fade that evening, I realised that I was in the desert, at night, with no major towns or light pollution nearby and what a great opportunity I had to try and capture the Milky Way over this wonderful location. A lovely little bonus.

Zeiss 21mm | f2.8 | ISO 1250 | 20 Sec
Because of the geography and the amazing backdrop of the mountains, a panoramic is the only way to go. It’s like finding a pond at the foothills of the Himalaya and not shooting the reflection… impossible. So, that was it, that was the shot I wanted and the beauty of the shot would be the light. As I was in the desert and at relatively high altitude, I was sure that I would see the very first rays of light hitting the top of those mountains and this was more that enough to get me out of bed at 5am.
Red sky in the morning, Photographers Warning.
My heart sank a little as dawn began to break and I could see the red sky, usually an exciting moment, but for me it was “Red sky in the morning, photographers warning”. There was to be no first, direct light kissing the peaks, smothering them in ruby red light way before we get to enjoy the suns warmth.
I decided to stick with my composition and shoot in the ambient dawn light, which actually turned out to be rather beautiful as you can see the red sky to the east is casting a delightful pink glow on the mountains.

Canon 70-200L | f8 | 3.2 Sec | ISO 160 | Circular Polariser

Canon 70-200L | f9 | 1/8 Sec | ISO 100 | Circular Polariser
I continued to shoot a couple more exposures, (Above is a great example of how light completely changes an image) however I did not think these shots were better than my first dawn image. So it was time to move on, explore and experiment.
I still had a problem finding compositions, however I was only searching in a small area. Whist setting up for my panoramic, I did spot a couple of boulders, which I thought would work well as a vertical image and this would be my first port of call whilst the sunlight was still soft and golden.

Zeiss 21mm | f9 | 1/6 Sec | Circular Polariser | Nisi ND Grad 0.6
Following on from this, the sun began to climb, casting a very harsh light and I decided that black and white would do very well here.

3 Bracketed Images – Main Exposure Canon 24-70L | f9 | 1/20 Sec | ISO 100 | Circular Polariser
My biggest regret is that I did not have more time here. I would have loved 3 nights camping. This would allow me so much more time to scout out and thoroughly enjoy the whole area. I had to be back at the motel for 9am and it was with a heavy heart that I left Lone Pine… To be continued.
For more info check out my Kit Blog, but here is a summery of kit used:
Canon 5D MK III
Zeiss Distagon 21mm Lens
Canon 24-70L f2.8
Canon 70-200L f4 (None-IS)
Manfrotto 055CXPRO3
Garmin Fenix 3 (For navigation)
LowePro Filter Pouch
Lee Foundation Filter Holder
A Range of Nisi Filters
A Heliopan 105mm Polariser
A 105mm Attachment Ring for it to fit on to my Holder
HotShoe Bubble Level (Love this)
A Waterproof Camera Cover always comes in handy
As Does my Leatherman Skeletool
I Always Take a Head Torch
I Make my Videos Using the Kit Below:
Canon G7X
GoPro Hero 4 Silver
TimeLapse Head
GoPro 3 Way Mount
GoPro Jaws Clamp
11,808 total views, 13 views today
September 28, 2015
Another Wild Camp – Haystacks Horseshoe
With little notice I found myself with some free time and a good weather forecast. It had been some time since I last ventured outdoors with my tent & camera and this is how I would use my bounty of free time. As the day was already getting on I had no time to plan anything concrete, so I grabbed a map of my chosen area, my camping kit and camera.
Open Space Web-Map builder Code
April 14, 2015
Wild Camp & Landscape Photography Place Fell
Last year (2014) I did my very first solo wild camp. You can read about my experience here. Ever since that trip, I have been hooked. Wild camping allows you to fill your photography boots to the very brim; shooting sunset, dusk, night, dawn & sunrise in one glorious session. Free from the pressures of day to day life, you can pack your bags and head out in to the wilderness (or as near as you can find) and truly enjoy nature and your surroundings.
Whilst planning my camp, I had a small dilemma. I could go to a location that I know well and have photographed before or I could take a risk and try somewhere new. In an ideal world, I would have time to scout lots of new locations, choosing one at a later date. Unfortunately time is not a luxury I have. I decided to take a risk and try a new location in the hope of adding some variety to my portfolio.
What do I take in to consideration when planning a wildcamp photography outing?
Popularity. Is the location a popular walk? If so, I will avoid as there is a good chance others will also be camping, not to mention dog walkers, fell runners, hikers and fellow photographers.
Weather. Check, compare, then check again. Make sure you are prepared for cold, wet weather & make sure you don’t over prepare for warm weather i.e. taking too many layers.
Accessibility. I have a lot of gear, do I really want to hike 4 hours to a spot? Yes! Just make sure the weather is on your side & tell somebody where you are going.
Are there enough flat areas? Google Earth will help with this. Most of the time there will be a flat ledge big enough to accommodate a small tent.
The view. In an ideal world, I want to camp on a summit or a ridge running North-South. This way I can shoot the sunset, wake up, turn around and shoot the sunrise, all from the comfort of my tent. A location with a good panoramic view is ideal to get the most out of a wild camp photo outing.
Kit. What do I need & what don’t I really need? Of course, I would love to take my big pillow, all my lenses, beer, a good selection of food, my laptop, a nice chair… I usually save this sort of packing for when I am staying at a campsite, which is also a brilliant way to get stuck in to Landscape Photography. For a wild camp, pack light… as light as possible. If you are lucky enough to be in the position where you need to buy new kit, don’t scrimp. £100 is CRAZY money for a camping mat until you pack it in your rucksack, unpack, inflate and have the best nights sleep of your life. All of this from something that weighs 50 grams and is the size of a can of lager. Apply this logic to your tent and sleeping bag as these are the bulky items that will ruin your hike if you get them wrong.
My Route
Below you can see a map of my route and I have marked my camping spot. The walk was very easy to navigate and not too challenging. It gains good height over a relatively short distance; perfect for a wild camp. By looking at the map, you can see my thinking when choosing this location. 360º panoramic views including views of Ullswater & Hellvelyn. This hike took me approximately 1 hour with a fully laden rucksack.
Open Space Web-Map builder Code
The Entire Contents of My Lowepro Rover Pro 45 AW Bag (Links at the bottom)
Canon 5D MK III
Canon 24-70L
Canon 70-200L
Camera Filters (Lee, Heliopan, Hitech)
Manfrotto 055CXPRO3 Tripod with 498RC2 Ball Head – **I have updated this with a much better Head
Lens Cloth
Vango Banshee 200 Tent
Thermarest Neoair X-Lite Mat
Mammut Air Pillow
Vango Trail Lite 240 Sleeping Bag
Insulated Jacket, Hat & Thermal Longjohns
Leatherman Skeletool
OS Map & Compass
Garmin Etrex 30 GPS
Head Torch
Whiskey,Water, Food, Gas, Pans, Tooth Brush, Tooth Paste.
I also had a change of clothes, deodorant & my Zeiss 21mm Lens in my car.
Once I had reached the top, finding a camping spot was easy. The summit of Place Fell has no shortage of flat areas, however with wild camping, ideally you want to be away from & out of view of the trail. Whilst setting up my tent the quality of the light was getting better and better. I placed my pegs in a hurry, anxious to get the camera out. I headed back to the summit, just 3 minutes away, desperately looking for a composition. The evening light was magical, golden, warm and ever so slightly defused by the mist hovering over the hills to the west. I knew the light would fade fast and there was one ‘stand-out’ composition; the summit trig point. The foreground was bathed in this glorious evening light with the background beautifully softened by the building mist, all held together with the footpath leading your eye past the tarn, over the hills and across to Ullswater in the distance. As soon as I took this photo, I knew it was a keeper.

Canon 5D MKIII | 24-70L @ 24mm | f11 | 0.5 sec | ISO 100 | NDH 0.6 | CP
The air was so still with not a breath of wind, the only sound I could hear was the birds and the geese from the lake 500 feet below. As I fired up the stove, that familiar smell of burning gas brought memories of childhood camping trips flooding back. The sun had set and the sky was burning red, there was only one photograph I wanted at this point.

Canon 5D MKIII | 24-70L @ 25mm | f5.6 | 30 sec | ISO 100 | NDS 0.6 | NDH 0.6 | CP
I have only done a handful of wild camping trips, but every time I do, I make a point of capturing the scene to remind myself and show others how utterly peaceful & inspirational it can be to stay out in the wilderness. The image above is a blend of 2 images. The first image was taken at dusk, however the ambient light was too strong for the glow of my measly little head torch, so I had to wait about 40 minutes for the light to drop, only then could I capture the glow of my tent, illuminated by the head torch. All I do then is stack the images in Photoshop and carefully mask the tent. If I had a flash gun I would have been able to get this in one shot, unfortunately I don’t think this is an essential item.
The Next Morning
I had a reasonable sleep, although I wish I had chosen a more level spot, rather than choosing a camp site entirely based on the view. My Thermarest worked a treat. Incredibly comfortable and very warm considering how small and lightweight it is. I was awake before dawn and the moonlight was illuminating the landscape. I could not believe my eyes when I unzipped the tent to see that I was above the most amazing cloud inversion. I had to capture this in an image as my video camera would not pick it up and I was not sure how long it would last. (Perhaps somebody can explain the colour temperature differences between the glow from Glenridding & the glow from Patterdale.)

6 Vertical Images Stitched | Canon 5D MKIII | 24-70L @ 24mm | f6.3 | 30 sec | ISO 1250
I decided to head back to the summit to plan my next move. By now, dawn was breaking. I opted for the long lens, anything wider and there was a chance of losing the majesty of the cloud inversion. The view to the east would have otherwise been rather bland, but with a burning sunrise and a glorious cloud inversion, the scene was transformed.

Canon 5D MKIII | 70-200L @ 81mm | f9 | 2.0 sec | ISO 100 | NDRG 0.9 | CP
As the sun broke, I headed back towards camp to take a final photograph looking towards Kirkstone Pass. The valley was still engulfed by low cloud and the light was crisp, allowing for a clean, sharp image.

Canon 5D MKIII | 24-70L @ 30mm | f8 | 1/4 sec | ISO 100 | NDH 0.6 | CP
After this image was taken, I sat. I sat and enjoyed the warm sunshine, the stillness, the silence. Any noise from below was now muffled by the cloud. It was so nice to escape life. No phone signal, no internet, no work. Whilst sitting, doing nothing at all, 2 dear stag passed a few meters below me; Perfect. I was finished for the morning. I packed up camp, hiked back to the car and had breakfast with a friend whom I arranged to meet in Keswick. Roll on the next trip!
For more info check out my Kit Blog, but here is a summery of kit used:
Canon 5D MK III
Zeiss Distagon 21mm Lens
Canon 24-70L f2.8
Canon 70-200L f4 (None-IS)
Manfrotto 055CXPRO3
Garmin Fenix 3 (For navigation)
LowePro Filter Pouch
Lee Foundation Filter Holder
A Range of Nisi Filters
A Heliopan 105mm Polariser
A 105mm Attachment Ring for it to fit on to my Holder
HotShoe Bubble Level (Love this)
A Waterproof Camera Cover always comes in handy
As Does my Leatherman Skeletool
I Always Take a Head Torch
I Make my Videos Using the Kit Below:
Canon G7X
GoPro Hero 4 Silver
TimeLapse Head
GoPro 3 Way Mount
GoPro Jaws Clamp
My Tent is a Vango Banshee 200
I Use a Thermarest Neoair X-Lite Sleeping Matt
23,409 total views, 31 views today
January 1, 2015
Isle of Skye Photography
A trip to the Isle of Skye starts off on the right foot and ends with a high as I have to pass right through Glencoe; A world class location for any landscape photographer.
It’s a shame that I could not spend a full day exploring Glencoe, it was just a quick stop off as we had a lot of driving still to do. My plan was to photograph Buachaille Etive Mor en route to Skye. This is a prominent peak, which is instantly recognisable. I wanted to concentrate much more on the form and the shape of the mountain, rather than the landscape in which it sits.

Buachaille Etive Mor
Image captured just in time, the sun had now set and it was time to continue on.
The Isle of Skye does not disappoint, it truly is a landscape photographer’s playground. I was lucky enough to get 2 fantastic days of weather. The first day was crisp and still, with minus temperatures, snow and frost. Day 2 was sunshine and showers, with foreboding skies, which really brought the landscape to life.
The map below shows all of the locations in which the images in this blog were taken, just click on the red dots to reveal which image was taken there. Hopefully this will help if you are planning a trip.
<!DOCTYPE html PUBLIC "-//W3C//DTD XHTML 1.0 Transitional//EN" "http://www.w3.org/TR/xhtml1/DTD/xhtml...
Open Space Web-Map builder Code
\
The
December 16, 2014
Photographing Meteors
When setting out to photograph a meteor shower, there are a few essential items that you need and some tips that will give you the best chance of getting a good shot.
Kit:
Tripod
Wide lens with fast aperture (f2.8 or below)
Shutter release cable
The 3 items above are essential when trying to photograph a meteor shower and without them it will be almost impossible to succeed.
Once your kit is packed, a few other items will help such as a compass, a red torch, warm clothing, a deck chair and a flask of tea. Photographing meteors is all about sitting, waiting and enjoying the night sky.

Star Gazing
So, the skies are clear and you have your kit ready, you will now need to think about your location. It goes without saying that you should get away from the city lights. These will have a dire effect on your image. The glow will wash out the night sky, making for a very low contrast image, terrible colour balance and will effect how your eyes see the stars. My advice is to try and get at least 5 miles from any large town or city.
Think about content and foreground interest. An image with a meteor streaking through the night sky is one thing, however if you can include some foreground interest then you will improve your photograph 10 fold. It doesn’t have to be anything as striking as a snow capped mountain or cascading waterfall, but something that helps balance the image or shows something of local interest such as on old farm house, a tree, castle ruins or even a human figure. Use your imagination. Meteor showers have massive pubic interest, so if you can include a local landmark, then you have a high chance of getting your image published in the nationals.

Northumberland castle ruins add interest.

The frozen lake helps lead the eye to the meteor. (Pure luck).
Technically: How to do it.
Find the constellation from which the meteors emanate. To help with this, I recommend downloading Stellarium. It is free and is an amazing bit of software.
Shoot in RAW for a higher quality finish.
Frame your image, making sure at least 2/3 of the image is sky.
Once you are happy with your composition, you will need 2 exposures. One for the foreground and one for the sky. The first exposure for the foreground can be taken on a lower ISO, greater aperture and longer shutter speed to get a cleaner, sharper image. Focus on the foreground interest and expose. You can choose to keep your foreground silhouetted or you can choose to bring out some detail with a longer exposure or a little light painting. This is up to you. Once you have your first image, very carefully adjust your focus to the stars. This will need to be done manually. Simply turn on live view, digitally zoom in to the brightest star you can see and focus. Alternatively, focus your lens to infinity, which will also give you sharp stars.
Keep your composition exactly the same, dial in a high ISO and a large aperture with the aim of exposing for no more than 15 seconds. This will ensure you capture most meteors that shoot across your frame. If you expose for longer than 15 seconds, with a lower ISO then there is a chance your camera will not capture the light emitted from some of the meteors. Most will dart through the sky for less than half a second, and although they are bright, if you are exposing for 20 or 30 seconds, your sensor will not be sensitive enough to capture the light.
Set your camera to continuous shooting mode. This is usually indicated by 3 rectangles over lapping each other. Lock your shutter release cable open and your camera will continue to fire for as long as you allow. Effectively you are creating a time lapse.
It will only be a matter of time until you start capturing those meteors and it is up to you whether to continue to capture lots of meteors and create a composite image or to move on and find a new composition.

A rough guide
Rule of 600:
There is a rough formula to follow, which will help you avoid unwanted star trails/blurry stars.
600/focal length = number of seconds to expose before stars become soft.
Once you are home with a memory card full of images, you need to weed out the duds and keep only those images with meteors in the frame and remember, don’t delete the 1st image, which is exposed for the foreground. This will be the foundation of your final image.
All the hard work is now complete. Simply open the foreground image in Photoshop and paste your favourite meteor image over the top. There are 50 ways to bring through the sharp foreground, the easiest is to simply use the eraser tool to brush out the soft, under exposed foreground and hey presto! Your image is complete.
Please join me on Facebook. There is a link in the column to the top right of this blog and if you’re feeling very generous, please share this blog. Remember, all of the above is not an exact science and there are many variables involved. Use this blog as a helpful guide and experiment with your photography and you will be sure of some great results.
11,536 total views, 13 views today
Thomas Heaton's Blog
- Thomas Heaton's profile
- 16 followers

