
Thomas Heaton's Blog, page 3
December 10, 2021
Upgrading to 3,400 watt hours of power in my van.
I already have a 2400wh lithium battery in my van, so why am I adding an additional 1000wh?
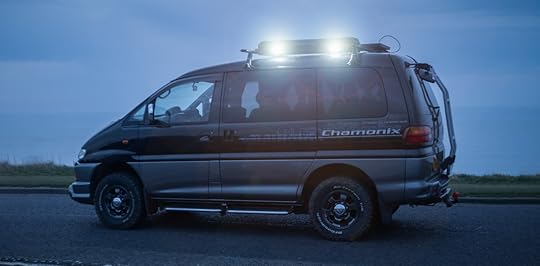
During the winter months, I do not get enough solar from my rooftop panel to maintain my current battery set up on a photography trip lasting more than 4 days. My current battery set up has 2400 watt hours, which is a lot, however there is one constant drain on the battery: my fridge. If I am on a 4-day trip with little to no sunlight, my 2400wh battery will deplete. 75% of that depletion is due to my fridge. It is the only item that is on 24/7. Take the fridge out of the equation and my battery will last for weeks.

The Jackery 1000 is a 1000 watt hour battery pack.

I know what you’re thinking: 1000wh will only keep your fridge on for about 3 days. Yes, but the Jackery does one thing that my current battery does not and that is 12v charging.
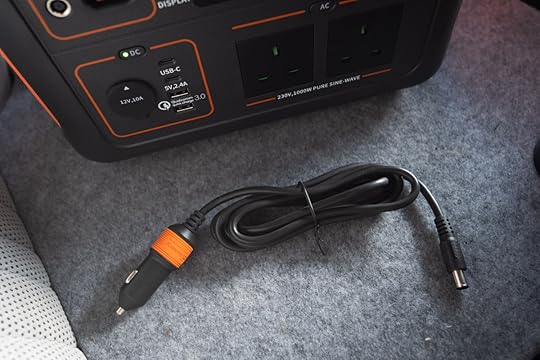
My current battery will only charge through solar or when at home, plugged in to a wall. The Jackery 1000 will do all of the above as well as charge from my 12v socket when driving. This is huge.

As well as that, I have 2 X 100w portable solar panels for the Jackery. So, should I be lucky enough to get blue skies in winter, I can strategically position those panels to soak up as much energy as possible.

The Jackery 1000 will be plugged in to my van’s 12v socket when on a long trip. Don’t worry, the socket doesn’t supply power when the engine is off. My fridge will be plugged in to the Jackery. It all fits neatly in the passenger footwell, so the extra battery does not take up any usable space.

The Jackery will also serve as additional power should I need it, but I can’t see that ever being the case as I now have a total of 3400 watt hours in my van.
Should I ever upgrade my camping set up and expand out of the van (I have been thinking about purchasing some sort of trailer tent) then the Jackery will serve as power inside of said tent. This camping set up would be used when I want to stay in one area for a prolonged period. In which case I would stay on a campsite and use the large tent as a basecamp. The van can transport me around the local area whilst offering such amenities as tea making and shelter. One of the problems I have now is if I want to stay on a campsite with my van, I must pack away my awning, table, and chairs before setting off for a morning shoot. Having a large tent set up would eliminate this problem.

Would I recommend a portable power unit? Yes. Without a doubt, having so much usable power that comes in an easy, transportable package is a ‘must have’ tool for people who like to spend time in the outdoors, be independent yet have power requirements, such as myself. Just make sure of one thing: it has solar and 12v charging.


January 14, 2020
Everest Base Camp Trek
You can see how I filmed & photographed my trek by watching my Nepal Gear Video here.
 Trekking & Photography in Nepal
Arriving in the capital of Kathmandu was a total culture shock! No rules or regulations, just pure mayhem. It was both exhilarating and scary and like nothing I had experienced before.
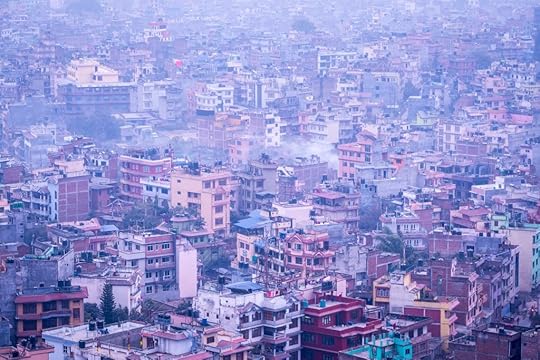 Kathmandu from Above
We spent 3 days here exploring and getting ourselves prepped for what would be one of the most unique treks in all the world.
 Top Tip: Visit Swayambhu (The Monkey Temple) at sunrise, it is an experience you will never forget.
Setting off for our hike, we were thrown in at the deep end right away, having to experience the plane ride to Lukla, given the grand title of the world’s most dangerous airport! With a runaway of just under 530m long and based 2845m up in the mountains, both take off and departures here really set you on the edge of your seat. With an incline of 12degrees, this serves as a way of slowing down the plane rapidly when landing, along with giving some extra much needed speed to the planes departing right over the cliff edge!
Watch my first Location Video from Nepal & see this flight.
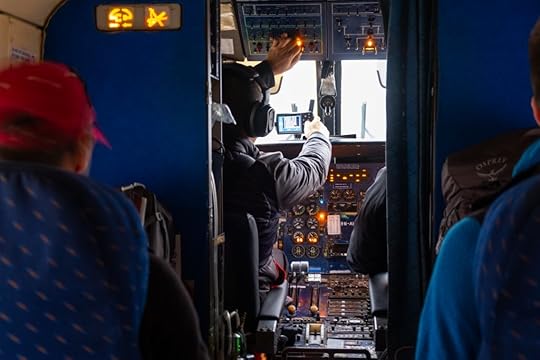 My View Flying in to Lukla
Upon arrival in Lukla we began our trek, heading to the town of Phadking, and experiencing our first night at altitude. Over the coming weeks we made our way through the Sagarmatha National Park, making numerous stops for both photography, and altitude acclimation, including Namche Bazaar, Machhermo, and Gokyo.
Watch my 2nd Location Video from the Gokyo & EBC Trek.
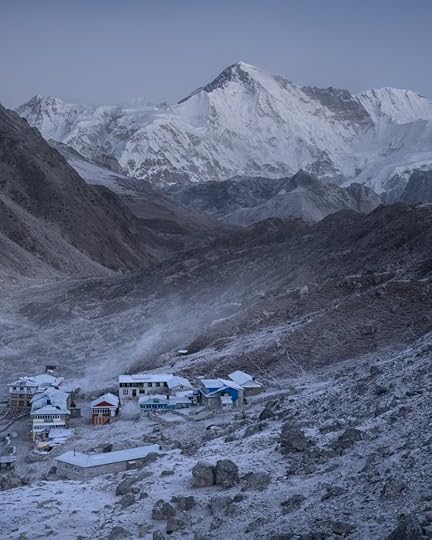 Gokyo, -17ºc
At approximately 4800m Gokyo was a stumbling block for me. With everyone feeling exhausted and very cold up at altitude it was hard to distinguish exactly when I started to feel ill. The best way to describe my altitude sickness is like having flu, only you can’t catch your breath and your bedroom is -10ºc. Luckily there happened to be a doctor staying at the same teahouse as us and she immediately diagnosed me with acute mountain sickness (AMS). It was advised that I do not continue on the trek and in order to prevent my sickness developing into a more severe and dangerous form I needed to drop back down to a lower altitude. I resigned myself to the fact I wasn’t going to make Everest base camp.
Watch the 3rd Location Video here.
 Suffering Badly with AMS. (But look how happy my guide is).
The next morning, as the rest of the group continued and made the final leg onto Everest base camp, I begrudgingly but sensibly travelled back on myself. Along with my porter, we both spent the next 3 days at lower altitude, he is taking a well-deserved break, and myself slowly gaining my strength and enjoying the extra oxygen.
 My Porter & I Making Our Way to Lower Altitude.
Once I descended 1000 meters, I immediately started to feel better and I continued on my journey and met up with the rest of the group in Pheriche. On my way, I was treated to some spectacular light on Lhotse and Mount Everest and made one of my favourite images from the trip.
 Sunset on Lhotse & Everest.
Once I was reunited with my group we had one final adventure together; a push up to Ama Dablam basecamp at 4600 meters.
 Ama Dablam Summit.
Ama Dablam is one of the most attractive mountains along the Everest Basecamp Trek and is visible for most of the journey. In my final instalment we attempt to hike up to the basecamp, however it was not as straightforward as we hoped. The difficult terrain and poor navigation meant that we ended up chasing the light, which is never a good situation to be in as a photographer.
Watch the final instalment of my Himalayan adventure here.
 Hiking to Ama Dablam Basecamp.
This trip was the most challenging I have ever been on. Our accommodation was basic with no heating, no running water and little in the way of amenities. The air was thin and the temperatures were cold, but we were greeted with nothing but warmth and friendliness from the locals. It was a real feeling that you were journeying out of civilisation and reaching heights of the world that not many people ever manage. Although many would think this sort of trip sounds miserable, when amongst friends and photography, it soon makes you realise life is what you make it. We had wonderful views, a few good beers, and made memories of a lifetime.
Click here to see my entire Nepal playlist.
The post Everest Base Camp Trek appeared first on Thomas Heaton.
December 17, 2019
Enduring Glencoe
The van is great for dry days as I can come and go as I please and really enjoy the outdoors. However, when the weather is just a constant downpour it can be a real struggle to enjoy the experience.Despite the weather I did manage to get a couple of photos. My 5D MK IV had no problems with the rain, but my little M50 deserves a status upgrade to ‘Waterproof’. That thing has been pushed way further than it ever should be and continues to perform without any issues at all.
Some of you may have noticed that the style of editing in my recent videos has slightly changed. Less talking and more the sounds of nature and the environment around me as I explore my location. I am hoping this gives the viewer a more immersive experience into my journey as they can hear, see and sense the same things I do whilst making my way to setting up for my shoot.
Do you like the slower paced journey, taking in the atmosphere as we walk together to find the ideal spot for a photograph? Or do you prefer me to get straight to the point and dive right in to taking the images?
The post Enduring Glencoe appeared first on Thomas Heaton.
Scotland Road Trip
Welcome to another blog and welcome to the start of a new series of videos documenting my recent trip up to and around Scotland in October 2019! As many of you know, Scotland is one my favourite places to photograph, and in the autumn time it is simply amazing for photography.
I travelled for 8 nights, starting at Dumfries and Galloway and slowly working my way up north trying to find and follow some good weather (with mixed results!)
Today’s video shows my first stop in Galloway where I meet up with Project Amber. He worked his magic on my campervan by installing and updating my solar panel and electrics. Now I can monitor my 150watt panel from my phone giving me great peace of mind.
After spending the day with Project Amber, and the weather turning, I moved on to The Trossachs where I found much better conditions; calm winds, gentle mist and lots of yellow trees. Actually, the ‘Yellow Tree’ thing becomes a bit of a joke as for a while it seems that all I photograph are lone yellow trees.
I continued north to Glencoe, which I can only describe my time here as hell on earth. Driving rains, storms, blustery gales! Everything I didn’t want for my trip. I begrudgingly persevered long enough to get a couple of images, but soon bailed on the area and made my way to the Cairngorms National Park.
Here things were much more subdued; no drama but plenty of lovely warm Autumn colours… and lots of yellow trees.
I met up with another fellow YouTuber and friend of mine, Murray: AKA Scotland’s Mountains. We loaded our camping and hiking gear and headed off into the wilderness and up the mountains. Despite our enjoyable hike with amazing scenery, the weather took a turn for the worse as we climbed higher.
With just enough time to grab a shot & not wanting to be stranded in the snowstorm that was arriving we took the decision to head back down to our sheltered camp in the woods. Naturally, a small sip of whisky to round off the day was shared, before we turned in for the night.
Keep watching over the coming weeks to see my trip unfold. In the meantime, if the weather holds, I shall be returning to Scotland very soon, this time accompanied by Simon Baxter and my new inflatable canoe! Fingers crossed!
The post Scotland Road Trip appeared first on Thomas Heaton.
December 16, 2019
My Gear
It’s 2019 and a lot has changed, so I have created this new up to date kit blog. Below is almost everything I use and I shall try my best to keep on top of it.
I have included links to all of my kit, some of the links will take you to Amazon. These Amazon links are “affiliate links” which means if you click on it and buy it, I make a small 3% – 8% commission. Thank you for your support.
[image error]
Recently Seen
Acratech Tripod Head
My Bowl Head Tripod
Go Pro Hero 7 Waterproof Camera
My New F-Stop Camera Bag
Cameras and Lenses
Canon 5D MK IV – I love this camera. Great image quality and excellent dynamic range. GPS & touch screen are welcome additions. The face detection AF is amazing for making Youtube videos.
Canon 70-200L f4 (None IS) – A great lens and very affordable. It’s lightweight and tack sharp. I always use a tripod so rarely need the IS.
Canon 24-70L f2.8 MKII – Probably my most used lens. It’s very expensive, but offers amazing image quality throughout the focal range and is perfect for a lot of landscape situations. Also comes in handy for portraits & events.
Canon 16-35mm f4 – A lens I have been after for a while. Great quality, not too expensive and really helps with those interesting foregrounds.
Go Pro Hero 7 Waterproof Camera – My current mini camera. Far more reliable than the DJI Osmo action that I previously tried. Great image quality.
Intrepid Large Format 4×5 Camera – This is a new venture for me. So far I am enjoying all the benefits that come with shooting LF film. This camera is very affordable, but be warned, you will need to invest in a lot of accessories to be able to go out and shoot large format properly.
Nikkor 180mm LF lens – This lens is tack sharp and has the 35mm equivalent focal length of 60mm.
Canon M50 – This compact & lightweight mirrorless from canon is almost the perfect vlogging camera. It’s relatively in expensive, shoots 4k and has an excellent Digital In Body Stabilisation for video as well as a flip out screen and mic input.
Rode Video Mic X – This is an expensive microphone, especially when you can pick up a Video Micro for £50, however the quality of this mic is superb and there is no better solution for recording the ambient sounds of the landscape.
Canon 200D/SL2 – This has been demoted to backup camera. This is a great little vlogging camera that ticks a lot of boxes. Flip out screen, excellent image quality, small, lightweight, dual pixel auto focus, affordable. After extensive research, this was the camera for me.
GoPro Hero 4 – Used mainly as a back up to the G5X, this camera has had a new lease of life injected as I now use it with the below ‘Gimbal’, which offers excellent smooth footage; perfect for B-Roll.
Photography Accessories
L-Bracket – This allows me to instantly rotate my camera 90º and is one of those accessories: Once you have it, you’ll never be without it.
Acratech Tripod Head – This is sturdy, lightweight and works in conjunction with my bowl head tripod. This setup allows for fast and accurate panoramic photography as well as single shots.
My Bowl Head Tripod – This is a new piece of kit for me, but it has been hoilding up well. It is tall, lightweight and has the all important bowl head which allows for rapid set up for panoramic photography.
Lee Filters – I use a range of Lee graduated ND filters, ND filters, a clip on polarising filter and some mist filters. All of these are used with the new Lee 100 Holder. The quality of the filters are second to none. The polariser causes minimal vignetting even at 16mm.
Filter Pouch – Keeps all my filters together and safe.
Sekonik 758DR Light Meter – Couldn’t shoot LF without it.
Film Changing Tent – This is a ‘must have’ accessory when shoot LF in the field.
Rode Smart Lav – This small mic clips on the my shirt and allows me to record audio separately from the camera. Very good for working on location and in the outdoors.
Zoom1 Audio Recorder – This is what the mic plugs in to. Small, good quality and a battery life that lasts forever.
Adapter – Annoyingly the Rode Smart Lav requires this small adapter to work with the Zoom1.
Rode Video Micro – This little mic offers amazing quality when plugged in to my Canon 5DIV. Mainly used when filming pieces in my office.
My Gimbal – This is a handheld, battery powered steady cam for the GoPro. This things is amazing! I can run with this at full speed and it looks like I am floating. Excellent battery life too.
Camera Slider – This is a very portable and extremely intelligent device which adds a very subtle cinematic feel to video work. That being said, it is very expensive.
[image error]
Drones
DJI Mavic Air – This is my go to drone for most of my work due to it’s portability, low weight and reliability.
DJI Phantom 4 – This is one f three drones I use for B-Roll. The image quality is excellent and it takes a great RAW file, but it is terrible to travel/hike long distances with as it’s too bulky.
DJI Mavic Pro – My second drone. What this thing lacks in quality is more than made up for in portability. No bigger than my lens, it fits in all of my bags and travels well. P.S. The quality is actually ok.
[image error]
Post Production Work & Editing
My Photography Monitor – I use this monitor in conjunction with my iMac as it gives a far more accurate representation of how my images will look in print.
Sandisk SSD Drive – This holds all of my media, Lightroom Catalogs and Adobe Premier Project files. This system allows me to seamlessly switch from laptop to desktop without ever having to sync folders or re-edit images.
Adobe Photoshop – I don’t need to say much about this.
Adobe Lightroom – Used to edit and organise my library of images.
Adobe Premiere Pro – A great piece of editing software. I probably utilise about 3% of what it is capable of.
My Office Gear
Photo Printer – I use a Canon Pixma Pro 1000. This produces amazing quality prints, up to A2 size. Most of my Ltd Edition prints come from this machine.
Stabilo Watercolour Effect Pencil – Not very exciting but its one of the best tools for the job for signing prints. Recommended by a viewer and it was certainly worth it as it works on all surfaces!
Quilted Soundproofing – Perfect to prevent bounce back of my voice and echo in my office.
BenQ SW271 Monitor – This works perfect in my dual monitor set up that I always wanted. Can flip to both horizontal and vertical easily which is fantastic for editing and viewing photographs. I use it exclusively when preparing prints as the colour and detail is so accurate.
Studio Lights – My hair lights are mounted on a boom pole allowing them to cast a light right over me where I want it.
Camera Rig Clamps – Easy to adjust and lets me mount my gear easily without having tripod legs all over the shop.
Camera Power Supply
Mic Stand – In use with the mic below this allows easy access and use during videos. Easily swings back and forth.
Voice Over Mic
SSD Drive – Admittedly very expensive but its my lifeline to store all my documents. I can migrate working from my iMac to my laptop seamlessly using this drive. Super fast and super reliable.
[image error]
The Outdoors
GPS Watch – My Garmin Fenix 3 is a real life saver. I always have it with me, I can plot routes, find my exact GPS location and cross ref with my map and I can navigate back to safety.
Hand Held GPS – This GPS relies on AA batteries, so I can always have spares and it has built in maps, so if I get lost, I can rely on this to get me back to civilisation.
Vango Banshee 200 Tent – Compact, lightweight, quick and easy to erect and big enough for 2, this tent is excellent. What sold it for me was the double doors, offering amazing views.
Thermarest Neo Air X-Lite – Expensive, but a purchase you will not regret. Small, super light, incredibly comfortable and warm; this camping mat is better than most beds.
Camping Pillow – Wait, don’t go anywhere! This is my most important piece of camping kit. I am one of those people who can’t sleep without a good pillow. Nothing cut the mustard until I found this. It really does tick all of the boxes.
Leatherman Skeletool – Well made, lightweight and incredibly handy when away from civilisation. You should always carry a tool with you when enjoying the outdoors.
Bags and Clothing
My New F-Stop Camera Bag – My current go to camera bag, with sturdy construction, incredible comfort and ergonomics that allow me to carry and access all my gear. Also acceptable size for aeroplane cabins too!
LowePro Pro Runner 450 – A really solid bag. I use other bags too, but this is the boy! Holds everything and so far, it is withstanding years and years of rough handling.
LowePro Tactic 450 – Another great bag. Solid with a shell like construction, versatile and is the best bag for overseas travel due to it’s moderate, yet generous size.
LowePro Pro Rover 45 – Sadly this bag has been discontinued, but I love it. I have comfortably trekked miles with 3 lenses, body, filters, tripod, tent, sleeping bag, food, water and all the other bits and pieces we need for the wild.
I have also made a Youtube video talking through my specific winter clothing selection. Below are the articles that featured in the video.
My Photography Gloves
My Down Jacket
My Hiking Boots
My Waterproof Socks
My Softshell Trousers
My Rab Mid Layer Jacket
My Waterproof Trousers
The post My Gear appeared first on Thomas Heaton.
July 3, 2019
Crazy Clouds
After having spent 5 days practicing landscape photography in Iceland I was lucky enough to witness some amazing scenes. This blog post is an add on to my Youtube video so you can see a few more images and read a little more information and if you would like to know more about the gear I use on my adventures, check out my Gear Blog Post.
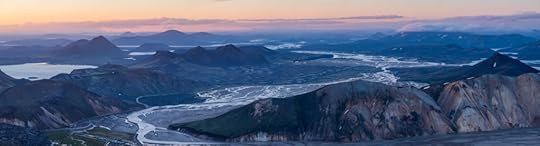
The weather in Iceland may always be unpredictable, but this results in it always being interesting. Our first stop was an impromptu one as we could see an enormous amount of dust and sand being whipped up in to beautiful clouds in the distance. This was quite unusual because Iceland is a very wet place, but it hadn’t rained for 6 weeks. As I tried to select a composition, I found I was distracted by a large rock that was always in my shot. I had a dilemma; do I remove this rock during editing to give a more satisfying image, or do I leave it, accepting that this rock is a natural part of the boulder filled landscape. Here you can see the 2 images for yourself. Did I make the right decision?

ƒ9 | 1/80 sec | 100mm | ISO 100
After photographing the sand storm, we headed to our campsite to set up base camp. During some down time we played a little frisbee and things quickly got carried away. Our videographer Greg’s finger took quite the beating from a diving catch as we tried to test the stabilised footage of my DJI Osmo Action Camera (The footage looked amazing by the way). Despite its crooked state, a visit to the islands hospital resulted in him being strapped and bandaged and ready to film another day! You’ll be pleased to hear that although Greg’s finger is still strapped up right now, he is managing just fine!

Dislocated Finger
Once Greg was back on his feet we ventured out. As we were getting ready to leave we noticed some peculiar looking clouds start to form above our campsite, but we had no idea that they would turn in to one of the best skies I have ever seen.

Photographing Lenticular Clouds
Lenticular clouds get their name from the fact that they’re shaped like a lens or saucer and are often known as flying saucer clouds or UFO clouds.
Air flow usually travels in a uniform fashion when there are no obstructions, but when its flow is interrupted by something like a large mountain then turbulence is caused and air is displaced. In this instance, the rising air continues to cool and condense, whilst the sinking air is encouraged to warm up and dry. Where this resulting moist air meets in the middle, a lenticular cloud is formed. They are different to other clouds in that they don’t move from their spot, instead, they are continually reformed over the same location by new air rising, condensing and producing the clouds.
What this means for us photographers is that we get to see some amazing shapes over the landscape, and since they are stationary we can often wait for the sun to set or rise, giving us time to photograph them in the perfect light.

8 Image Pano – ƒ6.3 | 1/320 | 35mm | ISO 640
Although they looked amazing in person, it was a challenge to try and portray their greatness in a photograph and get the viewer to feel what I was feeling. I attempted a pano (see above) to capture the entire sky. I used a high ISO to achieve a fast shutter speed due to the high winds. The image came out ok, but there is too much going on so I needed to simplify things and break the image down.
Luckily more interest started to build on the right hand side as low clouds began to form over the peak of the mountain. This allowed me to zone in on a much smaller area and work the scene.

Low Clouds Forming on the Mountain
Not only were the low clouds rolling over the peak, but the lenticular clouds had now started to catch the burning red light of sunset and for what looked like flying saucer over the interesting mountain. My first attempt was an 8 minute exposure with a Lee 10 Stop Filter, but it didn’t work out as I realised that all of the interest was actually in the structure of the clouds.

ƒ9 | 496 Seconds | 70mm | ISO 100
I was much happier with my second attempt of 13 seconds after I dropped in a Lee 4 Stop ND Filter. This image retained all of the detail in the scene and that, for me, is where the interest lies.

ƒ11 | 13 Seconds | 57mm | ISO 100 | 4 Stop ND
I made one more exposure, which was a shot of the entire mountain from a much wider angle. I am still unsure how I feel about this image. Something about it does not feel right, perhaps the balance is off due to the uneven cloud distribution, or perhaps I was at the wrong angle for photographing the entire mountain.

ƒ11 | 15 Sec | 27mm | ISO 100 | 4 Stop ND Filter
If you would like to know more about the gear I use in all of my photography adventures, including photography gear, video kit, clothing and camping gear then take a look at my Gear Blog Post. You can also sign up to my newsletter below to get information on workshops, calendars and various other stuff coming up in the future.
The post Crazy Clouds appeared first on Thomas Heaton.
August 1, 2017
My Fear of Workshops
Sunset from the summit of Bláhnjúkur
My recent Icelandic landscape photography workshop with Thor Photography was a success, all participants were happy, learned a thing or two and came away with some great images. We ate some great food, went kayaking in the mountains, we all bonded over drinks and great stories. In other ways, it was also a bit of a disaster, well the second week was a bit of a disaster. This article explains about a storm that hit our camp. Luckily we escaped it and had the sense to pack everything up and get the hell out of there. You can see the video series of this workshop HERE.

Volcanic Crater in the Icelandic Highlands
It has taken me several years to build up the confidence to lead group workshops. I would shudder at the thought of encountering days of bad weather and would worry about being asked questions I could not answer. Running a workshop is just one example of how a lack of confidence and self belief can hold you back because the truth is, running my first group workshop was one of the best things I have done and the relentless battering we took from the weather was a blessing in disguise.

Maria, Logan, Jody, Aljan & Thomas (Sorry Chris, I don’t know where you are)
“As long as we have perfect light, we can’t go wrong”. This was a constant thought I had leading up to my trip to Iceland and we did encounter those perfect moments, but thankfully we also encountered horrible weather; wind, rain, flat skies and on top of all of that we were camping! So why was I thankful? Because my fears were realised and as it happens, those fears weren’t a fraction as bad as I had imagined. In fact, it was the complete opposite. Those bad weather moments actually pulled us together as a group. We all bonded, helped each other out, shared drinks and shared stories.

Jim, Chad, Thor, Rob, Chris, Efrat, Andre, Me
During a really bad storm on week 2, we all had to rebuild camp at 1am in driving rain, it was horrible, we were wet and we were tired. But then something happened and the whole group found this amazing energy, pulled together as a team and built camp in 15 minutes flat! It was incredible. 4 people working on one tent at a time with 4 others working on another. That night we were wet, cold and tired, but we all had a great sense of accomplishment. We sat in the warm trailer tent, opened the Whiskey and chatted for what felt like hours in to the night. It was the happiest we had been as a group.

Bad Weather moving in
Running this Icelandic workshop, facing my fears and living them has only made me stronger, more confident and more comfortable with future projects. I am a big believer in getting out of your comfort zone, whether it is running workshops, starting a Youtube channel, shooting locations that are slightly less hospitable or travelling to a completely new & foreign land. Pushing ourselves and doing things we are not comfortable with is the only way we can grow and learn.
I’d like to say a big thank you to Thor Photography, my co-leader in Iceland and to all of the participants; André, Efrat, Chris, Rob, Jim, Chad, Logan, Maria, Jody, Thomas, Chris & Aljan all of whom I would consider friends. I have created this video playlist if you wish to watch this video series and see in more detail what we got up to.
The post My Fear of Workshops appeared first on Thomas Heaton.
July 15, 2017
The Hardest Part of Landscape Photography
People comment on my images and say things like “If I could take an image half as good as that, I would be happy”. This is the thing, anyone could have taken most of the images in my portfolio without any real difficulty.
Yes, composition can be tricky… sometimes. In most cases, the best approach is to keep things simple. Move left, shift right, drop your tripod a little, look for anything in the frame that distracts you and work to eliminate or minimise it. If you find yourself bending over backwards, with your tripod at angles never before seen by human eyes, then you’re probably trying too hard to make the shot work.
I shot this image and I love it. It’s one of my favourites. So, what was my secret? How can you shoot images half as good?
Well, my secret isn’t much of a secret and the most difficult thing about creating this image was not having the right gear or having the necessary technical skills to be able to execute the exposure. I did not use my extensive knowledge of Photoshop (I have no such knowledge) to achieve this photograph and I certainly didn’t pick out this composition in a crowded tangle of trees and shrubbery.
I checked the weather report, woke up early, I explored a local valley close to home and I took a few photographs. That was it. No magic recipe. The hardest thing about landscape photography is waking up and getting out! You can watch the video Here
The frozen tree was an easy find. It was there, it was obvious. A single subject, backlit by the morning sunlight. I looked at it, figured out what I didn’t like (the sky) and used an appropriate focal length to make sure the sky was not in shot. Point, Focus, Shoot.
I Photographed this image before sunrise at Buttermere in the Lake District. The hardest part? Waking up at 4am and walking down to the lake not knowing if it would be worth it.

So this is my point, landscape photography can be so simple. Your camera is very intelligent and will focus and expose for you in most cases. It is YOUR job to get out there, explore and find these hidden treasures. You need tenacity and perseverance and that is the most difficult thing about landscape photography.
The post The Hardest Part of Landscape Photography appeared first on Thomas Heaton.
May 24, 2017
3 Images, 3 Focusing Methods
Here are the 3 images from my focusing video. I am limited in file size to what I can upload here, but you can click on the images to enlarge and compare if you wish.
The first image of the trio is Hyperfocal distance using a tape measure.
The Second image is focused to infinity.
The third image is Hyperfocal using a method of depressing the DOF preview button.


Infinity

Hyperfocal

Hyperfocal DOF Preview

Hyperfocal

Infinity

Hyperfocal DOF Preview
The post 3 Images, 3 Focusing Methods appeared first on Thomas Heaton.
February 22, 2017
Luleå & Bad Composition
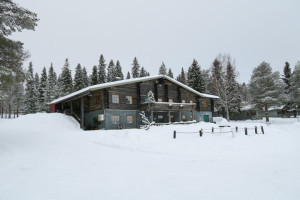
Brandon Lodge
I was fortunate enough to go on a trip to arctic Europe with Discover the World. It was this time last year that I previously visited Tromsø & Senja, so I was excited to return. My first stop was Luleå in northern Sweden. It was here that I hoped to photograph the northern lights. I stayed at Brandon lodge, which was a truly amazing place to stay with the most incredible, friendly and accommodating hosts. I had access to snowmobiles, fat bikes, snow shoes and even a hovercraft.
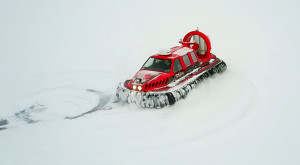
Hovercrafting!!
Luleå does not lend itself well to landscape photography when compared with the more mountainous areas of Norway, however what it lacks in topography, it makes up for in pure wilderness. Luleå is an archipelago and during the winter all of the lakes freeze over creating a beautiful winter wonderland. The peace and quiet coupled with the winter activities make for a splendid and unique experience. Unfortunately for me the weather was not great so I did not see the northern lights, but there was still a lot of areas to explore, activities to enjoy and experiences to be had.

White Landscape
The white landscape really helped me focus on my photography. Rather than being distracted by towering mountains or ancient woodland, the winter wilderness forced me in to a zen like state and made me thoroughly appreciate every detail.
The hovercraft was not a let down, it was incredible and made for a truly unique experience. Sadly it wasn’t practical for photography as it was almost impossible to maneuver in to position with any grace or accuracy. The pilot, an Australian?, was so patient as I tried my best to inch us closer to a composition I had seen, but I may have tested his patience when I asked him to reverse back a few inches. For those of you who don’t know, hovercrafts do not reverse. It was time to move on.

Finding the Detail
The real magic happened at the end of my final day in Luleå. I had been out on a snowmobile, riding across the endless white planes when darkness began to set it. Visibility was down to almost zero, which was rather quite beautiful. There’s something to be said for being in a complete whiteout with no sights and no sounds. It’s incredibly calming. In the distance appeared strange sounds and shapes back lit by the headlights of 2 snowmobiles. At first I wasn’t sure what it was, but as we got closer I could see that it was Sami Reindeer herders escorting a group of Deer to a nearby island. This was most unexpected and offered a unique opportunity for a photograph. As accommodating as ever, my host from Brandon Lodge agreed to let me jump on the back of his snowmobile a and shoot as we followed the group across the frozen lake. This was a truly wonderful experience.

Out of the Darkness
The next day I flew to Tromsø in northern Norway. The day was really supposed to be a travel day, but for me, that is a hard pill to swallow… so we took the scenic route to our hotel and stopped at Grøtfjord, which is a beautiful, remote beach surrounded by mountains on either side. The plan was to shoot an image at sunset. Unfortunately the light was gorgeous… wait, what? Yes, unfortunately. The light was great, but it was in the wrong place. I did attempt to make one photograph, but I could not make the composition work.
To make a great photograph you need a combination several components: Subject, Light, Composition, Mood, Action, Detail and more. You don’t need all of these, but certainly a combination of at least 3. The most important being Subject, Light & Composition.

Left and Away
This image only has 2 of those 3 elements; subject (mountains) and light (on the mountains). Unfortunately this image falls down massively on the composition. Take a look at the photo and imagine there is a magnetic force pulling your eyes to the left and out of the frame. That is exactly what is happening, but rather than magnets it is that stream of water leading you in and out of the photo, bypassing all of the goodness at the top of the frame. This makes the photo very hard to look at. In a perfect world the stream would have turned right and continued on to the mountains. Next time you frame a shot, ask yourself if anything is trying to pull you out of the shot and then correct for it. In this case, I was unable to correct.

Everything takes me away from the interest.
This blog will continue after the next in my ‘Arctic Europe’ videos have been released – I would hate to give away any spoilers.
9 total views, 9 views today
Thomas Heaton's Blog
- Thomas Heaton's profile
- 16 followers

