Daniel Royse's Blog, page 5
March 12, 2017
Gear Review: Water Filtration vs Water Purification (for Camping and Backpacking)
 With all the different products and technologies out there it can be difficult to understand which type of water purifier or filter you need for which situation. So I’ve decided to give you a quick breakdown of what I’ve learned along the way. This comes from years of backpacking, camping and trekking in different parts of the world. In this article, I’ll discuss the differences between water filtration and water purification and how they relate to camping and backcountry hiking and trekking.
In general the difference between a water filter and a water purifier is the size of the microorganism they fight. Filters will strain out bacteria and protozoa, whereas purifiers will remove viruses as well. Water filtration should be fine for anywhere in the United States, where as a water purification method is advised for areas outside the country. As always, check your products packaging for specific details.
WATER FILTRATION FOR CAMPING AND BACKPACKING:
Water filtration is a process that rids water of impurities by means of a physical barrier, chemical process or biological process. Water filters can come in a variety of sizes and shapes and most camping filters will protect you from bacteria and protozoa up to a certain level as well as heavy metals and other contaminants. When shopping for water filters for your next camping or backpacking trip, you will probably come across these three basic types.
 Pump Water Filters:
Pump-style water filters incorporate a hose that sucks water from a source and a pump that pushes it through a filter. These are great for filtering large quantities of water. However they are typically large and heavy, so not very good for backcountry hiking. They also require field cleaning, which means added work in order to keep you water safe for drinking. These types of filters are best if you are preparing water for a large group of people or a family.
 Straw or Bottle Water Filters:
Straw filters are small and lightweight and are great for long backpacking trips. They filter water as it is sucked from the source…like a straw. They can access water at its source or be attached to a bottle. They are great for individual use but cannot filter large quantities at one time. The two most popular types are the LifeStraw and the Sawyer Mini Filter.
 Gravity Water Filters:
Gravity filters involve gathering a large amount of water in a reservoir and using gravity to pass it through a filter. They are great for large quantities without having to expend much work. They also tend to be heavy and not recommended for long backpacking trips.
WATER PURIFICATION FOR CAMPING AND BACKPACKING:
Water purification is the process of removing undesirable chemicals, contaminants and solids from a water source. Water purification will kill most bacteria, protozoa and viruses, but keep in mind that the methods described below DO NOT filter the water from heavy metals or sediment, so it is recommended to use a pre-filter for murky or cloudy water…or any of the above mentioned filtration methods. In general there are two types of water purification methods that are used by campers to quickly purify water.
 Chemical Purification (Iodine or Chlorine):
This method is most commonly done with the use of iodine tablets. Simply drop one iodine tablet into your water canister and wait about 30 minutes or so (depending on the tablet and the size of the canister). The iodine tablet will kill the bacteria, protozoa and viruses and make the water safe to drink. Unfortunately iodine will give the water an unusual taste and is not considered safe for women who are pregnant.
 UV Light Water Purification:
Probably one of the best ways to purify water, the UV water purification method works by emitting UV light which kills the reproductive capabilities of bacteria, protozoa and viruses. It’s usually done by stirring a glowing rod around in a glass of water. It can purify a liter of water in under a minute. The downside of this method is that it takes batteries and therefore adds additional weight to your pack. The most popular brand is the SteriPen.


March 8, 2017
Living Abroad: Having a Great Experience and Leaving a Great Impression
 If you play your cards right, living abroad can be an extraordinary life-changing experience. You will face so much more than just new language, food and culture, you’ll be surrounded by countless invisible differences which conspire together to create that unique foreign charm. At times you’ll struggle to explain or comprehend what you see around you, and at others it will simply overwhelm your senses and leave you speechless. But if you can’t adapt to your new home, that charm quickly degenerates into annoyance and disdain and you come home jaded and bitter. After four years of living abroad and experiencing every variety of good, bad and ugly, the difference between extraordinary and jaded distills down to a few key points I want to share. While you’re gone, read through this from time to time to remind yourself why you’re there in the first place. Then eventually, when the time is right, you’ll come home with great things to say and leave behind people with great things to say about you.
When in Rome…
This really goes without saying, yet it still amazes me how many foreigners go abroad and live like they never left home. No one expects you to go native, but a little effort goes a long way. The locals appreciate the effort, you make a positive impression on behalf of all foreigners, and the compliments you’ll get will make you feel better and leave you with a better impression of your hosts. Give yourself some time, but if you find yourself living the same old life in your new home a year in, it’s time to re-evaluate.
 Find Your Balance:
Live as the Romans but don’t force yourself to try and be one. There will always be politics you don’t agree with, food you don’t like, habits you can’t stand, and cultural aspects you find unacceptable. The good news is that you get to choose what to accept and incorporate into your own life. As for the rest, be conscious of it but don’t brood, your contempt is not going to change their hearts and minds.
Break Away from Your Own Kind:
Surrounding oneself with expat friends is just comfort food for ignoring the challenges of foreign life. Don’t fall into this trap and miss an opportunity to make local friends and really understand a place and its people. Making local friends is difficult, be persistent and get out of your comfort zone, but nothing will guarantee a great experience better than a circle of close friends. At the end of the day, you’ll have far better stories to tell than typical expats.
Keep a Piece of Home:
You’ll still need that comfort food from time to time, so find your thing, keep it close, and apply as needed. Whether that’s Starbucks with a book or a 5k in the gym, there is no reason to give up the things you enjoyed back home and make life unnecessarily difficult. You will have bad days, when you do, indulge yourself, you’ll feel better. It’s also good to make an expat friend or two who can relate to you, get together for beer, pizza and politics once in a while and get it all out. Just don’t let once in a while turn into four days a week at the club.
You Are an Ambassador:
When people see you acting like a douche bag, they assume everyone else in the entire world who looks like you are also douche bags. When they see you go out of your way to be kind, same rule applies. Don’t be a douche bag. Don’t let your friends be douche bags either. A local person may only have a one experience in their entire life on which to judge an entire foreign culture, don’t let that be of you, the only white guy, wasted, blasting music, almost naked, and screaming at local girls in nearby boats at a water park for families (no, I did not make that up).
 Learn to Communicate:
Communication will be your biggest challenge, accept it. Concealed within a language is thousands of years of culture and history, and you’ll never fully understand another culture if you don’t learn the language. Most people don’t have that much time, but at least learn some basic words, it’ll put a smile on people’s faces and make the little things easier. When speaking your native language, speak slow, clear, use simple grammar, no colloquialisms, and speak the local version of it (Spanglish, Chinglish….). You might feel stupid at first, but if people can’t understand you they will avoid talking to you altogether. Finally, remember that translation is never exact and people will say the wrong thing all the time, don’t take it personally, try to understand what they really mean, and don’t correct them in public.
Not Everyone is Your Friend:
Most people will be friendly, sincere, and happy to meet and help foreigners, but don’t let that blind you to the fact that there are scammers, scumbags and bigots in every country on earth. Keep your guard up and if you get a bad vibe, trust your gut, foreigners are easy targets. On the off chance you meet someone truly prejudiced towards foreigners, there could be any number of good reasons why, or none at all. Either way an argument won’t help, just be polite, move on and remember there are a small minority of idiots where you come from too.
Know Your Place:
Learn the boundaries of cultural, political and other sensitive local issues, ask questions and understand viewpoints before opening your mouth. While people may agree with your opinion either way, they may not want to hear it from a foreigner, remember that this is not your country and it is almost always better to remain neutral on politics and sensitive issues. Many countries have histories of colonialism, political upheaval and other traumatic events which you may not fully understand or appreciate, and saying the wrong thing will just make you look ignorant. Use action to change hearts and minds, and save a contentious opinion for when it really counts.
 Work Quietly for Good:
It is easy to give in to those local bad habits that every place has, don’t give in to the dark side. Be polite and respectful, remember your manners, and go out of your way to be kind. Ultimately your small acts of kindness will touch countless people, and they will remember them along with that foreign face of yours. When local people talk about your culture, give them something good to say.
Know When it’s Time to Leave:
Sooner or later you’ll know it’s just time to go home. On the extreme end you’ll find yourself shouting obscenities in front of a crowd of locals who think whatever just happened is normal. If you find yourself here, it’s time to leave. More likely, you’ll just find yourself getting overly annoyed by everyday things, complaining more than you should be and in general just not feeling great about the whole situation anymore. Don’t delay the inevitable and end up leaving jaded and bitter, cut off your experience while it’s still good and call it a day.
March 5, 2017
New York City: What are Small Low Priced Micro-Capsule-Tiny-Room Hotels?
 Okay, so you want to visit New York City and not break the bank paying for expensive hotel rooms? Oh, and you also want to stay “in the city” and not across the bridge in Brooklyn, Queens or god forbid New Jersey? And to top it off you’re past the stage of staying in hostels, cause maybe you’re too old or just too damn sick of people coming in drunk at all hours of the night waking you up? Wow!…lots of requirements. BUT fortunately for you there is one option left.
Due to the lack of space and high prices, New York (or rather Manhattan) hotel owners have come up with a solution to your dilemma. They’ve adopted a micro-style (capsule) hotel room for people that just want a simple bed to crash in and still be close to all the action of Manhattan. No, its not glamorous and don’t try to take your wife or family to one of these places, but if its just you, you can pull it off without a problem. Let me break it down for you.
 WHAT IS A MICRO-HOTEL (CAPSULE HOTEL)?
The micro-style hotel room is a small…very small, room that’s typically about 6 feet long by 5 feet wide (give or take). It includes a twin bed and a night stand. That’s it! In fact in many cases the bed may be slightly smaller than a regular twin bed in order to fit it in the room. In most cases your luggage will have to sit on the floor in front of the door while you sleep and then be put on the bed once you get up.
The walls are not exactly walls, but more like partitions that provide privacy yet do not prevent noise from moving between them. So a big downside to this style of hotel room is that you can still hear some of the people near you. Ear plugs are recommended! The bathroom and toilet are shared with the rest of the rooms. Sometimes there are a few singular bathrooms and sometimes they are communal.
MICRO-CAPSULE-TINY HOTEL IN MANHATTAN, WHAT IS IT LIKE?
Here’s a couples things to know when you’re thinking about a micro-hotel room.
Check-in, grab your key and head to your “room”.
You will probably notice a huge room filled with small doors, each leading to an even smaller single “hotel room”.
Unlock your room and do your best to fit your luggage inside.
You should have a lamp, a night stand and a small bed. Not much else.
Restrooms are probably around the corner…and not very clean.

PRICES AND WHERE TO FIND THEM?
In New York City, Ive mostly noticed these kind of hotels around the Chinatown and Lower East Side areas. I know there are a few located on Bowery St. Here are a few that exist at the time of writing.
The Bowery House: About $50 per night
New World Hotel: About $40 per night
Bowery Grand Hotel: About $40 per night
Jane Hotel: About $90 per night
WHEN IT SHOULD BE CONSIDERED:
Do not bring your wife here. Do not bring your kids here. This is a one-man-show….and thats it. Its a bed in a prime location with almost no amenities. But I have to say that I don’t mind them. In my experience they were always clean-ish and cheap, but definitely not a place I would bring guests to.
 ADDITIONAL MID-RANGE OPTIONS:
These places will be a step up from the places listed above. They cost a bit more but will most likely be cleaner and offer more amenities. They may have options for in-room bathrooms as well. The POD franchise is a particularly popular option.
PODs (39 and 51): $120 to $175 USD
Arlo Hotel (Hudson Square and Nomad): $180+
Yotel: $180+
CitizenM: $220+
February 20, 2017
What is it Like to Live in a Hippie Commune?
 Every now and then it will come up in conversation that I’ve spent some time (during my late 20′s) living in a hippie commune. Okay not just one, but two hippie communes. It was never something I planned on doing, but in my desperate attempt to find affordable accommodation in those “fun” and “cool” areas of town, I guess it couldn’t be helped.
So if you’re planning on moving to one of those “super-hip” cities like San Francisco, Los Angeles or New York you may end up finding yourself deciding if you want to take the plunge and move in to a hippie commune in order to save money and live in a desirable part of town. I can’t speak for all hippie communes, but since I’ve had the pleasure of living in two of them I can comment on my experiences here.
 HIPPIE COMMUNE #1: VENICE BEACH, CA:
When I first moved to Los Angeles I really had no idea where to live. LA is a huge sprawling city with no center and a public transit system that just doesn’t reach all areas of town very effectively. At the time the only thing I knew was that I wanted to live near the ocean, so what better place than Venice Beach. The only problem is that Venice Beach, despite being very grungy, is also very expensive. So in order to live where I wanted and not pay a ridiculous amount for rent each month, I found myself interviewing to live in a hippie commune just a few blocks from the water. The commune was a small LA-style three bedroom bungalow, that somehow had 15 individuals living there. I would be number 16.
The house had one bedroom designated for the girls, one bedroom designated for the “old-timers” and the third bedroom reserved for us new guys which housed six of us in bunk beds. In the back yard we had a guy living in the back of a van, a girl living in a trailer, two beach huts with one person in each and another girl living in a tent. This made for 16 people, not to mention the guy who lived in his car parked just outside who would come over and hang out during the day. With all these people we still only had one bathroom to share.
 The bathroom policy was slightly invasive, as it was the unwritten rule that you had to leave the door unlocked when showering so people could come in and pee if needed. We had a television room in the front entrance way but the main “living room” area was in the backyard. Since it rarely rains in LA we could set up the backyard like an indoor living room without many issues. There was one refrigerator and people mostly respected each others food. Each of us had our weekly chores that we all did, however the place was more or less a mess due to the high traffic of all the housemates and their friends.
The vibe in the house was a friendly one. It was expected that if you moved in, you were apart of the “crew”. It was not uncommon to see people engaging in your classic hippie-like behaviors. Needless to say it was not a place where you would be getting a good nights sleep, nor could you easily keep a professional job in this environment. If there happened to be a party, good luck on avoiding it…even if you wanted to. Overall it was a fun and very interesting few months. People rarely stayed longer than a few months, as it tends to be an unsustainable way to live…even for your crunchiest of hippies.
 HIPPIE COMMUNE #2: SAN FRANCISCO, CA:
Once the summer ended, I decided to leave LA and get back to San Francisco. And by some crazy twist of fate I found my self moving into yet another hippie commune! But this time it was different and much more of a necessity since San Francisco is no easy place to move to.
This time the experience was different. It was more established and organized. The interview process involved going to the house and meeting every member of the household and then being approved by each of those members against all the other competition trying to move in. The place in LA was much easier…just show up and pay the rent.
The house was composed of two types of people. There were the original hippies from the 60′s who were still there “living the SF dream” and the young new-comers to the city who were in the transition of finding a “real” place to live. I was in the later group.
 There were three bathrooms, three floors, a backyard, a hot-tube and a balcony view. Unfortunately for me, I had a room (one of three) that was built in the garage and in no way legal in the traditional sense. The older folks in the house kept things civilized and as a result it was much less fun than the previous commune. Things were orderly, clean….and weird.
The house was decorated like your grandmothers house with old fashioned nicknacks strategically placed on built-in shelves. BUT what really made the place weird was that it was part of a sex workshop conglomerate. Though nothing of that sort actually took place in our house, it was not uncommon to see posted advertisements offering sex training seminars for exorbitant amounts of money as well as the occasional 60-year-old individual walking around buck-ass-naked. This is not a sight that goes well with having friends over.
Although this house probably sounds “interesting” it was not exactly “fun”. And I was trying to move out almost as soon as I moved in.
IN CONCLUSION:
So there ya go! Hopefully that gives you an idea of the hippie commune experience, despite those being two very different examples. Although they can come in a variety of shapes and sizes, you can bet they will be weird, interesting and something you won’t forget.
February 18, 2017
Gear Review: How to Set Up and Take Down The Coleman Pop-Up Tent
 If you’re like me, the most annoying part about camping is putting up and taking down the tent. So rather than fumble with all those poles and pegs, I decided to streamline my camping experience and buy a “pop-up tent”. The idea here is to have a tent that can be set up and taken down in a matter of seconds, leaving you more free time to sit by the fire and drink whiskey.
There are tons of pop-up tents on the market, just look through Amazon and you see more than you care to. But after a lot of online research I settled on one pop-up tent in particular and I thought I’d share it with you because its been such a good purchase…the Coleman Pop Up tent! I should note that though I am promoting a certain brand (which I usually don’t do), this is NOT a paid post…just my experience with the tent. However I will link to it here so you can pick one up if you want.
The Coleman Pop-Up Tent on Amazon
 POP-UP TENTS….WHAT’S GOOD, WHAT’S BAD:
Pop Up tents usually pack up as large flat disks, rather than the typical cylinder shape of most traditional tents. As a result, they are almost never good for backpacking. I bought mine exclusively for “car camping” and have a different tent for backpacking. They tend to fit 2 to 6 people and can be set up in a matter of a few seconds and taken down in a comparable about of time (maybe half a minute). That being said, the trouble most people have is taking them down, since the folding of the tent is not necessarily intuitive. For that reason, I’ve listed out the steps for putting up and taking down the Coleman Pop-Up Tent….since that’s the one I have.
 SETTING UP THE COLEMAN POP-UP TENT:
The Coleman Pop-Up tent, like most pop-up tents, comes packed up as a large round disk. To set up the tent, simply un-zip the carrying case, pull out the tent and remove the strap. From here, just literally throw the un-strapped disk into the air and it will unfold and expand into its full size. After that, just peg it down and you’re all set!
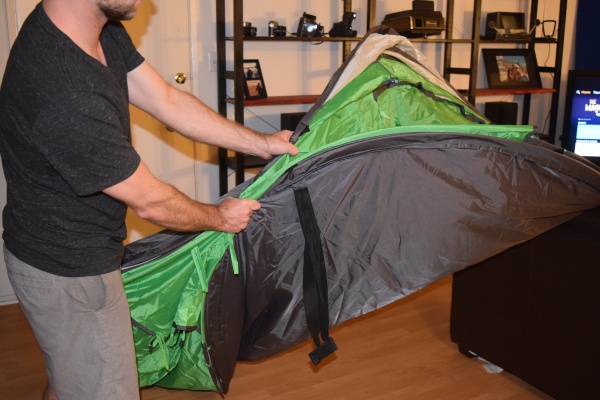
 TAKING DOWN THE COLEMAN POP-UP TENT:
Taking down the Coleman Pop-Up tent is where most people have trouble. The goal here is to fold the tent back into its original disk-shape. Here are the steps with photos:
 - Fold up the top part of the tent like you are closing an accordion.
- Now you have a taco-shaped tent.
- Grab the top of the tent and fold it forward two times
- Now you should have two circle shapes, side by side
- Push the two circles together
- If you have pieces protruding out, simply push everything into one large circle.
- Wrap the strap around the single circle.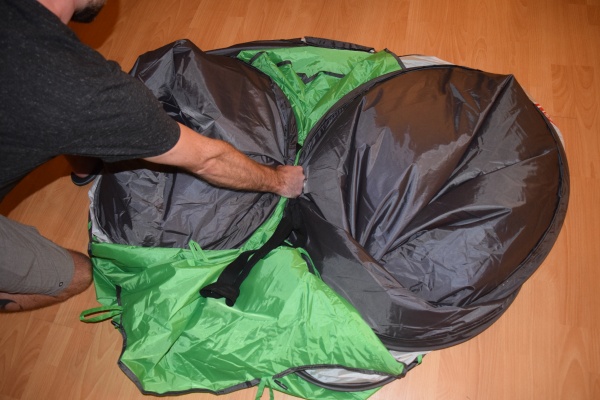 - Put it back into the carrying case.
- You are finished!
Okay, that’s it. Hopefully that helps you pack up the Coleman Pop-Up tent. At first it can be tricky but after a couple of tries you’ll have it down.
February 14, 2017
Gear Review: What Kind of Backpack to Buy? Top Loader vs Side Loader
 If you’re thinking of quitting your job and hitting the road in hopes of a more fulfilling life, then the first thing you’ll need is a good backpack to transport all your crap around the world. As you start shopping for packs you’ll eventually notice that there are a variety of sizes, colors and brands…each with a unique combination of pockets, zippers and attachments. However if you break it down, there are two basic types; the Top Loader and the Side Loader.
I often get asked from new backpackers what type of backpack they should get and although I can’t necessarily recommend a specific brand over another, I can breakdown the differences between the two major styles. Keep in mind, the backpacks discussed here are for backpacking, so they do not include roller-wheel luggage or smaller day-use bags. Here’s what to consider…
 TOP LOADER:
The biggest benefit to the top loading backpack is that it’s light. It typically consists of a simple metal frame and a thin material around it. On top of that it’s compressible and expandable, so you can vary the size of your pack based on what you are carrying. No large packs with empty space! Most have a bottom compartment and a smaller flip compartment on the top.
The downside of the top loading backpack is that since its a top loader all your gear is compressed on top of itself. So finding things in the bag can be a challenge. Its not uncommon to see backpackers emptying out their entire bag to find a lost pair of socks.
 SIDE LOADER:
The biggest highlight of the side loading backpack is that your gear is easily accesible and always organized. The side loader had a large zipper on the front side of the backpack to give you side access to the stuff inside. With this feature you can reach anything inside easily and nothing is ever (usually) lost.
The main drawback of the side loading backpack is that it tends to be heavier…not always, but most of the time. Also, due to the way it is packed (on the side), the contents of the bag will shift downward as you move around creating a bulge in the bottom of the bag and empty space at the top. These types of bags are often non-compressible.
SUMMARY:
That’s it for the backpack style breakdown. Over the years Ive used both styles of backpacks and have done well with each one. However these days I have to admit that the top loader is a better fit for me simply because it’s light and can be compressed when Im not carrying a lot of gear. For me, this is important because I try to travel as light as I can. Basically I gave up bag organization for a light pack. BUT the choice is yours!
February 3, 2017
Mexico: How to Visit “Hidden Beach” in the Marietas Islands
 The Marietas Islands National Park is a small group of federally protected, uninhabited islands 28 miles off the coast of Puerto Vallarta. It is famous for its “hidden beach” of Playa de Amor that is completely encircled by rock and vegetation. The unique shape and landscape of the main island is the result of military target practice in the early 1900′s.
Though you will need a permit to visit the islands, they are easy to acquire. Just make sure you have one before you depart, especially if you are traveling by local pangas. Boats of different sizes and shapes leave from three jumping off points; Puerto Vallarta, Punta de Mita and Sayulita. Puerto Vallarta is where the bulk of the tour operators are based, Punta de Mita is where you can hire a small local boat for a faster journey and Sayulita caters to the left overs.
 Puerto Vallarta:
Transport Type: Tourist Boats
Price: $80 USD and Up per person
Distance: 35 KM from Puerto Vallarta
Duration: 1 Hour Each Way (Up to 1 Hour and 20 Mins). Trips range from 3 Hours to 7 Hours.
Punta de Mita:
Transport Type: Local Boats (Pangas):
Price: $80 USD and Up per person
Distance: 8 KM from Punta de Mita
Duration: 20 Minutes. Trips are usually 3 Hours in Total.
Sayulita:
Transport Type: Tourist Boats and Local Boats. For local boats, you will first drive to Punta de Mita and depart from there.
Price: $80 USD and Up per person
Distance: 23 KM from Sayulita
Duration: 1 Hour Each Way
 Tours:
Tours cost between $70 and $100 per person. Most of the big tour operators leave from Puerto Vallarta and all the small local pangas leave from Punta de Mita. Tours typically include food, activities and sometimes drinks. At the time of writing most of the big tour operators were no longer allowed to visit the Hidden Beach. The best (and most efficient) way to see the beach is by going to Punta de Mita where the local boats are ready and licensed to visit the beach.
Swimming to “Hidden Beach”:
Boats are not allowed to dock on the island so swimming is required if you plan to get to the beach. The tunnel is about 40 feet long. The boats will stop at the required distance from the island where you can jump off and swim. Most of the swimming is easy, although the currents can be strong once inside the cave leading to the beach.
What To Bring:
Water
Snacks
Dry Bag (For Camera)
Swimsuit
Biodegradable Sunscreen
 When To Go:
The peak season is from November to May. This is also the time of year when you can see whales. Leave as early as you can in the morning since the last operators tend to depart at 11:30AM.
Environmental problems:
The Marietas Islands have become massively popular in recent years. So much so, that the number of visitors shot up from 27,500 visitors in 2012 to 127,000 visitors in 2015! But right along with those visitors comes garbage, pollution and coral reef destruction. As a result, the National Protected Natural Areas Commission (CONANP) has closed the famous “Hidden Beach” to the public in the past. Check before you book your flight.
January 31, 2017
Spiti Valley: How To Get To Key Monastery (Ki Gompa)
 The Key Monastery (Ki Gompa in Tibetan) is located in Spiti Valley, which is in the state of Himachal Pradesh in northern India. It is the most iconic structure in the valley and should definitely be part of any trip into this corner of the Tibetan Plateau. The monastery has a unique fort-like design due to it’s strategic importance of defending the valley’s citizens in times of warfare.
The Ki Monastery in Spiti Valley is a remote and relatively uncommercialized corner of India, although it is still fairly accessible given that you have enough time to make the trip. Most people start their journey at one of two jumping off points; Manali or Shimla. You can take the public bus up to either of these locations, but from here you will have to travel by mini-bus unless you have your own transport.
From Manali or Shimla:
The travel time from either Manali or Shimla is about 10 hours as you wind your way up the steep, often scary, road leading over the Himalayan range and into Spiti Valley. From whichever side you enter on, the travel time will be about the same. Although keep in mind that access to the valley via the eastern side can be periodically closed due to weather. The west side is the most common entry point.
 Kaza:
Kaza:
Kaza, the capital of Spiti Valley, sits at the base of the mountain range on the north side of the Spiti River. Most visitors will base themselves out of Kaza, although there are guesthouses all throughout the valley. Kaza has two sides, old town and new town. The old town has the majority of budget guesthouses and restaurants although the two sides are within walking distance of each other.
 Onward to Key Monastery:
Unless you have your own transport, the most common way to get around the valley is by hitchhiking. Buses to travel throughout the valley but they are infrequent and often full. Hitchhiking is safe and very acceptable in this region.
Key Monastery is just 15 KM northwest of Kaza. To catch a ride from Kaza walk to the edge of town where you will find a large cement archway. This is where the turnoff to Kaza meets the major road. Here, you should be able to hitch a ride to the monastery. Just tell the driver that you want to get dropped off at Ki Gompa.
 Key Monastery:
You will most likely get dropped off at the village sitting at the base of the monastery. From here you can simply walk up the hill to Key Monastery. There is no fee and you will most likely be welcomed by the monks there. Sometimes there are lectures from visiting Lamas and if you come at the right time of day, you may get an authentic meal out of it.
January 26, 2017
Travel For Work: Is Traveling For Work Glamorous?
 Sure!…at first. But after a couple months it stops feeling that way, and I’m not sure it ever really comes back. When I first started traveling for work I felt like a “baller”. I was so surprised that a company would actually pay for my flights and my hotel and all of my food. Surely I was something amazing to warrant such luxuries. Even my non-traveling friends and the random people I would meet validated that feeling with comments like “Wow!…what a cool job!” or “That sounds amazing!” or “I would love to travel for work!”. So for the first few months I was pretty excited about my glamorous, prestigious new career in consulting.
It Doesn’t Last:
It usually goes from being exciting, to being boring, to being straight up disgusting. When the trill of traveling is gone, all that’s left is annoyance. It did take a few months…maybe 6 or so, before I really started getting tired of it, but the money was good and it looked impressive…and really, I wasn’t sure what else I would do. My friends thought it was impressive, I think the girls I met thought it was impressive but in the end it really sucked up my life.

Let’s Put It Into Perspective:
I was on two flights every week for about 3 years. Over half of every week was spent in a Marriott. I drive a 2009 Volkswagen with only 55,000 miles on it…and I bought it 4 years ago with only 50,000 miles. The point is that I never drive my own car. I eat out almost every meal, because even when Im home I can’t buy groceries because they will spoil by the time I get home the following weekend. My girlfriend sits at home alone and bored while I try to cram 40 hours into 3.5 days because travel time doesn’t count as client time.
 Glamorous?
Glamorous?…sure, from the outside. But when you’re the one doing it you realize that spending every night on the edge of a Marriott bed, eating Chipotle and watching basic cable is not as sweet as people think. The free food and the happy hours are only exciting until you realize that all those late-night bar conversations were only about work problems and how “Janice” sent you that Excel file only partially completed! How dare she!
Can you tell I’m jaded?!
In a way I feel that my life has been put on hold by traveling so much for work. I feel that it can prevent you from moving forward. When you’re always on the road its hard to invest in your “real” life and push it forward. Instead you stay in this limbo state of travel, work, bar and repeat where you never have a moment to wake up and evaluate.
 The Brighter Side:
After all the bitching and moaning, I still wouldn’t trade in my experience. The consulting life has offered me the opportunity to see the world in a way that few get to. Ive been able to work (and kind of live) all over the country and meet an extremely wide variety of people. Even though its been frustrating at times, I don’t think I would change anything.
However you can’t do the same thing forever, else you get stagnant. And I think my time on the road is coming to an end. Its been a total of 6 years traveling for work now and I think its time to stay local and move on to “industry”. In a way, you can consider this my resignation post.
January 25, 2017
The Philippines: How To Get To Liwliwa Beach
 If you live in Manila or are just visiting for a short time, you’ll no doubt come to the conclusion that traveling around the Philippines, while not difficult, can be time consuming. With destinations that often require a messy combination of bus, boat and tricycle you may find that you don’t have time to get where you want to go without a flight. So if you’re looking for a chilled out, go-to beach relatively close to the city…look no further! Liwliwa Beach is your spot.
Liwliwa beach is a small village that sits just west of the town of San Felipe on the Zambales coast. The town itself is tiny, quiet and has consistent surf breaks that are good for beginners as well as advanced surfers. These days the small beach town caters to a steady flow of Manila-based surfers and a few straggling backpackers. Liwliwa Beach has a handful of small places to stay, the most popular being the Circle Hostel which rents boards and tends to be the center of all the action. At the time of writing, there were two small shops that sold various packaged foods, cigarettes, alcohol and cooked hot meals throughout the day.
Getting There:
In the Philippines bus travel is operated by private carriers that “could” have their own private stations anywhere in the city. In this particular case you’ll want to take the “Victory Liner” from either the Cubao or Pasay station (the two main stations) to San Felipe. The price is about $6 USD (300 Pesos) and takes about 3 hours. There are two routes that you can take.
Manila (Cubao/Pasay) – Iba (ask to get off at San Felipe)
Manila (Cubao/Pasay) – Olongapo (transfer) – San Felipe
Once you get to San Felipe, take a tricycle for about $1 USD (50 Pesos) to Liwliwa Beach. Tricycles should be waiting all around the center of town where the bus drops you off.
The Beach:
The beach is a long strip of grey-ish sand dotted with tiny shelters made of bamboo. The breaks are close to shore with waves ranging from 2 to 5 feet. There is no real development on the beach itself and all the accommodation is set just slightly behind the sand. Most hotels are only a 5 minute walk from the sand. No Marriotts or Hiltons here!
 Where To Stay:
The most popular spot is the Circle Hostel, which is an open-air dormitory. Dorm beds are $9 USD and Hammocks are $7 USD per night. The dorms are an amazing hodgepodge of handmade wooden dorm beds that are crammed into every possible corner. There is also a smaller enclosed dormitory that is typically reserved for women. They have communal toilets and showers and a couple of nice chill-out areas. The place is fairly clean and is packed with hippie/surfer/backpacker vibes. Stay here for the community! Across the street is one of the shops (sari-sari stores) where you can order breakfast, lunch, dinner and booze.
Other accommodation in Liwliwa tends to be smaller and slightly more upscale, meaning that you get your own beach hut rather than a bed in a dormitory. Stay in one of these if you want some privacy. All accommodation is close to the beach.
 Where To Eat:
You really have three options here. Shop #1, Shop #2 and driving into San Felipe. Most travelers will just eat at one of these beach shops since food in San Felipe is not usually worth the drive. The two shops sell all types of canned or packaged food as well as Filipino breakfast, lunch and dinner. Plan on eating a lot of meat, egg and white rice (tapsilog, longsilog…all kinds of silog!). If you need fresh produce the supply may be limited, so plan on going into town for that. Also San Felipe has a few more “sit-down” style restaurants if you need a change of pace. The two shops in Liwliwa are:
Ate Fely’s
Mommy Phoebe’s
Internet:
Cell phone service is pretty bad on the beach. We went all week without a signal. Internet is currently available in San Felipe, although its not easy to find. In the center of town, near the bus drop-off and just above the produce market there is a tall, nondescript building. Inside on the third floor there is an internet cafe. At the time of writing it was unmarked, so ask around for directions. Speeds are actually decent.
 What To Do:
People come to Liwliwa Beach for the surfing!…and there’s not much else. So plan on spending your days either laying on the beach, surfing or drinking…heavily. If non of that suites you, you can always rent a bicycle and tour around the village.
Summary:
Overall Liwliwa Beach is a quiet and fun little village. Its a great place if you need to escape the chaos of Manila for a few days. Keep in mind that it is not on the same level as Boracay or El Nido. The sand is not as white and the water is not as clear, nor are there the plethora of hotels and beach front restaurants to choose from. Tourism at Liwliwa is still only a trickle…and its mostly locals and backpackers. Enjoy!