C.R. Misty's Blog, page 2
June 19, 2016
30 Days of Forcing Myself to Write a Short Story Daily
C.R.Misty, the author of the International Boundaries Series | Book 1: Simple Affair and Book 2: Deeply Bound, shares about her experience using TaleHunt.
This all started from a suggestion of a complete stranger who had messaged me on Twitter.
They Privately messaged me out of the blue and the message was something like this, "Hey, we have this new app that we think you will like since you are a writer and now it's free to download for android. here is the link..."
They were marketing their app to me, just like tons of others do with various products on Twitter. At first I was reluctant to respond because it was just another promotional message. I responded with a quick, "Thank you" because their message told me that they did take time to look at my biography to see that I write.
A day went by and they private messaged me again, "Hey, I wanted to see if you had the chance to look at our new app. It's a tool used for writing short stories and think it is the perfect tool for you to try out."
I read the message and thought okay, this person is not your typical marketer that only tries once. I think, okay they are passionate and seem convinced that I'll like what they are offering, I'll take a look.
I reluctantly click their link to the app and see that it's exactly what they say it is which is an app for writing and posting short stories. I wonder, could I see myself using this tool? I don't know... I'm a novelist and enjoy writing 100k word novels and not short little snippets.
I viewed their app as simply just a writing tool and decide this isn't for me and message them back, "I took a look but this isn't a tool I can use as I enjoy writing full length novels."
They quickly respond, "I disagree, you are and author and could use this to share your talent of writing with others. we have a built in feature that allows you to share your short stories on other platforms."
Point made, I hadn't considered that. I take a look again, but can't seem to download the app to my iPhone and message them back asking if they have a version for iPhone and at the time they didn't and we parted ways.
2 weeks later, I receive another private message from them, "Hey I wanted to let you know that we now have a version for iPhone. Here is the link."
This time, I'm a little more eager and less reluctant and I click their link, get the app and see what it's all about. I read and like a few of the short story posts made by the other apps users. I don't post anything right away as I want to check it out some more with reading the things others are posting and how the TaleHunt's user community works. I actually wait a couple of weeks before posting anything.
I started dipping my toes into the water and created a user profile, adding an avatar picture and a short blurb about myself and continued to watch and like other users posts.
I noticed that the TaleHunt community is a small but passionate bunch of writers. They are active and like the marketer mentioned this would be a good platform for me.
Playing with words is a good exercise but what I needed in this moment was a place to share and market myself to and with their share feature it was perfect for me to write something, share it and my name was automatically inserted into the poster.
I was publishing my next romance novel in the coming months and I was decided, I'm going to try TaleHunt since its new and different. I took about a week to compile quotes from my upcoming novel. I created a schedule and published one quote to TaleHunt daily with a hashtag to where the novel was online and the likes and comments started to come in.
TaleHunt was giving me more activity then Twitter and Facebook with likes and comments, people engaged in the writing.
Within a couple of weeks one of the founders of TaleHunt emailed me, asking if I was an author and if I was, could I provide them with the website where my books can be found. I replied, providing a link to Amazon and within a day TaleHunt added a little book icon to all my posts and when you click it directs you to my novels. I was impressed.
A week later I receive another email from one of founders of TaleHunt asking if I would like to be interviewed for a blog feature they were doing. I said yes and answered their questions and shortly after they published my interview to their site.Forcing myself to post a short story daily turned out to be a fantastic thing. Not only was it good for marketing myself it became less work and more fun. It's still a relatively new app but what's awesome is that TaleHunt has shown me a level of support that I would never receive from other apps in catering their app to my needs as well as taking the time to feature me on their blog.
After I wrapped up my marketing campaign, I started posting just for fun, playing with words and seeing what I could do. I'm happy that listened to the persistent TaleHunt marketer and I hope that you check out my short story posts on TaleHunt.
Here are a few of mine cheers and enjoy!


June 6, 2016
Welcome Message
Welcome!
Lady Maverick Publishing is a Canadian Publisher of Romance Novels.
This site features posts about writing, designing and sharing news on its authors and their novels.
Lady Maverick Publishing is a Canadian Publisher of Romance Novels.
This site features posts about writing, designing and sharing news on its authors and their novels.

June 5, 2016
Welcome!
Welcome!
Lady Maverick Publishing is a Canadian Publisher of RomanceNovels.
This site features posts about writing, designing andsharing news on its novels.
Lady Maverick Publishing is a Canadian Publisher of RomanceNovels.
This site features posts about writing, designing andsharing news on its novels.
April 3, 2016
1 Year Later My Second Time Participating on Kindlescout
C.R.Misty, the author of the International Boundaries Series | Book 1: Simple Affair and Book 2: Deeply Bound, shares about her experiences in her second time participating on Kindlescout.
A lot happens in one year and last year I participated on Kindlescout with posting my first romance novel to their site. After that initial campaign had ended and I learned that I wasn’t selected by them for publication I wrote a blog on that first experience and discussed the reasons that my novel may not have been selected and you can read that here.
Now we are 1 year later and since that campaign I took my findings, applied some major changes to my first novel and self-published it. I also worked on the edits and cover to my second romance novel and developed a stronger marketing strategy and now I am at the point where I am ready to publish my second novel.
As a part of marketing and being able to preview my second book on as many platforms as possible I decided to look into participating on Kindlescout again. My reasons for going back to Kindlescout are many and even though my first book wasn’t selected by them, I learned many things with campaigning.
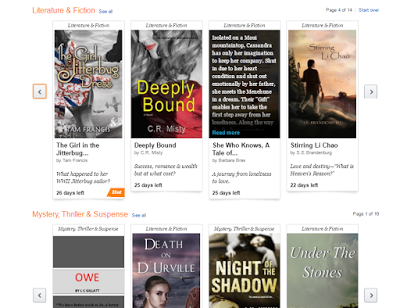
My first reason for using Kindlescout a second time is exposure. Their website is beautiful with featuring all submissions as large icons so that readers can see book covers clearly. When a reader sees a book cover that may interest them they can hover their mouse over the cover to read what the book is about and if they click on the cover they can view that books submission. Also the site is sorted by genre, and each genre has the same level of exposure on their main landing page.
This is fantastic exposure for me as it gives me a beautiful platform for me to feature my books and because Kindlescout encourages its participants to campaign to their networks it gives me the chance to gain new readers.
Here is what Kindlescout’s main landing page looks like.
Another reason I went back to using Kindlesout is to get back into the groove. What I mean by this is with Kindlescout, participants are encouraged to campaign in order to gain votes. My plan this year is to publish my second book, “Deeply Bound” by summer 2016 regardless on if Kindlescout chooses it. I am using my Kindlescout campaign as sort of a Launchpad to first spark interest and win over some new readers and two, to iron out any kinks with my marketing strategies. My plan is that if I am not selected by Kindlescout I will follow up with preparing myself for a pre-order campaign.
This year I have added blogging, added new social media platforms such as creating social media events, paid advertising and created a YouTube movie trailer for my marketing/campaigning efforts. I have also continued to use my existing social media channels to promote myself during the campaign.
Here is my movie Trailer to the International Boundaries Series, which features Book 1 | Simple Affair and Book 2 | Deeply Bound

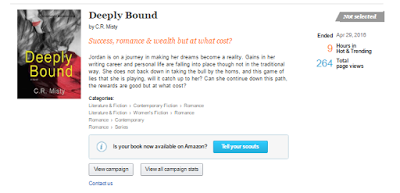
Lastly, I chose Kindlescout a second time because they are offering more to the author to help them learn and fine tune their campaign strategies. I was pleasantly surprised when I logged into my Kindlescout profile a year after my campaign to learn that they have a new feature that helps author’s measure their success.
After you have logged into Kindlescout there is a selection named, “Your Campaigns” and when you click on that you can view how many days your campaign has been running, how many hours your campaign has been “Hot & Trending” and how many page views you have received.
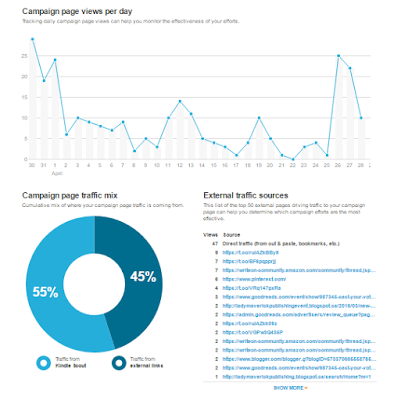
You can look into your campaign stats further by clicking, “view all campaign stats” and from there you can see your stats broken down by day with how many visits your campaign received as well as view the referring URL’s, so where your marketing is working the most.
These images below is what you see.
Pre-order her second book, "Deeply Bound" now on Amazon and this title will be auto-delivered to your Kindle on June 23, 2016!
I encourage you to share my post and if you have any questions please post them in the comments below.
Thank you
A lot happens in one year and last year I participated on Kindlescout with posting my first romance novel to their site. After that initial campaign had ended and I learned that I wasn’t selected by them for publication I wrote a blog on that first experience and discussed the reasons that my novel may not have been selected and you can read that here.
Now we are 1 year later and since that campaign I took my findings, applied some major changes to my first novel and self-published it. I also worked on the edits and cover to my second romance novel and developed a stronger marketing strategy and now I am at the point where I am ready to publish my second novel.
As a part of marketing and being able to preview my second book on as many platforms as possible I decided to look into participating on Kindlescout again. My reasons for going back to Kindlescout are many and even though my first book wasn’t selected by them, I learned many things with campaigning.
My first reason for using Kindlescout a second time is exposure. Their website is beautiful with featuring all submissions as large icons so that readers can see book covers clearly. When a reader sees a book cover that may interest them they can hover their mouse over the cover to read what the book is about and if they click on the cover they can view that books submission. Also the site is sorted by genre, and each genre has the same level of exposure on their main landing page.
This is fantastic exposure for me as it gives me a beautiful platform for me to feature my books and because Kindlescout encourages its participants to campaign to their networks it gives me the chance to gain new readers.
Here is what Kindlescout’s main landing page looks like.

Another reason I went back to using Kindlesout is to get back into the groove. What I mean by this is with Kindlescout, participants are encouraged to campaign in order to gain votes. My plan this year is to publish my second book, “Deeply Bound” by summer 2016 regardless on if Kindlescout chooses it. I am using my Kindlescout campaign as sort of a Launchpad to first spark interest and win over some new readers and two, to iron out any kinks with my marketing strategies. My plan is that if I am not selected by Kindlescout I will follow up with preparing myself for a pre-order campaign.
This year I have added blogging, added new social media platforms such as creating social media events, paid advertising and created a YouTube movie trailer for my marketing/campaigning efforts. I have also continued to use my existing social media channels to promote myself during the campaign.
Here is my movie Trailer to the International Boundaries Series, which features Book 1 | Simple Affair and Book 2 | Deeply Bound
Lastly, I chose Kindlescout a second time because they are offering more to the author to help them learn and fine tune their campaign strategies. I was pleasantly surprised when I logged into my Kindlescout profile a year after my campaign to learn that they have a new feature that helps author’s measure their success.
After you have logged into Kindlescout there is a selection named, “Your Campaigns” and when you click on that you can view how many days your campaign has been running, how many hours your campaign has been “Hot & Trending” and how many page views you have received.

You can look into your campaign stats further by clicking, “view all campaign stats” and from there you can see your stats broken down by day with how many visits your campaign received as well as view the referring URL’s, so where your marketing is working the most.
These images below is what you see.

Pre-order her second book, "Deeply Bound" now on Amazon and this title will be auto-delivered to your Kindle on June 23, 2016!
I encourage you to share my post and if you have any questions please post them in the comments below.
Thank you
January 30, 2016
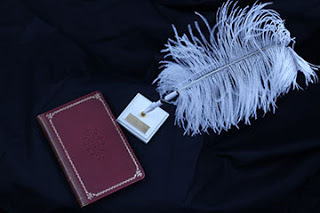
Designing and Producing your own Bookmark on a Budget
C.R.Misty, the author of the International Boundaries Series | Book 1: Simple Affair and Book 2: Deeply Bound, shares information on how to create a bookmark that is inexpensive and looks great.
Background
I am a self-published Author with a few published works under different pen names. I have marketed myself online, through social media and my goal for 2016 is to start making appearances at local bookstores as a way to branch out. Having marketing material is important to me and these bookmarks will serve as my marketing swag for these events.
My goal is to keep costs minimal while I build a fan base and sell novels.
Step 1: Go Shopping!
Materials Needed
Make sure you have the following materials on hand
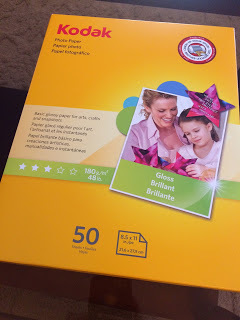
Glossy Photo Paper (I went with 8.5 X 11 Glossy) I purchased this at Walmart for under $30.00 for 50 sheets.
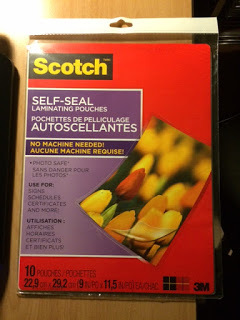
Laminate (I went with a 8.5 X 11) self-seal that doesn't require you to have a machine)) I purchased this at Walmart under $15.00 for 10 sheets.

You need a computer that is equipped with photo design software (I use Photoshop)
A photo printer with color ink

A credit card or other flat edged object
Scissors or a professional professional paper cutter like this one.

Time Required
1 hour (I gave myself a few days to think of how I wanted my bookmark design to look before I began creating it. The one hour captures, creating and saving your final image design, printing your image, letting the ink dry and laminating your bookmark. Once you have your final image design saved you can cut 1 hour down to 20 minutes).
Step 2: Get Creative & Design!
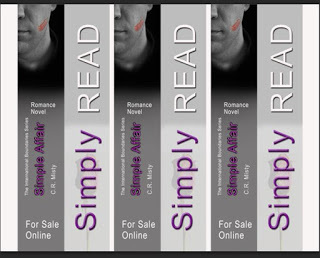
Login to your computer and open up your design software and start being creative. For my design I used a couple of photos that I had taken, re-sized them and then layered them with colors and typography. After creating my first template and printing it I found that I needed to tweak it. I hadn't created cut lines so I went back to my template and made the adjustments to the final design.
My Before
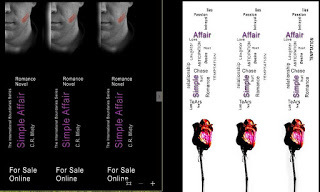
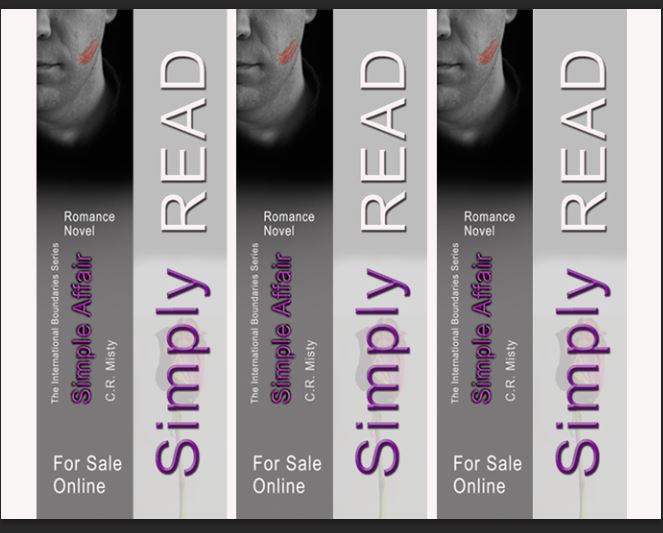
My After

Step 3: Printing!
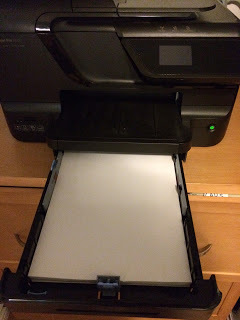
I made my design to cover one side of a sheet of paper. In order for me to create a double sided bookmark I first marked the blank sheets bottom right corner with a dot so that I could track how I fed it into the paper. I fed the paper so that the dot was located on the side facing me to the bottom right of the page. Feed your sheet in the printer and print your design.
To print on the opposite side of the paper look at the dot you put in and simply flip the sheet so that the dot appears on the revers side so that it is then facing to the floor but located on the top right. Feed your sheet in the printer and print again.

Step 4: Putting it All Together!
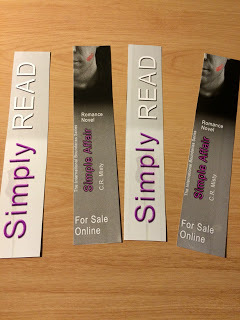
My first batch of bookmarks yielded 6 with 1 sheet of photo paper and 1 sheet of laminate
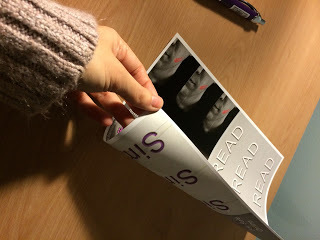
You can see in this image how my design template turned out with images appearing on both sides.

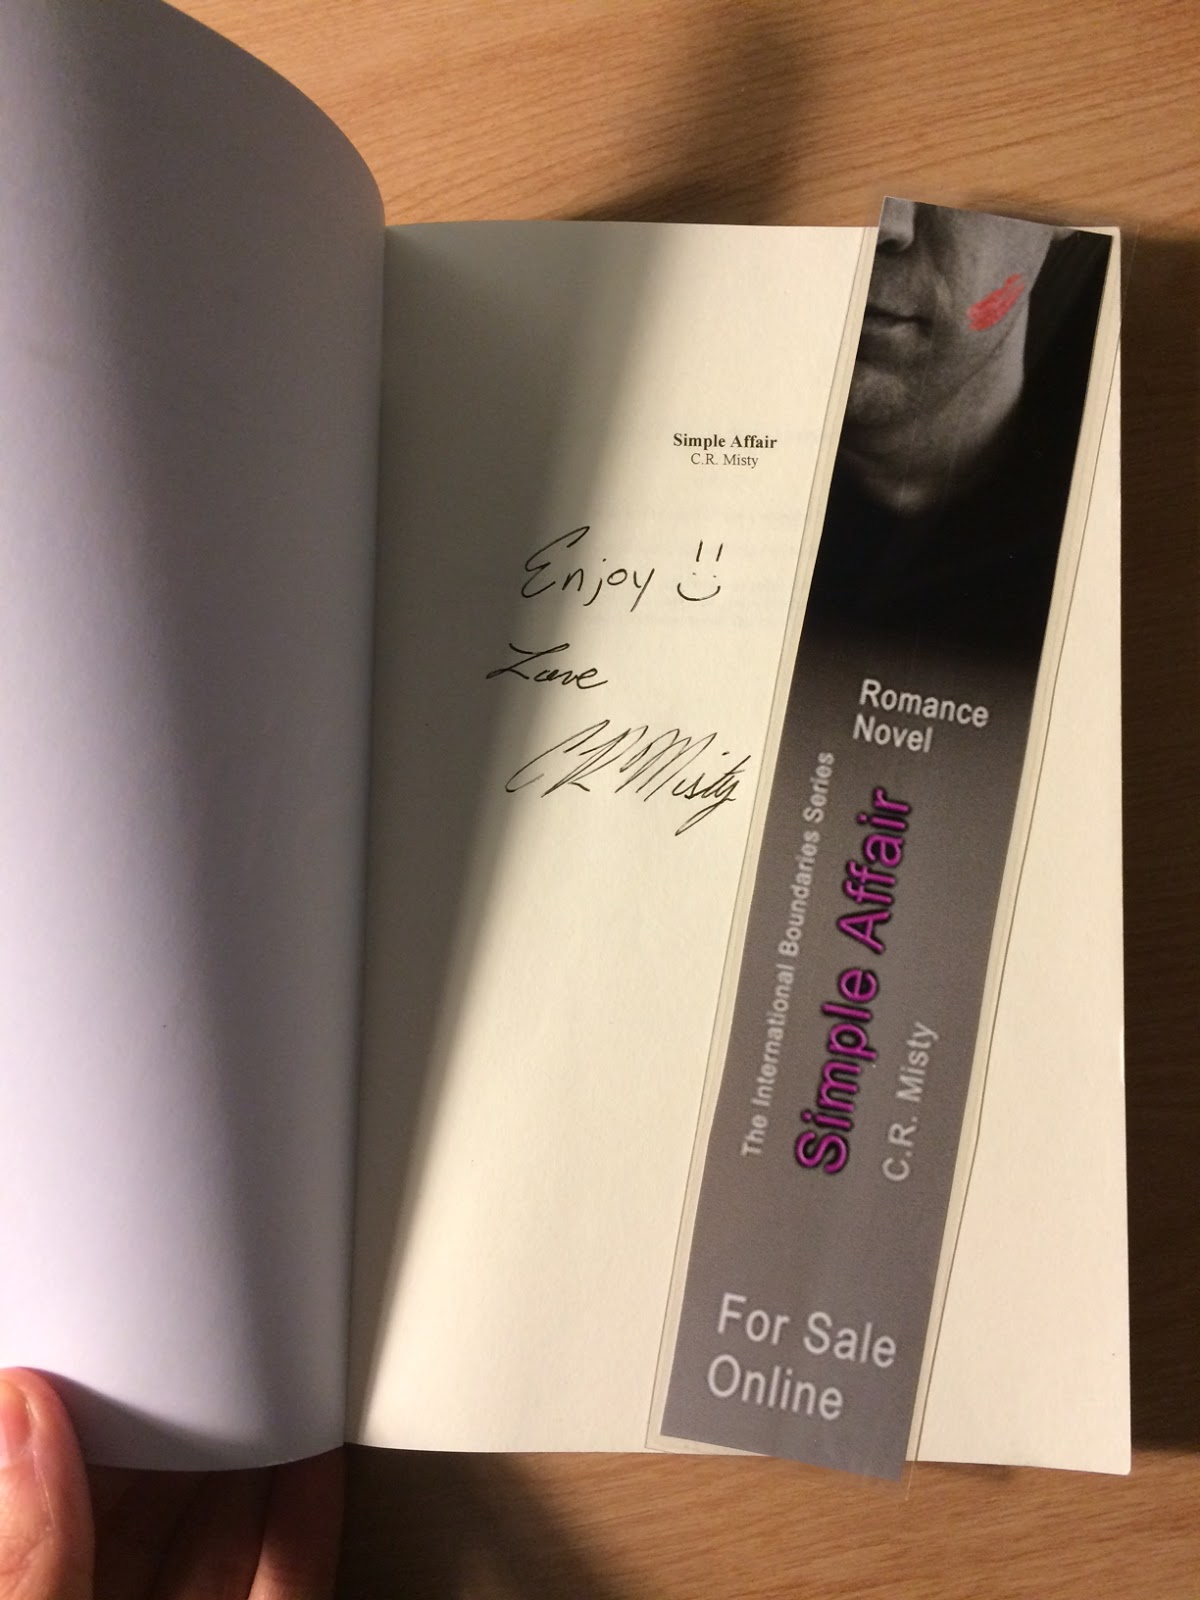
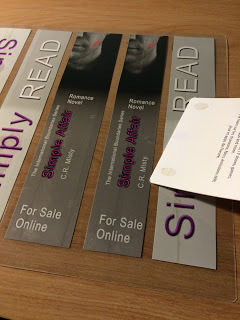
The next step is cutting out the bookmarks. If you have a professional paper cutter I recommend using one. For my own, I have a fairly steady hand and used scissors.
This is an image how they look after you have cut them out.

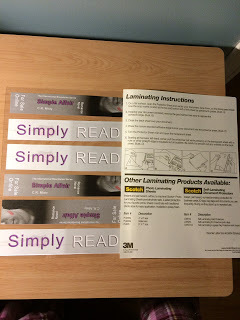
After cutting out your bookmarks you are going to take the laminate and read the instruction on how to use the product. I peeled open the sheet, in laid my bookmarks on the none sticky side, peeled off an adhesive strip and them slowly let the sticky side fall over the bookmarks.

After the sticky side has completely covered your bookmarks take a flat edged object. I used a gift card and scrape over the laminate to push out any air bubbles and to also ensure that the laminate is glued.

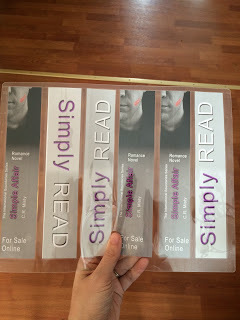
This is the laminated result.

Cut each of the laminated bookmarks out. You want to leave a clear plastic edge around each bookmark so that the adhesive on from the laminate holds.
This is the final result, a gorgeous bookmark!

About the Author: C.R. Misty is currently writing a romance trilogy. Her first book, is available online at Kindle, Nook, Kobo, ibook, inktera, OverDrive, Amazon & Createspace
Pre-order her second book, "Deeply Bound" now on Amazon and this title will be auto-delivered to your Kindle on June 23, 2016!
Background
I am a self-published Author with a few published works under different pen names. I have marketed myself online, through social media and my goal for 2016 is to start making appearances at local bookstores as a way to branch out. Having marketing material is important to me and these bookmarks will serve as my marketing swag for these events.
My goal is to keep costs minimal while I build a fan base and sell novels.
Step 1: Go Shopping!
Materials Needed
Make sure you have the following materials on hand
Glossy Photo Paper (I went with 8.5 X 11 Glossy) I purchased this at Walmart for under $30.00 for 50 sheets.

Laminate (I went with a 8.5 X 11) self-seal that doesn't require you to have a machine)) I purchased this at Walmart under $15.00 for 10 sheets.

You need a computer that is equipped with photo design software (I use Photoshop)
A photo printer with color ink

A credit card or other flat edged object
Scissors or a professional professional paper cutter like this one.

Time Required
1 hour (I gave myself a few days to think of how I wanted my bookmark design to look before I began creating it. The one hour captures, creating and saving your final image design, printing your image, letting the ink dry and laminating your bookmark. Once you have your final image design saved you can cut 1 hour down to 20 minutes).
Step 2: Get Creative & Design!
Login to your computer and open up your design software and start being creative. For my design I used a couple of photos that I had taken, re-sized them and then layered them with colors and typography. After creating my first template and printing it I found that I needed to tweak it. I hadn't created cut lines so I went back to my template and made the adjustments to the final design.
My Before

My After
Step 3: Printing!
I made my design to cover one side of a sheet of paper. In order for me to create a double sided bookmark I first marked the blank sheets bottom right corner with a dot so that I could track how I fed it into the paper. I fed the paper so that the dot was located on the side facing me to the bottom right of the page. Feed your sheet in the printer and print your design.
To print on the opposite side of the paper look at the dot you put in and simply flip the sheet so that the dot appears on the revers side so that it is then facing to the floor but located on the top right. Feed your sheet in the printer and print again.

Step 4: Putting it All Together!
My first batch of bookmarks yielded 6 with 1 sheet of photo paper and 1 sheet of laminate
You can see in this image how my design template turned out with images appearing on both sides.

The next step is cutting out the bookmarks. If you have a professional paper cutter I recommend using one. For my own, I have a fairly steady hand and used scissors.
This is an image how they look after you have cut them out.

After cutting out your bookmarks you are going to take the laminate and read the instruction on how to use the product. I peeled open the sheet, in laid my bookmarks on the none sticky side, peeled off an adhesive strip and them slowly let the sticky side fall over the bookmarks.

After the sticky side has completely covered your bookmarks take a flat edged object. I used a gift card and scrape over the laminate to push out any air bubbles and to also ensure that the laminate is glued.

This is the laminated result.

Cut each of the laminated bookmarks out. You want to leave a clear plastic edge around each bookmark so that the adhesive on from the laminate holds.
This is the final result, a gorgeous bookmark!
About the Author: C.R. Misty is currently writing a romance trilogy. Her first book, is available online at Kindle, Nook, Kobo, ibook, inktera, OverDrive, Amazon & Createspace
Pre-order her second book, "Deeply Bound" now on Amazon and this title will be auto-delivered to your Kindle on June 23, 2016!
How to Create Your Own Bookmark: Designing and Producing your own Bookmark on a Budget
This blog post will provide you with information on how to create your own bookmark that's inexpensive and looks great.
Background
I am a self-published Author with a few published works under different pen names. I have marketed myself online, through social media and my goal for 2016 is to start making appearances at local bookstores as a way to branch out. Having marketing material is important to me and these bookmarks will serve as my marketing swag for these events.
My goal is to keep costs minimal while I build a fan base and sell novels.
Step 1: Go Shopping!
Materials Needed
Make sure you have the following materials on hand
Glossy Photo Paper (I went with 8.5 X 11 Glossy) I purchased this at Walmart for under $30.00 for 50 sheets.
Laminate (I went with a 8.5 X 11) self-seal that doesn't require you to have a machine)) I purchased this at Walmart under $15.00 for 10 sheets.
You need a computer that is equipped with photo design software (I use Photoshop)
A photo printer with color ink
A credit card or other flat edged object
Scissors or a professional professional paper cutter like this one.
Time Required 1 hour (I gave myself a few days to think of how I wanted my bookmark design to look before I began creating it. The one hour captures, creating and saving your final image design, printing your image, letting the ink dry and laminating your bookmark. Once you have your final image design saved you can cut 1 hour down to 20 minutes).
Step 2: Get Creative & Design!
Login to your computer and open up your design software and start being creative. For my design I used a couple of photos that I had taken, re-sized them and then layered them with colors and typography. After creating my first template and printing it I found that I needed to tweak it. I hadn't created cut lines so I went back to my template and made the adjustments to the final design.
My Before
My After
Step 3: Printing!
I made my design to cover one side of a sheet of paper. In order for me to create a double sided bookmark I first marked the blank sheets bottom right corner with a dot so that I could track how I fed it into the paper. I fed the paper so that the dot was located on the side facing me to the bottom right of the page. Feed your sheet in the printer and print your design.
To print on the opposite side of the paper look at the dot you put in and simply flip the sheet so that the dot appears on the revers side so that it is then facing to the floor but located on the top right. Feed your sheet in the printer and print again.
Step 4: Putting it All Together!
My first batch of bookmarks yielded 6 with 1 sheet of photo paper and 1 sheet of laminate
You can see in this image how my design template turned out with images appearing on both sides.
The next step is cutting out the bookmarks. If you have a professional paper cutter I recommend using one. For my own, I have a fairly steady hand and used scissors.
This is an image how they look after you have cut them out.
After cutting out your bookmarks you are going to take the laminate and read the instruction on how to use the product. I peeled open the sheet, in laid my bookmarks on the none sticky side, peeled off an adhesive strip and them slowly let the sticky side fall over the bookmarks.
After the sticky side has completely covered your bookmarks take a flat edged object. I used a gift card and scrape over the laminate to push out any air bubbles and to also ensure that the laminate is glued.
This is the laminated result.
Cut each of the laminated bookmarks out. You want to leave a clear plastic edge around each bookmark so that the adhesive on from the laminate holds.
This is the final result, a gorgeous bookmark!
About the Author: C.R. Misty is currently writing a romance trilogy. Her first book, is available online at Kindle, Nook, Kobo, ibook, inktera, OverDrive, Amazon & Createspace
Pre-order her second book, "Deeply Bound" now on Amazon and this title will be auto-delivered to your Kindle on June 23, 2016!
How to Create your own Bookmark: Designing and Producing your own Bookmark on a Budget
This blog post will provide you with information on how to create your own bookmark that's inexpensive and looks great.
Background
I am a self-published Author with a few published works under different pen names. I have marketed myself online, through social media and my goal for 2016 is to start making appearances at local bookstores as a way to branch out. Having marketing material is important to me and these bookmarks will serve as my marketing swag for these events.
My goal is to keep costs minimal while I build a fan base and sell novels.
Step 1: Go Shopping!
Materials Needed
Make sure you have the following materials on hand
Glossy Photo Paper (I went with 8.5 X 11 Glossy) I purchased this at Walmart for under $30.00 for 50 sheets.

Laminate (I went with a 8.5 X 11) self-seal that doesn't require you to have a machine)) I purchased this at Walmart under $15.00 for 10 sheets.
You need a computer that is equipped with photo design software (I use Photoshop)
A photo printer with color ink
A credit card or other flat edged object
Scissors or a professional professional paper cutter like this one.

Time Required 1 hour (I gave myself a few days to think of how I wanted my bookmark design to look before I began creating it. The one hour captures, creating and saving your final image design, printing your image, letting the ink dry and laminating your bookmark. Once you have your final image design saved you can cut 1 hour down to 20 minutes).
Step 2: Get Creative & Design!
Login to your computer and open up your design software and start being creative. For my design I used a couple of photos that I had taken, re-sized them and then layered them with colors and typography. After creating my first template and printing it I found that I needed to tweak it. I hadn't created cut lines so I went back to my template and made the adjustments to the final design.
My Before

My After
Step 3: Printing!
I made my design to cover one side of a sheet of paper. In order for me to create a double sided bookmark I first marked the blank sheets bottom right corner with a dot so that I could track how I fed it into the paper. I fed the paper so that the dot was located on the side facing me to the bottom right of the page. Feed your sheet in the printer and print your design.
To print on the opposite side of the paper look at the dot you put in and simply flip the sheet so that the dot appears on the revers side so that it is then facing to the floor but located on the top right. Feed your sheet in the printer and print again.

Step 4: Putting it All Together!
My first batch of bookmarks yielded 6 with 1 sheet of photo paper and 1 sheet of laminate
You can see in this image how my design template turned out with images appearing on both sides.
The next step is cutting out the bookmarks. If you have a professional paper cutter I recommend using one. For my own, I have a fairly steady hand and used scissors.
This is an image how they look after you have cut them out.
After cutting out your bookmarks you are going to take the laminate and read the instruction on how to use the product. I peeled open the sheet, in laid my bookmarks on the none sticky side, peeled off an adhesive strip and them slowly let the sticky side fall over the bookmarks.
After the sticky side has completely covered your bookmarks take a flat edged object. I used a gift card and scrape over the laminate to push out any air bubbles and to also ensure that the laminate is glued.
This is the laminated result.
Cut each of the laminated bookmarks out. You want to leave a clear plastic edge around each bookmark so that the adhesive on from the laminate holds.
This is the final result, a gorgeous bookmark!

About the Author: C.R. Misty is currently writing a romance trilogy. Her first book, is available online at Kindle, Nook, Kobo, ibook, inktera, OverDrive, Amazon & Createspace
Her second book, Deeply Bound is currently in the editing stages & excerpts are available to read at Wattpad, Write On &Mibba.
Background
I am a self-published Author with a few published works under different pen names. I have marketed myself online, through social media and my goal for 2016 is to start making appearances at local bookstores as a way to branch out. Having marketing material is important to me and these bookmarks will serve as my marketing swag for these events.
My goal is to keep costs minimal while I build a fan base and sell novels.
Step 1: Go Shopping!
Materials Needed
Make sure you have the following materials on hand
Glossy Photo Paper (I went with 8.5 X 11 Glossy) I purchased this at Walmart for under $30.00 for 50 sheets.
Laminate (I went with a 8.5 X 11) self-seal that doesn't require you to have a machine)) I purchased this at Walmart under $15.00 for 10 sheets.
You need a computer that is equipped with photo design software (I use Photoshop)
A photo printer with color ink
A credit card or other flat edged object
Scissors or a professional professional paper cutter like this one.
Time Required 1 hour (I gave myself a few days to think of how I wanted my bookmark design to look before I began creating it. The one hour captures, creating and saving your final image design, printing your image, letting the ink dry and laminating your bookmark. Once you have your final image design saved you can cut 1 hour down to 20 minutes).
Step 2: Get Creative & Design!
Login to your computer and open up your design software and start being creative. For my design I used a couple of photos that I had taken, re-sized them and then layered them with colors and typography. After creating my first template and printing it I found that I needed to tweak it. I hadn't created cut lines so I went back to my template and made the adjustments to the final design.
My Before
My After
Step 3: Printing!
I made my design to cover one side of a sheet of paper. In order for me to create a double sided bookmark I first marked the blank sheets bottom right corner with a dot so that I could track how I fed it into the paper. I fed the paper so that the dot was located on the side facing me to the bottom right of the page. Feed your sheet in the printer and print your design.
To print on the opposite side of the paper look at the dot you put in and simply flip the sheet so that the dot appears on the revers side so that it is then facing to the floor but located on the top right. Feed your sheet in the printer and print again.
Step 4: Putting it All Together!
My first batch of bookmarks yielded 6 with 1 sheet of photo paper and 1 sheet of laminate
You can see in this image how my design template turned out with images appearing on both sides.
The next step is cutting out the bookmarks. If you have a professional paper cutter I recommend using one. For my own, I have a fairly steady hand and used scissors.
This is an image how they look after you have cut them out.
After cutting out your bookmarks you are going to take the laminate and read the instruction on how to use the product. I peeled open the sheet, in laid my bookmarks on the none sticky side, peeled off an adhesive strip and them slowly let the sticky side fall over the bookmarks.
After the sticky side has completely covered your bookmarks take a flat edged object. I used a gift card and scrape over the laminate to push out any air bubbles and to also ensure that the laminate is glued.
This is the laminated result.
Cut each of the laminated bookmarks out. You want to leave a clear plastic edge around each bookmark so that the adhesive on from the laminate holds.
This is the final result, a gorgeous bookmark!
About the Author: C.R. Misty is currently writing a romance trilogy. Her first book, is available online at Kindle, Nook, Kobo, ibook, inktera, OverDrive, Amazon & Createspace
Her second book, Deeply Bound is currently in the editing stages & excerpts are available to read at Wattpad, Write On &Mibba.
January 11, 2016
A Hidden Gem: How to Access Tons of Free Stories on Goodreads
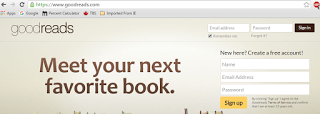
Before I start to explain the hidden Gem of Goodreads I want to first say to you that If you LOVE to read I urge you to start a Goodreads account.
Goodreads is a social media site where users can share what they are reading with one another. It has similarities to Facebook in that you can have a friends list but also incorporates a library of books that you can add to your profile and show others what you are reading or what you have already read.
Goodreads explains that you can, “See which books your friends are reading. Track the books you're reading, have read, and want to read. Check out your personalized book recommendations. Our recommendation engine analyzes 20 billion data points to give suggestions tailored to your literary tastes. Find out if a book is a good fit for you from our community’s reviews.”
I have my own Goodreads account and love its main feature of being able to list, write and share reviews of the books that I have read. There are other features too with the site that I feel do get overlooked and wanted to shine some light on the hidden gem that I found that gives access to its users to read Free stories. Here is how you can access Free stories:
1) Login to Goodreads
2) Click the Home tab, you should see a view similar to my own.
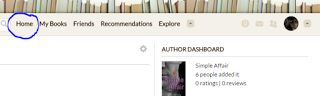
3) Click to Expand the Explore menu
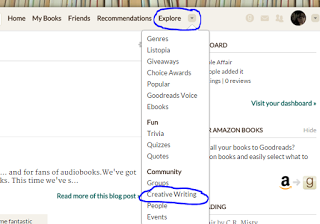
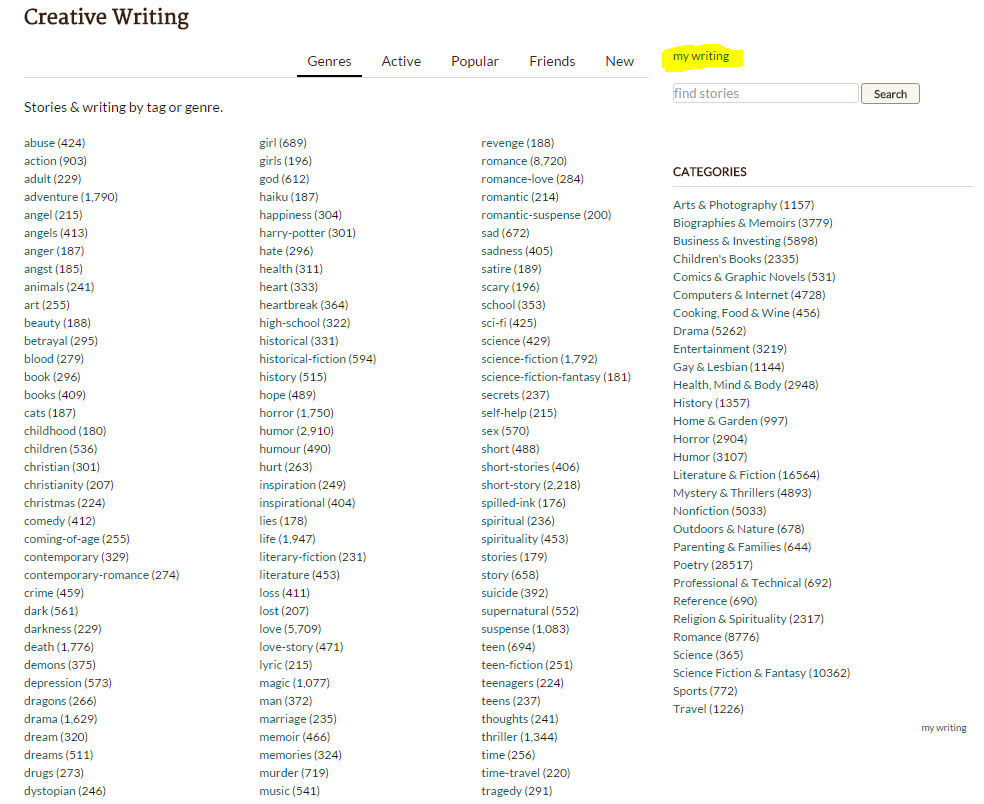
4) Click Creative Writing. This is where all of the Free stories and books are. The great thing about this page is you can browse by Categories, Genres, Active, Popular, Friends and New. There is also a small link, just to the right of “New” called “My Writing” where you can write and post your own writing. Your writing would then be saved to the "Creative Writing" area for the Goodreads community to see.
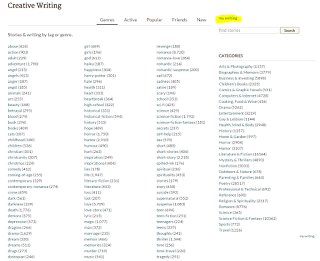
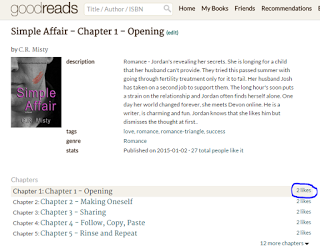
5) When you find a story that you are interested in reading, you can simply read the chapters by clicking on the story title and at the end of each chapter there is a like button and also share buttons to share on other social media sites.
Now it is time for you to get started and have a look yourselves.
About the Author: C.R. Misty is currently writing a romance trilogy. Her first book, is available online at Kindle, Nook, Kobo, ibook, inktera, OverDrive, Amazon & CreatespaceHer second book, Deeply Bound is currently in the editing stages & excerpts are available to read at Wattpad, Write On &Mibba.
Goodreads is a social media site where users can share what they are reading with one another. It has similarities to Facebook in that you can have a friends list but also incorporates a library of books that you can add to your profile and show others what you are reading or what you have already read.
Goodreads explains that you can, “See which books your friends are reading. Track the books you're reading, have read, and want to read. Check out your personalized book recommendations. Our recommendation engine analyzes 20 billion data points to give suggestions tailored to your literary tastes. Find out if a book is a good fit for you from our community’s reviews.”
I have my own Goodreads account and love its main feature of being able to list, write and share reviews of the books that I have read. There are other features too with the site that I feel do get overlooked and wanted to shine some light on the hidden gem that I found that gives access to its users to read Free stories. Here is how you can access Free stories:
1) Login to Goodreads

2) Click the Home tab, you should see a view similar to my own.

3) Click to Expand the Explore menu

4) Click Creative Writing. This is where all of the Free stories and books are. The great thing about this page is you can browse by Categories, Genres, Active, Popular, Friends and New. There is also a small link, just to the right of “New” called “My Writing” where you can write and post your own writing. Your writing would then be saved to the "Creative Writing" area for the Goodreads community to see.
5) When you find a story that you are interested in reading, you can simply read the chapters by clicking on the story title and at the end of each chapter there is a like button and also share buttons to share on other social media sites.

Now it is time for you to get started and have a look yourselves.
About the Author: C.R. Misty is currently writing a romance trilogy. Her first book, is available online at Kindle, Nook, Kobo, ibook, inktera, OverDrive, Amazon & CreatespaceHer second book, Deeply Bound is currently in the editing stages & excerpts are available to read at Wattpad, Write On &Mibba.
November 2, 2015
12 Steps on How to Get Along With Headers, Footers & Page Numbers in Microsoft Word 2010
C.R.Misty, the author of the International Boundaries Series | Book 1: Simple Affair and Book 2: Deeply Bound, writes about how to add headers, footers & page numbers in Microsoft Word.
If you are writing a book or you have written a document where you want to add headers, footers & page numbers BUT you don’t want the headers, footers and page numbers to show on your title and copyright pages, these are the steps that I learned on how to do this.
Step 1: Open your Microsoft Word 2010 document.
Step 2: Select The "Home" tab, click on the “Show / Hide” button circled below. You need it set to show all of your spaces, formatting and page breaks.
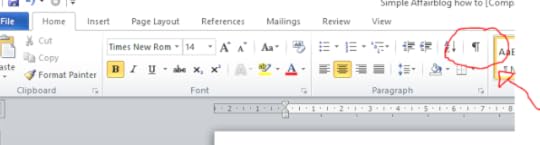
I highlighted below the items that will show when you click the “Show/Hide” button.

Step 3: in the image below, I circled where I put my pointer. What I am doing on the screen is I am placing my pointer where I want to add a "Section Break". A section break divides your document into sections. So in my document I want a "Section Break" there because in my second section is where I want my Headers and Footers to start and I want my page numbers to display. I don’t want headers, footers and page numbers to display on my title and copyright pages.
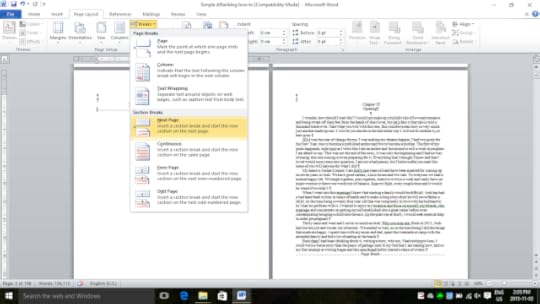
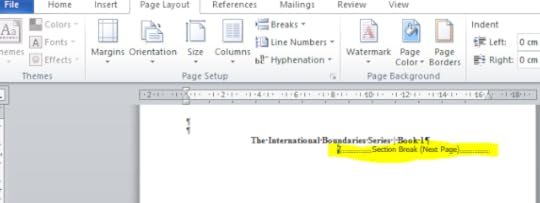
Step 4: Click “Page Layout” tab circled below.
Step 5: Click “Breaks” button circled below.

Step 6: In the “Breaks” menu, click “Next Page” highlighted in the image below.
I highlighted the Section break below that was added to the document once you complete the step. Note when I started I had a “Page Break” and so I have just deleted my “Page Break” since it is no longer needed for the page in the image.

I have divided my document into two sections and now I want to add headers, footers and page numbers to my second section.
Step 7: Click “Insert” tab as you see in the image below then select, “Header”, a drop down menu appears as seen in the image below and choose a format you want. (I selected the first option & centered my text afterwards)

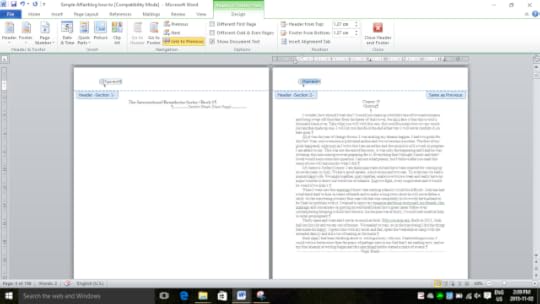
Step 8: When you complete the previous step a “Design” tab will open, see below image, highlighted in green. Also, look at the image noting that my title page shows the Header as “Section 1” and on my Chapter 1 page, the header shows as “Section 2”. I want to leave my “Section 1” header blank and add text to the “Section 2” header.
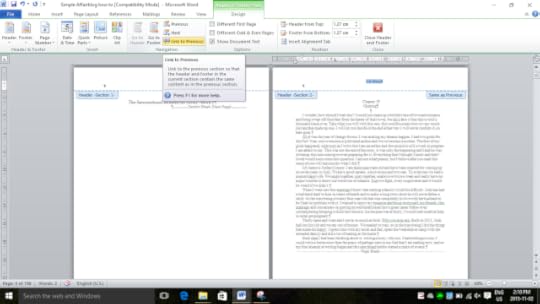
Step 9: Place your pointer into “Section 2” Header and type the text that you want. I entered “C.R. Misty” and then centered the text. Note: that in the image below the highlight “Link to Previous” Make sure that this is NOT selected because what it will do is put your “Section 2” Header text into “Section 1”.
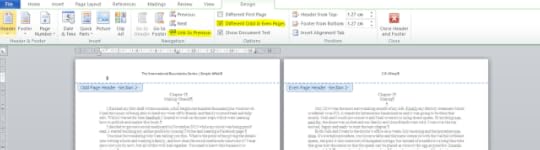
Step 10: My document in the images is a book that I wrote and I wanted different headers on the odd and even pages. Make sure that you check “Different Odd & Even Pages” highlighted below and again when you put your odd and even headers in double check that “Link to Previous” is NOT selected.
At this point, you have now created two Sections and you have added odd and even Headers to “Section 2” of your document. Next is adding Page numbers.
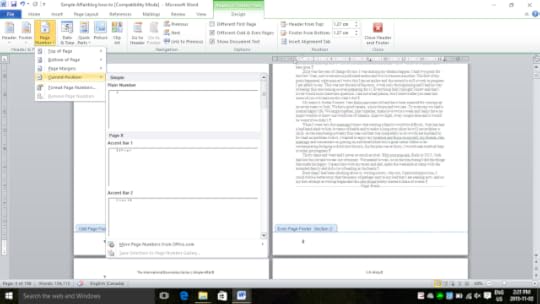
Step 11: Put your pointer where you want your page numbers to start. In the image below, I put my pointer in “Even Page Footer Section 2” & while still on the “Design” Tab, select “Page Number” button then select “Current Position”. In my document, it added the page number 4 and the following “Even Page Footer Section 2” followed suit with page numbers (6, 8, 10, 12 etc) Note: Again make sure “Link to Previous” is NOT selected.Step 12: Repeat step 11 for the odd numbers by clicking in “Odd Page Footer Section 2”
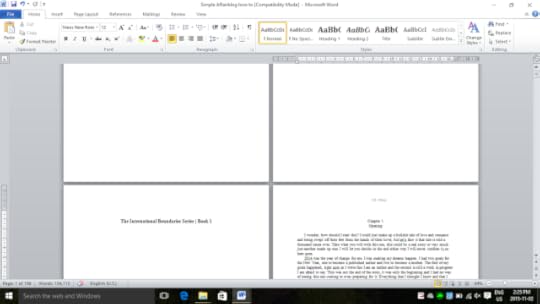
Once you are done adding your Headers, Footers & Page numbers you can uncheck the “Show/Hide” button to see what your work looks like. I have included a couple of images below to show you what my document looks like after completing the above steps.In the image below note that my two top pages have no numbering because I sectioned it off. That is my “Section 1”. The bottom left pages is also a title page and you can see there is no header. My Header starts in “Section 2”, which is Chapter 1 of my document.
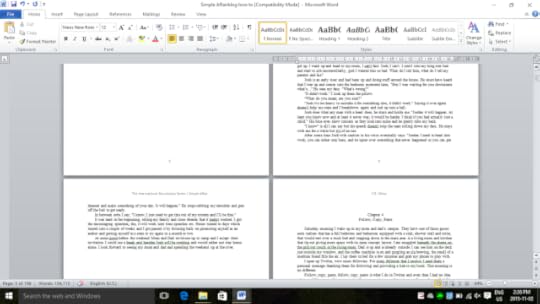
The second image below is scrolled down partway so that you can see my page numbers. Page 4 starts on my Chapter 1 page.
Now you should be a pro at this!

About the Author: C.R. Misty is currently writing a romance trilogy. Her first book, Simple Affair is available online at Kindle, Nook, Kobo, ibook, inktera, OverDrive, Amazon & CreatespacePre-order her second book, "Deeply Bound" now on Amazon and this title will be auto-delivered to your Kindle on June 23, 2016!
If you are writing a book or you have written a document where you want to add headers, footers & page numbers BUT you don’t want the headers, footers and page numbers to show on your title and copyright pages, these are the steps that I learned on how to do this.
Step 1: Open your Microsoft Word 2010 document.
Step 2: Select The "Home" tab, click on the “Show / Hide” button circled below. You need it set to show all of your spaces, formatting and page breaks.

I highlighted below the items that will show when you click the “Show/Hide” button.

Step 3: in the image below, I circled where I put my pointer. What I am doing on the screen is I am placing my pointer where I want to add a "Section Break". A section break divides your document into sections. So in my document I want a "Section Break" there because in my second section is where I want my Headers and Footers to start and I want my page numbers to display. I don’t want headers, footers and page numbers to display on my title and copyright pages.
Step 4: Click “Page Layout” tab circled below.
Step 5: Click “Breaks” button circled below.

Step 6: In the “Breaks” menu, click “Next Page” highlighted in the image below.

I highlighted the Section break below that was added to the document once you complete the step. Note when I started I had a “Page Break” and so I have just deleted my “Page Break” since it is no longer needed for the page in the image.

I have divided my document into two sections and now I want to add headers, footers and page numbers to my second section.
Step 7: Click “Insert” tab as you see in the image below then select, “Header”, a drop down menu appears as seen in the image below and choose a format you want. (I selected the first option & centered my text afterwards)

Step 8: When you complete the previous step a “Design” tab will open, see below image, highlighted in green. Also, look at the image noting that my title page shows the Header as “Section 1” and on my Chapter 1 page, the header shows as “Section 2”. I want to leave my “Section 1” header blank and add text to the “Section 2” header.

Step 9: Place your pointer into “Section 2” Header and type the text that you want. I entered “C.R. Misty” and then centered the text. Note: that in the image below the highlight “Link to Previous” Make sure that this is NOT selected because what it will do is put your “Section 2” Header text into “Section 1”.

Step 10: My document in the images is a book that I wrote and I wanted different headers on the odd and even pages. Make sure that you check “Different Odd & Even Pages” highlighted below and again when you put your odd and even headers in double check that “Link to Previous” is NOT selected.

At this point, you have now created two Sections and you have added odd and even Headers to “Section 2” of your document. Next is adding Page numbers.
Step 11: Put your pointer where you want your page numbers to start. In the image below, I put my pointer in “Even Page Footer Section 2” & while still on the “Design” Tab, select “Page Number” button then select “Current Position”. In my document, it added the page number 4 and the following “Even Page Footer Section 2” followed suit with page numbers (6, 8, 10, 12 etc) Note: Again make sure “Link to Previous” is NOT selected.Step 12: Repeat step 11 for the odd numbers by clicking in “Odd Page Footer Section 2”

Once you are done adding your Headers, Footers & Page numbers you can uncheck the “Show/Hide” button to see what your work looks like. I have included a couple of images below to show you what my document looks like after completing the above steps.In the image below note that my two top pages have no numbering because I sectioned it off. That is my “Section 1”. The bottom left pages is also a title page and you can see there is no header. My Header starts in “Section 2”, which is Chapter 1 of my document.

The second image below is scrolled down partway so that you can see my page numbers. Page 4 starts on my Chapter 1 page.
Now you should be a pro at this!


About the Author: C.R. Misty is currently writing a romance trilogy. Her first book, Simple Affair is available online at Kindle, Nook, Kobo, ibook, inktera, OverDrive, Amazon & CreatespacePre-order her second book, "Deeply Bound" now on Amazon and this title will be auto-delivered to your Kindle on June 23, 2016!
12 Steps on How to Get Along with Headers, Footers & Page Numbers in Microsoft Word 2010
If you are writing a book or you have written a document where you want to add headers, footers & page numbers BUT you don’t want the headers, footers and page numbers to show on your title and copyright pages, these are the steps that I learned on how to do this.
1) Open your Microsoft Word 2010 document.
2) Select The "Home" tab, click on the “Show / Hide” button circled below. You need it set to show all of your spaces, formatting and page breaks.

I highlighted below the items that will show when you click the “Show/Hide” button.

3) In the image below I circled where I put my pointer. What I am doing on the screen is I am placing my pointer where I want to add a "Section Break". A section break divides your document into sections. So in my document I want a "Section Break" there because in my second section is where I want my Headers and Footers to start and I want my page numbers to display. I don’t want headers, footers and page numbers to display on my title and copyright pages.
4) Click “Page Layout” tab circled below.
5) Click “Breaks” button circled below.
6) In the “Breaks” menu, click “Next Page” highlighted in the image below.

I highlighted the Section break below that was added to the document once you complete the step. Note when I started I had a “Page Break” and so I have just deleted my “Page Break” since it is no longer needed for the page in the image.
I have divided my document into two sections and now I want to add headers, footers and page numbers to my second section.
7) Click “Insert” tab as you see in the image below then select, “Header”, a drop down menu appears as seen in the image below and choose a format you want. (I selected the first option & centered my text afterwards)

8) When you complete the previous step a “Design” tab will open, see below image, highlighted in green. Also, look at the image noting that my title page shows the Header as “Section 1” and on my Chapter 1 page, the header shows as “Section 2”. I want to leave my “Section 1” header blank and add text to the “Section 2” header.

9) Place your pointer into “Section 2” Header and type the text that you want. I entered “C.R. Misty” and then centered the text. Note: that in the image below the highlight “Link to Previous” Make sure that this is NOT selected because what it will do is put your “Section 2” Header text into “Section 1”.
 10) My document in the images is a book that I wrote and I wanted different headers on the odd and even pages. Make sure that you check “Different Odd & Even Pages” highlighted below and again when you put your odd and even headers in double check that “Link to Previous” is NOT selected.

At this point, you have now created two Sections and you have added odd and even Headers to “Section 2” of your document. Next is adding Page numbers.
11) Put your pointer where you want your page numbers to start. In the image below, I put my pointer in “Even Page Footer Section 2” & while still on the “Design” Tab, select “Page Numbers” button then select “Current Position”. In my document, it added the page number 4 and the following “Even Page Footer Section 2” followed suit with page numbers (6, 8, 10, 12 etc) Note: Again make sure “Link to Previous” is NOT selected.
12) Repeat step 11 for the odd numbers by clicking in “Odd Page Footer Section 2”

Once you are done adding your Headers, Footers & Page numbers you can uncheck the “Show/Hide” button to see what your work looks like. I have included a couple of images below to show you what my document looks like after completing the above steps.
In the image below note that my two top pages have no numbering because I sectioned it off. That is my “Section 1”. The bottom left pages is also a title page and you can see there is no header. My Header starts in “Section 2”, which is Chapter 1 of my document.

The second image below is scrolled down partway so that you can see my page numbers. Page 4 starts on my Chapter 1 page.
Now you should be a pro at this!


1) Open your Microsoft Word 2010 document.
2) Select The "Home" tab, click on the “Show / Hide” button circled below. You need it set to show all of your spaces, formatting and page breaks.
I highlighted below the items that will show when you click the “Show/Hide” button.
3) In the image below I circled where I put my pointer. What I am doing on the screen is I am placing my pointer where I want to add a "Section Break". A section break divides your document into sections. So in my document I want a "Section Break" there because in my second section is where I want my Headers and Footers to start and I want my page numbers to display. I don’t want headers, footers and page numbers to display on my title and copyright pages.
4) Click “Page Layout” tab circled below.
5) Click “Breaks” button circled below.
6) In the “Breaks” menu, click “Next Page” highlighted in the image below.
I highlighted the Section break below that was added to the document once you complete the step. Note when I started I had a “Page Break” and so I have just deleted my “Page Break” since it is no longer needed for the page in the image.
I have divided my document into two sections and now I want to add headers, footers and page numbers to my second section.
7) Click “Insert” tab as you see in the image below then select, “Header”, a drop down menu appears as seen in the image below and choose a format you want. (I selected the first option & centered my text afterwards)
8) When you complete the previous step a “Design” tab will open, see below image, highlighted in green. Also, look at the image noting that my title page shows the Header as “Section 1” and on my Chapter 1 page, the header shows as “Section 2”. I want to leave my “Section 1” header blank and add text to the “Section 2” header.
9) Place your pointer into “Section 2” Header and type the text that you want. I entered “C.R. Misty” and then centered the text. Note: that in the image below the highlight “Link to Previous” Make sure that this is NOT selected because what it will do is put your “Section 2” Header text into “Section 1”.
10) My document in the images is a book that I wrote and I wanted different headers on the odd and even pages. Make sure that you check “Different Odd & Even Pages” highlighted below and again when you put your odd and even headers in double check that “Link to Previous” is NOT selected.
At this point, you have now created two Sections and you have added odd and even Headers to “Section 2” of your document. Next is adding Page numbers.
11) Put your pointer where you want your page numbers to start. In the image below, I put my pointer in “Even Page Footer Section 2” & while still on the “Design” Tab, select “Page Numbers” button then select “Current Position”. In my document, it added the page number 4 and the following “Even Page Footer Section 2” followed suit with page numbers (6, 8, 10, 12 etc) Note: Again make sure “Link to Previous” is NOT selected.
12) Repeat step 11 for the odd numbers by clicking in “Odd Page Footer Section 2”
Once you are done adding your Headers, Footers & Page numbers you can uncheck the “Show/Hide” button to see what your work looks like. I have included a couple of images below to show you what my document looks like after completing the above steps.
In the image below note that my two top pages have no numbering because I sectioned it off. That is my “Section 1”. The bottom left pages is also a title page and you can see there is no header. My Header starts in “Section 2”, which is Chapter 1 of my document.
The second image below is scrolled down partway so that you can see my page numbers. Page 4 starts on my Chapter 1 page.
Now you should be a pro at this!