
Michael Ruhlman's Blog, page 33
November 25, 2013
Cranberry Sauce and Thanksgiving Gravy
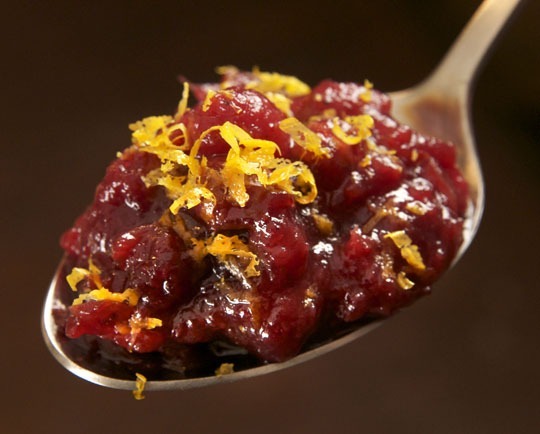
Cranberry Sauce for My Dad. Photo by Donna Turner Ruhlman.
This is a repost from November 21, 2012 featuring Michael’s Cranberry Sauce and Gravy from scratch.
My dad made this cranberry sauce when my daughter was very young. He was mystified, as I recall, having never cooked cranberries before, always used the kind with can-ribs, sliceable. That his granddaughter loved it made it very special to him. He continued to make it. His granddaughter is no longer four but rather seventeen and she will be making it this year (and so did I, because I wanted to share it in this post and think of my dad while it cooked).
It’s really simple, can be done today or the day of (or several days ahead, next year). Just throw everything in the pot, bring it to a simmer, and set a timer for 90 minutes. It will thicken up, but you may want to give it another 20 minutes if it’s soupy (you can always add more water, what you cooked out of it, if you find it’s too thick when it’s chilled).
Make real cranberry sauce. It goes fabulously well with turkey and everything else. There’s a reason for it; the unique berries grew in America on the East Coast where this whole thing, meaning, um, America, began. Tomorrow the entire country celebrates our singular food-centered gift: this free country and free speech that we must honor and cherish and protect and rejoice in (despite our differences, and they are vast). But tomorrow: Together. As one. A Happy Thanksgiving to all.
Cranberry Sauce for My Dad
one 12-oz bag cranberries
orange juice to cover (about 2 cups)
1/4 Meyer’s rum (optional)
3/4 cup brown sugar (less if you like tart, more if you’ve got a serious sweet tooth)
pinch of salt
1/2 teaspoon ground cinnamon
1/4 teaspoon ground cloves
2 tablespoons Grand Marnier (optional)
zest from half an orange (or to taste)
Combine all ingredients except the Grand Marnier and orange zest in a pot. Simmer on medium-low to low until thick, about an hour and a half, or until you have 2 cups. Taste, and add more sugar if you wish, but it should be somewhat tart.
Allow to cool.
Serve cold or at room temperature, adding the Grand Marnier (if using) and, last, the orange zest before serving.
Makes 2 cups
The cranberry sauce is done or it’s not going to happen. Time to think about gravy, the easiest part of the meal (if you made good stock), and what brings the meal together.
People freak out about gravy. I don’t know why. Gravy is easy as pie. Actually, easier than pie. All it is is a delicious, rich stock thickened with flour. In cooking school, they call it velouté, French for velvety. You take a great stock and give it a velvety texture.
Flour-thickened sauces got a bad name when bad “French” restaurants served heavy, badly made sauces. Properly prepared, flour-thickened sauces are light, flavorful, and refreshing. I prefer them to heavy reductions, which, prepared thoughtlessly, are gluey with protein and make the tongue stick to the palate.
The key is dispersing the flour uniformly through the sauce. We do this by combining the fat (butter or rendered chicken or turkey fat) so that the granules of flour are each coated with fat to prevent their clumping together. We accomplish this by adding flour to the fat and stirring. But we want to do more than just coat the flour. We want to cook it, too, so that you don’t taste any raw flour. Flour can be cooked pale (it will smell like pie crust), or it can be deeply browned, which gives it a wonderful nutty flavor but reduces its thickening power. (Someday I should do a quick plain roux video to show how easy it is, starting with equal parts fat and flour by volume, then adding more flour till you have a thin paste—3 parts flour to 2 parts fat is ideal if measuring by weight, but for small quantities, by eye is fine.)
The below gravy is simply minced onion cooked in the rendered chicken fat; flour is added and cooked; stock is added and brought to a simmer as the flour absorbs the liquid and expands in the heat to thicken the sauce. Skimming foam is key for a good for smooth velvety finish (that’s one of our new offset spoons in the last photo, for basting, tasting, and skimming!). Flavor it any way you want. Sage? Chopped giblets? Sautéed mushrooms? Go for it. White wine is always a good idea for acidity and flavor. Season to taste with salt and a few drops of lemon or vinegar.
You can make this any time of the day and keep it on a low burner or do it the night before and refrigerate. But the most important thing? Make loads—it’s one of the best parts of the meal and it helps to keep the food hot! Many a dry turkey breast has been saved by delicious gravy.
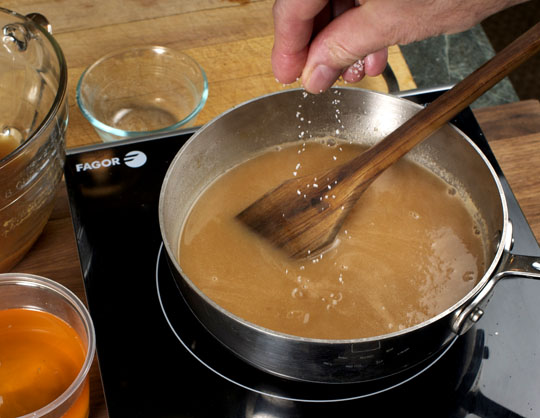
Gravy is nothing more than flour-thickened stock. Photo by Donna Turner Ruhlman.
Easy Turkey Gravy with Onion
Originally posted on November 18, 2011
1/2 Spanish onion, cut into small dice (1/2 to 3/4 cup)
1/4 cup turkey fat or fat saved from a roasted chicken or butter
4 to 6 tablespoons of all-purpose flour
1 quart turkey stock, cold or at room temperature
salt to taste
lemon juice or white wine vinegar to taste
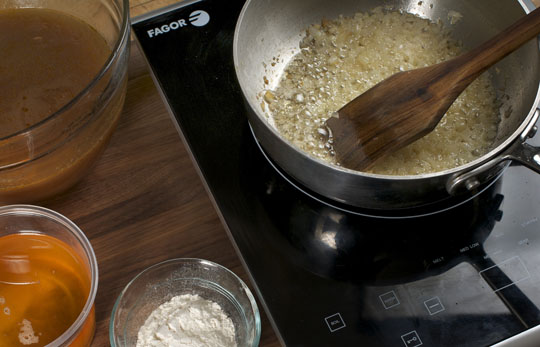
In a medium saucepan, combine the onion and fat over medium heat and cook until the onions are completely tender and just beginning to brown (if you want to brown them, go ahead), 5 or 10 minutes.
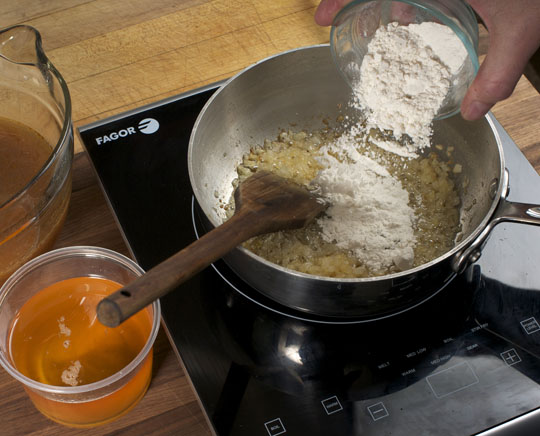
If you want a thin gravy, add 4 tablespoons of flour, for a thicker gravy, add 6 tablespoons. Continue to cook the onions with the flour till the flour lightly browns and loses its raw smell.
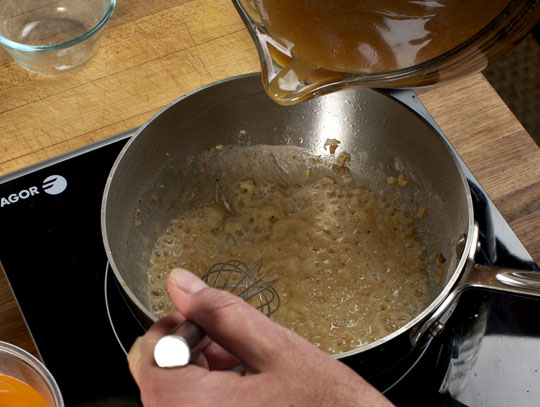
Turn the burner to high and pour in the stock, whisking continuously as you do.
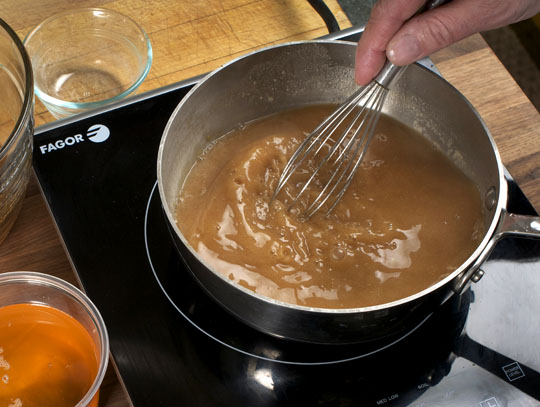
Keep cooking until the gravy comes to a boil and thickens. Season with salt to taste. Skim and discard any foam that collects on the side of the pan. Add a few drops of lemon juice or white wine vinegar.
Taste. Does it need more acidity or salt? Add it. Would you like to put pepper in it? Go ahead, it’s your gravy. Fan of giblets? If you roasted the gizzard and heart with the turkey, chop those up and add those. Too thick? Add a little more stock from the cool cooking method I posted on Monday. Too thin? Either make a quick roux of fat and flour and add that or a slurry of cornstarch and water. When it’s perfect, it can keep warm for ages, covered, while you work on the rest of dinner. Serve piping hot.

My other Thanksgiving links you may like:
Make your own Turkey stock.
Need a quick soup? Try whipping up the butternut squash soup.
Use the Roast and Braise technique to cook your turkey.
Thinking about sides use my dressing recipe or Stephanie’s pumpkin mac and cheese.
© 2013 Michael Ruhlman. Photo © 2013 Donna Turner Ruhlman. All rights reserved.


November 22, 2013
Make Your Turkey Stock Now—and a Turkey Shooter
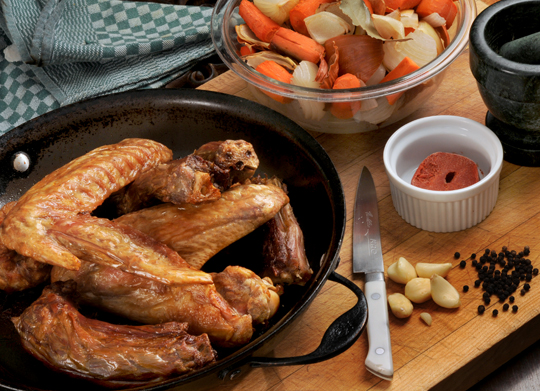
Mise en place for turkey stock/gravy. Photo by Donna Turner Ruhlman.
It’s Friday in NYC, a week before Thanksgiving, and I’m concluding last leg of what seems a forever road trip, concluding at Miami Book Fair tomorrow (I’m told I was on NPR Morning Edition today but haven’t heard and will be on The Chew on Tuesday cooking kreplach with my pal Michael Symon). Per our tradition we’ll be driving to the Hudson Valley to celebrate Thanksgiving with Donna’s big and growing family—something like 21 adults, a few teenagers, and a few great grand-kids. Donna volunteered me for the gravy because, gravy is a no-brainer, I love making stock, and frozen, it will travel well. (Recipes for stock and Friday Cocktail below.)
A no-brainer if you make excellent turkey stock now! I’ll be doubling or tripling the below recipe this year. When I’m home I’ll be roasting drumsticks, wings, and necks. (I read in the Times that the venerable Jacques Pépin picks the meat off the neck of the turkey and adds it to the gravy. I might try that this year.) Roasting them will give your stock a nice flavor. All that golden brown roasted skin above? Equals flavor.
I’ll take enough meat off the drumstick for dinner, then throw the bones into the biggest pot I own, and put it in a low oven overnight. The following day, I’ll remove the bones (12 hours in hot but not simmering water should do the trick!), add the vegetables and aromatics, and cook them, again without a bubble but with the pot too hot to hold your hand against, for another couple hours. I’ll then strain the stock through a basket strainer and, because it’s cold here, I’ll chill it outside, remove the fat, then strain it through one of my reusable All-Strain straining cloths, so that it’s very clean on the palate. (All that will remain is to thicken it with a turkey fat–based roux while the turkey rests. I’ll post on that next week.)
I’ll taste it. I may reduce it further but usually it’s pretty good by now. I happen to have some veal stock on hand from another project. I’ll add that because veal stock puts everything over the top.
I’m unaccountably lucky to be able to work from home, so this is easy for me to do today while I’m working. But the weekend is here, so if you plan ahead, pick up some turkey bones and roast them over the weekend, then cover them with water and put them in an oven at 200°F or below overnight. That’s how great gravy begins.
And it’s Friday, and cold, so maybe a hot TurkShot will be an end-of-week libation.
Easy Turkey Stock
Yield: 2 quarts stock
2 large turkey drumsticks
2 large turkey wings
2 Spanish onion, sliced
4 carrots, cut in pieces
4 celery ribs, cut in pieces
3 bay leaves
5 cloves garlic
1 tablespoon peppercorns, cracked beneath a pan or with a mortar and pestle
1/4 cup tomato paste
fresh parsley and thyme (optional)
Roast the turkey pieces (you should have 5–6 pounds/2–3 kilos) in a hot oven, 425°F/218°C at least, till it looks delicious. Scatter the onion, carrot, and celery in the same pan, and take them out when you take out the turkey. Don’t let the veg burn. (You can cut the meat off the bones for dinner if you wish; but the meat will add lots of flavor to the stock.)
Put the turkey bones in a big pot and cover them completely with water, 3–4 quarts/liters, and put the pot over high heat. Turn your oven to 180°–200°F/80°–90°C. When the water comes to a simmer, put the pot in the oven for 8 hours or overnight.
Add the remaining ingredients (if you don’t have enough room, remove the turkey bones—they will have cooked out by now). Bring to a simmer, then reduce the temperature to low and cook for another hour or so. Strain into a clean pot. Cool, then refrigerate.
Reserve any fat that’s congealed on top for the roux on Thanksgiving day. Reduce the stock to 1 1/2 to 2 quarts/liters if it’s not already at that level.
The Friday cocktail hour recipe is a savory drink.
TurkShot
2 ounces vodka
2 ounces turkey stock
splash Worcestershire
splash Sriracha (optional for heat)
twist of lemon
Serve hot.
To serve this turkey stock–based cocktail cold, add 2 ounces tomato juice, use Sriracha or Tabasco for heat, and serve over ice.
If you liked this post on turkey stock, check out these other links:
My post on stock clarifications and Stock Convictions.
Turkey Stock: Oven Method is another great way to make stock, the day after Thanksgiving.
Examine starting temperatures, stock clarity, protein density, and more in this kitchen science article by CIA Chef Tucker Bunch.
Here’s more info on the All-Strain cloths and Dalton-Ruhlman cooking tools.
© 2013 Michael Ruhlman. Photo © 2013 Donna Turner Ruhlman. All rights reserved.
November 20, 2013
Thanksgiving Dressing
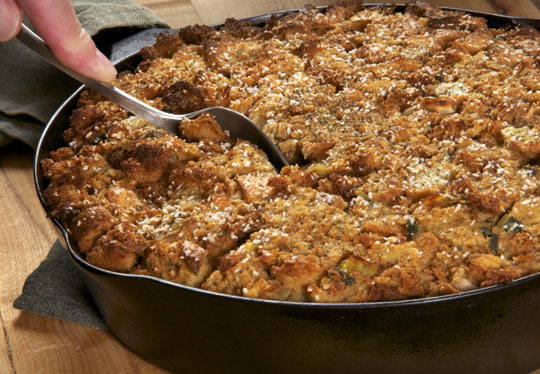
The basic ratio for custard makes your holiday dressing. Photo by Donna Turner Ruhlman.
I stopped stuffing our Thanksgiving turkey reluctantly, as the stuffing was always my favorite part of the meal when Grandma Spamer made it. But my goal became a perfectly cooked bird, and you can’t cook a turkey perfectly if it’s stuffed. So now I make what we must refer to as dressing, no matter what Mario says (“That’s what you put on a salad.”). Dressing denotes that it’s stuffing cooked in a pan.
And it can still be the very best part of the meal! Thanks to a versatile ratio, it’s a no brainer. Dressing, and there are infinite variations, is little more than a savory bread pudding. To make a great dressing you make the liquid a custard, the ratio for which is 2 parts liquid and 1 part egg, here 24 ounces stock (flavor!) and 12 ounces (6) eggs. The rest is the flavoring.
Here I use leeks and sage, and nothing more. Simple. But feel free to improvise: add sautéed mushrooms, celery (sweated with the leeks), replace the leeks with onion, or fennel, add chestnuts. Or swap in a cup of white wine for the stock. There’s no limit to what you can do with a dressing like this, provided you use a good flavorful custard.
A secret I don’t usually mention: before serving, I spoon some sizzling hot turkey fat over the dressing to make sure it’s truly succulent and tastes like my dear Grandma Spamer’s.
Holiday Dressing
Ratio: 2 parts liquid: 1 part egg
1/2 cup butter
4 fat leeks, thinly sliced and thoroughly rinsed of all dirt
3 tablespoons fresh sage, minced
1 tablespoon fresh thyme, minced
Salt and pepper to taste
6 eggs
3 cups turkey stock
8 cups cubed white bread (1 large loaf sourdough or country bread)
1/4 cup fresh parsley, chopped
Preheat the oven to 300°F/190°C.
In a large sauté pan over medium heat melt the butter, then sweat the leeks and add the minced sage and thyme. Season with 2 four-finger pinches of salt and some freshly ground black pepper.
Combine the eggs and the turkey stock and whisk or blend to combine.
Combine the sautéed leeks, bread, custard (eggs and turkey stock), and parsley. Toss and set aside for 10 or 15 minutes, pressing down on the bread so that it absorbs the custard.
Butter a baking dish or a cast iron skillet, and pour in the stuffing. Dot the top of the stuffing with extra butter. Cover with aluminum foil and bake 30 minutes; uncover and bake until golden, 15 to 30 more minutes.
Other links you may like:
My recent holiday post on Butternut Squash Soup and the Roast & Braise Turkey technique.
Need more ideas for your Thanksgiving feast? Take a look at Martha Stewart.
Here are some more stuffing ideas from Food Network.
Find local heritage turkeys on Local Harvest.
© 2013 Michael Ruhlman. Photo © 2013 Donna Turner Ruhlman. All rights reserved.
November 18, 2013
Holiday Classic Dishes: Braised & Roast Turkey
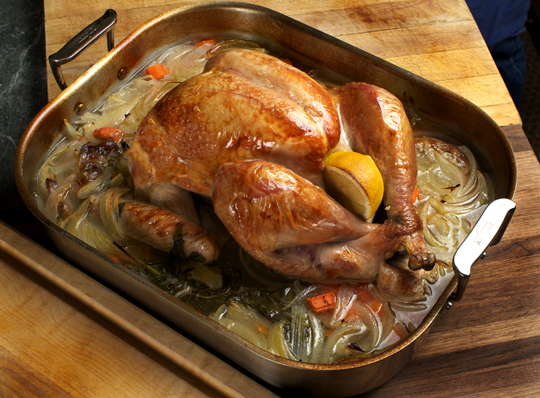
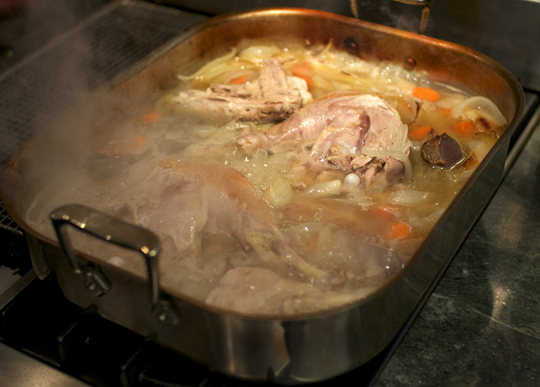
Turkey: The Roast/Braise Method. All photos by Donna Turner Ruhlman.
I’m starting to get Thanksgiving meal questions in my email, so I guess it’s time to review for our great shared secular holiday, Thanksgiving, our only holiday anchored by food. Time to start planning! I’ll have other posts later in the week, dressing, and stock-making for this weekend (have to have plenty of stock for dressing and gravy). Today, it’s the big one. How to handle the big bird.
I find it amusing how every year the major food media come up with some new way to do the same old thing. Last year The New York Times told you to steam your turkey! Not that there’s anything wrong with the story or the technique (by the Jacques Pépin, after all). My view is why mess with what works? For important occasions, the rule is: go with what works. And of all my years roasting a turkey, I’ve found that the braise/roast method works best, as I wrote last year.
The reason is that this method solves the two great Turkey Conundrums: 1) how to have both juicy breast meat and tender dark meat, and 2) how to serve it all hot to a lot of people.
Answer: the roast/braise method.
Three years ago, I was chatting with my neighbor, the excellent chef Doug Katz (Fire Food & Drink), and he described how he cooks the turkey in stock up to the drumstick so that the legs braise while the breast and skin cook in dry heat. Last year I tried it and it works brilliantly. Thank you, Doug. (Step-by-step pix below.)
The basic idea is this: cook the turkey half submerged in flavorful liquid (preferably stock, but water and wine will do) and lots of aromatic vegetables; the dense, moist heat of the water increases the speed of the cooking. When the breast, browned in the circulating dry heat, is barely done (if you’re measuring, push a thermometer deep into the breast near the wing joint and pull it when the breast measures 150˚F); remove the turkey from the pan. Remove the legs (and wings if you wish). Return them to the braising liquid and finish them on the stovetop, simmering them in the liquid while the breast rests. When the legs and thighs are done, remove the breast whole from the carcass, put them back into the pan, skin side up, and broil to crisp the skin and finish cooking the breast.
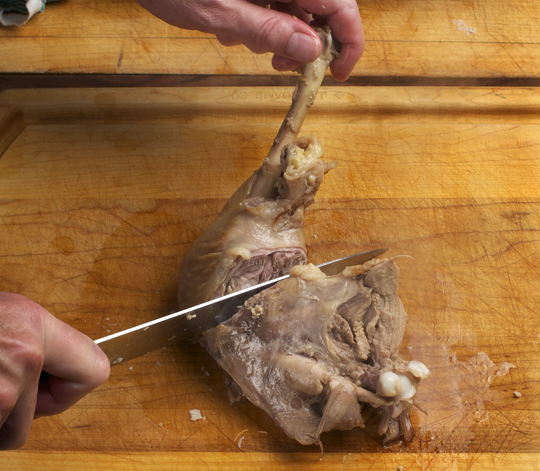
Slice the breast and cut the dark meat off the legs, thighs, and wings (in the Times recipe, by the way, Pépin chops off the knobby ends of the drumsticks so that you can easily dispose of all those meddlesome tendons in the leg; a cool idea that I’m going to try). Put all of the meat into a large service dish (or the roasting pan after you’ve strained the delicious cooking liquid into another pot). Ladle the hot braising broth over the carved turkey and keep it warm in the oven or on the stovetop till you’re ready to serve. Use the broth to moisten and flavor a pan dressing (we don’t stuff our turkey anymore, nostalgic as I am for my Grandma Spamer’s stuffing).
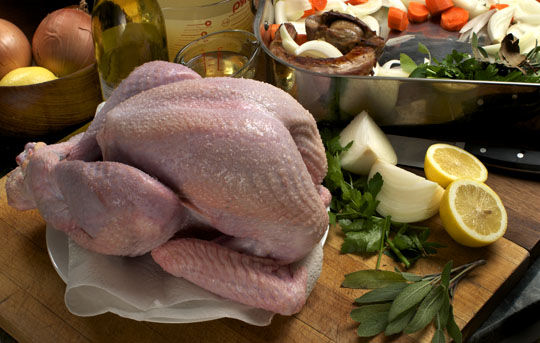
Roast/braise is the perfect technique for a big bird, especially if you order from a local farmer (farm-raised birds can be tough in the leg—but not when you use this roast/braise technique). We bought the above from Aaron Miller, who also raises great grass-fed beef, chicken, and lamb.
Here’s my recipe and technique for perfect turkey served hot to all. Quantities will vary given the size of your bird and roasting pan, so I don’t always give amounts. You’ll have to use your most important cooking tool for this: your brain. We cook with our senses, one of which is common sense. Relax, don’t freak out, ask the right number of people to help in the kitchen, have fun, and rejoice in this truly unique and wonderful holiday that celebrates the cooking and eating and sharing of food with the people we love. And remember the words of New York Times editor Sam Sifton, in his new book Thanksgiving: How to Cook It Well: “This is the most important message of Thanksgiving: Everything really will be all right.”
The Roasted/Braised Thanksgiving Turkey
Plenty of onions, carrots, and celery, roughly chopped (I used 3 big Spanish onions plus one for stuffing into the carcass, 5 carrots, and would have used 5 celery ribs if I’d have remembered to put it on the shopping list!)
5 or 10 cloves garlic, peeled
2 or 3 bay leaves
fresh herbs (I used sage and parsley, still from the garden; tarragon or rosemary would be good, too.)
cracked black pepper as needed
2 to 4 tablespoons tomato paste
3 cups of white wine
chicken stock, turkey stock, or water (I need needed between 2 and 3 quarts.)
kosher salt as needed
1 turkey (Doug recommends 1 pound per person; the one we used here is small, 10 pounds.)
1 lemon, halved
melted butter, turkey fat, or chicken fat for basting
Preheat your oven to 425°F to 450°F.
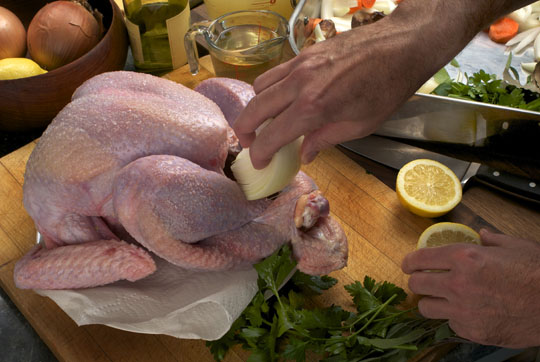
Combine all of the vegetables, garlic, bay leaves, most of the herbs, pepper, and tomato paste in a roasting pan just big enough to hold turkey and vegetables. Stuff a quartered onion, the remaining herbs, and the lemon into the cavity of the turkey.
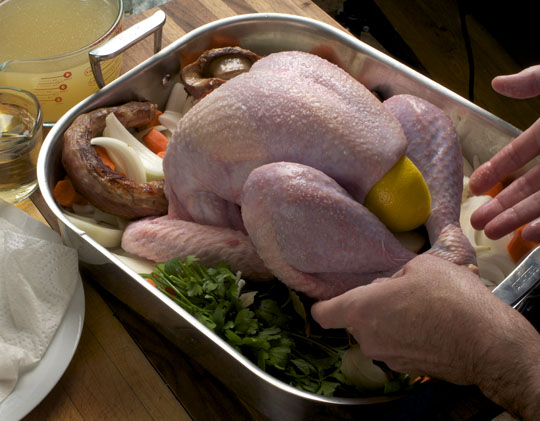
Nestle the turkey in amongst the aromatics (notice how all of these ingredients are what we use to make stock?).
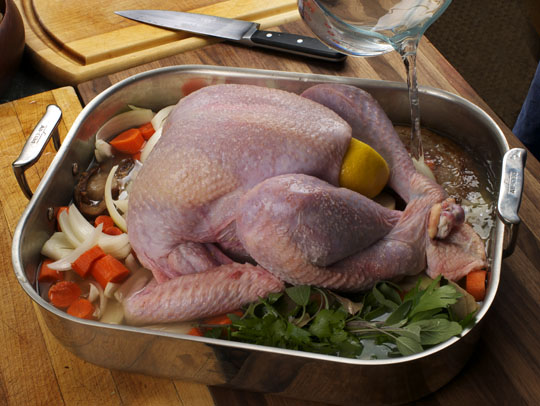
Pour in the wine and enough stock and/or water to come up above wing and thigh. Add an aggressive 4-finger pinch of salt.

Put the roasting pan over high heat on your stove top and until the liquid comes to a full simmer. Put the turkey in the oven, reduce the heat to 350°F/177°C. Roast until a thermometer in the fattest part of the breast, just above the wing joint, reads 150° to 160°F. I use this cable thermometer, which sounds an alarm when I hit the right temperature, so I don’t have to keep opening the oven and jabbing at the breast. Baste with butter or fat every 20 to 30 minutes. This bird took 80 minutes. A bird twice or more its size will take around 2.5 to 3 hours. Give yourself ample time (it all keeps warm, so better that it’s done early rather than late, especially if you’re serving cocktails).
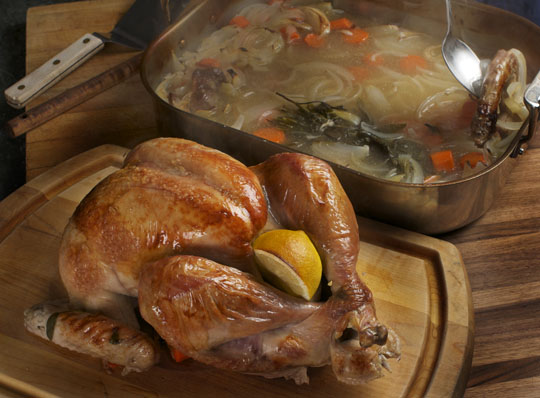
Remove the turkey to a platter. Now this is important: Present the turkey to everyone. Parade it, admire it. It’s important that all present regard and admire the bird.
Remove the legs at the thigh joint.

Return the legs to the braising pan.
If you wish, remove the wings as well and add them to the pan.
Continue simmering on the stove top, another half hour or so, until the thighs and drumsticks are tender.
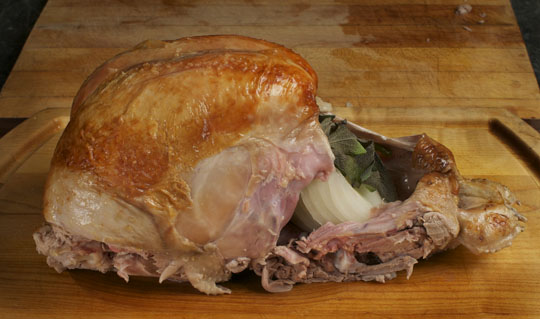
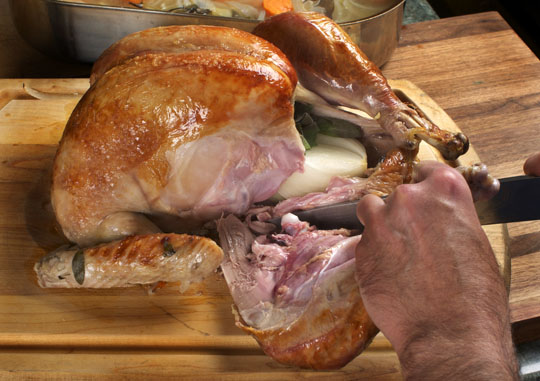
The breast should rest like this for at least a half hour or for up to an hour if you need that long to finish the dark meat.
When the dark meat is done, preheat your broiler and arrange an oven rack so that you can put your roasting pan close to the broiler element.
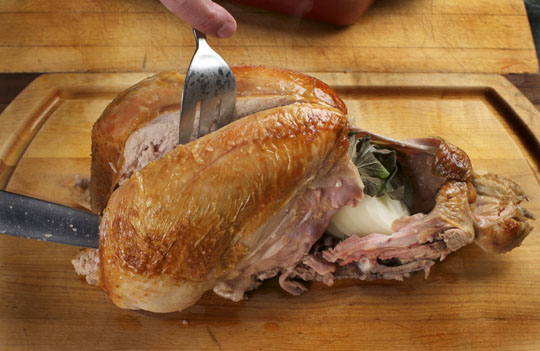
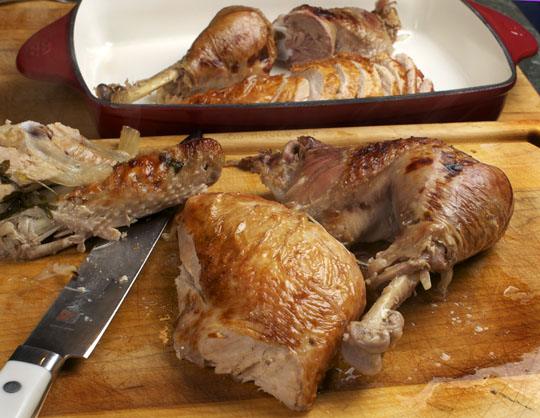
Remove each side of the breast.
It should be a little pink at the center. (The meat on the carcass will flavor your stock tomorrow or overnight.)

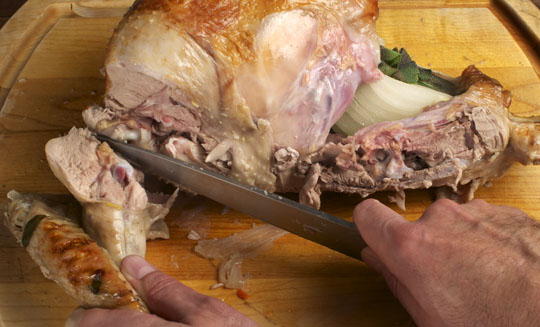
Add the whole breasts to the roasting pan skin side up. With all pieces skin side up, finish the turkey under the broiler until the skin is crisp and the breast has been rewarmed and cooked through.

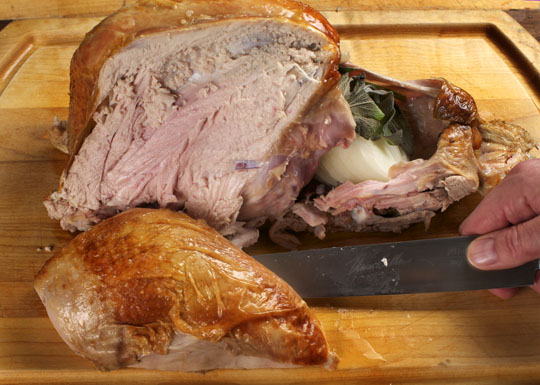
Slice the breast cross-wise so that every piece has some skin.
Separate the leg and thigh and carve the dark meat off the bone. Strain the braising liquid into a pot, discarding the vegetables, and bring it to a simmer (it helps to have someone else do this for you while you’re cutting turkey!). If you’ll be serving the turkey from the roasting pan, rinse it out and rewarm it. If you’re using another service dish, warm that.
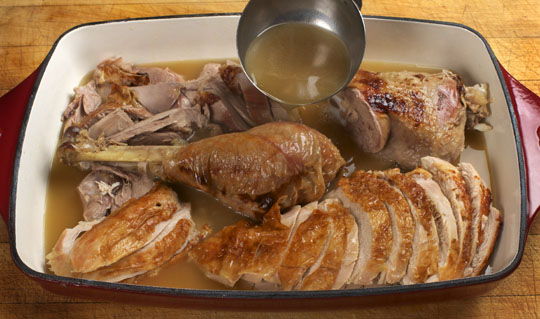
Arrange the turkey in the serving vessel and ladle the hot broth over the turkey. You can cover this with foil and keep it warm in the turned-off oven or on the stove top, while you ready the rest of the meal. Be careful not to overcook the breast, though the broth will always keep it moist.
Serve and be grateful.
Notes: If you want to add even more flavor to this, sauté the vegetables in the roasting pan first. I roasted the neck and gizzard and added it to the braising liquid. If you want, finely chop the gizzard and add it to your gravy (I’ll post my gravy method on Wednesday; I hope you made stock over the weekend if you’re responsible for the gravy!). When you’re done, you should have plenty of braising liquid. Add this to your stockpot when making stock from the leftover carcass and bones.
Braised and Roasted Turkey Slideshow
If you liked this post on roasted and braised turkey, check out these other links:
My recent holiday posts on stuffing and butternut squash soup.
Looking to grill your turkey? Try my Spatchcocked Grilled Turkey recipe.
Roasted cauliflower from Twenty is a great addition to Thanksgiving dinner.
Heritage breed turkeys, learn more about them at the Heritage Turkey Foundation.
© 2013 Michael Ruhlman. Photo © 2013 Donna Turner Ruhlman. All rights reserved.
November 15, 2013
Friday Cocktail Hour: The Rob Roy

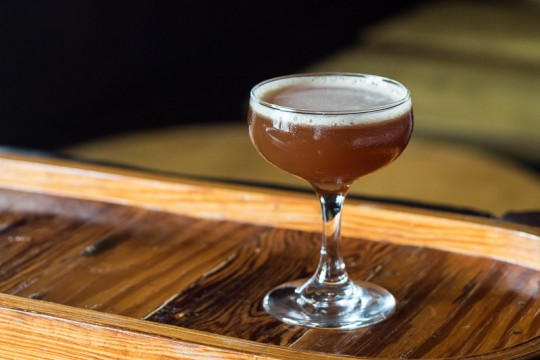
A Rob Roy. Photo by Donna Turner Ruhlman
Owing to a misspent youth and for reasons I’d rather not get into, I have no taste whatever for blended Scotch whiskeys. Thus the dearth of Scotch-based cocktails during the Friday Cocktail Hour. But there are some fine Scotch-based elixirs that deserve attention, such as the classic Rob Roy, inspired by a 19th-century Broadway show. This was a tradition back then, naming drinks after shows—a tradition worth reviving, I think. How about it, mixers out there? Give me a Kinky Boots! Or go downtown with a Designated Mourner. Or my fave theater experience of the year, also at the Public Theater, Here Lies Love. I’d love to hear that uttered at a bar.
“What’ll it be, pal?”
“Here Lies Love.”
“Comin’ right up.”
Herewith, a true classic, served in classic proportions. I am forced by my own history to use a splendid single malt (best enjoyed neat with a splash of cool water, if anything) for this excellent cocktail. That said, I was surprised and impressed by the complexity of a cocktail made with an excellent single malt. I’d say it’s worth it.
This cocktail is of course a variation on the theme of sweet vermouth and bitters; change the Scotch to rye or bourbon and it is called a Manhattan. Use bitters to taste. Angostura is the default here, but I love Hella citrus.
The Rob Roy
2 ounces Scotch
1 ounce sweet vermouth
Bitters to taste
Lemon twist
Combine the liquids in a shaker with ice, swirl till cold, then pour into a martini glass. Alternatively, mix the liquids in a lowball and add ice. Finish with the lemon twist.
My cocktail posts on the Boulevardier, the Mint Julep, and the Southside.
The NYTimes weighed in on what an old-fashioned is, giving two old-fashioned recipes, and a third that needs it’s own name.
Learn about the regions of Scotch in Scotland.
Here are five essential Scotch cocktails from the Serious Eats.
When in Cleveland, don’t forget to visit the Best Bar in the World: the Velvet Tango Room.
© 2013 Michael Ruhlman. Photo © 2013 Donna Turner Ruhlman. All rights reserved.
November 12, 2013
In Las Vegas with Bourdain

Bourdain on time at the agreed on pick-up spot. Photo by iphone.
Bourdain is waiting at the appointed rendezvous in the Nevada dessert. I’m in a 1970 Olds Cutlass “acquired” for me by a Vegas associate. I didn’t ask questions. Bourdain against the arid landscape is a site that fills me with a mixture of excitement and fear (but not loathing). He and the intrepid Zero Point Zero production team have brought me here to help Tony explore different sides of this morass of humanity—more precisely, those who serve that morass. But Bourdain has a penchant for getting me into trouble. Carol Blymire texted that she has bail money ready, say the word. Remember, I had to make a quick getaway in the “No Reservations” Las Vegas episode, for those who missed that one.
But Tony’s here to explore different sides of Vegas, ones less often covered. I type this from one of the major hotel’s villas, so large we’ve just discovered Colonel Mustard in the observatory holding a lead pipe. A place so secretive that when I tried to order room service, they didn’t know where the villa was or how to get the BLT to me. All the while it looks over the central swimming pool. I’m clearly in the land of the .01 percent.
Bourdain’s show on CNN, “Parts Unknown,” is an increasingly ambitious and thrilling travel show, anchored by the food of a culture, and addressing serious issues of that locale. If you haven’t seen the African episodes, my favorites, I highly recommend buying on iTunes or where you can find them. Listening to the Libyan rebel describe how he would locate, via Google maps, the coordinates of the buildings from which the Libyan military was picking off civilians, then tweet those coordinates so that NATO forces would see the tweets and bomb the precise spot, within view of the man sending out those tweets—gives you a true sense of the power of so much easily shared global information. The Congo episode, South Africa, and, more recently, the controversial Tokyo underbelly episode are all worth your time.
And during some downtime in the villa, I had a chance to sit down and talk with Tony about the issues I care about so much, food and its production, distribution, and consumption, and what it means to this country. Questions such as what is a chef’s responsibility to sustainable and local food purchases, and how we can ask people, especially people struggling financially, to not buy the cheapest food for some ultimately intangible result?
More of this to come when I’ve had time to make sense of my notes. But now gotta run—it’s time for some Texas Hold ‘Em.
More to come, that is, if I don’t cross The Man and find myself digging a hole in the desert. It’s a mighty big desert out there.
Other links you may like:
My recent post on Macaroni and Beef.
Bourdain’s guest post; So You Wanna Be a Chef.
Headed to Las Vegas? Learn more about Sin City through their tourism site.
© 2013 Michael Ruhlman. Photo © 2013 Donna Turner Ruhlman. All rights reserved.
November 8, 2013
Friday Cocktail Hour: For Whom the Sun Rises
For Whom the Sun Rises, a new cocktail from Cure. Photo by Kevin O’Mara
Back to New Orleans, where cocktails seem to be bursting from the seams. While Michael is carousing in Vegas, this week’s Friday Cocktail Hour is a guest post from Bellocq‘s sister saloon Cure (@cureNOLA), which is also located in New Orleans. Cure is yet another creation of the cocktail minds of Kirk Estopinal and Neal Bodenheimer. It was inspired by the historical period when cocktails grew out of medicine and home remedies. Their concept is to have their guests step a bit into the past while they have a libation and a quick nibble that are both healthful and enjoyable. With the fall arriving, Neal Bodenheimer wanted to share with us his creation, For Whom the Sun Rises, which is a twist on the Hemingway Daiquiri.—EJ
By Neal Bodenheimer
For Whom the Sun Rises started out as a thought experiment about turning classic cocktail formats on their head. The first part of the idea was based on the interaction of grapefruit, bitter, and salt. I started thinking about classic cocktail formats that would work with this flavor concept and how to interpret a very classic format from a different perspective. Normally you would flip out a few minor ingredients for some other more obscure ingredients, and the flavor of the classic drink would be mostly intact. However, the idea for this drink was to swap the base of this cocktail out for another completely unrelated base. For example, normally the logic would be to swap the white rum out for another base spirit like gin, but here the idea was to use a modifier as a base, so I chose Varnelli Amaro Sibilla. Sibilla is deeply bitter and powerful, so the idea of using 1.5 ounces of it seemed far-fetched for a cocktail intended for our everyday cocktail list. [Sibilla is an Italian liqueur in the Amaro category, so it is bitter, like Cynar.]

A peek inside of Cure.
The general ideas of For Whom the Sun Rises:
Hemingway Daiquiri classic format.
Grapefruit, bitter, salt flavor combination.
Base of the drink swapped out to something that at first glance would seem poorly chosen.
Salt to counteract the bitterness of the base and let the herbal notes come to life in the drink.
Result: materially a Hemingway Daiquiri, but also a far different experience that drinks juicy and low-proof with a far more bitter yet pleasing finish. Italian aperitif in flavor, Cuban Classic in format.
Cheers!
For Whom the Sun Rises
by Neal Bodenheimer
1.5 ounces Varnelli Amaro Sibilla
0.75 ounce grapefruit juice
0.25 ounce lime juice
0.25 ounce Maraska Maraschino (cherry brandy)
0.25 ounce simple syrup
5 drops salt solution (3 parts kosher salt to 1 part water)
Grapefruit peel (placed in the shaker)
Combine all ingredients in a shaker tin and shake hard 15 times to aerate.
Double-strain into a chilled coupe.
For those who don’t have access to these fluids but still want a fallback suggestion to look forward to, Michael recommends the Key Lime Daiquiri or the classic Hemingway Daiquiri.
Other links you may like:
Other cocktail posts that feature different drinks are the Ludwig, Old Infatuation, and the Cobbler.
Learn more about Amaro Sibilla and Maraschino.
Next time in NOLA, check out the annual Tales of the Cocktail festival.
© 2013 Michael Ruhlman. Photo © 2013 Donna Turner Ruhlman. All rights reserved.
November 6, 2013
Holiday Classic: Butternut Squash Soup

“Phenomenal” Butternut Squash and Leek Soup. Photo by Donna Turner Ruhlman.
Just back from great Chefs Collaborative event in Charleston, SC, and now must head to Vegas, my favorite city on earth (not—but a call from an old friend presented an offer I couldn’t refuse), then on to book events in New York and Miami. So I’m not doing much cooking, or blogging. But I love this soup, which I posted about last year, and it represents a good basic technique for any soup like it. November is the perfect month to make it, especially here in the Midwest with a cold, wet front about to move through, and it’s a great nutritious meal to cook for your family. —M.R.
Weekend before last, I bought, among other things, a butternut squash at the farmers’ market. I had not intended to buy it, but it beckoned. It is fall. It is time to cook fall things. Such as duck confit, and sausage, and bacon, and cassoulet. And rich, soul-soothing soups.
Squash soup is easy, nutritious, and delicious. I served it to a bunch of eighth-grade boys. One of them said, “This is phenomenal soup.” I was surprised they were eating it, let alone using the word “phenomenal” with regard to food.
This recipe will work with any similar squash (pumpkin would be great). Use onion if you don’t have leeks. The method is standard: sweat the onion in some fat, salt it, add the squash, cook it a little, add enough half-and-half to cover, simmer till the squash is tender. Purée, taste for seasoning, and perfect it—you may want to add some lemon juice or white wine vinegar; taste and think.
I took some extra time to clean and sauté the seeds in some butter for a crunchy garnish. Fresh or whole, dried thyme leaves are the key to the flavor of this soup (don’t use the old, powdered thyme sitting in your spice rack). I still have fresh thyme in the garden and that makes a good finishing garnish, and last, some yogurt, which I always have on hand (high point of last week: my Indian neighbor came over to ask for some starter as hers had gone bad, which happens, and she knows yogurt; I’m glad ours didn’t go bad at the same time).
Soup is a technique in Ruhlman’s Twenty, as is sauce, and this could easily be the sauce for the scallop dish (we’re in prime scallop season—lucky East-coasters are, anyway). I love how soups and sauces are often interchangeable. I’d never serve a bowl of Sauce Robert, or a bowl of Hollandaise, but most thick, puréed soups can be used as sauces. What a killer use of leftover butternut squash soup that would be.
Butternut Squash & Leek Soup
2 large leeks, white and light green parts only, cleaned and julienned (save dark green parts for stock)
2 tablespoons butter, plus 2 teaspoons or so for the seeds (if using)
Salt to taste
1 butternut squash, peeled, cut in large dice, seeds reserved
2 teaspoons whole dried thyme leaves (not powdered thyme; this is critical)
1 quart half-and-half (you won’t use it all; you can get by with 2 cups if you wish)
1/2 cup Greek or homemade yogurt, crème fraîche, or mascarpone
2 teaspoons fresh thyme leaves (optional)
Sauté the leeks in 2 tablespoons butter over medium heat until they’re soft, hitting them with a big four-finger pinch of salt (a teaspoon for the ladies who are measuring).
Sauté the rinsed reserved seeds in the remaining 2 teaspoons butter till golden brown and crisp, about 10 minutes over high, then low heat.
Add the squash and the dried thyme to the leeks and stir to heat through for a few minutes. Add just enough half-and-half to cover the squash. Bring to a simmer and cook on medium-low for 15 minutes or so.
Purée the squash in a blender (or in the pot with an immersion blender) till uniformly smooth.
Serve garnished as you like with yogurt, toasted seeds, and fresh thyme.
Serves 8
Other links you may like:
My other soup posts: corn tortilla soup, French onion soup, and cream of celery root soup.
Learn more about heirloom squashes and the various types of them.
Make spicy roasted squash seeds as a tasty snack.
David Lebovitz shares his recipe for pumpkin ice cream.
© 2013 Michael Ruhlman. Photo © 2013 Donna Turner Ruhlman. All rights reserved.
November 4, 2013
Macaroni & Beef
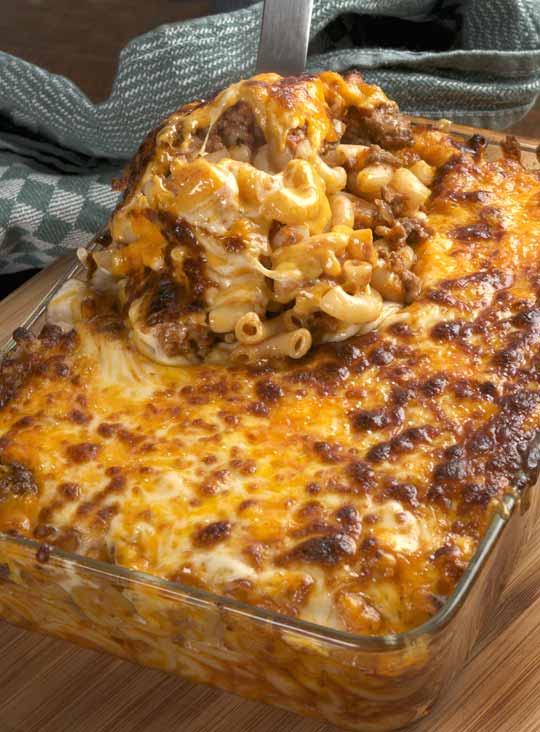
Macaroni and Beef with Cheese. Photo by Donna Turner Ruhlman.
I am at the Chefs Collaborative in Charleston, about which I will write more. So in light of the new book Melt: The Art of Macaroni and Cheese, I’m reposting what has become one of the most clicked-on posts on this site. That it is a mac and cheese variation speaks to the fact of how beloved it is. Needless to say, raise the quality of your cheese and you make this dish stellar.
I needed a dinner that was easy and delicious, would please everyone, one that also reheated well in case my daughter’s track meet ran late, and I had to be able to make it long before serving so it would be just a matter of reheating come dinnertime. There are of course a thousand options that fit these criteria, but last week, I was in a nostalgic mood and thought back to school lunches, one of my favorites, macaroni and beef. We were always famished by lunchtime and this dish was dependable and impossible to screw up by a 1970′s school kitchen. For a midweek meal I went as simple as could be. The only way I’d change it, I decided, would be to pile a monstrous amount of cheddar and mozzarella on top at the end and flash it beneath the broiler.
I know why we call dishes comfort food, because that’s their undeniable effect—this one was sooo good—but what is it about them that causes the comfort? Pasta and cheese, chief among comfort foods.
Simple Macaroni and Beef with Cheese
1 large onion, diced
1 tablespoon canola oil
salt to taste
2 pounds lean ground beef
one 28-ounce can whole tomatoes, pureed in the can with a hand blender or in a blender
1 box macaroni
1 cup each grated cheddar and mozzarella cheeses
optional seasonings: black pepper, oregano, cumin, coriander, chopped garlic, hot smoked paprika, chili powder—whatever you’re in the mood for (I just used black pepper, garlic, and a tablespoon of fish sauce, which gives it depth)
Sweat the onions in the oil with a three-finger pinch of salt. Add the beef and cook it, breaking it up as you do. (Because my beef was very fatty, I cooked it separately and added it to the pot along with the tomatoes. Also an option, but uses an extra pan.) Add another three-finger pinch of salt or two, along with any dry seasonings you want. Add the tomatoes and any fresh seasonings you may be using, bring to a simmer, then reduce the heat to low and cook for 1 hour.
Cook the macaroni in boiling water till it’s half-done. Drain it and add it to the tomatoes. (I wanted this to stretch into two meals, so I used the whole box, but if you want your dish to be very tomatoey and beefy, you might want to add only half the macaroni.) Stir it into the sauce. Taste it. Add more salt and other seasonings as needed, and cover. When it’s cooled and the pasta has absorbed the tomato juices, transfer it to a large baking dish and cover it with foil. It can sit out for several hours like this, be refrigerated for up to two days, or frozen a few weeks.
Bake it in a 400°F/205°C oven till it’s piping hot (about 45 minutes if it’s cold to room temperature). Just before you’re ready to eat, remove the foil, cover the macaroni with the cheese and broil till it looks beautiful.
Having used all the pasta, I put the second batch into the cleaned baking dish and covered it with foil, wrote “Mac and Beef, bake, cover with cheese and broil” on the foil with a sharpie—so that next time I’m gone, Donna has a mid-week meal ready to go.
Now that we have this frozen version, it begs the question, “What is the difference between pulling this homemade version and baking it, and cooking the ubiquitous store-bought kind?” Besides the fact that it’s more satisfying to serve from glass than from foil or plastic? Besides the good ingredients and lack of bad ones? Besides all that extra, gooey, delicious melted cheese? Besides that it was fun to make? Besides that it tastes better?
Love. It makes a difference.
If you liked this post, take a look at these links:
My award-winning book Ruhlman’s Twenty.
Pioneer Woman’s recipe for Fancy Macaroni and Cheese.
10 things you should do with macaroni and cheese.
Smithsonian provides some perspective on the history of macaroni and cheese.
© 2013 Michael Ruhlman. Photo © 2013 Donna Turner Ruhlman. All rights reserved.
November 1, 2013
Friday Cocktail Hour: Aged Eggnog
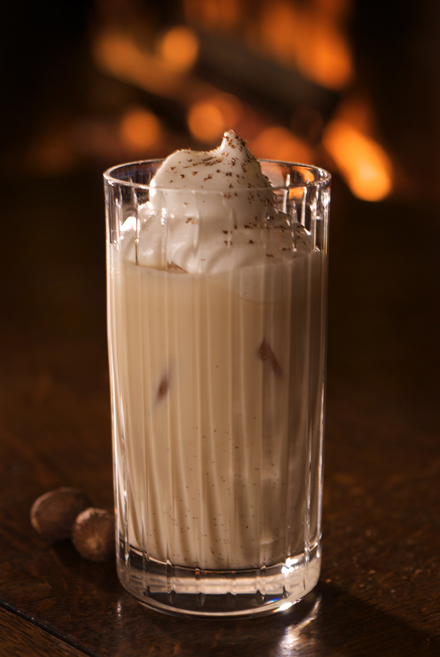
Cooked eggnog with meringue and nutmeg. Photo by Donna Turner Ruhlman
Plan ahead!
Not long after I began this blog in 2006, I wrote about and made aged eggnog upon reading about it at CHOW. Two years later Donna photographed it. A year after that, we finished the batch. It was a little funky and that was part of its deliciousness.
I’m writing about it now so that you can, if you plan ahead, make it this weekend or next, for this holiday season, and the next, and, if you have the discipline, for December 2015. It needs at least 30 days for the aged flavor and for the alcohol to take care of any bacteria. After that it will keep for a long long time.
Jonathon Sawyer liked it so much he began experimenting with different whiskeys. Last one I tried he’d use Oban, an excellent single malt that pairs well with cream.
Thus the Friday cocktail is a good whiskey, on the rocks, to enjoy after you make next year’s batch of aged eggnog.
Aged Eggnog
12 yolks (save whites for angel food cake!)
2 cups granulated sugar
1 liter bourbon
4 cups whole milk
1 cup heavy cream
3/4 cup Cognac or brandy
1/2 cup Myers’s dark rum
pinch of kosher salt
The Eggnog
Combine the yolks and sugar in a large bowl and whisk until well blended and creamy.
Add the remaining ingredients and stir to combine.
Transfer the mixture to a 1-gallon glass jar and tightly seal the lid. (Alternatively, you can bottle it.) Place in the refrigerator for at least 3 weeks and up to 3 years (or till it’s as you like it!).
Serve topped with sweet meringue and nutmeg if you wish.
If you liked this post, take a look at these links:
My past cocktail posts featuring dark rum or bourbon are rum old fashioned, the dark and stormy, and the derby.
Learn more about aged and barrel-aged cocktails.
Alton Brown shares a brief history of eggnog.
© 2013 Michael Ruhlman. Photo © 2013 Donna Turner Ruhlman. All rights reserved.
Michael Ruhlman's Blog

- Michael Ruhlman's profile
- 354 followers

