Paul Kelly's Blog, page 3
February 19, 2015
It’s Officially a Bestseller…
Great news today. My book Excel Macro Mastery has officially become a bestseller on Amazon in the Visual Basic category
My next in-depth post will be on the most powerful element of VBA – The Loop.
There are 5 types of Loops in VBA and of these 2 can be used in different ways. This leads to a lot of confusion among new users. Hope to have the post available for you in the next week or two.
January 6, 2015
The Complete Guide to Using Arrays in Excel VBA
“A list is only as strong as its weakest link” – Donald Knuth.

© Mangalika | Dreamstime.com – Array of Cute Cupcakes
This post provides an in-depth look at arrays in the Excel VBA programming language. It covers the important points such as
Why you need arrays
When should you use them
The two types of arrays
Using more than one dimension
Declaring arrays
Adding values
Viewing all the items
A super efficient way to read a Range to an array
The first section provides a quick guide to arrays – how to declare, pass to procedures, delete etc. This is useful if you want to find how to do something quickly.
In the second section we will look at is what are arrays and why you need them. You may not understand some of the code in the first section. This is fine. I will be breaking it all down into simple terms in the following sections of the post.
Quick Guide To Arrays
The following table provides a quick reference guide to arrays

A Quick Guide to Using Arrays in VBA
What are Arrays and Why do You Need Them?
A VBA array is a type of variable. They are used to store lists of data of the same type. An example would be storing a list of countries or a list of weekly totals.
In VBA a normal variable can store only one value at a time. The following example shows a variable being used to store the marks of a student.
' Can only store 1 value at a time
Dim Student1 As Integer
Student1 = 55
If we wish to store the marks of another student then we need to create a second variable.
In the following example we have the marks of five students
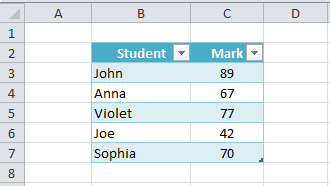
Student Marks
We are going to read these marks and write them to the Immediate Window.
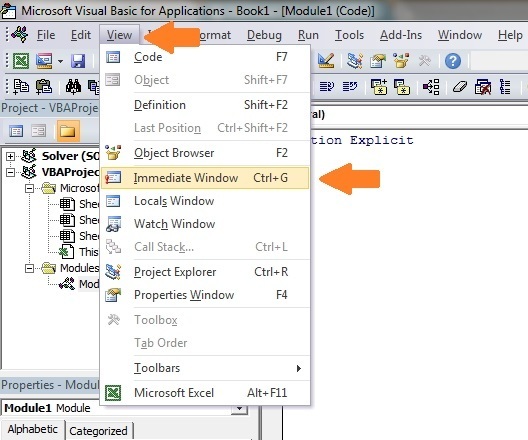
Note: The function Debug.Print writes values to the Immediate Window. To view this window select View->Immediate Window from the menu( Shortcut is Ctrl + G)
As you can see in the following example we are writing the same code five times – once for each student
Public Sub StudentMarks()
With ThisWorkbook.Worksheets("Sheet1")
' Declare variable for each student
Dim Student1 As Integer
Dim Student2 As Integer
Dim Student3 As Integer
Dim Student4 As Integer
Dim Student5 As Integer
' Read student marks from cell
Student1 = .Range("C2").Offset(1)
Student2 = .Range("C2").Offset(2)
Student3 = .Range("C2").Offset(3)
Student4 = .Range("C2").Offset(4)
Student5 = .Range("C2").Offset(5)
' Print student marks
Debug.Print "Students Marks"
Debug.Print Student1
Debug.Print Student2
Debug.Print Student3
Debug.Print Student4
Debug.Print Student5
End With
End Sub
The following is the output from the example

Output
The problem with using one variable per student is that you need to add code for each student. Therefore if you had a thousand students in the above example you would need five thousand lines of code!
Luckily we have arrays to make our life easier. Arrays allow us to store a list of data items in one structure.
The following code shows the above student example using an array
Public Sub StudentMarksArr()
With ThisWorkbook.Worksheets("Sheet1")
' Declare an array to hold marks for 5 students
Dim Students(1 To 5) As Integer
' Read student marks from cells C3:C7 into array
Dim i As Integer
For i = 1 To 5
Students(i) = .Range("C2").Offset(i)
Next i
' Print student marks from the array
Debug.Print "Students Marks"
For i = LBound(Students) To UBound(Students)
Debug.Print Students(i)
Next i
End With
End Sub
The advantage of this code is that it will work for any number of students. If we have to change this code to deal with 1000 students we only need to change the (1 To 5) to (1 To 1000) in the declaration. In the prior example we would need to add approximately five thousand lines of code.
Lets has a quick comparison of variables and arrays. First we compare the declaration
' Variable
Dim Student As Integer
Dim Country As String
' Array
Dim Students(1 to 3) As Integer
Dim Countries(1 to 3) As String
Next we compare assigning a value
' assign value to variable
Student1 = .Cells(1, 1)
' assign value to first item in array
Students(1) = .Cells(1, 1)
Lastly we look at writing the values
' Print variable value
Debug.Print Student1
' Print value of first student in array
Debug.Print Students(1)
As you can see, using variables and arrays is quite similar.
The fact that arrays use an index(also called a subscript) to access each item is important. It means we can easily access all the items in an array using a For Loop.
Now that you have some background on why arrays are useful lets go through them step by step.
Types of VBA Arrays
There are two types of arrays in VBA
Static – an array of fixed size
Dynamic – an array that grows or shrinks as required
The difference between these arrays mainly in how they are created. Accessing values in both array types is exactly the same. In the following sections we will cover both types.
Declaring an Array
A static array is declared as follows
Public Sub DecArrayStatic()
' Create array with locations 0,1,2,3
Dim arrMarks1(0 To 3) As Long
' Defaults as 0 to 3 i.e. locations 0,1,2,3
Dim arrMarks2(3) As Long
' Create array with locations 1,2,3,4,5
Dim arrMarks1(1 To 5) As Long
' Create array with locations 2,3,4 ' This is rarely used
Dim arrMarks3(2 To 4) As Long
End Sub

An Array of 0 to 3
As you can see the size is specified when you declare a static array. The problem with this is that you can never be sure in advance the size you need. Each time you run the Macro you may have different size requirements.
If you do not use all the array locations then the resources are being wasted. If you need more locations you can used ReDim but this is essentially creating a new static array.
The dynamic array does not have such problems. You do not specify the size when you declare it. Therefore you can then grow and shrink as required.
Public Sub DecArrayDynamic()
' Declare dynamic array
Dim arrMarks() As Long
' Set the size of the array when you are ready
ReDim arrMarks(0 To 5)
End Sub
The dynamic array is not allocated until you use the ReDim statement. The advantage is you can wait until you know the number of items before setting the array size. With a static array you have to give the size up front.
To give an example. Imagine you were reading worksheets of student marks. With a dynamic array you can count the students on the worksheet and set an array to that size. With a static array you must set the size to the largest possible number of students.
Assigning Values to an Array
To assign values to an array you use the number of the location. You assign value for both array types the same way.
Public Sub AssignValue()
' Declare array with locations 0,1,2,3
Dim arrMarks(0 To 3) As Long
' Set the value of position 0
arrMarks(0) = 5
' Set the value of position 3
arrMarks(3) = 46
' This is an error as there is no location 4
arrMarks(4) = 99
End Sub

The array with values assigned
The number of the location is called the subscript or index. The last line in the example will give a “Subscript out of Range” error as there is no location 4 in the array example.
Using the Array and Split function to Populate an Array
You can use the Array function to populate an array with a list of items. You must declare the array as a type Variant. The following code shows you how to use this function.
Dim arr1 As Variant
arr1 = Array("Orange", "Peach","Pear")
Dim arr2 As Variant
arr2 = Array(5, 6, 7, 8, 12)

Contents of arr1 after using the Array function
The array created by the Array Function will start at index zero unless you use Option Base 1 at the top of your module. Then it will start at index one.
In programming it is generally considered poor practice to have your actual data in the code. However sometimes it is useful when you need to test some code quickly.
The Split function is used to split a string into an array based on a delimiter. A delimiter is a character such as a comma or space that separates the items. The following code will split the string into an array of three elements.
Dim s As String
s = "Red,Yellow,Green,Blue"
Dim arr() As String
arr = Split(s, ",")

The array after using Split
The Split function is normally used when you read from a comma separated file or another source that provides a list of items separated by the same character.
Using Loops With Arrays
Using a Loop allows quick access to all items in an array. This is where the power of using arrays becomes apparent. We can read arrays with ten values or ten thousand values using the same few lines of code.
There are two functions in VBA called LBound and UBound. These functions return the smallest and largest subscript in an array. In an array arrMarks(0 to 3) the LBound will return 0 and UBound will return 3.
The following example assigns random numbers to an array using a loop. It then prints out these numbers using a second loop.
Public Sub ArrayLoops()
' Declare array
Dim arrMarks(0 To 5) As Long
' Fill the array with random numbers
Dim i As Long
For i = LBound(arrMarks) To UBound(arrMarks)
arrMarks(i) = 5 * Rnd
Next i
' Print out the values in the array
Debug.Print "Location", "Value"
For i = LBound(arrMarks) To UBound(arrMarks)
Debug.Print i, arrMarks(i)
Next i
End Sub
The function LBound and UBound are very useful. Using them means our loops will work correctly with any array size. The real benefit is that if the size of the array changes we do not have to change the code for printing the values. A loop will work for an array of any size as long as you use these functions.
Using Erase
The Erase function can be used on arrays but performs differently depending on the array type.
For a static Array the Erase function resets all the values to the default. If the array is of integers then all the values are set to zero. If the array is of strings then all the strings are set to “” and so on.
For a Dynamic Array the Erase function DeAllocates memory. That is, it deletes the array. If you want to use it again you must use ReDim to Allocate memory.
Lets have a look an example for the static array. This example is the same as the ArrayLoops example in the last section with one difference – we use Erase after setting the values. When the value are printed out they will all be zero.
Public Sub EraseStatic()
' Declare array
Dim arrMarks(0 To 3) As Long
' Fill the array with random numbers
Dim i As Long
For i = LBound(arrMarks) To UBound(arrMarks)
arrMarks(i) = 5 * Rnd
Next i
' ALL VALUES SET TO ZERO
Erase arrMarks
' Print out the values - there are all now zero
Debug.Print "Location", "Value"
For i = LBound(arrMarks) To UBound(arrMarks)
Debug.Print i, arrMarks(i)
Next i
End Sub
We will now try the same example with a dynamic. After we use Erase all the locations in the array have been deleted. We need to use ReDim if we wish to use the array again. If we try to access members of this array we will get a “Subscript out of Range” error.
Public Sub EraseDynamic()
' Declare array
Dim arrMarks() As Long
ReDim arrMarks(0 To 3)
' Fill the array with random numbers
Dim i As Long
For i = LBound(arrMarks) To UBound(arrMarks)
arrMarks(i) = 5 * Rnd
Next i
' arrMarks is now deallocated. No locations exist.
Erase arrMarks
End Sub
Passing an Array to a Sub or Function
Sometimes you will need to pass an array to a procedure. You declare the parameter using parenthesis similar to how you declare a dynamic array.
Passing to the procedure using ByRef means you are passing a reference of the array. So if you change the array in the procedure it will be changed when you return. It is not possible to pass an array using ByVal.
' Passes array to a Function
Public Sub PassToProc()
Dim arr(0 To 5) As String
' Pass the array to function
UseArray arr
End Sub
Public Function UseArray(ByRef arr() As String)
' Use array
Debug.Print UBound(arr)
End Function
Returning an Array from a Function
It is important to keep the following in mind. If you want to change an existing array in a procedure then you should pass it as a parameter using ByRef(see last section). You do not need to return the array from the procedure.
The main reason for returning an array is when you use the procedure to create a new one. In this case you assign the return array to an array in the caller. This array cannot be already allocated. In other words you must use a dynamic array that has not been allocated. The following examples show this
Public Sub TestArray()
' Declare dynamic array - not allocated
Dim arr() As String
' Return new array
arr = GetArray
End Sub
Public Function GetArray() As String()
' Create and allocate new array
Dim arr(0 To 5) As String
' Return array
GetArray = arr
End Function
Two Dimensional Arrays
The arrays we have been looking at so far have been one dimensional arrays. This means the arrays are one list of items. A two dimensional array is essentially a number of lists.
If you think of a single spreadsheet column as a single dimension then more than one column is two dimensional. In fact a spreadsheet is the equivalent of a 2 dimensional array. It has two dimensions – rows and columns.
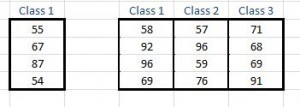
The following example shows two groups of data. The first is a one dimensional layout and the second is two dimensional.
To access an item in the first set of data(1 dimensional) all you need to do is give the row e.g. 1,2, 3 or 4.
For the second set of data(2 dimensional) you need to give the row AND the column.
So you can think of 1 dimensional being rows only and 2 dimensional as being rows and columns.
Note: It is possible to have more dimensions in an array. It is rarely required. If you are solving a problem using a 3+ dimensional array then there probably is a better way to do it.
You declare a 2 dimensional array as follows
Dim ArrayMarks(0 to 2,0 to 3) As Long
The following example creates a random value for each item in the array and the prints the values to the Immediate Window.
Public Sub TwoDimArray()
' Declare a two dimensional array
Dim arrMarks(0 To 3, 0 To 2) As String
' Fill the array with text made up of i and j values
Dim i As Long, j As Long
For i = LBound(arrMarks) To UBound(arrMarks)
For j = LBound(arrMarks, 2) To UBound(arrMarks, 2)
arrMarks(i, j) = CStr(i) + ":" + CStr(j)
Next j
Next i
' Print the values in the array to the Immediate Window
Debug.Print "i", "j", "Value"
For i = LBound(arrMarks) To UBound(arrMarks)
For j = LBound(arrMarks, 2) To UBound(arrMarks, 2)
Debug.Print i, j, arrMarks(i, j)
Next j
Next i
End Sub
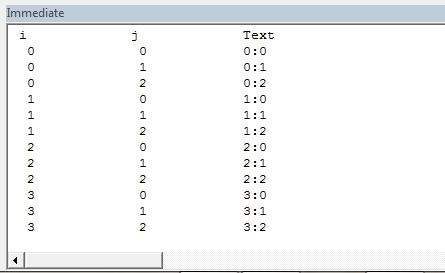
You can see that we use a second loop inside the first loop to access all the items. The output of the example looks like this:
How this Macro works is as follows
Enters the i loop
i is set to 0
Enters j loop
j is set to 0
j is set to 1
j is set to 2
Exit j loop
i is set to 1
j is set to 0
j is set to 1
j is set to 2
And so on until i=3 and j=2
You may notice that LBound and UBound have a second argument of 2. This specifies that it is the upper or lower bound of the second dimension. That is the start and end location for j. The default value 1 which is why we do not need to specify it for the i loop.
Reading from a Range of Cells to an Array
If you have read my previous post on Cells and Ranges then you will know that VBA has an extremely efficient way of reading from a Range of Cells to an Array and vice versa.
Public Sub ReadToArray()
' Create dynamic array
Dim StudentMarks() As Variant
' Read values into array from sheet1
StudentMarks = ThisWorkbook.Worksheets("Sheet1").Range("A1:Z3").Value
' Write the values back to the third row of sheet2
ThisWorkbook.Worksheets("Sheet2").Range("A3:Z3").Value = StudentMarks
End Sub
The dynamic array created in this example will be a two dimensional array. As you can see we can read from an entire range of cells to an array in just one line.
The next example will read the sample student data below from C3:E6 of Sheet1 and print them to the Immediate Window.
Public Sub ReadAndDisplay()
' Get Range
Dim rg As Range
Set rg = ThisWorkbook.Worksheets("Sheet1").Range("C3:E6")
' Create dynamic array
Dim StudentMarks() As Variant
' Read values into array from sheet1
StudentMarks = rg.Value
' Print the array values
Debug.Print "i", "j", "Value"
Dim i As Long, j As Long
For i = LBound(StudentMarks) To UBound(StudentMarks)
For j = LBound(StudentMarks, 2) To UBound(StudentMarks, 2)
Debug.Print i, j, StudentMarks(i, j)
Next j
Next i
End Sub
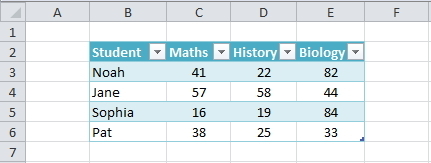
Sample Student data
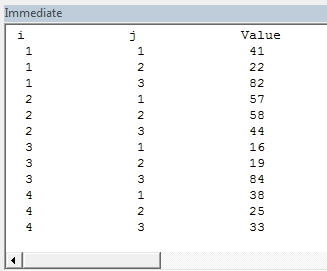
Output from sample data
As you can see the first dimension(accessed using i) of the array is a row and the second is a column. To demonstrate this take a look at the value 44 in E4 of the sample data.
This value is in row 2 column 3 of our data. You can see that 44 is stored in the array at StudentMarks(2,3).
Conclusion
The following are the main points so this post
Arrays are an efficient way of storing list(s) of items of the same type.
You can access an array item directly using the number of the location which is known as the subscript or index.
The common error “Subscript out of Range” is caused by accessing a location that does not exist.
There are two types of arrays: Static and Dynamic.
Static is used when the size of the array is always the same.
Dynamic arrays allow you to easily grow or shrink an array as required.
LBound and UBound provide a safe way of find the smallest and largest subscripts of the array.
The basic array is a one dimensional array. In VBA you can have multi dimensional arrays but two dimensional is the maximum you will probably ever need.
You can only pass an array to a procedure using ByRef. You do this like this: ByRef arr() as long.
You can return an array from a function but the array, it is assigned to, must not be currently allocated.
A worksheet with it’s rows and columns is essentially a two dimensional array.
You can read directly from a worksheet range into a two dimensional array in just one line of code.
You can also write from a two dimensional array to a range in just one line of code.
I hope you enjoyed this post and found it beneficial. Please feel free to share with your friends and colleagues.
January 2, 2015
The Complete Guide to Ranges and Cells in Excel VBA
“It is a capital mistake to theorize before one has data”- Sir Arthur Conan Doyle

© Boyfriend | Dreamstime.com – Numbers Photo
This is the third post dealing with the three main elements of VBA. These three elements are the Workbooks, Worksheets and Ranges/Cells. Cells are by far the most important part of Excel. Everything you do in Excel starts and/or ends with Cells.
Generally speaking, you do three main things with Cells
Read
Write
Change the format
Excel has a number of methods for accessing cells such as Range, Cells and Offset. “Why do I need them”, “When should you use them?”,”Which is best ?” are questions I am often asked.
In this post I will fully investigate each one of these methods of access and provide you with answers to those questions.
The first section provides a quick reference to Cells and Ranges. In the second section we will start with the simplest method – using the Range property of the worksheet.
A Quick Guide to Cells and Ranges
The following table gives a breakdown of different ways of accessing cells
Function
You provide
It returns a range of
Example
Range
Cell Address
Multiple Cells
.Range(“A1:A4″)
Cells
Row , Column
One Cell
.Cells(1,5)
Offset
Row , Column
Multiple Cells
.Offset(1,2)
Rows
Row
Multiple Cells
.Rows(10)
Columns
Column
Multiple Cells
.Columns(4)
The Range Property
The worksheet has a Range property which you can use to access cells in VBA. The Range property takes the same argument that most Excel Worksheet functions take e.g “A1″, “A3:C6″ etc.
The following example shows you how to place a value in a cell using the Range property.
Public Sub WriteToCell()
' Write number to cell A1 in sheet1 of this workbook
ThisWorkbook.Worksheets("Sheet1").Range("A1") = 67
' Write text to cell A2 in sheet1 of this workbook
ThisWorkbook.Worksheets("Sheet1").Range("A2") = "John Smith"
' Write date to cell A3 in sheet1 of this workbook
ThisWorkbook.Worksheets("Sheet1").Range("A3") = #11/21/2017#
End Sub
As you can see Range is a member of the worksheet which in turn is a member of the Workbook. This follows the same hierarchy as in Excel so should be easy to understand. To do something with Range you must first specify the workbook and worksheet it belongs to.
For the rest of this post I will use the code name of the sheet. This makes the code clearer as I will not need to specify the workbook each time. You can use a sheet directly with the code name as long as it is in the current workbook.
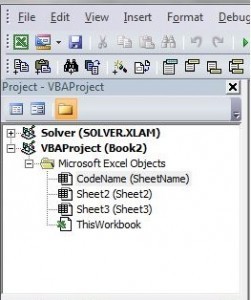
You can see the code name of the sheet in the VBAProject window. It is the name outside the parenthesis. Please read the post on Worksheets for more details to using the code name of a worksheet.
The following code shows the above example using the code name of the keyword.
Public Sub UsingCodeName()
' Write number to cell A1 in sheet1 of this workbook
cnSheet1.Range("A1") = 67
' Write text to cell A2 in sheet1 of this workbook
cnSheet1.Range("A2") = "John Smith"
' Write date to cell A3 in sheet1 of this workbook
cnSheet1.Range("A3") = #11/21/2017#
End Sub
You can also write to multiple cells using the Range property
Public Sub WriteToMulti()
' Write number to a range of cells
cnSheet1.Range("A1:A10") = 67
' Write text to multiple ranges of cells
cnSheet1.Range("B2:B5,B7:B9") = "John Smith"
End Sub
The Cells Property of the Worksheet
The worksheet object has another property called Cells which is very similar to range.
There are two differences
Cells returns a range of one cell only
Cells takes row and column as arguments
The example below shows you how to write values to cells using both the Range and Cells property
Public Sub UsingCells()
' Write to A1
cnSheet1.Range("A1") = 10
cnSheet1.Cells(1, 1) = 10
' Write to A10
cnSheet1.Range("A10") = 10
cnSheet1.Cells(10, 1) = 10
' Write to E1
cnSheet1.Range("E1") = 10
cnSheet1.Cells(1, 5) = 10
End Sub
You may be wondering when you should use Cells and when you should use Range.
Using Range is useful for accessing the same cells each time the Macro runs. For example, if you were using a Macro to calculate a total and write it to cell A10 every time then Range would be suitable for this task.
Using the Cells property is useful if you are accessing a cell based on a number that may vary. It is easier explain this with an example. The following code finds the first blank cell in the first spreadsheet row and writes text to it.
Public Sub WriteToFirstBlankCell()
' Get last column from left that is not blank
Dim lLastCol As Integer
lLastCol = cnSheet1.Range("A1").End(xlToRight).Column
' Write text to first blank cell in Row 1
cnSheet1.Cells(1, lLastCol + 1) = "John Smith"
End Sub
In this example we have the number of the column and the row. To use Range here would require us to convert these values to the letter/number cell reference e.g. “C1″. Using the Cells property allows us to provide a row and a column number to access a cell.
Sometimes you may want to return more than one cell using row and column numbers. The next section shows you how to do this.
Using Cells and Range together
As you have seen you can only access one cell using the Cells property. If you want to return a range of cells then you can use Cells with Ranges as follows
Public Sub UsingCellsWithRange()
With cnSheet1
' Write 5 to Range A1:A10 using Cells property
.Range(.Cells(1, 1), .Cells(10, 1)) = 5
' Format Range B1:Z1 to be bold
.Range(.Cells(1, 2), .Cells(1, 26)).Font.Bold = True
End With
End Sub
As you can see, you provide the start and end cell of the Range. Sometimes it can be tricky to see which range you are dealing with when the value are all numbers. Range has a property called Address which displays the letter/ number cell reference of any range.
This can come in very handy when you are debugging or writing code for the first time.
In the following example we print out the address of the ranges we are using.
Public Sub ShowRangeAddress()
' Note: Using underscore allows you to split up lines of code
With cnSheet1
' Write 5 to Range A1:A10 using Cells property
.Range(.Cells(1, 1), .Cells(10, 1)) = 5
Debug.Print "First address is : " _
+ .Range(.Cells(1, 1), .Cells(10, 1)).Address
' Format Range B1:Z1 to be bold
.Range(.Cells(1, 2), .Cells(1, 26)).Font.Bold = True
Debug.Print "Second address is : " _
+ .Range(.Cells(1, 2), .Cells(1, 26)).Address
End With
End Sub
In the example I used Debug.Print to print to the Immediate Window. To view this window select View->Immediate Window(or Ctrl G)
The Offset Property of Range
Range has a property called Offset. The term Offset refers to a count from the original position. It is used a lot in certain areas of programming.
With the Offset property you can get a Range of cells the same size and a certain distance from the current range. The reason this is useful is that sometimes you may want to select a Range based on a certain condition.
For example in the screenshot below there is a column for each day of the week. Given the day number(i.e. Monday=1, Tuesday=2 etc.) we need to write the value to the correct column.
We will first attempt to do this without using Offset.
' This sub tests with different values
Public Sub TestSelect()
' Monday
SetValueSelect 1, 111.21
' Wednesday
SetValueSelect 3, 456.99
' Friday
SetValueSelect 5, 432.25
' Sunday
SetValueSelect 7, 710.17
End Sub
' Writes the value to a column based on the day
Public Sub SetValueSelect(lDay As Long, lValue As Currency)
Select Case lDay
Case 1: cnSheet1.Range("G3") = lValue
Case 2: cnSheet1.Range("H3") = lValue
Case 3: cnSheet1.Range("I3") = lValue
Case 4: cnSheet1.Range("J3") = lValue
Case 5: cnSheet1.Range("K3") = lValue
Case 6: cnSheet1.Range("L3") = lValue
Case 7: cnSheet1.Range("M3") = lValue
End Select
End Sub
As you can see in the example, we need to add a line for each possible option. This is not an ideal situation. Using the Offset Property provides a much cleaner solution
' This sub tests with different values
Public Sub TestOffset()
DayOffSet 1, 111.01
DayOffSet 3, 456.99
DayOffSet 5, 432.25
DayOffSet 7, 710.17
End Sub
Public Sub DayOffSet(lDay As Long, lValue As Currency)
' We use the day value with offset specify the correct column
cnSheet1.Range("G3").Offset(, lDay) = lValue
End Sub
As you can see this solution is much better. If the number of days in increased then we do not need to add any more code. For Offset to be useful there needs to be some kind of relationship between the positions of the cells. If the Day columns in the above example were random then we could not use Offset. We would have to use the first solution.
One thing to keep in mind is that Offset retains the size of the range. So .Range(“A1:A3″).Offset(1,1) returns the range B2:B4. Below are some more examples of using Offset
Public Sub UsingOffset()
' Write to B2 - no offset
cnSheet1.Range("B2").Offset() = "Cell B2"
' Write to C2 - 1 column to the right
cnSheet1.Range("B2").Offset(, 1) = "Cell C2"
' Write to B3 - 1 row down
cnSheet1.Range("B2").Offset(1) = "Cell B3"
' Write to B3 - 1 column right and 1 row down
cnSheet1.Range("B2").Offset(1, 1) = "Cell C3"
' Write to A1 - 1 column left and 1 row up
cnSheet1.Range("B2").Offset(-1, -1) = "Cell A1"
' Write to range E3:G13 - 1 column right and 1 row down
cnSheet1.Range("D2:F12").Offset(1, 1) = "Cells E3:G13"
End Sub
Using Rows and Columns as Ranges
If you want to do something with an entire Row or Column you can use the Rows or Columns property of the Worksheet. They both take one parameter which is the row or column number you wish to access
Public Sub UseRowAndColumns()
' Set the font size of column B to 9
cnSheet1.Columns(2).Font.Size = 9
' Set the width of columns D to F
cnSheet1.Columns("D:F").ColumnWidth = 4
' Set the font size of row 5 to 18
cnSheet1.Rows(5).Font.Size = 18
End Sub
Using Range in place of Worksheet
You can also use Offsets, Cells, Rows and Columns as part of Range. You may have a specific need to do this but otherwise I would avoid the practice. It makes the code more complex. Simple code is your friend. It reduces the possibility of errors.
The code below will set the second column of the range to bold. As the range refers to two rows the entire column is considered B1:B2
Public Sub UseColumnsInRange()
' This will set B1 and B2 to be bold
cnSheet1.Range("A1:C2").Columns(2).Font.Bold = True
End Sub
Reading Values from one Cell to another
In most of the examples so far we have written values to a cell. We do this by placing the range on the left of the equals sign and the value to place in the cell on the right.
To write data from one cell to another we do the same. The destination range goes on the left and the source range goes on the right. The following example shows you how to do this
Public Sub ReadValues()
' Place value from B1 in A1
cnSheet1.Range("A1") = cnSheet1.Range("B1")
' Place value from B3 in sheet2 to cell A1
cnSheet1.Range("A1").Value = cnSheet2.Range("B3")
' Place value from B1 in cells A1 to A5
cnSheet1.Range("A1:A5") = cnSheet1.Range("B1")
' Will not work - You cannot read from multiple cells
cnSheet1.Range("A1:A5") = cnSheet1.Range("B1:B5")
End Sub
As you can see from this example it is not possible to read from multiple cells. If you want to do this you can use the Copy function of Range with the Destination parameter
Public Sub CopyValues()
' Use this to copy from more than one cell
cnSheet1.Range("B1:B5").Copy Destination:=cnSheet1.Range("A1:A5")
' You can paste to multiple destinations
cnSheet1.Range("B1:B5").Copy Destination:=cnSheet1.Range("A1:A5,C2:C6")
End Sub
The Copy function copies everything including the format of the cells. It is the same result as manually copying and pasting a selection.
Reading Values to variables
The last section showed you how to read from one cell to another. You can also read from a cell to a variable.
A variable is used to store values while a Macro is running. You normally do this when you want to manipulate the data before writing it somewhere.
The following is a simple example using a variable. As you can see the value of the item to the right of the equals is written to the item to the left of the equals.
Public Sub UseVar()
' Create
Dim val As Integer
' Read number from cell
val = cnSheet1.Range("A1")
' Add 1 to value
val = val + 1
' Write new value to cell
cnSheet1.Range("A2") = val
End Sub
To read text to a variable you use a variable of type String.
Public Sub UseVarText()
' Declare a variable of type string
Dim sText As String
' Read value from cell
sText = cnSheet1.Range("A1")
' Write value to cell
cnSheet1.Range("A2") = sText
End Sub
You can write a variable to a range of cells. You just specify the range on the left and the value will be written to all cells in the range.
Public Sub VarToMulti()
' Read value from cell
cnSheet1.Range("A1:B10") = 66
End Sub
You cannot read from multiple cells to a variable. However you can read to an array which is a collection of variables. We will look at doing this in the next section.
Reading a Range of Cells to an Array
This section shows an awesome way to read data from a large number of cells with very little code. It requires that you are familiar with arrays.
You can read data from a range of cells to an array in just one line of code. You can also write back to a range of cells from an array in just one line. This is a remarkably efficient way of getting a lot of values in one go. It saves you from having read the cells one at a time.
The following code shows you how to do this.
Public Sub ReadToArray()
' Create dynamic array
Dim StudentMarks() As Variant
' Read 26 values into array from sheet1
StudentMarks = ThisWorkbook.Worksheets("Sheet1").Range("A1:Z1").Value
' Write the 26 values to the third row of sheet2
ThisWorkbook.Worksheets("Sheet2").Range("A3:Z3").Value = StudentMarks
End Sub
Keep in mind that the array created by the read is a 2 dimensional array. This is because a spreadsheet stores values in two dimensions i.e. rows and columns
Going through all the cells in a Range
Sometimes you may want to go through each cell one at a time to check value. You can do this using a For Each loop shown in the following code
Public Sub TraversingCells()
' Go through each cells in the range
Dim rg As Range
For Each rg In cnSheet1.Range("A1:A10,A20")
' Print address of cells that are negative
If rg.Value < 0 Then
Debug.Print rg.Address + "is negative."
End If
Next
End Sub
You can also go through consecutive Cells using the Cells property and a standard For loop. The standard loop is more flexible about the order you use but it is slower than a For Each loop.
Public Sub TraverseCells()
' Go through cells from A1 to A10
Dim i As Long
For i = 1 To 10
' Print address of cells that are negative
If rg.Value < 0 Then
Debug.Print rg.Address + "is negative."
End If
Next
' Go through cells in reverse i.e. from A10 to A1
Dim i As Long
For i = 10 To 1 Step -1
' Print address of cells that are negative
If rg.Value < 0 Then
Debug.Print rg.Address + "is negative."
End If
Next
End Sub
Formatting Cells
Sometimes you will need to format the cells the in spreadsheet. This is actually very straightforward. The following example shows you various formatting you can add to any range of cells
Public Sub FormattingCells()
With cnSheet1
' Format the font
.Range("A1").Font.Bold = True
.Range("A1").Font.Underline = True
.Range("A1").Font.Color = rgbNavy
' Set the number format to 2 decimal places
.Range("B2").NumberFormat = "0.00"
' Set the number format to a date
.Range("C2").NumberFormat = "dd/mm/yyyy"
' Set the number format to general
.Range("C3").NumberFormat = "General"
' Set the number format to text
.Range("C4").NumberFormat = "Text"
' Set the fill color of the cell
.Range("B3").Interior.Color = rgbSandyBrown
' Format the borders
.Range("B4").Borders.LineStyle = xlDash
.Range("B4").Borders.Color = rgbBlueViolet
End With
End Sub
Conclusion
I hope you enjoyed this post and found it beneficial. The following is a summary of the main points
The Range property of the Worksheet can be used to return a range of Cells. It takes the number/letter reference e.g. A1:A56. It is best used when the range will be the same each time the macro is run.
Use the Cells property of the Worksheet when the cell location is variable. Cells return a range of one cell.
Use Range(Cells,Cells) to return more than one cell using the Cells property.
Offset is used when the range is relative based on a condition e.g. the day of the week.
You can use Columns and Rows when you require the entire column or row.
Cells, Columns and Rows are also members of Range but should be only used this way if there is a specific need.
You can read from one cell to another by placing the destination cell on the left of an equals sign and the source cells on the right.
You can write the value from one cell or variable to a range of cells in one line.
You cannot read from a range of cells in one line. To copy from multiple cells you can use the Copy function with the Destination parameter.
You can read values from cells to variables and vice versa. You can write a variable to a range of cells in one line.
Using arrays you there is a super efficient way of reading from a Range of cells to an array using just one line.
You can also write from an array to a range of cells in just one line.
You can use a For Each loop to run through every cell in a range.
You can also use a normal For loop. It is slower than For Each but allows more flexibility on the order.
Formatting cells is straightforward once you have the range.
The Complete Guide To Worksheets in Excel VBA
“The visionary starts with a clean sheet of paper, and re-imagines the world” – Malcolm Gladwell
© Marek Uliasz | Dreamstime.com – Data Spreadsheet On Digital Tablet Photo
There three most important elements of VBA are the Workbook, the Worksheet and Cells. Of all the code your write, 90% will involve one or all of them. In a previous post( The Complete Guide to Workbooks in Excel VBA ) I dealt with the workbook. Now it is the turn of the worksheet.
The most common use of the worksheet in VBA is for accessing its cells. Sometimes you may use it to protect, hide or move a worksheet but mainly you will use it to perform some action on a cell or a range of cells.
Using Worksheets is more straightforward than using workbooks. With workbooks you may need to open them, find which folder they are in, check if they are in use and so on. With a worksheet, it either exists in the workbook you specified or it doesn’t.
Accessing the Worksheet
In VBA each workbook has a collection which contains the worksheets that belongs. This collection is called Worksheets and is used in a very similar way to a Workbooks collection. To get access to a worksheet all you have to do is supply the name.
The code below writes “Hello World” in Cell A1 of Sheet1, Sheet2 and Sheet3 of the current workbook.
Public Sub WriteToCell1()
' Write to cell A1 in Sheet1,Sheet2 and Sheet3
ThisWorkbook.Worksheets("Sheet1").Range("A1") = "Hello World"
ThisWorkbook.Worksheets("Sheet2").Range("A1") = "Hello World"
ThisWorkbook.Worksheets("Sheet3").Range("A1") = "Hello World"
End Sub
The following examples show how to hide/Unhide and Protect/Unprotect Sheet1.
Public Sub HideWorksheet()
ThisWorkbook.Worksheets("Sheet1").Visible = False
End Sub
Public Sub UnHideWorksheet()
ThisWorkbook.Worksheets("Sheet1").Visible = True
End Sub
Public Sub ProtectWorksheet()
ThisWorkbook.Worksheets("Sheet1").Protect Password:="MyPassword"
End Sub
Public Sub UnProtectWorksheet()
ThisWorkbook.Worksheets("Sheet1").Unprotect Password:="MyPassword"
End Sub
If you use a worksheet name that does not exist in the current workbook then you will get a “subscript out of range” error. This may happen if the worksheet name is changed or if you spell it incorrectly.
Using the Index to Access the Worksheet
So far we have been using the sheet name to access the sheet. You can also use an index like we did for Workbooks. The index refers to the sheet tab position in the workbook. As the position can easily be changed by the user it is not a good idea to use this.
' Using this code is a bad idea as sheet positions changes all the time
Public Sub UseSheetIdx()
With ThisWorkbook
' Left most sheet
Debug.Print .Worksheets(1).Name
' The third sheet from the left
Debug.Print .Worksheets(3).Name
' Right most sheet
Debug.Print .Worksheets(.Worksheets.Count).Name
End With
End Sub
In the example I used Debug.Print to print to the Immediate Window. To view this window select View->Immediate Window(or Ctrl G)
Using the code name of a Worksheet
The best method of accessing the worksheet is using the code name. Each worksheet has a sheet name and a code name. The sheet name is the name that appears in the worksheet tab in Excel.
Changing the sheet name does not change the code name meaning that referencing a sheet by the code name is a good idea.
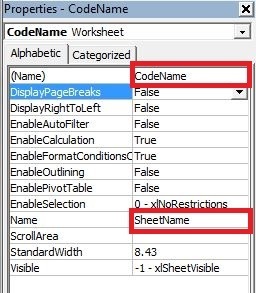
If you look in the VBE property window you will see both names. In the image you can see that the code name is the name outside the parenthesis and the sheet name is in the parenthesis.
You can change both the sheet name and the code name in the property window of the sheet(see image below).
If your code refers to the code name then the user can change the name of the sheet and it will not affect your code. In the example below we reference the worksheet directly using the code name.
Public Sub UseCodeName2()
' Using the code name of the worksheet
Debug.Print CodeName.Name
CodeName.Range("A1") = 45
CodeName.Visible = True
End Sub
This makes the code easy to read and safer from the user changing the sheet name. However there is one drawback to using the code name. It can only refer to worksheets in the workbook that contains the code i.e. ThisWorkbook. However we can use a simple function to find the code name of a worksheet in a different workbook.
Public Sub UseSheet()
Dim sh As Worksheet
' Get the worksheet using the codename
Set sh = SheetFromCodeName("CodeName", ThisWorkbook)
' Use the worksheet
Debug.Print sh.Name
End Sub
' This function gets the worksheet object from the Code Name
Public Function SheetFromCodeName(sCodeName As String, bk As Workbook) _
As Worksheet
Dim sh As Worksheet
For Each sh In bk.Worksheets
If sh.CodeName = sCodeName Then
Set SheetFromCodeName = sh
Exit For
End If
Next sh
End Function
Using the above code means that if the user changes the name of the worksheet then your code will not be affected.
There is another way of getting the sheet name of an external workbook using the code name. You can use the VBProject element of that Workbook. You can see how to do this in the example below. I have included this for completeness only and I would recommend using the method in the previous example rather than this one.
Note: In this example when retrieving a worksheet name you always use the text “Name” for the Properties argument.
Public Function SheetFromCodeName2(sCodeName As String, bk As Workbook) _
As Worksheet
' Get the sheet name from the CodeName using the VBProject
Dim sheetName As String
sheetName = bk.VBProject.VBComponents(sCodeName).Properties("Name")
' Use the sheet name to get the worksheet object
Set SheetFromCodeName2 = bk.Worksheets(sheetName)
End Function
Using the ActiveSheet Object
The ActiveSheet object refers to the worksheet that is currently active. As the worksheet that is currently active changes all the time it is not a good idea to use this.
If you use this then it is only a matter of time before you read or write using the wrong Worksheet.
Accessing the Worksheet in a Nutshell
The following table gives a brief overview of the methods of accessing the worksheet
Access Method
Details of Use
.Worksheets(“Sheet1”)
The sheet with name Sheet1. Vunerable to sheet name changing. It is okay to use but CodeName is better.
CodeName
Code name of Worksheet. Use this in the workbook that contains the code. Safe if the sheet name changes.
SheetFromCodeName
Custom made function to get the sheet based on the code name. Use this with sheets that are not in the workbook that contains the code. Safe if the sheet name changes.
.Worksheets(1)
Index is based on worksheet order in workbook. Avoid this.
ActiveSheet
The worksheet that is currently active. Avoid this.
Declaring a Worksheet Object
Declaring a worksheet object is useful for making your code neater and easier to read. The next example shows code for updating ranges of cells. The first Sub does not declare a worksheet object. The second sub declares a worksheet object and the code is therefore much clearer.
Public Sub SetRangeVals()
Debug.Print ThisWorkbook.Worksheets("Sheet1").Name
ThisWorkbook.Worksheets("Sheet1").Range("A1") = 6
ThisWorkbook.Worksheets("Sheet1").Range("B2:B9").Font.Italic = True
ThisWorkbook.Worksheets("Sheet1").Range("B2:B9").Interior.Color = rgbRed
End Sub
Public Sub SetRangeValsObj()
Dim sht As Worksheet
Set sht = ThisWorkbook.Worksheets("Sheet1")
sht.Range("A1") = 6
sht.Range("B2:B9").Font.Italic = True
sht.Range("B2:B9").Interior.Color = rgbRed
End Sub
You could also use the With keyword with the worksheet object as the next example shows.
Public Sub SetRangeValsObjWith()
Dim sht As Worksheet
Set sht = ThisWorkbook.Worksheets("Sheet1")
With sht
.Range("A1") = 6
.Range("B2:B9").Font.Italic = True
.Range("B2:B9").Interior.Color = rgbRed
End With
End Sub
Adding a New Worksheet
The examples in this section show you how to add a new worksheet to a workbook. If you do not supply any arguments to the Add function then the new worksheet will be placed before the active worksheet.
When you add a Worksheet it is created with a default name like “Sheet4″. If you want to change the name then you can easily do this using the Name property. The following example adds a new worksheet and changes the name to “Accounts”. If a worksheet with the name “Accounts” already exists then you will get an error.
Public Sub AddSheet()
Dim sht As Worksheet
' Adds new sheet before active sheet
Set sht = ThisWorkbook.Worksheets.Add
' Set the name of sheet
sht.Name = "Accounts"
' Adds 3 new sheets before active sheet
ThisWorkbook.Worksheets.Add Count:=3
End Sub
In the previous example you are adding worksheets in relation to the active worksheet. This is never a good idea. You can specify the exact position to place the worksheet.
To do this you need to specify which worksheet the new one should be inserted before or after. The following code shows you how to do this.
Public Sub AddSheetFirstLast()
Dim shtNew As Worksheet, shtFirst As Worksheet, shtLast As Worksheet
With ThisWorkbook
Set shtFirst = .Worksheets(1)
Set shtLast = .Worksheets(.Worksheets.Count)
' Adds new sheet to first position in the workbook
Set shtNew = Worksheets.Add(Before:=shtFirst)
shtNew.Name = "FirstSheet"
' Adds new sheet to last position in the workbook
Set shtNew = Worksheets.Add(After:=shtLast)
shtNew.Name = "LastSheet"
End With
End Sub
Accessing all the Worksheets
The Worksheets member of Workbooks is a collection of worksheets belonging to a workbook. You can go through each sheet in the worksheets collection.
The following example shows you how to do this. It is very similar to code for going through all the open workbooks.
Public Sub WriteToCell2()
' Writes "Hello World" into cell A1 for each worksheet in thisWorkbook
Dim sht As Worksheet
For Each sht In ThisWorkbook.Worksheets
sht.Range("A1") = "Hello World"
Next sht
End Sub
You have seen how to access all open workbooks and how to access all worksheets in ThisWorkbook. Lets take it one step further. Lets access all worksheets in all open workbooks.
Note: If you use code like this to write to worksheets then back everything up first as you could end up writing the incorrect data to all the sheets.
Public Sub AllSheetNames()
' Prints the workbook and sheet names for all sheets in open workbooks
Dim wrk As Workbook
Dim sht As Worksheet
For Each wrk In Workbooks
For Each sht In wrk.Worksheets
Debug.Print wrk.Name + ":" + sht.Name
Next sht
Next wrk
End Sub
Using the Sheets Collection
The workbook has another collection similar to Worksheets called Sheets. This causes confusion at times among users. To explain this first you need to know about a sheet type that is a chart.
It is possible in Excel to have a sheet that is a chart. To do this
Create a chart on any sheet
Right click on the chart and select Move
Select the first option which is “New Sheet” and click Ok.
Now you have a workbook with sheets of type worksheet and one of type chart.
The Worksheet collection refers to all worksheets in a workbook. It does not include sheets of type chart.
The Sheet collection refers to all sheets belonging to a workbook including sheets of type chart.
There are two code examples below. The first goes through all the Sheets in a workbook and prints the name of the sheet and type of sheet it is. The second example does the same with the Worksheets collection.
To try out these examples you should add a Chart sheet to your workbook first so you will see the difference.
Public Sub CollSheets()
Dim sht As Variant
' Display the name and type of each sheet
For Each sht In ThisWorkbook.Sheets
Debug.Print sht.Name + " is type " + TypeName(sht)
Next sht
End Sub
Public Sub CollWorkSheets()
Dim sht As Variant
' Display the name and type of each sheet
For Each sht In ThisWorkbook.Worksheets
Debug.Print sht.Name + " is type " + TypeName(sht)
Next sht
End Sub
The Sheets collection is only really useful if you want to access all your sheets and some of them are chart sheets. If you do not have charts as sheets then you do not need to use it.
Summary
The following is a brief summary of the main points of this post
If you are referencing the worksheet containing the code then use the code name of the worksheet to directly access the sheet
If you are referencing an open workbook other than the one with the code then use the custom function SheetFromCodeName with the code name to get the worksheet
To reduce the number of times you have to type an object name in your code use the With keyword.
To make the purpose of your code clearer and avoid long winded names like ThisWorkbook.Worksheets(“Sheet1″).Range(“A1″) declare a worksheet object e.g. Dim sht as Worksheet.
To run through all worksheets in a workbook use For Each sht in thisWorkbook.Worksheets where sht is a worksheet object.
The Workbook collections Sheets and Worksheets differ in that Sheets also includes sheets that are Charts. The Worksheets collection only contains sheets that are Worksheets.
When referencing Worksheets avoid using ActiveSheet and Worksheets(Index) as the reference to a particular worksheet is temporary.
Conclusion
This was an in-depth post about using the Worksheet in VBA. Worksheets are member of workbooks so it is important to understand these also. If you haven’t already the feel free to check out my post on Workbooks.
Workbooks, Worksheets and Cells are the three most important parts of VBA as you will deal with them in almost every line of code you write. If you found this post beneficial then you may also want to check out my post on The Complete Guide to Ranges and Cells in Excel VBA.
If you have found these posts useful then please feel free to share them with others.
December 16, 2014
The Complete Guide To Workbooks in Excel VBA
“We are drowning in information but starved for knowledge.” – John Naisbitt
© Haywiremedia | Dreamstime.com – Kids Reading Books In Fantasy Library Photo
This post provides a compete guide to using Workbooks in Excel VBA. If you are new to VBA then you will find it a good place to start your journey. If you have used VBA before you will see some little-known techniques that can dramatically improve your code. If you are here looking for a quick reference guide to using Workbooks then the first section was written for you.
A Quick Reference to Workbooks in VBA
The following table provides a quick guide to accessing the workbook
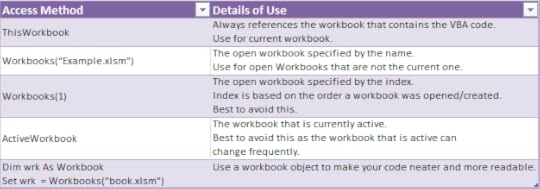
Accessing the Workbook
The following table provides a quick how-to guide on the main workbooks tasks
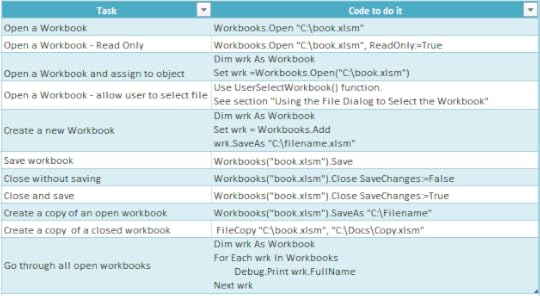
A Quick Reference Guide to the Workbook
Getting Started with the Workbook
We can access a workbook using Workbooks(“MyVBA.xlsm”) where MyVBA.xlsm is the name of an open workbook. Workbooks(“MyVBA.xlsm”) is called a workbook object. This means it contains methods and properties we can use to manipulate a workbook. Anything you can do with a workbook in Excel you can do with a workbook object.
The following example shows you how to write to a cell on a worksheet. You will notice we had to specify the workbook, worksheet and range of cells.
Public Sub WriteToA1()
' Writes the value 100 to cell A1 of worksheet "Sheet1" in MyVBA.xlsm
Workbooks("MyVBA.xlsm").Worksheets("Sheet1").Range("A1") = 100
End Sub
This example may look a little be confusing to a new user but actually it is quite simple. The first part up to the decimal point is the Workbook, the second part is the Worksheet and the third is the Range. Here are some more examples of writing to a cell
Public Sub WriteToMulti()
' Write the value 100 to cell A1 of worksheet "Sheet1" in MyVBA.xlsm
Workbooks("MyVBA.xlsm").Worksheets("Sheet1").Range("A1") = 100
' Write the text "John" to cell B1 of worksheet "Sheet1" in MyVBA.xlsm
Workbooks("MyVBA.xlsm").Worksheets("Sheet1").Range("B1") = "John"
' Write the value 100 to cell A1 of worksheet "Accounts" in MyVBA.xlsm
Workbooks("MyVBA.xlsm").Worksheets("Accounts").Range("A1") = 100
' Write the date to cell D3 of worksheet "Sheet2" in Book2.xlsm
Workbooks("Book2.xlsm").Worksheets("Sheet2").Range("D3") = "12\12\2016"
End Sub
You can see the simple pattern here. You can write to any cell in any worksheet from any workbook. It is just a matter of changing the workbook name, worksheet name and the range to suit your needs.
Take a look at the workbook part
Workbooks("Example.xlsx")
The Workbooks keyword refers to a collection of all open workbooks. Supplying the workbook name to the collection gives us access to that workbook. When we have the object we can use it to perform tasks with the workbook.
There are two important points to note:
If you are running two copies of Excel then Workbooks() only refers to Workbooks in the current copy.
If you get the error “Subscript out of Range” it means the workbook you specified is not open or you have spelled the name of the workbook incorrectly.
The following examples show what you can do once you have access to a workbook. (To try this example create two open workbooks called Test1.xlsm and Test2.xlsm.)
Public Sub WorkbookProperties()
' Prints the number of open workbooks
Debug.Print Workbooks.Count
' Prints the full workbook name
Debug.Print Workbooks("Test1.xlsm").FullName
' Displays the full workbook name in a message dialog
MsgBox Workbooks("Test1.xlsm").FullName
' Prints the number of worksheets in Test2.xlm.
Debug.Print Workbooks("Test2.xlsm").Worksheets.Count
' Prints the name of currently active sheet of Test2.xlm.
Debug.Print Workbooks("Test2.xlsm").ActiveSheet.Name
' Closes workbook called Test1.xlm.
Workbooks("Test1.xlm").Close
' Closes workbook called Test2.xlm. Will automatically save changes
Workbooks("Test2.xlm").Close saveChanges:=True
End Sub
Note: In the code examples I use Debug.Print a lot. This function prints values to the Immediate Window. To view this window select View->Immediate Window from the menu( Shortcut is Ctrl + G)
Using Index instead of the Workbook name
You can also access a workbook using the index number. The index refers to the order the Workbook was open or created. In the following example we use the Workbooks.Count property with the Index. Workbooks.Count contains the number of workbooks which are currently open.
' First workbook that was opened
Debug.Print Workbooks(1).Name
' Last workbook that was opened
Debug.Print Workbooks(Workbooks.Count).Name
In this example we used Workbooks.Count. This is the number of workbooks that are currently in the Workbooks collection.
Using the index is not really useful unless you have a specific need to know the order.
Using all Open Workbooks
If you want to access all the workbooks that are currently open the following example shows you how to do this using For Each.
Public Sub PrintWrkFileName()
' Prints out the full filename of all currently open workbooks
Dim wrk As Workbook
For Each wrk In Workbooks
Debug.Print wrk.FullName
Next wrk
End Sub
You can also use the Index to access all the open workbooks
Public Sub PrintWrkFileNameIdx()
' Prints out the full filename of all currently open workbooks
Dim i As Long
For i = 1 To Workbooks.Count
Debug.Print Workbooks(1).FullName
Next wrk
End Sub
For accessing workbooks either of these methods is fine. The For Each loop is generally preferred when you are accessing a large number of objects. In terms of open workbooks this is rarely an issue.
Opening a Workbook
So far we have dealt with workbooks that are already open. Of course, having to manually open a workbook before running a Macro, defeats the purpose of automating tasks. The following code opens the workbook “Book1.xlsm” in the “C:\Docs” folder.
Public Sub OpenWrk()
' Open the workbook and print the number of sheets it contains
Workbooks.Open ("C:\Docs\Book1.xlsm")
Debug.Print Workbooks("Book1.xlsm").Worksheets.Count
' Close the workbook without saving
Workbooks("Book1.xlsm").Close saveChanges:=False
End Sub
It is a good idea to check a workbook actually exists before you try to open it. This will prevent you getting errors. The Dir function allows you to easily do this .
Public Sub OpenWrkDir()
If Dir("C:\Docs\Book1.xlsm") = "" Then
' File does not exist - inform user
MsgBox "Could not open the workbook. Please check it exists"
Else
' open workbook and do something with it
Workbooks.Open("C:\Docs\Book1.xlsm").Open
End If
End Sub
Using the File Dialog to Select the Workbook
The previous section shows you how to open a workbook with a given name. Sometimes you may want to allow the user to manually select the workbook using the standard Windows file dialog shown here
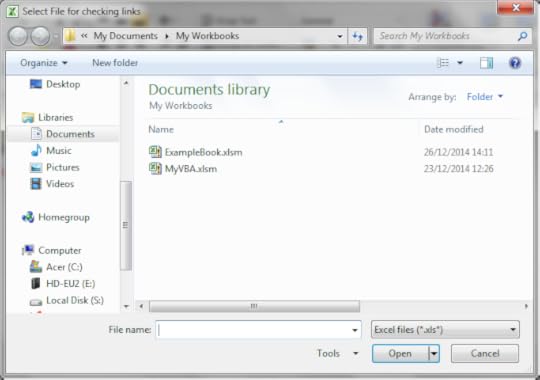
The Windows File Dialog
You can use the following function to open a workbook using the file dialog. The function returns the full file name if a file was selected. If the user cancels it displays a message and returns an empty string.
Public Function UserSelectWorkbook() As String
On Error GoTo ErrorHandler
Dim sWorkbookName As String
Dim FD As FileDialog
Set FD = Application.FileDialog(msoFileDialogFilePicker)
' Open the file dialog
With FD
' Set Dialog Title
.Title = "Please Select File"
' Add filter
.Filters.Add "Excel Files", "*.xls;*.xlsx;*.xlsm"
' Allow selection of one file only
.AllowMultiSelect = False
' Display dialog
.Show
If FD.SelectedItems.Count > 0 Then
UserSelectWorkbook = FD.SelectedItems(1)
Else
MsgBox "Selecting a file has been cancelled. "
UserSelectWorkbook = ""
End If
End With
' Clean up
Set FD = Nothing
Done:
Exit Function
ErrorHandler:
MsgBox "Error: " + Err.Description
End Function
When you call this function you have to check for the user cancelling the dialog. The following example shows you how to easily call the UserSelectWorkbook function and handle the case of the user cancelling
Public Sub TestUserSelect()
Dim userBook As Workbook, sFilename As String
' Call the UserSelectworkbook function
sFilename = UserSelectWorkbook()
' If the filename returns is blank the user cancelled
If sFilename <> "" Then
' Open workbook and do something with it
Set userBook = Workbooks.Open(sFilename)
End If
End Sub
You can customise the dialog by changing the Title, Filters and AllowMultiSelect in the UserSelectWorkbook function.
Using the ThisWorkbook keyword
There is an easier way to access the current workbook. You can use the keyword ThisWorkbook. It refers to the current workbook i.e. the workbook that contains the VBA code. If our code is in a workbook call MyVBA.xlsm then ThisWorkbook and Workbooks(“MyVBA.xlsm”) refer to the same thing.
Using ThisWorkbook is more useful than using Workbooks. When we use ThisWorkbook we do not need to worry about the name of the file. This gives us two advantages:
Changing the filename will not affect the code
Copying the code to another workbook will not require a code change
These may seem like very small advantages. The reality is your filenames will change all the time. And you will often use the same code in multiple workbooks. You don’t want your code to break every time you change a workbook name.
Look at the next example. If the filename changes to MyVBA2.xlsm then the second line will no longer work. You will have to change the filename in the code. However the first line will continue to work correctly without any change.
Public Sub WriteToCellUsingThis()
' Both lines do the same thing.
Debug.Print ThisWorkbook.FullName
Debug.Print Workbooks(“MyVBA.xlsm”).FullName
End Sub
Using the ActiveWorkbook object
Before we leave this section I want to let you in on a secret. Our good friend ThisWorkbook has an evil twin called ActiveWorkbook.
ActiveWorkbook refers to the workbook that is currently active. Seems perfectly innocent doesn’t it? However any workbook can become the active one. By simply clicking on a workbook with your mouse you make it the active one. This makes it so easy to read and write using the wrong workbook.
Using ActiveWorkbook can also make the code very difficult to read. It may not be obvious from the code which workbook should be the active one. With ThisWorkbook there is no confusion.
Because of these reasons it is better to avoid using ActiveWorkbook unless your application is interested in the currently active workbook.
Examples of the Accessing Workbooks
The next example shows how to print the full name of a workbook using each of the different workbook access types
Public Sub WorkbooksUse()
' This is a workbook that is already open and called MyVBA.xlsm
Debug.Print Workbooks("MyVBA.xlsm").FullName
' The workbook that contains this code
Debug.Print ThisWorkbook.FullName
' The open workbook that was opened first
Debug.Print Workbooks(1).FullName
' The open workbook that was opened last
Debug.Print Workbooks(Workbooks.Count).FullName
' The workbook that is the currently active one
Debug.Print ActiveWorkbook.FullName
' A closed workbook called Book1.xlsm in folder C:\Docs
Workbooks.Open ("C:\Docs\Book1.xlsm")
Debug.Print Workbooks("Book1.xlsm").FullName
Workbooks("Book1.xlsm").Close
End Sub
Declaring a Workbook Object
The reason for declaring a workbook object is simply to give a workbook a nicer name. It makes your code easier to read and therefore less error prone. It is easier to see the advantage using an example
Public Sub OpenWrkObjects()
Dim wrk As Workbook
Set wrk = Workbooks.Open("C:\Docs\Book1.xlsm")
' Print number of sheets in each book
Debug.Print wrk.Worksheets.Count
Debug.Print wrk.Name
wrk.Close
End Sub
You can set a workbook object to be any of the workbook objects we saw in the previous section.
The following shows you the same code without a workbook object
Public Sub OpenWrkNoObjects()
Workbooks.Open ("C:\Docs\Book1.xlsm")
Debug.Print Workbooks("Book2.xlsm").Worksheets.Count
Debug.Print Workbooks("Book2.xlsm").Name
Workbooks("Book2.xlsm").Close
End Sub
In these examples the difference is not major. However, when you have a lot of code, using a object is useful particularly for worksheet and ranges where the names tend to be long e.g. thisWorkbook.Worksheets(“Sheet1″).Range(“A1″).
Another advantage is that you can name the object as wrkRead or wrkWrite and then it is very obvious what this workbook is being used for. And obvious code is good code!
Creating a New Workbook
To create a new workbook you use the Add function of the Workbooks Collection. This creates a new blank workbook. It is the same as selecting New Workbook from the Excel File menu.
When you create a new workbook you will generally want to Save it. The following code shows you how to do this.
Public Sub AddWordbook()
Dim wrk As Workbook
Set wrk = Workbooks.Add
' Save as xlsx. This is the default.
wrk.SaveAs "C:\Temp\Example.xlsx"
' Save as a Macro enabled workbook
wrk.SaveAs "C:\Temp\Example.xlsm", xlOpenXMLWorkbookMacroEnabled
End Sub
When you create a new workbook it normally contains three sheets. This is determined by the property Application.SheetsInNewWorkbook. If you want to have a different number of sheets in a new workbook then you can chang this property before you create the new workbook. The following example shows you how to create a new workbook with seven sheets.
Public Sub AddWordbookMultiSheets()
' Store SheetsInNewWorkbook value so we can reset it later
Dim sheetCnt As Long
sheetCnt = Application.SheetsInNewWorkbook
' Set sheets in a new workbook to be 7
Application.SheetsInNewWorkbook = 7
' Workbook will be created with 7 sheets
Dim wrk As Workbook
Set wrk = Workbooks.Add
' Display sheet count
Debug.Print "The number of sheets is " + CStr(wrk.Worksheets.Count)
' Reset to original value
Application.SheetsInNewWorkbook = sheetCnt
End Sub
Creating a Copy of a Workbook
There are two main ways to create a copy of a workbook. If the workbook is open you can use the SaveAs function. This is the same as the manual SaveAs. It will close and save the original file and leave the new one open.
The function SaveAs comes with twelve optional parameters. Most of the time you will only need the Filename one as shown in the following code example
Public Sub WorkbookSaveAs()
Workbooks("Book2.xlsm").SaveAs "C:\Docs\Example_Copy.xlsm"
End Sub
If you want to copy a workbook without opening it then you can use FileCopy as the following example demonstrates
Public Sub CopyWorkbook()
FileCopy "C:\Docs\Docs.xlsm", "C:\Docs\Example_Copy.xlsm"
End Sub
Using the With keyword
The With keyword makes the process of writing VBA code easier. It also makes your code easier to read. Using With means you only need to mention the object once.
The following example has two Subs. The first is normal code we have seen so far. The second uses the With keyword. You can see the code is much clearer in the second Sub. The keywords End With mark the finish of a section code using With.
' Not using the With keyword
Public Sub NoUsingWith()
Debug.Print Workbooks("Book2.xlsm").Worksheets.Count
Debug.Print Workbooks("Book2.xlsm").Name
Debug.Print Workbooks("Book2.xlsm").Worksheets(1).Range("A1")
Workbooks("Book2.xlsm").Close
End Sub
' Using With makes the code easier to read
Public Sub UsingWith()
With Workbooks("Book2.xlsm")
Debug.Print .Worksheets.Count
Debug.Print .Name
Debug.Print .Worksheets(1).Range("A1")
.Close
End With
End Sub
The With keyword can be used with any object such as Workbooks, Worksheets, Ranges etc.
Summary
The following is a brief summary of the main points of this post
If you are referencing the workbook containing the code then use ThisWorkbook for the Workbook.
If you are referencing an open workbook other than the one with the code then use Workbooks(“Example.xlsx”) for the Workbook.
If you are referencing a closed workbook then use use Set Wrk = Workbooks.Open(“C:\Folder\Example.xlsx”) to open the workbook.
If you want to allow the user to select a file using Windows File Dialog then use the UserSelectWorkbook function provided above.
To create a copy of an open workbook use the SaveAs property with a filename.
To create a copy of a workbook without opening use the FileCopy function.
To reduce the number of time you have to type an object name in your code use the With keyword.
To make, the purpose of your code clearer, avoid long winded names like ThisWorkbook.Worksheets(“Sheet1″).Range(“A1″) use Workbook Objects e.g. Dim wrk as Workbook.
To run through all open Workbooks use For Each wrk in Workbooks where Wrk is a workbook object.
When referencing Workbooks avoid using ActiveWorkbook and Workbooks(Index) as their reference to a particular workbook is temporary.
Conclusion
This was an in-depth post about a very important element of VBA. I hope you found it beneficial. Excel is great at providing many ways to perform similar actions but the downside is it can lead to confusion at times.
To get the most benefit from this post I recommend you try out the examples. Create some workbooks and play around with the code. Make changes to the code and see how the changes affect the outcome.
Practice is the best way to learn VBA.
If you found this post useful then feel free to share it with others. You may also want to check out The Complete Guide to Worksheets in Excel VBA


