
General Craft & DIY discussion
Miscellaneous Crafts
>
Glass Gluing Test by creating a functional decorative piece
date newest »
 darn... photos 1, 2 and 4 didn't make it.
Photo 1, set up for grinding.

Photo 2, the lapidary unit.
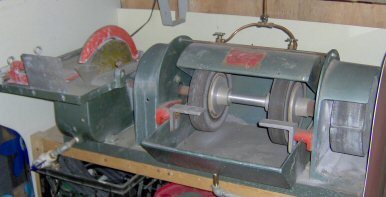
Photo 4- the piece clamped in UV light.
 Very cool. Those are some awesome glass pieces. Regular super glue doesn't work on glass?
 I'm not a chemist & really don't understand the differences between them all since they all seem to be called cyanoacrylate. I know it takes a special one to work on eye glass frames & the stuff I buy for wood doesn't seem to seal bleeding cuts well, unless I mix in some sawdust. Then it works pretty good.
The Wikipedia page here:
http://en.wikipedia.org/wiki/Cyanoacr...
has some interesting stuff on it. They list other formulations:
Methyl cyanoacrylate
Ethyl cyanoacrylate
Butyl cyanoacrylate
Octyl cyanoacrylate
2-Octyl cyanoacrylate
They all seem to be the type to glue skin together & none of them mentions eye glass plastic.
wot, you can't find a bandaid?I'm not a fan of cyanocrylate glues... they dry way too fast and such that the joint loses strength by buildup before you can even slap if together. Ever try to repair a broken cup handle with it? The reality is the handle can never be trusted again... or maybe I'm too uncoordinated to do it right.
The glue I tested doesn't dry at all until exposed to UV light and unlike regular super glues really does dry as clear as glass.
Now of course I can't walk by the scattered bits of glass around the shop without wondering what I can make next!
Nicks on fingers closed with super glue & sawdust don't bleed into the work or interfere & it's a very quick fix. I get a fair few turning rough wood on the lathe & the super glue is usually right there.It's only since I started turning that I really got into using super glue. Usually I'm using it in cracks mixed with sawdust to stop them from getting bigger, so they're not supporting a lot - just the pull of the wood apart as it dries. The speed is part of what I love about it. I can apply & start turning again in a minute.
It doesn't have a lot of sheer strength, so I'll use Ducco Cement on handles unless there is plenty of support.
I forgot about the UV drying. That does make sense. That's so cool. Chemists are amazing.
See, I thought you'd say the kids took all the bandaids!As I recall I once played with wooden model planes and superglue worked great, especially since the structure was reinforced with doped paper.
I never got into wood turning. When I hit cracks with shelves or cabinet components I just use wood glue and a clamp, waiting until the repair dries to move on.
I love what few wooden bowls I have, but I've found so many turned legs and details available from discarded furniture I never felt the need to create more.
(Not to mention the shop, the garage, the garden shed and the tower are filled to capacity already with tools and supplies... where would I put a lathe!)
It's amazing the amount of knowledge we have to have just to figure out which product to use for which application, isn't it? While there is a lot of crap out there, some new products are pretty amazing for how much easier & better they work.
Jim wrote: " While there is a lot of crap out there, ..."Ain't that the truth!
 Excellent information, Parlite glass glue adhesive is also extremely effective. It can bond glass to any other substance, including another piece of glass. This glue has all the advantages , but comes in a squeeze dispenser with comfortable finger grips which add to the preciseness of glue application while keeping the glue off of your fingers. You can get more idea here:
http://www.parsonadhesives.com/parlit...
Thanks Dasy! I'll add that to my list of adhesives.


Please note I don't have a book about gluing glass. I'm relying on transferring skills I've learned from other crafts I do have books about.
(also please note I HOPE the photos come through when I hit "post".. if not they are all in the photo section of this group)
Since I am unfamiliar with glass gluing I broke the cardinal rule of "manliness" and read the directions. Darn, I couldn't just slap it together, first I had to make the pieces fit nicely. That made sense, as whether pasting paper, gluing wood or welding cold rolled steel the better the joint the better the result.
I wanted to fit the bump on the Ball cover into the base of the lamp crystal. To arrive at the right angle for carving I made a mold of the crystal with Sculpty Modeling Clay, and then since I needed to carve in a decent circle at a consistent angle I clamped the dremel with a grinding bit in the shop vise. I then made a simple jig so I could spin the cover in place while applying pressure on the dremel.
It took a while of constant checking and resetting before they got close to a snug fit.
I also roughed out the base of the crystal to give it some "tooth" for the glue to grab, and discovered the two little nubs on the lid interfered so since they were sticking up I zipped them off with the lapidary unit.
For those of you unfamiliar with lapidary arts, the lapidary unti has a diamond blade on one end, two grinding wheels in the middle (about 600 grit and 1000 grit) and a sanding drum at the other with all of it plumbed for water to cool the materials being cut. It's designed to take a bit of rock and shape it into a cabuchon ready for polishing. I bought it to prepare specimens from my rock collecting days and have found 101 others uses for it, such as shaping glass quickly.
[image error]
But I digress....
Now I had a nicely shaped circular bit to join to the crystal cover, but the crystal was a bit out of round. To make them fit together even better I made a slurry with 240 grit silicon carbide (the first stage of rock polishing, or you could scrape some off a piece of gray sand paper)and twisted the pieces together until the fit was snug.
Next I added the pieces to the dish water and cleaned them real good, and when dry according to the directions I needed to treat the joint with either isopropanol or acetone. Since I had neither rubbing alcohol or nail polish remover I used methel ethyl ketone. MEK is an industrial solvent I had left over from my mural business (I had some real nasty surfaces to prep) that will not only dissolve nail polish but also fingernails. It's highly unlikely you'd find it at the local hardware but acetone and rubbing alcohol are readily available.
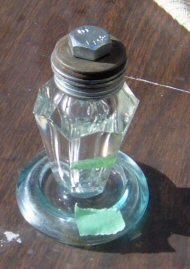
Finally the moment of truth. IT only took a dab applied under flourescent light (it should at $8 for 2 ml!) and spred out with a toothpick, then I aligned the pieces, "clamped" them by adding some washers on top and set in in the sun to let the UV light cure the adhesive.
It dried fast, and though it requires 24 hours to fully cure after about four hours I removed my "clamp" and it seemed fine. The adhesive had filled in the grinding marks and was indistinguishable from the pieces, making a nice solid joint!
I dropped in a bit of green glass salvaged from a discarded fishtank setup to bring out the color of the Ball lid, and added a snazzy pen holder to my desk!
So if you're considering glass gluing I've found that "The Original SUPER GLUE corporation Clear Drying Glass Adhesive" is an excellent product that really works!