Christine Haynes's Blog, page 16
May 10, 2014
Giveaway Reminder!

Just a quick reminder that the Colette Guide to Sewing Knits giveaway ends tomorrow! Click on over to the post to enter to win this amazing book!
Happy weekend to you all!


May 7, 2014
The Colette Guide to Sewing Knits Review & Giveaway!

I have been sewing with knits for decades. Back when I had a ready to wear line, I used 90% or so knits, because when you're selling your designs to a wide range of people, a lot of fit issues are taken out of the equation when you are talking about knits. So it really was the best way to sell my things to the public at large.
But when I started teaching sewing and working with beginners, I realized what a struggle it is for new seamstresses to handle the fabric. It stretches all over the place, you need a fancy machine to put things together, you need another fancy machine to hem anything, and on and on. I had all of that stuff - the industrial cover stitch machine, etc - but most home sewers don't. And why would they? Those are specialty machines that you really don't consider buying until you get a handle on the knit basics. Though warning, once you're bitten by the knit bug, it's hard to shake, and a cover stitch machine is usually in your sights before too long!

Because many of my patterns were knits, I of course have a closet full of designed patterns for knit items, and yet I've yet to release them to the public because it isn't just as simple as dealing with wovens. There is a lot to learn and know when you get started and you need to take your time with it.
Enter the best thing to happen to the scene - The Colette Guide to Sewing Knits. Seriously, this book is the bomb. First off, I am so proud of Sarai and her team for putting it all together and bolding going where no one else has yet, and I'm excited for Alyson who authored the book, for reaching a whole new fan base with her extensive knowledge of the topic of knits.

I didn't really need this book, but I didn't hesitate for a second at the chance to pre-order it along with both of the two new Colette Patterns designed for knits. Why? Because seriously, in my pile of 100's of books, this book doesn't exist in my stash. The closest thing I have is Wendy Mullin's Sew U Home Stretch, but there is honestly no comparison in these books. Wendy's book is much more project-based and doesn't fully explain the how and why required to really understand sewing with knits. The Colette Guide to Sewing Knits explains it, then takes it up a notch.
 I love information in a well organized chart, so I was thrilled to see super handy pages of charts on how to handle stitch length, what fabrics are best for what projects, and on and on. Don't have a serger or a cover stitch machine? No worries! Not only does it thoroughly explain and demystify both of those (seriously, the serger section is better than my machine's manual!), but it also covers all the things you need to know about sewing knits on a conventional home machine as well.
 It also gives you some ideas on how to take your projects to the next level with stretch lace, trims, and elastics. And if you need inspiration, there are some pretty photos of models in the first two Colette knit patterns in there too.
I seriously cannot recommend this book enough if you have any desire at all to work with knits. Seriously! Go get it! Or would you rather win a copy? BONUS! You can enter to win a digital copy of the book right here! Yep, that's right! Sarai released the book in both printed and digital form, and she has kindly offered for me to giveaway a digital copy to one of my lucky readers! Yes to one of you!
So, here's how you can win:
Leave a comment on this post telling me why you'd like to win!Leave your email in the comment, or a clear way for me to reach you and for Sarai to send you the book (obviously this is critical!)The giveaway closes at midnight, Sunday, May 10.A winner will be chosen at random and announced on Monday, May 11.Please note that you are only allowed one entry per person, and if I draw your name and have no way to reach you, I will move onto the next person, so do please leave some contact info!
Thanks again to Sarai for this opportunity and best of luck to you all!
May 6, 2014
SBCC Tonic T-Shirt for Sewing Indie Month (with Bonus New Skirt!)

As I mentioned last week, it's Sewing Indie Month! Hurrah! I was paired up with Betsy from Skinny Bitch Curvy Chick Patterns to do a tutorial on her site. From the excitement over the above photo on my Instagram feed, I think you all are going to like the post! Betsy has a super cute top called the Tonic T-Shirt and on the blog post I teach you all how to draft and sew a cute Peter Pan collar to it. Hop on over to her blog and check it out!

The Tonic went together super quickly and I was thrilled with the fit. I made up a straight size medium and it is my new favorite T-shirt. I plan to make many more, both with and without collars! And bonus, if you want the PDF version, it's a free download! So what are you waiting for?

In addition to the top, I also made the cute red linen skirt that I'm wearing. The fabric was a gift from the kind ladies at The Fabric Store here in Los Angeles. It's a beautiful linen with tremendous drape and works perfectly for this full and swingy skirt.

The pattern for the skirt is another quick and easy garment from Shaerie at Sew L.A. It's her next pattern called the Cute Pocket Skirt. Why? Well, just check out those cute pockets! It's a 6-panel gored skirt with a flat waistband in the front and an elastic waistband in the back. It's a wee bit full in the back, but nothing fits me right these days so I'm just rolling with it until my body stops moving around.
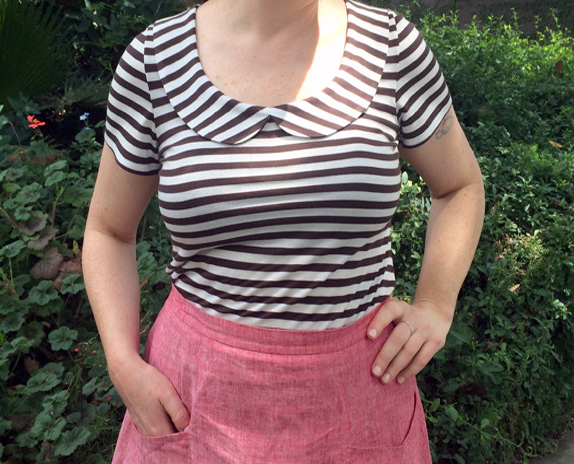
I absolutely love both pieces and see myself wearing them often! Great closet staples for a girl who has 99% dresses!
May 5, 2014
120 Day Fitness Update

This week is officially my 4 month mark of my fitness routine. It's been such an interesting ride and I've learned so much about myself, my habits, and more.
At last month's 90 day check in I was feeling pretty down about the lack of movement on the scale, but picked myself up with the dramatic change in my body measurement numbers. This month is much the same, except without the being down on myself part. I haven't lost a pound this month, and you know what, I'm totally okay with that. Not because I don't want to loose more, but because this has been quite a busy month (as will be the next 30 days) and the fact that I didn't gain any weight should be looked at as a major milestone.
Over the last 30 days I have been frantically busy working on a couple of huge projects, and I did some traveling. All of that with my usually busy work schedule, means that I didn't get to the gym as many times as I'd like to, and it also meant that I cheated much more on my diet than usual. Nothing terrible, but for example, while on vacation I had a drink or two everyday. And you know what, I should! I was on vacation for goodness sake! Though I know from my longer vacations in the past that this kind of mindset can only last for short holidays, or else you "reward" yourself with bad things, which is no reward at all in the end. But yes, I had a few cocktails and that's fine. I'm not gonna beat myself up about it.
I didn't lose any weight, but I did actually lose more inches on my waist, hip, and upper thigh. So for that, yay!
Last month I promised you all some fitness tips from my training session, so here we go! My trainer Yuichi (pictured above with me) was so kind and took some shots of me while working out last week. No, they aren't remotely flattering, but hey, working out is pretty embarrassing so what are you gonna do!
When I'm not working out with Yuichi I focus 90% on pure fat burning cardio: the stair climber, the treadmill, the elliptical, and the bike. I do some weights and calisthenics on my own, but not too much, as I know that once or twice a week I will get my ass handed to me in my training session, so I try to just get my ass burning on cardio when on my own.
When I work with Yuichi, we do 90% calisthenics and weight training, but it's all done with heart rate raising moves mixed in, so while it might look like I'm just jumping or stepping or lifting, my heart is pounding out of my chest and I'm a hot sweaty mess, so I'm doing both weight training and fat burning in the end.

I've learned that I love jumping rope! That is a typical warm up move with Yuichi. He'll hand me the rope and I'll do 100 or 200 reps with regular two-foot jumps. In addition to regular jumping, I also do "high knee" jumping with the rope, which basically means jogging with a jump rope. It's hard but so satisfying since you can feel it working your whole body and getting your heart rate up while warming the body up for more. It's a great way to start a session. I love that in the photo above you can't even see the rope! I'm moving so fast ;)

Another move that is deceptively effective is jumping onto a plank. Okay, true confessions time: I have seen more than a few episodes of The Biggest Loser TV show. I know, it's not great, but hey, a girl needs entertainment when sewing all night. Anyway, I've seen this move on the show where they set up a board and the contestants have to jump onto it with both feet, then jump back down. I have seen some people on the show freeze with a complete fear that they will trip and fall flat on their faces, and yes, the first time that Yuichi set this up for me, I did the same thing. And yet, from the outside, it looks so innocent and easy. But let me tell you this: it's not innocent and easy, but it's also nothing to fear. I would never do this move alone for the first time, nor would I make the plank very high if by myself, because yes, if you trip on the board, you will fall on your face and it will hurt. But I have yet to fall! So yay me!
Why is this a good move? Because while your brain is focused on getting your feet up on the board, all the other muscles in the rest of your body are working hard to make it happen. Last week I did 4 sets of 50 of these jumps with the second 100 at a slightly higher height than the first 100. Yes, 200 jumps on and off the board. And every muscle in my body felt it the next day, which makes this move amazingly effective. Try it!

Something that I'm trying to become better at is running. Yuichi has me do sprints at 7.5 or 8.0 on the treadmill and it's quite literally as fast as I can run. The whole time I'm thinking don't fall, keep running, keep running or you're going to fall, just keep running, oh and breathe!!! Yuichi is literally next to me (where the camera is) and is telling me to breathe and so breathe I do! I recently bought an external layer jacket with zipper pockets with the intention of running in the mornings in Paris for my upcoming spring holiday. If the beauty of Paris can't make me a runner, nothing can.

And lastly, my absolutely least favorite move: the bicycle. This is that stupid thing where you lay on your back and put your elbows to your knees on opposite sides and go back and forth. I totally hate this move and Yuichi knows it, therefore, we do it every mother f-ing week! I'm terrible at it and bitch the whole time. I'm sure it's doing good, but whatever, it sucks!
This is just a tiny sample of the kinds of things we do for an hour, at an ungodly early time of the day. But the point I mean to make with these moves is this: anyone can do this, with or without a gym membership, and with or without a trainer. I love working with a trainer and it's a serious kick in the pants, but very little that we do together can't be achieved on your own. I'm relying on his extensive knowledge of exercises to keep my body working, but if you try these kinds of things on your own and are hard on yourself, you can do it too!
Next month's update will be from the streets of Paris! Here's hoping that I'm running along the beautiful cobblestones with grace!
May 1, 2014
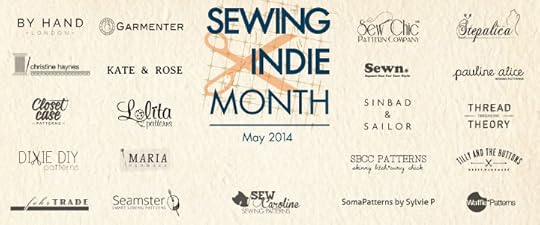
Announcing Sewing Indie Month! (& Some Giveaways!)

If you follow some of the other indie pattern blogs, you might have heard that starting today, it's officially Sewing Indie Month! What is that you say? Well, with Mari from Seamster Patterns at the helm, a bunch of indie sewing pattern companies (myself included) have teamed up for a whole month-long celebration of the indie pattern scene! I remember only a handful of years ago when there were hardly any indie patterns, and now look at us! So many to choose from! So it is indeed a situation worthy of celebrating!
What is coming for this month? All the the amazing participants will be posting tutorials and interviews on each other's sites, so you can get to know each of us better and see how we all work with each other's designs! In addition, some lovely bloggers are hosting sewalongs (including MAJOR prizes) as well! Check out their sewalong categories and sites below:
an Indie Love Affair, Wanett of Sown Brooklyn
Dressed to the Nines, Laura of Lilacs and Lace
Everyday Casual, Jenny of Cashmerette
Pattern Hacking, Rhonda of Rhonda's Creative Life
Oh, and did someone say prizes? Heck yeah! There are a TON of prizes up for grabs, so click here to read all about the prizes from the most amazing donors. There are over $1000 in prizes! So read on how you can participate and win! And of course, be generally inspired by all the fellow indie pattern designers.
See the full Sewing Indie calendar to see where the posts are each day and learn all you need to know and more at Mari's post!
Participating Designers:By Hand London Christine HaynesCloset Case FilesDixie DIYFehr TradeGarmenterKate & RoseLolita PatternsMaria DenmarkSeamster Sewing PatternsSew CarolineSew Chic PatternsSewn Square OneSinbad & SailorSkinny Bitch Curvy Chick PatternsSomaPatterns by Sylvie PStepalica PatternsPauline AliceThread Theory DesignsTilly & the ButtonsWaffle Patterns
Also, I spotted two giveaways out there on the web that you might want to enter if you'd like to win one of my patterns! Check out the posts on Imagine Gnats for Selfish Sewing Week and on Sew News Magazine's blog to mark my return to the Sew it All set! Time is limited for both so go check them out now to enter to win!
Happy weekend!
April 23, 2014
Off To Denver!

I'm super excited to jet off to Denver tomorrow for two awesome events!
First, I'm teaching my Emery Dress in a two-day weekend intensive dressmaking marathon at the amazing Fancy Tiger! I can't wait to see the shop in person and meet their lovely students! The class is sold out, but if you're not enrolled and want to swing by to say hi, I'll be there teaching all day Saturday and Sunday this weekend, so feel free to interrupt me and say hello! I've heard that they have my patterns and new book in stock, so if you need me to sign the book, I can do that too!

I'm also super excited to be shooting another episode for PBS' Sew It All with the lovely Ellen March! I was on season two and it will be great to revisit the set and shoot another season. I'm not sure when that will air but you can check your local PBS listings to see if you get it and when it is on.
After all of that goodness, my man and I are taking a day and a half for vacation before coming home, as I used to live in Denver and Boulder and we're going to see some old haunts as well as some old friends. Things will be a little quiet here for the next week while I'm away, but then I'll be back in action before you know it!
Thanks all!
April 21, 2014
Craftcation Zippy Bag Tutorial
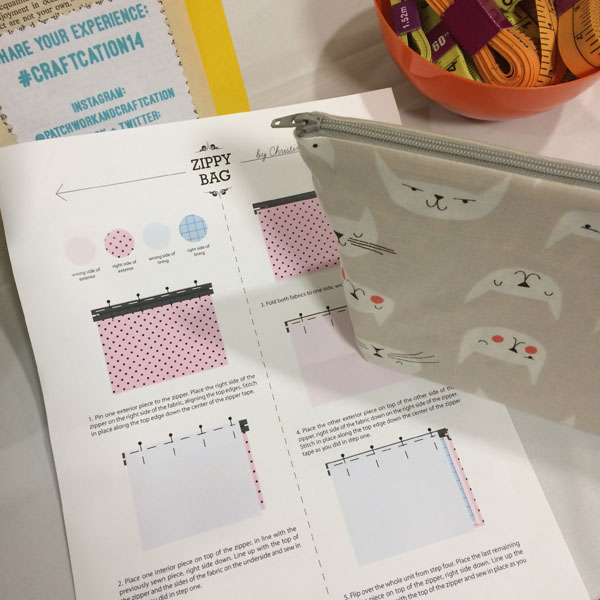
At this year's Craftcation Conference I taught a super simple zipper bag for beginner sewers. Though I wanted it to be something that anyone could complete, even if you've never touched a sewing machine, it's also a super satisfying project for anyone to make and honestly, don't you need like 1,000 little zipper bags in your life? I know I do! I have one in nearly every shape and size for all kinds of things!
I thought I'd share the instructions with all of you since I took the time to make up real instructions for the students to take with them. A few notes about the instructions:
I didn't have the students interface the outer layer of the bag due to time constraints, but I highly recommend using a lightweight woven fusible interfacing on the two outer layers before sewing the bag up.You can use any weight of fabric you like, but I would recommend using either quilt weight for both the outer and the lining, or using a heavier canvas for the outer and quilt weight for the lining. Using a heavy weight for both will create a lot of bulk.These can be made up in any size you like, so I don't have a cutting layout pattern on the instructions, as you can really do anything you like. Keep in mind that the boxed bottoms will eat up 2" of the bag's width and height when doing your size. The ones I made in class were 10" square to start, but you can make it whatever you want! Because we're sewing over the zipper teeth, do not use a zipper with metal teeth. If you choose a metal zipper, simply stop on either side of the teeth and back stitch to secure the stitch when having to sew over the zipper. You might want to hand tack with a few hand sewing stitches where the metal teeth are to hold it in place. To ease the sewing for the new students, I chose a zipper that was much too long and had them center the fabric on the zipper. Then we sewed with a regular presser foot with the needle in the left position so you could see a bit of the zipper tape and didn't have to fuss with a zipper foot. After sewing around the bag's perimeter, simply cut off the excess tape on either end! Easy peasy!
To get the instructions, download them here and print them out! Note that they are in color to differentiate the layers for instruction's sake, so if you choose to print them, keep that in mind!
I hope you enjoy these little bags, and if you make them up, let me know! I'd love to see your creations!
April 18, 2014
Advice Needed: Buying Jeans

I almost never wear pants, but as my body changes, so does my desire to wear pants and jeans. But I have to be honest, the last time I bought jeans was like, OMG, so long ago I can't even remember! Seriously, maybe 10 years ago? No… I've been in LA 10 years this June and I've never bought them here, so that puts it in the over 10 year mark. Wow!
Oh, and just to put a stop to the question about sewing jeans right up front: no, I'm not sewing my jeans… yet. I have a limited amount of time before our upcoming trip and I want to take pants with me, but I really don't have time to sew them up properly before we go, so buying them it is! And I think I'd rather wait to sew them once my body has leveled off a bit. Right now it's still seriously changing!
So needless to say, I have absolutely no idea where to go to buy jeans, or what type might suit me best. Help a girl out? Where do you get your jeans? I've heard that Madewell (pictured above) are really nice, but I honestly have no comparison knowledge to go on. Let me know! What jeans do you like?
Thank you for any help!
Jeans from Madewell
April 17, 2014
Bodice Fail
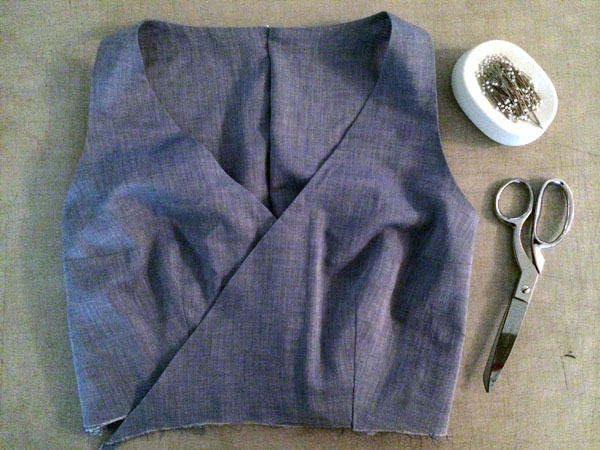
Because I think it's as important to talk about our failures as it is our successes, I share with you today my most recent fail. As you know if you read my blog regularly, I have been slowly but steadily losing weight this year. I'm down 13 pounds (yay!) and many inches around my body. While this is awesome, it also means that I am sewing for a completely new and different body than I've known for years.
I have been waiting to sew anything for my upcoming trip to Paris so that my body would be as close as possible to the way it will be when we leave, but at a certain point you just gotta pull the trigger and start making things again! Enter the gorgeous Flora Dress from By Hand London.

First, let me start by saying that their pattern is perfect and lovely, and that nothing said from this point forward is a reflection on their patternmaking skills. I loathe reading posts about patterns where the sewer thinks that poor fit is due to poor pattern making. Sure, sometimes that's true, but more often the case is that there is denial about how much work it actually takes to fit something to each unique body correctly, and typically muslin making and pattern changes were skipped. So this post is not a reflection of the Flora pattern, and you should all go and buy it! Rather, this is about how I have no idea what my body is shaped like anymore!
You might already know the gorgeous Flora pattern, available in two different bodice and skirt styles, both equally lovely. I labored over my bodice choice for a while because I really like both equally. In the end I decided to try the faux wrap version, as it is a style I rarely wear or make for myself, and I thought that it would look lovely under a cardigan with the wrap part still showing at the center. I already knew that I wasn't going to make either of the skirt choices, mainly because I wanted to make this more of an everyday dress, so I had decided to make a not-too-full knife pleated dirndl.
I've lost about 3" around my bust, and have nearly given up wearing my own bras because lord, you could take a big giant dart in those suckers right about now! Sorry, that's probably TMI, but hey, let's talk about how much smaller and less fatty my butt is! Okay, let's not. Moving on…

I saw the photos of the full-busted model looking amazing in the dress, and I'm not sure why I didn't think to myself, girlfriend, you don't have those boobs! You probably need a small bust adjustment! But I didn't think this.
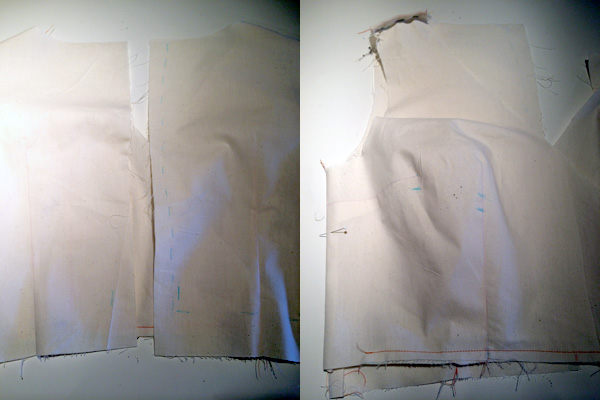
Anyway, I made a muslin for the bodice, had my pal Haley help fit me in it and mark where it should be changed, made all those pattern changes, and then cut into my fabric with glee. I sewed up all the darts, sewed up the shoulders, and I even made the lining front curve an 1" smaller so I could ease the outer layer to the inner layer to help prevent any gaping. I understitched the front edges to keep the lining in place, then forged ahead and basted up the side seams, knowing that if I needed to change it slightly at that point, I still could. With much anticipation, I pinned up the back at 5/8", then slipped the bodice on and wrapped it around the front and pinned it in place.
(Enter sad trombone sound here)
So what did it look like? Why am I not showing you this photo? Because clearly I no longer have the bosom to fill this bodice. Like, not even close people! So now, I'm not gonna lie, I really don't know what to do with this lovely and gorgeous bodice. For it to fit me will mean serious hacking and it will no longer even look like the real pattern anymore. I don't have any more of this pretty chambray, but that's okay, I have a stash that looks like a fabric store, so I'm not going to loose sleep over that, and besides, it's a very replaceable fabric. (I might even have other chambray cuts in my stash!)
Where do I go from here? Some of you might suggest I make the SBA and try again, but I think I'll make a SBA and try the other bodice. I really went back and forth on which one to make for the longest time, and I went for the wrap as a bit of a risk from the get go, as something very different for me. So I think I'll give it another try and make a muslin of the other view, which honestly, is more "me" anyway.
So there's my little reality check of the day! How are all of you doing with your Flora dresses? Any recent fails you want to share? Or if you have brilliant ideas of how I can fix this without destroying its original look, bring it on!
April 15, 2014
LA Workshops Reminder!

Hi all! Just a reminder that I'm teaching the lovely Deer & Doe Datura Tank starting tomorrow at Sew L.A. and there are a few spots left! So if you're interested, give the shop a shout today and sign yourself up! It's a perfect summer tank full of loads of skills like darts, buttons, curved bias bound hem, and more!

I also have one spot left in the Coco Top (or Dress) class. You all must know the pattern by Tilly & the Buttons by now, as it's everywhere on the web! And for good reason - it's a really great introduction to knits for the beginner. We'll make our Cocos on a regular home machine and I'll pass on tips on how to get around not owning a serger for knit sewing. That class starts on Saturday, May 3.

That same day I'm teaching the easiest class at Sew L.A., Throw Pillow Covers, so if you're an absolute newbie to sewing, this is the class for you! And yes, when we're done, you'll have a pair of throw pillows for your home. Pretty satisfying!
Find all the details at the links and sign up today! Spaces are limited.
Thanks and see you all in class!!!