
Stephen R. Wagner's Blog, page 2
November 10, 2025
Top Simple Prompts to Build Your First WordPress Site With AI
WordPress.com’s AI website builder helps you create a site using simple language prompts.
Just type what you need and it’ll materialize your vision (like magic!) — no coding or technical skills required.
In this guide, I’ll share seven prompts you can use to create and customize a website from scratch with our platform.
Let’s assume we’re making a personal blog all about books and publishing. Follow along, then adapt the prompts to suit the site you’re building.
1. Create the first site draftFirst, use the AI website builder to create a whole website from scratch.
Think of it as the first draft before you customize each section and page based on your needs.
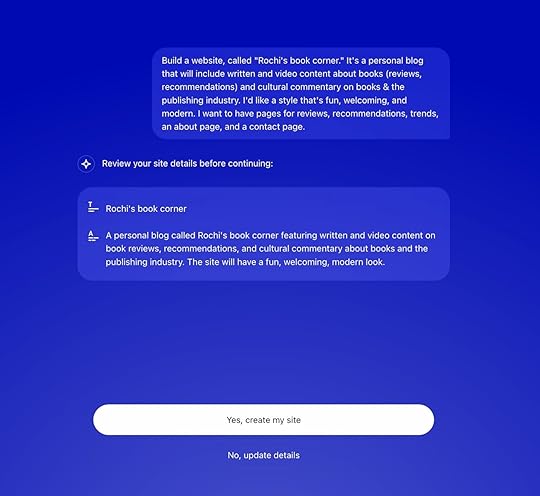
To create a blog about books, I used this prompt:
“Build a website called “Rochi’s book corner.” It’s a personal blog that will include written and video content about books (reviews and recommendations) and cultural commentary on books & the publishing industry. The style should be fun, welcoming, and modern. I want to have pages for reviews, recommendations, trends, an about page, and a contact page.”
To get a result as close to your vision as possible, include specific and detailed instructions, such as:
The name of your website (if you have one)The type of site you want to build — blog, portfolio, business, or something elseHow many pages you want to add and what each page should be calledThe style you’re going for — modern, professional, chic, funny, elegant, minimalistic, etc.The type(s) of content and media you’re looking to publish on the site — like blogs, images, videos, and moreFor the above prompt, WordPress.com’s AI website builder created this site:
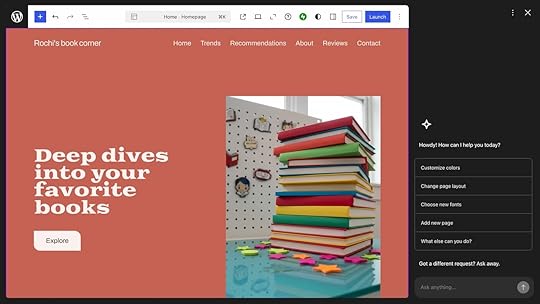
The first draft alone was stellar — something that would’ve taken me hours (if not days) to create were I doing everything from scratch.
2. Customize the site’s design and appearanceNext, customize how you want your site to look: fonts, colors, layouts, and more.
Follow the prompts I’ve shared below to adjust your site’s look step by step.
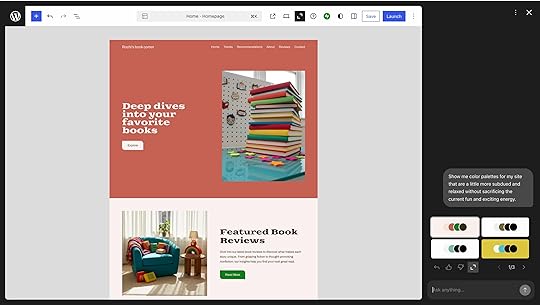
Change your site’s colorThe first draft of the site is great — the yellow and purple contrast pops, instantly giving it a fun and exciting energy (something I requested in my prompt).
However, I would like the color palette to be more subdued. Here’s the prompt I used to achieve this:
“Show me color palettes for my site that are a little more subdued and relaxed without sacrificing the current fun and exciting energy.”
The AI website builder gave me nine color palette choices to choose from.
Each of the colors complemented one another well and matched the requirements of the prompt I gave.
Ultimately, I chose the green palette.
 Change your site’s fonts
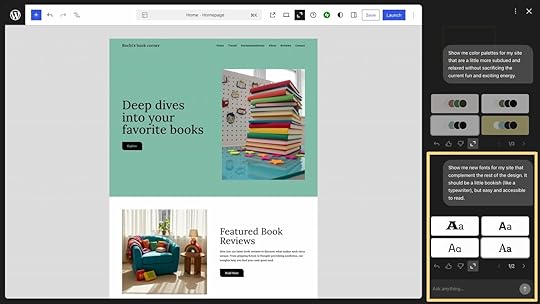
Next, I wanted to see if a different font looked better on the site. I used this prompt to ask the AI to give me options:
“Show me new fonts for my site that complement the rest of the design. It should be a little bookish (like a typewriter), but easy and accessible to read.”
The website builder gave me eight options of font pairs (one font for the header, another for body text) that go together like cookies and milk. I picked the one I liked the most.
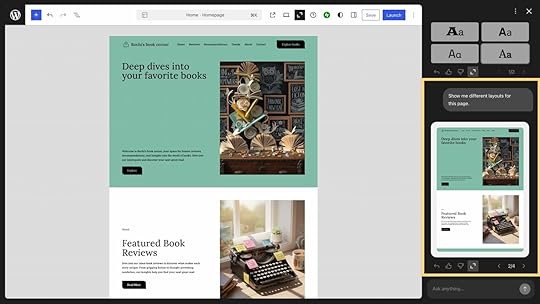
 Change your site’s layout
I also wanted to see if there’s a better way to arrange all of the moving elements of the site on the homepage. I asked AI to show me various layout options using a simple prompt:
“Show me different layouts for this page.”
I ultimately liked the original version best, so I simply clicked the backward arrow, which allowed me to restore my website to its last setting.
AI had several unique options with diverse designs and structures, which will come in handy when I update my site and mix up the appearance a little bit.
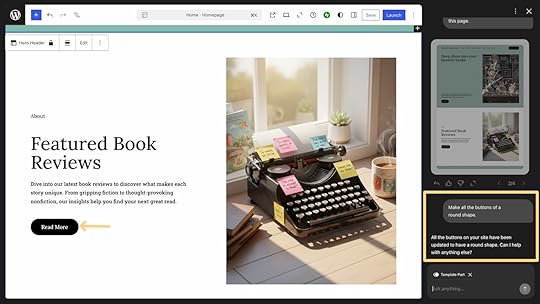
 Change your site’s buttons
Lastly, I wanted all the buttons to be round instead of square or rectangular. So, I gave this prompt:
“Make all the buttons of a round shape.”
AI instantly granted my request, and all the buttons on the whole site were made circular.
Note: Make sure you add the right links to all the call-to-action buttons across your site. You can do this manually or ask AI to link the button back to a specific page on your website.
3. Edit individual sections on your site by customizing WordPress blocksYou can also edit individual sections and WordPress blocks on your site.
Ask AI to add sub-sections, display posts in a different order, rewrite the copy, and even add a brand new section.
Edit a section on your siteI wanted the book reviews section to have different headers and sub-sections. I used the following prompt to accomplish this:
“Edit the “Latest Book Reviews” section. There should be five sub-sections overall: Fiction, Biographies, Self-help, Classics, and Debuts.”
AI reorganized the section based on my input and let me choose the appearance pattern for each sub-section.
 Rewrite the text of your site
In each individual block, you can also manually edit anything you wish.
I find it easier to edit the text manually, but you can also prompt AI to change the tone of any text on your site.
For example, you can use this prompt to make your landing page copy more concise and friendly:
“Rewrite the copy on the homepage to be more concise and friendly. Use short sentences and a welcoming tone.”
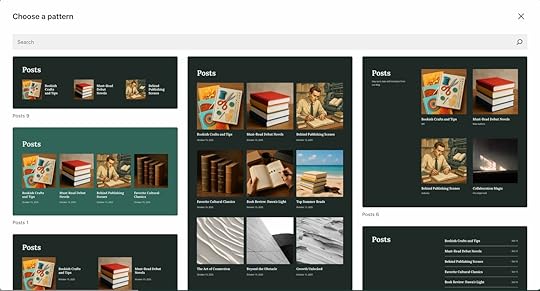
Add a new section to your siteYou can add new sections and pages to your site using the AI website builder.
I wanted to create a separate section for adjacent book-related content, for instance, so this is what I asked it to do:
“Create another section after “Latest Book Reviews” titled “We’ll Talk More Than Just Books.” Include headers with three posts inside them, similar to a sub-section. The sub-headers should be “The Rise of Romance Books,” “Should You Read Books Recommended on BookTok?,” and “The Cult of the Classics.””
The image below is the result generated by the tool.
I also provided specific instructions for each thumbnail so that it accurately reflects the section’s title. Here’s an example of the prompt I gave for the last image:
“Create a thumbnail image for the “The cult of classics” post in the “We’ll talk more than just books” section. This image should have a stack of five books that say “Jane Austen”, “Charlotte Brontë”, “Charles Dickens”, and “Virginia Woolf.”

Note: Select the section or block you want to edit before giving a prompt to the website builder.
4. Update or generate your website images and logosThe AI website builder can also create a logo for your site (if you don’t already have one) and generate images to complement your content.
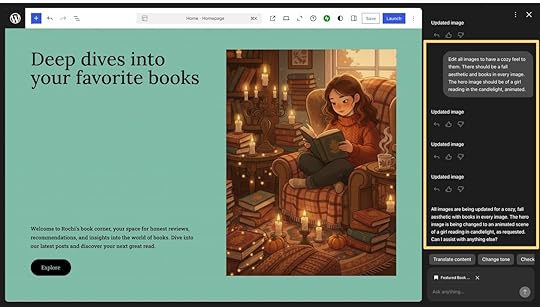
Generate and update imagesYou can add your own images to your site by uploading them. You can also ask AI to generate images for your site.
I prompted the tool to create photos for the whole site that match a specific aesthetic:
“Edit all images to have a cozy feel to them. There should be a fall aesthetic and books in every image. The hero image should be of a girl reading in the candlelight, animated.”
Honestly, I wasn’t sure if the images would be up to par (my experience with AI image generators has not been excellent), but the photos were surprisingly good. No six fingers or freaky joint angles.
 Create a logo for your site
You can also create your site’s logo from scratch.
Here’s the instruction I gave:
“Create a logo for this website. It should say “Rochi’s book corner” inside an open book.”

You can make the guideline more specific for better results and include details regarding the color palette, shape, etc.
Although I have found the tool creates a pretty decent logo on the first try, too.
5. Add social media icons and sign-up forms to your siteIf you’d like to include extra elements — like social media icons, newsletter sign-ups, or contact forms — just ask the website builder to add them.
Add media icons to your siteHere’s the prompt I used to add three social media icons to my site:
“Add social icons to the right side navigation bar with links to Facebook, Instagram, and Pinterest.”
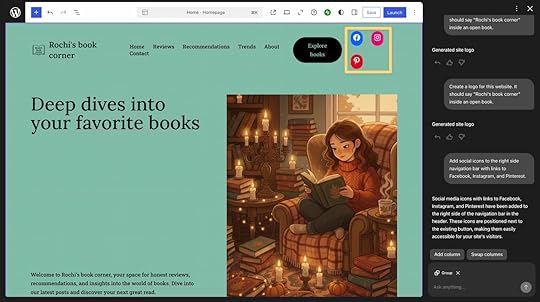
You can also continue prompting and further customize the icons’ appearance and placement on the site.
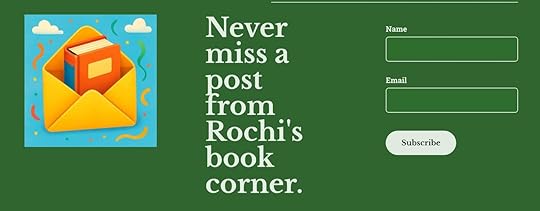
Add a newsletter opt-in for your siteI wanted to add a section on my site where readers can subscribe to my newsletter. I used this prompt to create a simple opt-in form:
“Add a newsletter opt-in form after the “We’ll talk more than just books” section. The form should include two fields: Name and Email, along with the “Subscribe” button. The section’s title should be “Never miss a post from Rochi’s book corner.” Add an image of an email opening up to reveal a book inside to go along with it. The order should be image, header, and opt-in box from left to right.”
Here’s the result:
Note: If you plan to send regular updates, use WordPress.com’s built-in Newsletter feature that lets you turn your posts into emails, customize layouts, and monetize your content without extra tools.
6. Learn how to use WordPressAlthough WordPress is quite intuitive to use, if you face any roadblocks, you can ask the AI website builder how to navigate it.
For example, I was struggling to understand how to create a slideshow for one of my website sections. I asked the tool:
“How can I add a slideshow to the “We talk more than just books” section? It should display the posts on the page “Beyond books.” Give me step-by-step directions.”
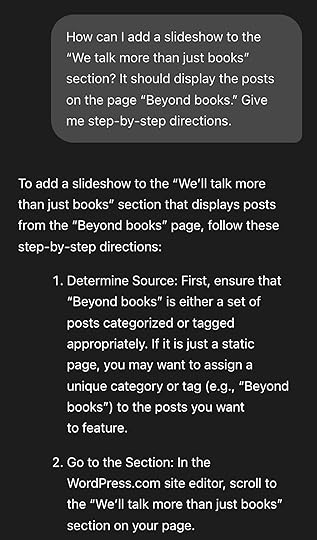
The full response included clear and detailed instructions on how to create the slideshow I wanted.
7. Get ideas to improve your websiteThe AI tool is also great for generating website ideas — you can ask it to improve navigation, suggest new pages, enhance security, or identify missing elements.
Make your site more secureI wanted to know what I can do to improve the security of my site, but I can’t invest in paid tools for this website yet.
Here’s the prompt I used to get some (free) solutions:
“Give me some ideas on how I can improve the security of my website. Don’t recommend any paid tools.”
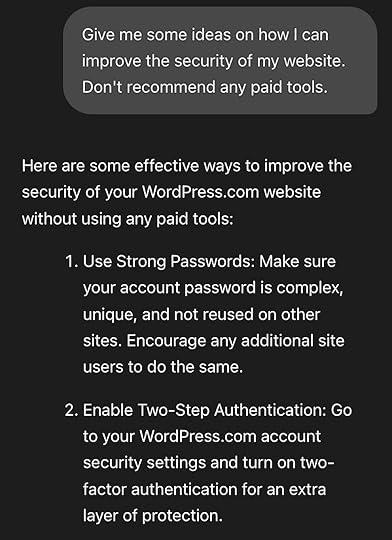
The full list of tips included several suggestions I hadn’t thought of before.
The best part?
The AI tool gives you recommendations tailored to your site’s current setup.
For instance, in my case, it detected that I didn’t have two-factor authentication (2FA) enabled and suggested adding it to improve security.
Brainstorm ideas to improve your siteNext, the AI website builder can provide you with personalized recommendations to improve your site overall.
For instance, I used this prompt to find general big-picture methods to make my site better:
“Suggest some ideas to improve this site. Recommend some additional pages or sections I could add, navigation enhancements, and any other missing elements.”
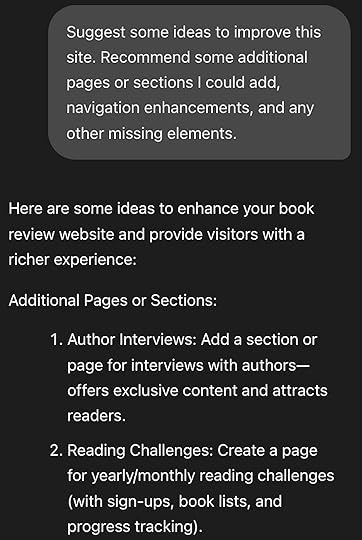
AI provided me with several detailed suggestions to improve my site, including adding social proof, producing author interviews, creating an online book club, launching reading challenges, and more.
The prompt I used was a bit broad, but you can ask AI for more specific queries to help improve your site as well. The tool is able to understand complex instructions.
Hopefully, the examples above give you a sense of what’s possible with WordPress.com’s AI website builder.
This is all really just the start because you can tweak and customize your site in almost any way you like.
There’s one catch, though: Your AI-built website will only be as good as the guidance you provide.
How to write effective prompts in the AI website builder: five pro tipsWhile AI can help you create a website in seconds, you’re still in the driver’s seat.
You have complete control over how you want your site to look and function — it all comes down to how you guide the AI with your prompts.
So here are some pro prompting tips:
1. Be as specific as possibleThe number one tip to prompt better is to provide specific, detailed instructions. Here’s an example:
Less effectiveMore effective“Make the text in this section better.”“Rewrite the text in the “Book Reviews” section to have a more friendly and casual tone.”This also means not relying too heavily on context.
For instance, tell it to “change the About section’s color palette to sky blue,” even if your last prompt was about the same section.
Be specific, and avoid overusing vague pronouns like “this” or “it” in your prompts.
2. Keep refining until you get the resultDon’t lose hope if the first draft of something that AI produces isn’t close to your imagination.
Continue providing more specific instructions until you achieve the desired result.
For instance, if the homepage’s hero image isn’t the right size, prompt the tool to “Make the hero image smaller so the headline stays above the fold.”
Each new prompt helps the AI better understand your vision, so think of it as a back-and-forth process rather than a one-time command.
3. Ask for help beyond website designThe website builder can do a lot more than design your website.
You can ask how to improve your site’s loading speed, get tips on the best security settings, or explore anything else related to your WordPress.com site.
4. Use it in conjunction with the manual editorThe AI website builder is extremely powerful, but you can also edit things manually to customize them to your liking or for convenience.
For instance, I find it easier to add/replace the links of all buttons myself rather than ask AI to do it.
WordPress.com’s Site Editor is just as sleek and smart as the AI tool itself — use it alongside the website builder to make your site exactly as you’ve imagined.
5. Take it one section at a timeSpecific, detailed prompts work great with AI, but only when they focus on a particular section.
Avoid giving multiple directions about different sections on your site simultaneously. Instead, break that request into smaller parts.
For example, instead of asking the tool to “Put the hero image above the headline and make all the buttons on this page blue,” break it down into two steps.
First, ask to resize the hero image. Then, enter the command for changing the color of the buttons.
Start building your WordPress site using these AI promptsWith WordPress.com’s AI website builder, creating your site takes minutes instead of days or weeks.
The prompts in this guide give you a starting point.
The next step is adjusting the details — such as content style, layout, colors, fonts, and everything in between — to match your unique vision.
Remember: Be specific, refine as you go, work on one section at a time, and use AI alongside manual editing for the best results.
Your first iteration might not be perfect, but with just a few tweaks, it’ll be exactly what you need.
Note: Using the AI website builder from WordPress.com enters you into a free trial so you can build your site before purchasing. To publish your site, you’ll need to purchase a Premium or Business plan.
Build your first website with AI

November 6, 2025
How to Build a Multilingual Website on WordPress.com
Have you ever wondered whether having your WordPress website in multiple languages is worth it, and how much effort it actually takes?
During my recent trip to the Netherlands, I found myself navigating local websites for everything from restaurants to train schedules.
As a non-Dutch speaker, it was such a relief when I could switch to English versions without fumbling with translation tools.
That experience reminded me that a multilingual site isn’t just about translating text — it’s about making people feel included and welcome.
As a website owner, offering your content in different languages opens you up to a wider audience and invites more connections, opportunities, and even sales.
If that piques your interest, let’s explore why you should consider a multilingual website and how to create one on WordPress.com.
Benefits of having a multilingual websiteIs my experience in the Netherlands not enough to convince you about turning your website or store into a multilingual one?
That’s okay!
Consider the following benefits you’ll gain if you do it anyway.
1. Sell more to a global audienceHaving a multilingual website instantly expands your customer base beyond local language speakers.
During my time shopping online in the Netherlands, I skipped sites without English versions and gave my business to those that offered language options.
This simple choice applies to all website owners — your potential customers include not only locals, but also expats and tourists who might not speak the local language.
The same applies if you serve customers and ship internationally. It removes purchase barriers, gives you a competitive advantage, and builds trust with your audience.
Why should you create a multilingual website when visitors can use their browser to automatically translate? Your visitors may have Google or other forms of translation built into their browsers, but not everyone has the plugins, and they’re not always reliable. You risk losing potential customers or readers simply because their browser failed to translate, or the translation wasn’t accurate. Besides, all areas of your website may not function properly when an extension takes over. That’s why it’s always better to offer multiple languages instead of relying on browser tools.
2. Share your passion with a wider communityA multilingual blog increases your potential readership and community engagement.
If you’re blogging about news, crafts, technology, or something you’re passionate about, it’s second nature to stick to the language you speak.
Adding another language version, however, opens doors to entirely new communities.
This is especially true if you currently write in a language other than English.
Since the internet is global and language reaches across borders, offering English versions of your posts means someone from another corner of the world might discover your content and become a follower.
Sounds far-fetched? It really isn’t.
That’s exactly why I started blogging in English alongside my native language back in 2008.
Have I met people from all over the world? I most certainly have.
That’s why I recommend considering going global, even if you’re primarily writing for yourself.
3. Rank in local search results in different regionsMultilingual content also improves your search visibility in different regions.
When I was Googling in the Netherlands, most search results appeared in Dutch — including links to Dutch websites, even when those websites had an English version available.
This was clear proof that if you want to reach people in a particular region, there’s no better way than to write in their language.
By doing so, you allow search engines like Google to index your content in that language, giving your website an SEO boost.
So, when your target audience searches for something, your website has a higher chance of showing up rather than getting lost in the digital void.
Will a multilingual website really help you get more sales and traffic? In many cases, yes! Remember when I chose one website over another for shopping online simply because it was offered in a language I understood? This behavior is more common than you think.
How to create multilingual websitesNow that you know you may be leaving traffic (and money) on the table by not offering your website in more languages, your next question is likely: How do I create a multilingual website?
Let me share three different ways you can create a multilingual website (or turn your existing website into one).
Each option has its pros and cons, which I’ll explain.
Tip: Did you know you can translate the content of your posts and pages using our built-in AI Assistant? Click here to find out!
Option 1: Create multiple websites for each languageThis is exactly what it sounds like: You create different websites for each language you want to offer. While it requires some effort, the payoff is definitely worth it!
This approach is best suited for:
Large-scale business and organization websitesMultinational companies that operate in different countriesBenefits:
Each website can have its own content and design language.You can optimize each website separately for maximum SEO benefits.It’s much easier to tailor the tone, voice, and overall design of each version of your website while keeping true to your brand.Drawbacks:
A little more time and effort are required to manage and update multiple websites, especially for online stores with frequent product updates.This approach involves higher costs.It can be harder to maintain brand consistency across all versions of the website and benefit from the existing authority of your original site.How to create multiple sites on WordPress.comThe best part: You can easily create multiple websites using the same WordPress.com account.
Whether you have different websites or the same one in multiple languages, you can have all of them in the same account, saving you from the hassle of having to log in separately to each site.
1. Create or copy an existing website.
If you’re using plans like Free, Personal, and Premium, click here and start creating a new website.
Or, if you have the Business plan or higher, use our Copy a site feature to effortlessly copy your entire site into a brand new one.
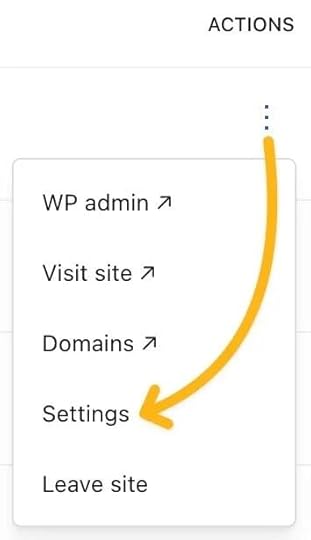
Click the W logo at the top left of your screen to see your Sites.
Then, click the three dots next to the website you wish to copy and click Settings.
Scroll down to the “Actions” section and click the “Duplicate” button.
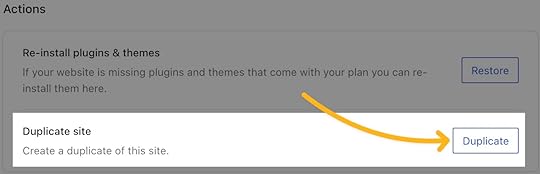 Screenshot
Next, give your new website a domain name.
You can opt for a completely different domain name, like my-website.com on the primary website and mon-site.com for the French version.
Or you can use a subdomain like fr.my-website.com to keep all versions of the website on the same domain name.
Not ready to set a domain name yet? No worries! You can type a name for your new website and pick the free address option that will appear in the list.
Then, choose a WordPress.com plan for your new website.
Not sure which plan is right for you? Check out our plans and pricing to learn more.

In most cases, you can purchase the same plan you have on your primary website for your localized ones.
For example, if you have the WordPress.com Business plan on your main site, you can choose the Business plan for the other version, too.
Keep in mind that each website will need to have its own plan.
2. Sit back and wait
You’ll see a progress bar as our system starts copying your website.

This means you can safely navigate away from the screen.
We’ll email you once your new website is ready.
You can then edit the content and translate it as needed.
Option 2: Publish multiple versions on the same siteIf you’d like to stick to a single website while offering your content in multiple languages, you’re not out of luck!
With a bit of planning and organizing, you can have multiple versions of the same posts and pages on the same website.
This approach is best suited for:
Personal and company blogsLocal businessesBenefits:
It’s relatively straightforward to set up — you won’t have to manage multiple websites.You’ll be able to use one dashboard to manage all of your website’s content.Perfect for growing blogs and small, information-oriented websites.Drawbacks:
Pages can look cluttered if multiple versions are in the same place.The audience of one language may unintentionally land on a page written in a different language, causing confusion.Search engines may struggle to recommend your website to a specific audience, especially if they detect multiple languages on the same page.How to implement this approach on WordPress.comIf this option best suits your needs, I recommend creating different pages and posts for each language rather than adding all translated copies on the same page.
This provides a better user experience with clear separation between languages.
When readers land on your website, they can continue reading content in their chosen language. You can add internal links to other posts written in the same language, reducing the “bounce rate” and keeping visitors on your website longer.
For navigation between languages, add a language switcher to your menu. For example:

Although language switchers work best with third-party plugins (more on this in Option 3), you can create a simple version by:
Creating multiple pages in different languages (including separate homepages)Adding links in your menu to the corresponding pages in other languagesThis way, visitors can easily switch between language versions of your site while maintaining a clean, organized structure.
Option 3: Use a multilingual pluginUsing a plugin (developed by third-party developers) can be a fantastic choice if you want to have your website in different languages without having to show different versions on the same page.
One of the most popular plugins for creating a multilingual website in WordPress is Polylang.
It lets you create multiple versions of every post and page, as well as add a language switcher to the navigation menu of your website, so that visitors can choose their language and see all content in their selected language.
This approach is best suited for:
Ecommerce websites that manage stocks of their productsProfessional websites that need content in multiple languagesContent-heavy sites with lots of pages to translateBenefits:
Visitors can switch languages easily with a toggle or menu.Strong SEO support. Plugins help Google index each language separately.You keep one single website, but with structured management for translations.Good scalability for larger sites or businesses.Drawbacks:
Initial setup can take a bit of time.Some plugins are premium (extra cost).Needs a consistent translation workflow to avoid confusion.How to implement this approach on WordPress.comEach multilingual plugin has its own specific setup process and guidelines.
For example, if you choose to use Polylang, you’d follow their documentation for the most up-to-date instructions.
I’d suggest checking out the Polylang plugin description to get started. You can also browse other multilingual plugins for your website.
Bonus: Use our AI Assistant to translate your posts and pagesI know you’re wondering, so I figured, why not sprinkle it in, too!
If you have an existing website, getting help from AI can be the fastest way to translate all the content into a new language.
The methods I mentioned above are all for creating different versions of your website in multiple languages.
You still have to manually translate the content.
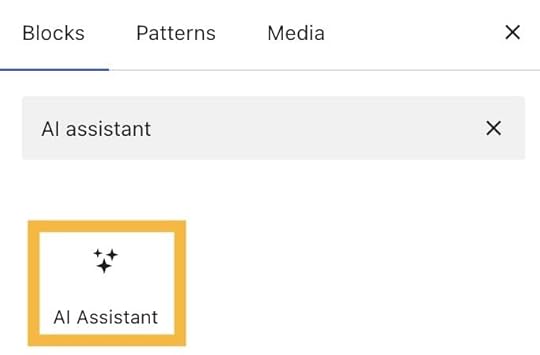
However, you can use our AI Assistant block to complete this task.
One of the coolest things it can do is it can access the content of the entire page you’re editing.
So, if you open up one of the pages that was written in English, you can insert the AI Assistant block at the top or bottom of your page and ask it to translate the content automatically for you.
For example, I used the following prompt: “Translate this page into Spanish.”

In seconds, you’ll get your copy translated and optimized.
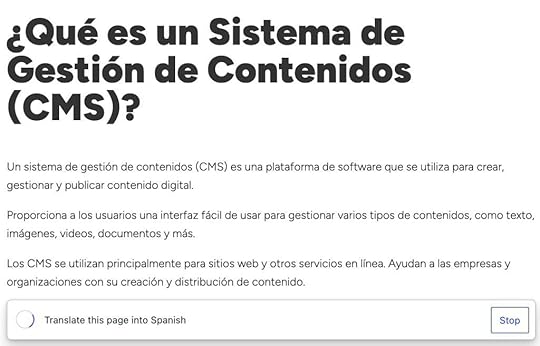
Once the AI Assistant block has finished generating the content, click the “Accept” button to insert it into the editor.

You can then add a separator or simply copy the translated version and paste it into the other page.
As you can see, the AI Assistant block is a powerful tool to speed up the translation process for your website.
However, for accuracy, I’d still recommend performing a human review, especially if you have a business website.
Ready to reach new audiences with your multilingual site?The bottom line is: Going multilingual with your online store, hobby blog, or professional website doesn’t have to be overwhelming.
Since WordPress.com gives you the flexibility to choose, pick the right method based on your time commitment, goals, budget, and audience.
Are you still in doubt about going multilingual with your WordPress.com website?
Let us know what kind of website it is and what’s preventing you from offering it in more languages in the comments below.
For WordPress.com websites on a paid plan, you can also reach our support team to discuss your multilingual needs directly.
We’re ready to help you choose the right method!
Build my website nowNovember 5, 2025
Let’s Grow Together: Introducing Recommended Blogs
Building an audience is one of the most challenging aspects of creating online content.
You pour your energy into writing, publishing, and refining your work, but finding readers who genuinely connect with what you create takes time and effort.
What if your readers could help your blog grow? What if the writers you love could introduce their audience to yours?
That’s the idea behind recommended blogs, a feature now available in the WordPress.com Reader that lets you share the blogs you enjoy most with your own audience.
Where to see recommended blogs in the ReaderWhen you find a blog you genuinely enjoy, you can add it to your personal recommendations list.
Your subscribers and readers can then see these recommendations when they visit your profile in the Reader or hover over your gravatar anywhere in the Reader.
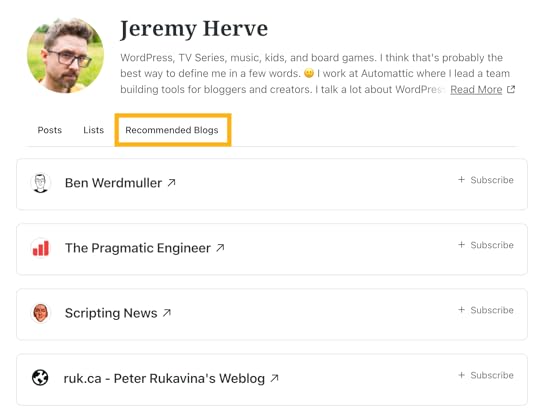 Recommended blogs on the Reader user profile
This creates a network effect — bloggers recommending other bloggers, helping each other discover new audiences authentically.
Rather than relying solely on algorithms or paid promotion, you can grow through the trust of fellow creators.
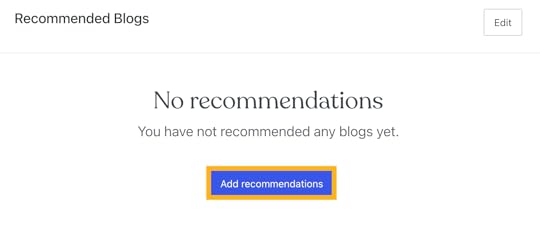
How to recommend a blogThere are several ways to recommend a blog.
First, you can add or edit your recommendations in the Reader by visiting Lists > Recommended Blogs.
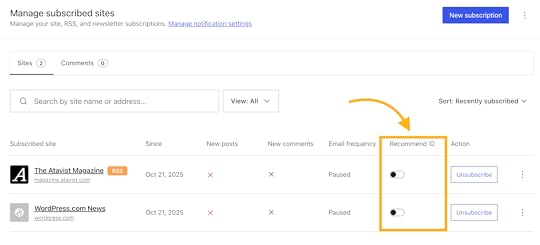
Alternatively, visit your Subscriptions page in the Reader and recommend a blog using the Recommend toggle.
Or, use the “Recommend this blog” button that appears on the blog page in the Reader.
You can recommend any blog shown in the Reader and update your recs as your interests evolve.
This includes blogs on WordPress.com, Jetpack, or any blog with an RSS feed.
If someone recommends your blog, you’ll receive a notification — a small reminder that your work is resonating with other creators.
Connect with creators who inspire youIf you haven’t spent much time with the Reader, it’s the place where you can discover new blogs, follow your favorites, and engage with people from across the WordPress.com community.
You’ll find personalized streams of posts from sites you subscribe to, can browse by topic, and interact with other creators.
It’s designed to help you stay connected to the sites you care about while discovering new voices that align with your interests.
Unlike sites that feel like social media, the Reader is built to be a calm platform where you can read what you like and find a community with similar interests.
Time to hand out the recsReady to make a recommendation? Visit the Reader and share the blogs you love with your followers.
We’re continuing to refine how recommended blogs work based on your feedback.
It’s all about building a network where creators support each other’s growth, one thoughtful recommendation at a time.
Visit the ReaderNovember 3, 2025
How to Use WP-CLI to Manage WordPress Sites More Efficiently
WordPress has a user-friendly graphical interface that makes site management simple.
But did you know there’s another way to run your website?
Meet WP-CLI, the WordPress Command Line Interface. It does everything WP Admin can, plus more.
You can use it to interact with your site through the command line in a terminal, which can actually save you a lot of time — whether you’re managing content, plugins, themes, users, or anything else.
In this guide, we’ll cover what WP-CLI is and share some useful commands to help you get up to speed.
Whether your site’s hosted by WordPress.com or another provider, WP-CLI could be the skill upgrade you’re looking for to make managing sites more efficient and flexible.
What is WP-CLI?WP-CLI is the official command-line interface for WordPress. It’s been built to help developers manage their sites more quickly and flexibly.
Instead of managing a site through the graphical WP Admin interface in a browser, WP-CLI lets you run powerful commands from your choice of terminal software.
For example, with commands, you can:
Install a list of plugins on a siteAssign multiple posts to a different userCreate new usersDelete all spam comments.You can even create a new WordPress installation, switch to a different version of WordPress core, and search for and replace strings in the database — things you can’t do from WP Admin.
The story behind WP-CLIWP-CLI is an open-source project, just like WordPress itself.
It was originally created by Andreas Creten, Cristi Burcă, and former Automattician Daniel Bachhuber, and is now maintained by Alain Schlesser with contributions from developers all over the world.
To ensure compatibility with the latest versions of WordPress, WP-CLI follows a regular release cycle. Updates are usually rolled out every three to four months and include new commands and improved performance.
At its core, WP-CLI aims to make WordPress more developer-friendly.
Once you get comfortable with it, you can manage one or many sites more efficiently — and even automate tasks you’d never be able to in WP Admin.
How to install WP-CLISome web hosts include WP-CLI by default — and WordPress.com is one of them.
To use WP-CLI on WordPress.com, your site needs to be on the Business or Commerce plan.
First, make sure you have SSH access to the server where WordPress is installed.
To check if WP-CLI is installed, try running a version check by entering the following command:
wp cli versionIf WP-CLI is installed, you’ll see something like:
WP-CLI 2.12.0If not, you’ll get a message such as:
command not found: wpIf WP-CLI isn’t installed yet, follow these installation instructions.
Why use WP-CLI?The main reasons to use WP-CLI over WP Admin are the efficiency and access advantages.
It lets you:
Execute commands in seconds instead of clicking through multiple screens in WP Admin, saving time when setting up new sites or managing existing ones.Keep working even if a problem prevents you from accessing WP Admin — for example, a plugin conflict. In those cases, WP-CLI lets you disable plugins, create user accounts, and update WordPress core, all without using WP Admin.Perform tasks that WP Admin doesn’t allow without installing extra plugins, such as interacting with the database or running bulk actions like installing and activating multiple themes or plugins with one command, generating dummy content, rolling back WordPress core or plugin versions, and managing multiple sites on the same server from a single command.Combine WP-CLI commands into chains or scripts to automate entire workflows — for example, setting up a new site, configuring settings, creating user accounts, installing plugins, and generating dummy content, all from one script.Sure, you need to learn a new way of working with WordPress to get the full benefits of WP-CLI.
However, it doesn’t take long to get familiar with this approach, and once you are, you’ll be working much more efficiently.
If your site is hosted on the WordPress.com Business or Commerce plan, you can use WP-CLI plus get access to a few WordPress.com-only commands, some of which we cover later in this guide.
The best part? As WP-CLI was built for developers, you get a lot of freedom in how you use it.
Examples of common WP-CLI commands and what you can do with themLet’s go over some examples of common commands and why you might want to use them.
Before we get to the examples, it’s worth taking a look at the format of the commands.
WP-CLI commands generally follow this structure:
wp [arguments] [--flags] [--flag=value]Every command starts with wp, which tells the shell you’re running a WP-CLI command. wp is then followed by a command and often a subcommand.
Examples include plugin and list — the command for listing all the plugins installed on the site:
wp plugin list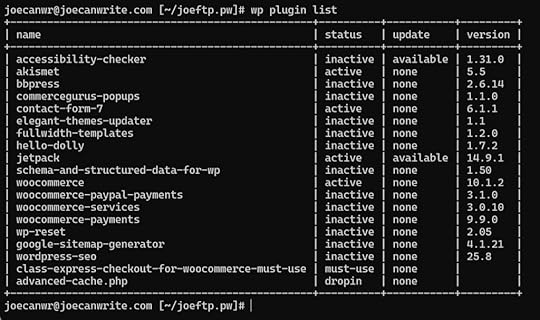
The commands can also include arguments, such as:
wp plugin update hello-dollyThis command updates the hello-dolly plugin (if an update is available).
Flags can also be added to commands. They start with — and either toggle options or pass a value to the command.
For example, when adding the –status=active flag to the wp plugin list command, it will only list the active plugins on the site:
wp plugin list --status=active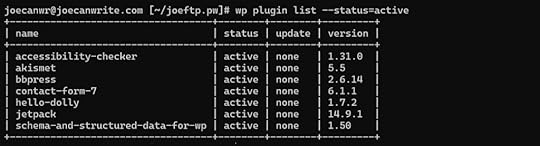
You can also chain commands together using &&, such as:
wp plugin install contact-form-7 --activate && wp plugin install akismet --activate && wp theme install twentytwentyfive --activateThis command installs and activates the Contact Form 7 and Akismet plugins, along with the Twenty Twenty-Five theme.
You can add –help to any command to view its subcommands, flags, and other information in WP-CLI.
For example:
wp plugin --helpwp plugin list --helpAs we go through the examples, you’ll get a better idea of how WP-CLI commands are structured.
You can use WP-CLI through terminal software, including the free Windows Terminal and macOS Terminal apps.
You can also use loops and Bash scripts with WP-CLI to build more advanced, automated workflows — performing bulk updates, managing multiple sites, and streamlining complex WordPress maintenance tasks with a single command.
How to manage WordPress plugins with WP-CLIwp plugin is a handy command for interacting with plugins on a site via WP-CLI.
It lets you install, update, and delete plugins using commands rather than navigating multiple steps in WP Admin — and saves you a lot of time.
For example, if you often set up new sites and have a list of plugins from the WordPress.org Plugin Directory that you always install, you can achieve this with a single time-saving command.
You can also easily update plugins you’ve installed from the WordPress.org Plugin Directory from the command line. Switching to different versions of a plugin, including older versions, from the command line is straightforward, too.
Finally, you can install and update plugins from other sources using WP-CLI. This won’t work for all plugins, as you’ll need to enter their URL, and WP-CLI must be able to access the ZIP file. However, if the files are accessible, then you should be able to install them.
Let’s have a look at some of the most useful wp plugin commands.
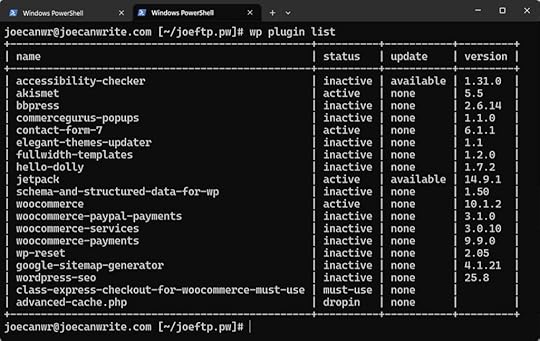
wp plugin listUse the following command to see which plugins are installed on the site:
wp plugin list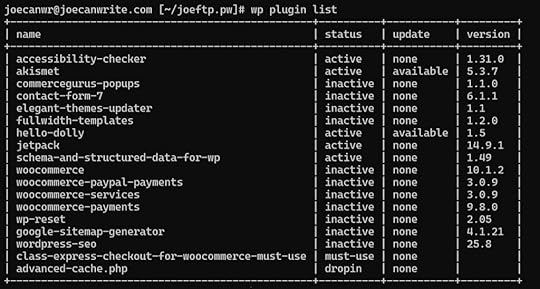
This command not only lists all the plugins installed on the site, but also displays their status, version number, and whether an update is available.
You can add flags to the wp plugin list command to modify what it returns, such as:
wp plugin list --update=availableThis command will only list the plugins that have an update available.
You can see all the flags available for a specific command by adding the –help flag to it.
For example:
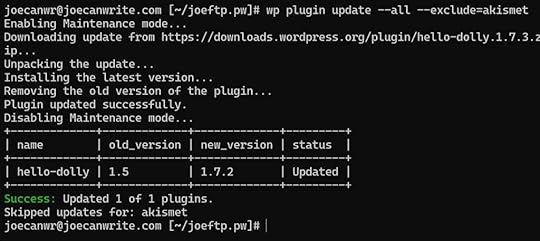
wp plugin list --helpwp plugin updateIf the site you’re working on has plugins installed that are hosted in the WordPress.org Plugin Directory and have an update available, they can be updated using the following command:
wp plugin update --allYou can exclude plugins from the update by using the –exclude flag:
wp plugin update --all --exclude=akismetExcluding a plugin can be useful if you haven’t tested the latest version of a plugin and don’t want to install it.
As you can see below, all plugins have been updated, except for Akismet, as requested.
 wp plugin install
WP-CLI can be used to install plugins hosted in the WordPress.org Plugin Directory.
You can also install plugins by entering the path to a local zip file or a URL to a remote zip file.
To install one or more plugins from the WordPress.org Plugin Directory, use the following command appended by the name of the plugin(s):
wp plugin installFor example, to install BuddyPress and Contact Form 7, enter:
wp plugin install bbpress contact-form-7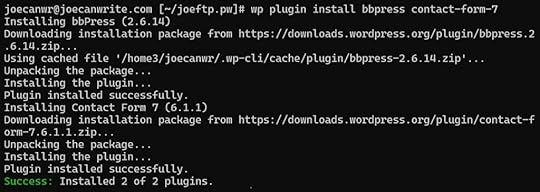
When entering the name of the plugin, you must use the plugin’s slug in the WordPress.org Plugin Directory.
To find the plugin’s slug, visit the plugin page in the WordPress.org Plugin Directory and locate the slug in the URL:
Image: WP-CLI-slug-example-oneIf you’d like the plugins also to be activated after installation, add the –activate flag to the end of the command:
wp plugin install bbpress contact-form-7 --activateYou can find more information about installing plugins, including instructions on how to install plugins not listed in the WordPress Plugin Directory, on the wp plugin install page of the WordPress Developer Resources site.
wp plugin deactivateYou can also deactivate one or more plugins from the command line.
This can be especially useful if the site has become unresponsive due to a plugin-related issue that’s preventing you from accessing WP Admin and deactivating the plugin via the browser.
Some of your options for deactivating plugins include deactivating a specific plugin by name, using the –all flag to deactivate all plugins, and deactivating all plugins except for specific ones.
For example, to deactivate a specific plugin, use the following command:
wp plugin deactivate akismetTo deactivate all plugins, use this command:
wp plugin deactivate --allTo deactivate all plugins except for specific plugins, use the following command:
wp plugin deactivate --all --exclude=akismet,hello-dollyYou can view the other options in the wp plugin deactivate command documentation, and for more plugin-related commands, view the wp plugin command documentation.
How to manage WordPress posts using WP-CLIYou can also work with posts and pages using WP-CLI.
wp post listFirst up, you can quickly get a list of all posts on a site using the following command:
wp post list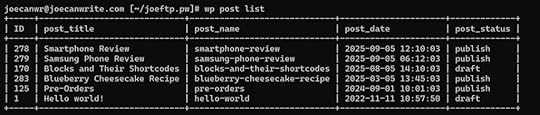
To see a list of pages, add this flag to the command:
wp post list --post_type=pageYou can see a list of posts and pages using this command:
wp post list --post_type=page, postThe wp post list page of the WordPress Developer Handbook provides more information about retrieving lists of posts.
wp post createAs you might expect, the wp post create command lets you create posts and pages with WP-CLI.
If you regularly set up new sites that include the same set of pages, such as about, contact, and services pages, you can quickly create those pages using a single command.
For example, the following command will create a post with the title “Created Using WP-CLI.”
wp post create --post_title="Created Using WP-CLI"To create more than one post, you can chain multiple commands together using &&:
wp post create --post_type=page --post_status=publish --post_title='Home' && wp post create --post_type=page --post_status=publish --post_title='About' && wp post create --post_type=page --post_status=publish --post_title='Contact'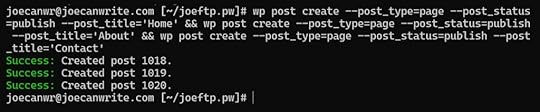
By default, new posts are saved as drafts.
However, you can change this by using the –post_status= flag and adding a command, such as publish, draft, or pending.
For example, to create a new post with the title “Created Using WP-CLI” with its status set to published, use the following command:
wp post create --post_title="Created Using WP-CLI" --post_status=publishYou can also add content to the post, assign an author, set the publish date, and more by using the appropriate flags.
More information about the wp post create command can be found in the WP-CLI documentation.
wp post generateIf you’re starting a new site and want to populate it with placeholder content, then the wp post generate command will come in handy.
This command is deal for creating test content for a new site design or populating a site with thousands of posts to test performance.
It creates multiple posts with a single command.

Like with other commands, you can add flags to the wp post generate command.
wp post generate --count=10Other flags that can be used with wp post generate include: –post_type=, –post_status=, –-post_author=, and –post_date=.
For example:
wp post generate --count=10 --post_type=page --post_status=draft --post_author=1 --post_date="2025-01-15 12:15:00"The above command will create 10 draft pages by the author with ID 1 with the creation date and time set to January 15, 2025, 12:15 pm.
You can find out more about the wp post generate command in the WordPress Developer Handbook.
wp post updateYou can also update or change existing posts using WP-CLI.
The wp post update command flags let you update the title, body, excerpt, publish date, status, and author.
As you can update multiple posts at once, this command is useful for changing the status for multiple posts from published to draft or assigning a different user as the author.
When updating multiple posts with a single command, you must refer to the posts using their ID. To see the IDs for each post, use this command:
wp post listOnce you have the IDs for each post you want to update, you can refer to them in the command, separated by a space.
Here’s an example of a wp post update command that updates multiple posts:
wp post update 1 125 283 --post_author=2This command changes the author of the posts with IDs 1, 125, and 283 to the user with ID 2.

(To view the list of users and their IDs, use the wp user list command.)
To build upon that command, if you wanted to change the author of all posts by a specific author to a different author, you could use this command:
wp post update $(wp post list --author=1 --format=ids) --post_author=2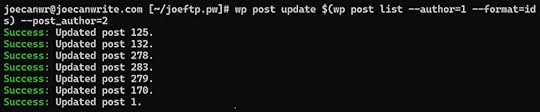
This command retrieves a list of all posts authored by the author with author ID 1, then updates or changes them so that the author is now the one with ID 2.
You could use the same approach to change the status of all published posts to draft by using this command:
wp post update $(wp post list --post_status=publish --format=ids) --post_status=draftYou can see what else is possible with this command on the wp post update page of the WP-CLI documentation.
wp post deleteDeleting posts is another task that you can carry out with WP-CLI.
Again, the post IDs are used when specifying which post(s) to delete:
wp post delete 649To delete multiple posts, separate the IDs with a space:
wp post delete 649 300 150By default, posts are moved to the trash. However, you can use the –force flag to skip the trash folder and delete the post:
wp post delete 648 --forceIf you want to delete all pages, you can use the following command:
wp post delete $(wp post list --post_type=page --format=ids)
This command deletes all posts by a specific user:
wp post delete $(wp post list --post_author=2 --format=ids)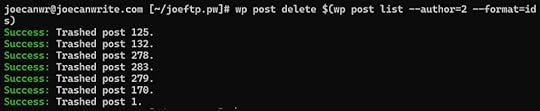 How to manage WordPress themes with WP-CLI
The wp theme commands also let you carry out several theme-related tasks on a site.
wp theme listTo quickly view a list of all themes on the site, along with their status, whether an update is available, and the version number, enter the following command:
wp theme list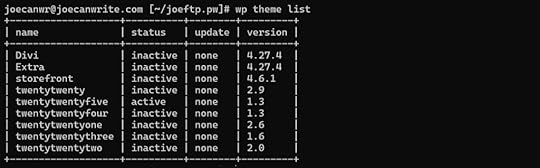 wp theme activate
You can activate a specific installed theme using the following command:
wp theme activate twentytwenty wp theme install
Like plugins, you can install themes from the command line.
If you want to install a theme from the WordPress Theme Directory, you’ll need to use its slug.
Like plugins, the slug is in the URL of the theme’s page in the WordPress Theme Directory.
For example, if you want to install the Hello Biz theme, you need to enter its name as hello-biz based on its slug.
wp theme install hello-biz
If you want to activate the theme after installing it, add the –activate flag:
wp theme install hello-biz --activatewp theme updateA single command can update all of the themes that have an available update:
wp theme update --allYou can also exclude themes from the update by using the –exclude flag:
wp theme update --all --exclude=twentytwentyHow to manage WordPress comments with WP-CLIBesides, the wp comment command gives you a quick way to view and delete spam comments on the site, as well as interact with comments in other ways.
You can see the comments on a site by using the following command:
wp comment listHowever, this doesn’t always include spam comments in the list. To see spam comments, use this command:
wp comment list --status=spamThen, to delete the spam comments, use the wp comment delete command with the wp comment list command:
wp comment delete $(wp comment list --status=spam --format=ids)The above are just a few examples of how you can use WP-CLI to interact with your WordPress site outside of the WP Admin interface.
Hopefully, this has inspired you to start interacting with WordPress from the command line.
For more information on using WP-CLI, check out the complete list of commands in the documentation.
Cool WordPress.com-specific WP-CLI commandsWP-CLI is included with the WordPress.com Business and Commerce hosting plans.
Some core commands aren’t supported, but there are a few others that are exclusive to WordPress.com sites.
1. wp –helpTo see exactly what’s available on the WordPress.com Business and Commerce hosting plans, enter the following command:
wp --helpDoing so will reveal all of the WP-CLI commands available to your site based on your plan.
2. wp wpcomsh diagwpcomsh is a WordPress.com-specific command that includes several useful subcommands for managing your site.
One such command is wp wpcomsh diag.
This command runs site diagnostics tests and outputs the results, including the status of plugins, accounts with administrator access, details of active WordPress.com hosting plans and services, critical PHP errors, and more.
It’s a quick and easy way to get a detailed overview of a site’s status.
3. wp wpcomsh pluginThe wp wpcomsh plugin command lets you switch between using the WordPress.com-optimized version of a plugin and the standard WordPress.org version.
For example, if you use the command:
wp wpcomsh plugin use-managed woocommerceThe site will start using the WordPress.com-optimized version of the WooCommerce plugin rather than the version available from the WordPress.org Plugin Directory.
You might want to use this command if you’re setting up a new site that needs to be identical to an existing site and is using a specific version of a plugin.
4. wp wpcomsh plugin-danceIf there are errors on the site, the following command disables all plugins and enables them one by one to check if a specific plugin is causing the issue:
wp wpcomsh plugin-danceYou can also manage Jetpack and WooCommerce via WP-CLI.
For more WordPress.com-specific WP-CLI commands, check out the complete list in the WordPress.com Developer documentation.
As you can see, being able to use WP-CLI is another reason why WordPress.com isn’t just for hosting simple blogs; it’s a developer-friendly platform with advanced tooling.
Learn more about WP-CLIThere’s a lot more you can do with WP-CLI, from checking out the full list of commands to creating your own custom commands.
You can also create Bash scripts that contain multiple WP-CLI commands. Then, instead of running each command individually, you can run the entire script at once.
For example, you could create a Bash script called update.sh that includes WP-CLI commands to update all plugins and themes:
wp plugin update --allwp theme update --allYou can then run the script with ./update.sh. The script’s contents will execute, which in this case, will update the themes and plugins on the site.
That’s just a sample of what’s possible with WP-CLI. To learn more, refer to the online handbook.
Ready to start using WP-CLI?WP-CLI is a great tool for developers and site owners who want more control over their site while spending less time clicking around in WP Admin.
The biggest hurdle to getting started is usually a mental one.
In most cases, opening your terminal software and logging in for the first time takes only a few minutes. After that, you’ll have a faster, more efficient way to manage your site.
Beyond its speed and efficiency, WP-CLI offers other practical advantages.
You can deactivate plugins and themes, toggle settings when WP Admin is inaccessible, and even generate dummy content with a single command.
To try it out, sign up for the Business or Commerce plan on WordPress.com.
Another useful tool to explore is WordPress Studio, a free open-source desktop app from WordPress.com for building local WordPress sites. In addition to letting you spin up sites in seconds, sync with WordPress.com or Pressable, and import any WordPress site to work on locally, it gives you a quick, easy way to try out WP-CLI in a safe environment.
October 28, 2025
11 Delicious Food Blog Examples (And How to Follow Their Lead)
When it comes to starting a food blog, there are lots of decisions to make.
The good news is that you don’t need to start completely from scratch: just like with recipes, it’s completely natural to browse other blogs for ideas, fork what’s working, and add your own unique spin for a blog that perfectly matches your tastes.
In that spirit, we’ve compiled a list of 11 unique food blogs to help you get cooking on your very own food blog.
Many of these blogs use affordable .blog domains, which are managed by WordPress.com’s parent company, Automattic. You can buy .blog domains from other providers. But they are still managed right here by our team, so we recommend you buy your .blog at the source to avoid upcharges!
Find my .blog1. Vegan Bunny Elle Theme: Bain Marie
Vegan Bunny Elle is a blog dedicated to fun, plant-based recipes.
Elle describes her site as “joyful, colorful, and wholesome,” leaning into bright, colorful recipes set against neutral backdrops.
In addition to providing recipe blocks, key notes, and lots of close-ups of her creations, Elle also embeds short-form YouTube videos so that you can see her cooking (and eating!) in action.

Elle organizes her recipes both by course (breakfast, lunch, dinner, and dessert) and by staple ingredients like rice, beans, and noodles, giving readers multiple ways to search her collection.
We also love that Elle includes a section for vegan basics, with easy recipes and directions for reusable vegan recipe staples like vegan cheeses, mayos, and eggs.
 Take a page from Elle’s cookbookDivide your content into categories: Follow Elle’s lead and create relevant categories for your site. Like Elle, take some time to consider what overarching categories will be most relevant across your recipes and content.Include videos: A photo is worth a thousand words, but when it comes to cooking, a video can be especially helpful. You can upload video content and embed YouTube and Vimeo videos directly on your WordPress site. Or, if you are on the Premium plan and above, you can host 4K videos directly on WordPress. Get this theme: Love Elle’s look? This website uses the Bain Marie theme, a theme created by WordPress.com developers specifically for food blogs. Check out WordPress.com’s huge library of food themes, available to all WordPress.com users on the Personal plan and above, or use a third-party theme on the WordPress.com Business plan and above. 2. Cuisine Helvetica
 Theme: Puzzle
Cuisine Helvetica celebrates Swiss food in all its forms.
Heddi is an American expat who has been living in Switzerland since 2012. In addition to Swiss recipes you can cook at home, Heddi also includes dining recommendations and upcoming food events for those looking to travel to and eat their way through Switzerland.
Since launching her blog, Heddi has released three Swiss cookbooks on bread, desserts, and suppers.
 Take a page from Heddi’s cookbookEngage your readers through comments: At the end of each post, Heddi encourages readers to reach out with their thoughts or personal favorite restaurants in a comment or via email. Enabling commenting and posing direct questions to your readers can help you build an active and dedicated community.Build your professional portfolio: If you are a professional chef or recipe developer, your blog can act as a digital resume. Alongside recipes and reviews, Heddi has a page with a list of her awards, media spotlights, and publications.3. A Hundred Years AgoTheme: Custom
A Hundred Years Ago is a unique project bringing recipes from the early 1900s to modern cooks.
Each week, Sheryl photocopies a “new” 100-year-old recipe from an old cookbook and discusses terms and verbiage that may be unfamiliar today.
At the bottom of each post, she translates the original recipe into a modernized version for today’s chefs.
 Take a page from Sheryl’s cookbookMake something old new again: Part of what makes A Hundred Years Ago so successful is that it archives and digitizes recipes and cookbooks that are likely not online elsewhere. An archival focus can help your blog stand out in this highly digitized space and guide content creation. Keep a content schedule: Posting on a regular cadence can help keep your audience engaged and keep you accountable. For example, in addition to a weekly recipe every Sunday, Sheryl posts more general musings about food from the early 1900s each Thursday.4. The Running Chef
 Theme: Gourmetto
The Running Chef is a UK blog creating recipes specifically for runners.
The blog’s writer, Glenn, is a professional chef and passionate runner with a background in sports science.
In addition to sharing recipes, Glenn digs in on specific ingredients, exploring what makes certain ingredients ideal nutrient blends for runners.
In each recipe, he breaks down the ingredients and shows how he swaps traditional ones for more nutritious options.
Between recipes, Glenn also diaries his own running experiences, from his first half-marathon to running home after work.
 Take a page from Glenn’s cookbookBring in your professional expertise: Glenn’s background in sports science and 10 years of restaurant experience set his food blog apart from typical recipe sites. Consider how your own professional expertise or education might inform your content in unexpected ways.Combine passions: Don’t be afraid to merge seemingly unrelated interests. Glenn’s fusion of running and cooking creates a unique niche that attracts readers interested in fueling for distance. Think about how your own hobbies or interests might help you design unique recipe collections.5. Bread.blogTheme: Huntt
Professional baker Karen Man’s Bread.blog is an ode to breadmaking and bread eating.
This blog only has a small collection of staple recipes, and Man notes the site is not to be a recipe center, but rather “to give pause and allow for space to lead from your own intuition.”
Bread.blog is a quirky collection, focusing on both aspects of the craft alongside bread-related musings, photos, and even a few Spotify playlists like this one.
While Bread.blog is text-heavy, Man mixes whimsy and mindfulness into her posts, reminding readers to breathe and set intentions as they start the journey of breadmaking.
 Take a page from Bread.blog’s cookbookPick a hyper-specific niche: Part of what makes Bread.blog’s variety of posts cohesive is its hyperfocus: the unique combination of “bread+mindfulness” and Man’s engaging writing style makes this seemingly random group of posts (a picture of buttered toast or a hip-hop heavy playlist for breadmaking) feel curated.Add an equipment list: We love Karen’s baking equipment page, which allows readers to outfit their kitchen with professional-approved baking gear. Blog-approved gear can be a great opportunity to use affiliate links to make commissions on products and ingredients.Get this theme: If you love the style of Bread.blog, and you’re a WordPress.com user on the Business plan or above, check out the Huntt theme! Or, explore our huge library of food-specific blog themes to find your perfect aesthetic. 6. Chef Allie’s Kitchen
 Theme: Custom
Chef Allie’s Kitchen is full of healthy, nutritious recipes that helped Allie lose over 100 pounds after having three kids.
Using the Weight Watchers method, she set out to create recipes that allowed her to eat the foods she loved with healthier, more satisfying ingredients.
Her recipes include creations like protein s’mores and mini cheeseburger sliders.
With over 100,000 subscribers, Allie has turned her blog into a healthy eating empire and even created an app for her recipe collection.
 Take a page from Allie’s cookbookUse a search function: With hundreds of recipes on her site, Allie makes it easy for visitors to find exactly what they’re looking for. All WordPress.com users can easily add search to their site using the Search Block or via the Jetpack Search plugin. Automate your social media: Instead of cross-posting your content on all of your social media platforms, consider using a plugin to automate that task. WordPress.com users can automate their social media with Jetpack Social. 7. Alt Chef D
 ScreenshotTheme: Gourmand
 Alt Chef D is run by Darius, a self-taught chef who has built a following across social media. Based in Atlanta, Georgia, Darius shares flavorful, accessible recipes inspired by his Southern roots.
Since starting his cooking journey in 2020, Darius has amassed over 700,000 followers and built brand partnerships, turning cooking from a side gig into a full-time job.
 Take a page from Darius’s cookbookUse a Recipe Plugin: To achieve that professional recipe site feel, Chef Darius uses a plugin called WP Recipe Maker, a WordPress plugin designed specifically for recipe sites. This plugin adds recipe blocks to the WordPress drag-and-drop blog editor so that you can easily add step-by-step directions, shoppable ingredient blocks, videos, and buttons to jump to or print recipes. Link your social media feeds: Darius is extremely active on YouTube and Instagram. To help readers find him on other platforms, he includes his social links in his header, footer, and sidebars, and has a direct link to his YouTube channel in his menu. Social media integrations can be a great way to keep your audience engaged across platforms, and WordPress.com offers a suite of social media integrations right out of the box, like social media icon bars and social share buttons.8. History and Wine
 Theme: Custom
History and Wine is a wine review blog by sommelier and Biscayne Times “Vino” columnist Jacqueline Coleman. History and Wine offers both reviews and lists of seasonal wines alongside wine tour itineraries and wine guides.
While some posts are standalone blog posts created specifically for History and Wine, the site also acts as a writing portfolio.
Jacqueline shares blurbs with links to her monthly columns in the Biscayne Times and other publications, creating a central hub for all of her work across the web.
 Take a page from History and Wine’s tasting menuKeep it Local: As the Biscayne Times reporter, much of the coverage on History and Wine is centered around the Miami area (with occasional guides to national wineries). A local focus can be a great way to build a dedicated following and increase your chances of showing up in local-specific Google searches.Create a Content Hub: If you write for paid publications, creating a centralized hub of your content is an important way to own and manage your content. Your site can show off your portfolio and create a forever home for your stories.9. Foodography
 Theme: Custom
Crystal Wee’s Foodography features reviews and photography of restaurants and cafes across Singapore and beyond.
Crystal documents every experience with stunning photographs.
Not only does she take curated close-up photos of her food and drink, but she also includes detail shots of the restaurants themselves, like a shot of the barista working behind the counter, a display of flowers, or a lovely light-filled corner.

In her reviews, Crystal shares how many times she visited, what she ordered, what it cost, and her general experience with the ambiance and staff.
Using her Index page, you can see everywhere she’s visited, organized by country.
 Take a page from Crystal’s photo bookInvest in high-quality photographs: Good photography can make or break a food blog. Even if you’re not a professional, invest time in learning basic food photography principles: use natural light when possible, keep backgrounds simple, and maintain a consistent style across all of your images.Consider advertising opportunities: As your blog readership grows, advertising can be an easy way to make passive revenue. WordPress.com enables advertising with WordAds. Just be mindful of ad placement — too many ads can negatively impact user experience.10. Jen’s Food Blog
 Theme: Custom
Jen’s Food Blog is another locally-focused blog based in North Sheffield, England.
Jen shares healthy recipes and restaurant reviews in nearby areas like Sheffield, Leeds, Wakefield, Manchester, and more.
In addition, Jen also writes product reviews for food-focused brands, including local food delivery services, up-and-coming consumer brands, and cookbooks.
 Take a page from Jen’s cookbookAdd a newsletter: Jen includes a newsletter signup on the sidebar of every page and post, making it easy for readers to subscribe from anywhere on her site. Adding the option to subscribe to a newsletter at strategic places across your site increases the odds that readers will continue engaging with your content.Add product reviews: Reviewing products provides value to your readers and opens up affiliate partnership opportunities with brands. When Jen’s readers buy products through her links or use her discount codes, she may make a small commission.11. Vintage Kitchen
Theme: Custom

Vintage Kitchen is run by Dorothy, a former newspaper and magazine writer who opened an old Victorian inn with her husband in Northern Vermont.
Through her blog, she chronicles tried-and-true recipes she’s developed and served to her guests using seasonal items from her on-site garden.
Inspired by the food her mother used to make for a household of six, her recipes are no-frills, homey, and hearty.
 Take a page from Dorothy’s cookbookMake it Personal: In addition to the recipe itself, Dorothy discusses the weather that day, shares stories of making these recipes in her childhood and with her family, and provides updates on her large garden. These personal touches differentiate a blog from a generic recipe site, allowing readers to connect with you on a deeper level.Use images to elevate the blog layout: For example, Vintage Kitchen uses a split-page layout for each recipe, with a “sticky” recipe photo on the left and the recipe on the right. The benefit of this layout is that your image will stay on the screen no matter how long your post is. For new bloggers without ample photography skills or who don’t love taking step-by-step process photos, this approach can help you get up and running in no time.
  Ready to Get Cooking?
Looking at other successful food blogs is one of the best ways to engage and learn about blogging.
From building relationships with other bloggers to discovering new ideas for your own blog and content, being a regular reader of food content is a great habit.
For step-by-step directions for starting your food blog, check out our companion posts:
How to Start a Blog How to Start a Food BlogOr, if you’re ready to jump into blogging, get a free domain name for your first year of hosting with WordPress.com.
Start my food blogOctober 22, 2025
How to Choose a Web Design Company You’ll Love Working With
How can you tell if a web design company is worth your investment?
In this guide, we’ll explore how much it costs to build a website in today’s market, highlight key considerations in your evaluation, and recommend questions to ask potential providers.
By the end of this post, you’ll be able to make the right decision with confidence.
What is the average cost to hire a web designer?Outsourcing web design can cost anywhere from $500 to over $5,000. Your final investment depends on various factors, including your website’s complexity and project timeline.
To illustrate, a basic five-page site built via our website design service costs $499, excluding hosting. This includes a free custom domain for one year and is completed within four business days or less.
In contrast, customizing a larger website requires a substantially larger budget. Hiring a web design agency through the WordPress.com Partner Directory, for instance, starts at $5,000 (excluding hosting).
This higher price point includes a custom-designed website, third-party integrations, multiple revisions, migrations, and pre-launch checks, among other benefits. Website completion takes three months or longer.
Here’s a pricing chart to differentiate the deliverables.
 How do I choose a web design company?
The best web design firms don’t just craft websites that align with your brand and vision — they create an experience users love. To pick the ideal partner, here’s what you need to watch out for.
1. Decide what you’re afterClearly defined goals pinpoint the ideal web design company for your needs.
Determine what you need your website to accomplish. Is it generating leads, driving ecommerce sales, or improving brand authority? Once you define your goal, you can quickly work out a rough budget and the type of agency to partner with.
Here are three examples to illustrate what we mean:
EXAMPLESolo service providerMid-sized IT businessFortune 500 enterpriseGOALImprove personal brand and attract new clients.Improve user experience (UX) to increase leads and set up analytics tracking and reporting.Improve digital footprint and increase pipeline growth through a complete omnichannel strategy.IDEAL AGENCYBoutique agency specializing in brand storytelling, photo direction, SEO optimization, and conversion-driven design.Mid-sized agency specializing in conversion optimization and copywriting.Full-service agency or a group of specialist agencies (e.g., one for web design and copywriting, another for SEO and lead generation).2. Curate a list of agenciesAfter defining your goals, prepare a list of potential agencies.
Here are three ways to find them:
Referrals: Ask for recommendations from trusted peers who’ve achieved similar goals. This can be your professional connections or community groups.Agency directories: Analyze reviews on reputable agency marketplaces like Clutch, DesignRush, and WordPress.com Partner Directory. Focus on web design companies with positive testimonials highlighting outcomes relevant to your goals.Favorite websites: Here’s a neat trick. Visit websites you admire, scroll down to the footer, and identify the credited web design company next to the copyright notice. This often reveals web design firms creating the caliber of work you’re seeking.For example:
 Source3. Focus on agencies that match your business
 Choose web design companies whose reputation or maturity level aligns with your own. This strategic alignment ensures effective collaboration and results.
Here’s what we mean.
Imagine your small business hired a prestigious agency. Given larger agencies’ tendency to prioritize bigger clients, it’s likely the agency will delegate your project to junior web designers with limited experience.
Enterprises partnering with less established agencies are no better. With standardized rules and processes, small agencies without first-hand experience navigating red tape will struggle to meet compliance standards, potentially delaying launches.
4. Review portfoliosPrioritize agencies with a proven track record in your industry.
A web design company working with B2C companies is unlikely to understand B2B market nuances — and vice versa.
Review the agencies’ projects, examining the challenges encountered, solutions implemented, and measurable results delivered. This should give you an idea if they possess the needed expertise.
Tip: If their portfolio lacks results, consider contacting past clients to gain insights using this script: “Hey! I noticed your website was designed by [web design studio]. It’s impressive. I’m considering hiring them to revamp my website as well. Out of curiosity, how was your experience?”
5. Assess soft skillsTypically, relationships cause agency partnerships to falter.
Evaluate the web design companies to better understand their communication, teamwork, and problem-solving skills — it’ll prevent partnership breakdowns:
Company research: What’s their process for learning about your business, ideal customers, sales cycle, and the customer journey?Collaborative approach: How do they ensure your input shapes the website from concept to completion?Risk management solutions: What do their contingency plans for unexpected hurdles look like? For example, what happens if the lead web designer becomes unavailable?Communication style: What channels or systems do they use for regular updates and feedback throughout the partnership?What to ask before hiring a website design company?You’ve now identified several potential web design companies on your list. Ask the following questions to pinpoint the perfect partner.
1. “Who will I work with?”Why ask this question: Anticipate the team members you’ll collaborate with. This way, you can assign the ideal counterparts in your in-house team and plan communication ahead. For example, assigning someone technical ensures immediate responses to technical inquiries from the agency’s web development specialist.
Green flags:
Offers a kickoff meeting with your dedicated team during onboarding.Outlines your direct access to channels and team members (e.g., Slack for daily questions, project management software for design updates).Handpicks team members with proven success in your industry vertical.Demonstrates ongoing investment in their team’s professional development.Tip: Check the agency’s careers page to verify ongoing training programs for its web designers and developers. Working with specialists who stay ahead of design tools and emerging technologies ensures your site remains future-proof.
Red flags:
Cagey about who you’ll collaborate with. This indicates the agency views its delivery team as an afterthought. They’ll likely randomly assign staff without considering who’s the best fit for the job.2. “How well does your team work together, and how is it structured?”Why ask this question: Agencies with great internal teams deliver exceptional results. Strong team morale translates to increased productivity, enriched company culture, and successful collaboration with clients and partners.
Green flags:
Consistently positive team reviews on career communities like Glassdoor.Testimonials or case studies highlighting team synergy and collaborative problem-solving.Red flags:
Rampant negative Glassdoor reviews reveal poor workplace experiences. This directly impacts your website project as the agency will likely provide poor customer service and inconsistent deliverables.Unusually rapid promotion of junior staff to senior roles. This high pace signals you’ll work with an inexperienced team lacking the depth of expertise your web project requires.Tip: Check the LinkedIn profiles of these agency staff, paying attention to their promotion timeline.
3. “What’s the project communication like? What can I expect to receive during our collaboration?”Why ask this question: Establish clear accountability to ensure progress toward your business goals.
Green flags:
Provides a detailed communication plan with deliverables, deadlines, and milestones.Adapts their communication style to align with your in-house team’s preferences and workflows.Runs regular meetings to keep stakeholders informed and identify potential issues before they impact deadlines.Red flags:
Rigid processes that prioritize their convenience over your business workflows.Vague or inconsistent communication that risks delayed launches.4. “What else do you do besides website design?”Why ask this question: A functional website goes beyond design. Here, you’re trying to tease out the agency’s complementary skills, such as digital marketing, information architecture (the practice of organizing information in a user-friendly way), and user research — all central to creating a website that drives conversions.
Green flags:
Highlights how their user research approach, mobile-first design process, wireframing, and UX design achieve your business goals.Walks you through how it handles security and third-party tool integrations.Red flags:
Relies on a one-size-fits-all approach to all websites (e.g., uses plug-and-play templates).Over-reliant on AI. While AI is becoming a bigger part of design workflows, it shouldn’t be treated as a complete replacement. The best agencies blend AI with human expertise to drive impact.Minimizes the importance of user research, information architecture, etc.5. “What happens after the website is done?”Why ask this question: The post-launch process matters as much as the initial design stage. Post-launch optimization helps you quickly spot opportunities for change and prioritize improvements based on results (e.g., conversions).
Green flags:
Provides a comprehensive action plan (e.g., migrate content management systems, document technical issues in the first three days after launch, check responsive web design, configure GA4 setup, heatmaps, and chatbots).Creates an optimization roadmap for the next 30/60/90 days to align efforts, allocate resources, and prioritize improvements.Conducts user testing to identify friction points in the conversion path and improve conversion rate.Red flags:
“Set it and forget it” approach. The agency treats your website as a one-time project rather than an evolving digital asset that needs long-term optimization.Start building your website with everything you need, right hereThese key considerations and questions offer a useful starting point for further discussion. You’ll narrow down your choice and find the best-fit agency partner to turn your initial concept into reality.
If you’re building a high-end website, check the WordPress.com Partner Directory. All agencies are verified, boast years of experience in multiple sectors, and offer ongoing post-launch support as your website scales. Site migration is included, to boot.
To make it easier for you, we’ll handpick the web design agency best suited to your project. All you need to do is share your vision, design preferences, and desired functionality, and we’ll match you with a partner. Alternatively, if you’re building a smaller website, choose our Express Website Design Service. You’ll get a professionally designed site in four business days or less.
Match me with an agencyBuild my website nowOctober 20, 2025
How to Become a WordPress Developer: A Zero-to-Hired Roadmap
So, you want to become a WordPress developer? That’s the best idea I’ve heard in a while!
After all, WordPress powers over 40% of the web — and behind every great WordPress site and product is someone who knows how to build and manage it. Why shouldn’t it be you?
Now, where do you start?
Well, how about right here? This guide walks you through everything you need to begin developing with WordPress professionally. You’ll learn what WordPress developers actually do, how to gather the right tools, skills, and knowledge, and how to start building a career.
What is a WordPress developer?A WordPress developer is someone who builds, customizes, contributes to, or maintains websites using the WordPress platform.
If that feels like a rather broad definition, it is. That’s because WordPress is a big ecosystem, and there are many different ways to work within it.
Types of WordPress developersWordPress developers come in different flavors, depending on what they like to build and how they work. These are some of the most common types you’ll find:
No-code/low-code site builders: Also sometimes called “WordPress implementers,” these kinds of developers use visual editors and existing themes, patterns, and plugins to create sites mostly using the WordPress user interface without writing custom code.Coding specialists: On the other end of the spectrum, developers with deep coding knowledge can build entire websites with custom design and functionality using different programming languages and advanced layout and design tools.Theme developers: Create the part that defines the visual design and layout of WordPress sites. You can build custom designs for specific clients or create themes as digital products for sale. Individual themes often focus on particular industries and use cases; making them requires both creativity, design knowledge, and technical chops.Plugin developers: Concentrate on extensions that add new features or integrations to a WordPress site. Plugin makers, too, can work directly for and with clients or build their own products and sell them online. This work involves less creativity and more logical thinking and programming skills.Technical/maintenance specialists: Handle security, updates, backups, performance, and day-to-day tasks for existing websites. Requires attention to detail and deep knowledge of where to do what in WordPress.WordPress core contributors: Help improve the WordPress software itself by submitting updates, patches, and new features to the open source project for the benefit of everyone who uses it.It’s up to you to decide what kind of WordPress developer you want to become. At the same time, you can wear more than one hat because skills in one role often carry over to others.
What WordPress developers doDepending on your role, here are some of the core tasks you might handle:
Frontend development: Means working on the visual elements of a website, like layout, fonts, colors, and all parts of the user experience. It often involves modifying existing themes or building custom ones. In WordPress, frontend work can involve the built-in Site Editor as well as HTML, CSS, and JavaScript.Backend development: Here, the focus is on server-side functionality; basically, everything that happens in the background of a WordPress website. Typical tasks include using PHP to customize theme functions, create plugins, or modify WordPress core features.Block development: This is a growing area focused on creating custom WordPress blocks using JavaScript. It’s essential for both theme and plugin work since most content elements in WordPress now work with blocks.Site management: Typical tasks include updating WordPress core, themes, and plugins, trying out new extensions, managing user accounts, doing design and content updates, or running speed tests and acting on the results. You may also do site migrations and deployments.Ecommerce development: Involves setting up and customizing online stores. WooCommerce is a great example of this. You’ll handle product pages, checkout flows, shipping logic, and integrations with payment gateways.Contributing to WordPress core: You can do almost all of the activities above to help improve the WordPress core software as well.Assembling your WordPress development toolkitTo become a WordPress developer, you need the right tools for the job. Here are great options to start with:
WordPress Studio : Free local development tool that allows you to sign up and work on websites on your computer, sync them with your WordPress.com and Pressable account, share live previews with clients, and more.Text editor: WordPress development is almost impossible without a good code editor. Check out Atom, Brackets, or Sublime Text for starters. GitHub : A platform for version control and collaboration. It also offers a free plan.Browser developer tools: Use Chrome or Firefox dev tools to inspect website elements and understand and debug frontend code.FTP client: Allows you to access your server directly to upload or edit files. Popular free options are FileZilla, Cyberduck, and WinSCP.Understanding WordPress basicsAs a first step in your developer journey, you need to familiarize yourself with some basic WordPress concepts.
WordPress.org and WordPress.comWordPress core is the open source software that powers every site built with WordPress. You can download it at WordPress.org and use it free of charge. It includes all functionality and default features.
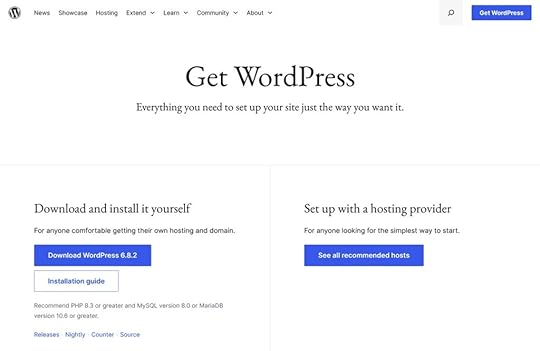
To run a WordPress website, you need hosting, meaning space on a web server.
There are different types of web hosting, from shared to managed hosting. The latter is what WordPress.com is — a hosting provider that lets you easily build WordPress-based websites while taking care of everything technical, like software updates, security, and performance.
Hosting your own or your clients’ websites on WordPress.com offers the following benefits:
Unmetered bandwidth and trafficWordPress-optimized server setup99.999% uptimeFree SSL certificateStaging sitesSSH, WP-CLI, and GitHub deploymentsFree domain for the first yearExpert supportGet your WordPress.com account nowFor more differences between WordPress.org and WordPress.com, check this detailed list.
WordPress adminThe heart of every WordPress site is the WordPress admin dashboard. It’s where you manage content, themes, plugins, and settings.
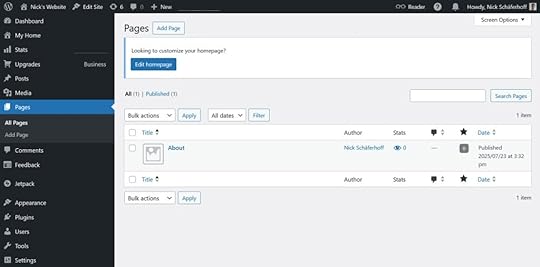
It goes without saying that, in order to develop with WordPress, you need to know this part inside and out — including how themes and plugins work.
For example, WordPress themes come in two varieties: classic (PHP and file-based) or block themes (built for the block-based Site Editor). Depending on the type you use for a project, the process of customizing it will differ.
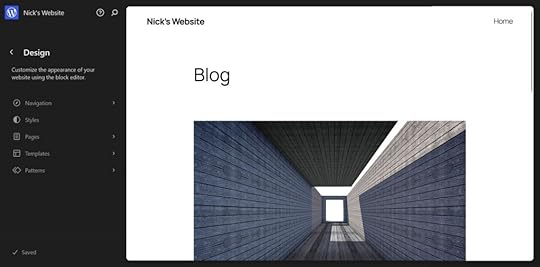
In addition, plugins cover a wide range of functionality. They can add singular layout elements, as well as create entirely new content editing experiences. This, too, is something you need to familiarize yourself with.
WP-CLI — The WordPress command-line interfaceFinally, WP-CLI lets you manage WordPress sites with terminal commands.

Pretty much anything you can do in WordPress admin (like install, activate, and update plugins, moderate comments, manage users and user roles, change site settings, etc.), you can do quicker and in bulk with WP-CLI.
Plus, it has some nifty features for developers, like running and testing PHP code or flushing website cache.
(As mentioned, WP-CLI is included on WordPress.com Business and Commerce plans. You can learn more about it here.)
How to learn WordPress developmentWith the basics covered, next you need to familiarize yourself with WordPress’s architecture and the programming languages that make up the platform.
1. Learn WordPress development fundamentalsA good starting point to dive deeper is the dedicated Beginner WordPress Developer course on WordPress.org.
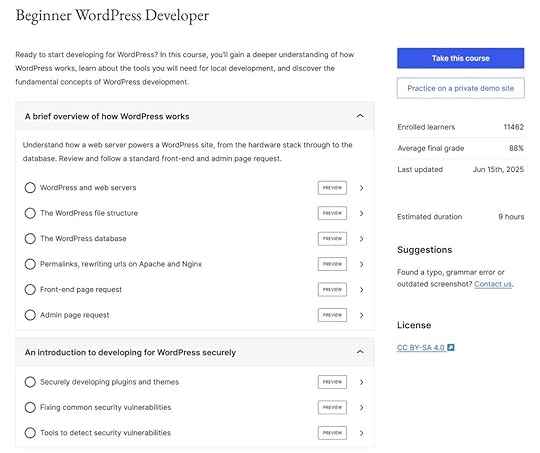
It offers a structured path to learn how WordPress works behind the scenes, development best practices, introductions to block, plugin, and theme development, as well as important topics such as the WordPress REST API, multisite, debugging, and much more.
This is a great basis to start from and decide in which direction to take your studies next.
Another frequently recommended option is the course “Become a WordPress Developer” on Udemy.
2. Get familiar with HTMLHTML forms the backbone of all web pages. It defines basic layout elements and content like headings, paragraphs, images, and links.

Knowing it is essential for understanding how WordPress and all other websites render content. That’s especially if you plan to do frontend development or customize themes or blocks.
In addition, it’s a great first language for beginners: it’s easy to read and learn, as well as immediately applicable.
You can start learning HTML for free on Codecademy, Learn-HTML.org, or W3Schools.
3. Dive into CSSWhile HTML controls site structure, CSS is responsible for how a website looks. Its role is to define colors, fonts, spacing, layouts, and more.
For example, CSS is responsible for making sure the website design adjusts to different screen sizes.
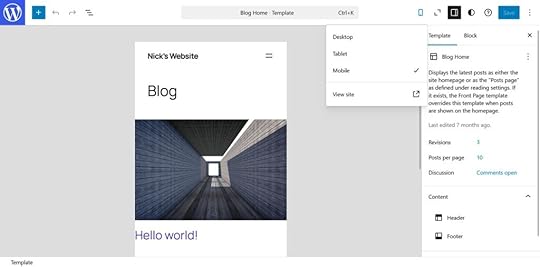
Again, if your goal is to do frontend work, you won’t excel without familiarizing yourself with this markup language. You can find great learning resources for it at Codecademy, W3Schools, as well as web.dev.
4. Consider learning JavaScriptAs the third-most important frontend language, JavaScript’s main purpose is to make websites more interactive. For example, you can use it to create things like sliders, pop-ups, and dynamic animations.
It also plays a role in:
Form submissionsConnecting to third-party services like web analyticsReal-time content updates (e.g., after user interaction)In addition, JavaScript is important in modern WordPress development. The WordPress block editor is built with React (a JavaScript framework), and custom blocks require working with JavaScript as well.
If you want to dive into this topic, you can do so at Codecademy, Learn JavaScript, or MDN Web Docs.
5. Master PHPPHP is the main WordPress backend language and what powers most of the platform. It generates frontend HTML and controls how content loads, templates work, and features behave.
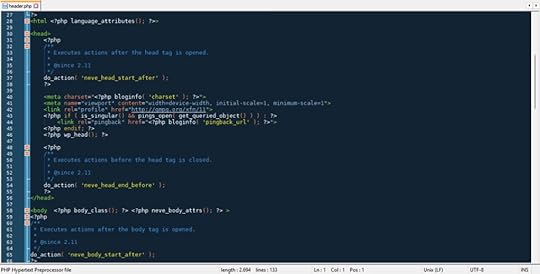
Knowing PHP is crucial for plugin development, although not as important for themes as it used to be.
Want to add PHP to your developer toolbelt? Great resources are Learn PHP and the ever-present W3Schools and Codecademy.
6. Be familiar with MySQLThe last skill to consider learning when pursuing a career as a WordPress developer is MySQL. It powers the database system that’s the other half of every WordPress site (the first being the file system).
The database contains all pages and post content, settings, and user data, which is pulled during the rendering process.
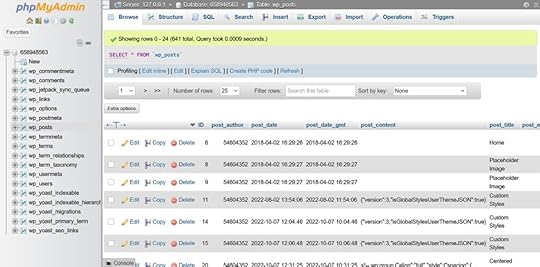
MySQL is likely not something you’ll work with every day, but understanding it helps when troubleshooting problems or building complex features.
You can get your bearings in this language at W3Schools, the guide in the MySQL documentation, or at MySQL Tutorial.
7. Other skills to invest inWhile the above is essential to start developing with WordPress, there are a whole host of supporting skills you should consider learning:
Git and version controlThe WordPress REST API and APIs in generalHeadless WordPressJSON, especially to work with theme.jsonAccessibilityPerformance optimizationSEO (e.g., to create optimized themes)UI, UX, and web designSoft skills like marketing and salesProject managementPlease don’t feel overwhelmed or pressured by this list; it’s just an overview. You will pick up many of these skills naturally as you take on more projects and grow your experience.
Build your first WordPress websiteSpeaking of which, the best way to learn anything is to use it in real life. Therefore, if you want to get into WordPress development, your best bet is to start building websites. Doing it will solidify your understanding of WordPress and give you something concrete to learn with.
You have different options for doing so:
Use the WordPress Playground to learn in a safe, browser-based environment with no setup required.Create a local development environment (e.g., with Studio) and practice there.Purchase hosting and build a live website.For the best results, pick a manageable project, like a personal blog, a portfolio, or a small business site. This will help you focus on achieving something tangible rather than aimlessly experimenting
If you want to focus on designing rather than managing servers, security, performance, or updates, launch your site on WordPress.com. We also have a guided first-website course for this.
Start your career as a WordPress developerOnce you’ve built a few projects and gained some confidence, it’s time to start thinking about how to turn your skills into real-world opportunities. The first step is to decide what you want:
Do you see yourself working for a company, joining an agency, or working freelance?What will be your niche? Frontend development for creative agencies? Perhaps you want to do ecommerce work for small businesses. Think about this both in terms of the technical area as well as the industry.Once you’ve made these important decisions, an important tool to find employment is your WordPress development portfolio site. There, you can showcase your work, skills, and services to help you attract web design clients. Highlight completed projects, describe the role you played, and include testimonials if possible.
After that, start applying for jobs in places like:
WordPress job boardWPMayorRemote OKWeAreDevelopersLinkedInCodeableYou can also join online communities (Slack groups, forums, Facebook groups) where WordPress work is shared and discussed.
Continue your WordPress development education
WordPress and the web are constantly evolving, and staying current is part of being a great developer. It helps you become faster and stronger, and to learn new techniques and tools so you can offer more services and ask for higher rates and salary.
Here’s how to continue your education:
Explore the WordPress Codex to deepen your understanding of core functions and best practices.Read WordPress.com’s developer documentation for platform-specific tools, APIs, and features.Join or attend a local WordPress meetup group or WordCamps to connect with other developers.Hang out in WordPress Facebook groups and/or subreddits.Subscribe to the Dev and Deploy newsletter for monthly updates, tips, and tutorials.Follow the WordPress.com YouTube channel for video walkthroughs, dev talks, and quick tips.Start your development journey nowBecoming a WordPress developer is more accessible than ever — even if you’re starting with zero coding experience. There are lots of free learning resources and tools out there. WordPress itself is free, too.
Explore the different areas of development to find the right fit for yourself. Grow your skills with personal projects and gather a portfolio as soon as possible. Soon, it’ll be time to get hired for your first job.
If you want some help with the technical aspects of running WordPress websites, go for WordPress.com.
October 17, 2025
How Net Literacy Secures Its Legacy With WordPress.com’s 100‑Year Plan
When the non-profit Net Literacy launched 20 years ago, it started with a simple but powerful idea: Empower those without Internet skills or resources to get online, with youth volunteers serving as teachers and ambassadors. Today, they have grown into a global nonprofit reaching over 250,000 people through digital inclusion and financial education while growing into new areas, such as AI literacy.
However, sustaining that impact across generations requires more than passion; it needs digital permanence and peace of mind that their resources will always be available online. This is what inspired Net Literacy to become one of the first customers to adopt WordPress.com’s 100‑Year Plan.
“A number of things really appealed to us about the 100‑Year Plan,” Net Literacy founder and CEO Dan Kent says. “First of all, it provides us with a lot of simplification and certainty around our operations. As a nonprofit, we’re looking to provide services for multiple generations.”
Planning for certaintyNonprofits live in cycles of funding and change. As Kent (who founded Net Literacy when he was only 14 years old explains, “As a nonprofit, our fundraising definitely is cyclical […] so, to provide us the certainty and peace of mind for our operations, the 100‑Year Plan protects us from downside risks and ensures that we’re able to continue our mission […] remain on the Internet for anybody around the world to access.”
Net Literacy’s mission is to establish and maintain an open, long-term digital curriculum that will be available for generations. For that, they rely on a website that cannot be lost to expired domains or administrative lapses. According to Kent, “The 100‑Year Plan provides us peace of mind, ensuring that future generations of volunteers […] don’t have to worry about making sure that our resources are accessible for anybody around the world.”
Tools to match the legacyNet Literacy’s programs tackle long-term challenges like closing the digital divide and spreading AI literacy. “Organizations that solve really big, meaty problems will really value this 100‑Year Plan,” Kent says. “Particularly those […] tackling problems that aren’t easily solved in decades, and need to measure their impact in generations.”
This isn’t just about hosting your website online with world-class open source software. It’s a promise that an organization’s digital presence is built to last and ready for anything. WordPress.com’s century-based products (which also includes 100-year domains) take a multi-layered approach that begins with a long-term investment model to endow the data, ensuring there will always be finances available to maintain the service.
This is then combined with distributed cloud server infrastructure, time-machine like layered backups, seamless trust-account continuity, and integration with the Internet Archive, making the 100-Year Plan not just a hosting plan, but a digital legacy fortress.
A trusted partnership backed by recognitionNet Literacy felt confident about the alignment between WordPress.com and their organizational goals. “WordPress.com has been around as long as we have,” Kent says. “That track record matters.”
Their trust in WordPress.com was reinforced when the 100‑Year Plan and Domain were recognized by Actualidad Economíca as one of the “100 Best Ideas of 2025” — a prestigious Impact Leader Award that underscores its innovation in digital legacy infrastructure.
Building for the long haul — togetherKent’s vision is clear: change is inevitable, but mission continuity is essential.
“The one thing that will be constant going forward is change […] things such as the 100‑Year Plan … will make sure that we have a lot more optionality and make sure that our mission continues into the future,” Kent says.
With both mission and medium secured, Net Literacy is ready for what comes next. Thanks to the 100‑Year Plan, their educational resources won’t vanish — they will endure.
Learn more about how to secure and future-proof your digital legacy with the 100-Year Plan and 100-Year Domain.
October 16, 2025
3 New Features in the Jetpack Mobile App
iOS 26 brought some significant updates to Apple’s mobile operating system, and we’re keeping pace with updates of our own in the Jetpack mobile app. With the release of Jetpack app 26.4, we’re shipping three new features designed to save you time, eliminate friction, and improve your experience. Let’s dive into what’s new.
Improved StatsThe new Stats screen retains the original structure, but improves every single aspect of the experience — better design, better interactions and animations, new features, and new technology to power it.
A new line chart with comparison periods, hourly data, trend indicators for metrics, significant data points on charts, custom date ranges, engagement and newsletter metrics for posts, full customization — these are just some of the new features coming to Jetpack Stats on mobile.

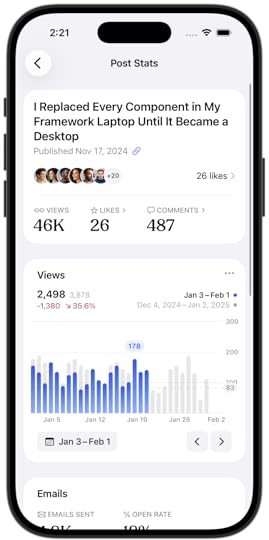
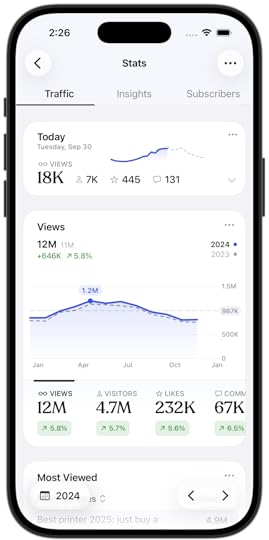
The new experience can be enabled using the “more” menu on the current Stats screen and can be disabled at any time. Please, give it a try and let us know what you think using the “Send Feedback” option available in the same menu.
On-device intelligenceThis year, Apple made it possible for apps like ours to utilize their on-device AI models, bringing intelligence features to our apps in a privacy-sensitive manner. We started by adding three powerful features for the app — excerpt generation, suggested tags, and post summarization.
The new features also arrive with a redesigned publishing experience that makes it easier to configure the post for publishing without missing any important details. With models running on-device, we are able to generate the suggestions pro-actively and at no-cost.
The new intelligence features require an iOS 26 device that supports Apple Intelligence and are initially only available in English, with more options coming later this year.

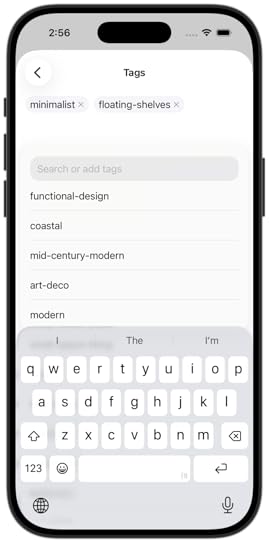
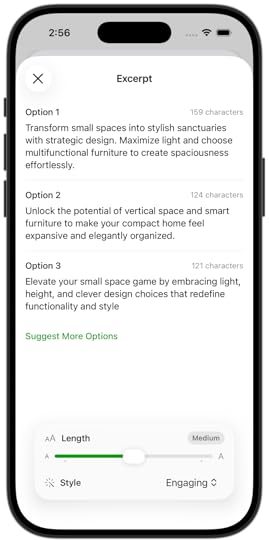 Liquid Glass
We’ve been hard at work to get our app up to speed with the latest Apple design and technology, including Liquid Glass — a new design language.
It elevated every single aspect of the experience, and especially in Reader, which is stunning. But it’s not just Reader — every part of the app was reviewed and updated to take the best advantage of Liquid Glass.
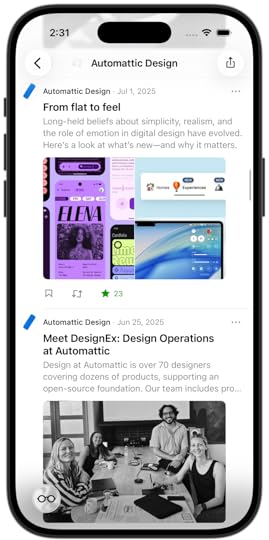
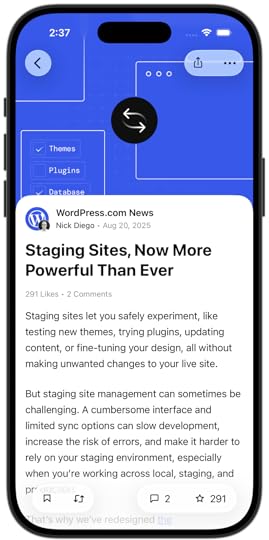
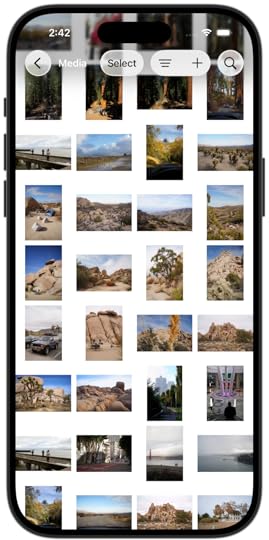 See what’s new in the app
We hope you enjoy these new features! If you’d like to try them, they are all currently available in the Jetpack mobile app. Upgrade or download it today for iOS or Android.
October 8, 2025
Introducing Blueprints in WordPress Studio 1.6.0
Starting a new site in WordPress Studio just got faster: Blueprint support is now enabled in version 1.6.0.
With Blueprints, you don’t have to start with an empty WordPress site; simply predefine your preferred setup once and reuse it. If your team relies on a standard scaffold, turn it into a Blueprint and keep every project consistent and efficient.
With Blueprints in Studio, you can create sites from your own custom Blueprint or pick from a curated set of Blueprints to get up and running quickly.
Here’s a brief demo of this new feature in action.
Try Blueprints in StudioHow Blueprints work in StudioBlueprints are lightweight JSON “recipes” for WordPress sites. Instead of saving a full site copy, they tell Studio which versions, plugins, and settings to apply so you and your team can spin up the same environment anytime.
Other local development tools often rely on full-site snapshots, which can be large, hard to share, and locked to a single environment. Studio Blueprints, by contrast, are portable and declarative: a single JSON file can reproduce the same site setup on any machine, instantly. That makes them more flexible for teams, easier to keep in sync, and more powerful for testing and iteration.
Creating local sites from Blueprints is now incorporated into the standard new site creation flow within Studio. Studio runs on WordPress Playground, so if you’ve used Playground Blueprints before, you can use the same ones here or use one of our free featured Blueprints.
Once you have Studio installed on your computer, click the “Add site” button in the lower left corner. The following screen will appear.
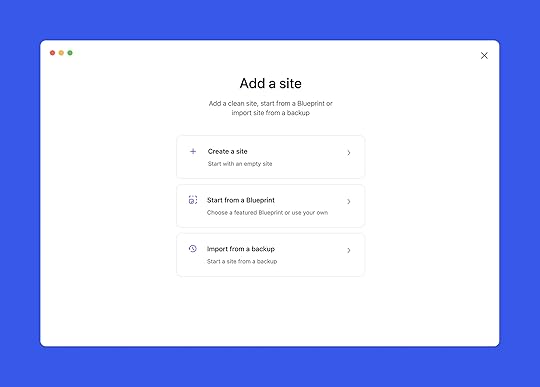
Select “Start from a Blueprint,” and you will see a gallery of featured Blueprints and an option to choose your own custom Blueprint.
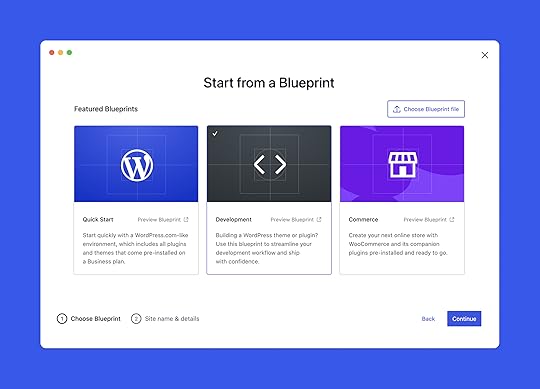
Studio currently includes three featured Blueprints:
Quick Start: Sets up a local site that mirrors the WordPress.com Business plan so that you can build in a production-like environmentDevelopment: Optimized for theme and plugin development, with tools like Plugin Check and Create Block Theme preinstalledCommerce: Powered by WooCommerce and companion plugins, giving you a store-ready site out of the boxIf a featured Blueprint fits your needs, select it and click Continue. To use your own Blueprint, click “Choose Blueprint file,” select the JSON file from your computer, and click Continue.
Next, name your site. You can access more options, such as WordPress and PHP version configuration, by opening “Advanced settings.” When you’re ready, click “Add site.”

Behind the scenes, Studio builds the site from whichever Blueprint you selected or added. This flow should feel familiar to adding a blank site in Studio.
Blueprint-enabled workflowsBlueprints bring speed and consistency to your workflow, whether you’re working solo or with a team.
They help you:
Streamline repeatable setups: Create Blueprints for common site types (blog, portfolio, store). Start new projects in Studio with the right foundation and get straight to work.Keep teams aligned: Add a blueprint.json to your project’s GitHub repository, whether you are building a plugin, theme, or full site. It scaffolds the same environment every time, so teammates can start in minutes. Version control keeps changes reviewable and consistent.Simplify demos and testing: Launch Studio with the exact theme, plugins, and sample content you need. Reproduce bugs or confirm fixes with a reliable, repeatable setup.The featured Blueprints in Studio are delivered through an API, so new ones appear in the app as soon as they’re published. After you’ve had a chance to try them, we’d love to hear how you’re using Blueprints and what additional options you’d find helpful. Share your feedback in the comments or on GitHub.
Ready to create your own? Start with the How to create custom Blueprints guide. If you already use WordPress Playground Blueprints, you can reuse them in Studio — there are just a few differences to keep in mind, which the guide covers.
What’s next for Studio?Blueprint support and the featured Blueprints in this release are an initial step. We believe Blueprints will be a fundamental part of most Studio workflows, so additional enhancements will follow. We’re also exploring the possibility of a public Blueprint library on WordPress.com where you can create, store, and share your own.
In the meantime, the next focus areas are:
Advanced Studio CLI: Create Studio sites, and push or pull site content to and from production and staging, all from the command line. The first pieces have already landed.Streamlined site creation: This will make the process of creating live sites on WordPress.com from Studio, and pulling existing sites into Studio, much smoother. Performance improvements: Upcoming enhancements in WordPress Playground will make Studio even faster and more responsive.We also enabled GitHub Discussions in the Studio repository. It’s a place for open conversation about the future of Studio, tips and tricks, questions, and more. It complements issues and pull requests. You’ll see me and the product team active there, and we hope you’ll join us.
Finally, if you haven’t tried Studio yet, or it’s been a while, now’s a great time to jump in. It’s free, open source, and improving rapidly.
Try WordPress Studio now

