
Luis Gonçalves's Blog, page 8
July 18, 2017
Energizing Retrospective – Energize Your Team Retrospective With This Easy Exercise
Energizing Retrospective – Energize Your Team Retrospective With This Easy Exercise
If you perform retrospective regularly you will know that each retrospective is different. Some retrospectives are fun, some serious, some are off the track and not really related to the team.
Most of us wish that a retrospective will leave us energized and super excited to get going on actions. Sam and Karen from Growing Agile follow an exercise for an energizing retrospective. Take a look at the structure of the exercise below.
Energizing Retrospective – Energize Your Team Retrospective With This Easy Exercise
Check-in [3 min per person]
Karen and Same use sticky notes with the following 6 headings: Be Brave, Be Kind, Be Yourself, Be Involved, Be Amazing, Be Accepting. You are free to use your own or just use ours. You can choose different colours to represent different things.
Now, ask each person to write one statement per sticky note about the past month (or sprint) and then ask everyone to share what they wrote for each.
Gather Data [15 min]
This is a variation on the perfection game. Use the scale 1-10 (10 is perfect). Score the month and ask each person to list 3 things they would have liked to have happened in the last month. Depending how many people are in the retrospective you can reduce the 3 things down. You don´t want to have more than 15 min total in the next section.
Generate Insights [30 min]
This is an opportunity for a discussion about the 3 things each person listed and why those would have made the month better. Consider these questions:
“What was lacking and why?”,
“What experiments have we done recently?”,
“What have we done for ourselves recently?”
Decide what to do [30 min]
Look at the list of 3 things each person wrote, as well as any other data you have on things you’d like to do (for example an improvement backlog).
Ask each person to pick 1 thing they really want to do next month, and he/she should share it.
Give people a chance to give feedback on reasons they would or would not want to do some of those actions.
Now dot vote to pick the top action.
Once you have a top action, create an action task board by breaking it down into tasks that are small enough to be done immediately by any person on the team. This is key to making the action exciting. If you see something you could do immediately, you are more likely to get started.
Close [1 min]
Get your action task board one and get started!
The post Energizing Retrospective – Energize Your Team Retrospective With This Easy Exercise appeared first on Luís Gonçalves.


July 11, 2017
7 helpful tips to ruin a meeting – What not to do to run effective meetings
Despite the diligent and tenacious efforts of dedicated folks around the world, rumors persist that effective meetings continue to be scheduled and attended.
Effective meetings provide a space for genuine collaboration, efficient use of time, increased alignment, improved morale and engagement and most worryingly…tangible and positive impact.
This. Has. To. Stop.
I feel duty-bound to share these 7 helpful tips to ruin a meeting:
1.Back-to-back scheduling
Ruining a meeting is hard work. So, before we get to some of the more advanced techniques, we’ll start with a basic tactic to really get your meeting, and those pesky attendees, off on the wrong foot.
Remember this easy mantra:
“Back-to-back has got your back”
Whenever you schedule a meeting, the first step is to try to schedule it to be back-to-back with another meeting.
Don’t worry, this is easier than it sounds. If you are lucky, you will use a meeting scheduling tool that defaults to start and end on the hour.
Hey presto! If your meeting starts on the hour, it’s highly likely that it will be back-to-back with someone else’s meeting that ends on the hour. Bonus points, if the previous or next back-to-back meeting was also scheduled by you!
Ideally, you will schedule your meeting to last for an hour, and that will lay the foundation for someone else’s meeting to be back-to-back.
If you are new to ruining effective meetings, let me take a moment to explain the value of back-to-back.
If your meeting starts as another meeting ends, that gives zero opportunity for someone to mentally rest or emotionally reset. And don’t underestimate the power of not having the chance to move around, grab a snack or hydrate, or run to the bathroom. All of these things will help to undermine someone’s ability to helpfully contribute to the next meeting.
Watch out for gaps!
[image error]Source: Simon Cockayne
SIDENOTE: It can be easy to ruin a meeting as the host. But, attendees can help too. If you receive a meeting that is back-to-back with another meeting, please do just blindly accept it, and under no circumstance should you ask the host to have it start later, or end earlier, to provide helpful gaps for people.
2. No clear purpose
After you have warmed up with back-to-back scheduling, you’ll need to start to do some of the really heavy lifting.
Perhaps the most critical role of the meeting host, is to keep the purpose of the meeting hidden.
If people, especially attendees, learn the purpose of the meeting, if they can somehow glean why the meeting is being held, that can lead to preparation…and preparation is only a hop, skip and a jump on the way to collaboration…and collaboration is worryingly close to impact and outcome…and we certainly don’t want any of that nonsense.
Whilst novice meeting ruiners might be at a loss as to how to hide the purpose of the meeting, you can find safety and comfort in the experience of others.
When specifying the meeting subject, be as vague and generic as you can. “Catch-up” or “Team meeting” are pretty solid choices.
WARNING: Don’t ever, ever, use the body of the meeting invite to describe the meeting purpose in any kind of helpful detail. That just plays into the hands of preparationists. That’s what they want you to do!!
Advanced meeting ruiners, can provide a clear purpose for the meeting, but then allow, even encourage, the meeting to wander off topic. But, that’s really beyond the scope of this blog post.
See the screenshot below, for an example of what you don’t want to see: A “Meeting Purpose” and a “Context”.
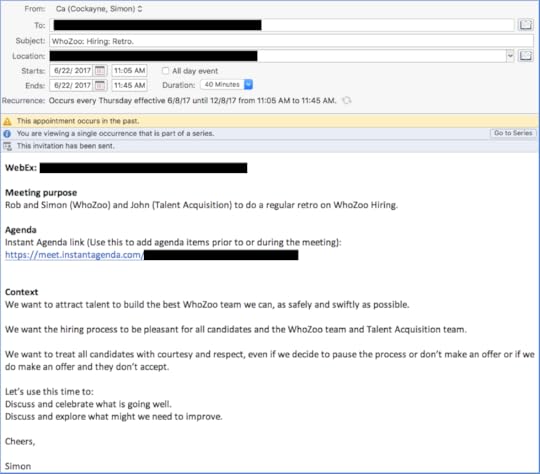 Source: Simon Cockayne
Keen eyed readers of the screenshot above, will see that a dynamic agenda tool is being used. If you want to keep ruining meetings…you certainly don’t want to start using something like Instant Agenda.
3. Never prepare!
“Never prepare!”, is really a backup, in case the meeting purpose does get leaked, and it becomes clear why someone wants to get some folks together.
Obviously, you don’t want to work in an environment where the meeting purpose is being revealed ahead of the meeting…but it will happen from time to time.
A helpful guideline here, is to accept a meeting before reading any of the body, which could contain a meeting purpose or context.
If you do accidentally discover the meeting purpose, the first thing to do is keep calm and remember these four tips:
Don’t add any preparation to your to-do list.
Don’t add a reminder, hours or days before the meeting, to refresh your memory.
Don’t make any notes of things to discuss or questions to ask.
And definitely do NOT make contact with the meeting host to explore or modify the purpose or the agenda in any way.
4. Multi-task
Your brain has no problem to listen to what is going on in a meeting. Listening to what is going on can cause involuntary reactions. Your passion and natural diligence can, all too easily, lead to learning and cause all kinds of helpful contributions.
You can nip this success in the bud with a simple trick.
All you have to do is Multi-task.
If you are only focused on the meeting, you are not focused on ruining the meeting.
You don’t need to go to a lot of effort or expense to create a distracting environment. Use what you have available:
Cell phone – While you are listening to the meeting audio, do use your cell at the same time for activities not related to the meeting. Tweeting, Facebook, texting are good starting points.
Laptop browsing – If you haven’t got your cell phone handy, you can browse around the desktop versions of social media apps or just process your email. If you are remote, remember to keep your line unmuted, that will allow the sound of you typing distract others, too.
The mute button always has a place in remote meeting disruption. It’s a quick way to waste your time and someone else’s by trying to contribute to the meeting, when no one can hear you. But, don’t stop there! Use the mute button, to allow you to multi-task. Try having a separate conversation with a nearby colleague or even on another line…ideally the conversation really needs to be utterly unrelated to the meeting topic.
5. Judge an idea by who suggested it
A major concern for anyone planning to ruin a meeting is the danger that someone might suggest an idea. New ideas that challenge the status quo are perhaps the most dangerous of all.
Brilliant ideas can be hard to destroy.
If you are hosting a meeting, or attending a meeting, and someone has the audacity to suggest a new idea, you should immediately react as follows:
Judge an idea by who suggested it!
You’ve got to make it personal.
For example, if Toby suggests an idea…keep talking about “Toby’s idea”. Then shift the whole conversation to be about Toby and whether an idea suggested by Toby warrants pursuing.
Especially draw attention to Toby’s title, years of service, and if Toby has ever had another idea that failed…then even better, turn the conversation to that past failure.
The last thing you want to do is judge the new idea on its own merits.
Remember, Toby’s idea is not going anywhere, if people don’t like Toby.
In an emergency, if a novel and courageous idea is gaining traction, do talk about any time something similar has been tried in the past and failed. PROTIP: It doesn’t matter how long ago that was. The echo of failure from years or even decades ago can help hobble a new idea today.
6. Strive to run over time
Running over time is the mark of meeting-ruining excellence.
Only a master of meeting-ruining, though, will see the two-edged blade that is running over time.
First, it’s a no brainer that this meeting running over, will spoil the start of any subsequent activities. So that pain is in the bag. Nice!
Secondly though, is a more nuanced benefit. As you get to the end of the meeting and it starts to run over, the meeting context changes.
People are distracted by the start of their subsequent activities.
Last minute items are squeezed and rushed through.
Resentment of the long-running meeting will bubble and spread.
But, you can’t run over time as a one-off. You need to run over in as many effective meetings as possible.
If you are tenacious, you can help make running over time a part of your standard meeting culture.
7. No follow-up
Ok, so we’ve saved the best for last.
This really is the most important of the 7 tips we have covered.
It takes time and effort to master how to ruin meeting.
Back-to-back scheduling, No clear purpose, Never prepare!, Multi-task, Judge ideas by who suggested it and Strive to run over time…are all beautiful ways to ruin a meeting…but they won’t always work.
In, thankfully, rare situations…you might find that none of those things have worked, and you are on the brink of having held an effective meeting.
Your only real hope then is to ensure there is No follow-up.
 Source: Simon Cockayne
If attendees have been swayed to action…you need to sow the seeds of failure now.
Here’s your check list.
Don’t state any kind of summary of decisions that have been made.
Don’t get folks to commit to any kind of specific actions.
If someone does unwittingly verbalize decisions or commitments to actions…be careful that nobody makes a written note of them.
In future meetings, never refer back to past unmet commitments of previous meetings.
In future meetings, focus on not meeting new commitments.
If you really want to ruin a meeting, you have to learn to cherish the awesome power of No follow-up.
In conclusion
We’ve explored a lot here, and it can seem overwhelming at first.
But if you practice hard, and diligently explore each of the tactics discussed, there’s really no limit to what you can fail to achieve.
The post 7 helpful tips to ruin a meeting – What not to do to run effective meetings appeared first on Luís Gonçalves.
June 13, 2017
How To Recover From A Project Completely Out Of Control
How To Recover From A Project Completely Out Of Control?
Some time ago, I finally had the opportunity to read a book that was on my reading list for a long time: Black Swan by Nassim Nicholas Taleb. The book is about uncertainty and unexpected events.
NNT (as the author calls himself) explains that we live in an extremely complex world where we cannot predict all the events which will happen, and therefore it is silly to try planning or predicting future outcomes.
Throughout the book, he mentions several events that humankind did not dream of that caused terrific outcomes.
Even living in this complex world, we always try to planning everything. We always try to predict the future. But, like NNT shows us, Plans fail because of what is called “tunnelling”: the neglect of sources of uncertainty outside of the plan itself.
We humans believe that we are good at forecasting if we do the same task over and over again; we think the more routine the task, the better we learn to forecast… We just forget there is always something non-routine in our complex world that will destroy our forecasts.
Like NNT explains: most delays and cost overruns appear from unexpected elements that did not enter into the plan—that is, they lay outside the model at hand—such as strikes, electricity shortages, accidents, bad weather, or rumours of Martian invasions.
We cannot project the behaviour of a system if we do not know all possible conditions of that system. Therefore we cannot truly plan; all estimations will be, most likely, completely wrong. Let’s make the bridge now into software development.
Everything that I described before can be applied directly to software development, so why the heck do most of the companies (in my experience) still ask for detailed project plans and estimations? It’s ridiculous even to start when we already know that we will be wrong!
Why do we still have Executive Management asking for milestone plans with detailed lists of features for months (of course they need this information, but there are better ways to do it)? Why do we have people bothering themselves with Gant charts full of detailed information that will be obsolete as soon they finish printing out the Gant chart?
Why do we have management looking into sprint reports, asking why the Delivered stories are not as high in number as the Committed stories? Why do we even have management forcing people to learn “how to get better at estimation”?
All the previous examples can be considered evidence of fantastic waste! We spend days and days trying to achieve what we cannot, so what can we do to avoid all this waste? The solution is simple: DO NOT ESTIMATE and FORECAST.
Woody Zuill is a guy that writes a lot about #NoEstimates; there are many more people doing so, but Woody is one of the ones that I am following quite closely. I am starting to talk about the topic more often myself;
The idea behind this approach is simple: We understand that we cannot do any estimations. Therefore we do not lose time trying. But how can we predict where, exactly, we are going to land? We cannot, but we can provide a time interval wherein the product will be ready. At the same time, we guarantee that we can deliver the highest value to the customer in small intervals of time.
But how can we help our clients to apply these ideas? How can we help clients to recover from projects that are completely out of control and bring them into some state of predictability?
Below I will describe how I am currently helping one of my clients applying these ideas. Feel free to contact me if you need some help.
Just a small background information about the project. This project will soon reach the eight digit budget. It´s not Agile at all, the teams follow the PMBOOK, but that does not matter, the ideas can be applied in the same way.
Every time I pick up a project, the steps that I follow are always the same.
Make the whole Value Stream Visible
To help my clients, we need to understand what is going on in the whole stream. Remember this is a waterfall process, this means that is not enough to just map the development plus testing phase. You need to map it all – business requirements, technical requirements, etc.
To do this I asked for help to different people inside of the organisation; I started with the business analysts. I asked them to map all the different steps of their process into a Kanban wall.
After that, I repeated the process and asked the people that were responsible for transforming the business requirements into technical specifications to map all the process. This process would contain a second kanban board that would be placed after the first one.
I repeated the same process for all different departments until we reached the “LIVE IN PRODUCTION” stage. Of course, I like to fill up walls (I could do it smaller), but we ended up with a 10 meters wall.
The reactions to this exercise were extremely interesting. People were shocked how long the process took. Of course, everyone knew the different phases but having a 10 meters wall telling you how long the process is, forces people to think.
Many told me this exercise was never done; this was the first time that someone took the time to visualise the whole value stream of a project.
Visualise the work
The next step was to make the whole work visual on the wall. Again, an eye opener for many people. It is funny how many still think that power points, excels or project management tools tell you something about a project. For me, nothing is more powerful than having a bunch of post-its on the wall representing the different pieces of work.
I believe many of my client´s employees thought the same; many told me that even without understanding anything about the project (they were external people to the project, visiting the room) they could immediately see problems on the wall, just looking at it.
When you do this kind of exercise, the bottlenecks in your system will become very visible and it´s almost impossible to ignore them, unless you want to ignore them :).
Create Predictability
When I joined the project, there was no idea how late the project was. Of course, we all had those Gant charts, and all fancy excels, but we all know those never tell us anything ;). So I needed to help my client to understand where they stood.
There were several steps that I took to bring predictability to the project.
Create Small Pieces Of Work
Organisations are like funnels; there is the top of the pipe and the bottom of the pipe. When you insert sand into a funnel, the sand will go out at a very fast pace.
If you substitute the sand for small stones, the stones will keep flowing but in a much smaller pace. If you put in bigger rocks, the whole funnel gets clogged, and nothing flows. Organisations are the same, if you are dealing with big pieces of work, the organisation will be clogged. You need to break those big pieces into smaller ones.
Limit Work In Progress
Limiting the work in progress helps the organisations to get things done faster. Let me use a very basic example of this concept. If you start to read a book on Monday, and you focus the whole week on that book until you are done, most probably you will read the entire book before Friday.
Now think that every day of the week you start reading a new book, and you will be reading five books at the same time. When will you be ready? You do not know, but most probably when the end of the first week arrives, you did not finish any of the books.
In organisations you have the same issue, people start too many things in parallel and do not finish anything. Make an effort and limit the work in progress as much as you can.
Measure Throughput
In general terms, throughput is the maximum rate of production or the maximum rate at which something can be processed. In this case, measure how many pieces of work the organisation can process for a specific interval. I usually measure this over a week.
Measure Lead time
The lead time is the latency between the initiation and execution of a process. For example, the lead time between the placement of order and delivery of a new car from a manufacturer may be anywhere from 2 weeks to 6 months. In industry, lead time reduction is an important part of lean manufacturing. In our case you can measure the time it takes from a business requirement is defined until the software is live in production.
In this case, you can measure the time it takes from a business requirement is defined until the software is live in production. Based on my experience, I would not be surprised that would take several months.
Start Forecasting Not Estimating
Having the previous information, you can start bringing visibility to what’s going on. Most probably the lead time will not be the most useful piece of information. At least not in a waterfall project where a piece of work can take months from the beginning until the end.
Instead, use the throughput, measure how many business requirements documents you do per week and do the forecasting for what is still missing. Yes, I know you think that business requirements documentation is not always the same size, does not matter. It will converge to an average, use that.
Repeat the same line of thought to every single part of the system; you will be able to predict pretty well what is your situation. How late you are from the original plan in just a few weeks.
What Can I Do With All This Information
Of course doing everything I mentioned in this article will not improve your release date, but will give you pretty good information where you are and where you will be in few months.
If you are too far away from the original date, start a series of discussions about prioritisation. Of course, you should always focus on the most important features, but experience tells me that very few companies are good in prioritising their work.
Start having a series of discussions with stakeholders about what can be dropped in order to meet the deadline. Executive managers need this kind of information to make business decisions.
Applying the same ideas in the past, I helped one company to cancel a project that costed until that moment 15 million euros.
Do you think that is crazy to cancel a project after spending 15 millions? Well, think twice! With this kind of information, I was able to show to the board of directors that we would need to spend 20 millions more in order to finish the project. The company would not be able to take that hit and they simply cancelled the project.
If you are in this kind of situation, I can work together with you to bring your projects back to life 
June 6, 2017
Scrum Product Backlog – the ultimate simplistic guide
While training some of my clients during the last few weeks, I have been continuously asked about scrum product backlog. To answer your ongoing questions, I have decided to research this topic more thoroughly and write this blog post.
The most simplified definition of Scrum Product Backlog is: ‘it is a list of all jobs that need to be done within the project’. They replace the traditional requirements of specification artifacts. Backlogs are designed in the form of user stories and can be technical in nature or user centered. Scrum Product Owner owns the Scrum Product Backlog. The Scrum Master, Scrum Team and other Stakeholders are all contributors. They have a broad and complete To-Do list to complete the backlog.
A typical Scrum backlog comprises the following items:
Features
Bugs
Technical work
Knowledge acquisition
The Scrum Product Owner uses a Scrum Product Backlog during the Sprint Planning Meeting to describe the top entries to the team. The Scrum team then determines which items they can be completed during the upcoming sprint.
Each Scrum Product Backlog has certain properties that differentiate it from a simple to-do list:
an entry in the Scrum Product Backlog that always adds value for the customer
entries in the Scrum Product Backlog are prioritized and ordered accordingly
the entry’s level of detail depends on its position in the log – all entries are estimated
it is a living document
there are no action-items or low-level tasks
User stories are the primary way for Scrum teams to express features on the agile product backlog. The stories are short, simple descriptions of the desired function told from the perspective of the user. For example, as a shopper, I can review the items in my shopping cart to see what I’ve already selected before going to the check out.
Bugs and new features describe something different that a user wants. Because there is no real difference between the two, bugs are also part of the Scrum product backlog.
Technical work and knowledge acquisition activities also belong on the agile backlog. An example of technical work would be an instruction like: “Upgrade all developers’ workstations to Windows 7″.
An example of knowledge acquisition could be a backlog item about researching various JavaScript libraries, then selecting a library.
Working with the Backlog
A backlog needs regular attention and care; it needs to be managed carefully. At the beginning, the Scrum Team and Scrum Product Owner start the project by brainstorming, and writing down everything they think of. The items that the owner and team come up with should be more than enough for a first sprint.
Scrum Product Backlogs are an ongoing process that comprise of the following steps:
Add and describe new items to they the list as they are discovered
Change or remove existing items as appropriate.
Move high-priority entries items to the top of the log in preparation for the next sprint planning meeting
Re-estimate the entries
While this is a collaborative process the Scrum Product Owner is responsible for making sure that the Scrum Product Backlog is in good, working condition. When using the Scrum Framework, about 10% of the Scrum Team’s total time should be reserved for maintaining the Scrum Product Backlog.
The collaborative maintenance of the Scrum Product Backlog helps to clarify the requirements and create a buy-in from the Scrum Team.
Common Pitfalls
The backlog is often confused with a requirements document.
There is no mandated format to represent the backlog: it can be an Excel document, a text file, database, a collection of index cards, or most commonly, Post-It notes.
Creating a physical form backlog increases the risk of creating multiple and conflicting versions; this is a dire mistake because the backlog is a single, trusted source of the work to be done.
Backlog items are atomic as opposed to narrative documents, meaning a single sentence could contain several distinct requirements, or conversely describe one requirement over several detailed paragraphs. The physical form encourages this “atomicity”.
The backlog should not describe every item at the same level of detail, or “granularity”. Features and tasks that are planned for the near future should be broken down into fine-grained items and accompanied with other details like acceptance tests, UI sketches, etc. Items planned for the more distant future can be described at a more macroscopic level.
10 Tips for Product Backlogs
Working with the product backlog can be challenging; many Scrum Product Owners wrestle with lengthy and detailed backlogs. The following tips can help you work with your product backlog effectively:
Tip #1: Complement your Product Backlog with a Product Roadmap
Use a roadmap to sketch the overall journey you want to take for your product. State upcoming major release with their goals or benefits, then design your product backlog from the roadmap. Use the goals to discover the right backlog items to ensure that you are in alignment with the product strategy. This helps you decide which items should be added to the product backlog and which ones should not.
Tip #2: Focus your Backlog on the Next Major Release
Use the product backlog as a tactical tool that states which product details–including epics and user stories– should be implemented for the next major release. This helps create a concise backlog that is easy to update and change.
Tip #3: Start with a Short and Sketchy Product Backlog
When you create a new product or feature, keep the lower-priority items coarse-grained. Use customer and user feedback to decide which features to implement to evolve and refine the backlog items.
Tip #4. Collaborate with the Development Team
Involve the team members in the product backlog work. You will benefit from their knowledge and creativity while discovering technical risks and dependencies. It also increases the understanding and buy-in of the team members, resulting in better, more clear requirements.
Tip #5: Say No
Decline ideas and requirements that do not help you meet the release goals or bring you closer to the product vision. This ensures that your product will have a clear value-proposition while preventing it from getting bloated.
Tip #6: Look beyond User Stories
While user stories and functional requirements are important, they are usually not enough. You must also consider the user interactions, the nonfunctional qualities of your product, and the user interface when creating your backlog.
Tip #7: Prioritize your Backlog
Use uncertainty and risk to decide how soon an item should be implemented. Addressing uncertain items early lets you test your ideas. You can learn from the failures as you continue with your backlog.
Tip #8: Proactively Manage your Product Backlog
Regularly groom and refine the items with the development team. Analyze the feedback and data collected from exposing the latest product increment to the users, then apply the new insights into the backlog. Remove or update existing older items while adding new ones. This maximizes your chances of building a product that users really want. It also keeps the product backlog up to date and concise.
Tip #9: Get the Backlog Ready
Break larger items into smaller ones by leveraging the insights gained from exposing product increments to the users. Ensure high-priority items are clear, feasible, and testable so they are ready for the sprint planning.
Tip #10: Make your Product Backlog Visible and Easily Accessible
Try a putting a paper-based backlog on the wall. This type of backlog has several benefits:
It is clearly visible and creates transparency (when on the team room wall and people are collocated).
You can see when your backlog is becoming too big because you run out of wall space.
I hope you like this blog. Please feel free to leave your comments below.
Thanks,
Luis
Sources used:
https://www.mountaingoatsoftware.com/agile/scrum/scrum-tools/product-backlog
https://www.mountaingoatsoftware.com/agile/scrum/scrum-tools/product-backlog/example
http://www.scrum-institute.org/The_Scrum_Product_Backlog.php
https://www.agilealliance.org/glossary/backlog/
http://www.romanpichler.com/blog/ten-product-backlog-tips/
The post Scrum Product Backlog – the ultimate simplistic guide appeared first on Luís Gonçalves.
May 29, 2017
Terrific retrospective Ideas to focus on individual needs – Mutant Star Fish Exercise
The Mutant Star Fish exercise gives great retrospective ideas to focus on people´s individual needs and performance.
The mutant Star Fish originally comes from a retrospective exercise called Star Fish. The Star Fish exercise contains three familiar questions: What Went Well? What went wrong? What should be improved? I´d like to add up an additional question focused on the team: “Why is it important for me to work in this team?”
The Mutant Star Fish Exercise
As the original exercise, this one also helps to identify problems and opportunities for the team using a simple visualization method. It also allows you to identify the individual needs of every team member.
While the original exercise concentrates on the team, the mutant version helps the team to understand the individual needs.
It contains 5 stages:
Stop: In the first stage, the team brings up the activities that do not bring any value – waste
Less: Here the team decides to reduce activities that require a high effort but don’t bring as much value as expected
Keep: Current activities that the team wants to keep. These are activities where effort and value produced are balanced
More: The team decides to use activities that boost its performance. These are the activities that are not so often executed but are very valuable.
Start: Start new activities to bring more value. These activities may be experiments.
Bonus: Extra Stage: Call it as you want: E.g.: WII-FM – “What´s in it for me?” Coolness. Amazing. Name this stage with a word or a phrase that will help the team to understand that this part should help them gather their individual needs and sentiments.
When to use The Mutant Star Fish exercise?
I suggest using the Mutant Star Fish exercise with teams that are new to Scrum (or Agile, generally). When people are new to Scrum, they are looking for their motivation. Focusing the exercise to both team performance and individual needs can help them to create a climate of “self-motivation”. They will understand that we are working as a team but we will never forget the single persons in the team. When a team starts with Scrum, team members are looking for a motivation to start this journey. In this way we ask them for it explicitly.
How to perform this retrospective ideas exercise
First of all, draw a diagram pictured below.
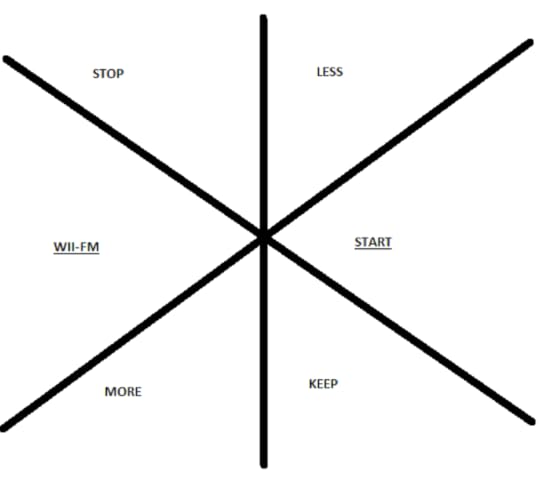
Credit: Stefano Porro
You all might be well familiar with this picture. In any case, let´s go through it together.
How to do it?
Ask the team to individually gather ideas for the STOP section (take about 3 minutes). Afterwards, ask everyone to read out loud their contributions and let them discuss the ideas. Take about 10 minutes.
Repeat the same for the LESS, KEEP and MORE areas.
In the START section, ask your team to vote for a single topic. This is a good way for a team to stay focused on a single topic, the most important one.
The order in which you put the sections to start with is important. For example, draw and underline START and WII-FM sections in the first place to start with. This is a good way for a team to start with positive brainstorming.
Going through all sections you proceed to the closure of the retrospective. At this point, the team members should talk about the individual needs and performance. Give the team members 5 minutes to write down something on post-its. Afterwards, ask them to present the ideas. After everyone reads his/her own ideas, Scrum Master will re-analyze the post-its to understand if everything is clear.
The idea here is to not implement these ideas/actions for the next sprints. But the idea is to guide the team through work they´re doing and adapt their work in a twofold manner: team and individual performance. For instance, if any of the team members is having certain issues, Scrum Master can always look at their individual needs they brainstormed earlier and guide the person towards the better path.
This retrospective ideas exercise helps to stay focused on WHY we are using Scrum. Developers wouldn´t be impressed by using numerical motivation (ROI, etc.), but you as a Scrum Master, must find the right key to motivate them.
If you are interested in getting some extra exercises, I created a blog post with dozens of Agile Retrospectives Ideas, check them and see if you find something interesting.
AGILE RETROSPECTIVES PROGRAM
A complete self-study program where you will learn anything that you need to become a great Agile Retrospectives facilitator
Subscribe Me
The post Terrific retrospective Ideas to focus on individual needs – Mutant Star Fish Exercise appeared first on Luís Gonçalves.
May 15, 2017
Easy And Effective Agile Retrospectives Exercise: DAKI
The agile retrospectives exercise called “DAKI” has brought me very good results in my retrospectives. First of all, let´s take a look at what DAKI really means.
Meaning of DAKI
D for Drop: When team members want to drop or remove something that bothers them. For example, a team wants to remove (drop) weekly meeting with their manager because of micromanaging.
A for Add: What does the team want to add to improve the process? Perhaps adding a weekly breakfast for the whole team or a company to share feelings/feedback with the rest of the people.
K for Keep: When team members want to keep something. For example, the team decides to keep a stand up meeting with a song chosen by a team member.
I for Improve: Something that a team wants to improve. A good example is when a team reduces the technical debt from a legacy code to avoid fixing bugs all day long.
When would you use DAKI exercise?
This exercise is suitable to use after several sprints working with the same team. The idea is to work with same people for some time using Scrum so that they can grow up as a team and accordingly propose some changes in a process.
Using DAKI in your team
Before conducting a retrospective you should draw 4 cells on the paper with the phrase of DAKI.
Timing: 30 minutes
Introduction: Explain your team shortly what is the mechanism behind the exercise. Use examples outside the team so that nobody gets offended.
Ask the team to share ideas for each of the letters of DAKI:
Drop (5 minutes), Add (5 minutes), Keep (5 minutes) and Improve (5-10 minutes).
You can use ideas from the “Improve” brainstorming and consider them as “Action items”.
Below is illustrated example how you can use DAKI exercise in your retrospective.

Action Items (examples):
Improvement – “User Stories have to be simpler”
Scrum Master should help a Product Owner to check the dependencies of each user story in the Sprint Backlog.
Scrum Master schedules a meeting with the manager (who is micromanaging people) and the rest of the team to explain there is no need to attend weekly meetings. In order to know the sprint progress, the manager should check the physical board.
If you have any questions related to this exercise, feel free to reach Mario at Twitter @metlucero.
If you are interested in getting some extra exercises, I created a blog post with dozens of Agile Retrospectives Ideas, check them and see if you find something interesting.
AGILE RETROSPECTIVES PROGRAM
A complete self-study program where you will learn anything that you need to become a great Agile Retrospectives facilitator
Subscribe Me
The post Easy And Effective Agile Retrospectives Exercise: DAKI appeared first on Luís Gonçalves.
May 8, 2017
Creating a Culture of Continuous Improvement and Experimentation
Continuous Improvement: If you think you can make something better (in your personal life, within a team, in a collection of systems you work with, or a process in your company), do it.
 Source: Andrew Cleff
Unpacking
“Kaizen” is made up of two Chinese characters: 改 kai = “change” + 善 zen = “good” – So kaizen translates literally as “good change” – i.e, improvement, betterment, or refinement. It has been colloquialized in today’s business parlance to add the concepts of “continuous” and “incremental.” So in our context, kaizen refers to a philosophy that focuses on the incremental, continuous improvement of working practices.
A common western attitude may be summarized as, “if it ain’t broke, don’t fix it.” The Kaizen philosophy, on the other hand, is to “do it better, make it better, improve it even if it isn’t broken, because if we don’t, we can’t compete with those who do.”
Get Everyone Involved
Participation in kaizen is not limited to a specific area (such as engineering), nor do ideas for change come from specific roles within an organization. The best approach includes everyone – Development, Design, Customer Service, Marketing, Management, Facilities. Everyone. You. Me.
The collective pursuit of continuous improvement is powerful – it gives an organization the ability to maneuver through unclear and unpredictable territory. (See Navigating Complexity aka Cynefin for Dummies)
Furthermore it is generally better to have a large group of people regularly, systematically, and methodically making many small improvements every day rather than a small group doing periodic big changes. (Kaikaku – radical change during a limited time – on the other hand, is not out of the question…)
Get Started
Toyota, as part of their Toyota Production System (TPS), developed a method for approaching continuous improvement that became known as the Toyota Kata. (The word kata comes from the martial arts. It is a set of exercises for practitioners that provides a form of both mental and physical patterns.) The TPS sequence is:
What is the target condition? (The future vision)
What is the actual condition now? What is the current problem we are trying to solve? (Go and see)
What obstacles do we think are preventing us from reaching the target condition?
What might be our next step? (There are so many possibilities)
When could we go and see what we have learned from taking that next step?
Probe, Sense, and Respond
In most of what we do, the relationship between cause and effect can only be perceived in retrospect. Uncertainty is normal – the obstacles and the potential paths to our target cannot be accurately predicted. To complicate things actual conditions might also be fuzzy.
Therefore our primary focus should not be in coming up with solutions per se, but instead on designing experiments that will help us to understand the current situation better.
That way, through continuous trial and error, questioning, reasoning, debriefing and reflection we obtain trial and success.
Experimental Design
I recently joined Esther Derby on one of her Q&A teleconferences. She presented ten questions to consider when designing experiments. These apply nicely to kaizen:
What factors may contribute to the current problem / situation?
Which factors can you control and / or influence?
What is your rationale for choosing this particular experiment?
What question(s) are you trying to answer with your experiment?
What can you observe about the situation as it is now?
How might you detect that your experiment is moving the situation in the desired direction?
How might you detect that your experiment is moving the situation in an undesired direction?
What is the natural time scale of the experiment? When might you expect to see results?
If things get worse, how will you recover the situation?
If things improve, how will you amplify or spread the experiment?
Be Transparent
After design, get a few experiments underway and then make them visible. The benefits of sharing (vs. going skunkworks) are many:
Others may have had similar obstacles and solved for them already. Why reinvent the wheel? Instead, see if you can make it better.
There may be hidden success in a failed experiment, or failure lurking in a success, either concealed by any number of cognitive biases from which the experimenter is suffering.
A successful change that becomes a “continue” action for one group could well become a “start” for another.
Another benefit of transparency and “including everyone” is that we get to collectively enjoy and celebrate progress. And that passion and confidence can be contagious, especially when the results over time are significant.
Rinse and Repeat
Recall our shared definition of kaizen… not simply good change, but continuous improvement. That approach includes not just “introducing new changes” but examining “old changes” as well.
Once a new change has been implemented, check back to see if things have taken hold. Contemplate things in any retrospective framework you like:
What is working well and can be expanded or applied to other areas?
Can the change be refined – reducing effort / time spent (See The 3M’s of Waste: Muda, Muda, and Mura )
Has a local peak been reached or is there more good change to be made?
Spread the Culture
If a kaizen approach is something new to the organization you’re part of, perhaps start with your own team. Your success and your transparency might just make other teams wonder, “What’s going on over there, in their yard? They seem to be slaying it… perhaps I’ll go and see.”
When interacting with other teams, don’t hold back from providing prompt, effective and constructive feedback on how the “interface” is or is not working. Sketch a picture of a possible better future. And then invite collaboration in the lab.
If your team is on the receiving end of feedback, be open and receptive. Ask clarifying questions, and get to a shared understanding of how both teams would like things to be.
Never be satisfied with what you or your team has accomplished today – keep looking for ways to make things better tomorrow.
The post Creating a Culture of Continuous Improvement and Experimentation appeared first on Luís Gonçalves.
May 1, 2017
Retrospectives: Checking a Box or Making a Difference
TLDR: Take the 1st Annual Agile Retrospectives Survey for a chance to win an Amazon Echo Dot.
As CEO and co-founder at Retrium, a tool that helps agile teams run more effective retrospectives, I spend a lot of time thinking and talking about the challenges facing agile teams and how retrospectives, when done correctly, can help those teams overcome blockers faster.
In my conversations with agile coaches, scrum masters, and our customers, I hear many of the same questions on a regular basis. Some of these questions focus on productivity and engagement while others are about how other companies are utilizing retrospectives, especially what tactics are used and how distributed teams collaborate.
VersionOne helped to shed some light on these challenges with the recent release of the 11th annual State of Agile™ survey, specifically around three key findings. First, retrospectives remain in the top 5 agile techniques up from 74% in 2016 to 83%. Secondly, distributed agile teams are becoming more prevalent with 86% of teams reporting that their teams are not all co-located. Finally, while 41% of respondents cited the need for consistent processes and practices as one of the top 5 tips for success with scaling agile, there was no tool or implementation practice mentioned in the results that specifically address the need for better, more consistent retrospectives.
One can go on to hypothesize that this means retrospectives remain varied, or even ineffective, in many agile spaces despite their popularity increasing. Or you could hypothesize that the flexibility of being able to customize each team’s approach to retrospectives makes them more valuable and effective.
The truth is, we don’t know. There has never been an in-depth study of how retrospectives are used in the real world.
It’s time that changed.
Last week, we launched the 1st Annual Agile Retrospectives Report survey with the intention of finding the common use cases, needs, and practices so we can all better understand the role retrospectives play in continuous improvement. If you’ve ever hosted, participated in, or been invited to a retrospective, we want to hear from you.
Visit RetrospectivesReport.Retrium.com or click here to start the survey immediately. As a thank you for taking the time to share your experiences, you’ll be entered into a drawing to win an Amazon Echo Dot. Plus, if you’d like to increase your chances of winning, share the survey with your Twitter followers by clicking here or including #AARR in your Tweets.
The survey is open through May 5 and we’ll be releasing the findings at Agile 2017 in August. Participants will receive the report via email as soon as it’s launched.
We hope you’ll share your experiences.
RETRIUM OFFERS 3 MONTHS FREE
Because you are my reader I am able to give you 3 months for free with Retrium.
SIGN UP AND YOUR FIRST 3 MONTHS ARE FREE!
The post Retrospectives: Checking a Box or Making a Difference appeared first on Luís Gonçalves.
April 25, 2017
Burndown Chart – The Ultimate Guide for every Scrum Master
Hi, during the last weeks I have been reading several blog posts on the topic: Burndown Chart and this week I want to bring you a small summary of what I found. Hope you enjoy.
Burndown chart is a common and useful tool usually used in stand-up meetings (not only) to assess how much work has been completed on an assignment. I personally like to use it as a forecasting tool instead. It gives us a rough idea how we are doing in the current Sprint.
The simple, visually appealing format is used by many Agile practioners because it can be easily understood by all team members.
Burndown charts are used to measure how much work has been completed on a project during a specific timeframe, then compared to the amount of time still available to complete the project. They outline the amount of work planned versus what is performed during each iteration.
The charts are a highly useful tool used to monitor completed work and work that still needs to be done during designated time frames. However, as useful as they are, burndown charts have their limitations. They cannot, for example, clearly or effectively measure work that is still in progress; they only measure what has already been completed.
Below is an example of a burndown chart. It demonstrates an example of work completed versus work that can be delivered during each iteration.
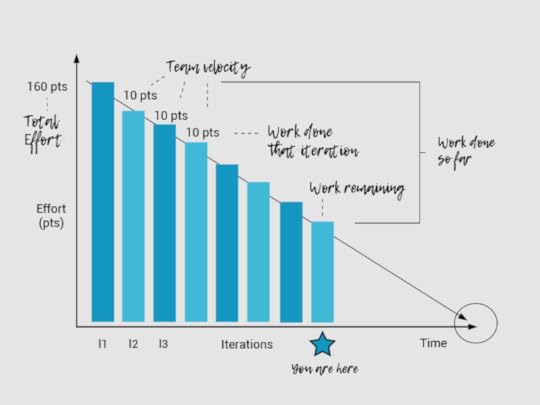 Originally taken from: http://www.agilenutshell.com/burndown
You can see by looking at the graph that the left side shows the total effort while the right side shows team velocity. This graph also provides the following information:
Work completed during each iteration
Work still needed to be done
Timeframe when the team expects the project to be complete
While this chart is very clear and easy-to-follow, it’s not necessarily realistic. A true burndown chart will not have straight lines showing timeframes because the team will never complete their tasks at the same speed or in the same timeframe.
A realistic burndown chart will look more like:
 Originally taken from http://www.agilenutshell.com/burndown
Pro’s and Cons of Burndown Charts
Burndown charts are highly effective tools with many strengths. However, there are weaknesses, or cons as well to using the chart.
Pros of using a burndown chart are:
Burndown charts are simple, easy-to-follow representations
They clearly show an Agile team’s achievements
Clearly show what the team still needs to achieve
Let teams know if they are on target with their deadlines.
Alerts the team to potential problems or bottleneck situations quickly
Show plateauing of a project
Teams can see where they need to focus their efforts to get back on track.
Motivate the team
Show the team where they have succeeded and work they still need to do
The cons of using a burndown chart include:
They are limiting – the charts only show part of the total picture
They do not show what tasks are still in progress
They do not show how close the team is to completing their work.
They can lead to exaggerated expectations
Teams that run aggressive projects based on unrealistic or over-inflated timeframes can become easily disgruntled, or lose their motivation when the project does not run smoothly. The team can also lose morale if they feel they are being micro-managed.
Any information that is not covered in the burnout chart should be addressed in a SCRUM meeting, so the team has a clear picture of how the project is going.
How to Create and Use a Burndown Chart
To effectively create and use a burndown chart, the team must first implement a task breakdown. This usually happens at the sprint planning meet. Each task identified in the breakdown should have an allotted amount of time designated to complete the task. Ideally 12 hours is the best amount of time. This can be broken down into two, six hour days.
Once the task breakdown has been completed, the team can then create and plot their burndown chart. If the team assumes that each task will be completed at the same rate as the rest of the tasks, then their ideas should reflect their steady progress.
There are many Agile tools available with built-in burndown chart abilities. Some of these tools include: Rally, RTC, Version One, and Mingle. If you do not have any of these programs, an excel spreadsheet can be used to create a burndown chart. On the spreadsheet, input the sprint dates on the X axis and the remaining efforts on the Y axis.
I’ve include an example of an ideal burndown chart below:
 Originally taken from https://www.scrumalliance.org/communi...
In this example, the sprint is 2 weeks; the team consists of seven members working 6 hours per day for a total of 420 hours. As you can see, the total hours for the entire sprint are show on the Y axis. The red line shows what the ideal work progress should be during the sprint. If we assume there will be no problems or delays, all the tasks should be finished by the end of the sprint.
The next example demonstrated another burndown to chart the team’s progress during the sprint:
 Originally taken from https://www.scrumalliance.org/communi...
You can see that the redline shows the progress that has been completed while the blue line shows the remaining effort needed to complete the project.
Release Burndown Charts
Scrum projects can use release burndown charts to track their progress. The Scrum Master is responsible for updating the release burndown at the end of each sprint exercise. On this chart, the horizontal axis shows each sprint while the remaining work is shown on the vertical axis. Teams can use any method they choose to show the remaining amount of work including story points, team days, and ideal days.
An example of a release burndown chart can be seen below:
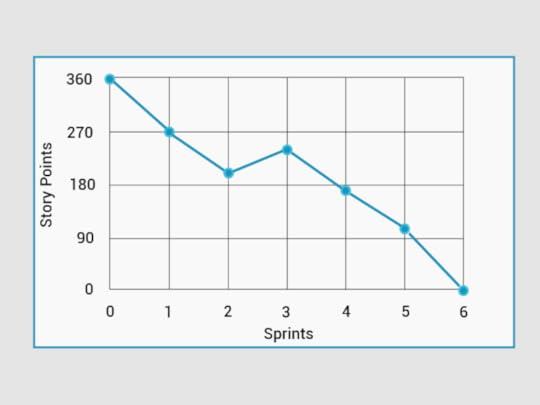 Originally taken from https://www.mountaingoatsoftware.com/...
In this example, the chart shows that the team started with 360 story points. To successfully complete their project in their planned six sprints, the team would have to average 60 story points for each sprint.
This example also shows that in the first sprint, the team used 90 story points with 270 remaining. The second sprint ran smoothly as well. However, as you can see in the chart, something happened during the third sprint and the team burned up their story points. Once they resolved the issues in the third sprint, the project ran smoothly for the remaining sprints.
There are a few reasons why teams can burn up their story points including adding extra work to the project, making changes to the timeframe, or adjusting work estimates. Once these issues are re-evaluated, the project should run smoothly again.
Release burndown charts are popular with many teams because they work well in a variety of situations. However, they do not work well on projects where lots of changes occur. These projects work best using an alternative form of the release burndown chart.
Common Errors That Create Misleading Information in Burndown Charts
These common errors made by agile teams can cause misleading information on the burndown charts:
Multiple stories with a common function
There are some projects where teams have multiple stories but only one generic function. Burndown charts can be misleading in these circumstances because adding extra tasks will give the wrong number of total hours. Tracking the progress with incorrect time is also misleading.
Too Big or Too Detailed Tasks
If there are too many tasks created in a project, it becomes too difficult for the team to accurately track them. Tasks should be small enough that they can be completed within 12 hours. Big tasks cannot be assessed properly during a daily timeframe; teams cannot assess how much work remains.
Effort Remaining and Effort Spent are Misunderstood
This is one of the most common errors made by teams. To avoid making this error, teams should re-estimate their tasks at the end of each day and update how much time is needed to complete the task.
Lack of Discipline in Updating Charts
Teams must update the ‘effort remaining’ measurements on their burndown charts every day. If teams lag in this task, their burndown chart might not be accurate.
Burndown vs Burnup Charting
There are two different charts used measure time on a Scrum project: burndown and burnup. Burndown charts measure how much work remains on a project. Burnup charts, on the other hand, measure the amount of work that has already been completed and the total amount of work that has been done.
Teams will have an easier time deciding which chart to use for their project if they first look at their project goal. For example, if their aim is to keep the project alive by presenting information to a client, or the Scrum Master is trying to motivate the team, a burnup chart would be the better option. But if the Scrum Master wants to gain greater knowledge or understanding of what is occurring in the project, the burndown chart is the better choice.
Information vs Simplicity
Another difference between burndown and burnup charts is one is simplistic while the other provides information. Burndown charts are simple: one line heads towards the zero mark as the team completes the project. They are easily understood by everyone on the team and do not require a lengthy explanation. However, burndown charts do not tell the whole story. They often conceal certain information like the effects of scope change.
Scope changes occur whenever work is added to or removed from a project. All Agile practitioners and team members should be familiar with scope change. It occurs when clients add extra features to the project or remove tasks so the project can be completed on time. A burndown chart cannot show these changes, but a burnup chart can.
Test Your Skills As Scrum Master
ARE YOU WONDERING IF YOU ARE DOING A GOOD JOB AS SCRUM MASTER?DOWNLOAD MY ASSESSMENT THAT WILL PROVIDE YOU A GREAT INSIGHT ON YOUR DAILY ACTIVITIES AS A SCRUM MASTER
Get My Assessment Now!
Burnup charts use two separate grid lines to track the work that has been completed and the total amount of work already done. The total work done line can provide vital information to the team about why the project is not finished. Some reasons might include: work is too slow; too many new tasks were added to the project, or there are other problems within the project.
Burnup Charts and Regular Progress Meetings
For Scrum Masters who meet regularly with their team or customers, burnup charts are the better choice to use at the meeting. It’s easier to show the team’s weekly progress with a burnup chart. This type of chart will also show the group any testing or problems that have added more work during the week.
Scope Creep
Scope creeps are not beneficial to software projects. They are the uncontrolled changes or growth to a project. When scope creeps are affecting the project, the burndown charts show little work done. It can be very deceiving. However, burnup charts will clearly expose the scope creep in a project. While scope creeps are damaging to a project and every team’s nightmare, they can also be beneficial. When a scope creep is exposed, the team can use it to convince customers to stop changing or adding work to the project.
Fixed Scope Projects
A fixed scope project has a completion date for achieving all story points. Defined fixed scopes only happen under limited situations. For projects with fixed scope deadlines, burnup charts are not useful because they do not provide more information that the burndown charts.
Using Burndown Charts in Daily Stand-up and Sprint Retrospectives
Scrum Masters often use burndown charts and daily stand-ups as a self-organization tool with their team. The burndown charts provide a summary of the team’s work. It shows the master and members what work they have completed and what issues they face.
The information provided in the chart can be used as inputted data in a daily stand-up. If the team finds that they are lagging, there are things they can do to get back on track. They can:
Address bottlenecks be reallocating work
Solve issues
Use the expertise of team members to speed up more challenging story points.
Talk to the project owner to de-scope.
De-scoping should only be done as a last result. Every and all other possible solutions should be looked at first before taking this step.
The purpose of using a burndown chart in a daily stand-up is to get the team back on schedule again. During the meetings, it’s important that the Scrum Master look for different cues such as: how well the team is working together, who is the lead, the level of honesty; team collaboration from the member, and commitment to the project.
The burndown charts provide good input in sprint retrospective meetings because teams can see the changes and look at the information to find the real cause of any issue or delay. Through team discussions and brainstorming meetings, teams can analyze the information and find solutions.
Hours Remaining in Burndown Charts – Agile Anti-Patterns
Hours remaining burndown charts are great tools for tracking the amount of time remaining on each task. They are easy to read and will quickly show the team if they are on time with completing their story points at the end of each sprint.
Yet, as effective, and easy as this chart is, many teams still face a very common problem: the information on the chart appears to deceive the team. While the charts show the team on target with each sprint, the reality is much different. That is because we tend to buy into the myth “Plan the work, work the plan” to often without putting the effort in to complete the tasks. It’s easy to plan the project but to complete it, the team must put the work in.
How can you tell if this is happening to your team? Here are some signs to look for:
Inefficiencies in the hours remaining metrics
Root cause analysis uses the burndown chart to reveal any issues
Team members want to toss the burndown chart completely
What Can You Do?
To stop this from happening in your team, it’s important to focus on the primary directive. Use software that can complete burndown charts in the sprint. Focus on the finished stories as the primary metric. Add a completed burndown chart to help regain your team’s focus.
Hours remaining burndown charts should never be discarded because they are valuable tools that can help a team organize the work that still needs to be done. You can use these tools to keep your team focused on the present situation with the project; not on past myths or false hopes.
Sources used in this article:
http://www.agilenutshell.com/burndown
https://www.mountaingoatsoftware.com/agile/scrum/scrum-tools/release-burndown

The post Burndown Chart – The Ultimate Guide for every Scrum Master appeared first on Luís Gonçalves.
April 24, 2017
Online Retrospective Tool – 6 Great Examples For Your Retrospective
Hi guys, this week I am writing a blog post for all of you that are looking for a good Online Retrospective Tool. This post will bring several scrum retrospective tools you can use when you run Agile Distributed Retrospectives.

Retrium
Agile Retrospectives
Description
Retrium is one of the only tools designed specifically for retrospectives and it’s my personal favorite!In a single click, Retrium lets you run powerful retrospective techniques, like Mad Sad Glad and Start Stop Continue.Each technique includes private brainstorming, dot voting, prioritized discussion, and more. On top of that, Retrium allows you to create action plans to track your progress.
RETRIUM OFFERS 3 MONTHS FREE
Because you are my reader I am able to give you 3 months for free with Retrium.
SIGN UP AND YOUR FIRST 3 MONTHS ARE FREE!

Go Reflect
Agile Retrospectives
Description
GoReflect is a free tool designed specifically for retrospectives. It supports Start Continue Stop, Mad Sad Glad, What Worked and What Didn’t, and a custom board that allows you to define your own columns. Unlike a typical retrospective, goReflect encourages the idea of a continuous retrospective to drive continuous improvement. Each retrospective board is always available for the team to share their thoughts by adding cards anytime from anywhere. goReflect also provides a dashboard that presents interesting analytics to the team that can promote retrospective engagement.

ScatterSpoke
Agile Retrospectives
Description
ScatterSpoke is an agile retrospective tool where anyone on your team can quickly launch and share a retro with team members. Everyone can post cards in real-time, vote on issues, create groups, or pin items for follow up. Create cards when they happen. Have a retro without trying to remember. Gather metrics on common patterns. Have a smarter retrospective. It’s time to ditch the stickies.

Sensei
Agile Retrospectives
Description
Fun, effective retrospectives for distributed agile teams. Engage your whole team in the continuous improvement process with simple activities that make it easy to gather insights, suggest actions and follow up on commitments.

Agile Cockpit
Agile Retrospectives
Description
There is an Agile tooling app which is specifically made for Distributed Team Retrospectives called – Agile Cockpit. It has an app which is called Retrospective app and is real time and teams across locations can real time capture their retrospectives

Stormz Hangout
Agile Retrospectives
Description
Conduct a retrospective with a remote team using Google Hangout.
If you are new to my blog you should know that I write a lot about Agile Retrospectives. If you are interested in the topic there are several blog posts that I believe you will find interesting:
Are You Aware Of The 5 Most Asked Questions About Agile Retros?
Agile Retrospectives Ideas: Games For Your Next Retrospective
9 Deadly Agile Retrospectives AntiPatterns Every ScrumMaster Must Avoid
Retrospective Agile Facilitator Role and Responsibilities
Big thanks,
Luis
The post Online Retrospective Tool – 6 Great Examples For Your Retrospective appeared first on Luís Gonçalves.


