
Jessica Merchant's Blog, page 395
September 30, 2016
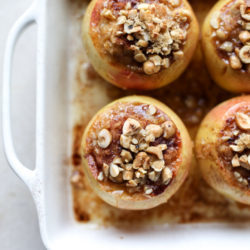
Oatmeal Baked Apples with Maple Brown Butter and Toasted Hazelnuts.
Raise your hand if you’re feeling dessert for breakfast.

Both my hands are so highly raised. I mean, twist me arm why don’t you.
OKAY. I guess I’ll eat brown butter and caramely apples for breakfast if you WANT me to. Gosh.

This isn’t ACTUAL dessert because it has oatmeal. And apples. Which means that this entire meal could possibly lower your cholesterol and keep the doctor away. Right right right?

Guys. I am in full blown FALL mode. I got back from upstate New York last night (definitely want to move there, no big deal) and it was so beautiful and stunning and full of autumn cheer. And when I returned home the air was crisp and Eddie had bought ten (yes TEN) pumpkins for our patio. Now that we have Max let’s just say it’s kind of easy to go overboard on the holiday décor.

I want to submerge myself in a vat of apple cider and eat a million apple cider donuts and burn fall scents like the crazy candle lady that I am. I definitely broke out a way-too-heavy scarf and can’t stop looking at sweaters in colors of burgundy and mustard. I even want to maybe eat OATMEAL.
What did I do with the real me?

It’s true that I tend to like my oatmeal best in cookie form, but sometimes a bowl of steel cut oats with brown sugar and cream tastes so freaking wonderful in cooler weather. I like it best when it’s baked but since I tend to lean towards the highly impatient millennial side, stovetop is easiest.

I’ve made baked apples before but they weren’t stuffed with actual brown sugar oatmeal. The filling for those was more of a crumbly crisp like filling – crunchy and super sweet and full of bourbon.
These ones can totally pass for breakfast… because I say so? The apples are sprinkled with cinnamon and drizzled with brown butter before being stuffed with the creamy oats. Like oatmeal you could already eat.
THEN they are topped with chopped hazelnuts and baked until perfection.

When they come out, a bit fat drizzle of maple brown butter goes on top. I never even cared about maple syrup – until this week apparently since this is my THIRD recipe in a row that involves it.

Aren’t these just super adorable?
They are perfect for sharing or even for brunch and you can make them a few hours ahead of time too. Maybe even prep them the night before.

Plus, ice cream is still cool for breakfast too. I said so!

Oatmeal Stuffed Baked Apples with Maple Brown Butter
Yield: makes 4 apples
Total Time: 1 hour
Ingredients:
4 honeycrisp apples
1/2 teaspoon cinnamon
2 cups water
1 cup old-fashioned rolled outs
1/2 teaspoon salt
1/4 cup heavy cream
1/4 cup dark brown sugar
1/2 cup hazelnuts, toasted and chopped
maple brown butter
4 tablespoons unsalted butter
4 tablespoons maple syrup
Directions:
Preheat the oven to 400 degrees F. Spray a baking dish with nonstick spray. (To peel the hazelnuts, bring water to a boil and add 2 tablespoons of baking soda. Boil for 3 minutes, then drain and run under cold water to remove the skins.)
Take each apple and cut the stem and center out to create a hole in the middle. You want to be able to stuff the oatmeal in the center and you also want to use the apple insides for the oatmeal! Chop up the apple that you remove from center. Sprinkle the apple insides with the cinnamon.
Bring the water to boil. Add the oats, apple pieces and the salt and reduce the heat to a simmer. Cook, stirring often, until the oats are thick and creamy, about 10 to 15 minutes. Stir in the heavy cream and brown sugar.
While the oatmeal is cooking, heat the hazelnuts in a skillet over medium-low heat, shaking or stirring constantly. Cook until they are toasted and fragrant, about 6 to 8 minutes. Remove, let cool and then coarsely chop.
Drizzle each apple inside with some the maple brown butter (but save some for the topping too!). Fill each apple with the oatmeal and top with the hazelnuts. Bake for 35 to 40 minutes, until the apples are softened.
Serve immediately with the remaining maple brown butter. And you can always add ice cream on top if desired!
maple brown butter
Heat the butter over medium heat in a saucepan, whisking constantly. Cook until it bubbles and the brown bits appear on the bottom (about 4 to 5 minutes) then quickly stir in the maple syrup and remove it from the heat. Whisk for another 30 seconds. Use immediately.
Be sure to follow howsweeteats on instagram and tag your recipes with #howsweeteats! You can also post a photo of your recipe to the howsweeteats facebook page. I appreciate you so much!

I’m moving my life into that bowl.


September 29, 2016
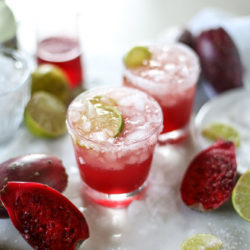
Prickly Pear and Ginger Beer Margaritas.
I bet you’ll never guess why I love this one.

Could there BE another cuter, pinker drink than this prickly pear margaritas, said Chandler Bing.
I think not.

Just look at that shade! Wildly gorgeous and completely natural. Between these prickly pears and my pitaya obsession this summer, my skin might turn hot pink. Not complaining one single bit.

So what do these gorgeous little pink pears taste like? Oh. Let me tell you.
I think they taste like watermelon gum. Like watermelon bubble gum. I actually googled what they are supposed to taste like because mine seemed almost too good to be true, and wouldn’t you know that I saw both bubble gum AND watermelon juice?! And cotton candy. They sort of taste like that too.
In short, they taste like a unicorn fairy prancing on a rainbow. Don’t you want to drink a unicorn fairy prancing on a rainbow?! I mean.

The thing is though that they are NOT overly sweet. It’s a natural flavoring of watermelon gum, if there could ever be such a thing. That’s why I wanted to add something with a bite to it, a flavor that could take us further into fall with a hint of spiciness. Enter ginger beer!
Gosh, I freaking love ginger beer. Fever Tree is my favorite brand and it tastes fantastic, making me never want to drink ginger ale again. I topped the drink off with the ginger beer which made it not only delicious but also a little bubbly, which I adore. It’s unique to most margaritas and the fizz is such a welcomed addition.

Also, let’s talk about how deprived I feel for not discovering prickly pears sooner! And pumping my guts full of artificial cotton candy flavor while this beauty was right there the whole time. These adorable things are in season through the holidays so the whole pink + green combo can also be your holiday cocktail of choice!
This is the best day ever.

Prickly Pear and Ginger Beer Margaritas
Yield: makes 1 drink, is easily multiplied
Total Time: 30 minutes
Ingredients:
coarse salt for the rim
2 ounces silver tequila
1 1/2 ounces Grand Marnier
1 ounce fresh lime juice
2 ounces prickly pear syrup (recipe below)
2 ounces ginger beer
lime wedges, for serving and garnish
prickly pear syrup
2 prickly pears, flesh scraped out
sugar
Directions:
Place the salt on a plate. Rim a glass with a lime wedge and dip in the salt to coat. Fill the glass with crushed ice.
In a cocktail shaker with ice, add the tequila, grand marnier, lime juice and syrup. Shake for 30 seconds. Pour mixture into the glass, then top it off with the ginger beer. Add a few lime wedges and stir. Drink up!
prickly pear syrup
Place the pears in a food processor and blend until pureed and "juiced." Strain the juice through a fine mesh sieve. However much juice you have is how much sugar you want! If there is 1/3 cup juice, you want 1/3 cup sugar. Place the juice and sugar in a saucepan and heat over medium heat. Whisk until the sugar dissolves and the mixture starts to simmer.
Remove from the heat and let cool.
Be sure to follow howsweeteats on instagram and tag your recipes with #howsweeteats! You can also post a photo of your recipe to the howsweeteats facebook page. I appreciate you so much!

Going to drink this in my hologram shoes and Lisa Frank leggings. Just kidding! Not.
September 28, 2016
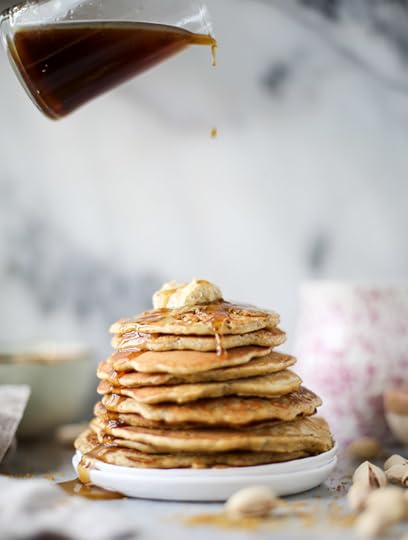
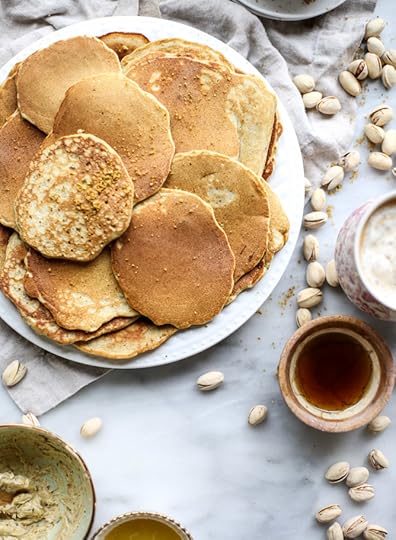
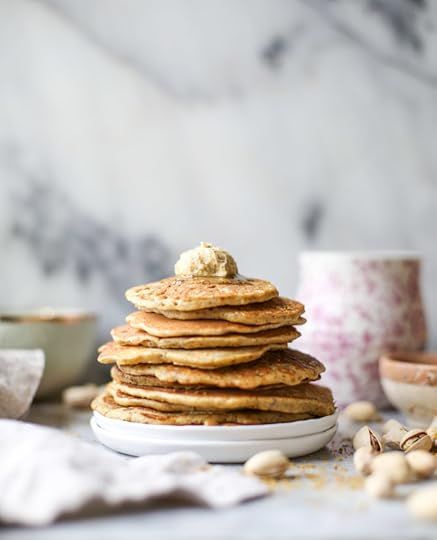
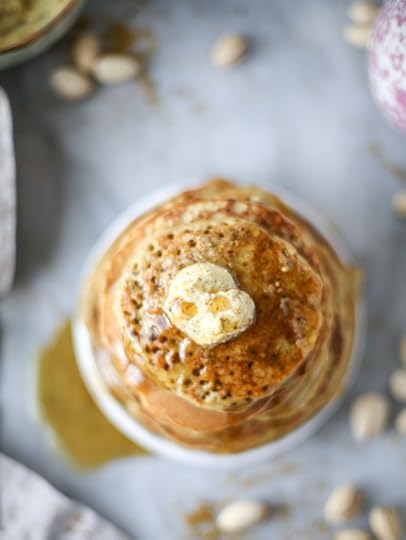
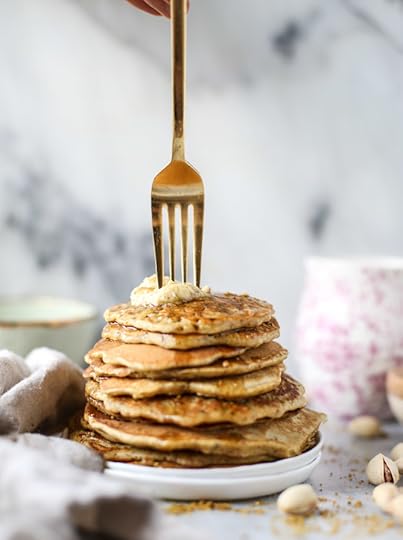
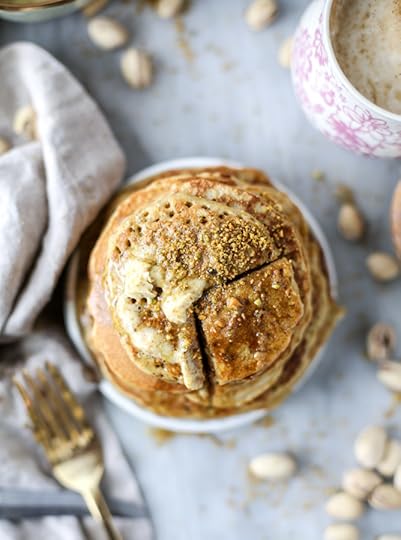
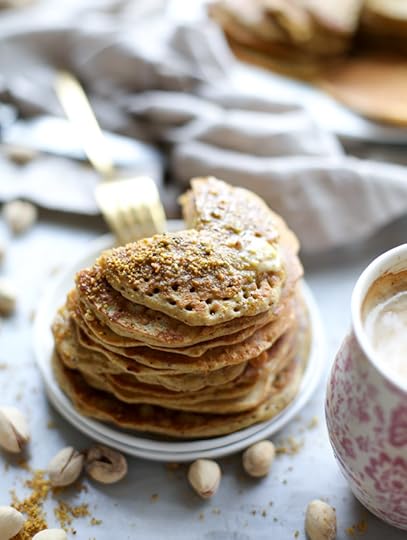
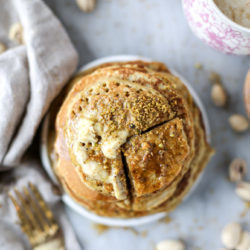
Pistachio Pancakes with Pistachio Butter.
You guyssssszzzz.
Pistachio pancakes. Freaking pistachio pancakes! Why haven’t I done this yet and why am I not eating them at this exact moment, like every minute for the rest of my life?
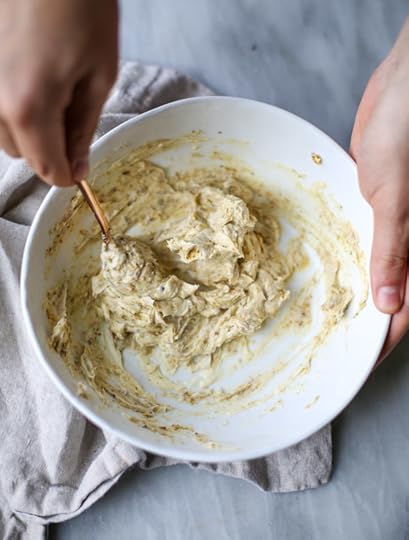
This whole thing started because I just wanted to make some pistachio butter. Not pistachio nut butter (though I did that once back on the blog in 2009 if you want to search and be horrified and disown me forever), but pistachios ground and swirled into sweet cream butter.
YES. Real butter with ground pistachios. I mean, it’s practically pistachio ice cream in butter. Or something like that.
I did this once before. I used it on fish. It was fantastic!
Why do I make fantastic things and forget about them?
Thank you internet I love you forever.
So for these pancakes, I also ground up pistachios and swirled them into the dry ingredients. OH MY GOSH. If you’re a pistachio freak (nut? so punny… ), you might just lose your mind. These pancakes themselves are not only an excellent vehicle for the butter and syrup, but they are incredible when spread with almond butter and rolled up and eaten on the go.
I die. You must try it.
The only thing that might rival these pancakes is my breakfast this morning. I am insanely excited because I’m in Aurora, New York visiting the Mackenzie Childs headquarters this week (check out my Instagram stories and snapchat!!) and guess what?
Delicious, soft and WARM muffins delivered to my door along with hot coffee and cream.
Oh hi, I’m never leaving.
Other than that though, nothing beats these pancakes. Know why else?
Brown butter. Plus vanilla. In your MAPLE SYRUP.
I don’t even know how something delicious is allowed to exist. This is my love language.
Pistachio Pancakes with Pistachio Butter
Yield: serves 4
Total Time: 35 minutes
Ingredients:
1 cup all-purpose flour
1/3 cup finely ground pistachios
2 tablespoons sugar
1 teaspoon baking powder
1 teaspoon baking soda
1/4 teaspoon salt
2 large eggs, lightly beaten
1 1/4 cups milk
1 teaspoon vanilla extract
2 tablespoons unsalted butter, melted
pistachio butter
3 tablespoons finely ground pistachios
6 tablespoons unsalted butter
vanilla brown butter syrup
2 tablespoons unsalted butter
1/2 teaspoon vanilla bean paste
1/3 cup maple syrup
Directions:
In a large bowl, combine the flour, pistachios, sugar, baking powder, soda and salt. Whisk together until combined. In a smaller bowl, whisk together the eggs, milk, vanilla extract and butter. Add the wet ingredients to the dry, mixing until smooth and combined.
Heat a large skillet or electric griddle over medium heat. Add a bit of butter if desired, then pour 1/4 cup of batter on the hot skillet and repeat, leaving an inch between pancakes. Cook until the pancakes bubble on the top and edges, about 2 minutes. Flip and cook for another minute or two until golden and set. Top the pancakes with the pistachio butter and syrup.
pistachio butter
Whisk together the butter and pistachios until combined. You can use it just like this or place it in the fridge to harden a bit. If so, you can wrap it tightly in plastic wrap and store it until needed.
vanilla brown butter syrup
Heat the butter over medium heat in a saucepan, whisking constantly. Cook until it bubbles and the brown bits appear on the bottom (about 4 to 5 minutes) then quickly stir in the vanilla bean paste and remove it from the heat. While warm, stir it into the maple syrup and serve immediately.
[adapted from my lemon ricotta pancakes]
Be sure to follow howsweeteats on instagram and tag your recipes with #howsweeteats! You can also post a photo of your recipe to the howsweeteats facebook page. I appreciate you so much!

Look at those little pistachio crumbles. I just can’t!
September 27, 2016
Tuesday Things.
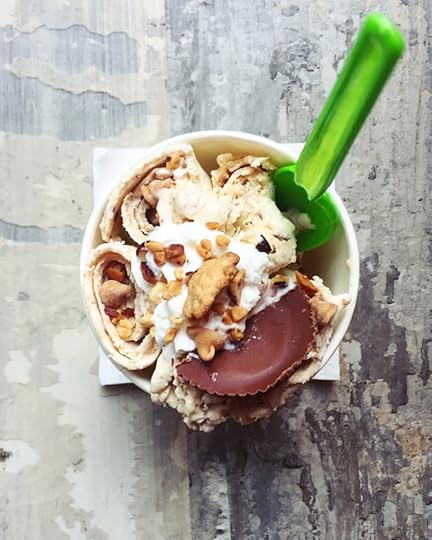
1. I have decided that I like the whole rolled ice cream concept with fruit only and not chocolate or peanut butter or caramel or whatever. Thinking this probably makes me 95 years old inside.
2. Um, mini pizza COOKIES?! Where has this idea been all my life?
3. In a major first world problem last week, I had an aisle seat on the plane and there was a stunning sunset out the window AND a rainbow. A freaking rainbow!! Outside of a plane! Like, in way up high sky. Hello, are you thinking what I’m thinking? Instagram pic. You can imagine my stress since I was unable to get a photo of said rainbow + sunset in the sky. Blogger’s worth nightmare? I think so.
4. That got me to thinking: what do you think the chances are that you fly on a plane with someone you don’t know, twice? Or multiple times? Because I SWEAR I saw someone that I recognized from a flight two years ago. It’s a long story.
5. Oh my gosh. these incredible life lessons by Anthony Bourdain. So good.
6. I’ve been drinking my coffee with no sweetener at all lately (mostly because it makes me feel like death, something about the caffeine + sugar + dairy is just NO, especially in the afternoon) but after three weeks I still MISS it! Because I still want my coffee to taste like ice cream. So what’s your favorite daily coffee order? Halllp me. Now that I’ve got myself addicted.
7. Eeeep I am getting SO into Masters of Sex, I loved the few twists it took this week. I definitely feel like I’m the only one watching it though. Did you see previews for the The Affair? It fast forwards THREE years after last year’s finale. Wah.
8. I’m big on brainstorming by myself but also in a team, and love these tips on how to do it better. That’s how I come up with all of my recipe ideas.
9. You know, just to follow up on my Tom Hanks obsession from last week. WHY COULDN’T THIS BE ME.
September 26, 2016
Weekend Photo Diary: Our First Time Apple Picking!

We went to Soergel Orchards this past weekend to go apple picking for the first time – and it was ridiculously fun! Max loved picking the apples, might have loved the apple cider donut even more (it was seriously the best I’ve ever had) and we came home with tonssss of pumpkins. Best time of year!!


That sugar though.
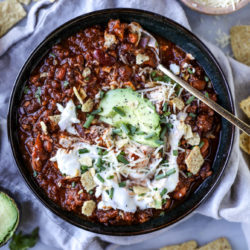
Game Day Beer Chili.
Who wants to have a cannonball competition right into this bowl of chili?!

It might be a bit warm but we can sit on an avocado raft and eat tortilla chips until we make our way to the edge. I’m all for this idea. Chili swim.
Especially THIS chili swim. It is so freaking delicious.

This chili comes from Ayesha Curry’s new cookbook, The Seasoned Life, and it is seriously FANTASTIC. Like, unexpectedly fantastic. We loved it so, so much.
It’s no secret that over the last seven years I’ve made (and shared) tons of chili. Really. A TON. And it’s also no secret that every single time I make chili, I never follow a recipe. Never. Not even with my own. (Okay wait I’m lying – always with this smoky chicken chili.) But I really love to make and taste and season as I go with chili. It depends on the day, my mood, what we’re making it for, what I have on hand and what we feel like using.
Yes, making chili in this house may just be a wildly dramatic event.

So it came as a surprise to even me that I followed the recipe. I almost followed it to a T. Just a few easy changes (I used beef instead of lamb and decreased the amount of cinnamon) and guess what? I might be using this chili recipe for the rest of my life.
GUYS.
It was that good. Holy cow.

Here’s what drew me to it:
I was looking through Ayesha’s book trying to decide on a recipe to make and I quickly scanned the chili. I loved that her version used tons of beans (especially pinto! major bean fan here), included sausage in the recipe (yes, I know, I don’t even like sausage!), included an entire bottle of beer (oh yes) and get this – included MAPLE SYRUP!!
Yep. Maple syrup. The moment I saw that, I was like… it’s happening. I have to make this right now. And that’s what I did.

Eddie and I both loved that this chili is hearty and not very saucy or soupy. That makes it an excellent chili topping for things like burgers or hot dogs or nachos (I may have had the latter last night… oops) and makes it super easy to scoop up with a tortilla chip. Priorities, man.
Aside from those obvious wins, it tasted really freaking good. I’ll be honest. I was hesitant to use the maple syrup, even though I was excited and intrigued about the addition. I thought it might be way too sweet or take away from some of the smoky flavor.
It didn’t do that at all. It was the perfect accompaniment to the beef, sausage, beer and crushed tomatoes.
So that there is my chili story for your Monday morning. Ayesha calls this her Game Day Chili and I have to agree that it’s ideal for that given it’s dipping capabilities. It can totally be made in the crockpot too. I might call it life-
changing chili since it’s some of the best I’ve had AND the recipe that made me use a recipe. I don’t even know who I am anymore.
Not complaining one leeeeettle bit.

Game Day Beer Chili
Yield: serbes 8 to 10
Total Time: 2 hours
Ingredients:
2 tablespoons extra virgin olive oil
2 teaspoons coarse salt
1 teaspoon pepper
1 pound ground beef
1 pound ground italian sausage (or links, just removed from casing)
1 red onion, diced
1 red bell pepper, diced
1 orange bell pepper, diced
1 yellow bell pepper, diced
1 jalapeno pepper, diced
1 (6-ounce) can tomato paste
1/4 cup chili powder
1 tablespoon cumin
1 tablespoon dried oregano
2 teaspoons smoked paprika
1/4 teaspoon ground cinnamon
1/4 teaspoon dried chili flakes
1 (12-ounce) bottle of your favorite beer
1 (28-ounce can) crushed tomatoes
1 (14 ounce) can fire roasted tomatoes
1 (15-ounce) can black beans, drained and rinsed
1 (15-ounce) can pinto beans, drained and rinsed
1 (15-ounce) can kidney beans, drained and rinsed
1/2 cup pure maple syrup
for topping: freshly grated cheese, sour cream, avocado, tortilla chips, chives, cilantro, red onion
Directions:
Heat a large pot over medium heat and add the olive oil. Season the beef and sausage with a sprinkle of salt and pepper. Add the beef and sausage and cook, stirring often, until browned and golden, about 8 to 10 minutes. Remove the meat with a slotted spoon and place it on a plate. Set aside.
Reduce the heat to medium-low. Add the onions, peppers, and garlic, stirring well to coat. Add a pinch of salt. Cook until softened, about 5 to 6 minutes. Add the tomato paste, chili powder, cumin, oregano, paprika, cinnamon and chili flakes and stir and mash it into the pepper and onions. Cook, stirring often, as the tomato paste begins to get darker in color - about 5 minutes. Pour in the bottle of beer to deglaze the pan, using a wooden spoon to stir any browned bits off the bottom.
Add the crushed tomatoes, fire roasted tomatoes, beans and maple syrup. Bring the mixture to a boil. Reduce it to a simmer and cook for at least one hour, or until it's thickened to your liking and the flavor has developed.
[slightly adapted from The Seasoned Life]
Be sure to follow howsweeteats on instagram and tag your recipes with #howsweeteats! You can also post a photo of your recipe to the howsweeteats facebook page. I appreciate you so much!

p.s. I like a bit of chili with my chips.
September 25, 2016
Chocolate Fudge Cake with Pernod Caramel Cream Icing.
[This post is brought to you by Pernod Classic – I’m working with them to create a few recipes this summer with their delicious liqueur! This is the final recipe in a series of three – thank you so much for reading! xoxo]
I have a major confession to make.

Up until recently, like very very recently, I was NOT a huge caramel lover.
In fact, I didn’t even really… like it.

Well. That’s a semi-lie, because when I was a kid, I was obsessed with all things caramel. I was a freak over those caramello candy bars and begged my mom to let me get one every time we went to the grocery store. My grandma always got pralines and cream ice cream with caramel ripples, and I couldn’t stop eating it. Anytime I was allowed to have sweets, I wanted caramel everything. In short, I’m pretty sure I overdid it on the caramel at a super early age.
By high school, I was over it. And I remained over it, until about two years ago when I began making my own sauce and making it often. The thing is that there is SUCH a difference between true, homemade caramel sauce and a jarred caramel topping that is often part of an ice cream sundae bar. The homemade caramel sauce is out of this world. Like, mind-blowing.
So! I knew that I had to make a creamy, icing-like version to top this chocolate fudge cake.
Because what ELSE would be so fantastic on top of a soft, fluffy cake in the fall? Nothing. I swear. Nothing. (Okay, maybe peanut butter, but I already did that.)

This is the final recipe I’m sharing in partnership with Pernod Classic, the anise liqueur that I have absolutely fallen in love with. I made a Pernod caramel cream and not only did it complement the cake in the best way possible, it was so wildly delicious that we wanted to eat it with a spoon.
Burnt taste buds and all. You know the drill.

P.S. I’m so impatient that burnt taste buds are the story of my life. Whyyyyyyy.

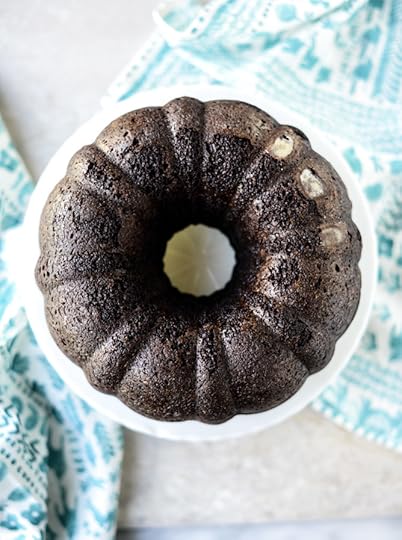
Let’s talk about the cake! Look at that CHOCOLATE. Also, how often does one get the most perfect bundt cake? Basically never. I knew it was a possibility because I got this original cake recipe from Joy, but I had just no idea how fantastic this cake would turn out. I made a few minor tweaks but it’s really quite simple. And I didn’t even have to fight it out of the pan!
Also, to be completely honest, I have no clue how we didn’t devour the cake itself before the caramel and fudge even made it on top. For real.

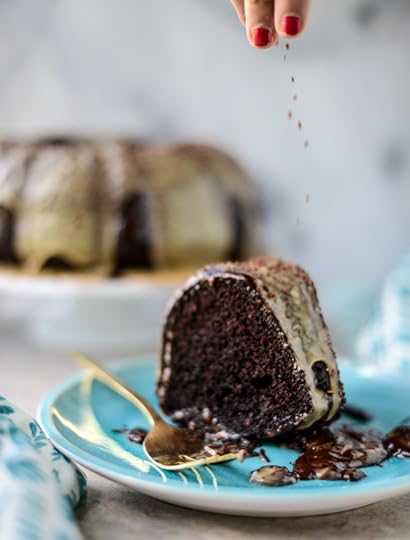
It’s messy and wonderful and fudgy and cakey and caramely and decadent and indulgent and needs to be on your table.

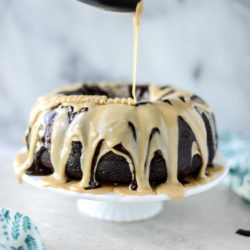
Once the cake is cool, we’re drizzling on lots of layers. A layer of Pernod caramel. A layer of dark chocolate ganache. Another layer of caramel!
And a layer of chocolate sprinkles, because I’m eternally seven years old. I’ll never leave sprinkles behind.

Chocolate Fudge Cake with Pernod Caramel Cream
Yield: makes one 10-inch bundt cake
Total Time: 2 hours
Ingredients:
1 cup brewed coffee
3/4 cup Dutch process cocoa powder
2 tablespoons espresso powder
2 1/4 cups sugar
1 teaspoon salt
2 1/2 teaspoons baking soda
2 large eggs
1 large egg yolk
1 1/4 cups buttermilk
1 cup canola oil
2 teaspoons vanilla extract
2 1/2 cups all-purpose flour, sifted
pernod caramel cream icing
1 cup brown sugar
4 tablespoons unsalted butter
1/3 cup heavy cream
¼ cup Pernod Classic
1 tablespoon vanilla extract
1 cup powdered sugar
chocolate ganache fudge
8 ounces high-quality chocolate, chopped
1/2 cup heavy cream
Directions:
Preheat the oven to 350 degrees F. Butter and flour and 10-inch bundt cake pan
Place the coffee, cocoa and espresso powder in a saucepan and heat over medium heat. Bring the mixture to a boil, whisking often, and then set it aside and let it come to room temperature.
In the bowl of your stand mixer, beat the sugar, salt, baking soda and eggs together with the whisk attachment until combined. Add in the buttermilk and oil and beat for another 1 to 2 minutes, scraping the sides or the bottom if needed.
Add the flour and beat on medium speed for 2 minutes. Beat in the cooled coffee cocoa mixture and beat for another 3 minutes. Pour the batter into the bundt pan. Bake for 60 minutes, or until the cake is set and a toothpick inserted into the cake comes out clean. Remove and let cool completely. Once cool, turn the cake out onto a plate or cutting board and drizzle the caramel on top. I like to do a layer of caramel, then a layer of the chocolate ganache, then a layer of the caramel again. Enjoy!
pernod caramel cream icing
Add all ingredients except the powdered sugar to a saucepan over medium heat and cook, stirring often, until the mixture bubbles and thickens, about 5 to 6 minutes. Remove and let cool. Once cool, whisk in the powdered sugar. Drizzle the caramel cream over the cake!
chocolate ganache fudge
Place the chocolate in a large bowl. Heat the heavy cream in a saucepan over medium heat until it is hot but not boiling - just until bubbles form on the sides of the pan. Remove it from the heat and pour it over the chocolate. Allow it to sit for 1 to 2 minutes, then stir continuously until a ganache forms - this may take a full 5 minutes but keep stirring! Allow the ganache to cool for a few minutes before pouring it over the cake or serving extra with a spoon.
[cake slightly adapted from joy the baker]
Be sure to follow howsweeteats on instagram and tag your recipes with #howsweeteats! You can also post a photo of your recipe to the howsweeteats facebook page. I appreciate you so much!
’bout to make this cake everyone’s breakfast.
September 24, 2016
Currently Crushing On.

{via}
Hello! How are you?! What’s new?
I just spent the past few days in Kansas City speaking at a blog event and now that I’m home, all I’ve got on the brain is apple picking. It was my first plane ride away from Max (I’ve left him overnight before but only driving, why is the plane ride so terrible now?!) and I can’t believe I survived. I have some more travel in the next few weeks and right now feel like our weekends are packed until the holidays. WHAT. That is crazy talk.
Um I also bought a new camera and just need a fun excuse to play with that babe outside for a while. YESS.
This week, I shared a few videos! You can find whole wheat pasta with feta, pine nuts and arugula here, a nutella latte here and my butternut squash goat cheese dip here. Enjoy!
favorite links this week:
avocado kimchi toast is going to be my new thang.
as a fig freak, i’m going absolutely nuts over these fig sticky buns. omg!
pumpkin oatmeal chocolate chip cookies that need to be made.
what what what! loaded baked potato tater tots.
the prettiest strawberry dream cake!
craving this almond flour blackberry crisp. so pretty.
go-to carbonara! a comfort food dream.
how to make your own DIY cookie sheet photography surface! i wish i was crafty.
also, yarn covered pumpkins?! hot pink? so cute!
it’s still super hot so this roasted plum ice cream sounds fab.
a slice of pumpkin truffle bundt cake is exactly what i need.
cutest ever pizza plush pillow. eeeep!
September 23, 2016
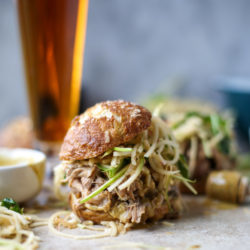
Smoky Pulled Pork Sandwiches with Spiralized Apple Slaw.
On PRETZEL BUNS! Oh yes.

And with maple mustard. MAPLE mustard. Please tell me that there are other insane mustard lovers out there. I don’t mind throwing my heart and soul at a condiment.

But hold up, FIRST, also puhhhleeease tell me how I have gone so long without spiralizing apples?! I mean, sure, I’ve spiralized zucchini and sweet potato and other vegetables, but fruit? Hello. This is my wheelhouse. I am a fruit fanatic. I might just spiralize my apples from now on and eat them this way through the end of the season.
It’s simple. It’s pretty! And it uses up every single bit of the apple except for the stem and seeds. Super cool if you ask me.
It’s not alllll about the apples though. I’m in a major pulled pork mood at the moment. I mean, technically, I guess I’m always in that mood, but lately I’ve been craving it more often than not. Especially, roasting a pork shoulder or even throwing one in the crockpot and using it for multiple different meals. So, seasoning it in a delicious yet versatile way in order to cure my meal boredom and also so I have an excuse to throw pulled pork on all the things.

In this case, I used almost the same recipe as my kalua pulled pork (
I don’t know any other expression to use for this.

Also, I was in totally food snobbery mode and could NOT find a bun that was making me happy for these sandwiches. Nothing seemed good enough at the grocery store, so I took about making my own. I used this recipe for soft pretzel rolls and kept them somewhat tiny, almost slider size, because I knew this would be a rich, loaded sandwich.
I also knew that Eddie would be THRILLED with a capital T to have pretzel buns to snack on throughout the week. In true food-blog-husband fashion, he started eating them before I even used them and I was all STOP IT WHAT ARE YOU DOING I NEED THE UNIFORMLY SIZED ONES.I will choose which ones you are allowed to eat. Okay?
Living in my kitchen is a joy. Right.
So yeah, that’s the whole shebang. I made a similar sandwich last year but was deprived of spiralizing apples. Now:
Pretzel bun plus
smoky, juicy pulled pork plus
maple Dijon mustard plus
spiralized apple slaw. !!!!!!
A million times better, don’t you think?!

Smoky Pulled Pork Sandwiches with Spiralized Apple Slaw
Yield: serves 6
Ingredients:
1 (4-pound) pork shoulder roast
2 teaspoons tablespoon coarse salt
1/2 teaspoon pepper
1 tablespoon liquid smoke
4 garlic cloves, minced
pretzel buns, or whatever bun you want! (mine were slider size)
spiralized apple slaw
2 apples, spiralized
1 1/2 cups fresh arugula
1 1/2 tablespoons olive oil
1/2 tablespoon apple cider vinegar
1 teaspoon honey
1/4 teaspoon salt
1/4 teaspoon pepper
maple mustard
1/2 cup dijon mustard
1 tablespoon maple syrup
Directions:
Place the pork shoulder in the slow cooker and cover it with the salt and liquid smoke, turning a few times to coat. Add the minced garlic cloves. Cover and cook on low for 8 to 10 hours. After 8 to 10 hours, the pork will easily shred with a fork. Shred it and mix with the juice in the slow cooker. I like to turn my slow cooker on high and let it sit with the lid off for 15 minutes or so - I find that if it's extra liquidy, some of the liquid will be absorbed.
Assemble the sandwiches on the bun of your choice with the maple mustard on the bottom, the pork piled on top and lots of apple slaw!
spiralized apple slaw
Toss the spiralized apples and arugula in a bowl. Whisk together the olive oil, vinegar, honey, salt and pepper in a small bowl. Pour it over the apples and toss well.
maple mustard
Whisk together the mustard and maple syrup until combined.
Be sure to follow howsweeteats on instagram and tag your recipes with #howsweeteats! You can also post a photo of your recipe to the howsweeteats facebook page. I appreciate you so much!

Wish I had it for breakfast.
September 22, 2016
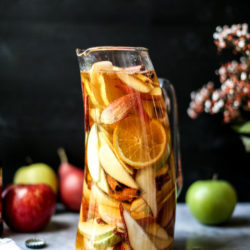
Cider Beer Sangria.
Hiiii. Happy first day of fall!

This calls for a huge pitcher of that stuff way up there. Right?
First, thank you for all of your wonderful words yesterday. Huge major hearts.
Second, please don’t disown me for not only sharing my third apple cocktail recipe in a row with you, but for sharing ANOTHER version of apple cider sangria. Another one. Yes.
Because one is never enough! More is more. Especially when it comes to apples. And… sangria.

I have made a lot of sangria over the years and a lot of cider sangria. clearly! But this one… with hard cider AND beer Is making me forget about my classic apple cider sangria from a few years ago, which is one of the most popular recipes here on the site.
If you’re a crazy apple cider fan (like me! woohoo!) and also like wine, you will looooove that original version.

A mini update was needed for my 2016 cider sangria though. And when I say “update,” I really just mean “option.” I wanted another option because I’m a crazy lunatic who gets bored with the exact same cocktail week after week. And never do I ever feel as inspired as I do in the fall.
SO. I love the hard cider + beer one for so many reasons. Obviously it tastes fantastic. But it’s also sort of… casual? Yeah. Casual. That’s the perfect word. It works on a random Saturday afternoon after you’ve gone apple picking and plan to sit on the couch and watch football for the rest of the day. It’s pretty darn simple and you don’t need any big bottles of wine, so there’s that.

Plus, it’s extra cold and bubbly and fizzy and refreshing. But it’s warm and cinnamon-y at the same time! Double duty sangria? Now that’s what I like to hear.

Cider Beer Sangria
Yield: serves 4
Ingredients:
2 (12-ounce) cold bottles hard cider (mine was heavy on the apple flavor)
1 (12-ounce) cold bottle wheat beer (a fall/octoberfest version is excellent!)
1 1/2 cold cups apple cider
1 cup cold ginger ale (or ginger beer! if you want it to have more of a bite)
1/2 cup apple brandy
2 apples, sliced
2 pears, sliced
2 oranges, sliced
a handful of cinnamon sticks
cinnamon sugar for the rim, if desired
Directions:
Add all of the fruit and cinnamon sticks to the bottom of a large pitcher. Add the hard cider, beer, apple cider, ginger ale and brandy together and stir gently. If you'd like, rim the edge of a glass with an orange wedge and dip in the cinnamon sugar.
To serve, pour the sangria over extra fruit and ice. Unlike regular sangria, I don't let this sit overnight since we're using the beer and it's carbonated and fizzy.
Also, as note, taste your sangria before serving. The sweetness level will depend on the beer you use along with the cider! If you need a touch of sweet, I'd go with some maple syrup stirred in.
[adapted from my meyer lemon shandy sangria]
Be sure to follow howsweeteats on instagram and tag your recipes with #howsweeteats! You can also post a photo of your recipe to the howsweeteats facebook page. I appreciate you so much!

and don’t forget to cinnamon sugar all the things.
Jessica Merchant's Blog

- Jessica Merchant's profile
- 53 followers

