
Jessica Merchant's Blog, page 372
April 15, 2017
Currently Crushing On.

Happy weekend! I hope you have a fabulous one, whatever the reason for the celebration is. We have a bunch of fun egg hunts planned for Max and are heading to my brother and sister-in-law’s for brunch on Easter!
Guys! ONE WEEK from today is my meetup in NYC! I hope to see you there!
Internet faves this week:
the best avocado toast breakfast.
matcha iced latte? it’s gorgeous.
how beautiful is this spring lentil salad with burrata?!
chocolate peanut butter avocado brownies. officially dead.
summer get here quick! so i can have a tarragon gin and tonic.
three quick pickled recipes. i love all things pickled!
buffalo wings soup dumpling? amazed.
these moroccan spiced carrots are beauties.
such a pretty rhubarb white chocolate tart.
these scallops with risotto look wonderful.
always love a good paloma.
samoa cheesecake?! sign me up.
The post Currently Crushing On. appeared first on How Sweet It Is.


April 14, 2017
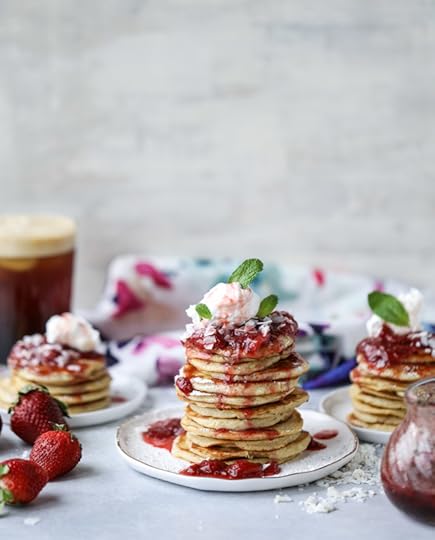
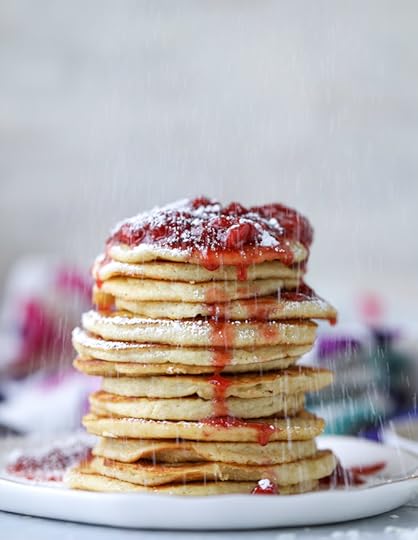
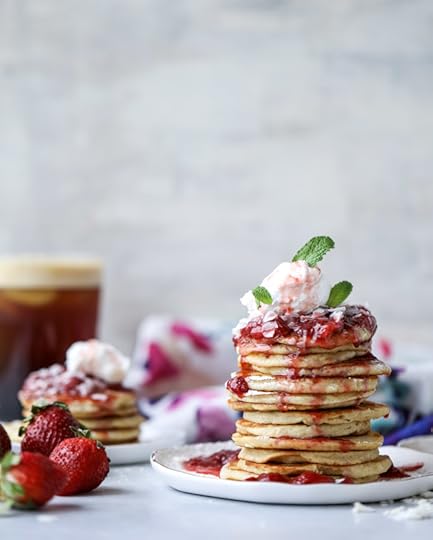
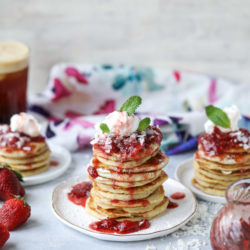
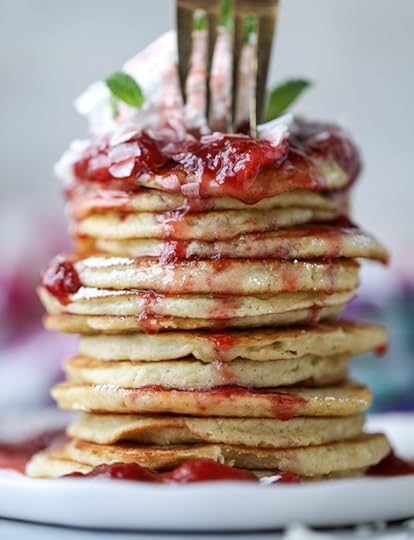
Mini Coconut Ricotta Pancakes with Strawberry Syrup.
Totally serving you breakfast today.
I feel like I’ve definitely overwhelmed you with breakfast and brunch recipes in the last few weeks, so I promise that after this one? We will take a little break.
For a few minutes, of course. The brunch obsession will just not quit.
THESE PANCAKES. Oh my gosh. They are SO good.
First, I adore ricotta in pancakes. I first tried it when I made these lemon ricotta pancakes with bittersweet chocolate. The key for me is to whip the ricotta first so it’s super smooth and creamy. Lovely!
Next, the coconut. We’ve already established that I’m a coconut freak so I’ll spare you my annoying rambles about how OMGIloveitsomuch. If you’re really not a fan, you can absolutely leave it out.
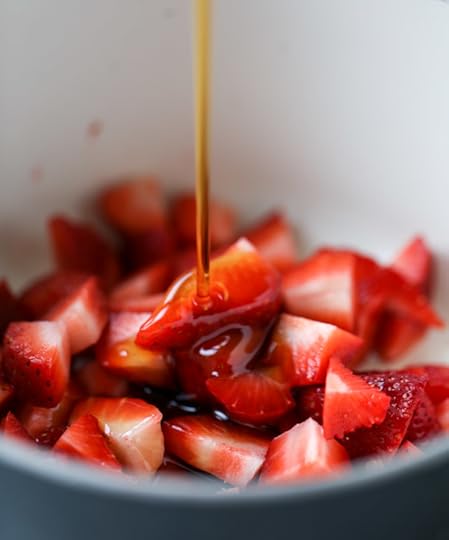
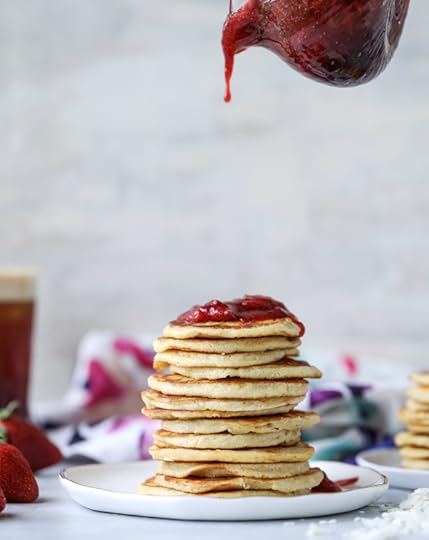
Because! The star of the show here for me, aside from the fluffy ricotta inside the pancakes, is the strawberry syrup. Whoa whoa whoa. It’s is so fantastic. It’s indulgent, but it’s really just maple syrup and strawberries cooked down. It adds so much to the pancakes though. Plus, you may just want to eat it with a spoon.
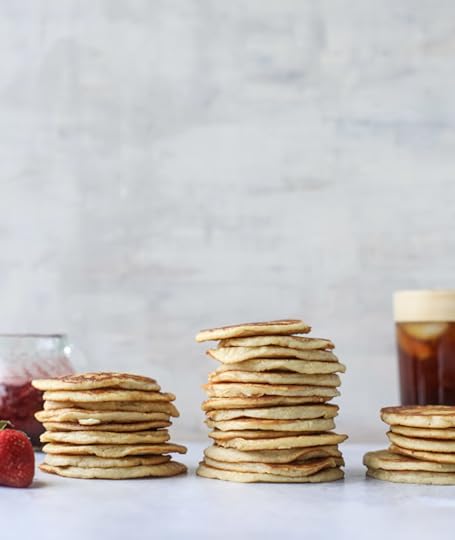
I made these in a mini version because all things mini are cuter. Plus, if they are part of a spread at brunch, they don’t need to be huge. Sometimes I want a savory breakfast, but still order one pancake on the side for a bite or two. It’s like breakfast dessert. The pancakes, however, tend to be HUGE and I can never finish them. So mini babies it is!
Obviously you can make big ol’ pancakes too if that’s your thing.
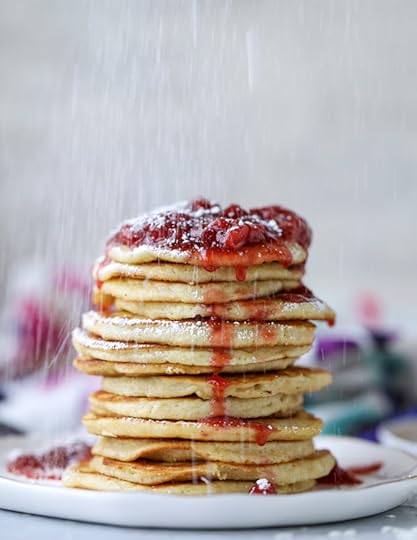
And powdered sugar showers are definitely a thing if you want these extra trashy.
Pancakes are truly the one food that put me straight into a carb coma. I can’t believe that there was a time in my life when I could eat only pancakes and syrup for breakfast without wanting to crawl back into bed an hour later. MY YOUTH.
These days, I like a few bites as mentioned – or I like them as a breakfast side dish with some form of eggs. Eddie on the other hand puts fried eggs on TOP of his pancakes. It’s interesting. I’m not against it but I’m not… into it yet.
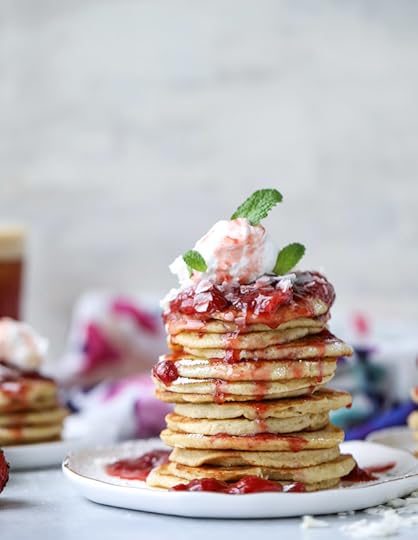
These I’m totally into. The coconut whipped cream on top completely sells me and cuts the sweetness of the strawberry syrup. I could EASILY take down an entire plate of these for breakfast if I planned on spending the day curled up under the covers.
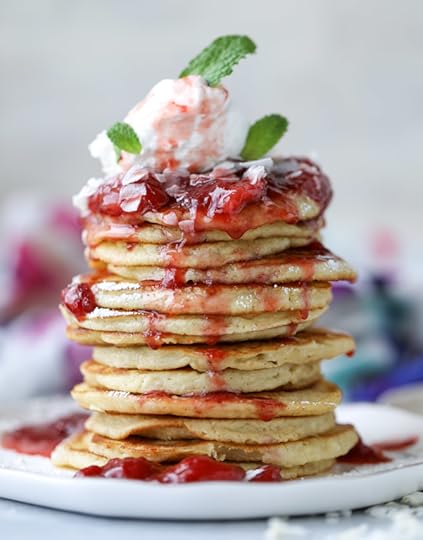
Plus, these are super adorable and pretty. Can I please only eat pretty food forever?
Mini Coconut Ricotta Pancakes with Strawberry Syrup
Yield: serves 4 to 6
Total Time: 30 minutes
Ingredients:
2/3 cup whipped ricotta cheese
2 large eggs, lightly beaten
1 cup all-purpose flour
1/2 cup unsweetened, shredded coconut
2 tablespoons sugar
1 teaspoon baking powder
1 teaspoon baking soda
1/4 teaspoon salt
1 1/4 cups coconut milk
1/2 teaspoon vanilla extract
2 tablespoons unsalted butter, melted
strawberry syrup
1 1/2 cups chopped strawberries
1/4 cup maple syrup
for topping
coconut whipped cream
powdered sugar
flaked coconut
fresh mint
Directions:
To make the whipped ricotta, add it to a food processor and blend until smooth.
In a large bowl, combine the flour, coconut, sugar, baking powder, soda and salt. Whisk together until combined. In a smaller bowl, whisk together the ricotta, milk, vanilla extract and butter. Add the wet ingredients to the dry, mixing until smooth and combined.
Heat a large skillet or electric griddle over medium heat. Add a bit of butter if desired, then pour 2 tablespoons of batter on the hot skillet and repeat, leaving an inch between pancakes. Cook until the pancakes bubble on the top and edges, about 2 minutes. Flip and cook for another minute or two until golden and set.
strawberry syrup
Combine the strawberries and syrup in a saucepan and heat over low heat until bubbling. Cook for 5 to 6 minutes, until the strawberries break down and the mixture is syrupy. You can mash the strawberries with a fork if needed!
Be sure to follow howsweeteats on instagram and tag your recipes with #howsweeteats! You can also post a photo of your recipe to the howsweeteats facebook page. I appreciate you so much!
That fluff is crazy.
The post Mini Coconut Ricotta Pancakes with Strawberry Syrup. appeared first on How Sweet It Is.
April 13, 2017
Strawberry Citrus Easter Punch.
It’s officially time for BRUNCH.

Brunch is always acceptable in my book (because, hi, cocktails at breakfast), but it’s finally warming up, spring is here, and we can brunch outside like the millennials that we are. I don’t hate it.
This perfect pink punch is made for your Easter weekend!
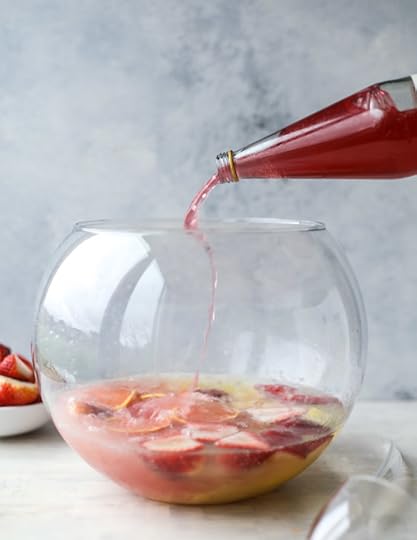
AHHH guys. I am so excited to finally share this. Last month when I was developing a bunch of recipes in preparation for the kitchen remodel, we made a ridiculous amount of cocktails in one day. I used tons of strawberries since I’m knee deep in a strawberry obsession at the moment… and this punch took the cake.
Truly. It was my favorite of all the cocktails, even though I have another delicious strawberry one coming next week!
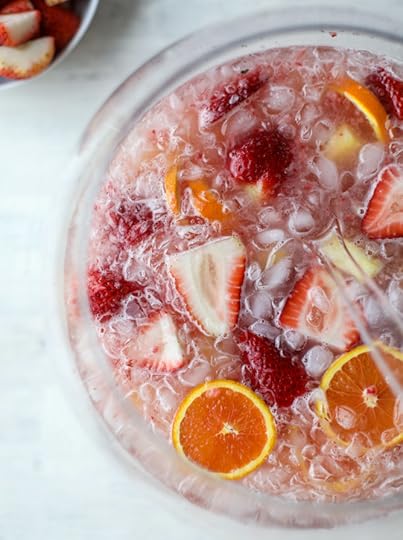
I love a good punch in springtime. Not only is this perfect for Easter, but all those bridal and baby showers you have coming up? This is your new punch recipe! It’s sweet and tropical and bubbly. Hits all the stereotypical brunch requirements. Maybe just missing the sherbet scoops?
We have:
Fresh strawberry juice puree. Oh my yes.
Fresh strawberries! Of course. The obsession continues.
Lots of citrus in the form of cara cara oranges.
And a little orange juice. Blood orange soda!
A hit of pineapple juice too! Woohoo!
Some light champagne for bubbles.
I looooove it.

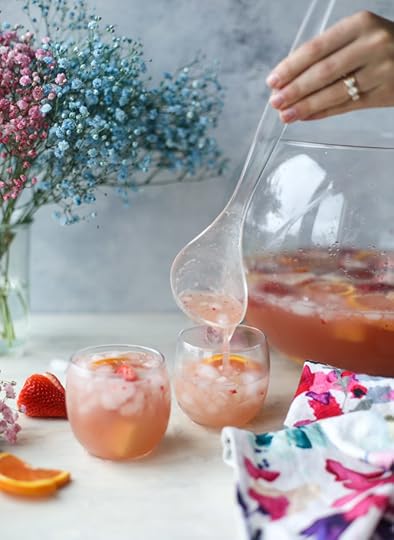
Most of my cocktails are shared in the method of easily making one or two, so I love to make a large batch for fun gatherings. It’s just a verrrry interesting day when I make said large batch. It obviously has to be the last recipe we make of the day… and then I tell everyone I know to come over and have a glass.
Heck, take a go-cup!

Aren’t these cups just too adorable?

So!
I’d love to know what your Easter brunch, lunch or dinner spread will include. We are headed to my brother’s house on Easter morning for brunch since we’re currently kitchenless, but I’m hoping for some desserts in the form of coconut and peanut butter chocolate eggs.
Also. How perfect would this be for your adult treat at an egg hunt? Oh yes.


Strawberry Citrus Easter Punch
Yield: serves 6
Total Time: 15 minutes
Ingredients:
2 cups quartered strawberries
2 cups fresh pineapple cubes
2 oranges, cut into slices (I love cara cara oranges)
1 standard size (750mL) bottle of champagne, chilled
2 cups cold blood orange soda (like the italian soda you can grab at trader joe's)
2 cups cold club soda
1 cup pineapple juice
1 cup strawberry puree
1/2 cup brandy
strawberry puree
2 cups quartered strawberries
1/2 cup water
Directions:
Place the fruit in the bottom of your punch bowl. Pour the champagne, juices and sodas over top. Add a few ice cubes if you really need it chilled! Fill some frosty glasses with crushed ice and serve your punch. Garnish with extra oranges and strawberries!
strawberry puree
Blend together the strawberries and water until smooth and blended. Pour the mixture through a fine mesh sieve to strain any solids. You have your strawberry juice!
Be sure to follow howsweeteats on instagram and tag your recipes with #howsweeteats! You can also post a photo of your recipe to the howsweeteats facebook page. I appreciate you so much!

Pretty enough to DRINK.
The post Strawberry Citrus Easter Punch. appeared first on How Sweet It Is.
April 12, 2017
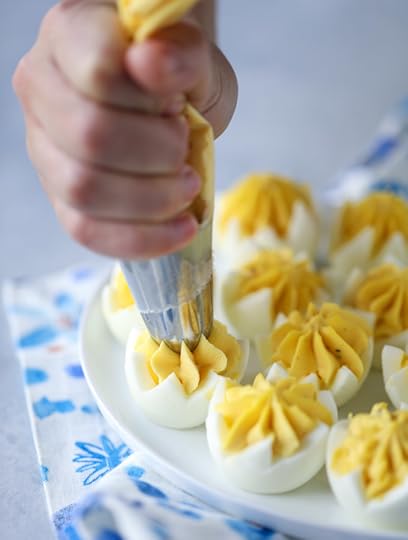
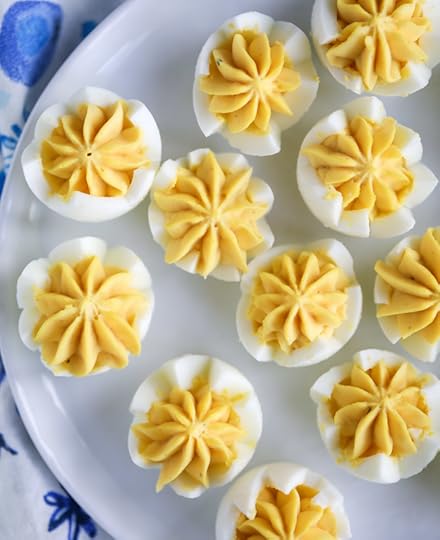
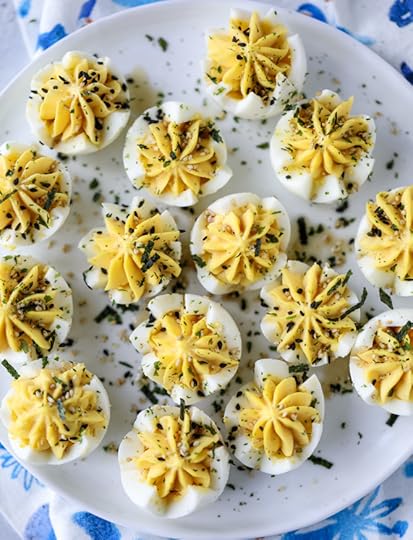
Toasted Sesame Sriracha Deviled Eggs.
Happy deviled egg season!
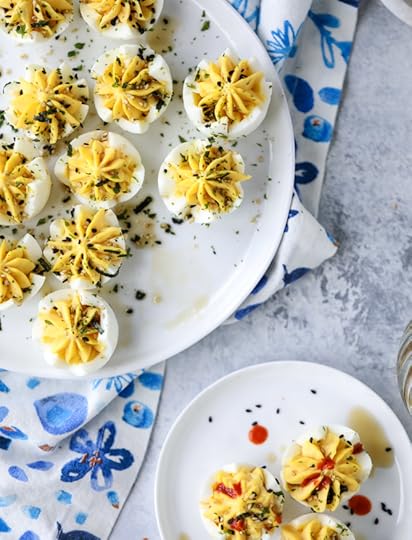
I mean, I guess it’s technically ALWAYS deviled egg season. But I like to think that Easter kicks it off. We tend to only make deviled eggs (or, say, a trashed up version like this) in my family during the warmer months. They never make an appearance during the holiday season or in winter, which when you think about it… is sort of weird.
I say we put an end to that and make every season deviled egg season. You in?
Here’s the deal. I wasn’t sure that I would be able to top last year’s deviled egg combo and flavor. I love them so much. I mean, bacon blue deviled eggs with an asparagus spear? Hello.
Also, quite adorable.
Oh my gosh.
But wait. I just checked and I made those eggs TWO years ago. Two years! I just lost an entire year of my life. How was that two years ago? Does not seem possible. What is this life I’m living? It’s whizzing by.
Anyhoo. I was determined to come up with another flavor combo that I love just as much. Much to some people’s dismay, people like my mom, which think that regular deviled eggs shouldn’t be messed with.
I clearly did not inherit the “trash it up” gene from her.
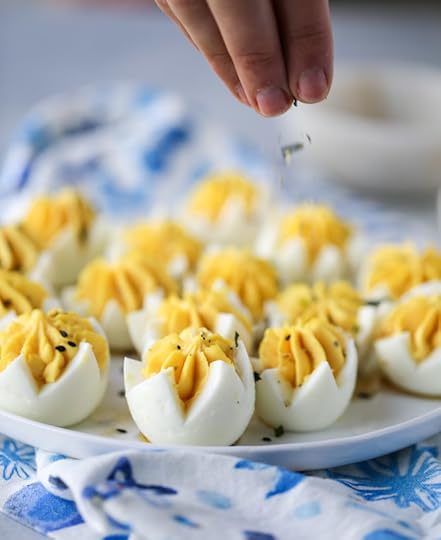
So! I took my love for all things toasted sesame and threw in some sriracha for spice. To top it off, a sprinkling of furikake seasoning. A little extra drop of toasted sesame oil on top. And that flavor is so WHOA.
Even Eddie was devouring them when he got home from work. He loves deviled eggs, but he isn’t as keen on the sriracha sesame flavor as I am. In fact, I figured he’d take one look and pass them by. But nope! He ended up consuming them while standing over the kitchen sink, which in my mind is the sign that whatever you’re eating is delicious.
It’s just that thing we do.
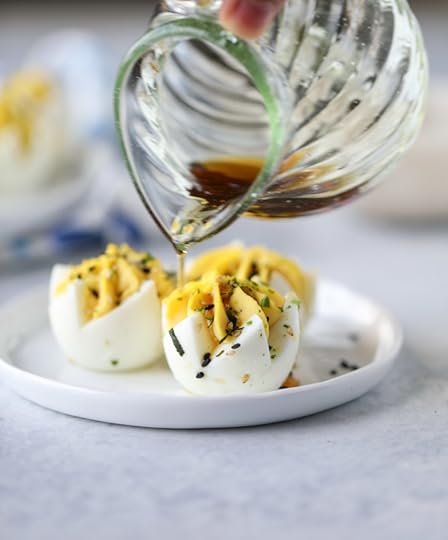
These are so easily popable and such a lovely snack, appetizer or addition to your Easter table. Plus, you can add as much heat and extra flavor on top as you want! My favorite kind of treat.
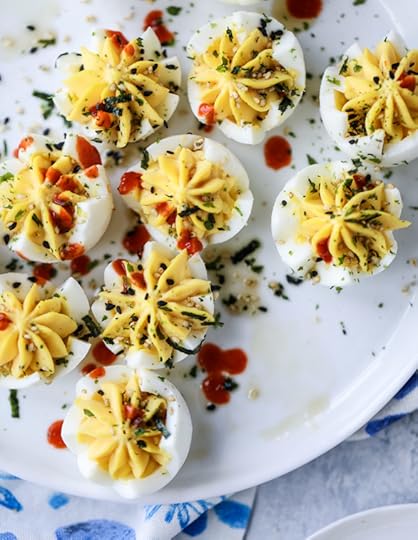
[image error]
Toasted Sesame Sriracha Deviled Eggs
Yield: makes 24 deviled egg halves
Ingredients:
12 large eggs
1/3 cup mayonnaise
3 tablespoons plain greek yogurt (full fat!)
1 tablespoons dijon mustard
1 1/2 teaspoons sriracha or hot sauce
1 1/2 teaspoons toasted sesame oil
1/4 teaspoon garlic powder
1/4 teaspoon salt
1/4 teaspoon pepper
for topping:
furikake seasoning for sprinkling
toasted sesame oil for drizzling
sriracha for drizzling
Directions:
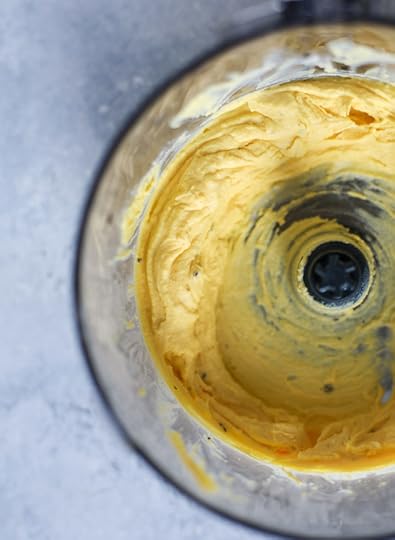
To boil the perfect egg, place the eggs in a large pot and fill it with cold water. Bring it to a boil and let bubble for 1 minute, then turn off the heat and cover the pot. Let the pot sit for 15 minutes. After 15 minutes, place the pot in the sink and fill it with cold water to cool the eggs down immediately. You want the eggs to sit in cold water for 30 minutes or so, so you will need to dump the water and refill with cold water a few times. You can add some ice cubes too!
After 30 minutes, peel the eggs and place them on a paper towel. If you'd like to cut them into "stars" you can follow this tutorial here (this is also how I cut my kiwi fruit!). Otherwise, you can slice the eggs like traditional deviled eggs, lengthwise.
Add the egg yolks, mayo, yogurt, mustard, sriracha, sesame oil, salt, pepper and garlic powder to the food processor. Blend until smooth and creamy and mousse-like. Scoop out the mixture and spoon it (or pipe it with a pastry bag) into the open egg whites. Top the yolk mixture with a generous sprinkle of the furikake seasoning, a drizzle of sesame oil and a drop of sriracha.
Be sure to follow howsweeteats on instagram and tag your recipes with #howsweeteats! You can also post a photo of your recipe to the howsweeteats facebook page. I appreciate you so much!

The cutest!
The post Toasted Sesame Sriracha Deviled Eggs. appeared first on How Sweet It Is.
April 11, 2017
Tuesday Things.
[image error]
1. We are in the seven stages of grief with the kitchen remodel but I’m not sure which stage I’m in. Last week Eddie was in meltdown mode. This week I’m in meltdown mode. It’s so much fun! Not.
2. The cutest idea of an easter “fried egg” pavlova. Adorable!
3. Max had his first froyo this weekend (like, his “own” bowl) and it was probably one of the most fun experiences we’ve had. It took him about 45 minutes to eat this tiny bowl and he enjoyed every bite. The place had a “faux” Dole whip which is what I got and it was SO good.
4. Waiting eagerly to dye Easter eggs this week as it is one of my favorite spring activities to do. We use old school Paas and let them soak forEVER, like 30+ minutes sometimes to get wild neon colors. My mom used to stay up half the night and finish dyeing the eggs since we would inevitably bow out from exhaustion.
5. I wasn’t even aware that millenial pink was a thing. I’ve loved that color family my entire life, which I’m sure comes as a major shock to you.
6. OH MY GOSH Homeland. I’m clearly heartbroken over the finale but also totally get it because I understand why it happened. Still. WAH. Also, GIRLS. Oh my gosh, that episode was so good. I can’t believe how I went from liking most of the girls and not being able to stand Hannah for most of the series to disliking all of the girls EXCEPT for Hannah at the end of the season! Crazy. Also, how freaking good are Damian Lewis and Paul Giamatti in character together in Billions? I love their face off scenes.
7. Worst nightmare ever. Seriously. How can I ever eat salad again.
8. My cousin Lacy send me this article last week and holy cow, was it written about my life? Also, trust me, it’s just as horrifying to me that at this age, I still can’t clean up after myself like an adult. WHY YOUR ROOM IS MESSY.
The post Tuesday Things. appeared first on How Sweet It Is.
April 10, 2017
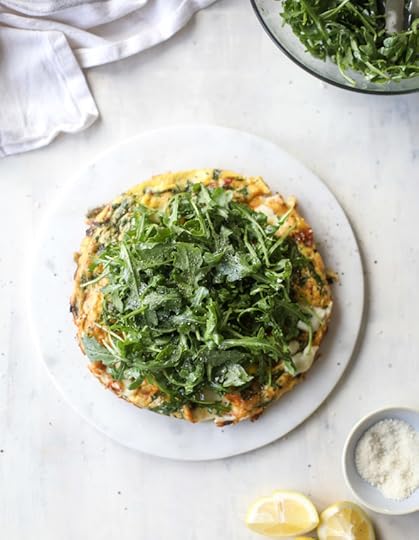
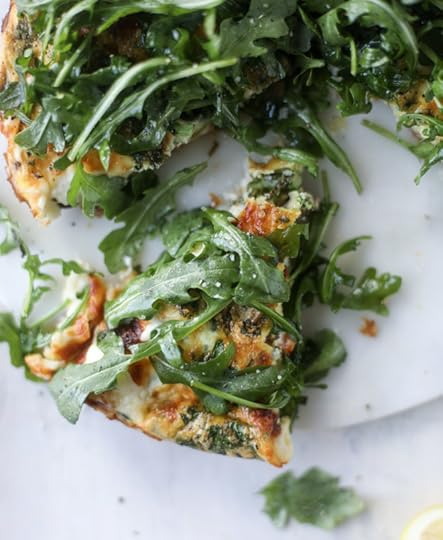
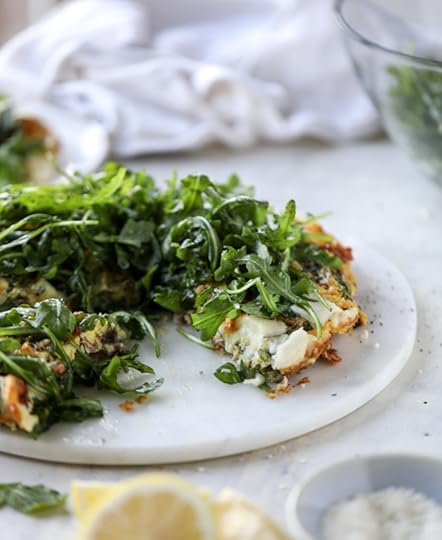
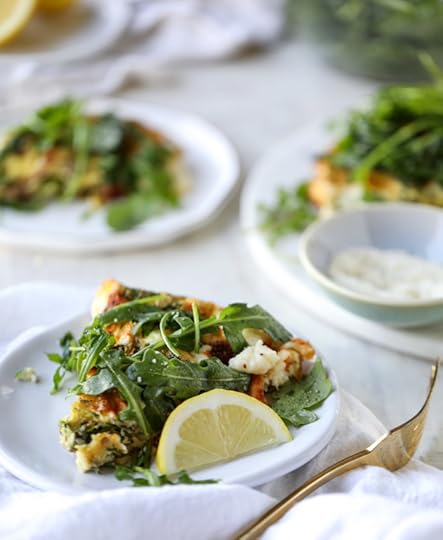
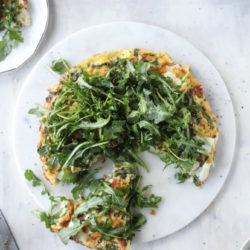
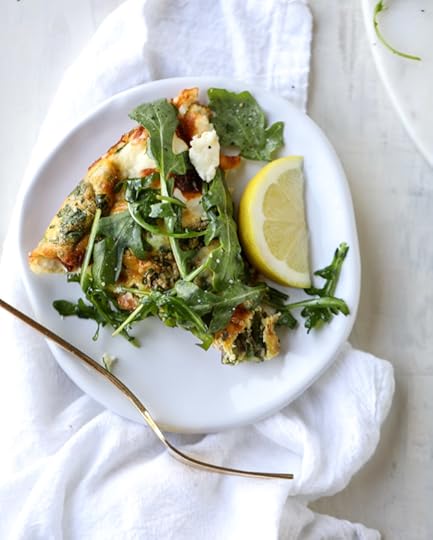
Spring Veggie Frittata with Queso and Arugula.
Can I interest you in a cheesy brunch?!
[image error]
I freaking love this. When a meal can be breakfast, brunch, lunch or dinner… or all four, you know that you’ve hit the jackpot.
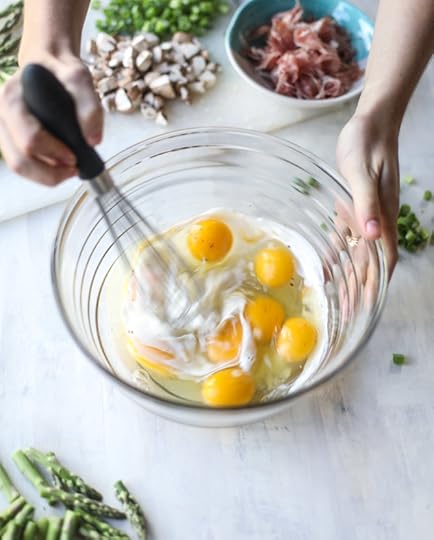
Okay guys. You might remember that in seriously delish, I have a roasted vegetable and queso cheese frittata recipe. That’s where the inspo came from for this recipe, but instead of using roasted veggies, I used a bunch of spring veggies and topped it with some lemony arugula.
And there is crispy prosciutto in there too! Flavor BOMB.
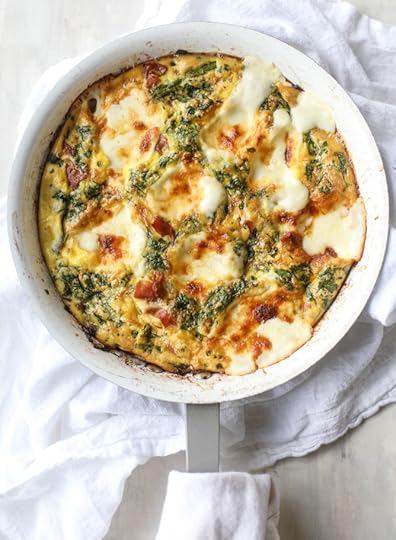
Seriously. Just look at those cheesy pockets!
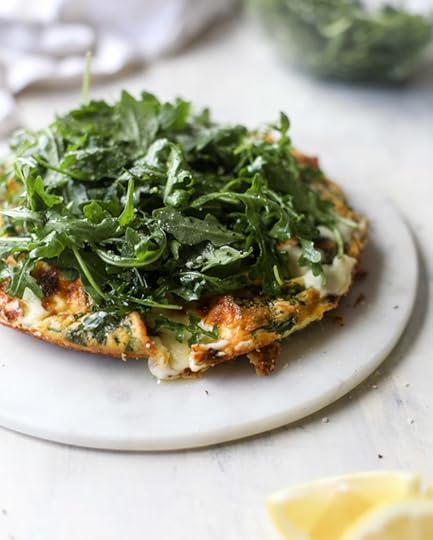
I am not kidding when I say that this reminded me of super cheesy pizza. It is SO good. I mean, it obviously isn’t exactly like pizza and I certainly don’t think it should replace pizza, but it has such a wonderfully cheesy flavor and is so packed with veg, that it reminded me of eating cheesy pizza. Topped with vegetables.
AND I LIKED IT.
The truth is that I was originally going to make this into a cheesy quiche, but I was hesitant on how the queso cheese would be with the quiche crust. I even had a pie crust all ready from the coconut custard pie I had made earlier in the week. But at the last moment, I chickened out and went with the frittata. Which is hilarious, because I usually don’t even like frittatas!
True story: I never liked frittatas or was even tempted by them, which is shocking given my extreme love for all things eggs, until I tasted the queso frittata that inspired the one in my first book. And even since, a frittata with queso cheese is all I even want. For some reason, it is SO much better than a frittata with regular, old shredded cheese tossed in. The queso makes it so creamy and wonderful. Oooooh it’s just a dream.
And it gets even better. Since I made this a frittata and NOT a quiche, it will take you no time at all! It is completely doable for your easter brunch. It’s stress-free, there is no anxiety over pie crust, there is no worrying about the center being set, because it’s a just quick frittata. I like to broil mine for a few minutes to finish it off and get the top a little golden, bubbly and even crunchy from the cheese. But you can have the ingredients prepped when your guests arrive, throw this together while they are there and it will be done in no time at all.
ALSO. More good news. It tastes excellent COLD. Just like how quiche tastes pretty dang good when it’s cold? So does this. It tastes good when cold or at room temperature, so if you let it cool a bit before serving, it will still taste fabulous. The only thing you won’t have it the creamy, melty cheesiness, but it’s not like that is everything in life.
(WAIT yes it is.)
I mean, we can’t even GET more springy than this.
Spring Veggie Frittata with Queso and Arugula
Yield: serves 4 to 6
Total Time: 1 hour
Ingredients:
4 ounces prosciutto
1 tablespoon unsalted butter
8 ounces sliced mushrooms, chopped
6 asparagus spears, woody stems removed and cut into 1-inch pieces
4 green onions, sliced
2 garlic cloves, minced
8 large eggs
2 tablespoons heavy cream
1/4 teaspoon salt
1/4 teaspoon pepper
3 cups baby arugula
1 teaspoon olive oil
1/2 lemon, juiced
queso cheese sauce
2/3 cup heavy cream
12 ounces white cheddar cheese, freshly grated
Directions:
Preheat the oven to 375 degrees F.
Heat a 10-inch oven safe skillet over medium heat. Add the prosciutto slices (it's okay if it's torn into pieces!) and cook it until it is crispy on all sides. You want it to look like bacon. Remove the prosciutto and place it on a paper towel.
Add the butter to the skillet. Add the mushrooms and cook until softened, stirring often, about 5 to 6 minutes. Add the asparagus and green onions to the skillet and toss well. Cook until slightly softened, about 5 minutes. Stir in the garlic.
While the veggies are cooking, whisk together the eggs, heavy cream, salt and pepper. At this time, you can also make the queso cheese which is pretty quick!
Drizzle a few spoonfuls of the queso cheese over the veggies in the skillet, tossing gently. Pour the egg mixture over top and spoon the rest of the queso sauce over the eggs. Bake until the eggs are set and the cheese is golden, about 20 to 25 minutes. You can broil the last minute or two on high to get the cheese a little bubbly and crunchy.
Toss the arugula with the olive oil, lemon juice and a pinch of salt and pepper. Pile it on top of the frittata before slicing and serving!
queso cheese sauce
Heat the cream in a saucepan over medium heat until bubbles just form around the edges of the pan. Reduce the heat to low, add the cheese in handfuls, stirring constantly until it melts and is smooth. Set the cheese aside until ready to use. If it thickens up too much, simply warm it over low heat and stir until it becomes melty again.
Be sure to follow howsweeteats on instagram and tag your recipes with #howsweeteats! You can also post a photo of your recipe to the howsweeteats facebook page. I appreciate you so much!
This certainly warrants a mimosa.
The post Spring Veggie Frittata with Queso and Arugula. appeared first on How Sweet It Is.
Spring Veggie Frittata with Queso Cheese and Arugula.
Can I interest you in a cheesy brunch?!
[image error]
I freaking love this. When a meal can be breakfast, brunch, lunch or dinner… or all four, you know that you’ve hit the jackpot.
Okay guys. You might remember that in seriously delish, I have a roasted vegetable and queso cheese frittata recipe. That’s where the inspo came from for this recipe, but instead of using roasted veggies, I used a bunch of spring veggies and topped it with some lemony arugula.
And there is crispy prosciutto in there too! Flavor BOMB.
Seriously. Just look at those cheesy pockets!
I am not kidding when I say that this reminded me of super cheesy pizza. It is SO good. I mean, it obviously isn’t exactly like pizza and I certainly don’t think it should replace pizza, but it has such a wonderfully cheesy flavor and is so packed with veg, that it reminded me of eating cheesy pizza. Topped with vegetables.
AND I LIKED IT.
The truth is that I was originally going to make this into a cheesy quiche, but I was hesitant on how the queso cheese would be with the quiche crust. I even had a pie crust all ready from the coconut custard pie I had made earlier in the week. But at the last moment, I chickened out and went with the frittata. Which is hilarious, because I usually don’t even like frittatas!
True story: I never liked frittatas or was even tempted by them, which is shocking given my extreme love for all things eggs, until I tasted the queso frittata that inspired the one in my first book. And even since, a frittata with queso cheese is all I even want. For some reason, it is SO much better than a frittata with regular, old shredded cheese tossed in. The queso makes it so creamy and wonderful. Oooooh it’s just a dream.
And it gets even better. Since I made this a frittata and NOT a quiche, it will take you no time at all! It is completely doable for your easter brunch. It’s stress-free, there is no anxiety over pie crust, there is no worrying about the center being set, because it’s a just quick frittata. I like to broil mine for a few minutes to finish it off and get the top a little golden, bubbly and even crunchy from the cheese. But you can have the ingredients prepped when your guests arrive, throw this together while they are there and it will be done in no time at all.
ALSO. More good news. It tastes excellent COLD. Just like how quiche tastes pretty dang good when it’s cold? So does this. It tastes good when cold or at room temperature, so if you let it cool a bit before serving, it will still taste fabulous. The only thing you won’t have it the creamy, melty cheesiness, but it’s not like that is everything in life.
(WAIT yes it is.)
I mean, we can’t even GET more springy than this.
Spring Veggie Frittata with Queso Cheese and Arugula
Yield: serves 4 to 6
Total Time: 1 hour
Ingredients:
4 ounces prosciutto
1 tablespoon unsalted butter
8 ounces sliced mushrooms, chopped
6 asparagus spears, woody stems removed and cut into 1-inch pieces
4 green onions, sliced
2 garlic cloves, minced
8 large eggs
2 tablespoons heavy cream
1/4 teaspoon salt
1/4 teaspoon pepper
3 cups baby arugula
1 teaspoon olive oil
1/2 lemon, juiced
queso cheese sauce
2/3 cup heavy cream
12 ounces white cheddar cheese, freshly grated
Directions:
Preheat the oven to 375 degrees F.
Heat a 10-inch oven safe skillet over medium heat. Add the prosciutto slices (it's okay if it's torn into pieces!) and cook it until it is crispy on all sides. You want it to look like bacon. Remove the prosciutto and place it on a paper towel.
Add the butter to the skillet. Add the mushrooms and cook until softened, stirring often, about 5 to 6 minutes. Add the asparagus and green onions to the skillet and toss well. Cook until slightly softened, about 5 minutes. Stir in the garlic.
While the veggies are cooking, whisk together the eggs, heavy cream, salt and pepper. At this time, you can also make the queso cheese which is pretty quick!
Drizzle a few spoonfuls of the queso cheese over the veggies in the skillet, tossing gently. Pour the egg mixture over top and spoon the rest of the queso sauce over the eggs. Bake until the eggs are set and the cheese is golden, about 20 to 25 minutes. You can broil the last minute or two on high to get the cheese a little bubbly and crunchy.
Toss the arugula with the olive oil, lemon juice and a pinch of salt and pepper. Pile it on top of the frittata before slicing and serving!
queso cheese sauce
Heat the cream in a saucepan over medium heat until bubbles just form around the edges of the pan. Reduce the heat to low, add the cheese in handfuls, stirring constantly until it melts and is smooth. Set the cheese aside until ready to use. If it thickens up too much, simply warm it over low heat and stir until it becomes melty again.
Be sure to follow howsweeteats on instagram and tag your recipes with #howsweeteats! You can also post a photo of your recipe to the howsweeteats facebook page. I appreciate you so much!
This certainly warrants a mimosa.
The post Spring Veggie Frittata with Queso Cheese and Arugula. appeared first on How Sweet It Is.
April 8, 2017
Currently Crushing On.

[via anniereeves]
We are alive! We survived five days of the kitchen remodel so far, with only a few tantrums (the culprit shall remain nameless). I actually feel MORE inspired to cook right now because I have to be creative. It’s weird. Anyhoo, I’m still writing my book and we will just be dodging renovations. I’m dreaming of the scene above. WHY DON’T I REMEMBER TO MAKE SPRING BREAK A THING?
Guys! Remember! Two weeks from now is my meetup with MacKenzie Childs in NYC. April 22!
Internet faves of the week:
the loveliest musings and ramblings. i get this.
i’ve been craving this all week: baked ziti with creme fraiche.
and i must try the best cinnamon rolls ever.
a big ! so pretty.
grilled chimichurri chicken salad. salad of my dreams!
look at these nutella thumbprints with caramel filling. eeeeep.
all you need to know: what to cook in april.
this strawberry rhubarb oatmeal looks perfect for spring.
skinny sweet and sour blood orange chicken stir fry. oh YES!
rose lassi? gorgeous.
how decadent is this vegan chocolate banana bread? whoa.
high plains margarita. gimme!
i die. cadbury mini egg skillet cookie? i’d eat the entire thing.
blackened cajun shrimp tacos. i’ll take ’em.
The post Currently Crushing On. appeared first on How Sweet It Is.
April 7, 2017
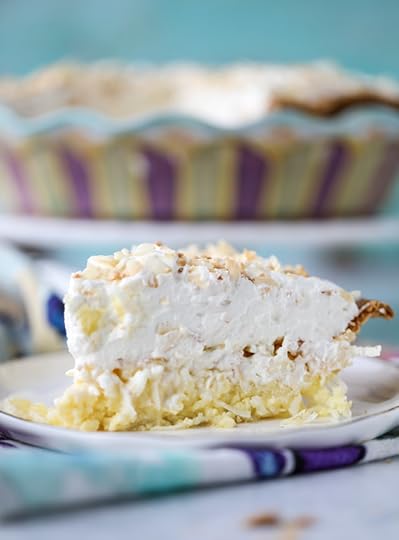
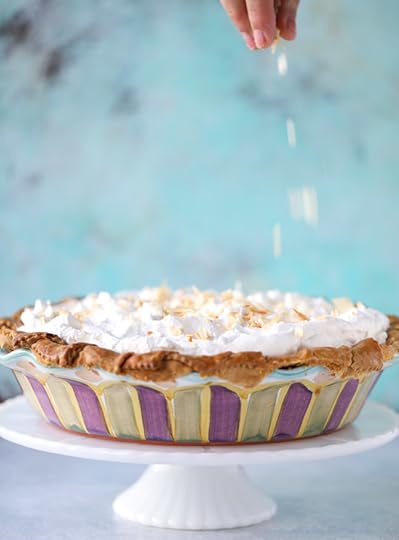
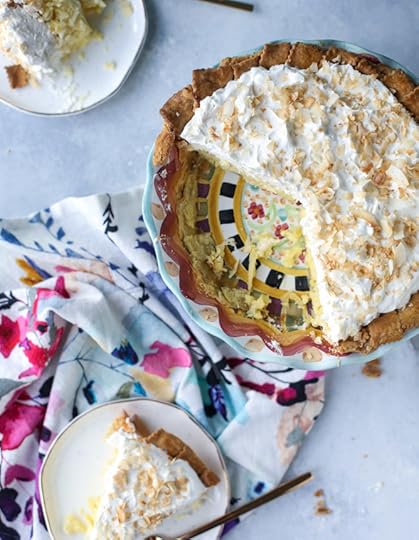
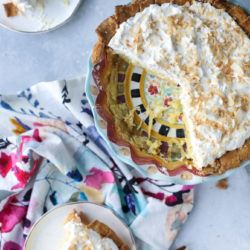
Coconut Custard Pie with Coconut Whipped Cream.
If you give me one choice of pie, it’s going to be coconut.
Important: do not judge this pie on my inability to photograph it! UGH YOU GUYS. I am the worst at photographing pie. Probably because it takes patience and patience is something that I just do not have.
Plus, pie gives me anxiety. Anx-pie-ety? And my slightly-a little too much-overgolden pie crust edges. I know nothing. Trust me not. But I swear it’s too good to end up in my recipe disasters.
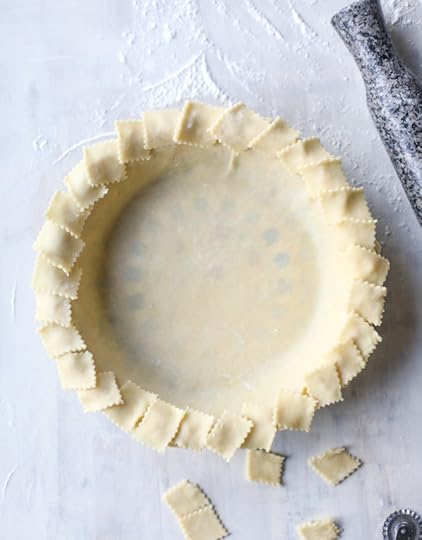
If you’ve been around for a bit, then you know that I’m a coconut freak. I’ve made no joke about that in all of these eight years. I LOVE COCONUT. All the coconut things.
On the flip side, Eddie hates coconut! He doesn’t mind the coconut flavor (like, um, coconut rum) but he can’t stand the squeak-beneath-your-teeth texture. And if you’re the same way, then I have to say that you will NOT like this pie.
[image error]
Mother Lovett made a killer coconut cream pie. Last year, my brother replicated it for easter and it was so good. This year, I spied a coconut custard pie in food and wine and was like, WHAT is that?! I’ve never heard of coconut custard pie. But I knew that I needed it in my life immediately. ASAP. Like, last week.
I was dreaming of it!
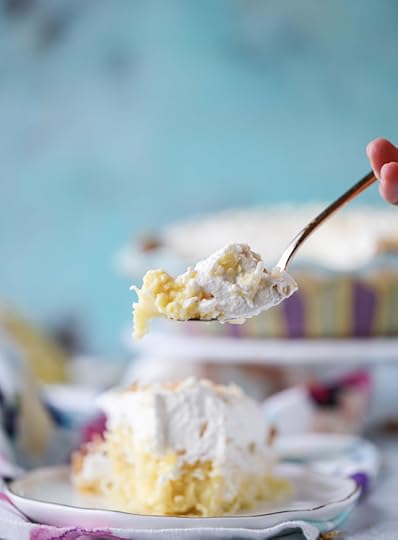
The verdict?
I really liked it. Thought I must say, it’s suuuuper different from coconut cream pie. Obviously! It’s not fluffy and creamy and pudding-like. It’s very thick and custard-like (again… obviously… please give me a thesaurus PLEASE) and FULL of coconut texture. It’s not like it’s chewy, but it’s so packed with coconut that you get the whole coconut chew factor, bigtime.
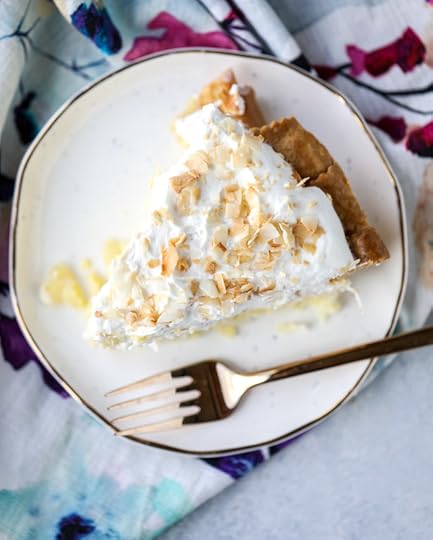
To bring it all together, I used Mother Lovett’s pie crust (the recipe below makes a few crusts, so freeze what you don’t use!) and then I topped it off with coconut whipped cream. Food and wine called for ice cream on top, but I just couldn’t do that. It seemed so… different. I needed some sort of good whipped cream and coconut it was!
Of course. I added just a touch of vanilla, so coconut vanilla whipped cream. Hello, I’d like to eat that with a spoon alone.
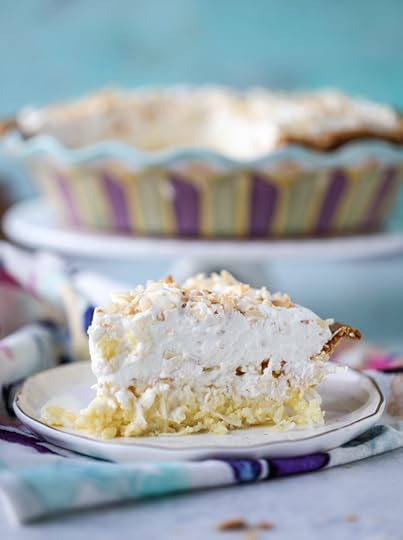
Yes, so basically this is a coconut bomb. I wonder if it would be appropriate to have this AND a coconut cream pie at Easter? I’m thinking so.
Coconut Custard Pie
Yield: makes one 9-inch pie
Ingredients:
crust (as a note, this makes 3 pie crusts, so freeze the other 2!)
4 cups sifted all-purpose flour
1 tablespoon sugar
3 teaspoons salt
1 large egg, lightly beaten
1 teaspoon white vinegar
1/2 cup ice cold water
1 1/2 cups cold unsalted butter, cut into pieces (3 sticks or 24 tablespoons)
coconut custard filling
1 cup sugar
4 tablespoons unsalted butter, melted
6 large eggs
1 cup buttermilk
2 teaspoons vanilla extract
1/4 teaspoon salt
2 cups shredded sweetened coconut
coconut whipped cream
2 cans full-fat coconut milk, cold (refrigerated overnight)
1 tablespoon powdered sugar
1/4 teaspoon vanilla extract
3 tablespoons toasted coconut
Directions:
crust
Add the flour, sugar and salt to a food processor and pulse just until combined. In a small bowl, whisk mix together the egg, vinegar and water. Add the cold butter pieces into the food processor and pulse until small coarse crumbs remain. Sprinkle the water/egg mixture over the flour and pulse again until the dough comes together.
Remove the dough with your hands and wrap it in plastic wrap. This dough makes enough for 3 pie crusts, so you can either separate it into 3 sections now, or separate it after it's refrigerated. Refrigerate the dough for 30 minutes.
After 30 minutes, preheat the oven to 375 degrees F. Roll the pie crust out into a 12-inch circle (if you're using a 9-inch pie plate). Fold it in half to pick it up and gently place it in the plate, unfolding as you go and trimming any excess off of the edges - you can also use a fork (or another decorative idea!) to press the edges down. At this point, I covered my crust with parchment paper, filled it with dry beans (or pie weights) and bake for 10 minutes. Once finished, tap any bubbles on the bottom with a fork.
coconut custard filling
Whisk together the sugar and melted butter until combined. Whisk in the eggs and the buttermilk. Whisk in the vanilla and salt. Fold in the shredded coconut.
Pour the custard into the pie crust. Bake it for 45 to 50 minutes, until the center isn't jiggly and the custard is golden brown on top. If needed, you can cover the pie crust edges with foil if they are getting too dark. Let the pie cool completely. Right before serving, make the coconut whipped cream and top the pie with it. Sprinkle on the toasted coconut.
coconut whipped cream
Open the cans and discard the liquid (use it in smoothies!), then scoop the firm coconut meat into the bowl of your electric mixer. Beat on medium-high speed until completely whipped and thick. Beat in the vanilla extract and powdered sugar. Spread it on the cooled pie right before serving. Sprinkle with toasted coconut!
[custard filling from food & wine]
Be sure to follow howsweeteats on instagram and tag your recipes with #howsweeteats! You can also post a photo of your recipe to the howsweeteats facebook page. I appreciate you so much!
P.S. this adorable pie plate is from MacKenzie-Childs! super cute.
The post Coconut Custard Pie with Coconut Whipped Cream. appeared first on How Sweet It Is.
April 6, 2017
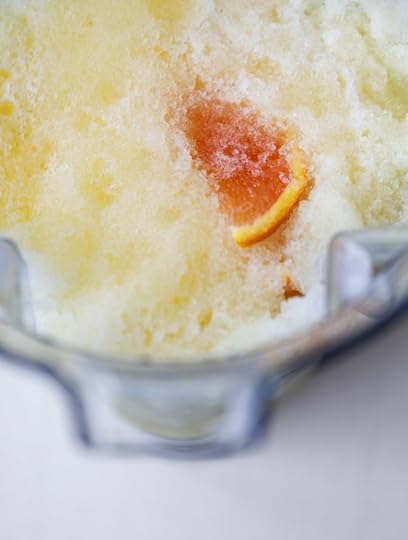
Frozen Mimosas!
How crazy would it be if we drank our champagne… frozen?!

I say, as long as it involves champagne, I’ll drink it any way, shape or form.
This is the first of two cocktails that I think are so super perfect for your Easter weekend.
And it couldn’t be easier! I’m actually embarrassed (again) at how easy this is. It just requires a leeeeettle bit of prep on your part, in the form of making orange juice ice cubes. I have some delicious fruity ice cubes coming in my next book, which is where the idea for a frozen mimosa even came from. I initially thought I could do orange juice cubes with champagne poured over top, BUT. What about blending them together? It’s like a frosty dessert that you get to have BEFORE your meal.
Champagne not optional.
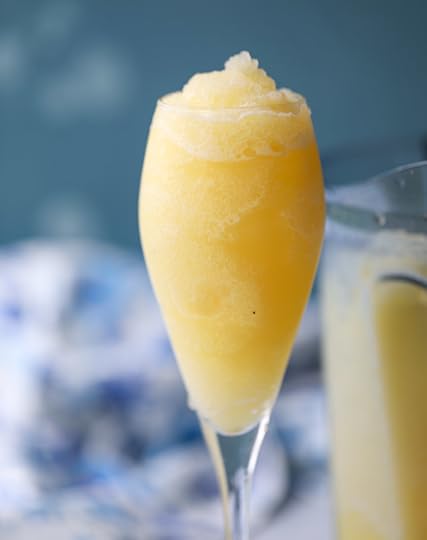
Let’s be real: you could have them at any point in time over the year, but it’s so cold during winter holidays that the last thing I want is an icy drink that’s reminiscent of snow. So save it for the sunny days like these when all the spring blooms are popping up and we are thisclose to having a taste of warmth.
It’s just in our glass! Looks like sunshine for sure. And has sooo much vitamin C that it may as well be a supplement.

100% going to make frozen GRAPEFRUIT mimosas for our actual Easter cocktail. That’s my favorite mimosa flavor and it will also be super pretty in pink. The flavor options are just ENDLESS. And frozen bellinis too! Oooooh I like where this is going.

ALSO. These remind me of my frosty coconut mojitos which I love so.freaking.much. Craving one of those like whoa at the moment because they taste like summertime. Hurry hurry!


Frozen Mimosas
Yield: serves 4 to 6
Prep Time: 8 hours to freeze orange ice cubes
Total Time: 15 minutes
Ingredients:
2 cups orange juice ice cubes
4 cups prosecco, champagne or sparkling wine
orange slices/wedges for garnish (I like cara caras!)
Directions:
The night before, fill two ice cube trays with orange juice and freeze them overnight.
The next morning, add your orange juice ice cubes and your champagne/wine to a blender and blend until frosting. If the mixture is too liquidy, you can add a few extra (regular) ice cubes!
Be sure to follow howsweeteats on instagram and tag your recipes with #howsweeteats! You can also post a photo of your recipe to the howsweeteats facebook page. I appreciate you so much!

So many thumbs up.
The post Frozen Mimosas! appeared first on How Sweet It Is.
Jessica Merchant's Blog

- Jessica Merchant's profile
- 53 followers

