
Jessica Merchant's Blog, page 340
January 31, 2018
Behind the Book: Shooting the Cover.
With the launch of The Pretty Dish coming so soon, one of the questions I’ve been constantly asked is “who designed the cover?!”
So I figured I’d give you a sneak peek!

When I was shooting my first book, Seriously Delish, I was so clueless. I never even THOUGHT about a cover shot and I think I just figured (or maybe was told? I can’t remember!) that we would use a photo from one of the ones I took while shooting the recipes. I mean, most cookbooks (at least at that time) had a photo of one of the recipes on the cover. I figured that’s how it would go.
If you’ve ever been to an event where I talked about the book or have listened to a podcast I’ve done or something, then you know: I did not like the cover of that book at first. To this day, I still get constant questions about the cover. The recipe isn’t clear (like what IS it?) so it’s difficult to find in the book and many people think the recipe isn’t even in the book! I have some of the most hilarious facebook comments and reviews because “the recipe on the cover isn’t in the book!” BAH.
Anyhoo. Since then, I have learned to love the cover. There’s something about it just being YOUR book that makes you love it.
But! This time, I had a big team from the publisher behind me and we talked about the cover from the beginning. We wanted something that brought both the recipes and beauty DIYs (even though they use food) on to the front. Books and photography have changed SO much since I did my first one. I knew I’d be shooting a very specific cover from the get go.
Also. GUYS! There is a photo for EVERY SINGLE RECIPE in this book. I am so, so, so happy! I never thought there would be a photo for every recipe, but I still shot every recipe, just because I wanted to have a visual. I figured that the recipes that didn’t have photos could go here on the blog so you could see what they looked like.
And then, I was surprised with a picture for EVERYTHING!! It’s amazing.
Shooting the cover was super difficult for me. I do not love photography and I like food styling even less. It’s just very hard for me. It takes me a long time to set up a shot. I rarely have a vision to start. It doesn’t come easy, it takes a ton of patience (which I don’t have) and I often end up shooting something because I’m just OVER setting up the shot and want it done.
I knew that we were possibly going to end up using a recipe from the book, but that I’d have to reshoot it to fit the cover if that was the case. This is a GREAT THING. This meant that we could experiment with fonts and titles and colors and everything. As opposed to having to choose a mediocre photo just to try and get a title to fit. I really really really wanted some sort of cheeseboard photo for the cover. You guys love those photos and they are some of my favorites too!
If you read my first behind the book post last year, then you know that I had Erin help me with styling the book. SHE IS AMAZING. She seriously saved me in 2017 from losing my mind. If you ever need food styling help or want food photography done, I could not recommend her more.
So back in May, the very first shot Erin and I ever took for the cover was this one of the ingredients. We did the beauty DIY ingredients on top and some recipe ingredients on the bottom. I never discussed this with the publishing team, aside from telling them we were going to try this shot on a phone call one day.

This was also during my kitchen renovation (kill me) and I was also in the early stages of pregnancy (sick as a dog), so I was just a PEACH. Here’s a behind the scenes pic! Massive mess, the microwave and fridge across the room, my actual kitchen ripped up, plywood for countertops and a secret ultrasound pic on the fridge. HA.


Funnily enough, this is pretty close to the final cover, huh? Totally unintentional! I didn’t shoot the final cover picture until five months later and we went through MANY other photos in that time period!

This is where I started with the next photo I did for the cover. Basically tried to fit any and all ingredients into the cover shot, make it LIKE a cheeseboard… but not an actual cheeseboard?

For a while, I ONLY wanted this picture as the cover. It wasn’t happening though. And after shooting it off to a few friends and getting their opinion, it became clear to me too – like, what is that a photo of?! It’s ingredients, but it’s just random ingredients. It’s not a cheeseboard I’d put together, even though it has cheese on it.
I still really like this picture because of the color and you will find it in the book. Just not on the cover.
Back to square one! A few weeks later the team had me shoot a watermelon “pizza” and a salad. You might remember that the watermelon photo was in the running for the cover!
I didn’t want to tell you at the time, because I wanted YOU guys to pick. But I did not want the watermelon cover. I mean, yes, I’m as basic as can be and I love the watermelon wedges. But they felt too trendy to me. Too seasonal. And also didn’t really depict what I wanted the cover to show.


[I was thrilled when the vote came in and over 75% of you voted for the current cover. I was pretty much doing cartwheels in the kitchen.]
The salad photos didn’t speak to me at all. And as much as I love a good salad and share a ton here on the blog, the salad didn’t feel right to me on the cover either!
A lot of you said that you felt like the blue background was my signature since I’ve used it for so long. I absolutely LOVE that background, but there are only certain colors of food that really pop on it (yellow, orange, brown, white) – otherwise I feel like things tend to get lost in the blue.


This was a crazzzzy day of shooting. This cover shoot day took me about eight to ten hours from start to finish, because I would be shooting the photo and texting the team pictures of it, then moving certain pieces and texting again – etc. I didn’t have Erin with me this day either. Now that I’m removed from the process I can say it was enjoyable. But at eight months pregnant, it was insane.

Below is just a quick screenshot of what my phone looked like that day. It was probably that times 50. Ha.

That takes us to the final photo! While there were a few other random cover shoots throughout the months, I wanted to show you the evolution of the final cover. The team suggested that I shoot something with the beauty foods on top and some recipe ingredients on the bottom. Similar to the very first shot Erin and I ever did! I started there, then would progressively move ingredients into the center. This shoot took about eight hours too, from start to finish.

I started with ingredients on the top and bottom.

Then moved ingredients down the sides, gradually.


We tried a few photos with plates.


And then moved ingredients inside, gradually – again! I can’t even TELL you how many pictures of this I took. Every single piece of food here was moved in one by one and I basically took a picture of it every single time.

Annnnd a behind the scenes pic below. For the third or fourth time, I reshot the watermelon picture AGAIN so we could have a final vote on the cover.

That’s how we landed on the final cover of The Pretty Dish!
This was such a completely different experience from my first book. All in all, we probably spent six months going back and forth on the cover, reshooting things constantly. Even though it could be frustrating at times (and with me being so pregnant, I just wanted it DONE), I was SO happy and grateful that there was this team behind me that wanted to make sure we had the perfect photo and make sure we had one that everybody loved. It was the best experience ever!
Now, having it in my hands? It’s incredible.
You can see a sneak peek flip through of the book right here, and I would be forever grateful if you would preorder your copy here! xoxoxo
The post Behind the Book: Shooting the Cover. appeared first on How Sweet Eats.


Roasted Jalapeño Guacamole Salsa.
I love eating green!

Right? I mean who wouldn’t love it when guacamole salsa is involved.

YEP. I said it. Guacamole salsa sounds like a weird name. It kind of is. It’s a mix of salsa verde and guacamole! It’s basically perfect. And noooo I didn’t make it up. I got the name from this bottle riiiiight here.

So I’ve always really loved that guacamole salsa – it’s a fun twist on salsa verde. But I happened to look at the ingredients a few weeks ago when I bought it and was super confused… it has artificial coloring AND flavoring?! Like why? Why does guacamole salsa need that?
It doesn’t, so I had to make my own.

I mean, aren’t both guacamole AND salsa made from all sorts of fresh ingredients? They are basically made from all vegetables so it’s acceptable to down said dips with a copious amount of chips. The veggies cancel everything out.
If only that could be the situation with queso…
Really though, that’s why I never even bothered looking at that bottle. Never did I ever think there would be weird stuff inside.

Pretty much going to swan dive right into that bowl.

To start things off, I charred a jalapeño pepper. And by “char,” I mean that I held it over the flame of my gas stove top with kitchen tongs while yelling at Max to stay far away.
It’s the best way to faux roast, for real. It goes into a bag to quickly faux steam and then! Into the food processor with the rest of these delicious ingredients.

I am in LOVE with the flavor here. Tomatillos, avocados, lots of fresh lime, cilantro, jalapeno, a little onion – all that good stuff. With chips, it’s to DIE for.

But! It also makes a perfect salad dressing or taco drizzle or burrito filling. OMG and nachos. Yes to all the nachos.
And it’s good for us so you know what that means!


Print Recipe
Did you make this recipe? Leave a review »
Roasted Jalapeño Guacamole Salsa
Yield: serves 4
Total Time: 30 minutes
Ingredients:
1 jalapeno pepper
4 tomatillos, chopped
3 avocados
2 garlic cloves
1/4 cup diced onion, plus more for topping
1/4 cup fresh torn cilantro, plus more for topping
1/4 teaspoon salt
1/4 teaspoon pepper
4 to 5 tablespoons freshly squeezed lime juice (or more if needed)
tortilla chips for serving
Directions:
Take your jalapeño pepper and either place it under the broiler on a baking sheet for a few minutes until it is charred, or heat it over your gas stovetop until charred. Place the pepper in a ziplock bag and let it “steam” for 10 minutes. Remove the pepper and rub off the charred skin, then slice it up. If you want it super spicy, leave in the seems!
Combine the pepper, tomatillos, avocados, garlic, onion, cilantro, salt and pepper in the food processor. Blend until combined and pureed. With the processor on, add in the lime juice until the mixture thins out a bit and is smooth. Transfer the salsa to a bowl and top with additional diced onion, cilantro and pepper slices.
Serve immediately with tortilla chips!
All images and text ©How Sweet Eats.
Did you make this recipe?
Be sure to follow howsweeteats on instagram and tag #howsweeteats. You can also post a photo of your recipe to the howsweeteats facebook page.
I appreciate you so much!

More margaritas.
The post Roasted Jalapeño Guacamole Salsa. appeared first on How Sweet Eats.
January 30, 2018
Tuesday Things.

1. This month of January is dragging like NO OTHER. I generally don’t love January through March but maybe it’s because this year, I feel extra stuck inside the house or something? Ack! I lie awake in bed at night and research beach vacations. It’s actually super fun.
2. Oh my gosh! Very into these black sesame truffles.
3. Ummmm please tell me that you have seen the Saved By the Bell lipstick!? So many of you have sent this to me. We just can’t let the 90s die.
4. This might be a really stupid questions. But aren’t “joggers” just… sweatpants? Like for a million years they have just be called sweatpants. Now there are women’s joggers and baby joggers. Joggers for everyone! What the what.
5. Oh god. Words cannot express how much I DREADING this week’s episode of This Is Us. Why am I so torn up about it? Like it’s actually real life? It really is right up there with Parenthood for me.
6. Also. WE FINALLY SAW I, TONYA. OMG. I pretty much had to drag Eddie and he ended up LOVING it too. Allison Janney is just unreal. Margot Robbie is so good. The story is fascinating. We spent all of Saturday watching specials on the event like complete psychos.
7. How to learn to love Mondays! Oh oh oh I need this. I’ve forever hated Mondays and am a huge Sunday blues person. Even when we have had the best weekend, the minute Sunday rolls around I’m like whomp whomp.
8. As we come to the end of January, I have failed miserably at my resolution of meditating every day. None of the apps are even helping me! I just forget. And then it’s 11:30 at night. And I’d rather research said beach vacations in #1.
The post Tuesday Things. appeared first on How Sweet Eats.
January 29, 2018
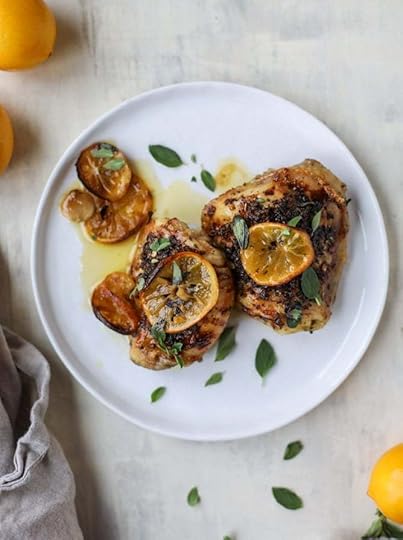
Meyer Lemon Roasted Chicken.
Hello beautiful!

We’re eating the best lemon chicken this Monday because it’s the ultimate Monday meal. Comforting and hearty and fantastic.
THIS CHICKEN.
Oh my gosh.
So I figured Eddie would like it. But I just thought he’d… LIKE it. That’s it. Not be totally crazy over it because he doesn’t always love dishes with lemon. I’ve made some delicious ones more recently that we’ve both been into, but lemon chicken is never his go-to meal.
I was blown away when he said it was some of the best chicken he has ever had. The seasoning on top is to die for. I think he ate every last piece of chicken that night. It’s ridiculously flavorful and the lemon slices get all caramely. Can’t even get enough!
And most of the time I’m totally MEH over chicken. Unless it’s smothered in gravy.

This little seasoning blend that I threw together is so, so good! It’s nothing special – most things you probably have in your pantry right now. But the combination of these spices with some freshly grated lemon zest takes the entire thing over the top.

And!
We almost always use boneless, skinless chicken thighs, but this time I went with regular chicken thighs (with the skin!) so the top would get a bit crispy. You can certainly use the boneless, skinless ones of course. But these… holy cow. The texture AND flavor. Yep yep.

Also, meyer lemons! Could they BE any more wonderful? This is not the first time that I’ve used them in an edible state. And what I mean by that is yes – you can eat that entire lemon slice! I’ve put meyer lemons on pizza before and made meyer lemon scones, as well as candied meyer lemons on salad and put meyer lemons in butter!
Oh. And sangria. How could I forget?

Let’s talk about sides! The obvious, like mashed potatoes or salads or rice. The traditionals, if you will. They’d be great with this. I love it with this spicy roasted broccoli or the Sicilian roasted cauliflower. These buttered rosemary smashed potatoes make for a fancy side and these mustard roasted brussels also work!
Garlic goat cheese mashed potatoes or bacon wrapped asparagus are the business too. Basically, you can’t go wrong.

The garlic! Can’t believe I didn’t mention the garlic. On the sheet pan, I throw a few cloves and they will get all caramely too. You can actually eat one and it will kind of taste like garlic caramel. In a good way, I swear. You can mash them up and spread them on toast or something.
Same with the entire head of garlic. It’s not necessary to throw in there, but you can squeeze out the cloves and use them as you please and they are pretty much one of the best things to ever exist.

Then fresh oregano on top! It’s gives it even more flavor but let’s be honest – also makes it prettier.

The drippings in the sheet pan from the chicken, leftover olive oil and lemon juice combined are SO good. You can spoon it over the chicken to serve (a must) or also toast up a baguette and dip it through the mixture. Doesn’t that just sound like a dream?! You have to try it!


Print Recipe
Did you make this recipe? Leave a review »
Meyer Lemon Roasted Chicken
Yield: serves 4
Total Time: 1 hour
Ingredients:
1 1/2 pounds chicken thighs
3 tablespoons olive oil
2 teaspoons lemon zest
1 teaspoon salt
1 teaspoon pepper
1/2 teaspoon dried basil
1/2 teaspoon dried thyme
1/4 teaspoon dried rosemary
1/4 teaspoon garlic powder
1/4 teaspoon red pepper flakes
4 garlic cloves, peeled
2 meyer lemons, thinly sliced
1 head of garlic
3 tablespoons fresh oregano
Directions:
Preheat the oven to 425 degrees F. Brush a baking sheet with a drop of olive oil or mist it with olive oil. Pat the chicken dry with paper towels.
In a bowl, stir together the lemon zest, salt, pepper, basil, thyme, rosemary, garlic powder and pepper flakes.
Place the chicken on the baking sheet and drizzle it with 1 1/2 tablespoons of the olive oil. Sprinkle the seasoning mixture over top on each chicken thigh. Place the garlic cloves and lemon slices around the chicken. Slice off the top of the garlic head and rub off any excess paper on the outsides, then place the head of garlic, cloves-side up on the sheet too. Take the remaining olive oil and drizzle it over top of the seasoned chicken, head of garlic and lemons.
Roast for 35 to 40 minutes, or until the insides of the chicken reaches 165 degrees F. Remove the chicken and sprinkle on the fresh oregano. Serve!
All images and text ©How Sweet Eats.
Did you make this recipe?
Be sure to follow howsweeteats on instagram and tag #howsweeteats. You can also post a photo of your recipe to the howsweeteats facebook page.
I appreciate you so much!
Super unreal.
The post Meyer Lemon Roasted Chicken. appeared first on How Sweet Eats.
January 28, 2018
January Favorites: Beauty.
Hi hi! January favorites are HERE.

One of my new year’s resolutions is to actually GET READY every single day and I’m happy to report that I’ve pretty much done that! There have been one or two days that I’ve done no makeup, but actually getting ready makes me feel SO much better.
Okay, so I’m still freaking out that Benefit Gimme Brow isn’t back in stock. Is it ever coming back?! I desperately need something to replace it! I tried the Glossier Boy Brow (hated it, more on that here) and a few of you recommended this Bobbi Brown one – but the issue is that the brush is HUGE. If you’ve ever tried gimme Brow, you know how tiny and minuscule the brush is and you get great precision with it. I need something like that!
This month I have been SO regimented with my skincare routine. I mean, I’ve been really good about it before and I never ever ever go to bed with makeup on my face (it makes me sick to even think of!), but since Emilia was born, I’ve almost started using that time as “me time”(< omg I hate that saying). But anyway – I’ve really taken the time to do a full skincare regimen every morning and night. As soon as Max was born, I was so exhausted that I was often skip putting anything on my face in the morning and at night, I wouldn’t always wait to do serum, oil, moisturizer, etc. But now I am! And I’m seeing huge results. I think I’m going to try and do some before/after pics! Needless to say, that’s why almost this entire post is skincare.
So on to my faves!
Dr. Jart Cicapair Tiger Grass Cream. OMG, this is by far my favorite thing of the entire month. I got this at the end of December but ended up getting so sick and not wearing any makeup. This is a color correcting moisturizer with sunscreen. The color correcting is INSANE. I have some redness on my face and some days, I end up just using this because it makes your skin tone incredibly even. It’s green but changes to a light skin tone color once rubbed in. I also use it under makeup and it’s great – but you do have to let it dry down and sink in for 10 minutes or so. I have told so many people about this and absolutely LOVE it.

Drunk Elephant Protini Polypeptide Cream. So I bought this because I was out of my Lala Retro Cream, thinking it would be the same but with some extra stuff. It isn’t nearly as thick as the Lala cream, but I am loving it! I still had to buy another Lala since I have the driest skin in the universe, but this stuff is awesome. I add it into the Lala cream and occasionally just use this in the morning. They describe it as adding a “shot” of something good to your other creams. Loving it so far. The consistency reminds me of Sunday Riley Tidal which I also love.
Drunk Elephant C Firma Day Serum. I’ve been using this serum for close to two years but have been religiously using it every single morning, after my Caudalie Moisturizing Toner, followed by moisturizer. 100% love it. Even with my dry skin, I can use this every single day as long as I moisturize after. I really feel like it brightens my skin! I just two pumps every morning to cover my face and neck. Drunk Elephant can do no wrong!
Sunday Riley Good Genes. I KNOW. This is a repeat favorite but one I can’t stop mentioning. But for the last two months I have used it every other night without skipping. I use it right after the toner. It is SO good. It improves any texture on your skin. I can’t use it more than 3ish days a week, but it’s so, so good when I do use it. I really want to alternate it with the Luna Oil, but I can’t use that yet since I’m breastfeeding. I have to moisturize after or this does rip up my skin.

OleHenrickson Banana Bright Eye Cream.I have so many mixed thoughts on this, but I do really love it. First, I think the name is so misleading. This does absolutely nothing to brighten my eyes. I don’t have horrid undereye circles, but I do have some. Maybe I’m just SO exhausted with a newborn + toddler that nothing can combat the circles at the moment? I just don’t find it brightening whatsoever. BUT. The reason it’s in my favorites and what I do love about it – it’s a great cream to put under concealer! Actually the best one I’ve found. The Lala cream is what I usually just use under my eyes when I put it on my face, but it’s so thick. This cream is such a great consistency and makes concealer go on super well. Love it for that reason. So I only use this during the day.
RMS Magic Luminizer. Another repeat mention from last month – OMG. This is the only highlighter I have used for close to two months. LOVE LOVE LOVE. It just gives the best glow ever. Some days I use just this, mascara, concealer and that’s it. Oh and BROWS! How could I forget.

MAC Retro Metallic Lip color in Metallic Rose. Eeeep! I love this color and I love the formula! This stuff does not MOVE from your lips. It’s not drying at all (but it’s not moisturizing either), but I do like a clear lip balm over it. This color is so awesome and I’ve been wearing it all month! People either love or hate the metallic look and while I don’t totally love it, this shade is just so pretty. Especially if you’re cool toned.

That’s that for January! I’d love to hear what you are loving right now. And what you have you eye on too! I kind of want to try the new Fenty matte lipsticks.
{as usual, none of this is sponsored and all of these products were purchased by me. i am not affiliated with any of the companies above, nor do i accept free products. just love to talk about what i like, makeup junkie to makeup junkie. there are some amazon and general reward style affiliate links above. thank you for being here!}
The post January Favorites: Beauty. appeared first on How Sweet Eats.
January 27, 2018
Currently Crushing On.

Hey hey! How are we at the end of January?! WHAAAAT. How are things? What is new?
I’m so excited that we have a laid back weekend and I’m going to use the time to get a ton of things in our home in order. FUN adulting and all that jazz. I hope you have a great one! xo
Favorites this week:
OMG. .
brown butter peanut butter rice krispie treats are all i want.
absolutely dying over this ensalada de col.
stranger things valentine cookies! adorable.
entertaining with pantone color of the year. i love it!
whoa: southern bbq nachos.
a chocolate bananas fosters sandwich. whaaaat.
in love with this white chicken curry pot pie.
beets, avocado and goat cheese! i can do this.
hello oatmeal chocolate chip cookies. yep.
I love tracy’s intentions for the year.
insane chocolate pretzel stout brownies. dead.
gin coconut cooler. adore this.
pretty chocolate raspberry truffle cakes!
The post Currently Crushing On. appeared first on How Sweet Eats.
January 26, 2018
Blood Orange Yogurt Cake.
It’s Friday so I have a cake situation!

This blood orange cake is not a bad situation to have. In fact, I wouldn’t mind having this situation around allllll the time.
We’re 26 days into the new year and I have yet to share a LEGIT dessert with you. I know, I know, I made these champagne rice krispie treats for the golden globes, but those were made with brown rice and therefore a total health food. I don’t see it any other way.
This is real cake! But in an easier-to-use loaf pan. Because I have zero patience.

My grandma made the most killer orange cake (you can find the recipe here!) and I always wonder what it would be like with blood oranges, so that might be next on the list. In fact, I might do it today because I haven’t been able to get the idea out of my head. It would also be such a fun surprise for my mom!

Also. Can we talk about this juicer? It’s my newest obsession. In full disclosure, this was sent to me by Crate and Barrel (this is not a sponsored post, but I create recipes and videos for them and they send me the product to feature!) and isn’t something I ever thought that I’d want or need.
I have a real juicer – like the crazy heavy duty ones that ruin your life because they are easily the worst kitchen appliance to clean in the history of the universe. Combine that with the fact that if you don’t clean it right away, you basically have to throw it in the trash because it’s ruined forever, and you will use that thing once or twice and be done with it. OH. ALSO: it sounds like a jet engine is flying through your kitchen too, so that’s great.

But anyhoo – this citrus juicer. We have used it every single day. Max and I have been using cara cara and blood oranges to make orange juice and it is super easy. Not to mention delicious. And I don’t even like juice!
It’s really easy to clean too and doesn’t take up a ton of space. I’m obsessed with making fresh orange juice on the weekends, but the biggest thing is that I love lemon and citrus desserts so much and juicing them all by hand can be CRAZY. Especially if you have a large orange or grapefruit. When I make orange cookies at Christmas, I practically get carpal tunnel.
MORAL OF THE STORY: you don’t need this exact juicer, but an electronic citrus juicer is now up there with my favorite kitchen gadgets. Who knew?

SO. This recipe is pretty much just like the lemon loaf cake that I shared last year and ADORED. There is a bit more juice in this one and the flavor is so wonderful. It’s super hearty – almost like a pound cake, but light enough that you don’t feel weighed down by eating a slice (or three). Citrus desserts for the win!
I mean, you know I’m a huge chocolate person, but sometimes you just need orange or lemon. (And a piece of chocolate after. )

It’s so pretty too! Because blood orange everything.
Would we love blood orange as much if it was in season all year round? I actually think we would because it’s not like there are that many other foods that can naturally turn things pink. Beets, pomegranate, maybe strawberries?
But blood orange makes it the prettiest shade of pink. Like the millennial pink! Can’t help it. It’s true.

I also think that making candied blood orange slices to go on top would be amazing. Since I used this crazy wavy loaf pan, my oranges wouldn’t sit perfectly on top. But if you use a regular old loaf pan, go for it. Be extra.

These are also my favorite kind of cakes to make because they are more acceptable for breakfast. Don’t you think? It’s like cake bread. So kind of like toast. Practically salad. If you ask me.

One of my all-time favorite recipes is this blood orange coffee cake and while this may look the same, the two are completely different. I love both equally like they are my children. I’m thinking both can go on your menu this week.
Breakfast and dessert. YEP.


Print Recipe
5
5 / 5
(1 Reviews)
Did you make this recipe? Leave a review »
Blood Orange Yogurt Loaf
Yield: makes one 9x5 inch cake
Total Time: 2 hours
Ingredients:
1 1/2 cups all-purpose flour
2 teaspoons baking powder
1/4 teaspoon salt
1 cup plain greek yogurt (full fat or 2%)
3/4 cup sugar
3 large eggs
2 blood oranges, zested
1/4 cup freshly squeezed blood orange juice
1 teaspoon vanilla extract
1/2 cup coconut oil, melted
blood orange icing
1 blood orange, zested
1 1/2 cups powdered sugar
2 tablespoons freshly squeezed blood orange juice
Directions:
Preheat the oven to 350 degrees F. Butter and flour a 9×5 inch loaf pan generously.
In a small bowl, whisk together the flour, baking powder and salt. In a large bowl, whisk together the yogurt and the sugar until combined. Whisk in the eggs, orange zest, juice and vanilla extract.
Stir the dry ingredients into the wet, mixing until full combined. Use a spatula to fold the coconut oil into the batter, folding and stirring until the oil is incorporated completely. Pour the batter into the greased loaf pan and bake for 50 minutes, or until the center is set and a toothpick inserted comes out clean.
Let the cake cool in the pan for 10 minutes, then remove it gently and set it on a cooling rack to cool completely. Once cool, pour the icing over top. Let the icing set for 20 minutes, then slice and serve!
blood orange icing
Whisk the zest, powdered sugar and juice together in a large bowl until smooth. Pour it over the cake once cooled.
slightly adapted from this lemon loaf
All images and text ©How Sweet Eats.
Did you make this recipe?
Be sure to follow howsweeteats on instagram and tag #howsweeteats. You can also post a photo of your recipe to the howsweeteats facebook page.
I appreciate you so much!

It’s just a cheery cake!
The post Blood Orange Yogurt Cake. appeared first on How Sweet Eats.
January 25, 2018
Kombucha Sangria.
Alternate title: how far can I take my kombucha obsession?

This far? I think so. Kombucha sangria is my newest favorite thing! Until my next favorite thing comes along. Which could be tomorrow. Naturally.

The plight of 2018 is that we can have favorites every three seconds and no one bats an eye! The constant turnover of favorites in my life is amazing and annoying. Especially when it comes to meals. I supposed it means that we can almost “always” have something we really, really, really love for dinner without getting sick of it, since there are soooo maaaannny faaaaavorites.
Had to drag it out for dramatic release. The drama is never enough.

Two weeks ago we did a kombucha mocktail and today I’m here with a legit cocktail!
I also sort of wanted to title this brunch sangria. Or brunch punch! There is kind of a brunch punch recipe in The Pretty Dish though, and it’s really different and delish. So I didn’t want to confuse us. (read: me.)

Into this pitcher goes an entire bottle of Pinot Grigio, just because it’s my favorite. (of course.) You could also use a red wine you like!
A little brandy, because it IS sangria.
We have some freshly squeezed blood orange juice, because it’s the season. Regular orange juice or even one of those Italian sodas works well too.
Two bottles of kombucha! The flavor is up to you, but citrus or cherry or berry or something of the sort is probably best. As long as you like it.
Lots of fruit! Whatever you have on a hand.

Now the real question is… can’t we just feel amazing about this sangria since it’s made with kombucha?!


Print Recipe
Did you make this recipe? Leave a review »
Kombucha Sangria
Yield: serves 4 to 6
Total Time: 20 minutes
Ingredients:
2 apples, sliced
2 blood oranges, sliced
1 cup frozen berries
1 handful fresh mint
1 (750 mL) bottle pinot grigio
2 (15-ounce) bottles kombucha, citrus or berry flavor (or your fave!)
1 cup freshly squeezed blood orange juice
1/3 cup brandy
Directions:
Add the fruit and mint into the bottom of the pitcher. Pout the wine, kombucha, orange juice and brandy over top. Serve over ice with the fruit in the glass!
All images and text ©How Sweet Eats.
Did you make this recipe?
Be sure to follow howsweeteats on instagram and tag #howsweeteats. You can also post a photo of your recipe to the howsweeteats facebook page.
I appreciate you so much!

I’m thinking yes.
The post Kombucha Sangria. appeared first on How Sweet Eats.
January 24, 2018
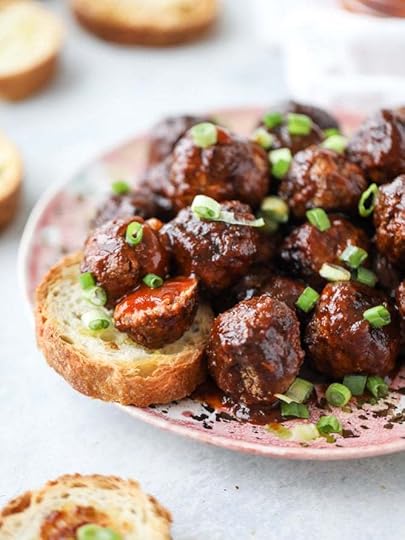
Slow Cooker Chipotle BBQ Meatballs with Garlic Toast.
I have game day eats for you today!

Slow cooker meatballs!
Tell me. Are we still doing the slow cooker thing? Because I think that a lot of you are doing the instant pot thing. If you follow my Instagram stories, you know that I’m certainly NOT doing the instant pot thing. Or let’s just say that the instant pot is not doing my thang.

Errr… at least not yet. I find it to be awful for meat (four cuts in one week – ruined!) but I do find it to be amazing for rice and beans and things like that.
The replies I got to my instant pot saga were hilarious. Many of you (I even want to say the majority buuuuut) were in the same boat. Saying that meat tastes horrible from the instant pot and that anyone who actually likes meat from the instant pot, doesn’t like to eat meat that is cooked properly. (I laughed for a long time, to be real.) Others said it was the best meat they’ve ever had!
Some of you want the instant pot but think it’s a fad and don’t want to jump on the bandwagon. Many of you don’t have the space for the instant pot! Neither do I. It’s sitting on my dining room table and I want to punt it.
And then some of you acted as if I had just given you horrific news and that I was 100% RUINING THE LIVES OF EVERYONE by not using the instant pot.
People are serious about their instant pots. Let’s just say that.

For me? It just seems to take MORE time. It seems MORE difficult to use! More complicated. And I mean, I’m not only talking about the fact that I’m also convinced it might blow up our house.
Perhaps I was completely unfazed by the instant pot because I have used this slow cooker over the last few years that sears IN the slow cooker (and haven’t stopped raving about it – I KNOW!), so that part is not impressive to me. I mean, it was SO impressive two years ago when I bought this slow cooker because that is downright perfect. Less dishes? Seared meat? I love it!
For now, I’m just side eye-ing my instant pot from across the room. We shall see.

Okay, back to the freaking meatballs.
So this BBQ sauce? Obsessed. It’s the best combo of sweet and spicy. Maple, which I rarely love on its own PLUS chipotle.
I took the idea of this cherry chipotle BBQ sauce and ran with it. Could eat this stuff with a spoon. I mean, I pretty much did. It’s delicious.
And once you make BBQ sauce at home once or twice? It’s pretty darn easy enough to keep doing.
I like to make the meatballs on the more, let’s say… mini size. The smaller the better! Because they are cute. And then they fit on small sliced of garlic buttered baguettes.
OMG. Yes. I just said that. Put your meatball on a garlic buttered baguette slice and eat it. Devour it. Best thing ever, forever.

In all seriousness, one of the other reasons that I like these meatballs to be smaller in size is because of the BBQ sauce. Does that sound weird? The BBQ sauce on a small meatball isn’t as overpowering as the BBQ sauce on a large meatball. If that makes sense. Probably doesn’t!
But when do I ever.
And yessss I used turkey for these, but you can totally use beef. Or chicken! Or pork. Maybe a mix of two or three or four. Whatever the heck you would like, for sure.

Yep. So I think that I adore this combo of the meatballs with toast because it’s just different enough. Just ENOUGH. It’s different from the traditional tomato-y sauce that you expect with the garlic toast. So very good.
Down below, I’m also telling you how freeze these babies! Back before I had Max, I made the freezer meatballs from Seriously Delish. I threw them into the slow cooker that New Years Eve with a ton of sauce and they were absolutely perfect. Like some of the best meatballs I’ve ever had – so that is forever my go-to recipe. Always!
And now let these take you away.


Print Recipe
Did you make this recipe? Leave a review »
Slow Cooker Chipotle BBQ Meatballs with Garlic Toast
Yield: serves 4 to 6
Total Time: 6 to 8 hours
Ingredients:
meatballs
1 pound ground turkey (or beef!)
1 large egg, lightly beaten
3 garlic cloves, minced
2 green onions, thinly sliced, plus extra for serving
1/4 cup panko bread crumbs
1 teaspoon smoked paprika
1/2 teaspoon salt
1/2 teaspoon pepper
maple chipotle BBQ sauce
2/3 cup ketchup
2/3 cup water (or beer!)
1/4 cup maple syrup
3 garlic cloves, minced
2 chipotle peppers in adobo sauce, minced
2 tablespoon apple cider vinegar
2 tablespoons Dijon mustard
1 tablespoon of adobo sauce from the can of chipotles
1 teaspoon Worcestershire sauce
½ teaspoon onion powder
½ teaspoon smoked paprika
¼ teaspoon freshly ground black pepper
garlic baguettes
1 baguette, sliced into rounds
4 tablespoons unsalted butter
2 garlic cloves, minced
Directions:
In a large bowl, combine the turkey, beaten egg, garlic, onions, bread crumbs, paprika, salt and pepper until just combined. Do not overmix! For the mixture into meatballs about 1-inch in size and place them on a sheet of parchment paper.
At this point, you can throw the meatballs directly in the sauce in the slow cooker, you can brown them first (my favorite) or you can freeze them (see below)!
Heat a large skillet over medium heat (or use a slow cooker that does this for you!) and add the olive oil. Add the meatballs in batches and cook just until golden on the outsides. Place the meatballs and the sauce in the slow cooker. Cook on low for 4 to 6 hours (long is okay too, but they will be done in 4 hours if they are browned).
Serve with extra sliced green onions on top!
maple chipotle BBQ sauce
Place all ingredients in a saucepan and stir together until combined. Heat oven medium heat and bring to a boil, then reduce to low heat and cook for 30 to 60 minutes, until thickened. Stir occasionally. Remove from the heat and let sit at room temperature until it cools and thickens even more. This stays great in the fridge for a week or so when sealed in a container.
garlic baguettes
To make the garlic baguettes, slice the bread into rounds and place it on a baking sheet. In a bowl, mix together the melted butter and garlic cloves. Brush or drizzle it on the baguettes. Bake at 350 degrees for 15 minutes, or until slightly toasted.
To freeze the meatballs, roll the mixture into balls and place them on a parchment paper lined baking sheet. Place the sheet in the freezer for 60 minutes. After 60 minutes, remove the sheet and place the meatballs in a large ziplock bag. They will stay good for about 6 months! When ready to use in the slow cooker, place them in the sauce and cook for 8 to 10 hours on low heat.
All images and text ©How Sweet Eats.
Did you make this recipe?
Be sure to follow howsweeteats on instagram and tag #howsweeteats. You can also post a photo of your recipe to the howsweeteats facebook page.
I appreciate you so much!
Ooooh that toast!
The post Slow Cooker Chipotle BBQ Meatballs with Garlic Toast. appeared first on How Sweet Eats.
January 23, 2018
Tuesday Things.

1. Last week I shared on instagram stories that I finally made these cookies that are breaking the internet. I’m not really a shortbread fan so I wasn’t sure if I’d be into them. BUT THEY ARE SO GOOD. They are like… addictive. At first bite you think “eh, they’re okay…” but then you can’t stop eating them. Forever.
2. My insane desire to decorate for random holidays since I had kids? It’s over the top. I’ve bought Valentine’s day plates, cups and decor for Max. I can hardly wait for Easter. Why does my 25 year old self feel like I have no life and my 35 year old self feel like it’s the best life ever?
3. OMG – I will never get over how FB destroyed instagram and how instagram changed from being NOT REAL LIFE… and this is so spot on. Stop ruining it.
4. Remember a month or so ago when I said I don’t care for “everything” seasoning on… well, everything? Well. Max and I split an everything croissant from Starbucks last week and I basically want to eat it every day.
5. My excitement for the olympics is intensifying constantly. On a serious note, I watched the clips of Aly Raisman speaking in court last week and was blown away. So many emotions for her and all the girls. Watching them speak is incredibly moving and just amazing.
6. Divorce on Sunday night seriously made me laugh out loud. It’s so awful and embarrassing but hilarious and real (from what I can assume… ha!). And This Is Us. GAH! Killing me. Why is every single actor so so so so good in the show? I can’t handle it.
7. Oh and can we talk about my love for Allison Janey and how cool her outfit was at the SAG awards?! I also loved what Mandy Moore, Margot Robbie, Halle Berry, Lupita Nyong’o and Nicole Kidman wore.
8. I’m desperately trying to avoid the instagram-deep-dive-before-bed routine. See #3. I mean, I should probably have that meme framed – you know, the one that says something about being absolutely exhausted, but you’ll go to sleep after scouring facebook, instagram and every wikipedia page on the internet for four hours? THAT’S ME. Why is this entire post about instagram? Can’t even stand me.
The post Tuesday Things. appeared first on How Sweet Eats.
Jessica Merchant's Blog

- Jessica Merchant's profile
- 53 followers

