
Aimee Ray's Blog, page 9
March 31, 2019
Felt woodland animal kits are here!!
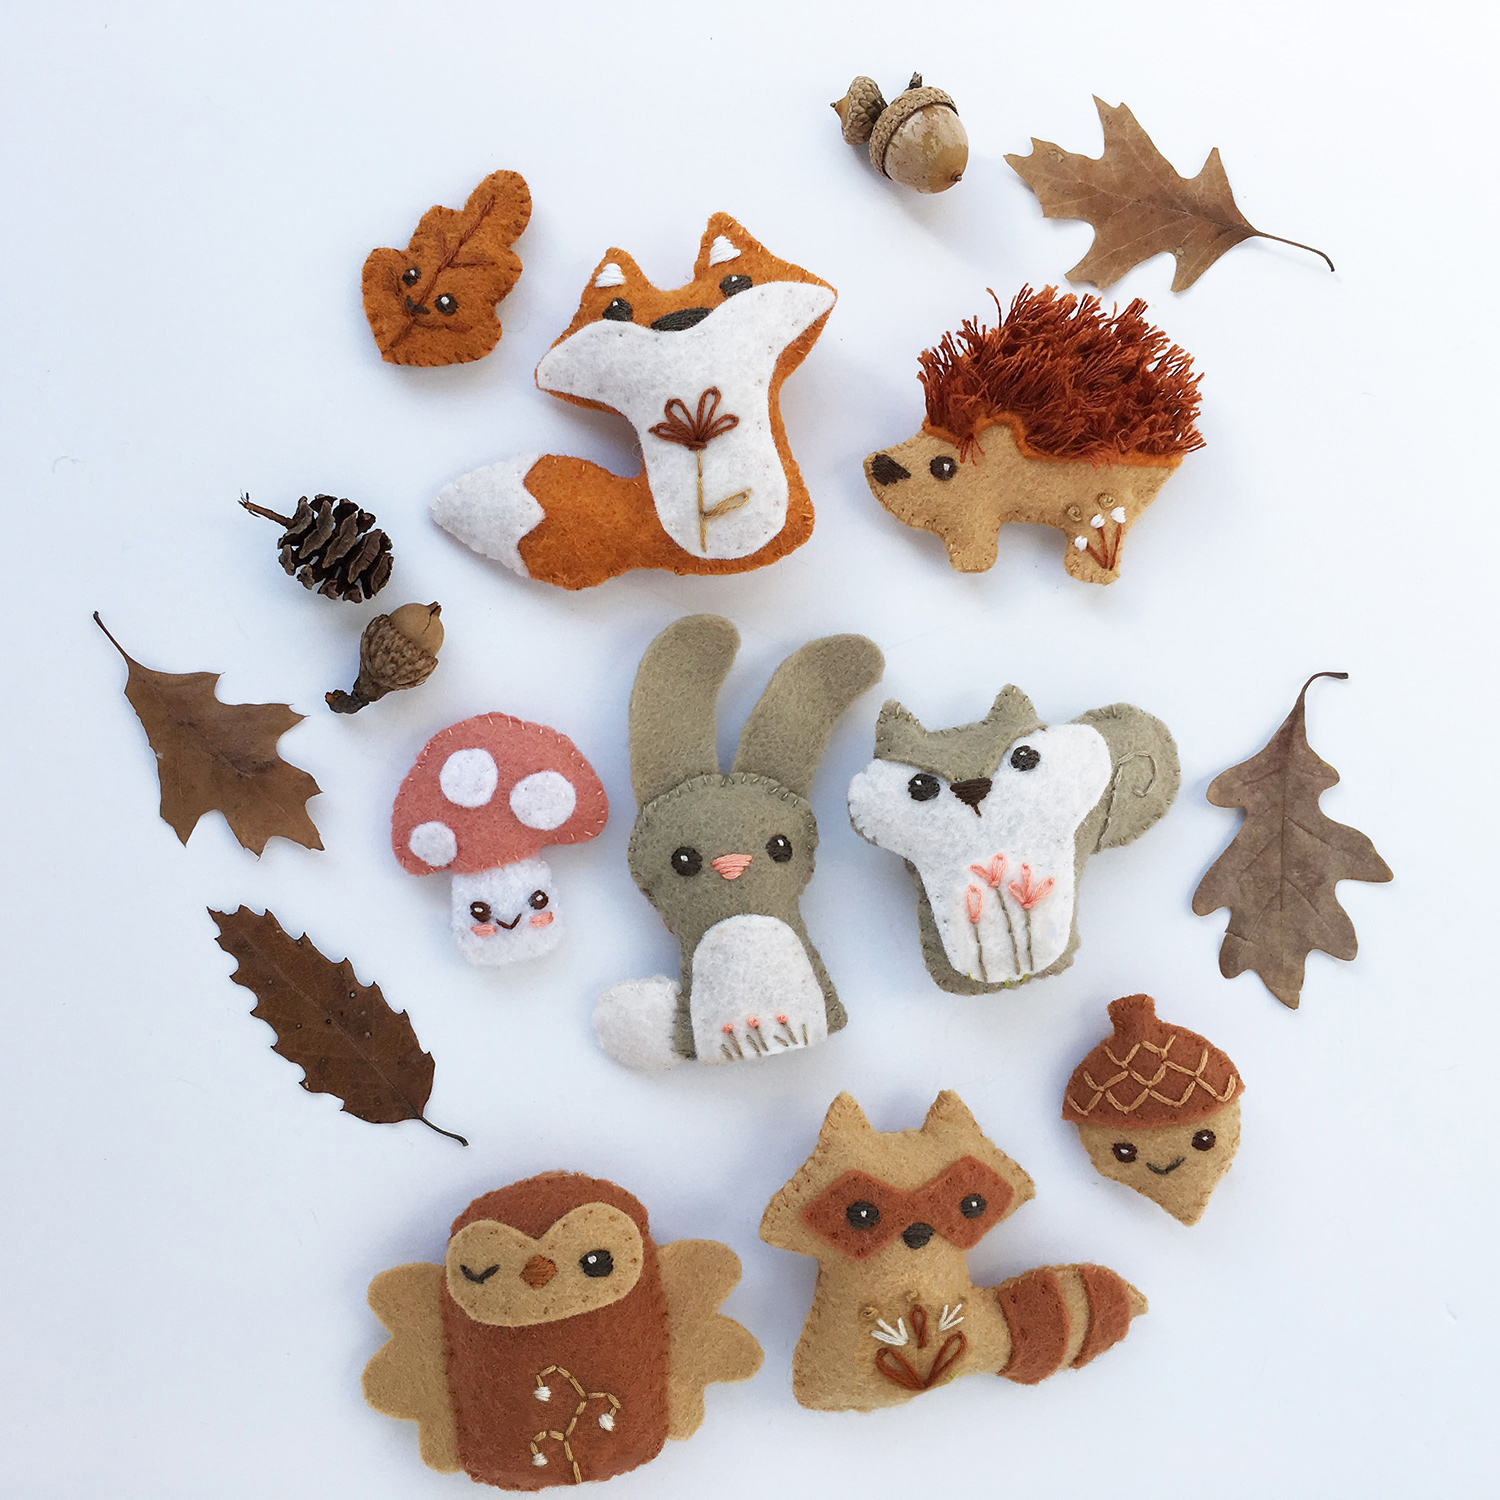
Long awaited, much requested Woodland Animal felt sewing kits are finally in the shop!! I'm so excited to share these with you and I know you'll love stitching them up as much as I do.

Three different kits are available, Fox, Hedgehog and leaf; Bunny, Squirrel and mushroom; and Raccoon, Owl and acorn.
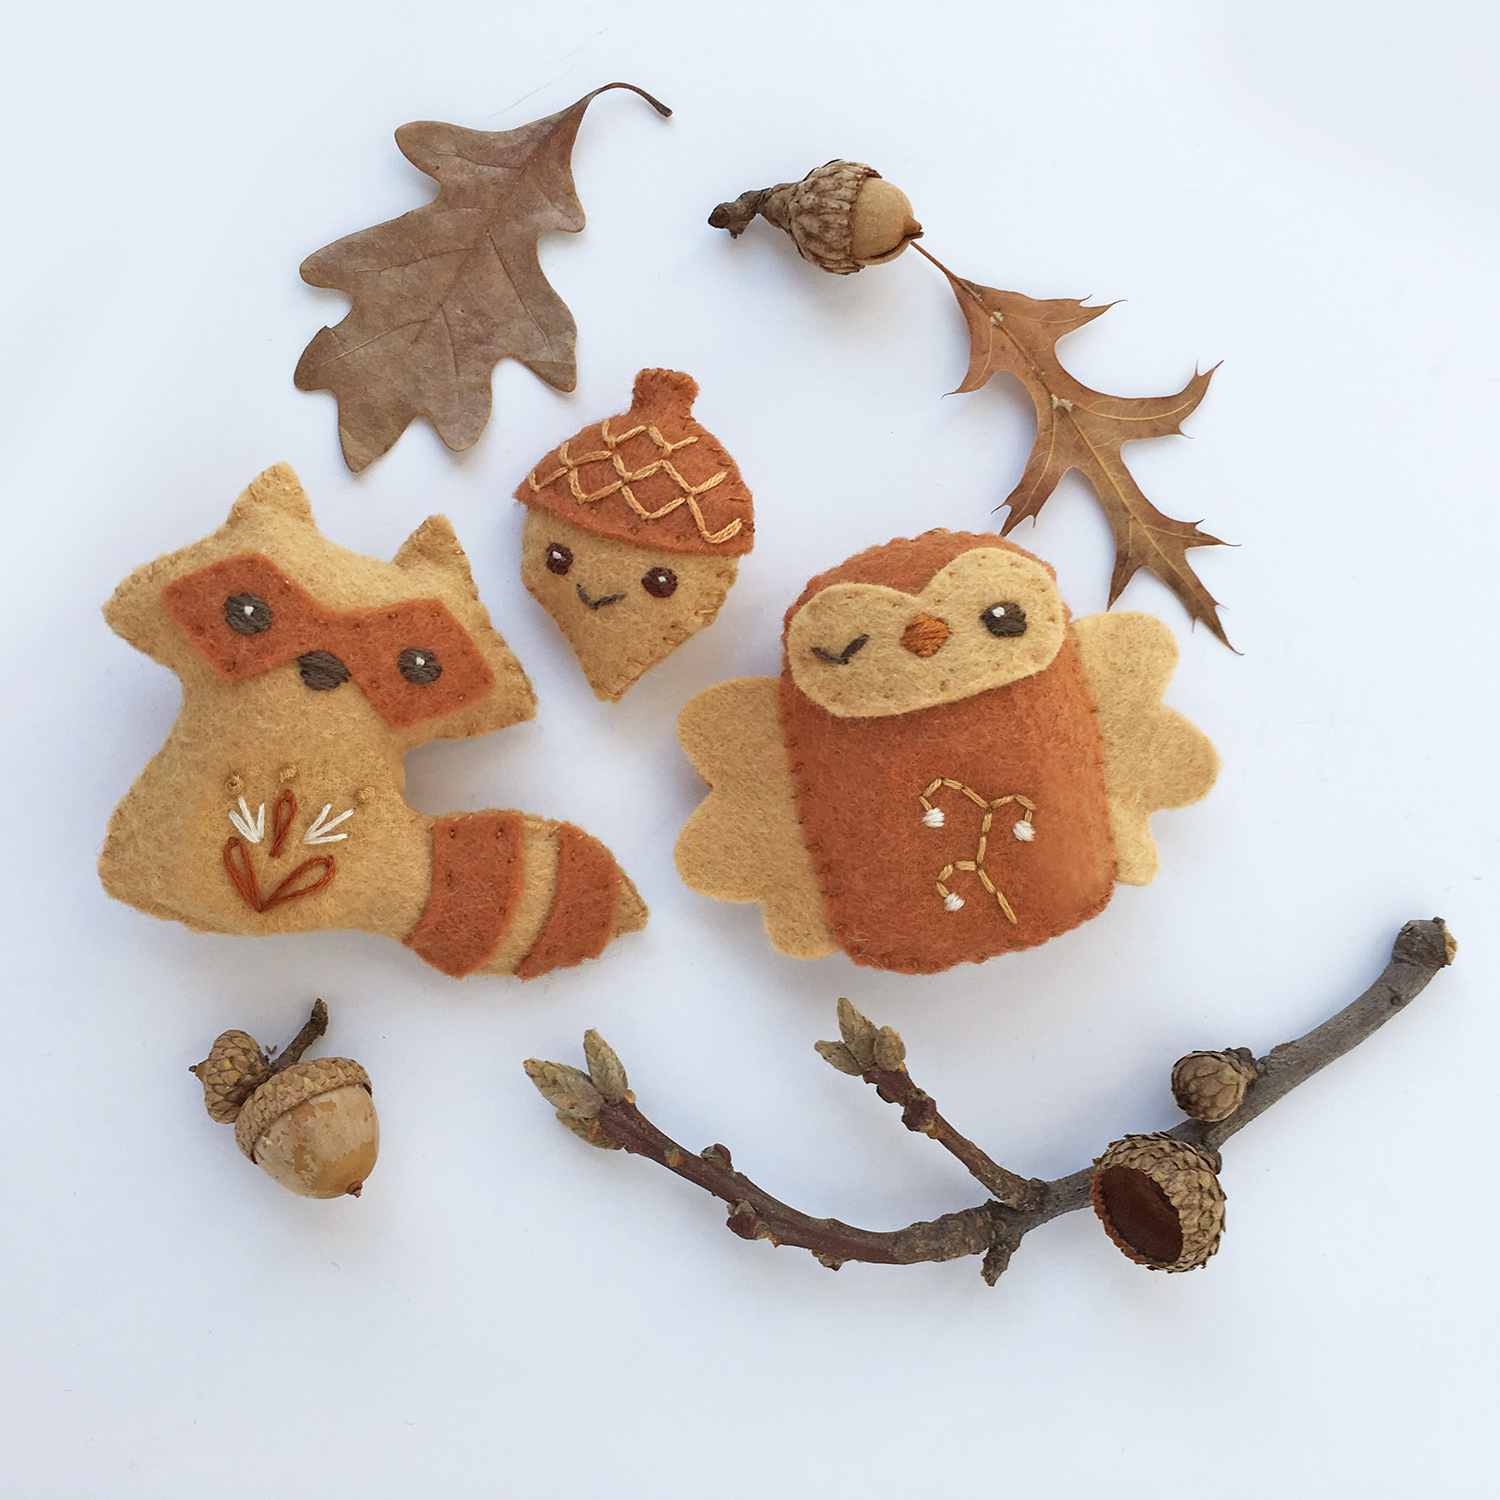
Each little felt animal is around 2-3 inches, perfect for ornaments, magnets, gift tags, pocket play and more.
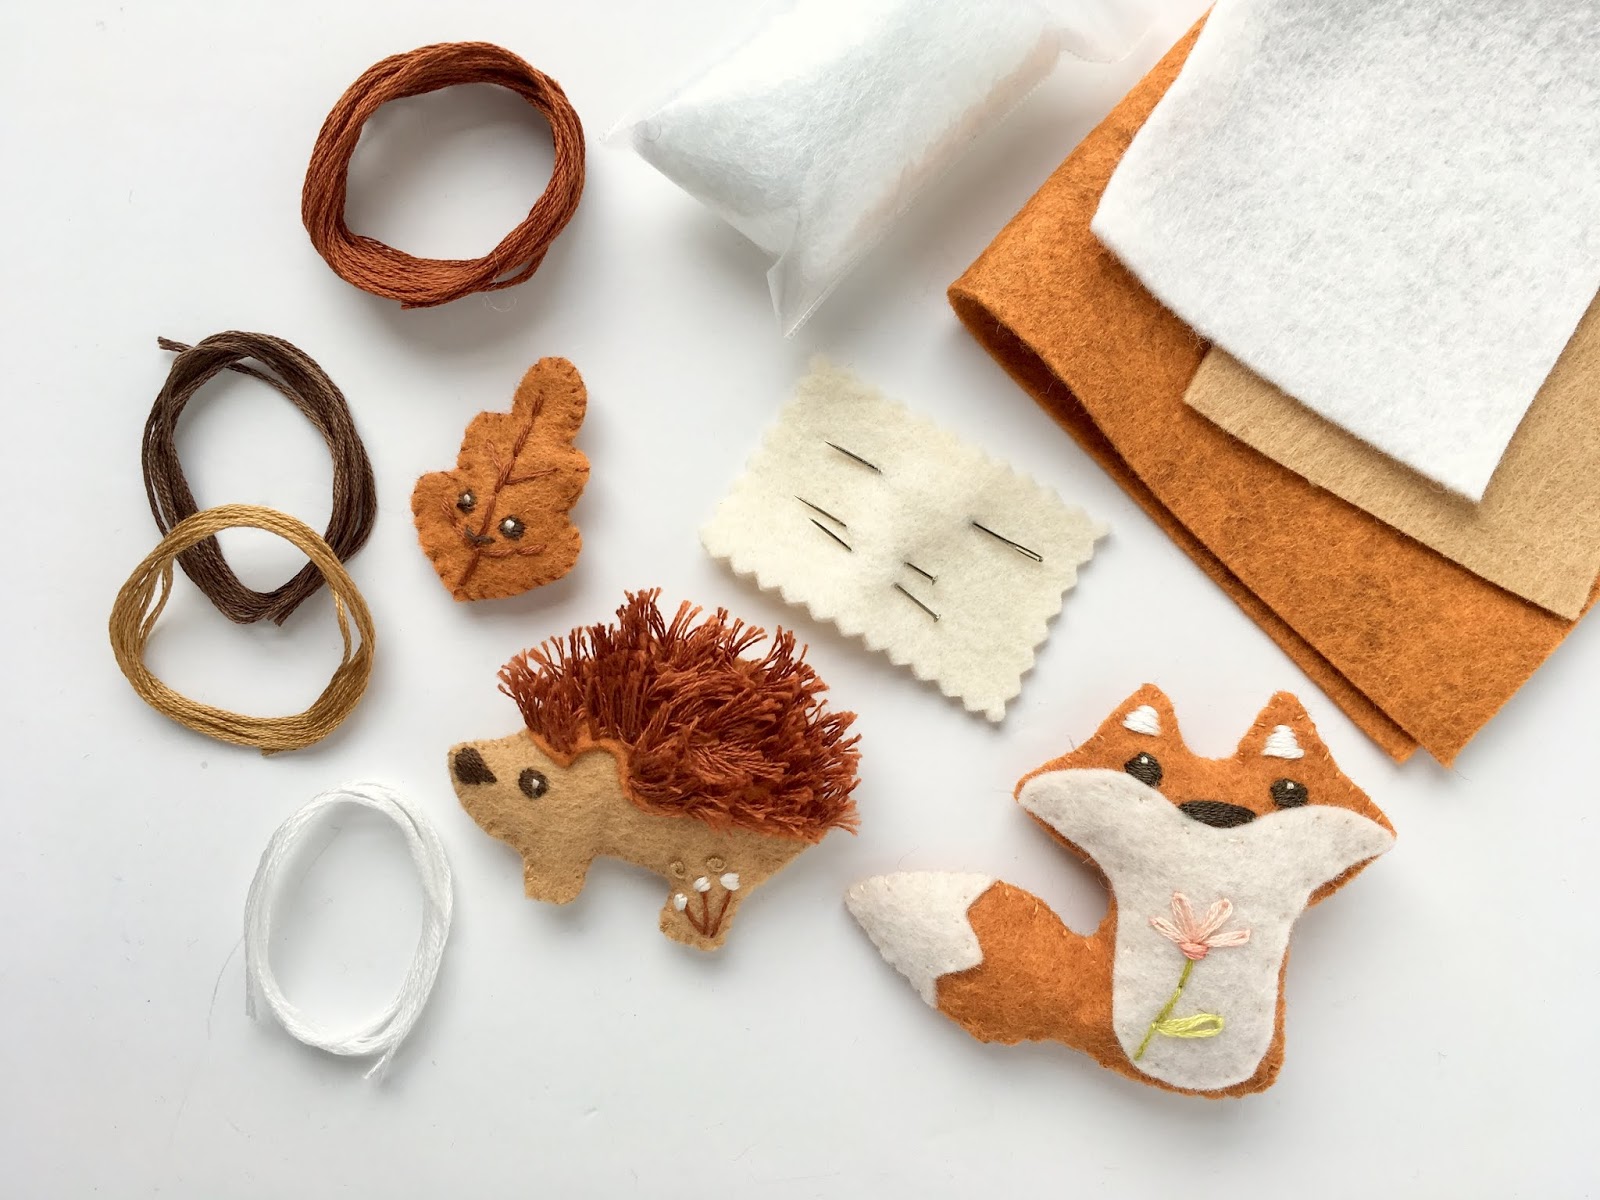
Kits include everything you need to sew your sweet little woodland friends.

Which set is your favorite?? You can grab them all at littledear.etsy.com
xo Aimee


March 12, 2019
Panda felt plush pattern
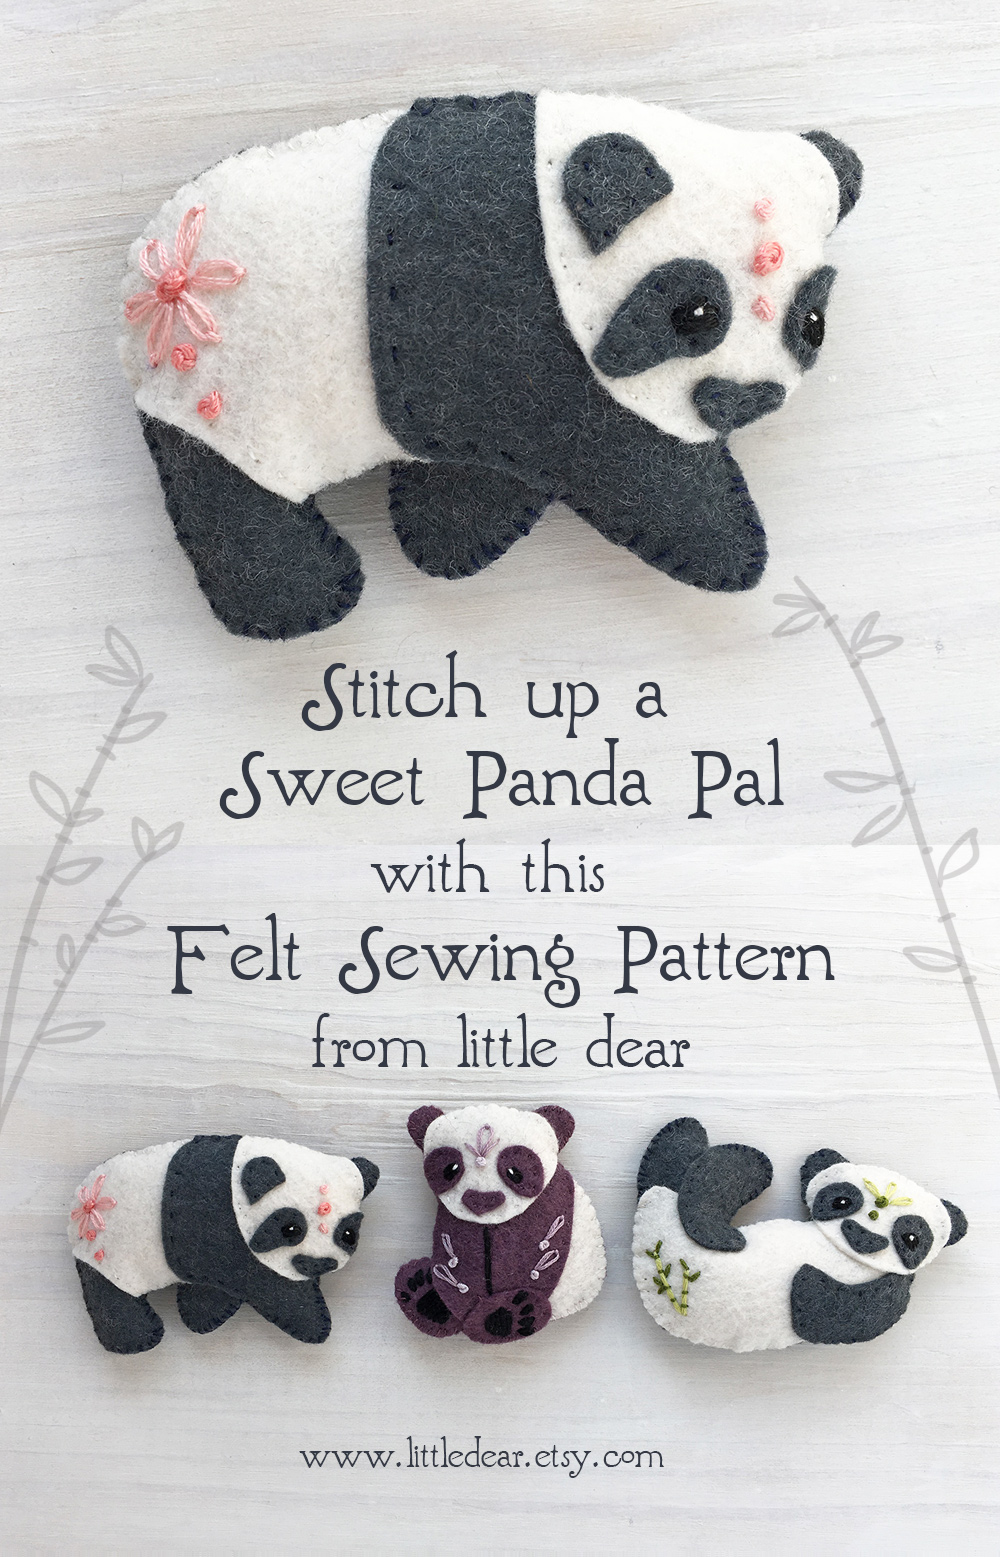
Pandas are here!! I've wanted to do a panda pattern for ages (and had many requests for one) but I could never decide what other animals would go in the set, so I finally decided they needed a set of their own. Here they are! A set of three adorable panda patterns for you to sew. You can get the pattern PDF download at my shop: http://littledear.etsy.com Do you know a panda lover who would love these cuties? (Who doesn't love pandas, btw??)Enjoy!xo aimee
March 7, 2019
Learn embroidery with these cute little mini samplers!

All new mini embroidery samplers are in the shop! Learning hand embroidery has never been so easy and fun. Each sampler is printed in grey so you can choose your favorite colors and stitch up something beautiful!
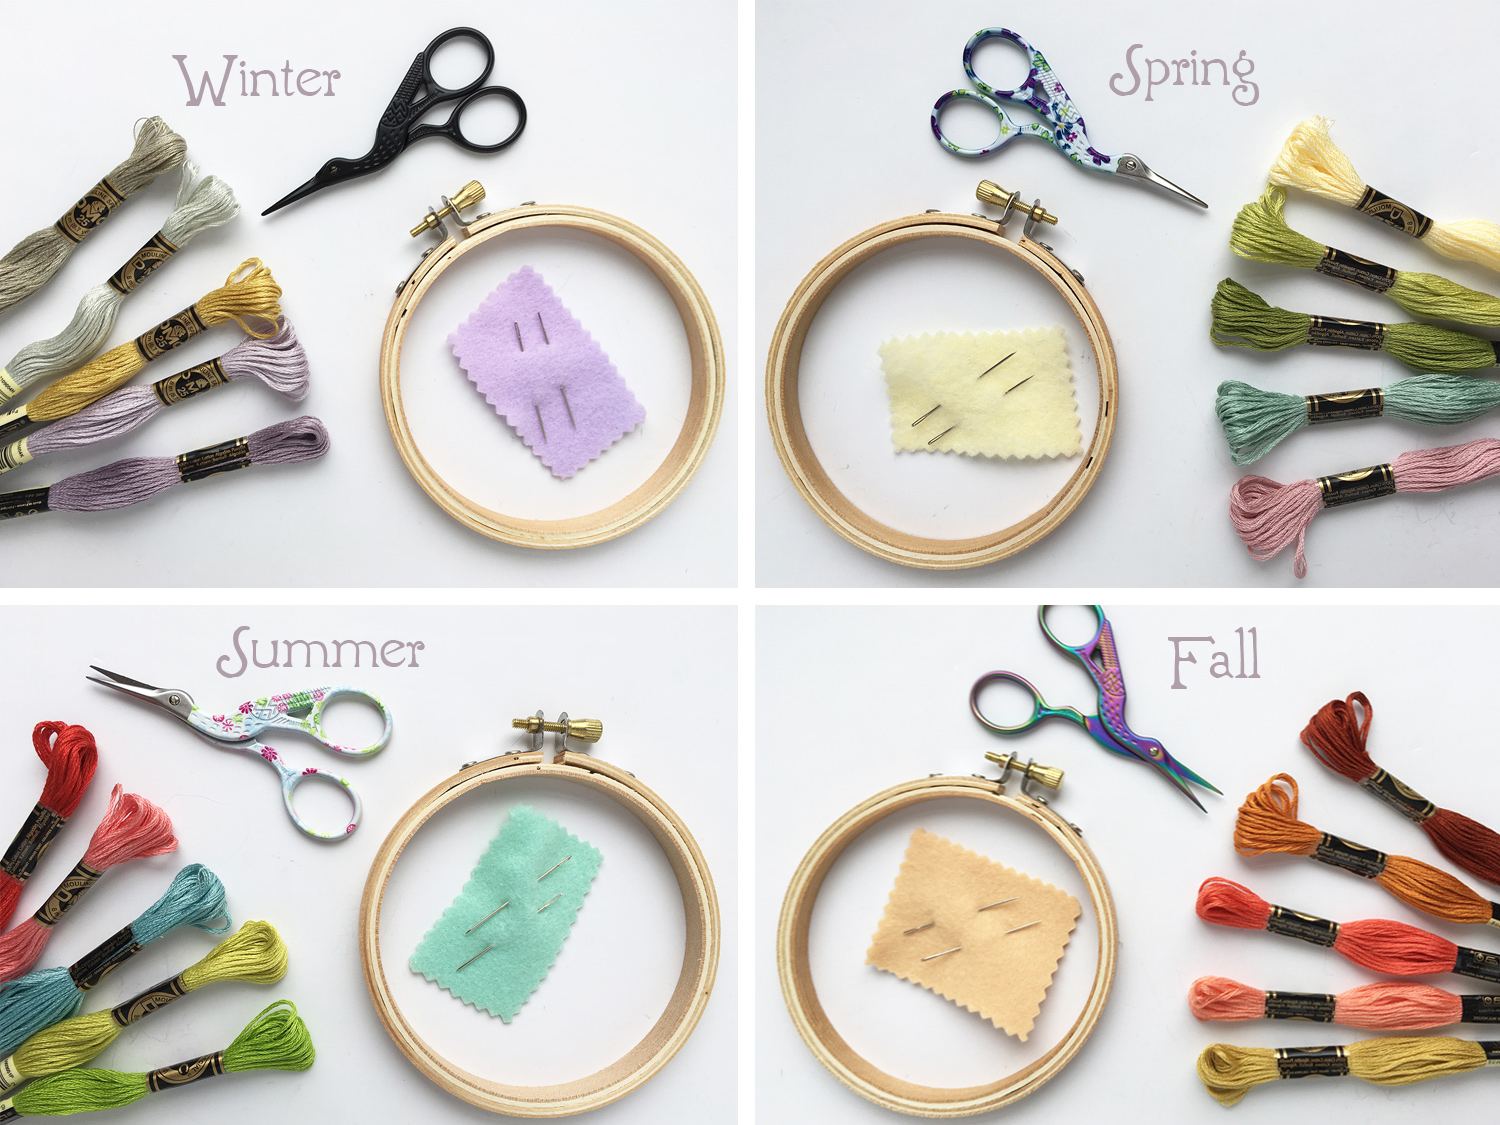
I've also just released some hand embroidery Start-Up Supply Kits! These pair perfectly with the new mini samplers, each kit contains a 4-inch hoop, needles, embroidery scissors and your choice of floss palettes: choose Winter, Spring, Summer or Fall colors. Which is your favorite? I always love to hear what colors you love.Mix and match your favorite colors with your favorite sampler design and start embroidering today. littledear.etsy.com
xo Aimee
January 31, 2019
nature motifs embroidery patterns

I've just listed a new set of embroidery pattern PDFs at www.littledear.etsy.com!These little designs fit perfectly into 4 inch hoops, just right for a sweet little woodland arrangement.
These are also perfect for making embroidered dream catchers!

If you've not tried this before, check out my Dream Catcher stitch tutorial here,and my Dream Catcher assembly instructions here. Hand embroidered dream catchers are so unique and fun to make, and a beautiful addition to your special space.Try them out and let me know what you think!xo aimee
January 29, 2019
learn hand embroidery
I post lots of embroidery patterns and tutorials here all the time, but it's been awhile since I did a quick "Getting Started" post so here you are.
Are you ready to learn hand embroidery? You've come to the right place. Even if you've never embroidered in your life, you can learn in just a few easy steps! Embroidery is fun, relaxing and very versatile. I know you'll love it! Just read on to learn the basics and you'll be all set to stitch up something awesome.
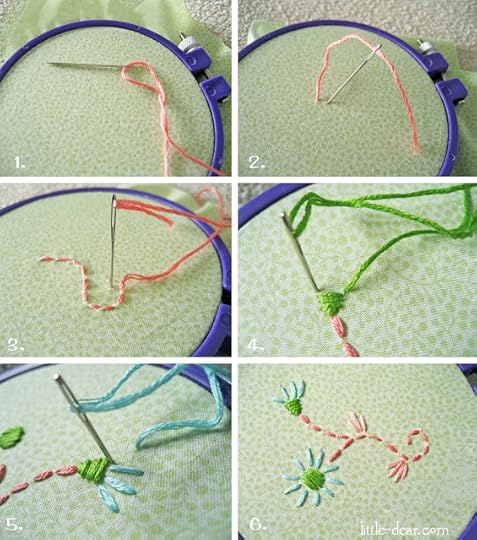
Step 1. Gather your supplies. You'll need an embroidery needle (I buy packs of different sizes and pick my favorite), floss (pick your favorite colors!), hoop (a 6 inch wood or plastic one is a good one to start with) and fabric. You can embroider on almost any fabric, try embellishing your clothes, dish towels, pillowcases, anything! You can find all of these things at your local craft store, or maybe even in your closet.
Step 2. Stretch your fabric onto the hoop, make sure it's tight and smooth. Cut a length of floss about 12 inches long, thread the needle and then tie a knot in one end. Pull the needle and floss through the fabric from the back until the knot catches. Now push the needle back down through a little ways away and pull the floss tightly to the fabric. You've made a Straight Stitch!
Step 3. Keep making Straight Stitches in a line. You can make them all the same length, short or long, far apart, or very close together to get the effect you want. Straight Stitches in a line like this are called the Running Stitch. When you're done with your line, tie a knot on the back and start with another color.
Step 4. Now make a few Straight Stitches side by side, close together, going back and forth. This is a Satin Stitch and it's great for solid shapes.
Step 5. Use a third color to make a few more Straight Stitches in flower petal and leaf shapes.
Step 6. You're done! It's really easy to embroidery pretty designs freehand with just a couple easy stitches. Play around and see what else you can come up with!
Ready for more? Check out my Doodle Stitching books for lots of fun patterns and instructions! And visit www.littledear.etsy.com and pick yourself out a unique kit, sampler or PDF pattern download.
Enjoy!xo Aimee
Are you ready to learn hand embroidery? You've come to the right place. Even if you've never embroidered in your life, you can learn in just a few easy steps! Embroidery is fun, relaxing and very versatile. I know you'll love it! Just read on to learn the basics and you'll be all set to stitch up something awesome.
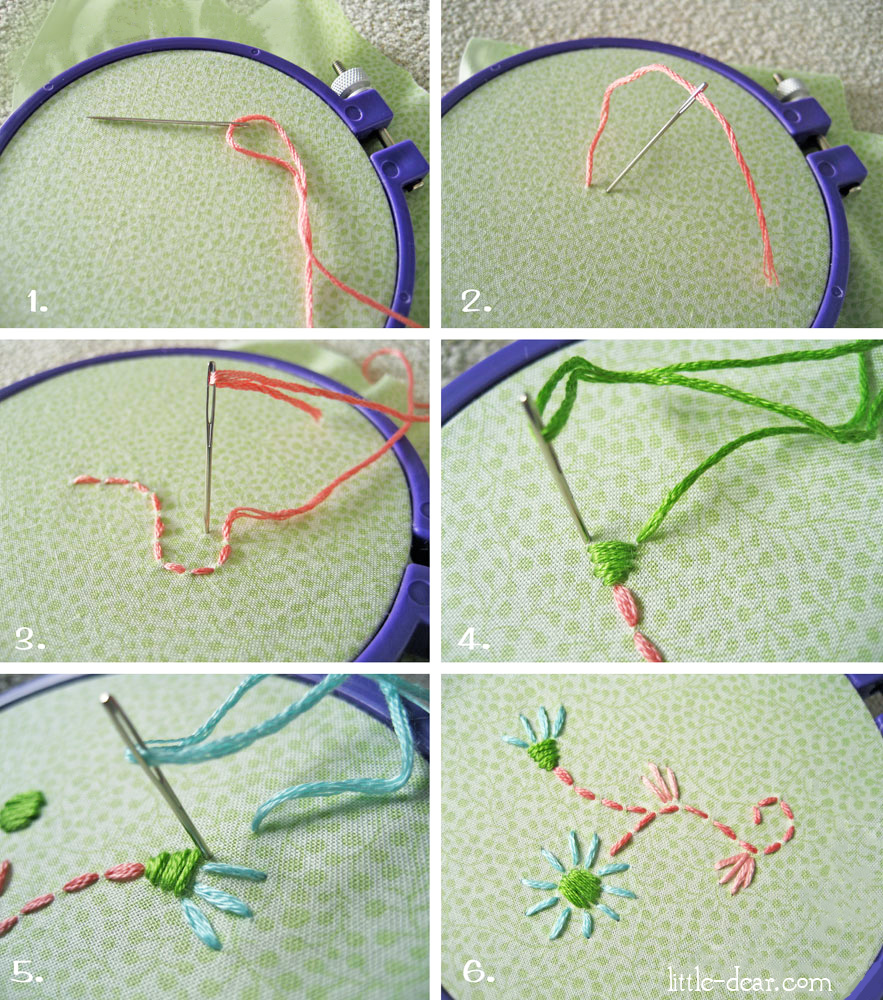
Step 1. Gather your supplies. You'll need an embroidery needle (I buy packs of different sizes and pick my favorite), floss (pick your favorite colors!), hoop (a 6 inch wood or plastic one is a good one to start with) and fabric. You can embroider on almost any fabric, try embellishing your clothes, dish towels, pillowcases, anything! You can find all of these things at your local craft store, or maybe even in your closet.
Step 2. Stretch your fabric onto the hoop, make sure it's tight and smooth. Cut a length of floss about 12 inches long, thread the needle and then tie a knot in one end. Pull the needle and floss through the fabric from the back until the knot catches. Now push the needle back down through a little ways away and pull the floss tightly to the fabric. You've made a Straight Stitch!
Step 3. Keep making Straight Stitches in a line. You can make them all the same length, short or long, far apart, or very close together to get the effect you want. Straight Stitches in a line like this are called the Running Stitch. When you're done with your line, tie a knot on the back and start with another color.
Step 4. Now make a few Straight Stitches side by side, close together, going back and forth. This is a Satin Stitch and it's great for solid shapes.
Step 5. Use a third color to make a few more Straight Stitches in flower petal and leaf shapes.
Step 6. You're done! It's really easy to embroidery pretty designs freehand with just a couple easy stitches. Play around and see what else you can come up with!
Ready for more? Check out my Doodle Stitching books for lots of fun patterns and instructions! And visit www.littledear.etsy.com and pick yourself out a unique kit, sampler or PDF pattern download.
Enjoy!xo Aimee
tiny acorns
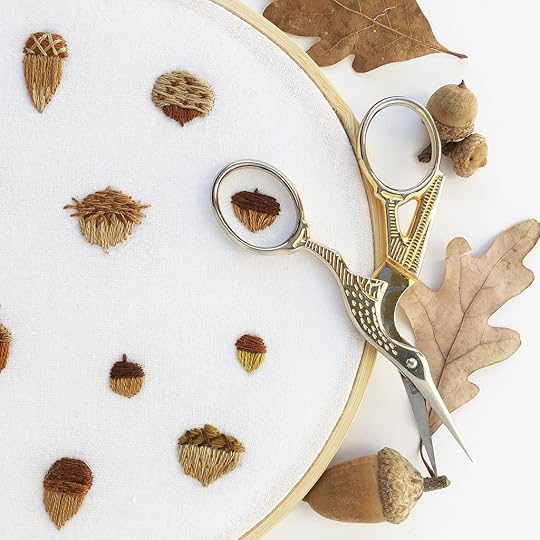
Hey guys! I've finished a new hand embroidery pattern and I love it almost as much as I love real acorns. I have a big collection of them because I can't help pocketing a few anytime I see them! So I decided to document them in stitches.
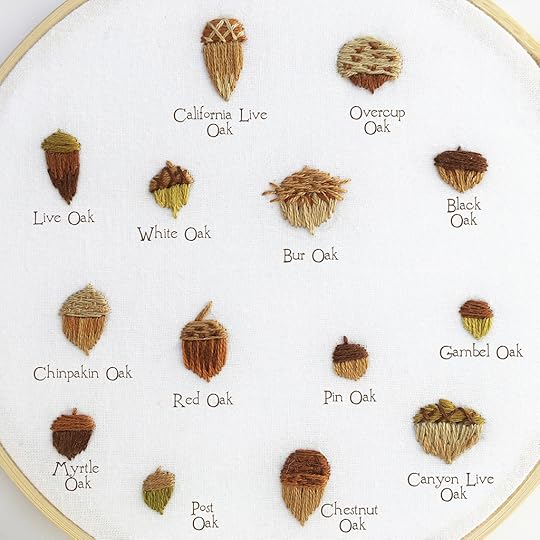
Here's a key code if you're interested in all the different varieties! I find them so fascinating, they come in so many different shapes and sizes. I hope you enjoy the pattern! You can get the PDF download at my shop: www.littledear.etsy.com
Have fun!xo aimee
January 21, 2019
Embroidery Floss Tassels
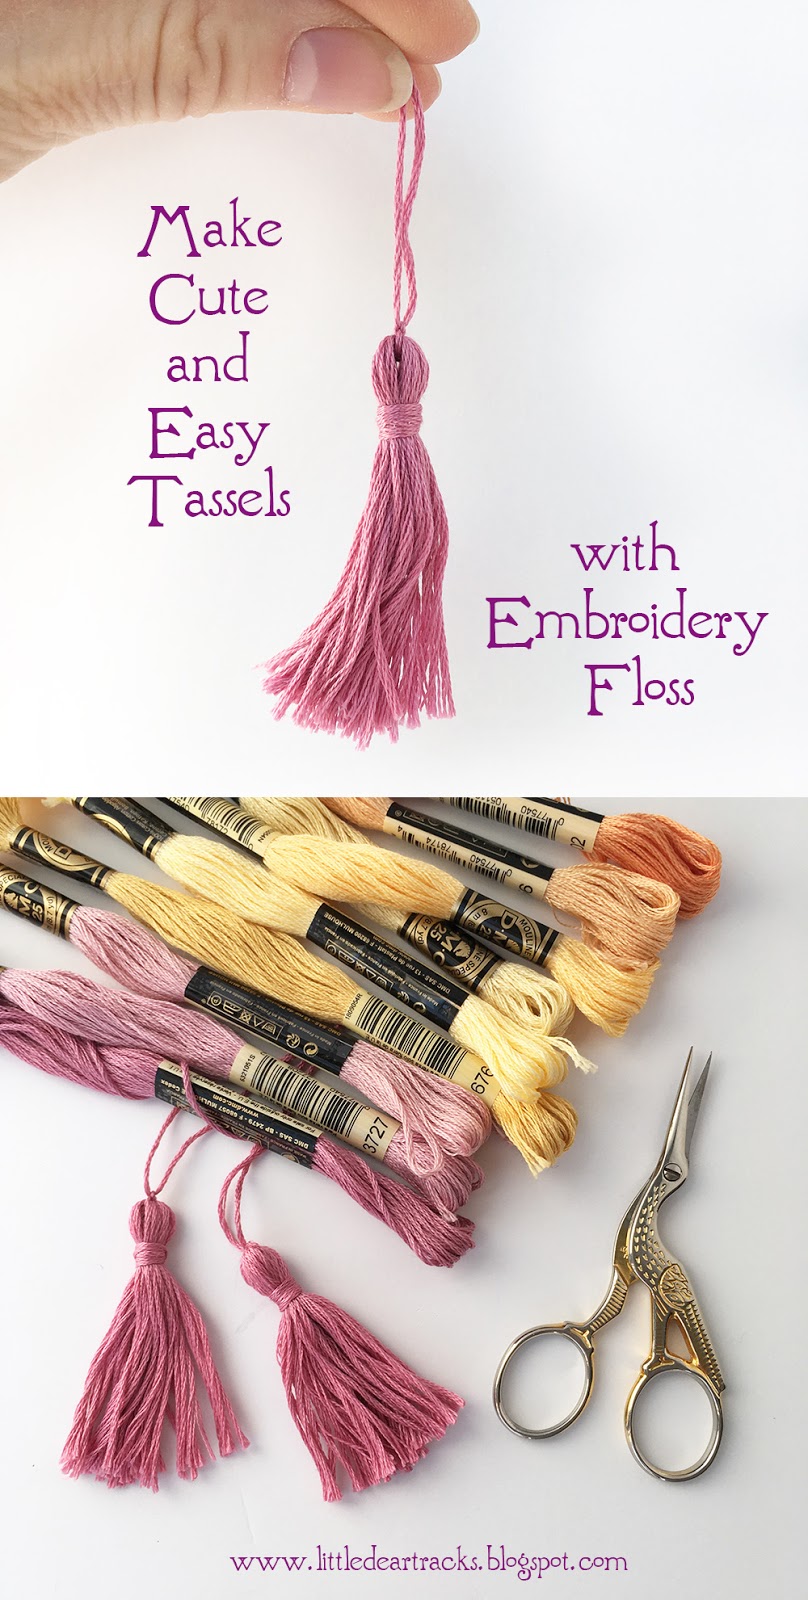
Hey guys! I've got a fun, easy project for you today, making mini tassels from embroidery floss! These little guys are so cute and versatile, you can use them to decorate pillows or bags, make necklaces or keychains, or tie them onto your sewing scissors (or anywhere else!) They are quick and easy, you'll want to make some in every color of the rainbow.
All you need:1 skein of embroidery floss (makes 2 tassels)ScissorsNeedle
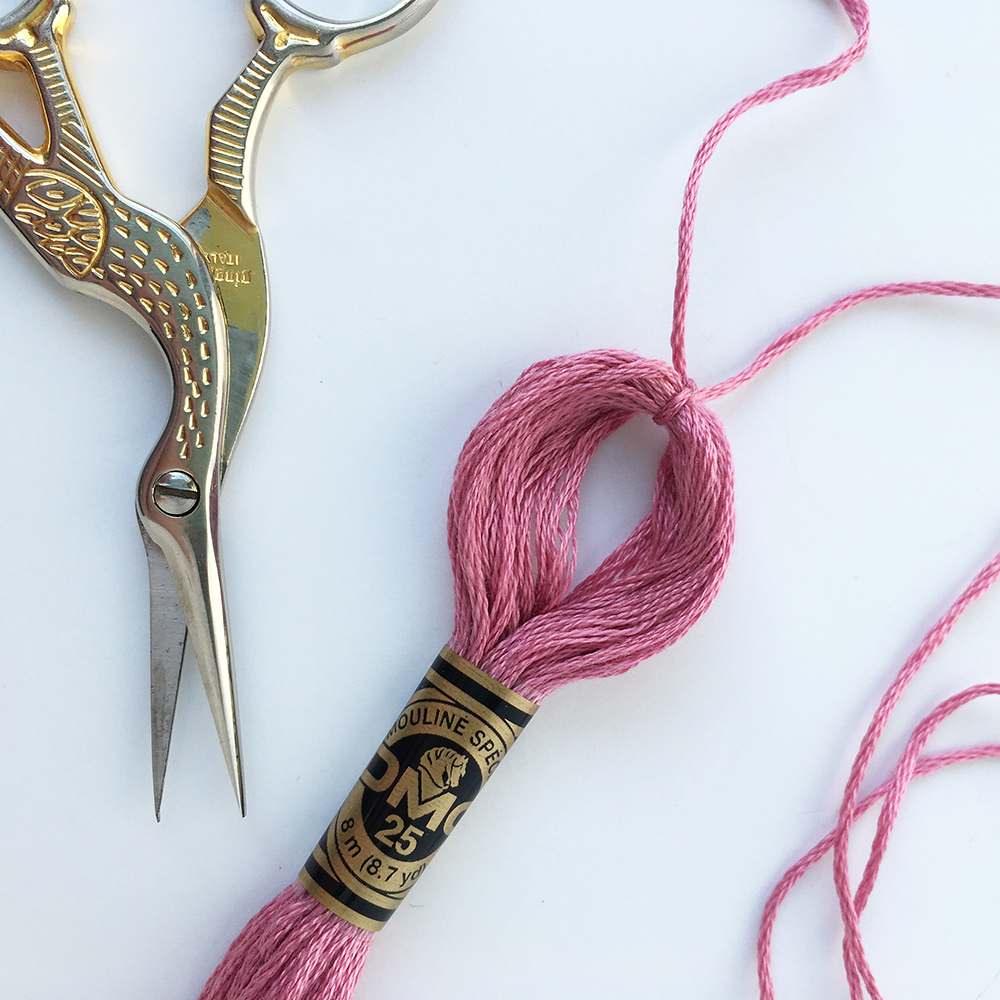
Leave the paper wrappings in place on your skein. First pull out and cut four 6-inch pieces of floss. Gather and separate the threads on one end of the skein into a loop. Thread one 6-inch piece of floss through the loop and double knot it tightly.
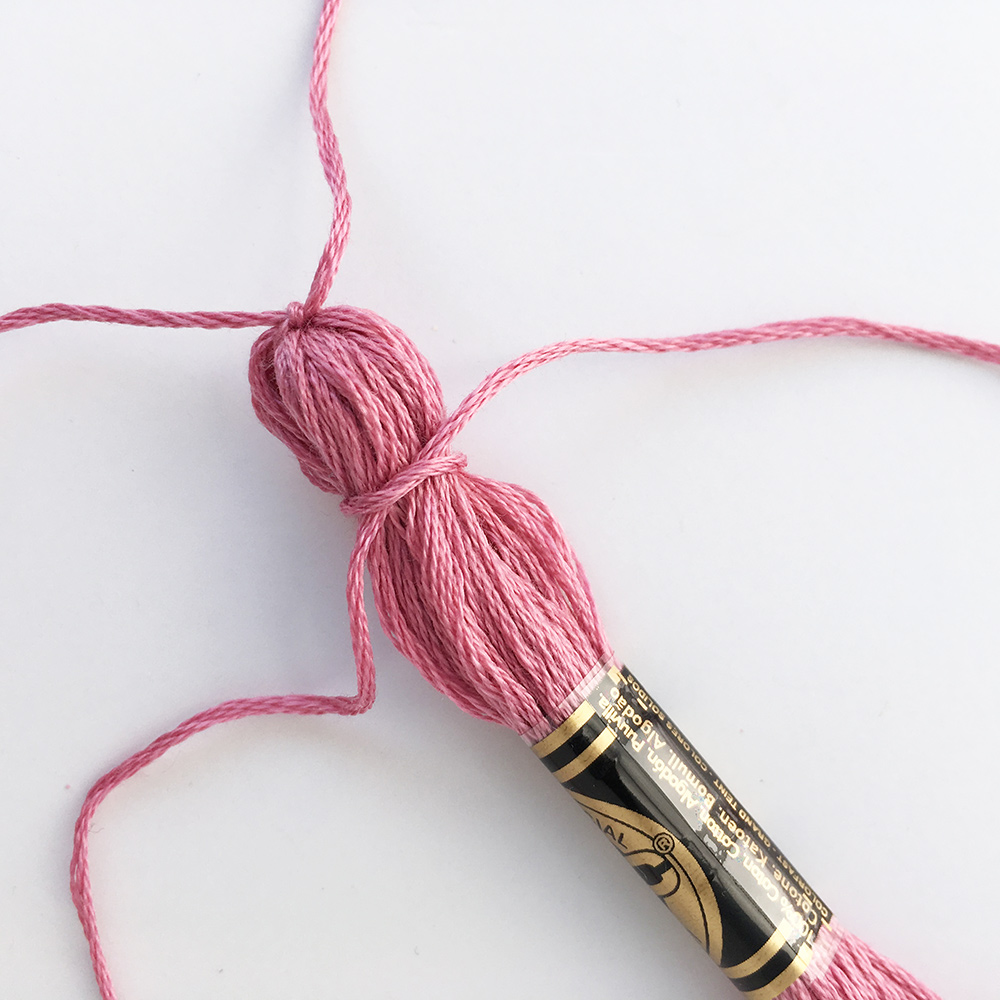
Tie a second piece of floss piece around the entire skein near the top, below first knot. Wrap the ends around 2 or 3 times and then double knot it to secure. Cut the skein in half crosswise to create one tassel. (Use the same wrapping and knotting process to make a tassel with the other end of the skein.)

You'll have a stray strand of floss pointing upwards from your knot at the back, just thread it onto a needle and pull it back under the wrapped floss. Trim the ends of the tassel off evenly. Use the floss strand at the top to stitch or tie your tassel wherever you wish!If you prefer a fatter tassel, fold your skein in half and gather both ends together before tying you're knots, then cut the skein in half at the middle.
Enjoy! What will you do with your tassels?? Let me know in the comments!xo Aimee
January 12, 2019
new at little dear!!
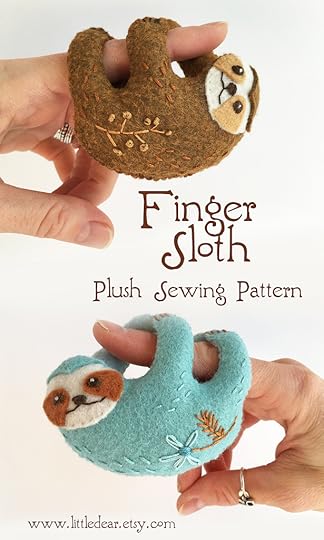
I've been designing lots of new projects to keep you in stitches throughout the winter months. Here's my newest felt animal pattern, Finger Sloths! They are so much fun to make and sew, and they'll want to go everywhere with you. Grab the PDF pattern at www.littledear.etsy.com

New hand embroidery samplers are here as well! I really loved stitching up these designs and I know you will too. They fit nicely into 5 or 6 inch hoops and make perfect hoop art for your wall.
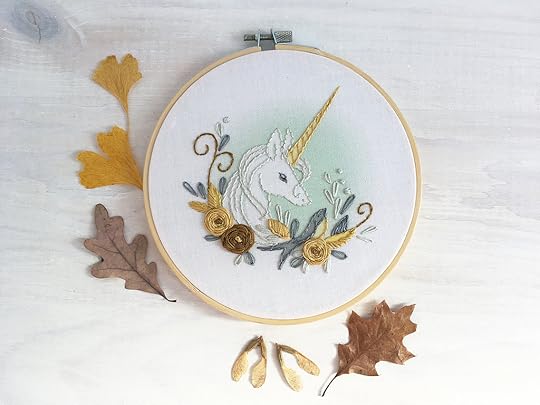
Sleeping Fox and Unicorn samplers are waiting at www.littledear.etsy.com along with all of my other embroidery kits and samplers.
xo Aimee
January 6, 2019
tiny succulents

Just in case you were wondering what the types of succulents were in my Tiny Succulents embroidery pattern, I've made up a little guide. :) This is one of my favorite patterns, I've been pouring over beautiful succulents lately on Pinterest (come follow me if you love them too!) This time of year when nothing is growing always has me itching for gardening weather. Unfortunately I don't have much space (or light) for indoor plants where I currently live. (come on spring!)
You can grab this PDF download pattern at www.littledear.etsy.com and stitch up these tiny beauties even if you can't grow your own. Also, I'm planning some new tiny embroidery patterns for this series coming soon, can you guess what they will be?
xo aimee
December 26, 2018
Free penguins embroidery pattern

Have you been enjoying your holidays? I hope you've found some fun times and relaxing time as well. Here are the last of the free embroidery patterns I'm posting this month from my new book, Doodle Stitching: The Christmas Collection Transfer Pack!I always feel like this week between Christmas and New Years is kind of a weird limbo time. If you've still got some days off, it's the perfect time to grab a new craft project!

This cute trio of penguins is ready for some frosty fun. Even if you're not into cold weather, stay in where it's warm and enjoy embroidering them up. Maybe cut out a few snowflakes while you're at it!
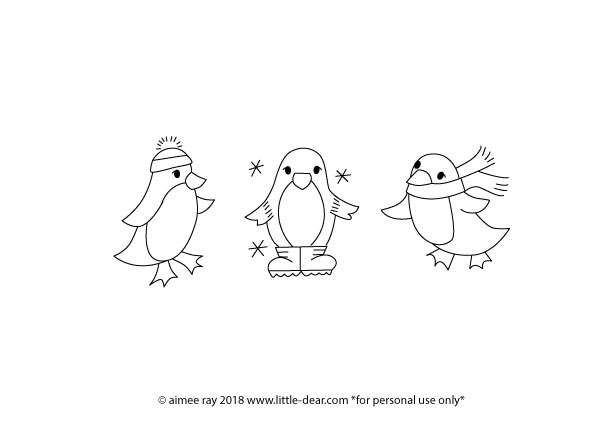
Here is the pattern! You can also download the PDF version right here.

Look back on the blog a few posts if you missed the previous free patterns, and don't forget to check out my new book, it's one of my favorites! You can have a peek inside (and grab even MORE free patterns) right here.
Have fun stitching!xo aimee
Aimee Ray's Blog

- Aimee Ray's profile
- 12 followers
Aimee Ray isn't a Goodreads Author
(yet),
but they
do have a blog,
so here are some recent posts imported from
their feed.

