
Valerie Bothell's Blog, page 6
June 24, 2014
My Renaissance Ribbon Purse
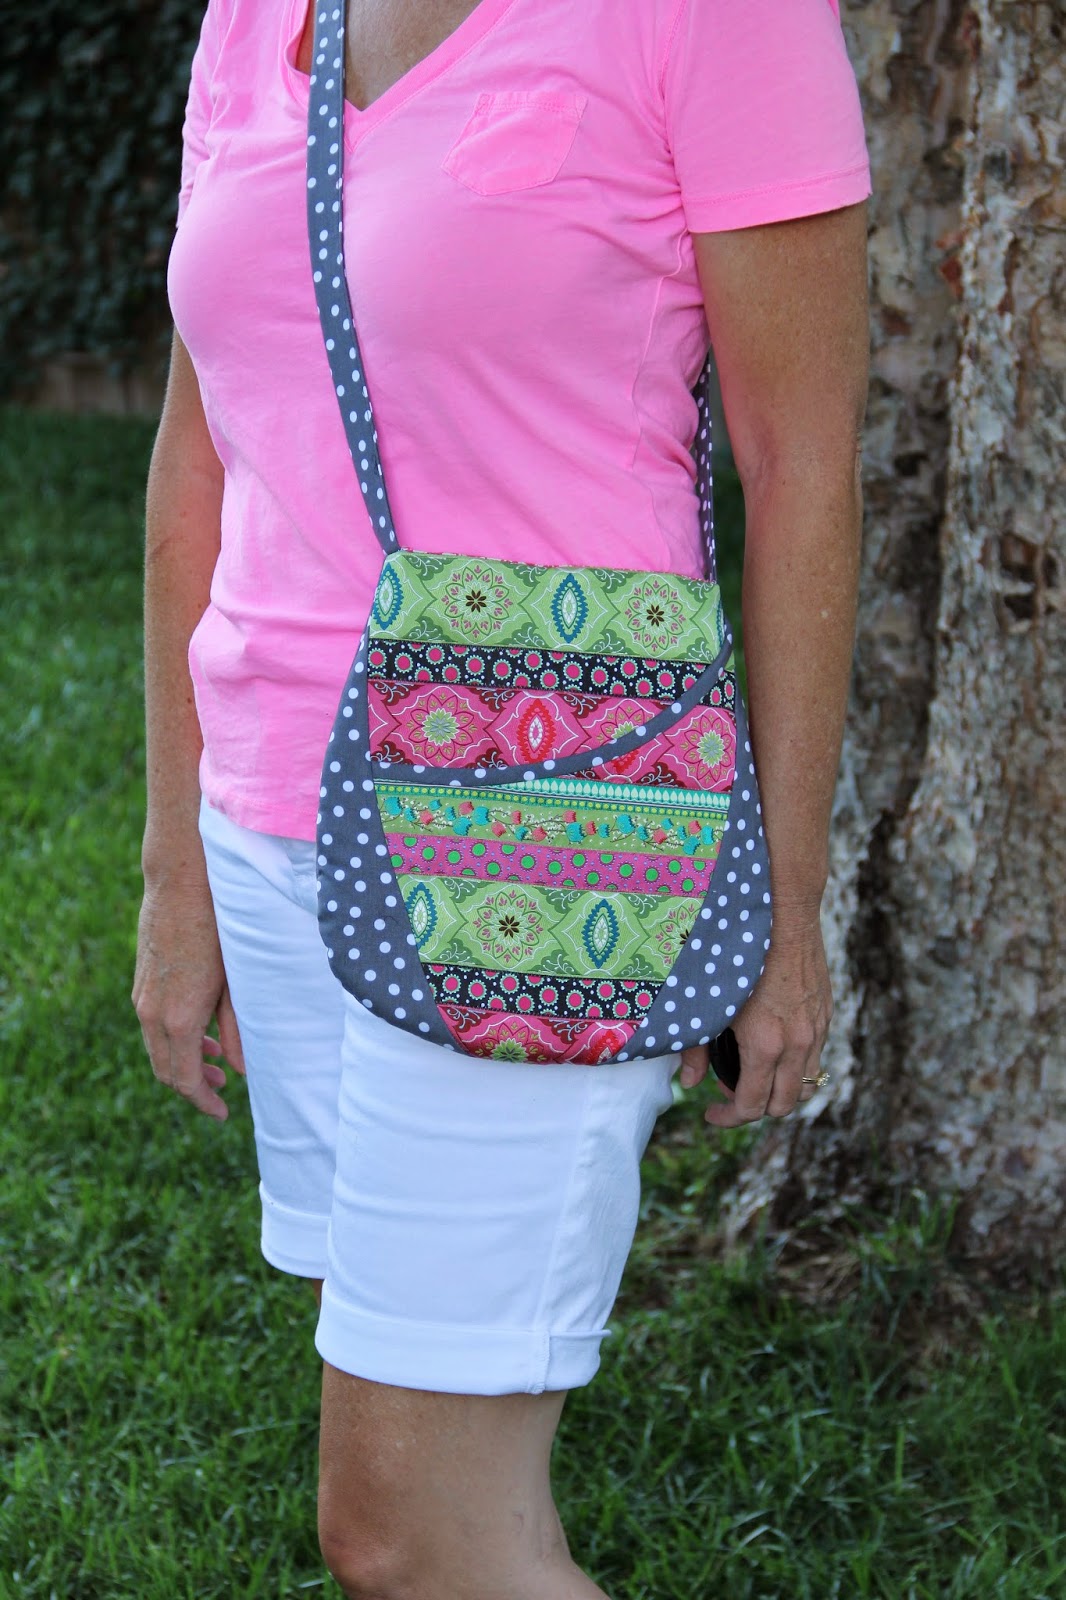 A few weeks ago, as I was scrolling through Face Book, I noticed a post by Renaissance Ribbons that looked interesting. They posted a picture of an adorable purse and asked if anyone would be interested in making this purse with some of their ribbon. The funny thing is that for a couple of weeks, I had been looking at their website drooling over their ribbons. The reason: I wanted to make a ribbon purse! What great timing! I left a comment on that post that I would be very interested and they emailed me a few days later...so much fun! I decided to use the pattern they had posted, it is free and was really easy to do. The blog is called the Stitching Scientist which further peaked my interest on this pattern because for many years I was a chemist, so I guess I am also somewhat of a stitching scientist! The pattern is an Oval Messenger Bag and here is the link:
http://thestitchingscientist.com/2014/05/oval-messenger-bag-with-free-pattern.html

I looked at their website once more and had a hard time deciding what ribbons I wanted to put together! I finally pinned my choices on Pinterest to see how they looked together. You can go to the Pinterest board for my choices here:
http://www.pinterest.com/valbothell/renaissance-ribbon/

I printed out the pattern and started right in! Because I was not using a whole piece of fabric and I knew I would be piecing the ribbons together, I did what every good crazy quilter would do and decided to foundation piece the ribbons. I made the foundation a neutral color so it wouldn't show through if I didn't get the ribbons close enough together. I also decided to double the fabric because these are really nice durable ribbons!
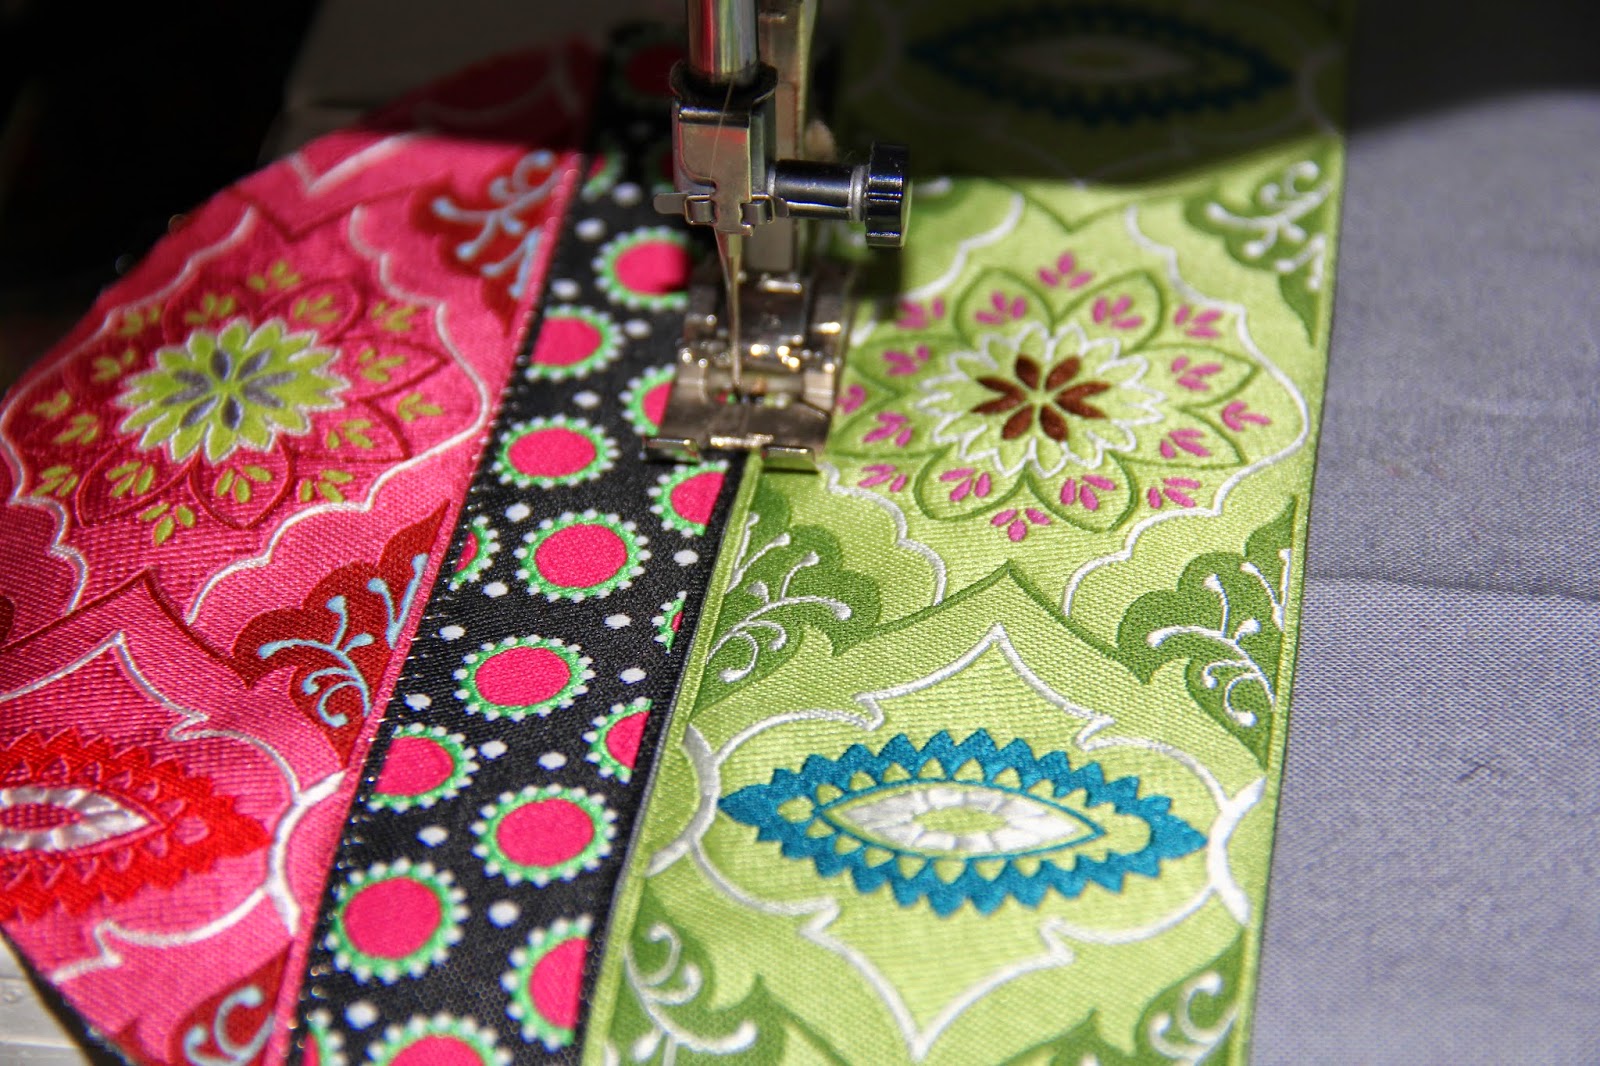 I placed the ribbons side by side and zig zagged them together on top of the foundation. The first piece I did was the front pocket. I used invisible thread on the top so that you couldn't really see the stitches. Several years ago, I wrote a tutorial on sewing with invisible thread. If you have never done it before, you should give it a try! Here is a link to my tutorial if you have never used invisible thread:http://pinkbunnykansas.blogspot.com/search?q=invisible+thread
Piecing the front pocket went really well and I was pleased with the result. Somehow I didn't get a picture of the piece that goes behind the pocket after it was done. For that piece, I did the same thing. I cut the piece out using a gray neutral and doubled the fabric. I only pieced the section that was going to show up above where the top of the front pocket stopped. I didn't want to waste any ribbon inside the pocket where you wouldn't see it!
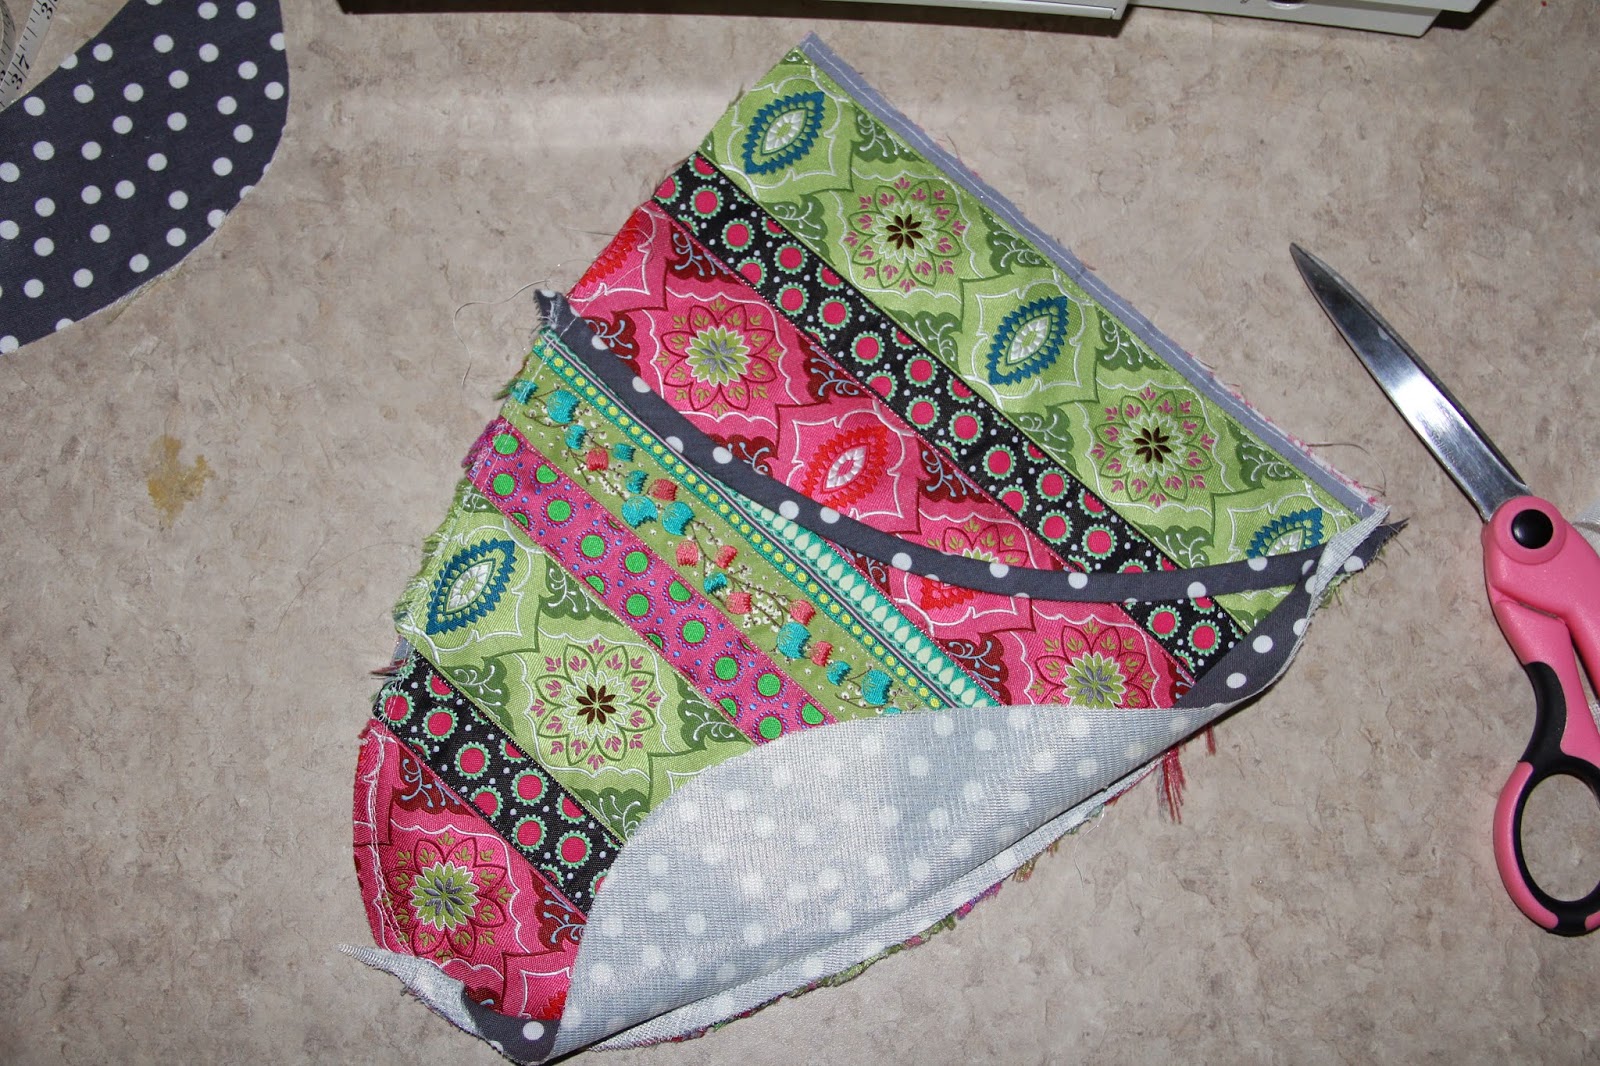
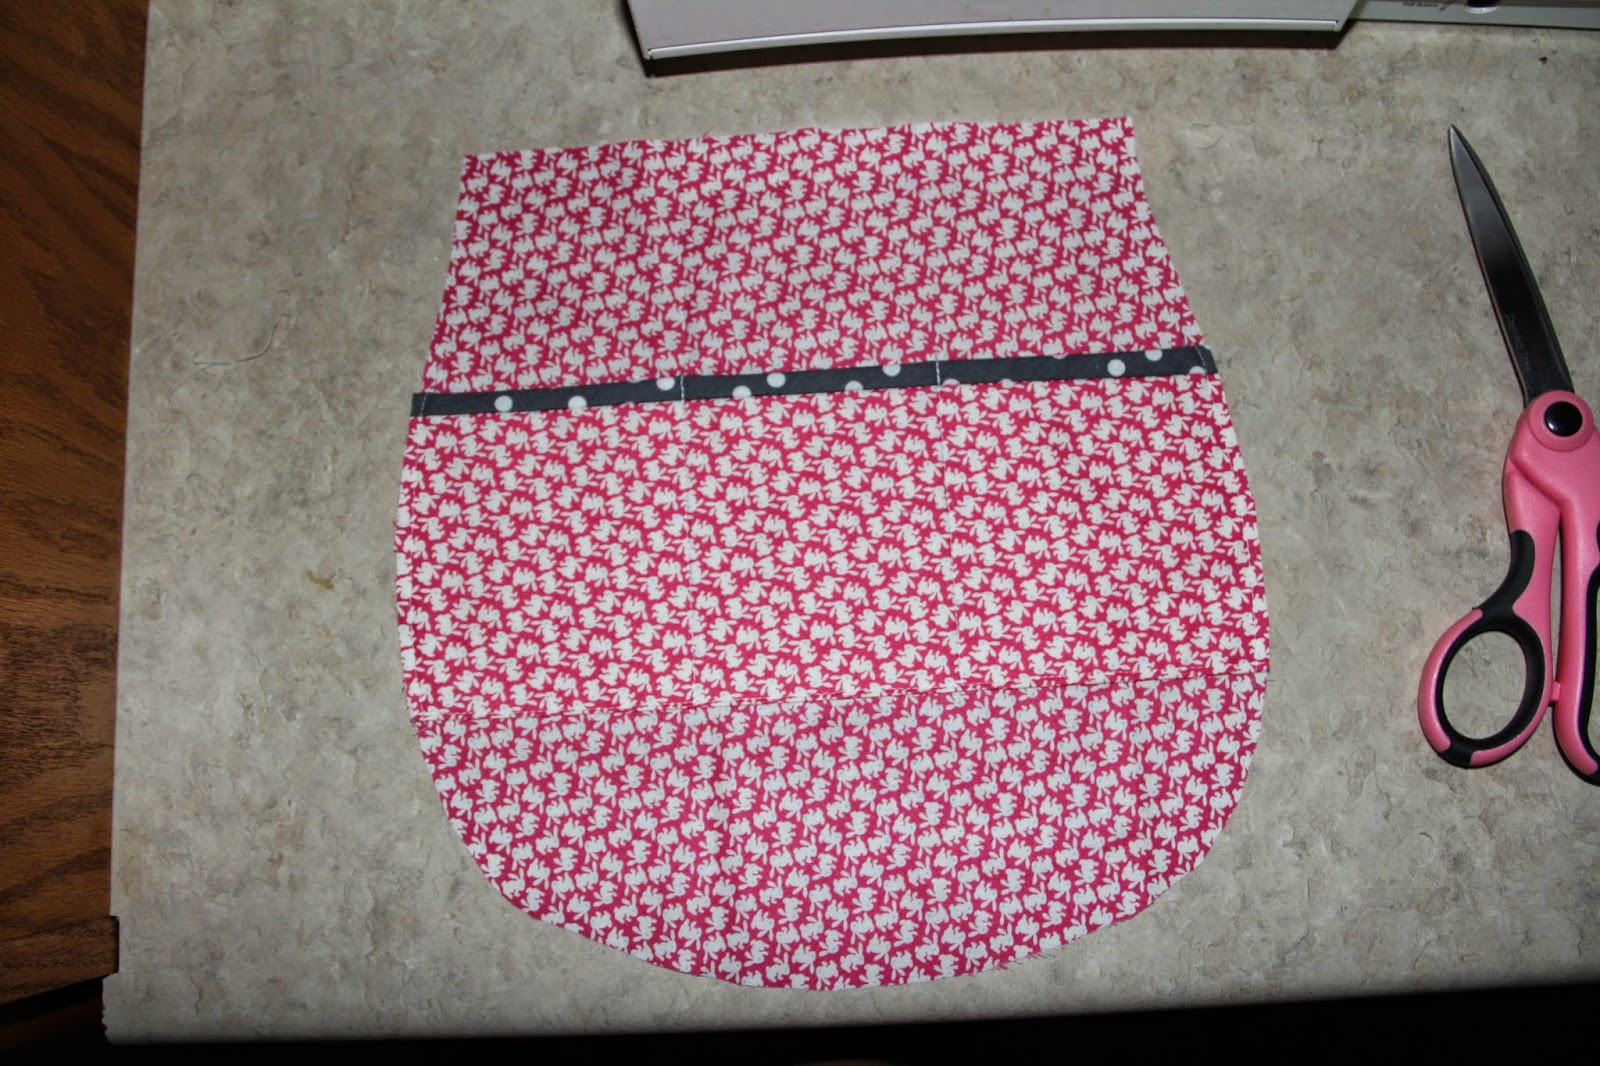
After I had finished piecing both parts that make up the front pocket, I put a piece of binding on the top edge of the pocket and basted the two pieces together. Next, I cut out the side pieces that make up the remaining part of the front of the purse. Because the front pocket is fairly heavy from all the layers, I decided to iron some fusible knit to the side pieces to give them more stability. They were sewn them in place on either side of the front pocket.

At this point I was really happy with the way it was turning out!
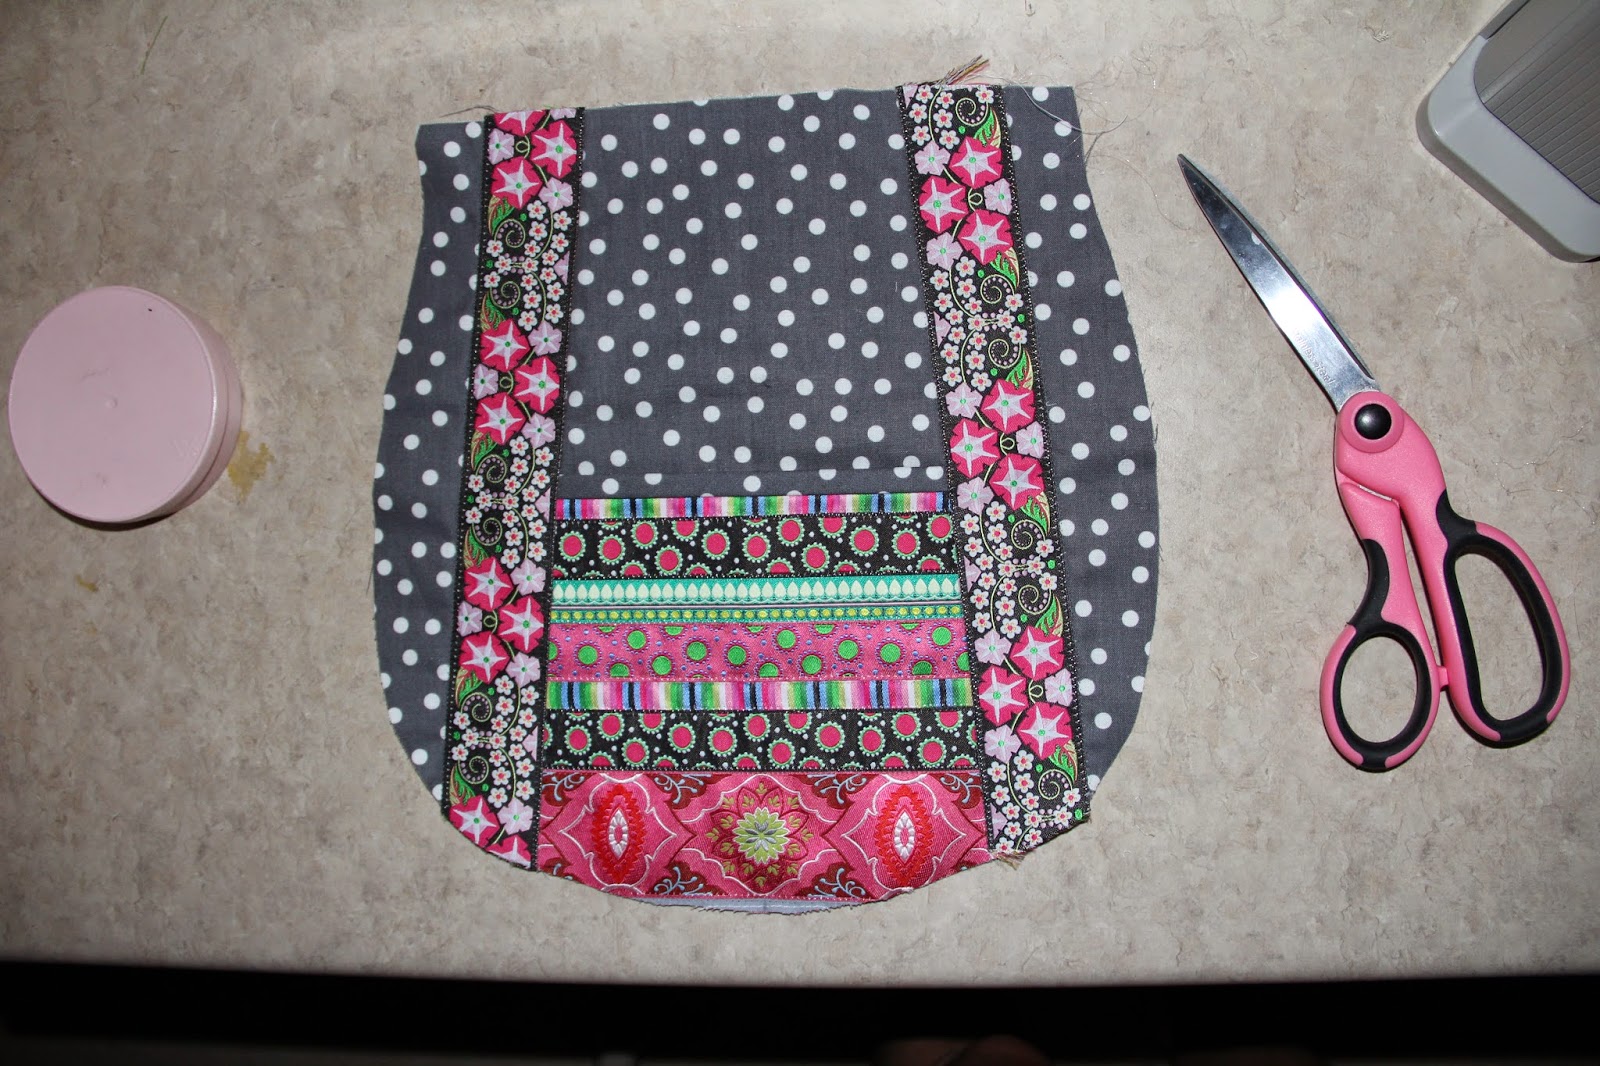
I still had some ribbon leftover, so I decided to add a pocket to the back of the purse. I really love lots of pockets to put things in, it helps me to organize my stuff! I used the same method and pieced the ribbons to a neutral base and put a piece of binding on top of the pocket. To hide the raw edges of the pocket, I just ran a length of ribbon along the sides of the pocket and up to the top. The fabric I used for the back of the purse was also stabilized with some fusible knit and the lengths of ribbon on either side of the pocket were zig zagged into place using invisible thread.
I decided to make a pocket for the lining of my purse...I know the fabric looks off grain but I promise it was cut straight! Following the rest of the instructions for the pattern, I sewed the purse together.

For a final touch I even put a piece of ribbon at the top of the strap.....
This purse was so much fun and it gave me more ideas for projects involving ribbon!
Talk to you later,


May 1, 2014
I Dream in Pink Ribbon Collection!

I just listed a ribbon collection on my website that I am really excited about! It is the I Dream in Pink ribbon collection. It includes all the ribbon colors that I used in the I Dream in Pink project I blogged about in my last post. If you love pink, you'll love this collection!
Here's the link to my website:
http://valeriebothell.com/catalog.php?view=productListPage&category=189
Talk to you soon!
April 14, 2014
I Dream in Pink
 I Dream in Pink, Valerie Bothell, 2012
As I sat to write this post, I just became lost for words. I have so many things to say about this project that I don't even know how to begin! I'll begin by saying that this project began at the International Quilt Study Museum on one hot day in July.

Allie and I knew we were going to be taking a tour of the IQSM and we also knew that this was where one of our all time favorite crazy quilts lived. When we started the tour, we asked if there would be any chance that we would be able to see it. By it, I am referring to My Crazy Dream, made by Mary M. Hernandred Ricard between the years of 1877-1912. As you can see from the picture above, our dream came true and we were able to see this beauty in all it's glory!

Can you see the smiles on our faces? Those smiles never left our faces for the next 45 minutes as we studied and admired this glorious crazy quilt.

Just in case you couldn't see how happy this quilt made us, I'll show you a closer shot. Ok, I know I am being silly but it was such a great day for both of us! The funny thing about it, I think everyone else in our group had more fun watching us because none of the rest of them were crazy quilters! They eventually moved on to other quilts as we stood there in great awe. I do have one secret to tell you about this quilt....it's not done. That's right, it's not done! Isn't that just like a crazy quilter, to make a beautiful crazy quilt but not put the back on it!

So, you may ask, what does the first photo of your project, I Dream in Pink have to do with your visit to the International Quilt Museum? Well, Allie and I decided to take a small 18'' x 20''section of My Crazy Dream and try piecing it ourselves. So, I Dream in Pink is an exact piecing replica(not of the stitches or fabric) of a small section of Mary Ricard's masterpiece! We had so much fun reproducing this section of her quilt, that it became a pattern in our book. In fact, we sacrificed 8 pages of written text, to give you a full sized 18''x 20'' pull out pattern. For two women who had a lot to say in their book, that was a sacrifice, one we happily made!
Many thanks to Marin Hanson, and the International Quilt Study Museum for helping Allie and I make our dream come true.
Talk to you soon,
March 31, 2014
Fond Memories
 Fond Memories, Valerie Bothell 2012
When Allie and I were discussing what type of projects we would do for our book, we decided that one of the projects needed to be a down to earth workingman's quilt. About the time that we were working on these quilts, we were gifted with some absolutely beautiful feed sack fabrics. I instantly knew that I was going to use 1930's reproduction fabrics with my feed sack fabrics.
I also began to think about the fabrics that were given to me when my grandmother passed away. You see, she was a fabric hoarder. No wonder I love fabrics, I come by it honestly!

This is one of the fabrics that was from my grandmothers stash. I didn't even put a dent in it when I made this quilt, I have yards of it! I am guessing that this fabric is from the 1950's...I love it! After browsing through all of my grandmother's fabrics, I became very sentimental. When I would go visit her in the summer, she gave me free reign to use her fabrics and sewing machine. What fun as I made clothes for my favorite doll! As I worked on my quilt, so many fond memories of my grandmother came to the surface, thus the name of my quilt! She certainly wasn't perfect, but she was fun. She smoked ALOT and being 100% Danish, she would cuss in the Danish language if she got mad at you! Ha! (Don't ask me how I know!)

To make this quilt with the long skinny crazy quilted pieces, I had to get creative to keep the look still "crazy! I really love doing this technique and have made several projects using it. Pictured above is a small wall hanging I made for the Quilt Alliance as a fund raiser. I liked it so well, that I made myself another one!

At Christmas time I finished off a little UFO using this same technique and you can read about it here: http://www.pinkbunnykansas.blogspot.com/search?updated-min=2013-01-01T00:00:00-06:00&updated-max=2014-01-01T00:00:00-06:00&max-results=12

Then, in January, I decided to do the project pictured above. In this project, I used two techniques that are in our new book, Quilting....Just a Little Bit Crazy. The piecing of the long borders that I have already talked about, but also my method for piecing crazy quilt curves. I just love how it turned out and is by far my favorite piece I have made using the techniques.

I taught these methods for the first time in February to the quilt guild here in my hometown. As, you can see, they had a ball and I just love how their wall hangings were coming together!

Now, I know that you are thinking....Val, these are not embellished so are they crazy quilts? My answer is YES! Webster's definition of a crazy quilt is: a covering for a bed that is made of many pieces of cloth in different sizes without a regular design. Notice....no embellishments are mentioned! Many of you that know me well will be surprised that I have made some crazy quilts without embellishment, because hands down, the embroidery is my favorite part of crazy quilting. I can tell you that I love this technique so much that comes in at a close second! Anyway, something for you to think about!
Talk to you later,
March 8, 2014
QNNtv!

Last spring, I had the opportunity to film three segments for QNNtv, and I didn't pass the chance up! Their studio's are located in Golden, Colorado which made it even more fun. QNNtv is a great way to watch a ton of different types of quilting shows online for a very reasonable price. Pictured above, I am with Jodie Davis, the host of the show. Jodie is the BEST and she made it sooo easy! No, I don't look like that in real life, they just have a great hair and makeup person.

I did three segments starting with piecing this cute little Easter Egg, a pattern I wrote a few years ago. Then in segments two and three, I go over some crazy quilt stitches and show you some closeups of my black crazy quilt that I made several years ago. You can get the Easter Egg pattern here, if you are interested!

Here I am a little later in the evening, just having a little fun in my room....before I wash the Barbie look off.....
My co-author, Allie Aller , also filmed three episodes for them and they are listed right next to mine.
If you would like to see us on both on QNNtv, you can go here.
Talk to you later,
February 27, 2014
Serendipity

According to Webster's dictionary, serendipity is: luck that takes the form of finding valuable or pleasant things that are not looked for. The kind of luck that only comes from above. That is how two crazy quilter's, one from Kansas and another from Washington state came to write a book together. A very happy accident, that really was no accident in the whole scheme of things.
In November of 2011, these two crazy quilter's happened to sit together at a lecture given by Carole Samples. Both were moved, almost to tears by this lecture. At that moment we realized that as different as we both were, we had so much in common. We both had a deep love for crazy quilting, historical quilts and a special place in our hearts for Carole Samples and her work. I couldn't sleep that night thinking about Carole's lecture!
The very next morning we vowed to write a book together. Our journey was filled with the joy of creating beautiful things together. It is our hope that you will feel the joy radiate off the pages of our book. Then maybe you can take a little bit of that joy to create your own beautiful things.
Oh, and it is due for release May 2014, so excited!
For Allie's take on our book announcement, you may visit her here:
http://alliesinstitches.blogspot.com/2014/02/announcing-our-new-book-quiltingjust.html
Talk to you later,
Allie and Val
February 13, 2014
{Crazy} Quilt Heart

Happy Valentine's Day to all of you! Of the top two things I love to make, a heart is one of them. This is a class I will be teaching for Prairie Quilt Guild in my home town next week. If you are interested in taking this class you can go here:
http://www.pqgks.com/programs.html
If you can't make it to the class, I have the heart portion of the project (not the borders!) written up as an online class. For more info on the online class, you can go here:
http://www.valeriebothell.com/catalog.php?view=productListPage&category=179
Thank you for stopping by and I'll talk to you later,
February 4, 2014
A Very {Vintage} Update

I haven't posted in a few weeks and so I thought I would give you an update on my vintage crazy quilt block that I am working on. I changed a few things that I thought didn't look quite right. I had a white lace butterfly in the upper right hand corner but it just stuck out like a sore thumb, so off it went! I put a Christmas tree in it's place.

Here is a close up of the lower left hand corner. The reindeer are still flying, but I have added some red poinsettias and some small Christmas trees to the mix.

Upper left hand corner close up...

Upper right hand corner close up...

Bottom right hand corner close up....
I am giving a lecture and a workshop in my hometown in the next week or so and that has keep me busy, so I don't have as much progress on this project as I would like, but I am getting there! You may have noticed that I haven't appliqued the picture of my 4 boys on the center of this block yet. I am waiting until I am a little closer to the finish line because I don't want to damage the print as I work. I have another project that I made a few days ago that I will post in a few days so......
I'll to talk to you later and thanks for stopping by!
January 13, 2014
A Very {Vintage} Crazy Quilt Block

About 10 days before Christmas, I decided to start a new project. It seemed a little crazy to start something new so close to Christmas but this project had been on my mind for about 2 weeks and I just couldn't let it go! I knew what pattern I was going to use, so I started picking fabrics. As you can see in the picture above, it looked like a mess but what a fun mess!

I decided to plan the project around my favorite picture of my 4 children at Christmas time. This picture was taken about 7 years ago and I still have it in a frame in my bedroom. The pattern I drew up was a difficult one, but I really wanted this to look as vintage as possible. I felt that the extra time it would take to piece it would be totally worth it. Pictured above is after a few days of piecing.

Here is more progress after a couple more days. Remember it was Christmas time, so I worked it in around other Christmas stuff I was doing!

A few more days later with more progress, you can see my faithful sidekick right at my side as usual!

Finally about a week later, it was pieced! Time consuming, but so worth it as I felt it had the vintage feel that I was going for.

What I usually do next is pick out all of my thread and silk ribbon that I am going to use. The things I pick intially are not always what I end up using, but a girl always has to have options!

Then I pick out my laces and trims that I may use, with the same philosophy...options!

I usually put all of my stuff for a project in one box, so I can just grab it and go.

This old blanket binding looked interesting and was the right color so it may have a use, we'll see!

Then, on to my favorite part, stitching!

I just love that herringbone stitch I did around the fan shape in the upper left hand corner. I used ribbon floss and I love the shine it gives to the stitich.

Here is a closer look at the top right hand corner. That green piece of tatting is going to become a wreath. Well I have more done than this, but I'll save that for another day!
Talk to you soon and thanks for stopping by,
January 3, 2014
Gratitude

I have always been fascinated with the way Victorians would express their emotion's for one another through flower's. There were many books for the Victorians to use as a reference to help them with their choices. Many times the different books didn't agree on the meanings of the different flowers. One would only hope that both the giver and the receiver were using the same book or there could be huge misunderstandings!
The block pictured above is a page out of my Secret Language of Flower's book I recently finished. It is a Camellia and it's meaning is: Gratitude.

For this year I have chosen to focus on expressing gratitude....
So thank you for stopping by and I'll talk to you soon!


