
Ranjini Rao's Blog, page 12
July 8, 2013
Restaurant Review: Pizza Festival at Mezzaluna

It’s hard to refuse an invitation titled - Amiamo La Pizza! or Fall in love with Pizza, again! We were more than willing to do so, after too many close encounters with tasteless pies turned out by chain pizza joints that we’ve been dragged to by the little pizza-hogs in our families. So off we went for lunch at the Mezzaluna, the specialty Italian restaurant at Movenpick Hotel and Spa Bangalore where they’re running a festival featuring pizza from different regions in Italy. We joined a lively group of food bloggers and gourmands at the Chef’s table and were served a selection of thin-crust pizzas, with a choice of regular or wholewheat crust, each paired with complimentary wine from Moncaro.

The Pizza E Fichi, topped with Parma ham and marinated figs was a great way to start the meal, and it was served with a Templi red wine. The classic sweet-salty duo topped with fresh rucola leaves were highlighted by a light hand on the sauce and cheese. A very satisfying pizza, one that we would have been happy to munch on the rest of the afternoon.

The Braccio di Ferro, a vegetarian pie, was an interesting jumble of jammy caramelised onions, garlicky baby spinach and chunks of a really mild feta. We liked the wholewheat crust option with this pizza, the slight robustness of the crust went well with the delicate sweetness of the onions.

The crisp, almost lavash-like crust was consistently good on all the pizzas and we found ourselves nibbling on the edges too, considering they usually form an ugly pile in a corner of the plate. The decadent Fromaggi, a 4-cheese pizza, lavished with some of our favorite cheeses – provolone, fontina, gorgonzola and parmesan worked perfectly with the thin crust. Anything else would have been overwhelming. One slice of this unabashedly cheesy pizza was all that we could handle. This pizza especially tasted best when it came hot off the oven, since the thick layer of cheese turns slightly tough when cold.

For the chicken fanatics, the Genovise pizza, slathered with basil pesto and generously topped with tiny nuggets of smoked chicken and lightly roasted pine nuts is a flavourful option. We enjoyed this one though the chicken seemed a tad dry from the smoking.

When a pizza is loaded with layer upon layer of delicious toppings like the Contadina from Napoli, it’s got our attention, for sure. The roasted zucchini slices and strips of sweet peppers gave this pizza a bright, splashy look, with the mushrooms, artichokes and sundried tomatoes providing great texture and a melange of flavours. We’d definitely recommend this to vegetarians, who can eat several slices of this pizza and be smug about having knocked off a fair bit from the daily requirement of veggies.
We also tried a slice of the Bufalina, which came topped with chunks of spicy lamb and pools of melted buffalo mozzarella, offset by lots of sliced tomatoes. The lamb was rather chewy for our taste and the tomatoes could have been fresher. This was the only pizza that got a thumbs-down from the table.

And when at Movenpick, can a meal end without a little sweet something? Strawberry ice cream, the best that we’ve eaten in recent times, with a fantastic fresh berry tartness and chunks of fruit to boot is what we ended this fabulous meal with.
Go check out Amiamo La Pizza! at Mezzaluna, we did fall in love with their pizzas and chances are you will too.
Note: The vegetarian pizzas are priced at Rs 450/- and the non-vegetarian ones are Rs. 550/- without tax.


July 5, 2013
Grilled And Gorgeous: Krispy Masala Kulchas

Weekday woes come to bite us when the faces grow long, the eyes droopy and the pouts taking shape at the very mention of rotis and rice for dinner – possibly the only meal we get to share with our families. Thinking back to the yeasty store-bought naans and the rubbery tortillas we used to turn to when in the US to make rolls and wraps out of makes us squirm, somewhat. With inspiration thinning out and time fleeing right out of our hands, we turn to an unexpected source for help – a new acquisition – a stove top grill. Which then provides the solution to our dilemma, and sees us tossing out a mounting stack of some crispy, crusty Kulchas with favorable flavors and nutrition built in, to turn the grumpy groans into ‘ahaa’ and related sounds of excitement.

Grilled Kulchas
(Makes 12-14)
For the dough -
400g all-purpose flour
½ Tsp baking soda
1 Tsp baking powder
1 Tsp sugar
1 Tbsp oil
1½ Tsp salt
½ Cup curd
1 Medium onion, minced
¼ Cup chopped coriander/ cillantro
2 Hot green chillies, minced
1 Tsp finely grated ginger
¼ Cup finely grated carrot
Warm water to knead
2 Tsp oil
Ghee/ butter/ oil for brushing, optional
Mix together all the ingredients for the dough in a wide, shallow bowl. Add warm water a little at a time and knead well to make a soft dough. Clean out the bowl and then spread a little oil all over the bowl and then roll the dough in the oil. Cover with a damp towel and set aside in a warm place for about 2 hours.
Preheat a grill pan and brush with a little oil. Take golf-ball sized pieces of the dough and roll each into a smooth ball, you will get about 12-14. Use a rolling pin to roll out a ball into a 6″ circle, adding a little flour to prevent stickiness. Place the circle onto the hot grill and cook, undisturbed until you get good grill marks. Flip the kulcha and cook the other side.
Brush the kulcha lightly with a little oil, butter or ghee if desired. Serve right away or keep warm in a kitchen napkin. Repeat with the remaining dough.


June 30, 2013
Kneady And Greedy: Doughnut Blowout!

You’d have to be someone like Lara Ferroni to wheedle us into thinking baked doughnuts are very edible, toothsome and as close to the real thing as it gets. Or Jon Hamm, even Oprah will do. But we digress.
As part of the We Knead to Bake group, we got our hands deep into the folds of this soft yet gluteny dough that made gluttons out of us with the end result. Fluffy little doughnuts good for the dunking, in plain, jam-filled or lemon-glazed and sprinkle-kissed forms. Enough said.

Jam-filled Baked Mini Yeast Doughnuts with Lemon Glaze
(Adapted from Lara Ferroni’s Doughnuts)
Makes 15 mini doughnuts
2 tsp sugar
½ cup warm milk
1½ tsp active dry yeast
1 tsp pure vanilla extract
1 cup cake flour (or 1tbsp cornstarch + enough all-purpose flour to make up to 1 cup)
¼ tsp salt
1 cup all-purpose flour (approx)
50gm cold butter, cubed
1 tbsp melted butter for brushing
¼ cup raspberry am for filling doughnuts
Lemon glaze (recipe follows)
Put the sugar, milk, yeast and vanilla in the bowl of a food processor bowl and pulse to mix. Allow to rest for 5 minutes or until the yeast froths up. Add the cake flour, salt and 1 cup of all-purpose flour and process, adding a little more of the flour as necessary till the dough starts coming together. Now add the butter a few cubes at a time and process briefly. Add a little more flour if needed and process until your have a soft, pliable and elastic dough that is most but not overly sticky.
Turn the dough out onto a floured surface and knead gently. Shape the dough into a ball and place in a lightly greased large mixing bowl, turning it to coat well with the oil. Cover with a damp towel and let it rise till double in volume, about an hour.
Gently punch down the dough and roll out to a thickness of 1/2″ thickness. Cut out doughnuts using cookie cutters. We used 2.5″ round cutters with half inch cutters for the centres, flower-shaped and heart-shaped cutters. If you’re making doughnuts to be filled with jam, then do not cut out the holes. Place the doughnuts and the holes on parchment lined or lightly greased baking sheets, leaving at least 1” space between them. Re-roll the scraps and cut out more doughnuts.
Let them rise for about 20 minutes or till almost double in size and then bake them at 200C (400F) for about 5 to 10 minutes till they’re done and golden brown. Do not over bake.
Take the doughnuts out of the oven and immediately brush them with the melted butter.
For filling the doughnuts – If filling the doughnuts with jam, let them cool. Put the jam into a piping bag with a writing nozzle/ tip and press into the doughnut from the side and gently press out the jam into the doughnut till it starts oozing out. If glazing your doughnuts, let them cool completely and then dip one side of the doughnut in the lemon glaze. If using sprinkles add them immediately after glazing.

Lemon Glaze
1 Cup sifted confectioners sugar
1 tbsp corn syrup
1 tbsp lemon juice
Zest of one lemon
Stir together all the ingredients using a fork. Add more lemon juice, if needed to get a runny consistency. Use immediately.


June 25, 2013
Pat Down Arbi Patties!

The starchy goodness of Arbi (Colocasia) has its place in an array of recipes, from stews to sabzis. Yet, those take a beating when it comes to the prospect of, well, beating the tuber down, if gently, coating it with a crispy outer layer and shallow frying until it looks somewhat familiar, to eyes that have a thing or two for fritters and fries. Make a stack of these mouthwatering medallions and join the snack-smitten hordes in gobbling them up, including us and the ones we live with.

Crispy Arbi Medallions
(Serves 4)
500gm colocasia/ arbi/ Taro/ Elephant Ear roots
2/3 cup coarse semolina/suji/ rawa
Salt to taste
1 tsp red chili powder or to taste
½ tsp turmeric
½ tsp garam masala powder
½ tsp dried mango powder/ aamchur
¼ tsp ground carom/ ajwain
Oil for shallow-frying
To serve – lemon wedges, red pepper flakes, black salt/ kaala namak
Pressure cook the colocasia until just tender. Peel and discard the skins. If any pieces are too large, cut them into thick slices.
Mix the semolina with the salt and all the spices and spread out in a plate.
Roll each piece of the colocasia in the semolina mixture and then, keeping it in the semolina, smash it lightly with your fingers so that it stays together but flattens out. It is best to do this when the vegetable is still warm. Repeat with all the pieces.
Preheat a cast iron griddle or tava and place a few of the crumbed colocasia on it. Drizzle generously with oil. Cook until brown and then flip the pieces over and crisp up the other side. Repeat until all the colocasia is cooked. Serve hot, sprinkled with red pepper flakes and black salt/ kaala namak, a few lemon wedges on the side.
Alternatively you can shallow-fry the medallions in half an inch of oil in a frying pan.


June 5, 2013
A Mango-mottled Scoop Of Summer

Summer for us is a smorgasbord of happy possibilities. We seldom stew over the rigmaroles..instead, we let go, and let be. We take in the icecreamy mustaches on our girls’ upper lips as we stealthily wipe off our own, and yearn to paint them in all manner of healthy hues, from the striking strawberry-kissed pink to the mollifying mangoey orange. We go overboard, we let our refrigerators brim with tall orders of coolers, and we also get tagged as Mamarazzis for taking umpteen pictures of our creations – both the culinary and the human kind. We laugh a little, we live a little, we learn a little. We repeat. Summer, for us, is a metaphor for smiles that reach the little eyes that we love to bits and smithereens. Summer, for us, is contained in these glasses of Mango Mousse delights that were gone without a trace. All we have left is the reassuring urge to make some more and watch it be gone..in a trice.

Mango Lassi Mousse with Saffron-infused Whipped Cream
(Serves 4)
2 Teaspoons gelatin (See Note)
½ Cup hung curd or plain Greek yoghurt, preferably full fat
5 Tablespoons confectioners/icing sugar, or to taste
2 Cups ripe fresh mango chunks
½ Teaspoon powdered cardamom
¼ Cup heavy/double cream
Mango chunks and toasted pistachios for garnish
Sprinkle the gelatin over 2 tablespoons of cool water in a wide bowl and set aside to soak for 5 minutes.
Add 2 tablespoons hot water to the soaked gelatin and stir until it dissolves, warming the mixture slightly if needed, to do so. Set aside to cool.
Place the yogurt, sugar, mango and cardamom in a blender or food processor and process until smooth. Add the gelatin mixture and blend well.
Whip the cream to soft peaks in a large bowl and fold in the mango mixture.
Ladle the mousse into glasses or bowls, cover and refrigerate for about 4 hours or until set.
Dollop or pipe the saffron cream on top of the mousse. Finish with chunks or slices of fresh mango and the toasted pistachios.
Saffron-infused whipped cream
4-5 Saffron threads
1 Teaspoon hot milk
1/3 Cup heavy/double cream
2 Tablespoons confectioners/icing sugar, or to taste
Soak the saffron in the hot milk for a few minutes.
Whip the cream along with the icing sugar and saffron milk until stiff peaks form.
Note: This recipe makes a very soft mousse. If you’d like a stiffer texture increase the gelatin to 3 teaspoons.

We like to layer the mousse with a layer of fresh mango pieces in the middle. Fill one-third of the glass with the mousse, freeze for 10-15 minutes. Then spread the mango chunks and add the top mousse layer.


May 31, 2013
Out of the Lunchbox – Broccoli ‘n Cheese Sandwiches

It’s back to school for our kids and back to the usual lunchbox song and dance for us. While we usually throw in a sweet surprise or two for our girls to get excited about at lunchtime, we also like to ensure they’re getting their fill of protein and vitamins with whatever little the lunchbag can hold. Up here is a super easy and delicious sandwich idea that is tangy and crunchy and a big hit with our girls (and whoever gets a bite out of this). While broccoli isn’t hard to please anymore, it’s the walnuts and cheese that seem of a sudden to require some recommendation and hence we’ve combined all these things and packed them between soft slices of multigrain bread so little gets lost in between.

Broccoli-cheese Sandwiches
(Makes 2)
1 Cup steamed broccoli
2 Tablespoons chopped roasted walnuts
1 Tablespoon cream cheese, Greek yogurt, hung curd or mayonnaise
¼ Cup grated cheddar or Amul cheese
Salt and pepper to taste
¼ Teaspoon mixed Italian herbs
4 Slices bread – we used soft Multigrain
Butter or cheese spread for the bread
Finely chop the broccoli and place it in a bowl. Add the walnuts, cream cheese, cheese and season to taste with salt, pepper and herbs. Toss gently.
Butter the bread and trim the crusts if desired. Divide the broccoli filling between the 2 sandwiches and wrap well in plastic wrap or place in a ziploc bag.
Note – If you have some lettuce on hand you could add a few leaves to the sandwich for freshness and additional crunch.


May 24, 2013
Bring on the Bialys!

When we asked our pals and followers on Facebook to identify the round, chewy roll in the picture below, one comment read “Bialiies, & they are heaven. Full-sized ones from traditional Jewish baker are about four inches across by half an inch high at the edge, with an onion-poppy seed mixture not too dense so the onions caramelize as the bialiies bake. A very light dusting of flour after the topping is put keeps the onions moist as they caramelize.” You’re absolutely right, Heather, and we couldn’t have put it better.

Our bialys, part of this month’s baking assignment from the group We knead to bake, were topped a mite over-generously with caramelised onions than is traditional, but then we love our onions! We retarded the dough overnight – that is, we slowed down the fermentation process by refrigerating it. This improves the flavours in the final product and in this case also helped us achieve the classic Bialy chewiness that usually comes from using a strong or high gluten flour.

Bialys
Makes 8
For the Dough:
1 Teaspoon active dry yeast
1 Tablespoon sugar
1 to 1¼ cup warm water
3 cups all-purpose flour (If you have some vital wheat gluten, remove 3 tablespoons of the flour and replace it with the gluten)
1.5 Teaspoons salt
Milk for brushing the dough
For the Onion Filling
1 Tablespoon oil
3 medium onions, finely chopped
Salt and pepper to taste
Cheese to top the Bailys, optional
To make the dough – Put the yeast, sugar and warm water in a large bowl. Stir and set aside for 5 minutes. Add the flour and salt. Stir until the dough comes together as a mass and then cover and allow to rest for 10 minutes. This will help the dough absorb water and make it easier to knead. Knead again, adding a little more water or flour (not too much) if you need it, until your dough is smooth and elastic but not sticky.
Shape it into a ball and put it in a well-oiled bowl, coating the dough with oil on all sides. Cover and let it rise till about double. If you’re not making the Bialys right away, you can refrigerate the dough overnight at this point. When ready to make them, keep the dough at room temperature for about half an hour and then proceed with the rest of the recipe.
To make make the filling - Heat the oil in a pan, add the onions, and sauté over low to medium heat. Sprinkle a little salt and continue sautéing until they become soft and turn golden brown in colour. Add the pepper and set aside to cool.
To shape the Bialys - Sprinkle your work surface lightly with flour and place the dough on it. Divide it into 8 equal pieces and shape each one into a roll by flattening it and then pinching the ends together to form a smooth ball. Roll the ball to smooth the surface and then place the rolls on a lightly greased baking sheet and cover them with a kitchen towel. Let them rise for about one hour (about 1 1/2 to 2 hours for refrigerated dough) till pressing with a finger on the top leaves a dent.
Work on one piece at a time, keeping the others covered so they don’t dry out. Use your fingers, form the depression in the middle. Pinch the dough between your thumb and fingers, rotating as you go and gradually making the depression wider without actually poking a hole through.Remember not to press on the edges, or they will flatten out. Once shaped, you should have a depression about 3” in diameter with 1” of puffy dough around the edge, so your Bialy should be about 4” in diameter. Dock the centre of the Bialy with a fork so the centre doesn’t rise when baking. Also use a pair of scissors to make a cut at the bottom. Place the shaped bialys on a parchment lined (or greased) baking tray leaving about 2 inches space between them. Place the caramelised onion filling in the depressions of each Bialy. Brush the outer dough circle with milk. If the sides have collapsed too much alow the bialys to rise for 5-10 minutes before baking.
Bake the Bialys at 230C (450F) for about 15 minutes till they’re golden brown in colour. Put a little cheese in the centre of each roll if you like. Transfer them to a rack. Serve hot and fresh from the oven or at room temperature.

Adapted from King Arthur Flour


May 19, 2013
Freshen up! Fizz up! Mango Cream Sodas

When the sun is out and tolerable in Bangalore, our minds hark back to the beaches of Fr’isco, to the tall, cooling glasses of fizzy, fruity, creamy sodas guzzled down breathlessly..leaving frothy mustaches that lived long enough to tell a tale. Here we bring back the freshness of that memory with our Mango Fizz topped with just a touch of cream to make you go hmmm..

Mango Cream Fizz
(Serves 6)
1 Cup water
1 Cup sugar
1″ Piece fresh ginger root
1″ Cinnamon stick
1 Large ripe mango
1 Litre club soda
1 Tablespoon cream whisked with 1 Tablespoon milk or 2 Tablespoons Half ‘n Half
Make the simple syrup – Put the sugar and water in a saucepan and simmer until the sugar dissolves. Add the ginger and cinnamon stick, cover and steep for 15 minutes. Discard the ginger and cinnamon. Set the syrup aside.
Meanwhile peel and deseed the mango. Puree the mango flesh in a blender/mixie and pass the puree through a strainer. Return the strained puree back to the blender and add 3/4 of the simple syrup, reserving the rest. Blend until smooth. Pour the mango syrup into a pitcher.
To serve, add some ice into the glasses. Pour in the mango syrup, filling the glasses about a third of the way up. Fill the glasses with the club soda. You can adjust the ratio of syrup and soda to your taste – add more of either, and use the reserved simple syrup for additional sweetness if desired.
Finally top each glass with a teaspoon of the cream mixture and stir well. Serve immediately.

Garnish with luscious cubes of fresh cut mango.


May 12, 2013
Kurkuri, Krunchy, Krispy Okra
 No matter how you refer to it, okra/ ladies finger, or to go completely desi, bhindi, has lovers in all walks and stages of life. Having grown up on a substantial diet of the vegetable, we’ve come to love it in sabzis and kadhis, sambar and raita, but what takes the cake is this crispy, crunchy version in which the darling okra not only lends itself to the spice rub and oil, but also to the grinding of the teeth, which isn’t half as telling with respect to its favorableness. Try it and you’ll know why we’re short of words – and let it also be said that we’ve had our plates (and mouths) full for a while now..

Krispy Bhindi/Okra
(Serves 4)
½ Kg or about a pound of small/medium fresh Okra/Bhindi/Ladiesfinger
1/3 Cup besan/chickpea flour plus 2 tablespoons rice flour, stirred together
½ Teaspoon red chilli powder/cayenne or to taste
½ Teaspoon coriander powder
Oil for deep frying
Salt, powdered rock salt or chaat masala to taste
Lime wedges for garnish
Wash the vegetable and pat dry with a kitchen napkin. Spread it out in a single layer on a dry towel and set aside until the okra is completely dry. If pressed for time use a paper towel to individually wipe down each pod and remove the wetness.
Trim the tops of the okra and discard them. Slice each piece into two along its length.
Sprinkle the flours all over the okra and add the chilli and coriander powder. Toss lightly and set aside. You can also do this step a few hours ahead and keep the okra in the refrigerator in a closed container until its time to fry. Do not add any salt.
Heat about 2.5-3″ of oil in a deep frying pan or kadhai. Place the okra in a colander and tap lightly to remove any excess flour. Deep fry about a handful at a time, on medium-high heat until the okra is crisp and browned. Drain well and place it on paper towels to absorb any excess oil.
Immediately sprinkle the rock salt or chaat masala liberally over the crisps. Serve right away, with lemon wedges on the side.

This dish works well as a starter (make sure that you fry more than you think you will need) or as a scrumptious side to jazz up a regular dal-rice meal.
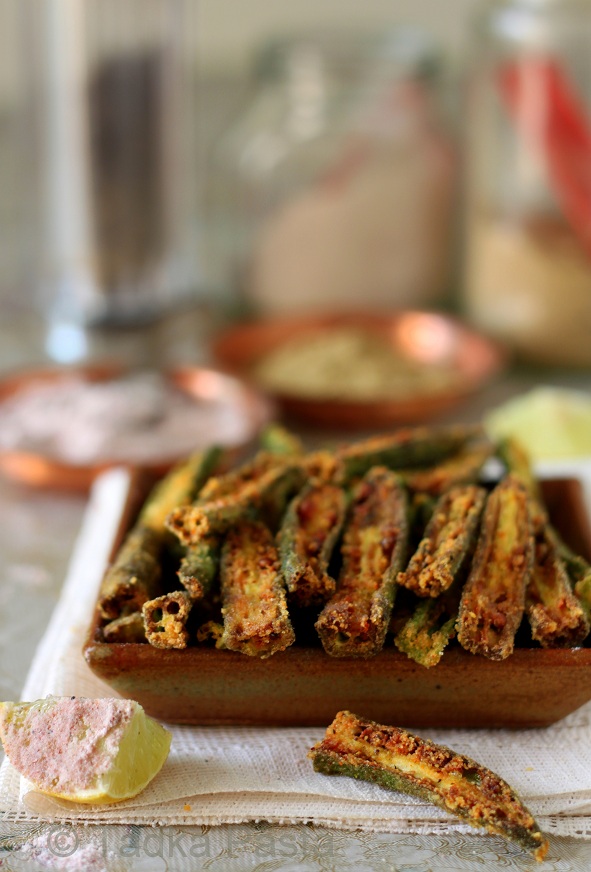
And if you have a little okra hater in the family, just plonk a platter of these crispy goodies on the table and watch them get gobbled away.


April 30, 2013
Sugar-dusted and Caramel Crusted

Had it been left to us, these little beauties would in all likelihood, never have waltzed out of the Tadka kitchens. We like our cookies buttery and flaky, crisp and chewy, and sweet, most definitely sweet. So when our baker pals over at We knead to bake were dishing out batch after batch of the Torcettini di SaintVincent, we have to say, a yeasted cookie dough with no sugar wasn’t really getting our baking juices flowing.

But we’ve promised to bake along every month, so we did, and amazingly, this was just the kind of treat that we fancy. The lemon zest added a lovely freshness to the cookies and worked well with the tang of the yeast. The sugar that we rolled the dough in (perhaps a trifle over-zealously) crusted and caramelized all over to give the cookies a delicious light sweetness. The texture within was a pleasing cross between a puffy palmier and a Little Hearts cookie with no overt hints of breadiness.

We’ve munched through our first lemon-scented lot and it sure looks like this recipe will become a regular stopover when we flip through our over-stuffed recipe folders.

The cookies started out with a fairly simple dough of flour, butter, lemon zest, salt and yeast, whipped up conveniently in our trusty food processor. A brief first rise, and then we wrapped the dough and chilled it to develop flavours and make the soft dough easier to handle. The only part of this recipe that takes a little time is the shaping of the cookies. If the dough feels too sticky at this point, rolling it in a little granulated sugar will help, as will keeping it in the fridge while working with a few pieces at a time.

We dunked our cookies in homemade lemon curd and enjoyed them over cups of cardamom tea. They taste pretty good even the next day if stored in an airtight container. For the recipe and more tips head on on over to My Diverse Kitchen.

Adapted from A Baker’s Tour by Nick Malgieri


