A.C. Flory's Blog, page 129
March 13, 2016
#howto – search for an image on the internet
My thanks to Pinky for showing me how to do this! Now for the why. The answer is the big C. No, not cancer, copyright.
If you are just downloading pictures off the internet for your own enjoyment, and no, I’m not going to go there, then copyright is not an issue. The instant you use one of those images in anything vaguely commercial, even a simple blog post, you have to be sure you’re not infringing on someone’s copyright.
But how do you do that when you have no idea where the picture originally came from?
This is where Google Images comes in. Google has long been the king of word searches, but now it also lets you search by picture [and voice], and it all starts in the familiar Google search box…sort of.
How to find Google Images
If you are using Google Chrome then it’s easy. Simply click on the ‘Images’ option in the top, right hand corner of the screen:
That will lead to this:
 If you’re using some other browser [I use Firefox], type http://images.google.com into the address box of your browser and hit Enter :
 [Note: as soon as the page is displayed, the URL changes to ‘https‘. As I’m a purist I always type the plain ‘http’.]
You should now be looking at this:
 [Note: in Firefox, the Google search box does not include the ability to search by voice. This is only available in Chrome.]
How to actually do an image search
Whatever route you took to get here, you should now click on the small icon of a camera as shown above. That will lead to this:
The ‘Search by image’ dialogue box contains two tabs – Paste image URL, and Upload an image.
Click the tab to Upload an image. This is what you will see:
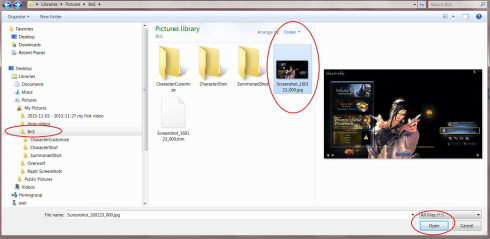
Click the ‘Browse’ button as shown. This will allow you to browse your own computer in order to find the image to be searched:
The next bit assumes that you know how to find your way around the Windows files and folders. If you don’t, you can find a step-by-step how-to here.
Find the folder that contains the image you’re interested in. Click on that image and then click on ‘Open’ [as shown in the screenshot above].
And now the magic happens. Google search will think for a moment or two and then it will present you with the closest match it can find on the internet. This is the result for my image:
As the image I chose is from a game, I did not expect to get a perfect match, and I didn’t. That’s because game avatars, even when customised, are based on a preset image. So they’re not unique. Photos of people and/or drawings etc., are unique, so they’re easier to find.This also means that if you use a copyrighted image in your blog, it can be found. So be careful!
cheers
Meeks
Filed under: How-to guides Tagged: Chrome, copyright, Firefox, Google-Images, how-to, image, search, step-by-step


March 11, 2016
Amazon Takes Aim At Scammers But Hits Authors
Scary new development for all Indie authors. The big message is: if you have your Table of Contents at the back, move it to the front. ASAP! Read David Gaughran’s complete article to understand why.
 Amazon is an extremely innovative company – and usually quite responsive to self-publisher’s concerns – but sometimes it gets things very wrong too.
Today is one of those times.
I’ve received several reports from writers threatened with having books removed from sale, and heard even more worrying stories from others who had their titles actually removed from the Kindle Store without notice.
What were these authors guilty of? What crime did they commit for Amazon to adopt such heavy handed treatment? Something completely innocuous: the Table of Contents was at the rear of their books instead of at the front.
Yep, that’s it.
We’ll get to what might be the root cause of this crackdown in a moment, but Amazon is claiming that having a TOC in the end-matter instead of the front-matter is a breach of the (ever-changing, 100+ pages) Kindle Publishing Guidelines (PDF). Amazon says that rear TOCs result in…
View original post 2,136 more words
Filed under: Uncategorized


March 9, 2016
#Music – the what-eremin?
Okay, I thought this was either a joke or a tongue-in-cheek scam when I first saw it, but the #theremin is an actual instrument – an electronic instrument that plays almost like a violin or harp, but without the strings. What makes it particularly difficult is that the musician has to ‘find’ the note, literally from thin air!
This first video clip (audio only) is from a very old recording by Clara Rockmore who was the first musician to play the theremin… and it’s 100 years old!
In this second video clip you can watch a step-by-step tutorial on how to play a theremin.
[Warning! The guy sometimes plays flat. I don’t have perfect pitch but it did grate on my nerves a bit. The reason I chose it is to demonstrate just how hard it is to play the theremin well.]
And what would a music post be without a Guiness World record? Having seen how hard it is to get just one theremin to play on key, watch as 273 Japanese thereminists play Amazing Grace…complete with harmonies. You heard me. This is worth watching even just for a minute or two. In fact, I found it quite beautiful, more like a very good choir than an orchestra.
[Note: I started the 16 minute clip at about minute 5 to save you from heaps of setup footage. The actual music ends at about 10:38. ]
Enjoy!
Meeks
Filed under: Music Tagged: Amazing-Grace, Clara-Rockmore, electronic, Guiness-World-record, how-to-play, Japan, music, no-strings, Theremin, Theremin-ensemble


March 7, 2016
#Coal vs #solar – the true cost of electricity for India’s poor
 Queensland’s Galilee Basin contains a lot of coal which could create a lot of electricity, but let’s not get precious about why we’re going to export it to India. No Australian government, state or federal, is interested in providing the benefits of electricity to India’s poor. They are only interested in export dollars. As for India’s poor, they cannot afford coal fired electricity.
“The poor will benefit from coal-fired power generation only if you ignore the costs of pollution and if industries can be attracted to rural areas. Without industry, though, electrification for the world’s rural poor requires a different model to that offered by coal-fired power.”
That quote comes from an article written by three Australian academics:
Lynette Molyneaux is a researcher, Energy Economics and Management Group, Global Change Institute, The University of Queensland,
John Foster is a professor of economics at The University of Queensland,
Liam Wagner is a lecturer in economics, Griffith University.
They crunched the numbers and came to the conclusion that India’s poor would be far better off with localised, small-scale solar power generation. You can read the Quartz article here:
The deadly cost of bringing coal-powered electricity from Australia to India
Or you can read the original article on the Conversation here:
Now, my fellow Aussies, ask yourselves whether making an almighty mess of the Galilee basin is really worth those export dollars when only large corporations will really benefit?
Then ask yourselves what might have happened had we supported our solar industry [we let it die here or go offshore] instead of coal?
I believe a thriving Australian solar industry could be bringing in squillions of export dollars from the Third World as well as doing a great deal of good for the Third World’s poor. Instead, countries such as China* are exporting solar panels to the world and we are still trying to flog coal.
Clearly the coal industry has a great deal more lobbying power than the fledgling solar industry did. Or perhaps our politicians are just too damned stupid to read the writing on the wall. Or perhaps it’s a bit of both. Either way, we Aussies are the ones who will miss out in the not-so-long-run.
I’m angry,
Meeks
*This is an interesting article looking at the provenance of so-called ‘Australian solar’.
http://www.businessspectator.com.au/article/2013/5/9/solar-energy/murky-side-australian-solar-panels
Filed under: My soap box Tagged: Australia, Coal-vs-solar, cost-effective, electricity, export-dollars, Galilee-Basin, India, poverty, Third-World


March 3, 2016
#amwriting – using StoryBox 2.0
I’ve been using StoryBox novel writing software for years now so it’s easy to forget what a difference it makes to my writing. You see, I’m a pantster at heart. I don’t outline, I don’t storyboard, I don’t use ‘cards’ and I don’t know how my stories will end.
That last point guarantees that my stories will not be predictable. Unfortunately, it also guarantees that they are always in danger of turning into a sprawling, self-indulgent mess. I know, because I used to use Word [before I found StoryBox] and I remember how hard it was to see the forest for the trees – i.e. to get an overview of the whole story. I also remember how hard it was to restructure that story in order to make it flow properly.
Now when I say ‘structure’, I don’t mean a neat, pre-ordained three act roadmap of the story. I mean placing scenes where they are meant to go.
“Well, duh. Isn’t that what writers are supposed to do?”
“Yes, but I’m a pantster, remember?”
The truth is, I ‘see’ scenes in vivid technicolour and write them down. If I’m having a good day, the scene will fit perfectly into the progression of the story. Other days, not so. That’s because my sub-conscious doesn’t work in a neat, linear fashion. The process is more like putting together a spherical, 3D jigsaw puzzle. My sub-conscious gets an idea and my fingers translate that idea into something more or less relevant to the part of the story I’m currently working on. It’s not until later, often much later, that I realise scene A is in the wrong spot and that it would go much better in position 123. Something like this:
And this is where StoryBox comes in. It allows pantsters like me to become hybrid ‘pantliners’, and all without trying to turn my brain into something it’s not.
For me, StoryBox does two things extremely well:
it allows me restructure chapters and scenes as easily as moving physical cards around on a storyboard, and
it allows me to create quick and dirty outlines on the navigation tree as I go [sort of like creating a roadmap rather than following one].
This is the navigation tree. In the beginning you start with just one chapter and one scene. As the story progresses you add more chapters and scenes on the fly until you get something like this:
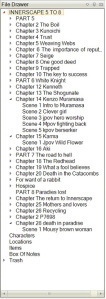 At the very top of the navigation tree is the name of the story itself. Below that are the chapters and inside the chapters are the scenes.
I can leave the chapter headings as just ‘chapter x’ [created automatically by the software], or I can add my own road signs to show what’s in each chapter/scene.
Over time, these road signs add up to that quick and dirty outline I was talking about.
I’m too lazy to add a synopsis to each chapter/scene, but that is also easily done on the fly.
So now I can look at my ‘outline’ to get a quick overview of the story. This allows me to see whether it’s flowing correctly. It also allows me to rethink what comes where, both in terms of events and in terms of character motivation.
In fact, this post was motivated by the fact that I have just had to do quite a substantial restructuring of the second half of Innerscape. If I had still been using Word…-shudder-
As wordprocessors go, Word is probably as good as you’re going to get, but it simply doesn’t have the tools a writer needs. Yes, you can move great chunks of text around. You can even set up a form of navigation to help you, but it’s still hard work. First you have to find the exact chunk you need to move. Then you have to select it, cut it, scroll through hundreds of pages of story, find the new spot and paste. If you mess up anywhere during that process you can do terrible things to your story.
Now look at how StoryBox does it:
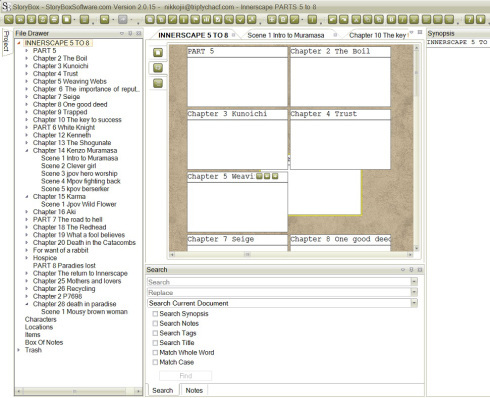 In this screenshot I have selected the whole story by clicking on ‘INNERSCAPE 5 TO 8’ [at the top of the navigation tree]. Then I click on the storyboarding function which displays every chapter [and part] as a digital ‘card’. To move a ‘card’, I simply drag & drop it to its new location. Every scene associated with that chapter is moved right along with the chapter.
On a smaller scale, I can do exactly the same thing with scenes. To move a scene around inside a chapter, simply select the chapter, select the storyboarding function and move the relevant ‘card’ for that scene to a new position.
If I want to move a scene from chapter A to chapter B, I click on the scene in the navigation tree and drag and drop from there.
I truly do not think I could have written the Innerscape beast without StoryBox to organize it for me. The story has become so big, with so many threads woven through it, that I simply could not have kept it all in my head.
If a project you’re working on is turning into a behemoth and you’ve reached the limits of Word functionality, I really would recommend trying one of the dedicated writing packages. I’m very happy with StoryBox, but I’ve heard that Scrivener is very similar, and there are other options out there as well. Stop struggling and start optimizing your time and energy!
cheers
Meeks
p.s. If you want to read my original review of StoryBox version 1, you can find it here. Version 2 has the same core functionality but is sleeker.
p.p.s. I just realised that using StoryBox has changed the way I write. Now I think totally in ‘scenes’ and that has resulted in a dramatic drop in the amount of waffle I produce. :D
Filed under: Reviews, Writing Tools Tagged: dedicated, novel, outliner, Pantster, Scrivener, software, storyboard, StoryBox, Word


March 2, 2016
8 Sound Sculptures That Lets Nature Be The Musician
This is not the kind of music I usually listen to but it is jaw-dropping nonetheless. Be amazed. :)
While most sculptures are intended to be viewed, there are some that strive to stimulate our other senses as well. These eight large scale sculptures are installed at various locations around the world, and interact with natural forces like the wind and the rain to create soothing music. Let’s hear them.
Singing Ringing Tree, Burnley
The Singing Ringing Tree in Burnley, in Lancashire, England, is 3-meter tall and comprises of galvanised steel pipes of differing lengths and with holes punctured into the underside. When the wind blows, the sculptures produces an eerie sound in several octaves. Completed in 2006, the Singing Ringing Tree is part of the series of four sculptures within the Panopticons arts and regeneration project created by the East Lancashire Environmental Arts Network (ELEAN).

Aeolus Wind Pavilion, London
The Aeolus Wind Pavilion stands at London’s Canary Wharf and is composed of 310 stainless steel tubes that terminate…
View original post 735 more words
Filed under: Uncategorized


February 29, 2016
#Benji – if you love dogs, please watch
Damn, this made me cry but there is a happy ending :
Meeks
Filed under: Uncategorized Tagged: adopt, dogs, street


Making #charcoal without tools
It’s been a while since I researched primitive technologies [for Vokhtah], but I couldn’t resist this one:
The thing I love about it is that every single thing he uses comes from a ‘natural’ source [except the starter flame]. It’s almost like a how-to for post-apocalyptic living. If you’ve ever wondered how primitive people did things, this is one video not to miss.
cheers
Meeks
Filed under: Uncategorized Tagged: charcoal, how-to, no-tools, primitive, video


February 26, 2016
#Science – are we hardwired for music?
This video clip by #Bobby McFerrin, totally surprised me:
Music is a huge part of my writing life because it acts as both emotional portal [into the story] and distraction filter, but to realise that I and everyone else may be hardwired for music, is mind blowing. My thanks to Marian Allen for introducing me to this wonderful video clip.
Happy weekend,
Meeks
Filed under: Music Tagged: Bobby-McFerrin, brain, expectations, intervals, music, musical-notes, neuroscience, video-clip


February 25, 2016
Amazon #LookInside – how to install it
Part 2 of my Amazon LookInside article is now live on Indies Unlimited:
Amazon’s New ‘Look Inside’ Feature for Blogs and Websites [Part Two]
The LookInside feature allows you to turn static images of your books [or anyone else’s books] into portals that allow visitors to read the LookInside excerpt that goes with the book.
Part 2 is a step-by-step guide to installing the feature onto WordPress.com blogs.
cheers
Meeks
Filed under: How-to guides Tagged: amazon, blogs, how-to, Indies-Unlimited-tutorial, LookInside, websites


