
Ryan McClure's Blog, page 2
September 10, 2015
Adventures in Camera Calibration and Photo Modeling
This post is part of a meta-series. Click here for a list of all posts in this series.
Photogrammetry has been a major interest of mine for a number of years now, but all of my efforts toward making use of it as an artistic tool have thus far met with failure. None of the open-source, free, or even pay solutions either work or do what I want.1 I have designs on cooking up a program of my own at some point that does it all, but haven’t really set aside the time (hah!) to work something up.
Imagine my delight when I discovered that Blender could do some of what I wanted, natively.
It’s got major restrictions, though: namely, it only solves for a single camera (i.e. one focal length, one sensor size). Mingling images from different cameras, even if the various properies of those images are known2, is a no-go. That put me in a bit of a pickle, because I have a ton of Stormtrooper helmet reference photos, but very few from the same camera and even fewer that present a good “turntable” set. Fortunately, I did have one set, complete with full EXIF data that I could use to set the correct camera properties!
Of course, it was only nine images, with a lot of movement between frames. Blender couldn’t hope to solve that on its own. So, I spent hours and hours every night tracking points across my nine “frames” by hand, trying to find any features that stood out and were easily tracked. Naturally — because it couldn’t possibly be easy! — these points were almost never major “feature” points of the Stormtrooper helmet as one might conceive of them. They were usually blemishes; chipped paint, drips, dings, and so forth.
It took me a while to realize that tracking these “defects” was even worthwhile. My first approach was to try to project the 3D coordinates into the scene so that they coincided with actual features of my existing model. As time went on and I learned more, though, I realized this was folly. I just needed the right “origin” (I used the top of the gray “frown”) and to set the proper scale. I also came to understand, since I wasn’t defining any lines as denoting an X and Y axis3, that the camera solver made use of my initial camera position in 3D space as-is. It wasn’t “solving” that; it was using that as the starting point for the camera’s motion. That meant I had to eyeball that into the right position.
Eventually, though, I got it. A “perfect” solve is anything with a Blender-reported error of astonished by after how impossible a task it seemed when I set out.
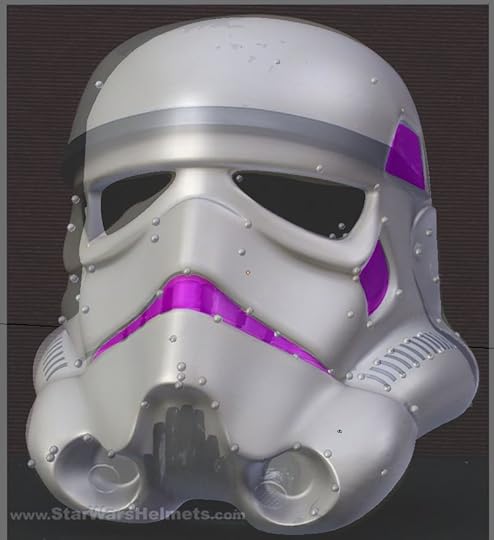
The little balls are the 3D projections of my tracking points. The reason the photo and the right side (camera left) of the model are so different is explained further down. Image source.
With my camera calibrated, I could finally start modifying my existing model to make it better match the real, screen-used prop! This was the very first time in my entire history 3D modeling that I’ve been able to do that — take a “real life” picture that wasn’t purpose-shot as near-orthographic and use it as a reference plate in 3D space. It took some doing, but this part was much easier than the tracking itself. After all, it’s essentially the same sort of thing I’ve been doing for the better part of two decades. It entailed a great deal of hopping back and forth between “frames” to make sure everything lined up from all nine of my camera angles, but eventually I had the entire left half of the helmet photo-matched.
The screen helmet, though, is asymmetrical. That meant copying my left-side model and tweaking it all over again on the right side to make it match that one. That went a great deal faster, though, and with a quick hop back over to the left to do some final tweaks, I had a bang-on (with a handful of exceptions that could easily be chalked up to lens distortion of the photos themselves) match for the asymmetrical ANH Stunt helmet.
//www.youtube.com/watch?v=nZe3Cx9KIO4
From there, it was a simple matter to “average” the vertices from the left and right sides to create a symmetrical helmet that matched pretty well with both the left and right helmet sides in the photos.

(Click for full-resoltion)
Next step, convert it to paper!
PPT and Voodoo always seem to crash or spit out garbage and Catch123D is super off-putting. The Cloud and cloud computing can be amazing things, but I still want my applications local, man.One of the things that’s possible to do in general, given sufficient shared coordinates between images, but unknown camera parameters, is to back-calculate the camera properties. My photogrammetry program, whenever I eventually write it, will do this.My image sequence was shot against a single, static background and the helmet itself was turned, so there was no true 3D origin coordinate I could use.


August 20, 2015
Full Guinea Pig
This post is part of a meta-series. Click here for a list of all posts in this series.
This is sitting on my dining room table right now.
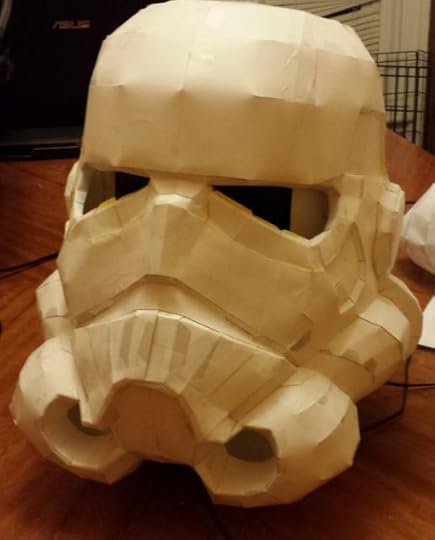
Glaring inaccuracies? You bet. Beyond the overall dimension one I mentioned yesterday, even. All correctable in the next version, which can also be even more detailed on top of being more accurate.
I’m…pretty excited.
That excitement, though, is tempered somewhat by questions and self-doubt around the term “accuracy.” Ever since hearing about them and especially since meeting some of them in person, I’ve had my eye on eventually applying to join the 501st, whenever I got myself around to actually building this damn thing. But even though that badge of honor, that community would have meaning for me, doing this my way has more.
I don’t aim to achieve “screen accuracy.” The screen accurate model is asymmetrical, there are differences in the helmets seen in each movie, and even within individual movies (the ANH “hero” and “stunt” helmets). For my helmet, I want to opt for the “best” of all of them, not just pick one and replicate it. That’s not to say I’m looking to take shortcuts or produce a sub-par product by any stretch of the imagination. My goal is to create something that you could easily put on screen next to any of the other “screen accurate” suits and have it blend right in…unless you knew exactly what to look for.
I’ve been lurking on the 501st boards for a long time and the prevailing sentiments on this topic stick to just a few schools of thought.
There is the most common reaction that one should “just buy a kit” from an approved vendor. Some consider this the “cheapest” path, especially factoring time in. Maybe they’re right, if that’s where their priorities lie. I want to create, so that holds no value to me. Others expressing this view come across as pushing a marketing scheme. “You won’t get approval to join unless you buy from an approve vendor!” I realize this is an intensely cynical view; the “approved vendors” have all spent tremendous time, thought, and energy into creating authentic, accurate replicas and that is work that should only ever be commended. It’s still got an unpleasant feel to me that I can’t shake.
There are those who simply don’t “get” the process of papercraft molds. They see the papercraft version and think people are going to apply with that alone, which obviously doesn’t meet any kind of standard for authenticity. And, for what it’s worth, some — many, even — folks do go on to use the paper model as the basis for the final, wearable piece. There have been some great costumes created this way. Again, that’s not what I’m doing, but the prospect of having to explain and re-explain that isn’t terribly appealing.
Along a similar line, the 501st has been around for a long time. They’ve no doubt had countless people trying to apply and get approval with “unique ideas” or “unique approaches” or whatever else that are, objectively, pretty terrible. They’re tired of it, they’re cynical of anything that has even the vaguest aroma of this, and they’d rather steer such enthusiasm toward a non-terrible end product (and often end up dovetailing heavily with the “just buy a kit” crowd, as a result). I sympathize with this group; they have no reason to believe I’d be anything other than yet another in a very long parade of wannabes.
Finally, there are those who just seem to enjoy the entirety of the hobby and want to encourage participation and creativity as a whole. These seem, rather depressingly, to be the rarest sort. They do exist, though, so that’s something.
At the end of it all, I have to remember that I’m doing this for me. If it doesn’t pass someone else’s sniff test but it does pass mine (knowing just how high my bar is for myself), so be it. They just aren’t looking for the same thing I am.
Regardless, I have work to do.
August 19, 2015
Time And Relative Dimensions In Stormtroopers
This post is part of a meta-series. Click here for a list of all posts in this series.
You’d think after working on this project on-and-off for two years that any new setback would come as yet another dispiriting blow. For once, tonight’s setback is a huge win and even serves to make all of the previous setbacks — especially the CarveWright-related ones — seem like blessings in disguise.
You see, I had the size wrong all along.
I originally scaled the 3D helmet model in Blender to an approximation of my own head. I eyeballed it until the size looked right. Later, I found some actual measurements folks had taken of the molds from the films and checked those against my existing pieces, which seemed to line up correctly. Cool, my estimate had been correct out of the gates! Confident now that I was on the right path, I proceeded through all of the various updates you’ve read about this project. I occasionally spot-checked during the cardboard process to make sure I was still within expected tolerance of those dimensions. When I switched to the CarveWright, I was already set, since the Blender model hadn’t changed and the cardboard cross-sections had been correct in any event. Having now switched to paper, I continued on as before with the existing dimensions.
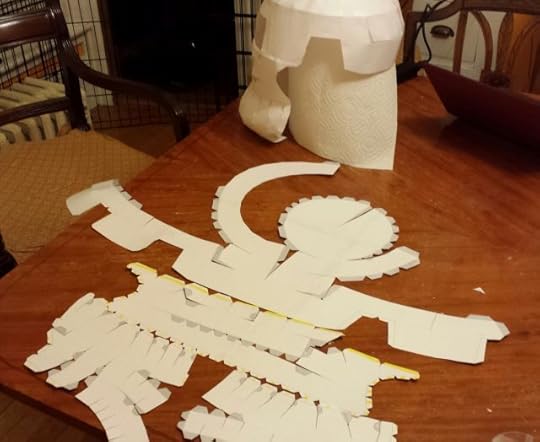
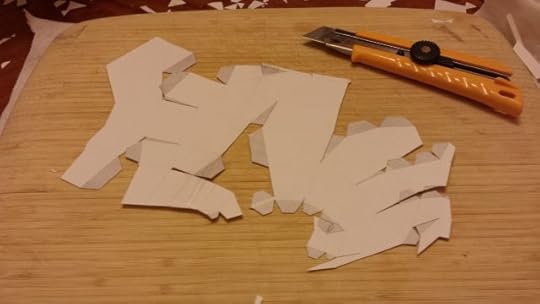
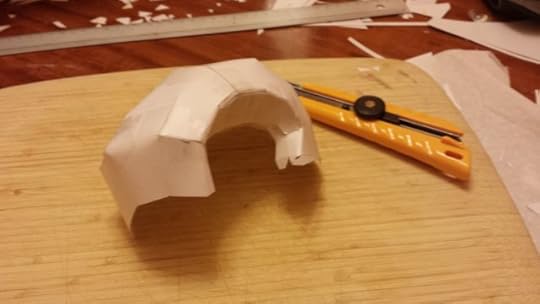
Before printing everything out on heavy-duty cardstock, I did a test print of just a few portions of the helmet in plain paper to get a feel for the method, check dimensions, sanity check my paper templates, and so on.
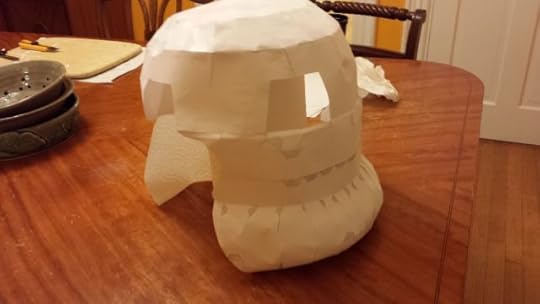
Lumpy, but promising. Size seemed pretty good when I put it over my head (dopey as I looked doing it…), so I started printing out the cardstock parts. Here’s the same set of templates, printed in cardstock, used to make the plain paper prototype.
All in all, everything was coming together very nicely.
More than any other time in the project, I felt like I was making real progress at last.
I got quite far along. Here’s where things stand as of right now.
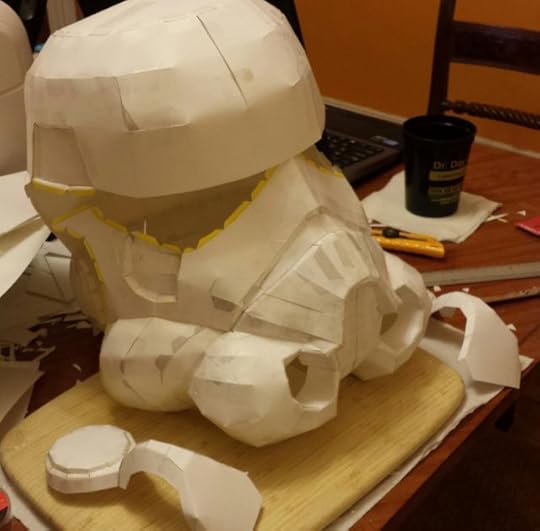
All along, though, something’s been nagging me. Every time I held up the “face” to my face, every time I eyeballed the dome, it all felt really big. Having never actually handled a stormtrooper helmet of any variety in person before, I figured this was just expectations clashing with reality. But I’d hate to go through the entire process and screw up something as basic as the proper dimensions, so I started measuring things.
And they were too big. The helmet, which I expected to “stand” about 12″ tall, measured closer to 14″. Did I misprint? Scale something wrong in the process? I couldn’t have gotten the model wrong; I’d checked that against the research from that theRPF post…
…hadn’t I?
I jumped into Blender and threw down a 12″×12″×12″ cube…and it was smaller than my model!
What the hell? At what point had I overscaled it? Perhaps at no point. I may have deliberately underscaled the cardboard cutouts when I did them and forgotten about having done so somewhere along the way. Why I would’ve done that instead of scaling the Blender model, I couldn’t tell you. Maybe something to do with render resolution and creating consistently sized cross-sections? In any event, with the exception of those templates, my dimensions have been too big all along. Even if the CarveWright had worked perfectly, I’d’ve had a garbage mold that I’d need to re-carve.
But now…I actually have a testbed. It’s too big, sure, so I won’t be casting from it, but I’m so close to done with it that it’s actually a worthwhile guinea pig to test out other aspects of my approach: resin-and-fiberglass reinforcement, Bondo filling, sanding, and so on. It won’t need the same level of finish as the “real” one will, but it’ll give me free reign to learn and screw up without feeling tremendous loss.
What’s more, I can use everything I’ve learned about the Blender papercraft export plugin thus far along with the experience of having cut out all this stuff once before, to create better, more detailed, and easier-to-assemble templates than I did the first time through.
Catching this now is a huge win compared to catching it at any other point along the way and especially going forward. Color me relieved!
August 11, 2015
Pivot #3
This post is part of a meta-series. Click here for a list of all posts in this series.
After struggling to get the CarveWright CNC carving machine to cooperate on-and-off over the last year or so, I’m ready to declare defeat on this approach. Every time I think I’ve got “the” problem solved, a new one crops up. First, I had the colorspace issues. Fixed that. Then, I had issues stemming from materials (MDF), so I swapped out for wood. Then I had issues with accuracy, that seemed to stem from the heightmap accuracy. Wasn’t that. These accuracy issues continued to plague. I disassembled the machine, cleaned it, greased it, aligned it, calibrated it, and repeated the whole process numerous times. Once I thought I had it licked, I engaged in an ambitious 8-hour carve to get all the pieces finally done…only to discover massive disparity between what I expected and what the final pieces measured, none of which seemed due to the data going in. I sought out advice on the CarveWright user forums, got some new ideas — perhaps I needed to calibrate the machine per board, for each carve in order to achieve the accuracy I sought, for example. But before I could test any of this, new issues appeared — now, boards wouldn’t even measure, complaining that there was a sensor roller error…when he board left the sensor roller because it had fed past it!
That was toward the end of April. The last straw came tonight, when I mustered up the courage to finally see about resolving these issues and test out this per-board calibration hypothesis. I couldn’t get the sensor roller to stop throwing errors, telling the machine to ignore the errors caused different errors to appear, and then — when taking apart the sandpaper belts that feed the board through the machine, I saw that the belts had started to “roll under” themselves again, which was an issue I fixed months ago. It was too much. There are parts I can look into replacing — newer, better; rubber belts instead of sandpaper, for instances — but that costs a great deal of money on top of the money already spent to acquire the machine in the first place (dramatically discounted though it was). I set out to prove that one could make a good-quality stormtrooper helmet on the cheap; this wasn’t that at all and I wasn’t about to keep throwing money at it.
Therefore, I’m changing my approach once again. While the cross-section approach is still something that I think has merit, I’ve come to the point now where I’ve seen enough successful projects that start from naught but paper that I’m going to give that a go. I’ve already got my 3D model, which needs only marginal tweaking to be suitable for that sort of approach, so I should lose little in the accuracy I hoped to achieve with the CarveWright, though I may not end up with a solid wood positive mold that I can pull numerous silicone negatives/poured urethane casts from. Maybe. Who knows, perhaps I will be able to create a mold this way and still use the silicone-and-urethane approach I planned to use all along.
Time to find out.
July 25, 2015
Notes on OPT Models for TIE
I’m mostly writing this for my own notes, but on the off-chance my incoherent notes are useful to others, I decided to put it here. Most of this is going to be devoid of context, but for reference’s sake, I’m using a combination of XWA Opt Editor, Blender, XWA Texture Replacer (XTR), and finally OPTech to create the XvT/TIE-compatible OPTs. I’ll probably add more to this as I go.
Clean Up Unused Materials
There’s an addon that ships with Blender but is dormant by default called Material Utils that has a function to remove unused materials from an object (Clean Material Slots (Material Utils)). Use this once you’ve finished futzing with materials.
Clean Up UVTextures
These garbage up the exported OBJ with bad materials long after you’ve done any material editing. The following script obliterates them:
import bpy
objects = bpy.context.selected_objects
if (objects is None):
print("You must select at least one object") # This warning will only show in the Blender console
quit()
for ob in objects:
uvTexData = ob.data.uv_textures.active.data[:]
print("Active UV on %s has %s faces of data" % (ob.name, len(uvTexData))) # Purely informational; can be omitted if desired
for i in range(0, len(uvTexData)):
if (uvTexData[i].image is not None): # We do not want ANY uv textures!
print("Face %s: %s" % (i, uvTexData[i].image.name)) # Purely informational; what face has what UV texture
uvTexData[i].image = None
print("Cleaned UV texture from face")
Material and Texture Naming
Materials and Textures (the Blender concept of a Texture, not the actual filename) must be named TEX*, with a 5-digit numeric identifier (starting at 00000 and incrementing by 1) in order to behave properly. I tried a bunch of different naming schemes in the hopes that I could keep human-meaningful names applied to either Materials or Textures, but this inevitably caused problems once trying to check the model in XTR or OPTech. XWA Opt Editor handles it fine, though. I wrote several python scripts to do this, based on whatever previous iteration of material naming I had. Here was the most recent:
import bpy, re
materials = bpy.data.materials
idx = 0
for mat in materials:
if mat.name[0] == 'X': # Detecting whether a material was prefixed with X, which was the previous naming scheme for my top-level LOD
newName = "TEX%s" % format(idx,'05') # 0-pad to 5 digits
print("Renaming %s to %s" % (mat.name, newName)) # Informational
mat.name = newName # Rename the material
imgEx = mat.active_texture.image.name[-4:] # Get the extension on the Texture
print("Renaming %s to %s%s" (mat.active_texture.image.name, newName, imgEx)) # Informational
mat.active_texture.image.name = "%s%s" % (newName, imgEx) # Rename the texture; NOT the file, though
idx = 1 # Only increment if we matched above
Export Settings
Make sure Selected Only is enabled if you only want to export your selection (which I did/do, since I had multiple LODs in the same Blender file) and make sure Triangulate Faces is turned on. Optionally, turn off Include Edges, which I think will keep the OBJ from having two-vertex mesh objects treated as full faces (if you have these, you probably did something wrong).
Texture Format Doesn’t (Seem To) Matter
One thing I tried was converting all the PNGs exported by XWA OPT Editor to BMPs before loading them into Blender, but this didn’t ultimately make a difference when then re-importing the exported OBJ back to XWA OPT Editor; they still came in as 32-bit images and had to be internally converted to 8-bit. Irritating limitation of the tool, I guess. One issue I’ve variously encountered is garbage material/palette names that I thought might be connected to this in some way. The solution here, though, seemed to simply be saving the imported OPT as soon as it was imported from the OBJ, then running the 32 -> 8-bit conversion. That resulted in non-garbage palette names. Of course, this may also be related to the previous note about naming and have nothing to do with the conversion order of operations.
Look, Up, Right Vectors
I’m not actually sure about any of this yet, because I haven’t tested it, but I wrote the following script to compute my best-guess for the OPT convention for what “Look”, “Up,” and “Right” vectors should be, based on an input selection of vertices and the average of their normals. The idea here is to use it to define rotational axes and such for rotary gun turrets and other moving model parts. For most parts, this isn’t necessary.
import bpy
from mathutils import Vector
selVerts = [i.index for i in bpy.context.active_object.data.vertices if i.select == True]
retNormal = Vector((0,0,0)) # The resulting vector we'll calculate from the selection
for i in selVerts:
vertNormal = bpy.context.object.data.vertices[i].normal
retNormal = vertNormal # Add to the calculated normal
retNormal = retNormal / len(selVerts) # Average the summed normals by the number of vertices involved
retNormal = retNormal * bpy.context.active_object.matrix_world * 32767 # Scale to the OPT convention and multiply by the world matrix to get global normals instead of local
# ALL OF THIS IS SPECULATIVE!
# The idea is to take the computed average normal from Blender's coordsys and convert it to the OPT coordsys displayed in XWA Opt Editor
lookVector = Vector((retNormal.y, retNormal.z, retNormal.x))
upVector = Vector((retNormal.z, retNormal.x*-1, retNormal.y))
rightVector = Vector((retNormal.x, retNormal.y*-1, retNormal.z*-1))
print("Look: %s\nUp: %s\nRight: %s\n------" % (lookVector, upVector, rightVector))
Getting a Coordinate for a Hardpoint
Rather than manually copying every vertex I wanted to use as a hardpoint, I wrote this script.
import bpy, os
objLoc = bpy.context.active_object.location
objWorldMatrix = bpy.context.active_object.matrix_world
objVerts = bpy.context.active_object.data.vertices
selVerts = [i.index for i in verts if i.select == True]
for i in selVerts:
# Need to do the following vector/matrix math to get the value
# actually reported as a Global coordinate by Blender for a
# selected vertex
#
# (Local vertex coordinate (object location * object world matrix)) * inverse object world matrix
vertLocalPos = objVerts[i].co
vertGlobalPos = (vertLocalPos (objLoc * objWorldMatrix)) * objWorldMatrix.inverted()
# Flip the y value to match OPT coordinate space
vertGlobalPos.y = vertGlobalPos.y * -1
# Dump the string to the clipboard
optStr = "%s; %s; %s" % (vertPos.x, vertPos.y, vertPos.z)
print(optStr) # Informational
os.system("echo %s | clip" % optStr)
July 2, 2015
TIE Fighter (Windows CD version) Windows 7 x64 Installation Instructions
Putting this here for posterity and in case it’s useful to others.
This specifically applies only to people who have the Windows CD version of TIE Fighter (the one released using the XvT engine). If you have the old DOS version or the GOG.com version, these instructions may/will not apply to you. These steps are directly adapted from this guide, distilled into the minimal form of the steps I followed. That guide also has instructions for the older DOS version and GOG.com versions, if that’s your thing. Additionally, this is specifically for users of Windows 7 x64. I make no guarantees of applicability to other versions of Windows.
tt { color: #8ac; }
Primary Instructions
Download Tie95-win7.zip
Download TF95ReochestratedDatav1.zip
Extract Tie95-Win7.zip to a temporary location (henceforth %TIE95-WIN7_DIR%)
Insert the TIE Fighter CD. Close/exit autostart if it opens.
Open the TIE95 disc in Explorer instead.
Copy all files on disc to your hard drive somewhere (henceforth %TIECD_DIR%)
Run XCS_TIE95_MSI_v1.0.0.0.exe from %TIE95-WIN7_DIR% and point it at the place where you copied the game files.
Run XCS - TIE Fighter 95.msi from %TIECD_DIR%. Accept defaults (or change them as desired; I didn’t try; henceforth, this install path is henceforth %TIE_PATH%).
Copy tie95.bat from %TIE95-WIN7_DIR% to %TIE_PATH%. This file closes Explorer when the game launches (possible color issues) and restarts it again when the game exits. Do not be alarmed.
Locate the TIE Fighter 95 shortcut in the start menu, right-click and choose “Properties”
Change TIESTART.EXE to tie95.bat
Click ‘Apply’, then ‘Change Icon…’, then select the TIE95.EXE and click ‘OK’
Click ‘OK’ to close the properties window.
In your video card profile settings (e.g. NIVIDA Control Panel), create a profile for TIE95.EXE
Disable anti-aliasing. Having it on leads to weird color flickering.
Enable 16x Anisotropic Filtering
Open XWTIE95.zip from %TIE95-WIN7_DIR% and run XWTIE95.exe to prevent D3D crashes.
Make sure the disc is in the drive
Copy B6M3GW.TIE from %TIE95-WIN7_DIR% to %TIE_PATH%\Mission (official LucasArts patch for this mission)
Make sure you have a joystick plugged in. Game won’t cooperate without one.
Run the game from your shortcut
Reorchestrated Music
To get the original music and improved voice, you basically need to rebuild the TIE CD disc with the Reorchestrated data files.
Ensure you have a way to create and virtually “mount” ISO disc images
Extract TF95ReochestratedDatav1.zip to %TIECD_DIR%
Replace %TIE_PATH%\TIE95.EXE with the one in the Data zip’s INSTALL folder.
Create an image of %TIECD_DIR% and be sure to name it TIE95 (so it matches the existing disc)
Mount it as TIE95 using some kind of virtual mounting software.
Ensure the original game disc is no longer in your drive.
Run the game from your shortcut
You may get prompted that there is no disc in the original drive. Click ‘Cancel’ and the game should launch anyway. It will not show this warning on subsequent runs.
Enjoy!
January 20, 2015
Writing in Public, Finishing the First Draft
A fairly inconsistent close-out to the end of the year, followed by three consecutive 2000+ word days finally spell the completion of the first draft of Alour-Tan 2! I immediately set to outlining Alour-Tan 3 and sent off the draft to my First Reader, who has been providing me regular and fantastic feedback while progressing through the book. Once all the feedback is in, I’ll fire up a new round of Writing in Public to chronicle the second draft.
Date
Written
NaNo Total
Overall WC
Notes
Sun, Dec. 14
2187
65540
72396
Mon, Dec. 15
4399
69939
76795
Tue, Dec. 16
0
69939
76795
Went to see The Hobbit
Wed, Dec. 17
2081
72020
78876
Thu, Dec. 18
0
72020
78876
Wife’s company party
Fri, Dec. 19
826
72846
79702
Coworker’s retirement party
Sat, Dec. 20
738
73584
80440
Friend’s birthday party
Sun, Dec. 21
0
73584
80440
Mon, Dec. 22
0
73584
80440
Tue, Dec. 23
1295
74879
81735
Wed, Dec. 24
877
75756
82612
Thu, Dec. 25
0
75756
82612
End of year vacation. Didn’t quite hit the 80k I wanted to hit in the November+December timespan, but I needed to not think about any sort of work for the remainder of the year.
Fri, Dec. 26
Sat, Dec. 27
Sun, Dec. 28
Mon, Dec. 29
Tue, Dec. 30
Wed, Dec. 31
Thu, Jan. 1
Fri, Jan. 2
Sat, Jan. 3
2886
85498
Sun, Jan. 4
2109
87607
Mon, Jan. 5
2143
89750
DRAFT ONE COMPLETE
Previous Writing in Public post here.
December 15, 2014
Writing in Public, Day 44
Per my tweet from a few days back, Act Two is done and now it’s time to run down the home stretch to the end of this draft of this book! Then begins the revision process to make it not abjectly terrible.
Date
Written
NaNo Total
Overall WC
Notes
Mon, Nov. 24
2054
40338
47194
Tue, Nov. 25
2807
43145
50001
Wed, Nov. 26
4252
47397
54253
Thu, Nov. 27
0
47397
54253
Thanksgiving
Fri, Nov. 28
2243
49640
56496
Sat, Nov. 29
994
50634
57490
Regular NaNo goal achieved. Also, a travel day, so not much time for writing.
Sun, Nov. 30
0
50634
57490
More traveling. Recovering.
Mon, Dec. 1
2513
53147
60003
Sixty thousand!
Tue, Dec. 2
0
53147
60003
Not sure what happened here.
Wed, Dec. 3
2243
55390
62246
Thu, Dec. 4
2105
57495
64351
Fri, Dec. 5
1726
59221
66077
Sat, Dec. 6
0
59221
66077
In general, I like to take one (deliberate) day off a week and that day is generally Saturday.
Sun, Dec. 7
2022
61243
68099
Mon, Dec. 8
0
61243
68099
Funky commuting plus staying out late.
Tue, Dec. 9
0
61243
68099
Movie night.
Wed, Dec. 10
0
61243
68099
Working late.
Thu, Dec. 11
0
61243
68099
More working late.
Fri, Dec. 12
2110
63353
70209
Seventy thousand!
Sat, Dec. 13
0
63353
70209
Party!
Sun, Dec. 14
2187
65540
72396
Previous Writing in Public post here.
November 28, 2014
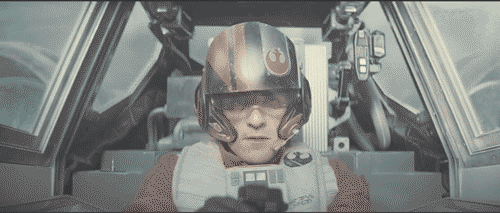
Star Wars: The Force Awakens teaser trailer musings
//www.youtube.com/watch?v=erLk59H86ww
A random collection of thoughts:
Star Wars is a weird thing for me because it’s kinda split into two entities. There’s “my Star Wars“, which consists mainly of the OT1, a handful of the novels and games, a great deal of fan research, and some of my own twists on things. Then there’s “the Star Wars franchise,” which is everything with the name Star Wars attached. I get super-jazzed for stuff in the former category, while the latter category’s flame has long since burned out. I have no idea where these new movies/the Disney Star Wars era fits into those categories.
I don’t have any negative things to say about J.J. Abrams as a director. Any of the issues I take with the stuff of his I’ve seen have been writing-related. Sure, he has influence over that as a director/producer, but I don’t think those issues ultimately fall at his feet. I mean, I guess they do in a “the buck stops here” sort of way, but…meh? That he’s not working with Orci/Kurtzman/Lindelof this time, but rather starting from a script by and retooled by Empire Strikes Back and Return of the Jedi co-writer is at least encouraging.
This teaser has a strong fan film vibe to it for me, but I can’t quite put my finger on why. Vibrancy, maybe? Color timing not quite what I expected? Not sure. The very first shot, when pops his head up, is the one that feels the most fanfilmish to me. I bet that’s actually a location shot, but it looks like a greenscreen shot. Something about it just feels wrong. This comp2 also feels weird to me, color-wise, and to make matters even more confusing, I think it’s actually the human element that feels off. The helmet, the white vest, and the cockpit all look fine, but his actual skin just seems to…not fit.
As a rebuttal to the previous point, though, it’s worth noting that none of those shots likely represent “finished” shots. This far out from release, ain’t none of those gonna be final comps.
Good grief, John Williams. The shot where they hard-in on the Falcon with the fanfare swelling? Damn.
My initial reaction to the claymore lightsaber was a mixture of “gee-whiz!” and eye-rolling amusement. On thinking about it, though, it makes some amount of sense. What’s the one thing a lightsaber can’t immediately cut through? Another lightsaber. So, if you’re going to have a crossbar on your lightsaber, what do you make it with? Mini-lightsabers.
Favorite shot of the trailer was that lights-flickering interior dropship shot with all the stormtroopers. That was badass.
A reminder for everyone that this was the Episode I teaser. TFA’s teaser already has about 1000x as much attitude and tone.
Lucas approached Mark Hamill about reprising the role of Luke in an Obi-Wan-style mentor capacity during the filming of Return of the Jedi and speculated that it would film sometime in 2011. As pointed out by this redditor, “Everything that has transpired has done so according to my design.”
Did you notice the antenna on the Falcon? Not the old dish! (’cause, y’know, Lando knocked that one off)
In conclusion:
must
not
get
hype

Original Trilogy. Episodes IV through VI“Comp” refers to “composition” or “composite” when referring to VFX.
November 25, 2014
Writing in Public, Day 24
Odds of my being able to hit my 80,000 words-for-NaNo target are diminishing rapidly, sadly, but the standard 50,000 word NaNo target remains well within reach. I hadn’t expected to lose as many days as I have to A) allergies prompting early bedtimes/late rises, B) Bruins games, C) holiday travel, and D) holidays generally, but lost them I have. Short of hitting a consistent word count well north of anything likely for the remainder of the month, 80k is out of reach. That said, I’m solidly in the swing of the story now, so there’s at least no reason that my current momentum should abate as November turns to December.
I have to wonder at the wisdom of placing NaNoWriMo in November. October culminates in Halloween, which makes much of the month costume project time (at least, for me!). November culminates in Thanksgiving in the U.S., forcing a choice between family time and writing time. December is much the same, but with your-winter-holiday-of-choice and New Year’s. September, on the other hand, is devoid of such obligations in its entirety. If I decide to do a month-long writing push again next year (as opposed to a much more sensible lots-of-writing-all-the-time-regardless-of-the-month approach), I think I’ll kick it up two months and do it in September.
Date
Written
NaNo Total
Overall WC
Notes
Sat, Nov. 1
0
0
19271
NaNo begins, but I don’t!
Sun, Nov. 2
2709
2709
21980
Mon, Nov. 3
2769
5478
18823
Notable removal of some stuff from the existing manuscript
Tue, Nov. 4
966
6444
19789
Wed, Nov. 5
3049
9493
16349
Another big chunk of existing text removed
Thu, Nov. 6
3441
12934
19790
Fri, Nov. 7
473
13407
20263
Beer o’clock on office Fridays doesn’t do good things for my word count
Sat, Nov. 8
2145
15552
22408
Sun, Nov. 9
0
15552
22408
“Write every day” is good advice. So is “don’t work every day.”
Mon, Nov. 10
1873
17425
24281
Tue, Nov. 11
729
18154
25010
Wed, Nov. 12
0
18154
25010
Crushing Bruins loss to the Maple Leafs.
Thu, Nov. 13
2133
20287
27143
Managed to write in the morning before work, but crushing and dispiriting Bruins loss to the Habs killed evening writing.
Fri, Nov. 14
0
20287
27143
Sick, but worked from home. Called it a night pretty early.
Sat, Nov. 15
0
20287
27143
Sun, Nov. 16
3400
23687
30543
That’s better.
Mon, Nov. 17
4666
28353
35209
Tue, Nov. 18
2416
30769
37625
Wed, Nov. 19
4021
34790
41646
Thu, Nov. 20
358
35148
42004
Four hours of work here, to boot.
Fri, Nov. 21
956
36104
42960
Allergies kicking in. Fell asleep on the train home (usually the more productive of my train rides). Epic Bruins game against the Caps, ending in a 7-round shootout.
Sat, Nov. 22
0
36104
42960
Packing, travel, Bruins loss to the Habs (again!). Literally no unallocated time.
Sun, Nov. 23
2180
38284
45140
Mon, Nov. 24
2054
40338
47194
Previous Writing in Public post here.

