Lora Langston's Blog, page 68
December 16, 2012
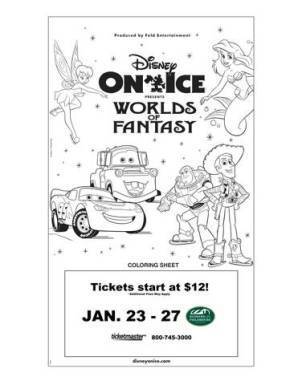
Disney on Ice Worlds of Fantasy Coloring Sheet Printable featuring Tow Mater
We've got a fun printable coloring sheet featuring Tow Mater, Tinkerbell, The Little Mermaid, and Woody and Buzz from Toy Story. Click the image below for a printable PDF.
Disney on Ice Worlds of Fantasy is coming to Banker's Life Fieldhouse January 23 - 27, 2013.
Rev up for non-stop fun with four of your favorite Disney stories at Disney On Ice presents Worlds of Fantasy. Thrill to high-speed stunts as Lightning McQueen, Mater and the crew of Disney/Pixar's Cars race across the ice. Dive into The Little Mermaid's enchanting undersea kingdom and enter the mystical world of Pixie Hollow with Tinker Bell and the Disney Fairies as they reveal the magic that lies within! The toys are back in town with heroic action when Buzz Lightyear, Woody, Jessie, and the Toy Story gang escape from the rambunctious tots of Sunnyside Daycare and race for home, in their most daring adventure ever! From wheels to waves, playtime to pixie dust, your family's favorite Disney moments come to life at Disney On Ice presents Worlds of Fantasy with dazzling skating, special effects and beloved characters certain to create a lifetime of memories.
Disney on Ice presents Worlds of Fantasy! January 23-27, 2013 at Bankers Life Fieldhouse
FFA Discount Code for Disney on Ice:
Code: SAVE4
$4 off all performances (excluding opening night)
Valid on $24 tickets
Valid NOW - Jan. 22, 2013
Limit of 6 tickets
On-Line only
Phineas and Ferb Printables
 [image error]
Tweet
[image error]
Tweet


Disney on Ice Worlds of Fantasy is coming to Banker's Life Fieldhouse January 23 - 27, 2013.
Rev up for non-stop fun with four of your favorite Disney stories at Disney On Ice presents Worlds of Fantasy. Thrill to high-speed stunts as Lightning McQueen, Mater and the crew of Disney/Pixar's Cars race across the ice. Dive into The Little Mermaid's enchanting undersea kingdom and enter the mystical world of Pixie Hollow with Tinker Bell and the Disney Fairies as they reveal the magic that lies within! The toys are back in town with heroic action when Buzz Lightyear, Woody, Jessie, and the Toy Story gang escape from the rambunctious tots of Sunnyside Daycare and race for home, in their most daring adventure ever! From wheels to waves, playtime to pixie dust, your family's favorite Disney moments come to life at Disney On Ice presents Worlds of Fantasy with dazzling skating, special effects and beloved characters certain to create a lifetime of memories.
Disney on Ice presents Worlds of Fantasy! January 23-27, 2013 at Bankers Life Fieldhouse
FFA Discount Code for Disney on Ice:
Code: SAVE4
$4 off all performances (excluding opening night)
Valid on $24 tickets
Valid NOW - Jan. 22, 2013
Limit of 6 tickets
On-Line only
Phineas and Ferb Printables
[image error]
Tweet


December 15, 2012


December 13, 2012
Jake's Journey in Art ~ Building a Gingerbread House from Cardboard ~ Holiday Homeschool Lesson

Cardboard Gingerbread House.
Jake had a messy break through during the making of this Gingerbread House at our local library. When I signed the family up for the project, I didn't think he would like it, but he was more excited than his little sister, Mayhem. He collected all the candies off the community candy table. (Each family brought two bags of candy to share.)
Read more »


December 12, 2012
7 Homemade Christmas Ornament Craft Ideas
Heirloom Ornaments from our family tree...
One year, my niece made everyone beautiful gifts from Fimo clay.
Fimo is easier than salt dough, and it lasts longer than play dough. Many craft stores carry it. Just open, create, and insert hole in top with a straw. Voila! Quick, simple, holiday ornaments or package tie-ons.
Christmas Tree Cardinal Legend.
The cardinal is considered the Christmas bird and is a reminder to Christians of their faith in Christ. Its scarlet color represents the blood of Christ.
This is an old, family heirloom, but you can make a no-sew cardinal decoration for your tree with red felt. Just cut out the shape of the bird in two layers, stuff with scrap fabric or shredded newspaper, and glue the edges with tacky fabric glue. The kids can use Sharpies to draw on the bird's features.
Ever since I can remember, we've had a cardinal near the top of our tree.
Winter Snowflake Crochet Craft for Tree Ornament.
Crochet a beautiful snowflake like my Grandmother did, then paint it with a glue/water solution or Modge Podge. You can also use Fabric Starch. Make a solution, place snowflake into bag, pour in liquid starch. Find How to DIY here.
Old-fashioned cookie cutters make awesome Christmas Tree ornaments. Just insert a ribbon.
Craft Stick Snow Ski Ornament. Perfect After-school or Scout project.
My Mother and Aunt used to make an ornament for all the cousins every Christmas. My Aunt made lots of crafts in 4-H programs. This one is a favorite that stood the test of time.
Just paint two craft sticks with acrylic paint, hot glue them in the mid-point forming an "x", apply fake snow or white glitter paint to each end, and decorate with a bow. Holiday Snow Ski Ornament is a great craft idea for kids.
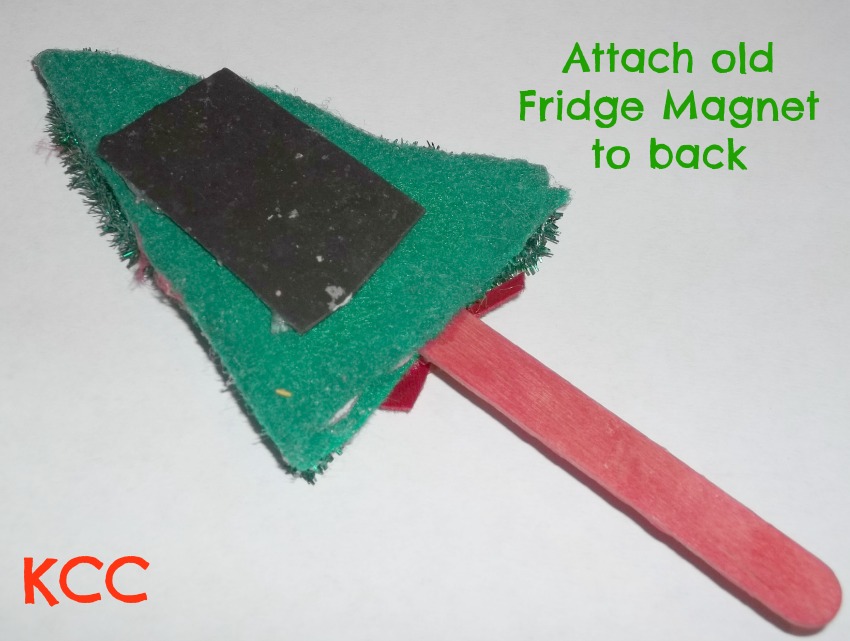
Craft Stick Fridge Magnet or Holiday Puppet.
Get preschoolers and elementary kids crafting with this simple holiday decoration. I cut out two of various holiday shapes: Triangles, Circles, Stars. Then, place a popsicle stick between the layers and glue the edges together.
Collect old advertiser fridge magnets, cut them up and repurpose them. You can attach to the back with tacky glue or glue between the layers to hide the magnet.
A red triangle and pink circle make a great Santa Face. Let the littles decorate the ornaments with glitter, star stickers, and pipecleaners. Place low on fridge and let the little use them to make a holiday puppet show or give as gifts to the Grandparents :-)

DIY Handmade Paper Pulp Heart Christmas Tree Craft Ornament.
Here is a fun link explaining how to make these ornaments or plantable paper seed cards. Great gift idea! My high school Art teacher (the spark of my creativity) gave these as gifts one year.
[image error]
Tweet


One year, my niece made everyone beautiful gifts from Fimo clay.
Fimo is easier than salt dough, and it lasts longer than play dough. Many craft stores carry it. Just open, create, and insert hole in top with a straw. Voila! Quick, simple, holiday ornaments or package tie-ons.
Christmas Tree Cardinal Legend.
The cardinal is considered the Christmas bird and is a reminder to Christians of their faith in Christ. Its scarlet color represents the blood of Christ.
This is an old, family heirloom, but you can make a no-sew cardinal decoration for your tree with red felt. Just cut out the shape of the bird in two layers, stuff with scrap fabric or shredded newspaper, and glue the edges with tacky fabric glue. The kids can use Sharpies to draw on the bird's features.
Ever since I can remember, we've had a cardinal near the top of our tree.
Winter Snowflake Crochet Craft for Tree Ornament.
Crochet a beautiful snowflake like my Grandmother did, then paint it with a glue/water solution or Modge Podge. You can also use Fabric Starch. Make a solution, place snowflake into bag, pour in liquid starch. Find How to DIY here.
Old-fashioned cookie cutters make awesome Christmas Tree ornaments. Just insert a ribbon.
Craft Stick Snow Ski Ornament. Perfect After-school or Scout project.
My Mother and Aunt used to make an ornament for all the cousins every Christmas. My Aunt made lots of crafts in 4-H programs. This one is a favorite that stood the test of time.
Just paint two craft sticks with acrylic paint, hot glue them in the mid-point forming an "x", apply fake snow or white glitter paint to each end, and decorate with a bow. Holiday Snow Ski Ornament is a great craft idea for kids.
Craft Stick Fridge Magnet or Holiday Puppet.
Get preschoolers and elementary kids crafting with this simple holiday decoration. I cut out two of various holiday shapes: Triangles, Circles, Stars. Then, place a popsicle stick between the layers and glue the edges together.
Collect old advertiser fridge magnets, cut them up and repurpose them. You can attach to the back with tacky glue or glue between the layers to hide the magnet.
A red triangle and pink circle make a great Santa Face. Let the littles decorate the ornaments with glitter, star stickers, and pipecleaners. Place low on fridge and let the little use them to make a holiday puppet show or give as gifts to the Grandparents :-)
DIY Handmade Paper Pulp Heart Christmas Tree Craft Ornament.
Here is a fun link explaining how to make these ornaments or plantable paper seed cards. Great gift idea! My high school Art teacher (the spark of my creativity) gave these as gifts one year.
[image error]
Tweet
What She's Wearing Wednesday ~ Elf on a Shelf or What to Wear to a Gingerbread House Decorating Party

Mayhem thought it'd be nice to dress like the Elf on a Shelf. Note the candy cane stripe socks. She was disappointed Mommy refused to let her wear the the Women's Size 9, Red, Pointy-toe Cowboy boots from the 1980's. See, sometimes I draw the line. It was a safety issue, the bottoms are flat and slippery and the boots are 3 times the size of her feet!
[image error]
Tweet


December 10, 2012
Kitchen Kids ~ Christmas Cranberry Muffins Recipe

Holiday Cranberry Muffin Recipe.
You need:
English Muffins
1 Can of Jellied Cranberry Sauce
Cinnamon
Brown Sugar
To make:
Toast Muffins in toaster or toaster oven.
Open the cranberry sauce and slide it out of the can.
Slice into thin circles.
Place cranberry slices on muffins.
Sprinkle with brown sugar and a dash of cinnamon.
Place in toaster oven or on a cookie sheet in a warm oven at 375 degrees for 5 minutes.
Serve warm.
[image error]
Tweet


December 9, 2012
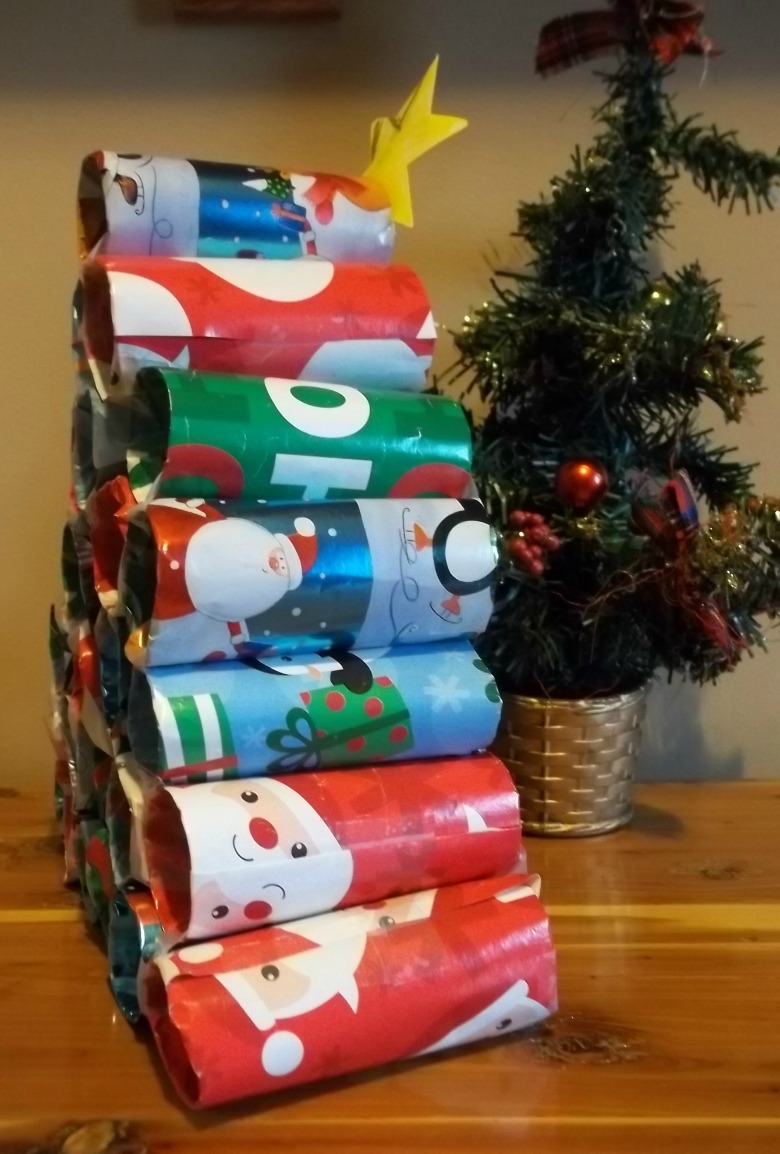
Countdown to Christmas Gift Advent Calendar with Toilet Roll Tubes and Wrapping Paper

Easy Preschool Advent Calendar.
So, we save our toilet tubes. Yes, I am one of those people (I save my jars too) here is a post from one who is not, it made me LOL. Just imagine the possibilities?
Jar lids make great messy spoon holders, paint mixing trays, and chimes. Jars make amazing things! When I was a kid, my Dad had a glass cutting kit and he'd make all kinds of "fancy" glasses from jars. (You know, just like Waterford Crystal.)
Toilet Tubes are even better. They just cry out for re-purposation. Do you like that word? I just invented it. There, now I copyrighted it too. 12/2012. Maybe, I can trademark it? "You're fired!" Wait, what was I saying? Toilet Tubes and Cardboard Tubes = Awesome craftability.
So... we save our toilet roll tubes. Except we moved, and then we didn't, so I had to start all over. I barely had enough for 25 days, and they were all different diameters and lengths. We had fun, but it wasn't perfect. Remember, it's the fun that counts.
To make our Advent Calendar tree, we took an idea from something similar we saw on Pinterest and it sparked an idea. You know, how that goes. Hmmmmm, very pinteresting. I wonder how I can recreate it to make it my own?
Ow, my brain just exploded a little! I'm going to get my crafty blogging buddies together and make a contest. I'll call it, "The American Crafter" and we'll find something pinteresting and give everyone an assignment to make it their own and you can vote but not by phone maybe just by comments. Copyright, Trademark, and Hashtag that please.
Digression ~
He digressed so often that it was hard to follow what he was saying.
To turn aside especially from the main subject of attention or course of argument.
I do that a lot when I write on Sundays. It's my little form of meditation. So who's in? Are you up for a Voice/American Idol style Crafter contest?
I'll make the winner a handmade, toilet tube crown with a fancy jar torch. (wink, wink)
What? You came here to make an Advent Calendar or a cute holiday decoration? Here goes:
You will need 25 Toilet Roll Tubes minus the toilet paper, but I guess you could use the toilet rolls, now wouldn't that be pinteresting?
Tape or a Hot Glue Gun
Wrapping Paper or Scrap s
(Yes, of course, I save the little bits of paper from the previous year that aren't big enough to wrap a package. They are so pretty, I can't bare to throw them away. No, I talk about hoarding, but I'm not really a hoarder not yet anyway. My cat is alive and well, The food in my fridge isn't expired, and you can walk through the rooms of our house just fine. Well, most of them.)
Construction Paper
1. Cut little squares of wrapping paper and roll onto your tubes. Attach with tape.
2. Decide how many will be in each row to taper to one on top.
3. Attach the bottom row together with a little piece of tape inside the end of two tubes.
4. Stack the next row. Repeat step 3. Choose to glue first row to second row or use tape.
5. Repeat.
6. Cut out a Star or Angel from Construction Paper and glue to top of Christmas Tree.
7. Fill each slot with little gifts or fun notes until Christmas Day.
Merry Christmas!
More things to do with Toilet Tubes:
Holiday Party Favor Basket Ornaments
Turkey with Fall Leaves
New Year's Eve Rocket Popper
Please feel free to do a better job and share your link below ;-)
[image error]
Tweet


December 8, 2012
Christmas Past ~ Favorite Ornaments Adorn Our Tree ~ Homemade and Repurposed ~ Grandma's Cookie Cutters
Remember making Christmas cookies with Grandma? Those sugar cookies were covered in colored candy sugar, icing piped from a tube, and chocolate coated candies. It is a favorite memory I try to recreate every year with my kiddos minus those old-fashioned plastic cookie cutters. Remember? The cutters were floured, but it was still nearly impossible to remove the reindeer antlers or any other tiny details in the cookie cutter.

Decorate your tree with Grandma's Old Christmas Cookie Cutters- Perfect Tree Ornaments.
So, to honor the memory, I tied a ribbon through the top of our heirloom ornaments and hung them on our tree. The light reflects behind them with a beautiful red glow making the perfect decoration for the tree.

Red, plastic angel cookie cutter ornament.

Red Cookie Cutter holly and "Merry Christmas" gift ornaments for tree decorations.
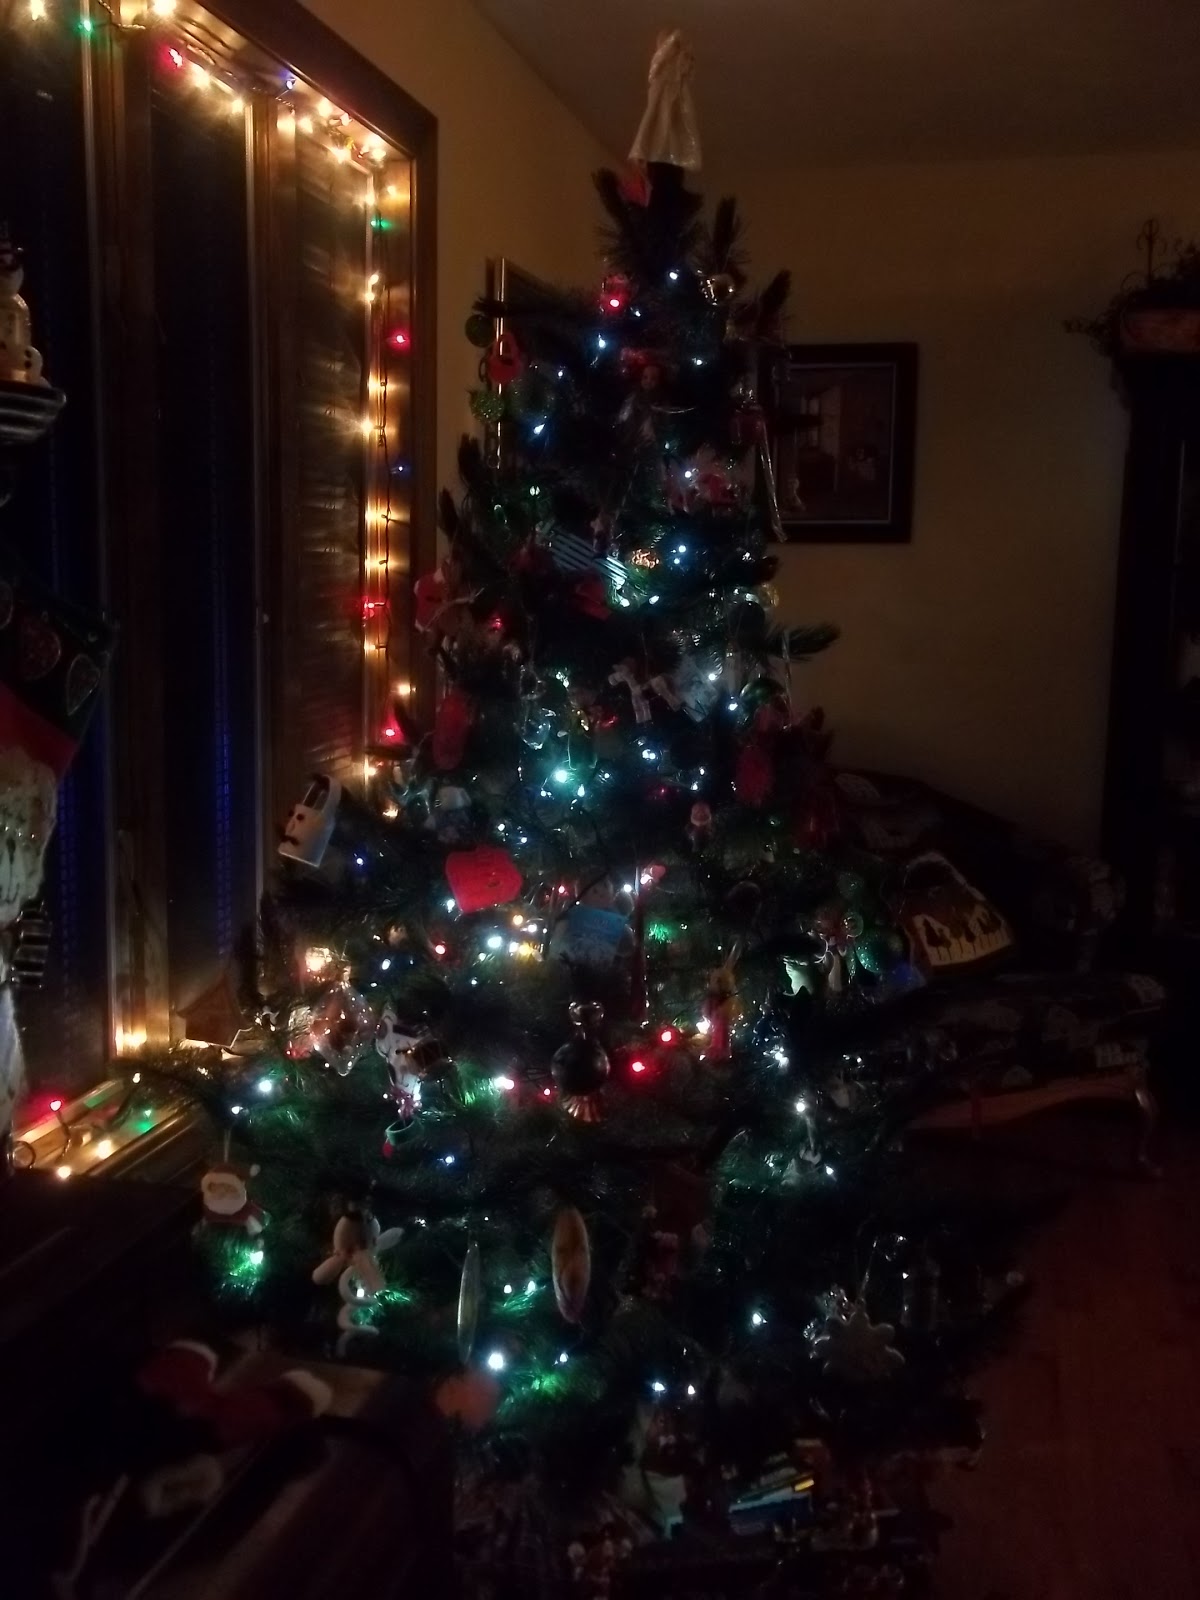
Our Tree with lights and red and green theme.

Preview for next week ~ Handmade Paper Heart Ornament, Metal Cookie Cutters, and Handmade Wooden Decorations.
[image error]
Tweet


December 7, 2012
Jake's Journey in Art ~ Homeschool Printmaking Lesson with Foam Trays and Pencils

Animal Prints with Foam Trays ~ Piggy
What fun! This is an incredibly easy way to teach the art of printmaking to young children. The assignment required choosing an animal to draw and first drawing it on paper by looking at the image upside down. If you draw an image upside down you tend to focus less on the end product and more on each individual line. The idea is to make drawing perfectly less overwhelming, then when turned right side up, it magically becomes a great drawing.
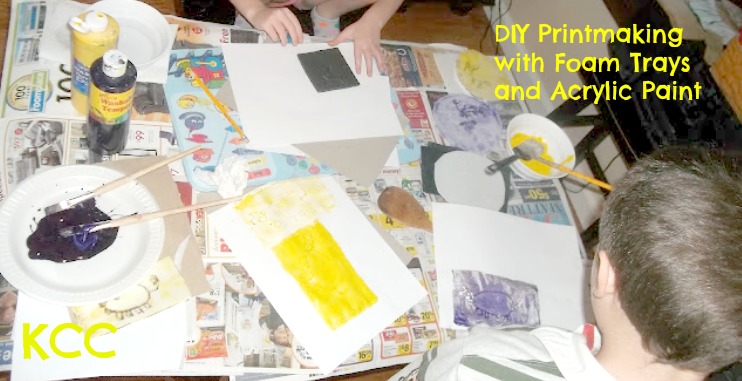
Messy Craft with Paint and Prints.
Hmm... Great theory. Jake drew his pig by copying the image with the right-side up, then he proceeded to complain profusely about how everyone's drawings were better than his. It took a great deal of coaxing to get him to draw the picture upside down. He felt it was a waste of time and "stupid". The battle ensued, he tried it and the results were similar. That's good news and good news, I think. The good news is he tried it, saw it worked, and wasn't stupid, and the good news is he draws pretty good either way.

Be careful not to move your foam around. Printmaking requires a steady hand.
You will need: Foam Trays, Pencil, White Paper, and Acrylic Paint.
First, draw a picture of an animal on a piece of paper. Remember, if you are looking at an image turn it upside down and draw it upside down first. Now, turn your image around and check out your handi-work. This is practice.
The next step is to "draw" the image onto a foam tray. Make sure to press down hard to make a deep indentation into the foam. Now, cut the edges off your foam tray so it is a flat surface. It needs to be completely flat to make the print.
Lightly paint your foam image. You can use one color or several. Make a practice print on paper to remove some of the excess paint.
Then, carefully place your foam tray paint side down onto a clean sheet of paper. Press firmly, but do not move the tray or the image will smear. With a finger or hand on each end of the tray, carefully lift it from the paper to reveal your beautiful print. Wipe the tray clean and experiment with new colors.

Once they started making prints they didn't want to stop.
Tip: The best prints are the ones made as the paint is starting to wear off the tray. This is a great way to make holiday or birthday cards. You can also cut them out and frame them as Christmas gifts.
[image error]
Tweet