Debra Collett's Blog, page 2
October 8, 2012
My Newest and Best Resources for Teaching the Colonial Era
I didn’t post anything last week because I was rushing to get my new book, HISTORY QUESTERS Colonies Trek ready to distribute in time to be used for your Colonial Unit. I’m thrilled to announce that the e-version is now available at Amazon and Barns and Noble.
The Teacher’s Guide that accompanies HISTORY QUESTERS Colonies Trek is available here. Hard copies are still coming in the future, but I was eager to make the novel and teaching materials available for use by students this year—especially in light of the Common Core Standards creating an urgent need for more aligned resources. While I was writing my last post about teaching the Colonial Period, I kept thinking about all of my best strategies and activities that had to wait to be shared, so I decided to publish an e-book format first. In this post I will tell you a little about the book and the activities for teaching about the American Colonies that I developed to go with it. I will also share some reading and discussion strategies for any social studies or ELA class (scroll down).
About the Book
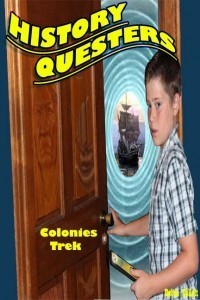
HISTORY QUESTERS Colonies Trek is about a group of kids who travel to the Colonial Period via a Q-Pad and get entangled in real historical events with real historical figures. Because many teachers are faced with diminishing time to teach Social Studies content as they prepare their students for standardized testing in Reading and Language Arts, I saw the need to provide a way to do both at the same time. Even classes that have the luxury of a whole period to teach Social Studies Content, the common core standards necessitate teaching literacy as well. To purchase the e-book for just $3.99 click here to go to my page on Amazon or here for Barns and Noble.
Besides having all of the Social Studies content most state standards require in the form of a sweeping saga of the Colonial Era, the novel tells a compelling coming of age story with all of the rich characters, complex plot and sensory imagery that an ELA teacher would want. It is appropriate for students in 5th-9thgrades and is versatile enough to be used as a supplementary extra credit reading assignment or independent study unit if there is no time in class, or as an entire curriculum unit. It will work well for both regular and homeschool classrooms.
About the HISTORY QUESTERS Teachers Guide and Activity Book
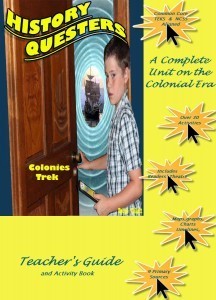
The 90 page HISTORY QUESTERS Colonies Trek Teacher’s Guide includes over 30 interdisciplinary activities that can be used to enhance and enrich the reading experience. Many of them can be used alone, without reading the novel, but together the novel and the teacher’s guide form a complete unit with more than enough material to teach the Colonial Period. A textbook would not even be needed. There are primary source documents, maps, timelines, graphic organizers, graphs, charts, art activities and cooperative learning activities. Here is a copy of the table of contents.requirements of most states.
Look at the Table of Contents:
Lesson Ideas for History Questers’ Colonies Trek……………………………….…4-12
Learner Standards Correlations……………………………………………………..13-14
Background Activities
Time Quest: European Colonies in North America teacher key……………..…..15-16
Time Quest: European Colonies in North America student page…………….……..17
Motives for English Colonization Chart Teacher key…………………………………18
Motives for English Colonization Chart student page………………..……………….19
Push-Pull Factors Activity teacher key…………………………………………………20
Push-Pull Factors Activity student page………………………………………..………21
Strategies for Reading History Questers’ Colonies Quest
HISTORY QUESTERS Colonies Trek Discussion Questions……………..…….22-27
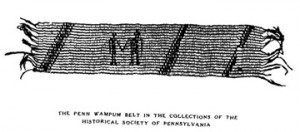
Readers’ Theatre: The Wampum Belt Cast of Characters………………….……28-29
Readers’ Theatre: The Wampum Belt………………………………………..…….30-36
Readers’ Theatre: The Wampum Belt Debriefing Questions student pages…..37-38
Readers’ Theatre: The Wampum Belt Debriefing Questions key……………….39-41
13 Colonies Chart key…………………………………………..……………….……….42
13 Colonies Chart student page….……………………………………….……………43
PEGS New England Colonies Chart key………………………………………………………..44
PEGS (Political, Economic, Geography, Social ) Middle Colonies Chart key……….45
PEGS Southern Colonies Chart key…………………………………………………….….46
PEGS New England Colonies Chart student page……………………………………47
PEGS Middle Colonies Chart student page…………………………………………….48
PEGS Southern Colonies Chart student page……….…………………………………49
Terms and Vocabulary Activities
Colonies Terms Crossword Puzzle key…..…………………….………………………….……50
Colonies Terms Crossword Puzzle student page……………………………………..51
Each One Teach One: Colonial Terms……………………………………………….…52
Each One Teach One: Blank……………………………………………………………..53
Art-based Activities
Timeline Key ………………………………………………………………………..…54-55
Timeline student pages……………………..………………………………….…….56-57
Tree of Liberty Activity Bulletin Board Template……….……………………..……….58
Tree of Liberty Activity key…………………………………………….…….…………..59
Tree of Liberty Activity student page…………………………………………………60-61
Story Elements Cube……………………………………………………….…………….62
HOTS (Higher Order Thinking and Skills) Daily Activities
Foundations of Freedom: Analyzing Documents key……………..………….…….…63
Document A: Mayflower Compact…………………………………….…………..64
Document B: Rhode Island Charter………………………………………………65
Document C: English Bill of Rights………………………………………………..66
The First Thanksgiving True/ False and Evidence key…….…………………..…67-68
The First Thanksgiving Teaching Notes……………………………………….……….69
Document A: Edward Winslow’s Mourt’s Relation………………….…….….…70
Document B: First Thanksgiving Painting………………………………….……..70
Document C: Journal of William Bradford…….………………………….……….71
Document D: National Thanksgiving Day Proclamation…..……….……………71
The First Thanksgiving True/ False and Evidence student page..………….……72-73
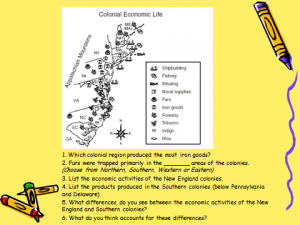
Colonial Economy Map key ………….………………………………………………..…74
Colonial Economy Map student page……………………………………………….75-76
Triangular Trade Map key……….………………………………………………………..77
Triangular Trade Map student page……………….……………………………………78
Colonial Ethnic Population Graph key…..………………………………………….…..79
Colonial Ethnic Population Graph student page……………………………….………80
Did Pocahontas Save John Smith? Analyzing the Evidence key…….……….…..…81
Did Pocahontas Save John Smith Teaching Notes.……………………………….…82
Background Reading on John Smith and Pocahontas by Dr. John Birchfield…83-88
Document A: John Smith’s A True Relation…………………..…….…….…….89
Document B: John Smith’s General History of Virginia………………….…….89
Did Pocahontas Save John Smith? Analyzing the Evidence student page…………90
Reading Strategies for Social Studies
I don’t want this blog to turn entirely into a sales pitch, because its true purpose is to share teaching ideas that can benefit all of our students. In celebration of the book’s release, I thought I would share some reading strategies today. I have used my book as the example, however. 
There are many options for reading History Questers’ Colonies Quest, or any history-based book. Using a variety of strategies will enhance the experience. It is best to break the reading into small chunks of a chapter or two. Whichever reading strategies are used, they should be accompanied with pre-reading activities that access prior knowledge and give background; during reading activities that engage the student and make them think; and post-reading activities that reinforce learning, build new understandings and apply them to new connections.
Independent Reading
Students could read the book, or some chapters, for homework, or as summer reading. It could also be read as an extra credit assignment or as an enrichment assignment for GT students.
Teacher Read
Teacher could read aloud some chapters. This might work best for the first few chapters to introduce the novel.
Pair or Group Read
Form History Questers teams in your class. Let each team choose a name and work together for some of the reading and/or activities. They can read aloud to each other.
Reader’s Theatre
Some of the scenes could easily be acted out or read as a script. It would be engaging to assign groups to rewrite these scenes (or portion of scene) with a narrator and dialogue, and act them out for the class as you get to that part of the novel. One such scene has already been turned into a Reader’s Theatre as an example. The Wampum Belt is available as a free download for a limited time. It is also available in the Teacher’s Guide.
PEGS Chart
The History Questers kids in the novel are collecting political, economic, geographic, and social information during their quest. It would be logical for your students to collect it along with the characters. If they are working in teams you could assign each team member a different category to collect and share with group, or watch out for if reading aloud. Students can record their information on the charts provided for each region. The History Questers visit a representative colony of each region, but all colonies are discussed within those chapters.
HOTS Discussion Questions
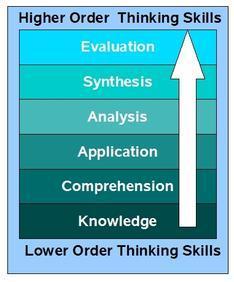
Discussion questions in sequential order are provided for each chapter, along with the chapter and scene where the answers are found. The questions range from fact-based to higher levels of Bloom’s Taxonomy. Students could answer them independently, or during group reading. They could also be used solely as discussion questions after reading a chapter or chapters. Teachers can choose all or some of them. There are questions that meet English/Language Arts Literacy standards and questions that meet Social Studies Standards as indicated by the Common Core Literacy Standards and TEKS.
13 Colonies Chart
This chart lists the region, the date, and reason for establishment of each of the colonies and has spaces to fill in the colonies’ names. It could be used as a guided reading activity. It could also be used as a check for understanding, guided practice, or evaluation tool. You could also change the chart so that it gives only the Colonies’ names and students fill in the other information as notes during a lecture/discussion or during reading. All of the information is in the novel.
Discussion Activities
HISTORY QUESTERS Colonies Trek or any book is best taught through a variety of educational experiences. Reading and writting activities alone will not provide a rich, interactive educational experience. At least some portions of the novel and the events it portrays should be discussed as a class and or in group settings. The activities provided in the teacher’s guide are designed to guide, facilitate, or stimulate discussion.
Inner/Outer Circle
Once students are familiar with the origins of the colonies and the geographic regions, you may want to go a bit deeper. One way that you can get to the analysis and evaluation level of Blooms is to have an Inner/Outer Circle discussion—especially with older students. Assign 1/3 of your class to become experts on the New England Colonies, 1/3 on the Middle Colonies and 1/3 on the Southern Colonies. (or add a separate group for Chesapeake, if you wish.) These will become the inner circle and will answer the questions and elaborate during the discussion of their region. There are several options for the Outer Circle. You can have them pre-write and ask the questions, or ask for elaboration during the discussion, or just take notes and listen. Even younger ones can do this if you adjust the level of the questions. Even younger students can do this if you ask the questions and make them simpler.
Placemat discussion
A form of group discussion that is interactive, yet quiet is the placemat discussion. Begin by grouping students in threes or fours. Hand each group a discussion mat, which is a large piece of butcher paper divided into four sections. Write an open- ended question in each section. Explain to students that they will answer the question on their section by writing their comments on the butcher paper. After a minute or two have them turn the paper so that they are answering the next question. When each student has answered all four questions, turn the paper again and ask each student to comment on everyone else’s answers. Encourage them to ask new questions and make new observations. You may even want to turn it a third time. Have each student use a different color marker so that you can identify who made each comment. This also facilitates grading. This would work well as a chapter debrief or at the end of the book.
Here are some sample questions using Chapter 7 in HISTORY QUESTERS as an example.
What is the young Scotsman’s attitude toward Native Americans? What caused him to feel that way?
What was Braxton’s attitude toward Native Americans? What caused him to feel that way?
Do you think William Penn followed through on his promise to make Pennsylvania a Holy Experiment? Explain.
What do you think the team learned from hanging out with the Native American boys in Pennsylvania? Would you enjoy spending a day like this?
September 18, 2012
Teaching About the 13 English Colonies
 The Colonial Era is one of my favorite periods to teach. It is so dynamic, with so many forces at play. It formed the foundation on which all of the United States’ history and future is built. It is very important for us to help our students make these connections. In this post I will share some ideas for teaching about this exciting era when all was new in America.
European Colonies in America Time Quest
I think it is important for students to have some context about the competition for American colonies among the other European powers. You probably laid this foundation in your explorer unit, but I wanted to share a new resource that I have found that might be a good introduction and transition from the Age of Exploration into the Colonial Era. It is free online series of interactive maps that span world history called Time Maps. To get a snapshot of Colonial America, I suggest what I call a “Time Quest” activity using the 1648 map of North America. You can give students questions that must answer or a chart to complete as they explore. For example, you might begin by having them click on the New France button. This will take them to a new map with a few paragraphs about what is going on in the French Colonies. Ask them to find out things like where the French settlements clustered; what advantages the rivers and lakes offered, what occupations the settlers took up, etc. Spiral your questions so they include both fact-based and higher order thinking. They can explore Spanish, Dutch, Swedish and English colonies to compare. There is also brief information on what is happening with Native American peoples as they encounter Europeans. A great way to transition to the English colonies is to click on Europe and then England to see what is happening back in Europe.

http://www.timemaps.com/history/north... It
Motives for Colonization
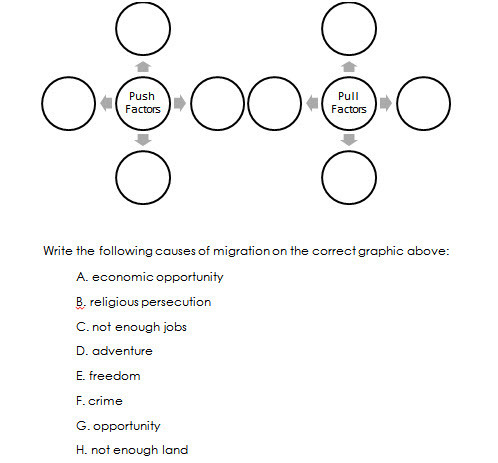
Early in your colonies unit you will probably want to address the motives of England for establishing colonies and the motives of settlers for joining them. I like to begin with a HOTS daily practice on push and pull factors. (See the example later in the post) Then I turn to one of my favorite free online resources, Adventure Tales of American History. It explains in cartoon format the motives of various stakeholders and explains related economic, social, and political conditions in England. I have students work in pairs to complete a chart using this resource. Something like:

http://www.signalmedia.com/adventure3/
Colonies Web
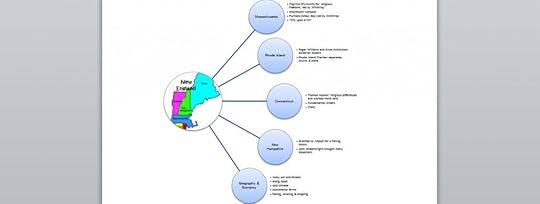
Of course you will want to teach the origins of each colony. There are many ways, but I like to direct teach this in what I call an interactive lecture. This technique combines direct teach with questioning, discussion and sometimes other short interactive interludes. Your students will need to have a way to record the information as you discuss it. I think a web works well for the colonies. If you have a smart board you can make one for it. Otherwise a powerpoint, or even an overhead projector works too. Just make it so that each bullet must be clicked before it shows, or cover them up before discussing each. Here is an example I made using smart shapes in Microsoft word.
PEGS or PERSIA Chart
At some point you will want your students to compare the colonies by region. A very effective way is to have students create either a PEGS (Political, Economics, Geography, and Social) or PERSIA (Political, Economic, Religious, Social, Intellectual and Artistic) chart. For this activity the PEGS works best because you will want to make the point that geography influences lifestyle. This will also lay an early foundation for the sectionalism that leads to the Civil War. There are many resources that students can use to find the information. My novel, History Questers’ Colonies Trek is a fun one that is aligned with the Common Core Literacy Standards. Students can complete the chart while reading an adventure story. All of the historically accurate info is woven in. A PEGS chart will be among the student activities in the Teacher/Student Guide that I am creating to go with the book. I am still looking for a few teachers to “test drive” the book and activities in a pre-publication pilot. Email me at historyquesters@yahoo.com if you are interested. I have saved all of my best activities and strategies for it.
Inner/Outer Circle
Once students are familiar with the origins of the colonies and the geographic regions, you may want to go a bit deeper. One way that you can get to the analysis and evaluation level of Blooms is to have an Inner/Outer Circle discussion—especially with older students. Assign 1/3 of your class to become experts on the New England Colonies, 1/3 on the Middle Colonies and 1/3 on the Southern Colonies. (or add a separate group for Chesapeake, if you wish.) These will become the inner circle and will answer the questions and elaborate during the discussion of their region. There are several options for the Outer Circle. You can have them pre-write and ask the questions, or ask for elaboration during the discussion, or just take notes and listen. Even younger ones can do this if you adjust the level of the questions. Even younger students can do this if you ask the questions and make them simpler.
Reader’s Theatre
You may still down load the Reader’s Theatre and discussion questions that I created to go with the HISTORY QUESTERS Teaching Guide for free. This is an engaging way to teach about colonial-native relationships
HOTS Daily Practice
Here are a few Higher Order Thinking and Skills activities you may want to use to start your class.
Colonial Products Map- see top of page
Push Pull Factors of Colonization
City Upon a Hill Quote

Please share your favorite ideas for teaching about the colonies.
September 12, 2012
Download My Readers’ Theatre About the Colonies Free
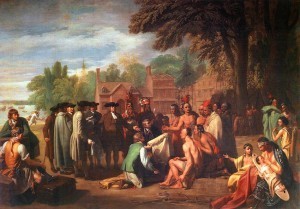
The Treaty of Penn with the Indians.” Painting by Benjamin West, 1771-72. Public domain
My next post will be on teaching about the Era of Colonization. Right now I am working on a student and teacher’s manual to go along with my new novel, History Questers’ Colonies Trek, so I am fully immersed in the Colonial Period. I have created many engaging activities for teaching about the 13 English Colonies. I will save most for the manual, but I want to share a Readers’ Theatre that I wrote based on the novel. Information about it and how to download it for free will be further in this post.
History Questers’ Colonies Trek
First let me tell you a little about the book, History Questers’ Colonies Trek. Though the novel is an exciting story that kids will want to read, it is also designed for classroom use. I am passionate about creating literature that will engage students in history. As a Social Studies Instructional Coordinator for a Texas school district, I (and the teachers I worked with) were frustrated by the lack of time available to teach social studies. I became convinced that an interdisciplinary approach would be the most effective solution. The advent of the Common Core Literacy Standards just reinforced this resolution. So I began a series that includes all of the elements of literature, but also sneaks in all of the social studies content our state required at grade 5 and 8.
The book is still in manuscript form at this time, but I hope that it will be ready for students by next school year. You may read the first 3 chapters by clicking here. However these chapters just set up the story and introduce us to the main characters. I would love to have some pre-release reviews by real teachers, so if you would be willing, I would be happy to e-mail the manuscript. You may contact me at historyquesters@yahoo.com
The book is about a team of four kids who spiral back in time via a Q-pad app created by their teacher, Ms. McQuester who believes in hands-on history lessons. Braxton, the point of view character, is the shy new member of the team. His journey of self-discovery and growth parallels the story of the growth of the colonies. The other members of the team also have well-developed characters with whom kids will relate. There is a lot of team drama along with the drama of the historical events and people the kids interact with.
The kids are supposed to just witness the events, but end up getting quite involved. They visit Jamestown, Plymouth, Boston, Salem, and Philadelphia and have a lot of adventures along the way. Though the story is fiction, the history is authentic and is aligned with the Common Core Literacy Standards, The Texas 5th and 8th grade U.S. History TEKS (which are similar to most states) and the National Council for the Social Studies Curriculum Standards.
Reader’s Theatre
One of the themes of History Questers is the relations between Native-Americans and Colonists. I have condensed 5 scenes from the book and formatted them as a Reader’s Theatre Play that students can perform. It has characters from the book as well as real historical figures, but it can stand alone without reading the book. I have also created a number of higher order thinking discussion questions to go with each scene. The goal is to have students analyze colonial-Native relations from different perspectives. The Reader’s Theatre, which is called The Wampum Belt, is just one of the activities which will be in the Student and Teacher manual. It is copyrighted, but you may download the Readers Theatre , my discussion questions and the key now to use with your students. Please let me know what you think of it– and remember if you would like to preview the entire History Questers, email me at historyquesters@yahoo.com
August 30, 2012
Teaching About Reconstruction After the Civil War
This post is for my friends that begin their American History course with a Reconstruction Unit. I will share lesson ideas that I used during my years of teaching Part 2 of U.S. History and in my AP class. In my Part 2 U.S. History classes, it had been several years since students had taken the first half of U.S. History in 8th grade, yet at that time in Texas they were still tested over it in 10th and 11th grade. Even though this has changed with our new end of course test, I still might consider starting with a quick review of early American history. If you would like to begin with a review, here is a fast and effective way to do it. In fact it is a way to cover any large chunks of content fast and effectively. It is a combination of a jigsaw, learning center and carousel activity.
Review of American History Part 1: Learning Center Carousel
Begin by dividing the material to be covered into categories. In this case, I divided it into historical periods, such as Colonial, Revolutionary, New Republic, Age of Jackson, Manifest Destiny, Coming of the Civil War and Civil War. You can divide it by chapters if you would like your text book to be used as your primary resource. Assign a group of students to each era (or chapter, or category…) Provide the group with a list of topics that must be covered in each era and the requirements for the project, along with a grading rubric.
Each group was required to create a display on a standing tri-fold project board. This display was to be a learning center for the rest of the class. My list of expectations for the display included the use of at least one primary source; a variety of images including maps, charts, and graphs; terms and definitions; important people; and a list of causes and effects; Students were required to tell the story with these elements and organize with headings, captions and subtitles. They were also required to write 10 questions that could be answered by reading through their whole display.
The next step was the carousel activity. The Learning Centers, with their questions, would be numbered and positioned around the room. Groups would begin by standing at the display to the right of theirs. At a signal from the teacher, the groups would collaborate to find the answers to the questions. At the next signal they would advance clockwise to the next learning center, and so on until they had visited each. After the carousel have groups exchange their papers with another group to check. This is the opportunity for the teacher to also review and emphasize major themes.
Diary of a Freedman, Former Confederate, Carpetbagger, etc.:
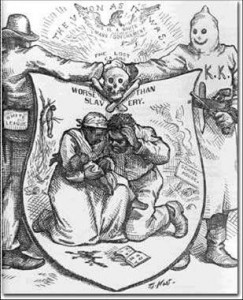
To understand the perspective of the participants of an event, I like to have students role play. I make a list of terms that I expect to be used correctly in each diary entry and assign a role to each student. Examples of terms to be used include, sharecropping, KKK, Freedman’s Bureau, 14th Amendment. Compromise of 1877, etc. Students write 3 entries, one immediately following the Confederate surrender, One from after Radical Reconstruction begins, and a final one in 1877 after Reconstruction ends. Entries correspond with the sections of the text they must read for information. Have a volunteer from each role and entry read their journal aloud.
Inner/Outer Circle:
Another role playing activity I have tried with good success in the Reconstruction Unit is the Inner/Outer Circle. I assign students to one of the following roles: a Moderate Republican, a Radical Republican, a Johnson representative, a southerner, or a freedman. I assigned each group relevant pages to read and take notes to simplify, and I wrote the questions to ask to simplify as this is likely the first graded class discussion of the year. However you could have students read the entire chapter/s and write questions for each group.
One group is then called to the Inner Circle. Here they will discuss the open ended questions that I (or other students) ask. For example, one question I might ask a southerner is: What problems do you face now that the war is over? Or a Radical: How do you think the seceded states should be treated? The outside group can take notes and ask follow-up questions until their turn to be in the inner circle.
A Silly Song to Remember Reconstruction Amendments:
Strangely enough, one of my first strategies that went viral across the district when I was teaching was a silly song I made up to remember the Reconstruction Amendments. These were always tested on our state test and students had trouble remembering which was which. I always laughed when I saw students hum it to themselves during the test. I am almost embarrassed to share it, but here goes. It is to the tune of Three Blind Mice. “Free Citizens Vote, Free Citizens Vote, 13th 14th 15th, Free Citizens Vote.”
Kids thought it was silly and so did I, but that is part of its charm—and it works. Kids can remember that the 13th freed the slave, the 14th gave them citizenship, and the 15th gave them voting rights.
Pros and Cons of Reconstruction Debate:
Okay, so now something a bit more serious—a debate on the effects of Reconstruction. I had students draw one of 8 thesis statements (see below) and research facts to support it. Of course you could choose fewer. They would the debate the students who had drawn the counterargument. After the debates, I asked all students to rewrite a new thesis statement for each pair of arguments, based on their more complete understanding. For evaluation, I would have them write an essay supporting one of their new thesis statements.
Reconstruction created a more politically equal society.
Reconstruction failed to create political equality.
Southern Reconstructed governments boasted many accomplishments and had a positive impact on America.
Reconstructed governments in the South were ultimately failures.
Emancipation achieved the Radical Republican goal of integrating African Americans into society both economically and socially.
Emancipation failed to integrate African Americans economically and socially into American Society.
The job of Reconstruction was complete by the end of the 1870’s and the country needed to move on to other issues.
Northern Republicans brought Reconstruction to a pre-mature close and abandoned the South.

Plans of Reconstruction Chart:
During a lecture/discussion of Lincoln’s, Johnson’s, Congressional under Wade-Davis Bill, and Radical Republican plans of Reconstruction students will complete a chart:
Plans of Reconstruction Report Cards:
After the lecture, discussion or reading comparing the plans of Reconstruction, have students grade each plan on the four criteria listed in the chart above and make comments.
Johnson Administration Flow Chart:
Have pairs of students copy events (see below) of Andrew Johnson’s administration on individual sticky notes (but give them in a scrambled format to copy). Then have them place them in correct chronological order on their desks. You can make it a contest to see which group can get it correct first. During discussion, students can copy them correctly as a flow chart for their notes.
Johnson implemented a lenient plan.
New Southern states passed Black Codes.
Radical Reconstruction began as military rule was established in the south.
Radicals passed the 14th Amendment.
Johnson vetoed the Radical plan, but Congress overrode it.
Radicals passed the Tenure of Office Act.
Johnson defied the Tenure of Office Act by firing Secretary of War.
Hose voted to impeach Johnson.
The impeachment vote was 1 less the 2/3 required, so Johnson retained his office.
Grant won the Election of 1868.
The 15th Amendment was passed.
HOTS (Higher Order Thinking Skills) Daily Practice

August 23, 2012
Teaching the Age of Exploration
The Age of Exploration…oh such a big topic and so little time to teach. Most scope and sequences don’t provide for a lot of time-or a lot of depth on this subject in American history classes. Fortunately it is also taught in the World history curriculum so the burden is split. In this post I will share ideas that can be used in both courses at the middle grade and high school levels, and sprinkle in some tips and resources for elementary.
Video Viewing Guide
One approach is to combine the study of Pre-Columbian America, 15th century Europe, and even Africa, in a unit entitled something like Three Worlds Meet, or the Old World Discovers the New World. In my AP classes which gave very little time for the period, I could do this fairly quickly with a DVD entitled Three Worlds Meet (Origins to 1620). This costs about $40 or can be purchased as a set, but I thought it worth the splurge of our limited social studies budget. In 35 minutes it provides a pretty good overview and background of the era. I created a fill-in-the-blank viewing guide that students would complete while viewing. Click here to find it. This served as the basis of their notes which they could augment during the follow-up discussion. In fact I made guides for most of the series. If you ask for one in the comments section, I will be happy to e-mail it to you.
Model and Trace Explorer Routes
To teach about the explorer routes a good method is to have students trace them on their own map as part of an interactive lecture. This strategy works well for visual, auditory, and kinesthetic learners. The teacher discusses the expedition and models the route on a smart board, overhead… while the student draws the route on his own map. You can use different colors for each nation and make a key. I would also have them color the areas controlled by each nation, as well. Besides having students label the routes, I would have them write the names of each explorer on the back along with basic info about their discovery.
Interactive Explorer Maps
There are sites that offer interactive maps that show explorer routes. One good one is here.
Newspaper Article on Discovery
A good strategy to use when teaching about specific explorers is to have students write a newspaper article about his discovery. While reading an article about the explorer, have students take who, what, when, where, why, how notes. Then they will use their summarization to write the news report about his discovery. You can have them add a quote from a primary source such as Columbus’ Journal or letter to Luis de Santangel (1493) as if it were from an interview. Have them draw a picture or add an image and format it like a newspaper with a headline. For older students you can assign different topics to different students and combine them to make a group or class newspaper of the era.
Interview with Explorer
Assign a different explorer or other relevant person (such as Prince Henry, Queen Isabella…) to each pair of students. As they research or read their text, they will format questions that can be answered with their information. For their presentation one partner will role play the explorer and the other the reporter.
The Spanish Legacy Debate
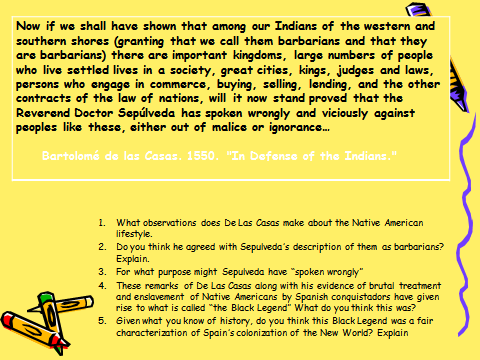
Divide students into two teams. Have one side argue from the perspective that Spanish colonization had a positive benefit while the other will argue the “Black Legend” perspective. They should prepare by researching internet sources including primary sources of Juan Gines de Sepulveda and Bartolome de Las Casas. Here is one abbreviated version.
They should include a discussion of Native American treatment, the Columbian Exchange, and the successes and failures of the Spanish Empire. Finish by making a chart of both the positives and negatives of the Spanish Legacy.
Explorer Skit or Readers Theatre:
You can have groups of students write their own script to perform for class about event of the era. There is one already written for young students called The Discovery of the Americas: A Play About Early Explorers
Columbian Exchange
Assign half of the class to bring something to represent an item from the Old World list and the other half to bring something from the New World list. See the chart in the HOTS section below. Include foods, stuffed animals, or pictures. Have each student bring their item to the table and explain how that item helped (or in case of disease, changed) the other half of the world.
IPad game
European Exploration: The Age of Discovery By GAMeS Lab at RU Explore the new world as a European power in the 15th Century by funding and sending expeditions out into the unknown. Hire captains, build ships and outfit expeditions…
Age of Discovery Cause and Effect Manipulative
Teach students about the background of the Age of Discovery as a cause and effect exercise. Hand students one or two sentences from the list of causes shown below written on a sticky or strip of paper. Working alone, or in pairs have them add the word therefore or so and complete the sentence with what it led to. Do a round robin to discuss each. You can follow up by having students place sentences in categories as follows: Power, Knowledge, Religion, Trade, Wealth. Make it a manipulative by having students move the sticky not sentences or strips to the appropriate heading. Some can fit in more than one category, so this can lead to a discussion about why.
Marco Polo’s tales of China created curiosity about the Orient.
During the Crusades many Europeans explored the east.
Europeans desired products from Asia, Africa, and the Indies.
The Commercial Revolution created a desire for international trade.
The Renaissance reawakened the desire to know about the world.
The invention of the printing press spread knowledge.
New navigation technology was invented.
Advances in ship design made them faster and safer.
Prince Henry of Portugal started a school for sailors.
Centralization of power and strong monarchs created more powerful European nations.
Overland trade routes across Asia were dangerous and expensive.
Columbus believed it was possible to reach the east by sailing west.
Italy had a monopoly of the Mediterranean Sea routes.
Portugal had a monopoly of sea routes around Africa.
Queen Isabella and other monarchs wanted to spread Christianity.
Conquistadors gained great wealth for Spain.
European powers wanted to maintain a balance of power.
The New World provided an abundance of natural resources.
England, France and the Netherlands wanted to find a Northwest Passage through the American continents.
HOTS Daily Practice
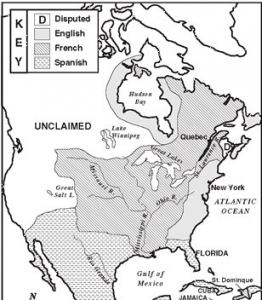
If you have read my previous posts, you know that I like to start each day with a warm-up to practice social studies skills. Here are some samples for the Explorers Unit for various grade levels.
1. Which 2 countries claimed modern Texas?
2. What 2 nations claimed modern Canada?
3. Which country claimed the area around the Mississippi and St. Lawrence Rivers?
4. What geographical barrier separated the English and the French claims?(the answer is not on the map)
5A. Which nation claimed the most territory?
B. What are the advantages and disadvantages of such a large land claim?
6A. What nations might the English colonists have conflicts with?
B. What might be the reasons for conflict?
Sunday 4 November
… The Admiral showed cinnamon and pepper to a few of the Indians of that place… and he says that they recognized it; and they said by signs that nearby to the southeast there was a lot of it. He showed them gold and pearls, and certain old men answered that in a place that they called Bohio there was a vast amount and that they wore it on neck and in ears and on arms and legs; and also pearls.
– From the Journal of Christopher Columbus
1. The passage is from the journal of Christopher Columbus. A journal is called a ____________ source.
2. What are some other examples of this type of source?
3. Why do you think Columbus called the Native Americans “Indians” in his journal?
4. Why do you think Admiral Columbus showed the Indians cinnamon, pepper, gold and pearls?
5. How well does it appear that Columbus and the Natives got along, based on this journal entry?
August 16, 2012
Teaching About Pre-Columbian Native American Cultures
It’s time to plan that first social studies unit. Some of us have the lesson plan pretty much handed to us by the state or district, and told not to veer off of it. Others are given standards as guidelines, but are left to our own creativity and students’ needs to determine how we will teach them. Some of us fall in between. If you are in the first group, you’re probably not looking for new ideas, but if you are in the later groups—this blog’s for you.
On this post I am going to share ideas that are specifically geared to teaching early U.S. History in the Middle Grades, although the strategies will work for other subjects and grade levels. Future posts will discuss planning for U.S. History starting with Reconstruction, World Studies, and Elementary Social Studies.
Some states start with Pre-Columbian Native American cultures; others begin with the Age of Exploration. Many states (and AP) aren’t giving a lot of time for either anymore and give more emphasis to the Colonial Period. If you have a week or so to spend on the Pre-Columbian Era, here are some ideas. If you start with the Age of Exploration, or combine the two eras, watch for my next post.
Group Research:
I found that the most logical way to teach about Native American cultures is to divide students into groups each assigned to research a culture region. This also provides an opportunity for your students to practice your cooperative learning procedure early in the year. Provide groups with a list of topics to research, such as: geography, food, shelter, government, beliefs. Let groups appoint a member to research each topic. If time is short you may opt to have students read a portion of their text or other article in lieu of more detailed research. There are many options for sharing the information with the rest of the class. I think the least effective and most boring way is to have them read it to the entire class. Following are some of my favorite alternatives.
Jigsaw or Tribal Council:
After students have researched their assigned topic, have them share the information with the other members of the group in a Tribal Council. Each group member should fill in a chart or other graphic for notes. To make sure their chart is accurate, each member should compare with the rest of the group. If you wish, you could then hold Inter-tribal Council meetings where groups are rearranged so that there is a representative of each culture region in each new group. These members can then share all of the information from their group’s chart with the new group, who will fill in the information on a new chart for each region.
Learning Center Carousel:
This activity can be done with the Tribal Council portion of the above activity, or without it. After students have collected their information, they will design a project board (3-ply standing poster-like used in science projects) display. Make sure they use headings to make it easy to follow. I also ask my students to include a variety of visuals such as pictures, maps, graphic organizers. Provide clear guidelines of your expectations and a grading rubric.
After completing their display, groups should write 10 questions that can be answered by their display. Make sure they also provide a separate answer sheet.
When all displays are complete, number them and display them around the room. Place the questions next to them (numbered to match the display). Have each group move to the display to the right of theirs. Give them a limited amount of time to examine the display and work together to answer the questions. Use a signal to move groups clockwise to the next display, where they will answer the questions about a different region. Continue until they are back to their own display. You may allow them to answer their own question, especially if they have not previously shared their topics within their group (as in the Tribal Council).
I like to make the carousel activity a contest to see which group gets the most correct answers. The prize can be bonus points on their project. I have them exchange their papers with another group to check as we go over the answers as a class. This also provides an opportunity for a debriefing discussion in which you can emphasize the “big questions” of history such as: How does geography impact culture, and How do different groups govern themselves…
Shadow Box or Model:
Younger students might like to make a shadow box, or model village to represent the cultural group they researched. Ask them to create the environment in which they lived. Have them add their homes, maybe some animals they hunted, or crops they grew if they were farmers, and other things to represent their culture. They can display these along with a report if you wish, or they can show and tell. You will want to follow with a discussion of how the groups were different and why, emphasizing the interaction of environment and culture. You might also have them compare the lives of Native-Americans a long time ago with today, or their own lives, to exemplify the concept of change over time.
Foldable:
Another option for younger students is to make a foldable to illustrate the various groups. A tab style book works nicely. Have the student label each tab with a different Native American area and draw their house or type of environment on the cover. When the tab is lifted they can have a picture showing them hunting, gathering or farming, or another aspect of their culture. Or they could each make a more detailed foldable showing more aspects of one culture. Then they can be put into groups with students who were assigned the other cultures. They can show and tell their group members about the culture they studied.
Daily HOTS:
Before starting class each day, I had my students do a warm-up activity related to the topic to exercise their HOTS (higher order thinking skills). These were usually an analysis of a primary source, map, graph, chart, etc. In a unit where group work is the primary mode of information input, it is especially important to add activities that foster discussions of other relevant topics. Your textbook or internet sources are good places to start. Look for something that spurs your students to learn concepts that may not be included in their cooperative learning activity.
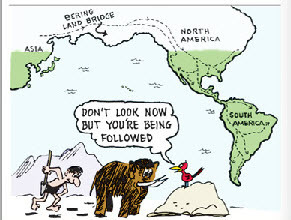
To teach about migration, I use the Bering Strait map. Most textbooks have one, or there are many on the internet. The one below comes from the free flipbook of Adventure Tales of America. It tells the history of the U.S. in cartoons. It’s a great resource!
Ask questions from lower to higher levels of Blooms like the following:
Where did Native Americans originally come from?
How did they get to North America?
Why do you think they came?
When do you think this happened?
Why do you think many continued migrating south?
Where would you have chosen to settle? Why?
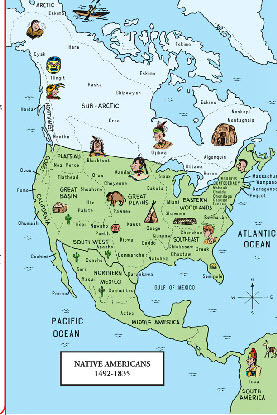
Here’s another one that you can use to introduce the cultural regions
Why do you think these areas of Native Americans were called Pre-Columbian cultural regions?
Name the Pre-Columbian cultural regions you see on the map.
What do you notice about the pictures on the map?
What do the pictures tell you about the cultural differences among Native American groups?
Which area would you choose to live in if you were a Pre-Columbian Native American? Why?
How do you think their way of life changed after the Europeans came ?
What are your favorite ways to teach about Native Americans?
August 7, 2012
First Day of School Lesson Ideas

The first day of school. Do you still get the tingles when you think of it? I bet your students do. You want to set just the right tone for the fresh new school year. You want to keep that excitement alive in your students. You want to let them know yours is a classroom that will be fun—but still values learning above all. So what do you plan? You probably want to start with an ice-breaker to get to know each other, then find an interactive way to get into the curriculum as soon as possible. In this post I will give some tried and tested ideas to do both in the first few days.
Sponge Activities to Get to Know Each Other:
Most of the time you have a certain amount of administrivia to deal with that prevents you from spending the important first moments of class interacting directly with your new students. If this is the case, make sure you greet each one warmly at the door and then set up a sponge activity while you take care of the enrollment procedures. Join them as soon as possible.
Partner interview: Find a fun way to pair students. For U.S. History, I use states and capitol cards that I make myself. Students have to find the person who has the capitol that matches his state. Have the pair interview each other and take notes. You may want to list a series of possible questions on the board for them to ask. Following the interview have each student introduce his partner to the class and tell some things about him. You might ask the partner to create a web about the person he interviewed or something else to show during his introduction.
Scavenger Hunt: Prepare BINGO-like cards with a description in each square. Include things like: has visited another country, hates their middle name, plays an instrument, etc. Give each student a card. They will mingle with each other and find people that match one of the descriptors. Once they find a match, they write the person’s name in the appropriate square and go on to find another match. They can write each person’s name only in one square. Play until they have a BINGO or black-out, depending on how much time you want to spend.
Concentric Conversation Circles: Have students form an inner and outer circle that faces each other. Explain that the outer circle will rotate around the inner circle at the signal. Demonstrate the half-time and time to move signal. Present a question that will be discussed by the two students facing each other. Allow 20 seconds or so for the first person to respond to it then sound the half-time signal indicating that it is the other person’s turn to answer. The half-time signal can be left out if you prefer a less formal conversation. After about 45 seconds sound the signal to move and have the outer circle rotate so they are talking with a different inner circle person. Provide a new question or discussion starter. Continue rotating as long as you wish.
Take Off/Touch Down: The teacher makes a statement such as, “I took a vacation this summer”. All students to whom the statement applies stand up (take off). Those to whom it does not apply remain seated (touch down). When teacher makes next statement, such as, “I love social studies” those to whom it applies take off and those to whom it doesn’t touch down. Hopefully no one will touch down for this question.
Learning Style Inventory: If students need to do something quietly at their desks a good first day activity is to have them take a learning style inventory. This can help you know how to better plan for them and help them gain insight into themselves. There are many available on line.
KWL About theTeacher or Class Chart: Another activity that works well while you are taking care of the administrivia is to have students complete a chart about what they already know about you or your class and what they would like to know. This can be a springboard for you to introduce yourself and your class to them.
Getting into the content:
If you are like me, you want to get into the content as soon as possible. We all know there is never enough time, so I like to introduce procedures with the content as much as possible. Here are some ideas to get started.
Group Brainstorm: You can introduce your group work procedure and have small groups work together to brainstorm answers to a series of introductory curriculum-based questions. Here are some that work well for upper grade history classes. What is history? What do we study when we study history? How do we find out about what happened in the past? What do you think were the 5 (or 10) most important events in U.S. (or world) history? Rank them in order of importance and discuss why you chose them. Who were the 5 (or 10) most important people in U.S. (or world) history? Why did you choose them? List as many reasons as you can think of as to why it is important to study history. You can make that last one a contest to see which group comes up with the most reasons. The debriefing for this activity provides a good springboard to introduce your course.
Seating Chart Map Grid: By the second day you probably have your seating chart made. Why not put it on a grid and make it like a map of the room? Tape off and label longitude and latitude lines on the floor. You can post the map, or hand it to the students when they arrive and have them find their own seats using the coordinates. Of course this only works as a review if students have been taught the grid in an earlier grade. If you want to wait until you have had a chance to teach it first, you can do this later in the year w,ith a new seating chart. Then you can do a lot more guided practice with directions and coordinates. Kids love maps that they can move into.
Class Preamble: My favorite way to introduce the class rules is to have the students write a Class Preamble. I begin with a short discussion on the purpose of a government and why society makes laws (rules). Then we read the Preamble to the U.S. Constitution, clarifying the vocabulary and discussing its meaning. Next I explain that we will write our own Preamble for our Class Constitution. I then put students into groups to write a version. I provide the following template for them to complete in their own words:
We the students of Ms. Collett’s U.S. History Class, in order to__________________________________, establish________________________________, Insure_______________________________, Provide_________________________________, Promote_____________________________, and secure_______________________________,
Do ordain and establish this Constitution for the class in room 216.
You may also have them write class rules if you like. It is amazing how well they can do at that. After the groups have finished their versions, I have them write them on their Preamble on the board, or overhead. After the class has looked over each version, I allow them to vote on the one they prefer. If you have more than one class, simply write the version chosen by each class and then have an election among all your classes to choose the final version that will hang in your room. I write it in calligraphy on parchment colored paper in the shape of an old document.
If you have them also write rules, you can have them list their rules on the board, too. Many will be similar, so vote on the best wording, while erasing the rest. This activity opens the door for a quick discussion on democracy and representative government. Explain that you will have the final veto power over the rules, and that they are subject to being overturned by the school administration, thus introducing the 3 branches.
Thinking Like a Historian:
This activity comes from the Introductory Unit of the Reading like a Historian curriculum developed by the Stanford Education Group. I love this curriculum for U.S. History! It turns students into historical investigators and critical thinkers using primary source materials. Best of all it is free! There are 13 Units with several activities for each. This one is called Snapshot Autobiography. More details, worksheets and posters can be found at their website.
Students begin by creating a pamphlet about themselves. They write about 3 or 4 key events in their life and illustrate them. For homework, they choose one of their snapshot events and interview another person who was a witness to the event. The student takes notes of the interview and identifies similarities and discrepancies. Debrief the activity with a discussion of historical perspective.
What are your favorite first week activities? Please share in the comments section.
July 30, 2012
Classroom Management: Planning for Success
 A new school year approaches. The classroom is arranged and decorated. Teaching materials are chosen and prepared. Class rolls are run. Exciting lesson plans await. All is ready for a successful year, right? Well, maybe…maybe not. All of the aforementioned preparations could still go bust if classroom management is not well planned.
The best teachers know that a well-behaved and fully-functioning classroom generally doesn’t just happen—it is planned…and it is essential! Based on a review of 11,000 studies spanning 50 years, researchers determined the most important factor governing student learning is classroom management. (Margaret Wang, Geneva Haertel, & Herbert Walberg, 1994)
Classroom management is not synonymous with student discipline. Classroom management is proactive. It is planned. It is not a reaction to a negative student behavior; it is rather a system that the teacher plans and puts into place to assure positive student behavior. It’s all the things a teacher does to organize students, space, time, and materials, so that student learning can take place. A classroom management system shows students that the teacher values their instructional time and has a plan to optimize it.
A google search results in thousands of articles and books on classroom management, attesting to its importance. In this post I want to share some practical ideas that I share in new teacher workshops in honor of my daughter’s first teaching assignment and the beginning of a new school year.
Set Expectations
Communicate high expectations for behavior and enforce them consistently.
Set Classroom Rules
Determine critical ones
Limit number
State desired behavior
Make them reasonable
Plan Consequences
Plan a variety of both positive consequences to reward compliance and negative consequences to correct inappropriate behavior.
Put them in a hierarchy from minor to major
Post and clearly explain them. (Share them with parents)
Let the “punishment fit the crime”
Enforce consistently
Enforce fairly
Plan and Teach Classroom Procedures
Having systems and procedures in place ensures smooth transitions and optimizes instructional time. Transition times are the most likely breeding grounds for mischief if they are not well-organized. A wise teacher pre-plans procedures for the start of class, transitions between activities and for the close of class and trains students to follow them.
Have warm-up activities ready when students arrive to prime the pump for learning while you take care of administrative details.
Plan procedures for dealing with the administrative details (i.e. attendance, assignments, etc.)
Plan and practice group work protocols
Create a system for distributing materials
Teach students your expectations for way they should participate in class discussions, get out of their seats, take care of personal needs, move to a center, etc.
Plan Engaging Lessons
If students are actively engaged in learning, they will generally not be off task. See my post on student engagement for more ideas.
Plan for Extra Time
Nothing creates a stronger opportunity for misbehavior than a vacuum. Strong teachers teach from bell to bell. It is an indication that you value your student’s learning. Always plan too much rather than too little. You might occasionally use a free student choice activity as an incentive, but down time is often the devil’s playground. For this reason, have some anchor activities ready that students can do if they finish early, or if you are called out of the room.
Plan the Physical Environment
Optimize your use of space to facilitate traffic flow
Arrange seating so that you can “work the crowd” and easily reach all students.
Arrange room so that it easily transforms from independent, to group, to whole class instruction.
Make a seating chart to assist you in learning names
Rearrange seating chart to re-group students as you know them better-for both educational and classroom management purposes.
Use bulletin boards and wall space to maximize learning (word walls, etc.) and to reinforce procedures (VIPs: Visual Instructional Posters)
Plan and Create a Supportive Learning Environment
The way students perceive their teacher (and believe their teacher perceives them) plays a significant role in the way they behave, as well as in how much they learn.
Create a culture of:
Success (“You can do it”; “Great job” messages)
Safety (“It’s ok to try and fail”, “Don’t’ give up” messages)
Caring (“They don’t care how much you know until they know how much you care”)
Valuing Education (“We have important things to learn so we can’t waste time” messages)
Respect (“Bullying will not be tolerated”; Everyone is valued” messages)
Do Not:
use sarcasm
degrade student
embarrass students
nag
send “you are a failure” messages
Do:
be proactive
be consistent
be fair
be reasonable
be kind
be calm
be flexible
be fun
Plan for Student Academic Success:
Students who are not successful in academic activities often become frustrated and act out. This is obviously a whole new topic but here are some simple things to remember:
Teach to a variety of learning styles
Differentiate
Give very clear directions
Teach in steps
Check for understanding frequently
Group appropriately
Practice Seasoned Teacher Behaviors:
With-it-ness: be aware of what is going on in all parts of the room with all of your students
Work the Room: Use proximity or eye contact to communicate with students that you know what they are up to. Don’t interrupt instruction or have a confrontation, just use “the look” or move closer. If necessary place a gentle hand on their shoulder.
Positive reinforcement and praise.
Behavioral prompts: tell students your expectations before beginning each activity.
Corrective Teaching: “This is what you are doing…, A better choicewould be…, because…”
Allow choices: “Would you like to work by yourself or with a partner?”
Allow a cool-off period in emotionally intense situations: “I know you are upset right now. I’m going to give you a few minutes to calm down”
Use empathy and reality statements to deal with back talk: “If you continue, I’ll have to…, I know you may not see the value of this assignment, work on it now and we can talk more about it after class.
Privately discuss behavior issues with student.
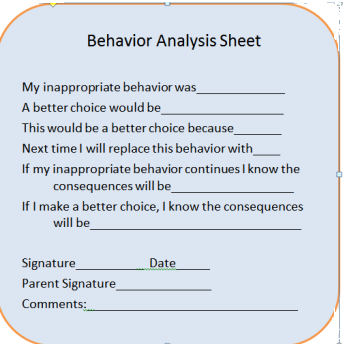
Use a Decision Analysis Sheet after a severe rule violation to help student adjust future behavior such as the one below.
What are your best strategies for classroom management? Please leave a comment below.
July 20, 2012
Higher Order Thinking Skills: HOTS Daily Practice Activities
 Analyzing primary sources and documents, making inferences, determining cause and effect, interpreting maps, charts, graphs, etc., making comparisons, drawing conclusions, critical thinking, decision-making, forming generalizations, supporting with details and fact, determining facts vs. opinion, summarization, research, organize knowledge…
Higher Order Thinking Skills are the core of what Social Studies teachers teach. We do so much more than teach historical, geographic, political, or economic facts, don’t we? We teach our students how to think about their world. Our discipline is devoted to Blooms taxonomy. This also makes Social Studies and English/Language Arts natural allies in the battle for literacy. We share many curricular goals. Not to mention that the common core standards and most state standards focus on these skills- and state assessments increasingly test them.
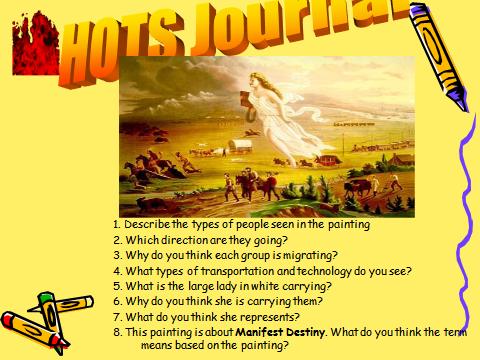
It is essential that we emphasize these Higher Order Thinking Skills in our classrooms. In this blog I would like to share one of my favorite strategies for teaching them. I called it the HOTS Journal, but these daily warm-up activities, or bell-ringers could be done in a variety of formats and for different social studies subjects and grade levels. The basic goal is to begin each class (or at least several times a week) with an activity relevant to the day’s learning goal, which practices one or more of the above skills. This activity can then be the starting point for the lesson of the day.
The activities generally featured a stimulus such as a portion of a primary source, document, map, cartoon, photograph, graphic organizer, etc. relevant to the lesson. I frequently used a stimulus from a released state test (such as Regents or TAKS). There are many sources for images on the internet (see my resource page) or even choose something from your textbook. I liked to create them on PowerPoint so that I could project them. This also allowed me to create some fancier things, such as conversation bubbles for photos, or allow students to resort pictures into correct column, or make an answer page showing answers placed one at a time on a graphic organizer.
The students would respond to a series of questions about the graphic that would range from lower to higher levels of Bloom’s. Sometimes that might create a graphic organizer or some other product based on the stimulus. Sometimes they were brainstorm activities. Sometimes they filled-in-the-conversation-bubbles on a photo. Sometimes they answered personalized what-would-you-do questions. On some occasions they would work with a partner.
One key to success is to create questions that start as simple, fact-based, then move up the ladder to more analytical and evaluative questions that ask students to think about and make decisions about the facts. Another key is to use variety-in terms of the student product, the type of stimulus and the skill that is practiced.
In my class, we went over the HOTS activity each day to assure that the students learned and understood the concepts and skills. Frequently I had students model their thinking as they answered. My students kept their responses together in a section of their notebook that I called their HOTS Journal. I collected them periodically for a completion grade. This was an easy way to hold the students accountable, but the most important thing was the daily practice of skills.
I saw my student’s scores skyrocket on standardized tests. This strategy was also very successful when, as District Social Studies Coordinator, I initiated it among the teachers of my district. It works well with grades 4 -12. For younger grades, I would encourage a modified version. Even the younger students need to be introduced to interpreting and analyzing graphics and primary sources, as well as the Higher Order Thinking Skills.
What strategies do you use to teach Higher Order Thinking?
July 9, 2012
Teaching Resources for Social Studies in the 21st Century

20th Century Classroom
This graphic picturing the 21st Century classroom got me thinking about all of the resources we teachers have available to engage our 21st century kids…So I made a list of my favorites. You can find the whole list on the Teacher Resources page, but I will highlight a few here. Some are very techie and some are not. It’s not the tool that matters most, though–it’s the way that it’s used that determines how successful it will be with our students.
ONLINE TOOLS: Web 2.0
While many teachers eagerly test out the latest gizmos and gadgets, wickis and vokis with their students, others are so overwhelmed with all of the technology out there that they fear immigrating to the digital age in their classroom. Reminds me a little of the quote about westward migration, “cowards never started and the weak died along the way.” Luckily we digital immigrants aren’t left in the technological wilderness without guides. There are many free tools online and places that offer advice. My favorite places for help are EdTechTeacher and Edudemic. Both explain the tools and give examples of how to use them in your classroom. We know that technology in and of itself tends to engage our digital natives, but it is sooo important to use these tools in ways that stimulate their higher order thinking.
APPS
IPads are becoming so popular that we educators can’t overlook their value as a teaching tool. Angela Cunningham has developed a LiveBinder of terrific iPad apps for social studies. Many can be downloaded free. One of the newest that excites me is The Flow of History. It contains hundreds of historical flowcharts with links and explanations. It is great for teaching cause and effect and making historical connections. We can even encourage student learning during play time with educational games. A good free one about the Exploration in the 15th century is European Exploration: The Age of Discovery.
Social Studies Weekly
One of my favorite social studies resources for grades K-6 is more traditional, though you do get an online version with your subscription. It is a full-colored newspaper from Studies Weekly that is customized to your grade and state standards. Each student gets 28 newspapers a year, each full of articles, primary sources, graphic organizers and activities that match your scope and sequence. It costs about $5 per student ( with a purchase of 10 subscriptions- more if you need fewer) but I think it is a real bargain (I don’t get paid for recommending this, by the way). It is a great way to teach social studies with English/Language Arts in an interdisciplinary fashion. There are so many activities that can be done with the readings. The teacher’s guide has lots of ideas. You can get information and free samples of the first quarter’s papers from their website.
Adventure Tales of America
This is the story of American history told in cartoon illustrations written by Professor Jody Potts based on the right/left brain theory. It is probably my all time favorite resource. When I taught sheltered ESL 8th grade history umph…years ago, I used it daily. The concepts were so well put together, that I even later used it in my AP classes for occasional graphic organizers. As district coordinator, I bought sets for our 5th grade teachers and they loved it. There’s also one about the Constitution.
The bad news is that it’s no longer available for purchase in textbook form. But the good news is that it is now online…and the great news is that it’s free! You are allowed to print out copies, or more realistically, pages for individual or group activities, or project it for whole class activities. Here’s a sample page.

The First Americans: Prehistoridc Adventurers
Just think of the possibilities for using this resource with your students! Here are a few ideas that came immediately to my mind:
A small group could use it as the basis of a skit.
They could make a chain of events, or match causes with effects.
They could brainstorm the geography that would host each of the dwellings and what people might eat and wear there.
They could form a theory about what happened to the Anasazi and then research to see if they were correct
They could make a timeline, or a map, or a………
How might you use this sample with your students?
What are some of your favorite teaching resources to share?


