
Cecilia Tan's Blog, page 35
December 27, 2012
What if there was NaNo specifically for erotic writers? Hmmm…
Okay, we’re doing it! Organized Advanced Smut-writing Month (OrgASM) is happening Jan 1st through Feb 14th!
What is OrgASM? Organized Advanced Smut-writing Month (OrgASM) is kind of like NaNoWriMo, except each participant sets their own goal (novel? 2 short stories? post in your WIP every week? do a kink meme or fest? pro fic or fan fic welcome…) so long as the writing is erotic or about sex! All those who self-report as winners/having reached their goal will get an ebook of the new anthology Fantastic Erotica and a $25 gift certificate for any ebook(s) sold through circlet.com! Anyone who wants to work on an erotic writing project can join–you don’t have to be a previously published author, nor have any connection to Circlet Press.
Signups are going on now, and you can start posting your progress anytime between January 1-14. The challenge runs until Valentine’s Day, February 14th, so your “month” can be from Jan 3-Feb 3, for example. Totally up to you! Links and details below the cut:
The “advanced” part of the challenge is that what you are writing should be intended for publication/posting somewhere. Even if it’s fanfic, you should share it with the world when it’s done.
Signups and progress posts should be made in our Livejournal or Dreamwidth communities (ideally both, since LJ has been flake-tastic lately).
http://orgasm-circlet.livejournal.com
http://orgasm-circlet.dreamwidth.org/
The posts in the comms will be visible only to members of the comms, so please do post your progress, excerpts, rough samples, whatever you like, and please do give feedback and encouragement to others who post.
I’ll be participating as I try to finish the novel I have in progress right now, Slow Seduction, which is the second in my “BDSM billionaire” trilogy for Grand Central Publishing. Can’t wait to see what other folks are working on!
Please do spread the word, the more the merrier!


November 24, 2012
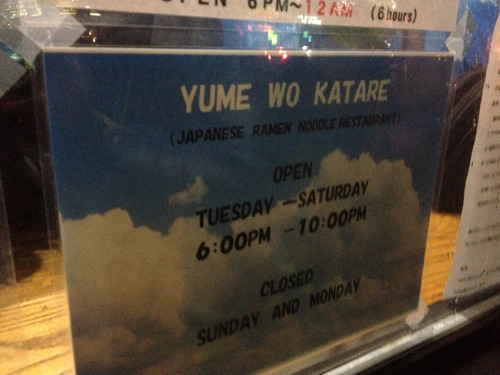
Yume wo Katare – New ramen shop in Porter Square (review)
Is it possible to actually experience a physical high from pork fat? Or maybe from alkaline-based noodles like ramen? Because I’ve now been high twice from ramen. No, wait, three times. The first time I had the ramen at Momofuku Noodle Bar in New York City I think I experienced this also. That was a chicken ramen.
What they serve at Yume wo Katare (“Talk About Your Dreams”) is not. It is the essence of pig distilled into one giant bowl of goodness. Have you ever had whole roast suckling pig, what in the Philippines is known as “lechon”? Under the crackling skin of the lechon there is a gorgeous fatty pig. Now imagine that pig was the size of a piggy bank. Two slices of that piggy-bank sized pig is what you’ll get on your bowl of ramen at Yume wo Katare, along with a healthy (is that the right word?) serving of pork fat in the broth.
Photos and more description under the cut!
My love affair with ramen started with the packaged kind, with Maruchan brand “brick” ramen, which I learned to cook for myself when I was about ten years old. In those days the packages pretty much came in only a few flavors, chicken, shrimp, beef, or the ever mysterious “Oriental” flavor (my favorite). I ate it every day for breakfast before going to school when I was a teenager (except on days when I ate Chunky soup).
More recently, I’ve had ramen at various shops in cities around the world, including Sapporo-Ya, which is just a few blocks from my house and which has a very intense chicken ramen. One of my favorite anime is Hikaru no Go, and the main character Hikaru is practically addicted to ramen. Then I started reading about Korean-American chef David Chang, who was so devoted to ramen that he went to Japan to try to learn to make it (and through various mishaps ended up working for a soba chef… read it in his Momofuku cookbook for the whole story) and eventually got going with Momofuku in NYC which launched Chang’s entire culinary empire, now spanning multiple countries (well, at least two, as I just ate at his brand new restaurant in Toronto) and media (Lucky Peach magazine, podcast, app, etc…) I’ve also been following the adventures online of an intrepid group of food adventurers known as HapaRamen, now serving at pop-ups around San Francisco. I’ve never managed to be in San Fran at the right time to catch a Haparamen pop-up. Yet.
Anyway, ramen has become hip and a thing. Although the long lines of people waiting 90 minutes to two hours to get into Yume wo Katare are not made up of hipsters. They seem to be mostly Japanese and Japanese-Americans.
My first trip to Yume wo Katare I went by myself. corwin had other plans and so I got in line on a Friday night around 7:30pm about two weeks ago. It was cold. I was bundled up for the wait and had an ebook to read on my phone, so I was content. The line was back to the second window of the Dunkin Donuts. It was a full hour before I reached the front of the line, and 90 minutes before I was seated with my ramen, but it was worth the wait.
They serve only two things here:
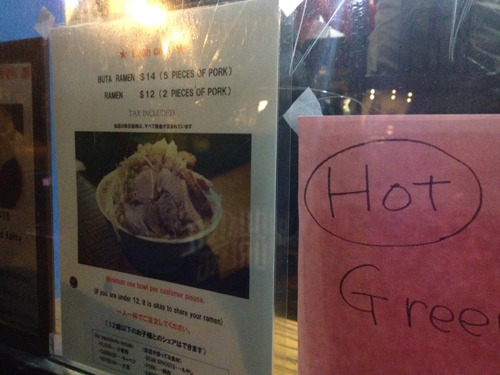
1) Ramen with two slices of pork. ($12)
2) Ramen with five slices of pork. ($14)
I feel “slice” is a mistranslation. “SLAB” is a better term. The two-slice bowl is PLENTY. I ordered the five-slice bowl, and after the third slice began to wonder if I had erred. As it turned out, I hadn’t eaten at all that day (too busy) and after a brief breather, I polished off all five slices and the entire heaping bowl of ramen and vegetables without too much trouble. But I am a champion high-volume eater when I want to be. I would NOT recommend the five-slice bowl for anyone who normally eats lightly.
I went back for a second trip to Yume wo Katare tonight, with corwin. We went at 5:30, since they open at 6pm and we figured maybe the line wouldn’t be too long yet, and if we could get in that first group of 14-16 people we might make it in at 6. As it turned out, they started letting people in at 5:30, two at a time, and beginning to serve them. We just missed being in the first seating, but at 6pm we entered the place where there are a a few “jump seats” for people who are next in line.
When you go in, you pay at the cash register and say which you want, the two or five slices, and this is also your chance to buy bottled water or bottled tea (or Red Bull…?). They have also added hot green tea for $2. But there is regular water in pitchers on the tables. They take CASH ONLY, pay the person at the cash register, and then you wait to be directed to a chair.
Inside, you can see the many empty frames that represent unfulfilled dreams. If you have a dream, for $10 you can write it on a piece of paper and display it for all to see for a month. For more money your dream can be up for longer. Apparently if your dream is fulfilled you can go back and get a free bowl of ramen? I’m unclear on how it works but it’s fun to read what previous customers have written (at least, the ones in English that I can read).
corwin normally eats more than I do, but tonight we both got the two-slice bowl and he said it was more than enough for him. In fact, when he was down to half a slice, I mean slab, left, he started to wonder if he could finish it. Then he got a second wind and packed it away.
He, too, experienced the ramen-high that I did, as we walked home, unable to feel the cold after eating the hot soup. The broth alone seems like you could live on it, it’s so rich with meaty goodness. I saw a Yelp commenter describe it as a “porky haze.” Yep. They do not allow takeout: ramen is considered ruined if it gets soggy, from what I hear. It must be eaten fresh, right from the chef, while chewy and robust. The one thing you can take out is you can buy the pork loin (fatty version or unfatty version) for $15. I’m totally doing that one of these days.
There’s more information about Yume wo Katare on some local blogs:
Japanese American in Boston: http://japaneseamericaninboston.blogspot.com/2012/10/everything-you-need-to-know-about-yume.html
Boston Phoenix: http://thephoenix.com/boston/food/147448-buta-ramen-at-yume-wo-katare/?page=1#TOPCONTENT
My photo gallery of my first meal at Yume wo Katare:
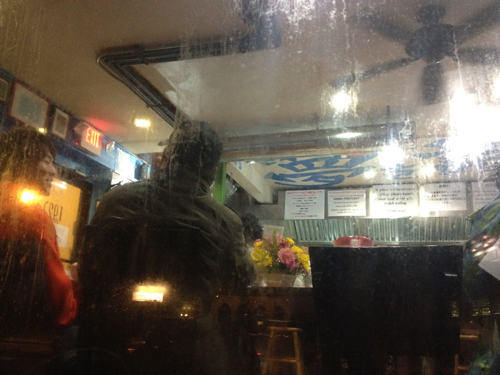
The view of the warm, welcoming interior from outside in the cold waiting line.
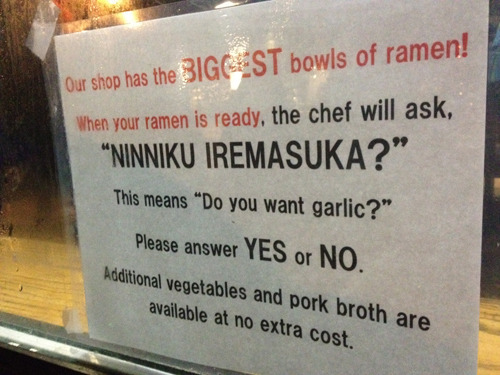
Signs in the window prepare you for the Biggest Bowl of Ramen.
This sign is already updated. They will officially expand hours to 5 hours/day starting December 4, and to 6 hours a day starting in February!
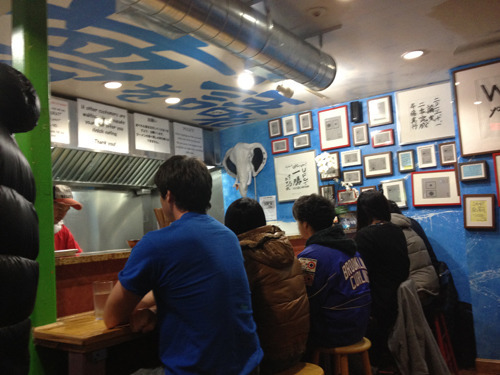
The coveted 4-5 seats at the bar where you can watch Chef do his thing.
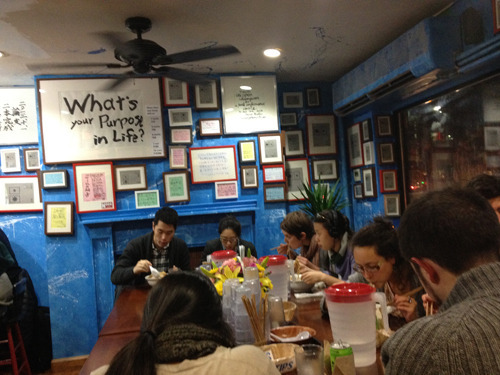
Inside the restaurant about 10 can fit at the communal table, with 5 at the "bar".

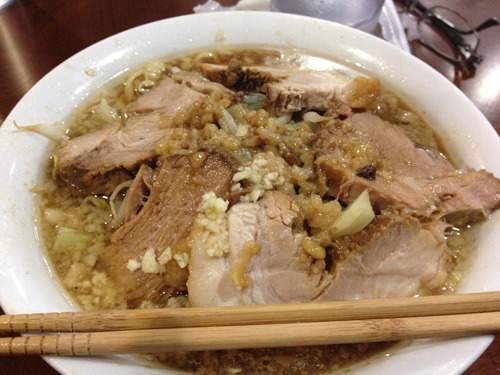
Five-slice bowl in all its glory. I already knocked the pile of chopped garlic into it.
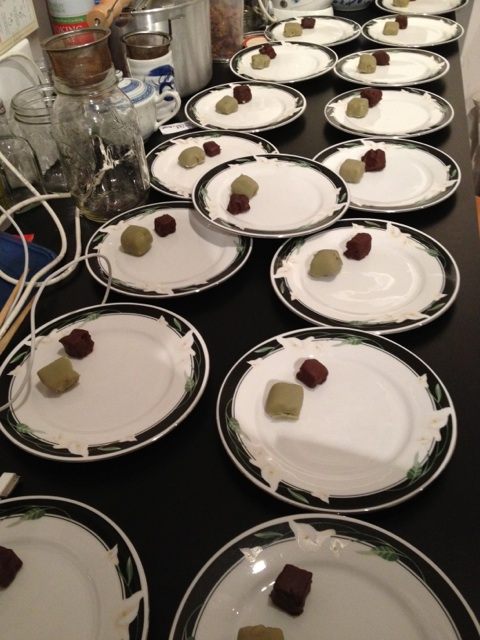
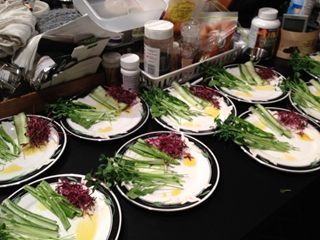
Duck Day photos from guests, including the missing soup
Since I often forget to take pictures as we go along (though my iPhone and Twitter have made that less of a problem than it used to be) I asked guests at the meal to take pictures, too! Here are some, including a course I managed not to get any photos of prep or service, the “Hot and Sour Soup.”
The concept in this dish was to feature the vinegar, since it was the Vinegar course. (Vinegar being one of the Seven Essentials, see original post for explanation on that.)
I didn’t want a traditional, slimy “hot and sour” soup. I wanted to highlight vinegar as a desirable flavor of its own. And duck, of course. My thought was to make it more like a consomme, with duck broth (we make a ton of duck stock for this meal), just a touch of “hot”.
We bought a few vinegars to try in the soup, including a palm sugar vinegar, Chinese “chinkiang” vinegar, and we have a ton of rice wine, white, sherry, balsamic, etc… stocked here to begin with.
Sherry vinegar, even at 1/2 teaspoon per 1/2 cup was way too strong and just not a good flavor. The palm sugar vinegar I liked but corwin said it tasted like floor cleaner chemicals to him. Chinkiang, though, was the perfect thing. It was like all the intensity of fish sauce without any fish–and is what I’ll replace fish sauce with in vegetarian recipes from now on. In the end, the proper balance was per one cup of soup, one teaspooon chinkiang and half-teaspoon white vinegar, then upon serving the bowl, one more half teaspoon dash of fresh chinkiang from the bottle.
We served it with a raw quail egg and fried wonton skins. This was my first time making wonton skins from scratch, again using Andrea Nguyen’s “Asian Dumplings” cookbook, which recommended using the pasta machine to get them really thin and flat. We love an excuse to use the pasta machine!
One of our guests had never had a quail egg before. I usually describe it as like a buttery chicken egg.
At each guest's place there were glasses for every wine course: sparkling, sake, two whites, and a red. And a description of the menu to come with pairings.
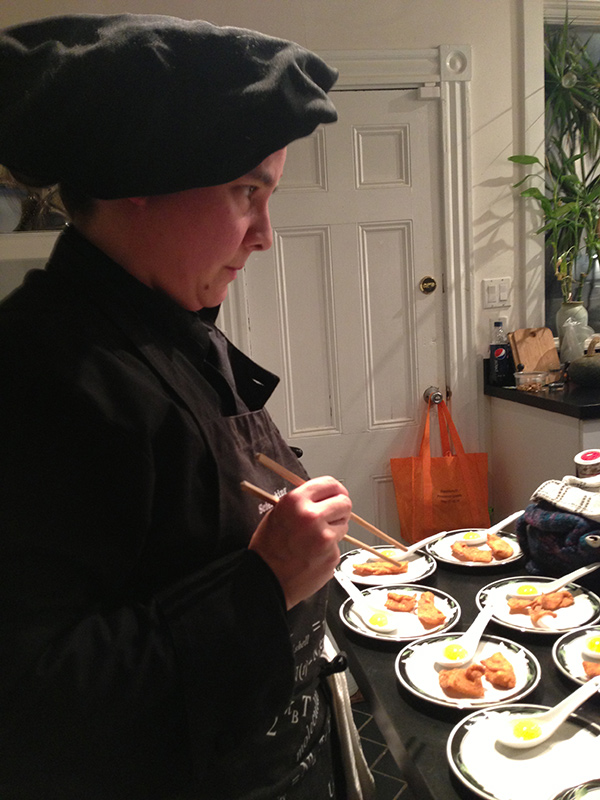
That's me! All in my cooking clothes. Plating the garnishes for the Hot & Sour Soup.
Soup garnishes, raw quail egg yolk on the soup spoons, friend wonton skins in various shapes.

The finished soup as assembled by a guest!
And here’s a guest’s shot of the Shanghai Soup Dumpling, which I talked about in a previous post.
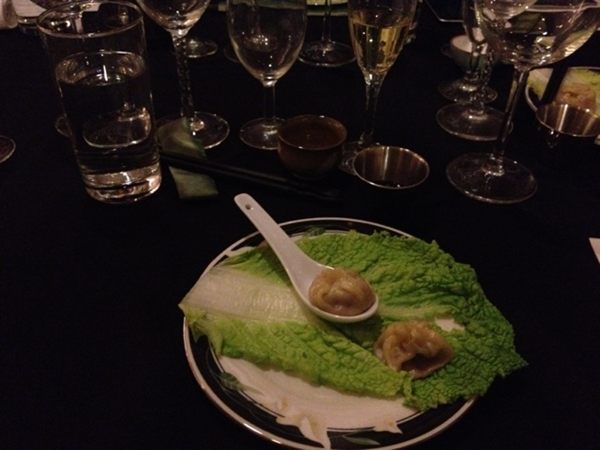
A shot of the first course, the Shanghai soup dumpling, as plated.
November 23, 2012
Lapsong souchong broth Soup Dumplings Shanghai-style
A couple of people have asked for the Lapsong Souchong broth Soup Dumpling recipe.
It was our first time making Soup Dumpling and we learned a bunch. Our basic guide was Andrea Nguyen’s cookbook ASIAN DUMPLINGS. There is far more in there than I can reproduce here without feeling like a copyright infringer, so get the book from Ten Speed Press (2009) for the full rundown on the technique.
The main thing about the soup is that you are making it with agar-agar (or gelatin, if you can’t find agar agar) so that it is solid in the dumpling filling, but melts into a soup when the dumpling is steamed. The important trick with the dumpling dough is that when you roll it out, instead of making just a round flat skin, you just roll out the edges, leaving a thick-bottomed “belly” in the center which becomes the bottom of the dumpling.
Photos and broth recipe below the cut:
Lapsong Souchong Broth
corwin invented this some years ago after we’d eaten a meal at Restaurant L in Boston, one of the first upscale fine-dining places doing Asian Fusion after Ming Tsai’s Blue Ginger. They served us thin shaved beef and brought an iron teapot of broth that they poured at he table over the meat, cooking it instantly. corwin adapted the idea but made up this broth with actual tea in it for a much better effect!
Lapson souchong is the tea that already tastes like smoke. That and ginger, plus perhaps a pinch of fine spice powder are the main flavorings other than whatever meat stock you are using. In the case of Duck Day, we used duck stock.
Here’s a variation using canned beef broth, though, easy to do at home:
BEEF LAPSANG BROTH
1.5 cups beef broth (or stock, if stock add salt to taste)
3 slices ginger
1 scallion, loosely chopped
1 clove garlic, smashed
1 pinch five spice powder
1/2 cup lapsong souchong tea leaves
1/2 teaspoon agar-agar (or 1.5 teaspoon gelatin)
Put the broth, ginger, scallion, garlic, and five-spice powder into a sauce pan and simmer until reduced by half. Remove from heat, then put in the tea leaves while still hot and let them steep for for minutes. Strain immediately and squeeze what you can out of the tea leaves back into the pot.
Top up the liquid amount now to 2/3 cup (if it’s below that amount). Put it back in the pot and sprinkle in 1/2 teaspoon powdered agar-agar, or if you don’t have that you can do it with 1 1/2 teaspoon unflavored gelatin. Bring it to a boil, then pour it into an 8×8″ baking pan and refrigerate for an hour (or overnight) so that it’s solidified.
Cut it into fine cubes to add to the filling.
The filling can be any of the usual wonton or dumpling fillings. Ground meat, mushrooms, scallions, leeks… I’m now game to try all of them. The main thing is you mix this with the little cubes of solidified soup. We found that if we chopped the cubes finer, we had a better distribution of soup from dumpling to dumpling.
The ratio for this amount of gelled soup goes with about 1/2 pound of ground meat.
Dumpling skins are basically flour, water, and oil and you can do it in the food processor. You really need to read Andrea’s book on the nitty gritty of rolling them out, though. Looking online I found a lot of places that said buy dumpling wrappers not wonton wrappers, but I’ve been in dozens of Asian markets and I never recall seeing dumpling wrappers. (Maybe you can only tell that’s what they are if you read one of the asian languages printed on the package?) I’d be willing to try it with round wonton wrappers just to save time but I haven’t run that experiment yet.
Tips:
Ngyuen’s book says to line the bamboo steamer lined with parchment paper. If I do it again I’ll leave out the paper and use napa cabbage leaves instead. Some of the dumplings stuck to the paper, and a few broke and we lost their soup. In cabbage leaves we wouldn’t have the sticking problem and the soup would still be sitting there. Also I think the loose leaves will let more steam through to the upper baskets (we were steaming 3 layers at once).
Funnily enough, we steamed some leaves by themselves to put on the serving plates, but it would’ve made more sense to do them under the dumplings to begin with. Duh. Live and learn.
I used to think I could get through life without a bamboo steamer basket by just using the steamer plate in my rice cooker. I was wrong. Bamboo steamers are awesome and magical and if you buy them at the Asian market they are dirt cheap as well. Since we bought ours and can’t believe we lived without it, basically.

Bamboo steamer baskets add up to a tower!

Our first attempt at the Shanghai soup dumpling. The soup is INSIDE the dumpling! It worked well except for a few that broke.
Coconut brown butter financiers: green tea or chocolate variations
Coconut Brown Butter Financiers Recipe: Green Tea or Chocolate Variation
Makes 32 bite size petit fours
Egg whites : 150 g (about 5-6 eggs)
Icing sugar : 175 g (aka confectioner’s sugar)
Unsalted butter : 150 g (2 sticks plus 3 tablespoons)
Plain flour : 50 g
Coconut flour : 80 g (Bob’s Red Mill makes this)
Matcha/green tea powder : 5 g OR 5g Baking cocoa powder, OR melt 2 ounces bittersweet chocolate with the butter plus 2 grams baking cocoa
Two pinches of Kosher salt
Mix together the egg whites, icing sugar, flour, almond or coconut flour, salt, and the powdered green tea or baking cocoa. (As for what to do with all the egg yolks, how about making creme brulee? There’s a great all egg-yolk version in Joy of Cooking.)
Make brown butter: melt the butter until it has turned brown and nutty. Mix this, still hot, in the dry ingredients. For a variation I tried it with melting Callabaut bittersweet chocolate in this step and replacing some of the baking cocoa (but not all or it was too sweet), and it came out fantastic.
Use a spatula to spread the final batter/dough into a large buttered bread loaf pan. Make it as flat and smooth as you can. (I ended up using my buttery fingers.) Should be about 3/4″ thick.
Bake 20-30 minutes on 350 degrees. Start checking it at 20 minutes, don’t under-bake it. The edges should be slightly brown and the center not wet.
Allow to cool for a while (15 minutes), then unmold it from the loaf pan. You want to cut it when it’s firm (so that it doesn’t crumble) but not dried out (again so that it doesn’t crumble).
I found it divided pretty easily into 32 pieces that weren’t too small nor too large. (I divided a previous batch into more like 48 and they were too small and lost their structure easily. You’ll see in the photos below that the chocolate ones are smaller than the green tea ones. I made the chocolate too small and they fell apart and left too many crumbs in the fondant.)
(Some useful recipes I looked at for reference before cooking this up: http://www.atelierdeschefs.co.uk/en/r... and http://allrecipes.com/howto/petit-fours/ among others.)
WHITE CHOCOLATE/GREEN TEA FONDANT COVERING
I have struggled with getting the coating right and I think I may have finally hit upon one that I like. Here’s the green tea white chocolate version:
2 tablespoons corn syrup
4 tablespoons water
2 cups confectioners sugar SIFTED
1 tablespoon SIFTED green tea powder
3 ounces white chocolate, chopped/shaved
In a small saucepot, combine the corn syrup, water, confectioners sugar, and green tea powder. Heat it to about 100 degrees on low heat, then put the chopped white chocolate in and stir until it is all melted. When the stuff gets to 150 degrees, dip a financier cube (cut as described above) into the goop until it is fully coated. Carefully lift it out using metal chopsticks or chef tweezers, and carefully set it down on either a cooling rack or wax paper.
The cooling rack has the advantage that the excess coating drips through, but the disadvantage that the coating melds to the rack and you have to sort of slice them free after they harden. The wax paper has the advantage that you can just peel the hardened petit four free at the end but the coating may have pooled and slumped around it. I haven’t found a solution to this yet, neither by reading recipes nor by trying different methods.
The metal chopsticks help in that if they are lifted slowly and carefully from the petit four, the hole they would leave in the coating self-heals. If the hole doesn’t self-heal, return the coating mix to low heat until it is sufficiently liquidy to do that and coat easily. I had to return the pot to the stove about five times to get through the whole batch of 32 financiers.
These had to cool at least a half hour before they were hard enough to detach from the cooling rack.
To do a chocolate fondant coating, replace the white chocolate above with bittersweet or baking chocolate and the green tea powder with cocoa powder. You can easily adjust the sweetness by mixing in more confectioners sugar or more bitter chocolate until it has the taste you want.
The first mistake I made with the chocolate was not to make large enough a batch of the pourable fondant, which meant it lost heat too quickly and got too full of crumbs while I struggled to make it coat better. I also tried to hurry and coat more than one square at a time. The result was delicious but not as smooth-looking as the fondant shell should be.
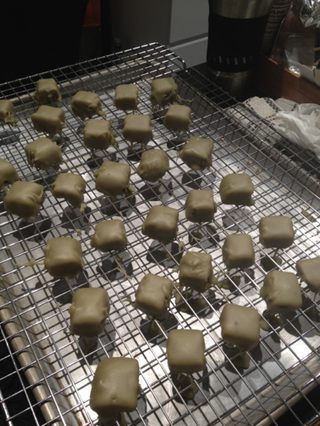
Green tea financiers after being dipped in the fondant. Most of them came out nice and smooth.
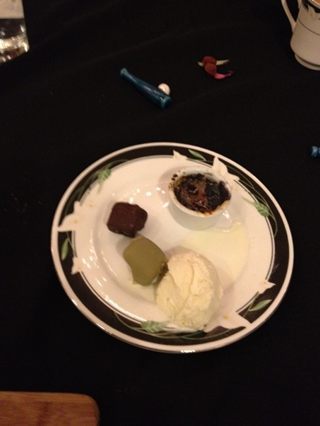
Dessert being plated. Each has two financiers, one chocolate, one green tea, and will be joined by a tiny ramekin of black rice pudding and a scoop of milk oolong ice cream.
The final dessert plate with both financiers. You can see the chocolate one is smallish and a litte lumpier than the green tea one.
Duck Day 2012 Menu: The Seven Essentials
Duck Day 2012: The Seven Essentials
Tradition holds that there are “seven essentials for Chinese life” and that these make for a civilized household in what is colloquially called “Open Door Seven Items”: wood, rice, oil, salt, soy/fermented sauces, vinegar, tea. (Some attribute this list to Confucius, but it is probably older.) This year’s menu incorporates many of these elements into each course, but each course has a featured essential.
It’s been several years since we did an Asian fusion meal for Duck Day, and my recent visits to that various Momofuku outlets (NYC Noodlebar and Ma Peche, Toronto Shoto) plus seeing David Chang speak last year had gotten my wheels turning. I’ve been plotting to do a “Seven Essentials” dim sum at some point, but I’ve been so busy haven’t gotten around to inviting people over or doing the test recipes I want to. Instead, we adopted the Seven Essentials theme to do this as a Seven Course meal, as follows: (menu and then picspam of the meal…)
TEA
Lapsang Souchong Soup Dumpling
Shanghai-style soup dumpling featuring a duck filling with lapsang souchong broth. (The soup is inside the dumpling.)
Wine pairing: Vouvray Petillant, Domaine Huet Brut 2007
SOY
Sashimi With Enoki
Yellowtail, salmon, and tuna sashimi served with seared enoki mushrooms in truffle oil and
traditional accompaniments: double-distilled soy sauce, gari, and fresh-grated wasabi.
Wine pairing: Sake “Wandering Poet” Rihaku Junmai Gijo
VINEGAR
Hot & Sour Soup
Duck broth and chinkiang vinegar soup, served with quail egg and fried wonton skin
OIL
Quote-Salad-Unquote
Flavored oils—lemongrass, hot pepper, garlic-saffron—served with vegetable matchstick dippers,
sprouts, and arugula.
Wine pairing: J. L. Wolf Wachenheimer Riesling 2010
SALT
Duck Confit
Duck leg confit seasoned with Szechuan peppercorn, served with Red Spiral Slaw (red cabbage beets, red onions),
and a trio of salts.
Wine pairing (for this and the next course): Domaine Zind Humbrecht Gewurtztraminer 2011
WOOD
Tea-Smoked Duck
Duck breast, tea-smoked and served Peking “sandwich” style in a steamed bun with house-made bourbon-black soy sauce, scallion, and cucumber.
INTERMEZZO
“It does not matter how slowly you go so long as you do not stop.” —Confucius
Clementine Soda with Ginger Ice and Yamomomo (Japanese miniature mountain peach)
RICE
Risotto
Porcini risotto, with a poached duck egg and white truffle.
Duck-garlic-basil-marsala-wine sausage.
Wine Pairing: Azelia Dolcetto d’Alba Bricco Dell’Oriolo 2010
THE WASHING OF THE DISHES
To be able under all circumstances to practice five things constitutes perfect virtue; these five things are gravity, generosity of soul, sincerity, earnestness and kindness. The sixth virtue is to wash the dishes of your hosts.” —Confucius
DESSERT
Forbidden Rice and Coconut Milk Pudding, Brulee
Milk Oolong Ice Cream
Financiers in two flavors: chocolate and green tea
Tea and Coffee
-*-
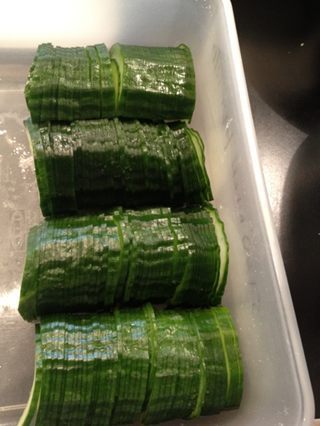
My knife technique leveled up. Over 200 pieces from a single cucumber.
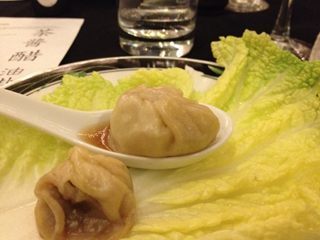
Our first attempt at the Shanghai soup dumpling. The soup is INSIDE the dumpling! It worked well except for a few that broke.
I love vegetables but despise "salad" as a usually lame-ass "easy" and cliche-ridden course. I like to deconstruct it. Here is amaranth sprouts, cucumber, sweet peppers, pea sprouts, served with the three flavored oils I made: lemongrass, garlic saffron, and hot pepper.
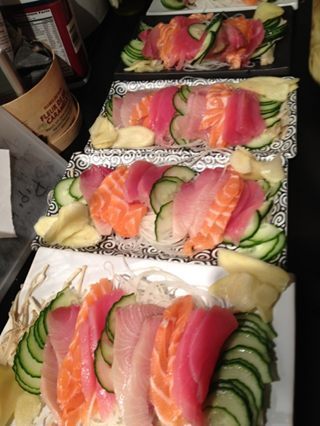
We decided to do a sashimi course. Yellow tail, salmon, tuna, with enoki mushrooms torched with truffle oil. With spiral shredded daikon and cucumber, house-made ginger ad fresh-grated wasabi root.
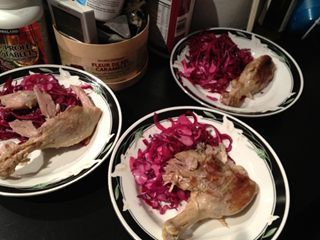
Confit of duck legs with red spiral slaw. The confit was utterly perfect, falling off the bones.
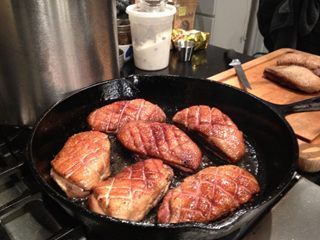
Tea-smoked duck breast being seared as it's final step before being served inside a steamed bun with bourbon-dark soy-hoisin sauce, scallion, and cucumber, "Peking Duck" style. Very much like the pork belly sandwich at Momofuku Noodle Bar. Only duck. And all ours.

Oolong was the only one of our three cats who was brave enough to join us. Here he is checking out what corwin's eating.
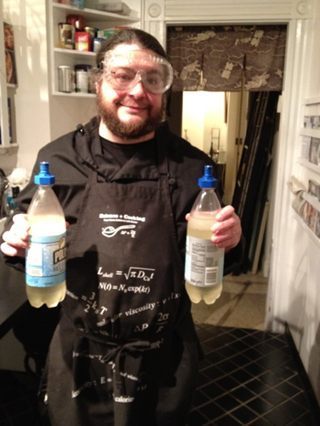
corwin getting ready to carbonate the Intermezzo.
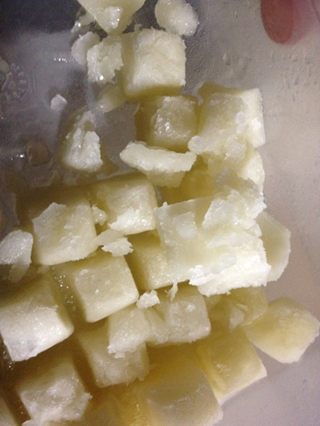
Miniature ginger ice cubes to go in the Intermezzo (tangerine home-carbonated soda).

corwin drinking his intermezzo. It's looking at meeeee!!
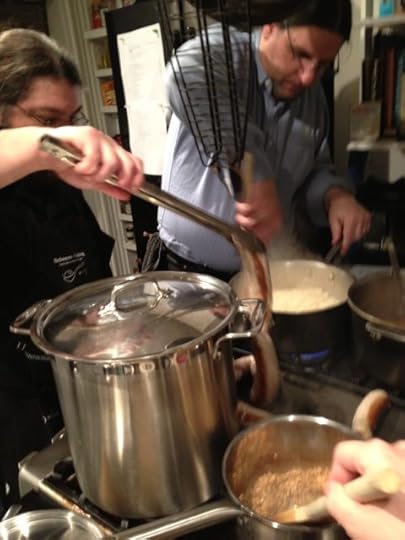
corwin, Scliff, and me all cooking on the same stove. I'm stirring the vegetarian risotto (and taking the photo), corwin's on sausage duty, and Scliff's on duck risotto.
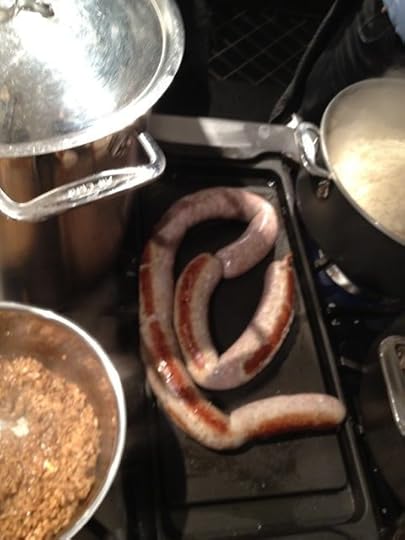
Duck sausages being seared, between pots of risotto (one vegetarian risotto, one with duck stock).
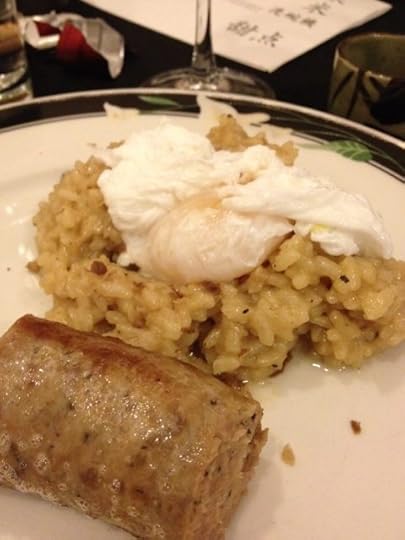
The plated risotto with poached duck egg and duck-garlic sausage and shaved white truffle.
Dessert being plated. Each has two financiers, one chocolate, one green tea, and will be joined by a tiny ramekin of black rice pudding and a scoop of milk oolong ice cream.

Rice pudding made with "forbidden rice" and coconut milk, ready to be sugared and bruleed.

We do every course with a wine pairing. Here are the bottles at the end...
November 13, 2012
I need to hire someone who knows Quark and Lightning Source
I need to hire a freelancer to handle a couple of small book production jobs for me. I need someone who can handle pre-existing Quark Xpress files and the fussy file prep and uploading needs of Lightning Source.
I don’t have a huge budget but I am thinking it probably won’t be more than 2-3 hours of work per file, so how about $60 per book? Four books in queue right now already.
Details below:
Circlet Press is trying to publish many of our ebook titles in print-on-demand through Lightning Source.
We have pre-existing layouts of the interior pages from the ebook editions, done in Quark Xpress.
I’m out of time and energy to do all the fiddling with Lightning Source that seems required. Someone who is familiar with prepping and uploading files to that particular system is what I really need. I need someone who knows it better than I do.
Each book would need the following:
-interior ebook file made into bookblock PDF for interior printing, this means updating the copyright page and then doing all the settings etc so that the PDF meets the LSI specs
-front cover design transformed into full back-spine-and-front cover layout for paperback printing. we’ll supply the art, copy, and barcode, you put the pieces together and then all the settings etc so that the PDF meets the LSI specs
-upload the PDFs to our LSI account and handle all the whiny error messages. Okay, chances are if you are good at meeting LSI’s specs you won’t get nearly so many of those as I do. This is why I need to hire someone else to handle it.
I’m offering $60 per book. RIght now I have four titles backed up in the queue that need to be made available before December 15th. So that’s $240.
Any takers? Email resume/references/pitch letter to me at ctan.circletpress At Gmail Dot Com.
October 29, 2012
Sandy storm update… we’re all fine here now. How are you?
The power went out around 2:45 in the afternoon here, amid howling winds that rattled the house. Lost phone and Internet at the same time. NSTAR had an easy to use mobile website I could use from my cell phone to report the problem. It said heavy winds had downed many lines in our area and caused many outages. Yep.
Managed to get in one game of cribbage while all electronic forms of entertainment were unavailable, and corwin cooked eggs and sausage on our gas stove with his battery-powered LED headlamp on.
Power came back at just before 6pm. Internet came back around 7:30pm. Regular phone still hasn’t come back but we have to check the box outside for that. The wind died down around 9pm and really hasn’t been much, and the only really heavy rain was between 6-8pm. Now it’s not even raining (midnight-thirty or so).
So basically everything’s back to normal here on this side of Boston. I have yet to check out news reports of whether the storm surge wreaked much flooding-type havoc here. My entire Twitter feed is about New York City, where it sounds like a severe disaster is underway, hospitals without power, fire trucks unable to get through because of flooding, 13+ feet water recorded at Battery, ConEd substations exploding spectacularly, cranes dangling, and the entire front walls of buildings (two, that I’ve heard of) blowing off.
Nothing like that here. I’m working on revising SLOW SURRENDER (my BDSM romance novel for Grand Central Publishing) and corwin is making a steak. All is well.
September 8, 2012
The publishing nitty gritty: all the hoops to self-publish or publish
OK, folks. A lot of people have been asking me for advice in recent years about either how to publish or how to self-publish. In the past year alone I’ve had four conference calls and half a dozen “coffee/tea” dates with people asking the same questions again and again, and I find myself telling the same things over and over again.
I figured I should make a post or two about the subject.
If you’ve asked me for advice about publishing or self-publishing, read this first, so you know what the hell I’m talking about when we actually talk, and we can skip to the things you actually have to ask ME about, and not the things you could have probably just Googled. I know, I know, you can’t believe everything you read on the Internet, and you want to hear from someone you trust. I’ll try to keep that trust by being smart and coherent here, and not an idiot. One caveat: the world of ebooks and publishing changes very fast and so something that is true and correct here today may be obsolete by Christmas 2012.
The first thing we should get out of the way is covering what steps a publisher takes to go from raw manuscript to finished salable product and how many people it takes to do so, whether the product is an ebook or a printed book.
A lot of people think, oh, it’s all computers now, so the author hands in a Word doc and bam they put some covers on it and it’s a book. Well, that might be true of some of the absolute worst examples of clueless or crap-grinding publishers, but that’s not what any professional publisher does.
(Related to this, my six-part posts on the basics of typesetting and book design. Read ‘em here.)
PAPERBACK PRODUCTION PROCESS
Traditional Print Publishing: minimum steps
1. Raw manuscript
2. Editor reads it and gives feedback to the author
3. Author rewrites it, makes corrections, sends it back
4. Manuscript is copyedited.
5. Author makes corrections based on copyeditor queries.
6. Manuscript is typeset by designer
7. Typeset proofs are then proofread by both author and a proofreader.
8. Corrections are made to the typeset proofs.
9. Proofed design is manufactured into a book.
You’ll note that the above process requires a minimum of five people: the author, the editor, the copyeditor, the proofreader, and the designer. In reality it may be as few as three or as many as seven depending on time, budget, and expertise. For example, in small press publishing, the editor often functions as editor, copyeditor, and proofreader, which results in errors slipping through that wouldn’t be as likely to if three separate people each brought fresh eyes to the project each time.
In self-publishing, the author might do all five roles. However, you can usually tell. If you want a professional product, pay professionals to do those jobs of editing, copyediting, proofreading, and design.
An abbreviated version of the above might look like this:
1. Raw manuscript
2. Editor copyedits it and gives feedback at the same time
3. Author rewrites it, makes corrections, sends it back
4. Corrected, revised manuscript is typeset by desiger
5. Proofs are read by author and third party and corrections made
6. Corrections are made to the typeset proofs.
7. Proofed design is manufactured into a book.
This version takes only four, not five, people.
A REALLY abbreviated version looks like this (not recommended):
1. Raw manuscript
2. Editor copyedits it and gives feedback at the same time
3. Author rewrites it, makes corrections, sends it back
4. Corrected, revised manuscript is typeset AND PROOFED/CORRECTED by designer (author does not get to approve final changes)
5. Proofed design is manufactured into a book.
This version takes only three people.
ANOTHER really abbreviated version looks like this (recommended only for material that doesn’t need much work to begin with):
1. Raw manuscript
2. Editor copyedits it, proofs it, makes changes directly in manuscript
3. Designer typesets the manuscript into page proofs
4. Author sees changes/corrections for first time in page proofs & approves/disapproves of each one
5. Author changes are incorporated
6. Proofed design is manufactured into a book.
This version takes only three people.
The cover also needs to be designed, by the way, so add an artist or art director to the list, unless the person who designs the interior handles the cover, too.
Many freelance production houses, by the way, handle ALL those functions AND interface with the actual printer for you, too, much of the time. Back when Circlet Press could afford to do so, we used to use Windhaven Productions (Nancy Hanger http://www.windhaven.com) and Swordsmith Productions (Leigh Grossman http://www.swordsmith.com/services.html) as one-stop shopping for all copyediting, proofing, design, and production support. A typical price back in the 1990s for such services for a 200 page paperback book was about $1000. I don’t know what the going rates are now, but they can be based on a per page rate or per book. Both Nancy and Leigh are still in the biz and I recommend you contact them if you have the budget to hire out.
But that was “traditional” paperback publishing we were talking about.
Now let’s compare the ebook production process:
EBOOK EDITORIAL AND PRODUCTION PROCESS
Digital-only production flow from raw manuscript to ebook
1. Raw manuscript
2. Editor reads it and gives feedback to the author
3. Author rewrites it, makes corrections, sends it back
4. Manuscript is copyedited.
5. Author makes corrections based on copyeditor queries.
6. Manuscript is proofread one more time after author corrections are input.
7. Corrected, revised manuscript is output into all viable ebook formats.
Why look, that’s already two steps shorter than the full nine steps to traditional paperback. But it still takes five people: author, editor, copyeditor, proofreader, and the person converting the manuscript to ebook formats.
And if we cut corners and consolidate some jobs, it can be a lot less:
1. Raw manuscript
2. Editor copyedits it, proofs it, makes changes directly in manuscript
3. Author approves/disapproves changes
4. Revised manuscript is output into all viable ebook formats.
This version takes only three people, and is how a lot of digital publishers do it. But it’s really really recommended that at least one pure proofreading pass by a qualified third party be done. This “quick and dirty” way is really cutting corners and it will show.
Now, where it gets complicated is, what happens when you want to make an ebook AND a printed book of the same material?
There are a million technical blog posts on this out there, but here’s the simple version. You have to figure out what workflow works best for you, your budget, and your goals.
Ebooks are much easier to make from the manuscript stage (i.e. when it’s still a Microsoft Word document) than from the typeset/designed stage (when the book takes shape in a production program like Quark Xpress or Adobe Indesign). The problem is that effective proofreading nearly always has to take place in the typeset version. So you have two choices:
1. Start with completely edited and corrected manuscript
2. Typeset it, including formatting italics, etc
3. Proof it, fix typos etc, and input the corrections into the typeset version
4. Output PDF for both digital sale & printing from this corrected version
5. Extract text from the typeset version to convert to ebook formats, redo italics if needed
6. Convert to ebooks
OR
1. Start with completely edited and corrected manuscript
2. Typeset it, including formatting italics, etc
3. Proof it, fix typos etc, and input the corrections into the typeset version
4. Output PDF for both digital sale & printing from this corrected version
5. Go back and duplicate all the corrections from the typeset into the manuscript document
6. Convert the corrected manuscript document to ebooks
In one version you have to do the corrections twice, in the other you have to wrestle to get a clean corrected manuscript out of InDesign or Quark that is suitable for conversion.
RIGHT NOW these two things are about equal amounts of pain in the ass. Until Quark or InDesign makes their autoconversion tools a LOT better, the epub they output isn’t of salable quality. (I’m currently using Quark 9.2 and InDesign CS6, which are the latest as of this writing.)
By the way: epub isn’t the only format you need. You must make mobi/prc also, for the Kindle. There’s an easy script that Amazon provides that converts epub to mobi (it’s called “kindlegen” and you can get it free on Amazon). In the past four years of selling ebooks, I can tell you that 99% of all ebooks sold by Circlet Press were epub, mobi, or PDF. The other 1% were .pdb and LIT formats and at least half of our sales in those formats were purchased mistakenly by people who wanted other formats.
(in my humble opinion…) AT THIS TIME THE ONLY THREE FORMATS YOU NEED ARE PDF, EPUB, and MOBI. (Note: .mobi, .prc, and .amz are all identical files, just with different suffixes.) All the other formats: lit, lrf, pdb, etc… are dead. I’m talking 99.99% Circlet’s ebook sales have been in epub, PDF, and mobi/prc/amz. When you combine all the other formats together they make up about .001 of our sales.
This is nitty gritty stuff, but if you’re going to self-publish or publish the work of others, there’s no magic wand to make it fly from the author’s head into the reader’s. These are the steps you have to go through to make a product the reader can purchase.
You don’t have to do all the steps yourself, in fact it’s preferable if you don’t. But someone has to do them and you likely have to manage the process. A recent study of ebook sales showed that books that had received editing and design help (even if it was provided free by a friend or family member) sold better than those where the author tried to do everything. Why? We don’t know: that’s just what the data shows. Presumably some number of readers recognized better quality and felt better about recommending the books to others, rated them higher, and/or purchased other books by the same authors once a quality expectation was set.
If you want to keep up on news like the aforementioned study, get on the Digital Book World daily email list. While you’re at it, you should be subscribing to the free e-newsletter Publishers Lunch. Ebooknewser is another good source online for keeping up with changes in the ebook landscape. No, I’m not giving you links to these things. Just Google them and you will find them. You Googling for them will no doubt help you learn the landscape better than me spoon-feeding you the links.
The final part of the nitty gritty we haven’t talked about, of course, is how to get the salable product ON SALE somewhere.
Self-publishers have a bunch of easy DIY options:
1. Amazon Kindle Store via KDP
2. Barnes & Noble Nookstore via “Pubit”
3. Apple iBookstore via iTunesConnect
4. Smashwords (who distribute to Apple, Kobo, Sony, & more)
Those are the “big four.” Fictionwise used to be up there but after they got bought by Barnes & Noble we’ve seen our sales there almost disappear. YOUR MILEAGE MAY VARY. Smashwords is good because they wholesale to a bunch of other places like Kobo, whose direct upload instructions/standards are so insanely difficult to meet it’s not worth the bother. Smashwords is bad because their own file prep standards are pretty ridiculous and I don’t like the quality of the ebooks they create. (Smashwords has you–or your ebook conversion professional–prep a Word doc in some very specific ways and upload to them and they spit it out again in various ebook formats for sale on their site).
The big three above all have similar self-publishing set ups. You open an account as a publisher, enter and verify various bank account info and the like (this can take a day or a week depending), and then for each book you log in to your account and create a new entry for each one, uploading the ebook files and the cover design and filling in all the metadata necessary including the description of the book, price, etc. Each one has a completely different interface, which is a pain to learn, but it’s not rocket science. You basically fill out a big online form for each. I recommend writing up all your metadata on a book in a single document (what would be called a ‘tipsheet” in traditional publishing) that includes all the following:
Title and subtitle of book:
Principal author name:
Other contributor names (i.e. if multiple authors or contributors):
Ebook price:
Ebook ISBN:
Print price:
Print ISBN:
Word count:
Number of pages:
Principal genre:
Secondary genre:
Other tags/categories/genres:
Short, targeted description of the book (100 words or less):
Longer, more detailed description of the books (300 words minimum or MORE):
Optional info for the tipsheet depending on the book:
Author bio:
Author hometown:
Table of Contents:
Related titles: (i.e. other books in same series or by same author)
Comparable titles: (i.e. books that would appeal to the same reader as this one)
You’re going to need to compile that information for your book and use it over and over again, as you list it for sale in places and as you send it out for review to bloggers and review sites. Publicity is a whole different ball of wax I’ll tackle another day. For now, the checklist above is all the hoops you need to go through from raw manuscript to having the ebook on sale to the public.
September 1, 2012
Worldcon Day Two! (Friday)
Today I spent almost no time at the con in the daytime since that was spent on my first ever trip to Wrigley Field. Separate writeup coming to my baseball blog later about that trip.
Got back to the hotel around 6pm, and the evening’s order of business was the Hogwarts Alumni Reunion party at 8:30pm.
This was another one where we just talked and talked and talked. I had on the schedule to give out wizarding costume awards at 11pm, but at 11pm none of the people in costume other than myself and co-host Lyda Morehouse were present. At one point it looked to me like two Death Eaters in full masks came in, but before I could get over to that side of the room, they had gone back out. And perhaps I was just imagining they were Death Eaters and they were actually from some other fandom? I never got around to doing any Tarot readings either.
But people did enjoy the slashy slide show and the butterbeer. Thanks to the shopping prowess of Naomi Kritzer we had all the butterbeer components and did not run out of ingredients until nearly midnight.
All told we handed out 84 “temporary wands” (glow sticks and fairy princess wands with a star on the end), ate 100+ “edible wands,” and nearly two full pounds of Bertie Botts Beans. Looks like over a hundred people picked up MISTI-Con postcards as well. Valerie Frankel came by and handed out ribbons promoting her Henry Potty parody books, too. And the Easter Bunny came and handed out eggs. (Not kidding.)
I once again set up a Mirror of Erised and asked people to write what they saw in it. Here’s the list:
“What do you see? What is your heart’s desire? Write it here!”
MEAT
A thirsty wizard
McDonald’s
Severus Snape
Hermione on ice
Contentment
Her
a proper cup of tea
Hogwarts in Rockton on the Moon
an otter
The con man going to Jail
dragon
Lucius Malfoy-yum!


