
Josh Kilmer-Purcell's Blog, page 81
January 10, 2013
1804 Riddles

A friend recently gave us a 1804 Almanac for the house. William Beekman built his house from 1802-1804, so this almanac would’ve been the first one published after the family moved into the home. I thought I’d share the two riddles included in the almanac…it’s fun to imagine Beekman and his children sitting around the fire puzzling out the answers. Can you solve them?
Here’s the first:

Here’s the second:

Share your answers in the comment section below.


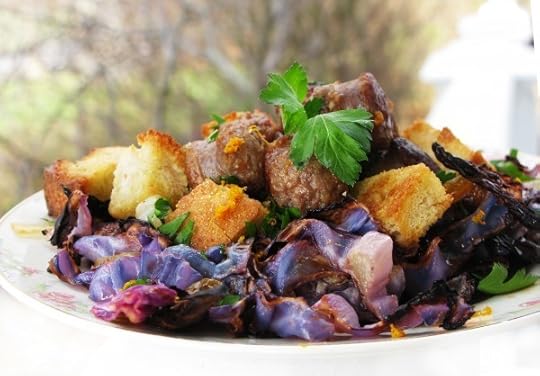
Broiled Purple Cabbage & Sausage

During the dead of winter in Sharon Springs, mealtimes can get a little uninspiring. The final vestiges of last summer’s garden in the root cellar consist of a few unusably-soft potatoes with sprouts as long as spider legs, some equally spongy onions, jars and jars of tomato sauce (on which we’ve long since OD’d,) and…wait…what’s that lurking in the corner by the pickles? In one of the bushel baskets we stashed away until next year’s bounty? It’s…it’s….sheild your eyes…colorful!
Yes, color is notably absent from mid-winter foodstuffs. But because we sow our garden continuously throughout the growing season, one of the last crops we’re fortunate enough to harvest is cabbage. And one of our favorite varieties of cabbage is Mammoth Red Rock. (Seeds available here.) This bright red/purple variety seems to store almost as well as it’s hardier green cousins, so we usually have a serviceable head or two sitting on our basement until late January.
But whether purple or green, when cabbage is boiled or sauteed it’s as blah and mushy as a cloud covered winter day. We like a little crispness in our cabbage, even if it’s not exactly coleslaw weather outside. Our solution? Broil it in a super hot oven or broiler. Not too long. just enough to get a little burnt edges before it collapses into its usually mush. Part of the leaves should still be raw and crunchy. Then toss is with flavorful sausage, sweet orange/white wine sauce, and some chunky homemade croutons for even more crunch.
For a minute you might even forget that winter isn’t even half over and all you have left in the basement are tarantula potatoes.
Recipe after the slide show. Let us know in the comment section what ingredients cheer you up midwinter.


<
>
Beekman 1802 Simple Sausage and Purple Cabbage.
1/4 large head purple cabbage (or 1/2 of small head.)
2 tablespoons olive oil (plus extra for coating croutons)
1 lb hot italian sausage, sliced into 1 inch rounds (use very sharp knife to keep cut through skin without smushing.)
1 large onion, chopped
2 oranges, zested and juiced (keep zest separate from juice.)
1/2 cup dry white wine
1/3 cup golden raisins (optional)
1/3 cup chopped, fresh parsley
four thick slices of rustic white or sourdough bread
salt, pepper to taste
Preheat broiler. Carefully cut purple cabbage into 1/2 inch slices. place slices in one layer on roast-proof baking sheet or broiling pan. Broil for approximate 4-6 minutes or until some outer edges have burnt. Do not over-broil or cabbage will become too soft.
Preheat oven to 300 degrees. Cut bread into 1 inch cubes, toss with olive oil to coat, and bake for 12-18 minutes until browned, turning occasionally to prevent uneven burning.
Heat 2 tablespoons of olive oil in a large frying pan. Add sausage rounds and saute over medium-high heat until thoroughly cooked through and browned. Transfer with slotted spoon to paper towel-lined plate. In same pan, add chopped onions and saute over medium-high until translucent and beginning to caramelize. Add white wine, orange juice, and raisins to pan with onions, and simmer until slightly reduced. Add salt and pepper to taste.
Plate cabbage first then top with sausage and croutons. Pour sauce over plate, and sprinkle with freshly chopped parsley and orange zest.
Five Beautiful Things

Winter White
While I was looking for my first apartment, I was warned by friends and family that I would likely have to surrender myself an environment painted entirely in “Landlord White.” Surrender isn’t really part of my vocabulary, so when I did find a bright, spacious bachelor pad on the 19th floor of a highrise in Ottawa, Canada, one January long ago, I embraced my white environs. “This is not Landlord White,” I told myself. “It is Winter White…and the landlord loves Scandinavian design, as I do, and he knew I would appreciate this desaturated palette.” (The power of imagination goes right to my head.)
The light from the floor-to-ceiling windows in my bright little box in the sky was so beautiful and warming that I wanted to add more white to my decor. And so I bought lovely, white cableknit throw cushions for the sofa and bed, painted the ugly brown cabinets in the kitchen a deep ivory and only bought houseplants that would produce white blossoms. My 22 year-old self took it a little far, in hindsight, but it was a great experiment in self-discipline. Challenging myself to decorate within a restricted palette honed my tastes and sharpened my focus by training my eye to edit.
I’ve outlined some tips to keep in mind when going for an all-white space. Since white rooms have the potential to feel uninviting and sterile, here are some ways to keep frigidity at bay.
Consider painting the trim (mouldings, baseboards, doors) a slightly different shade of white than you used on the walls. This will give the room definition.
Entirely white rooms can feel cold and clinical if they are not warmed by other colours. To keep the palette restricted but still warm, consider ivory, gray, beige or pale pastel accents. Jolts of bright colour or hits of dark black and brown can also add lots of personality through hits of fun punctuation. Warmer tones and colours also allow the eye to travel to a point of destination.
Remember texture! Texture is essential in white rooms and can really add warmth and coziness without the use of colour: textured white blankets, knitted elements (like my cable knit throw cushions), plush carpets and rugs, the grain of wood floors or architectural elements such as crown mouldings and decorative accents that can create shadow and definition.
Let the light in! White rooms are meant to be bright and open. Using white indoors reflects outdoor light so window treatments should be clean and simple, no matter how traditional the space is. Let go the idea of dark, heavy drapes if your rooms are painted white, unless you have the benefit of a very large space to make them work.
Bring in natural elements, such as stone, wood or foliage, to contrast the sleekness of white. You don’t have to use a lot, but the organic gnarl of an orchid’s stem or the rough-hewn texture of a driftwood lamp will tone down the severity of an all-white space.
Below are five rooms that use white very effectively. Pay attention to how the rooms use texture, colour, pattern and detail to keep the white from feeling frigid.

Photos:
1. Greigedesign.blogspot.com
2. Blog.tagesanzeiger.ch
3. Theprojectgirl.com
4. Cboheme.tumblr.com
5. Desiretoinspire.net
Andrew Ritchie is the creator of Martha Moments, a blog devoted Martha-Stewart related content and her community of supporters. He lives and works in Toronto, Canada, and has been a longtime friend of Brent & Josh, Beekman 1802 and Sharon Springs. Each week he’ll scour the world (wide web) to find the 5 most beautiful things to inspire you. Follow Andrew on Pinterest.
January 8, 2013
Reuse that Salad Container for …Salad.

This winter gardening tip is either ironic, serendipitous, or meta. Or maybe a little bit of all three. Re-using empty lettuce containers as mini greenhouses to grow new lettuce is really the ultimate in recycling.
Here’s what you’ll need:
Several plastic clam-shell containers - from grocery-store-purchased baby spinach and mesclun.
Seeds – spinach, arugula, mesclun work great.
Seed-starting soil mixture, or light potting soil
A rimmed baking sheet
Here’s the process:
If the plastic clam-shell container you’re reusing doesn’t have circulation holes in the bottom, use a sharp knife to create five slits…one at each corner and one in the middle. Conversely, if your plastic clam-shell container has air circulation holes that are so large that soil would leak out (like some berry boxes) line it with a paper towel. These holes will act as drainage. Place as many containers side-by-side as will fit on your baking sheet.
Fill clamshell container halfway with moistened seed-starting mixture or light potting soil.
Sprinkle seeds on top of soil according to directions on packet, and lightly press to ensure seeds are in contact with damp soil.
Place plastic cover on container and set tray on top of refrigerator, or other consistently warm spot for 2-5 days, until seeds begin to sprout. Keep moist by pouring water into the baking sheet and allowing the dirt to soak it up from the bottom.
Once sprouted, move to warm, bright, south-facing window. Keep watering from bottom.
When lettuce leaves reach the lid, uncover and allow to grow freely. Keep watering from bottom. If you plant your seeds very closely, you can thin them to use as sprouts in a salad.
Harvest your crop at any stage after leaves have formed by clipping at base of plants with scissors. As long as the roots are left undisturbed, new leaves should grow.
(If you want to get serious about starting your own seeds at home, we recommend getting seed mat warmers and this grow light kit like we use at Beekman 1802 Farm.
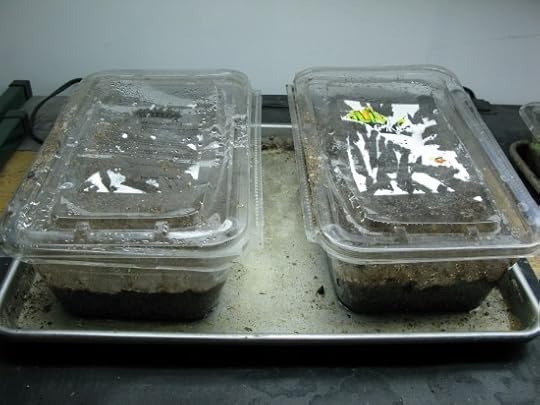
The covers help keep the soil heat in which is necessary for proper seed germination.

Two intrepid spinach seedlings.

If you have plenty of seed, plant them thickly to harvest sprouts. Simply leave a few behind to grow into full size leaves.
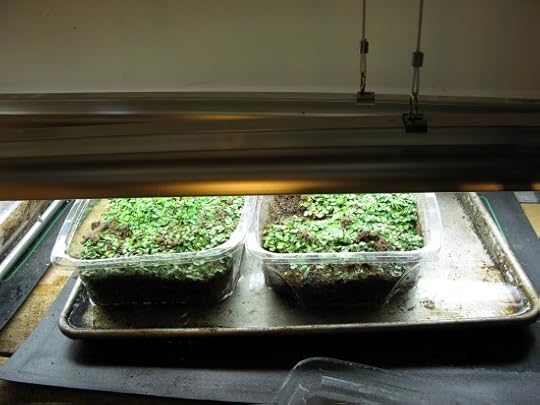
Because we start a lot of seeds, we use grow lights. The lights are on a pulley because they must always hover just above the seedlings as they grow.
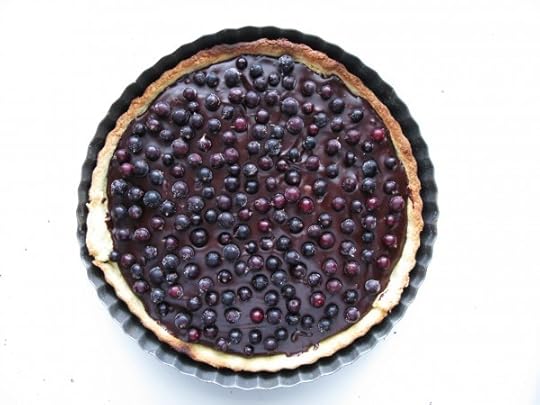
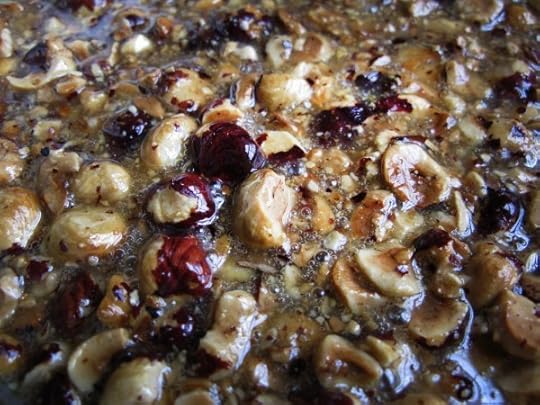
Tarte aux Chocolat-Noisette-Cassis

So dark and rich.
It’s Fancy-Pants Day at Beekman 1082 Farm! You can tell cuz we’re speaking french. That’s about the only way you can tell really. Because we don’t have any actual fancy pants to wear anymore. Our city clothes are seasons out of date.
Instead we’re sharing a fancy dessert recipe we recently made for a friend’s dinner party. Josh’s late french uncle Robert once made a similar dish, but Josh was too young and fancy-free to bother asking him for the recipe. Now that Josh is old and fancy-full, he sat down with some vintage french cookbooks to try to recreate his uncle’s version of this french classic.
This tart takes its inspirational roots from the traditional Walnut Tart, or Tarte aux Noix, which likely has origins in the former Périgord region of France. (now part of the Aquitaine Region.) Except, Uncle Robert’s version substituted hazelnuts (noisettes) for walnuts because…well, just because. Uncle Bob didn’t make excuses. Uncle Bob also liked chocolate and fruit in his hazelnut-substituted-for-walnut tart. So in they went. Josh couldn’t remember what kind of fruit Bob used, so he used frozen black currants from the summer garden, which certainly seemed french enough. Although one could probably use most any kind of berry. Or even raisins.
So what we wound up with was a Chocolate Hazelnut Black Currant tart that is vaguely similar (but not really) to a traditional Tarte aux Noix. And you know what? Everyone j’adored it. So there.
Recipe follows the slide show:


<
>
Beekman 1802 Tarte aux Chocolat-Noisette-Cassis
Ingredients for crust:
2 cups flour
1/4 cup sugar
pinch salt
1/2 cup (1 stick) unsalted butter, very cold, chopped into small pieces.
3 eggs, lightly beaten
Ingredients for chocolate ganache:
6 oz good dark chocolate, chopped finely
1/3 cup heavy cream
Ingredients for filling
1 cup black currants (or blackberries, raspberries, blueberries, red currants or raisins.)
1 cup sugar
1/2 cup cream
1/3 cup (1 stick) butter, cut into pats.
2 cups toasted hazelnuts, very roughly chopped
coarse salt, approx 1 teaspoon
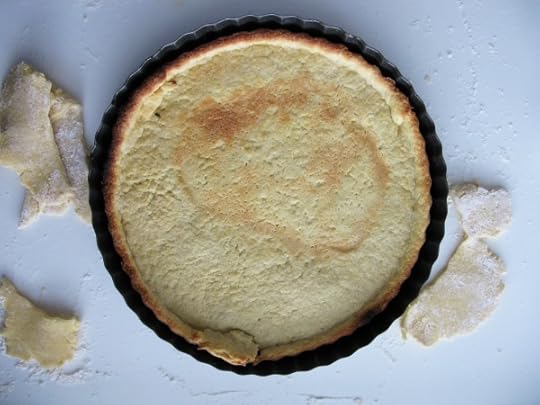
Make crust
Preheat oven to 350F. Combine sugar, flour and salt in medium mixing bowl. Using a pastry cutter or fork, cut in butter pieces until mixture resembles coarse corn meal. Make well in the center of the butter/flour mixture and add beaten eggs. Using hands, combine mixture, smearing through fingers, until dough ball forms. Flatten into a disk, wrap in plastic wrap, and place in refrigerator for 1/2 hour to cool.
Once cooled, roll dough out on lightly floured surface until large enough to fill 12 inch tart pan with removable bottom. Prick bottom of crust with fork, and place sheet of parchment paper or buttered aluminum foil (buttered side down) on top of crust. On top of parchment or foil, place pie weights or dried beans. Bake in oven to approx 10 minutes, then remove weights and foil. Bake another 5-10 minutes until crust is golden brown and fully cooked.
Toast hazelnuts. Place whole hazelnuts on baking sheet. Roast in oven until they become aromatic, and skins begin to blister away from nuts. Check at 8 minutes, but may take as long as 15 minutes. Do not allow to burn. Once roasted, place nuts in dish towel. Draw up corners of dish towel to form a sack. “Roll” nuts against each other in dishtowel until most of the skins have been removed. Transfer nuts (no skins) to large heavy plastic bag. Hit bag with rolling pin until nuts are very coarsely chopped. (Each nut should be broken into two or three pieces.)
Make chocolate ganache. Heat cream in small saucepan over medium-low heat until simmering. Remove from heat. Stir in chopped chocolate pieces. Continue stirring until completely smooth. Pour evenly over tart shell, and smooth surface.
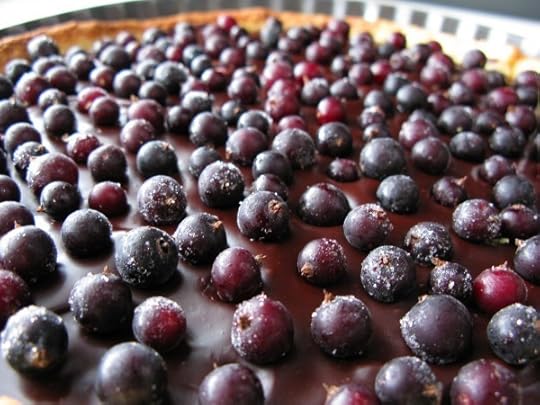
While ganache is still slightly warm, Add fruit by hand to evenly cover surface of chocolate. Press fruit slightly into ganache to hold it in place. Set tart in refrigerator to completely cool.
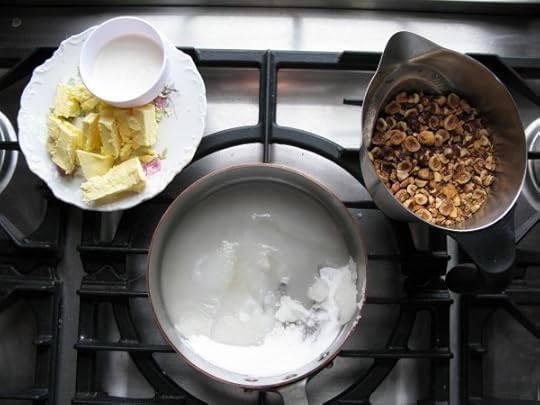
Make caramel sauce with hazelnuts. Heat sugar in heavy, medium saucepan over medium low heat. Work slowly and be patiently. Have cream and butter chunks nearby. Sugar will eventually begin melting. Shake pan or stir occasionally with whisk if sugar seems to be browning unevenly against sides of pan. (You may also lightly brush sides of pan with water to keep from burning.) Keep a close eye on mixture. When sugar has completely melted, and bubbles are very large, the mixture will begin browning. Be careful at this stage. It can quickly burn. When mixture has turned a light brown/tan color, remove from heat. Quickly pour and whisk in cream (carefully, it will spatter.) Add butter pats several at a time, whisking until melted into the caramel. When all cream and butter has been incorporated, add toasted nut pieces. Stir well. Spoon nut/caramel mixture over top of fruit and chocolate, being careful not to disturb fruit. Sprinkle top of tart with coarse salt. Place in freezer to cool quickly, and transfer to refrigerator to continue cooling after 1/2 hour. Tart should be cooled completely, then brought to room temperature before serving.
Serve small pieces with small dollop of creme fraiche.
Serves 16.
all dry plus butter together, then eggs
January 5, 2013
Dinner by Candelight

At Juniper Hill Inn in Vermont we saw a clever idea for masking the unattractive “faux candle” stems that are standard on most chandeliers.
Measure the diameter and height of the stem. Using sheets of bees wax that can be purchased at any crafting store, simply cut the appropriate-sized piece and wrap it around the plastic sheath. Cut the piece to be tall enough so that the top edge of the sheet meets the light bulb. (After a few hours in place, the heat from the light will make the edge melt and drip just a tiny bit making it look even more authentic.) You can blend the area where the two ends of the sheet meet with your finger.
No glue or adhesive is necessary. The heat from the light bulb will make the wax tacky enough to hold in place.
See how we use beeswax at the Beekman 1802 Mercantile
Josh’s Lazy Scrambled Eggs
There are as many ways of cooking scrambled eggs “correctly” as there are chefs in this world. Some insist that you must start with a blazing hot pan, some lecture that adding additional liquid will make eggs rubbery, some claim that the secret to perfect scrambled eggs is in the wrist movement.
I think they’re all nuts.
There’s only one way to make perfect scrambled eggs…
The easy way.
I’ve tried nearly every possible technique and add-in. And I’ve learned that, really and truly, the simplest, laziest way results in the most velvety AND flavorful eggs. The method is simple…cold pan, cold butter, eggs cracked directly into the pan (no whisking in a separate bowl,) a little milk, salt & pepper, slow cooking and finishing the cooking away from direct heat.
That’s it. No extra bowl or whisk to clean, either. Sometimes, although rarely, being lazy does pay off. Check out my easy technique below, then post any counter-arguments in the comment section. (Not that I’ll listen.)


January 3, 2013
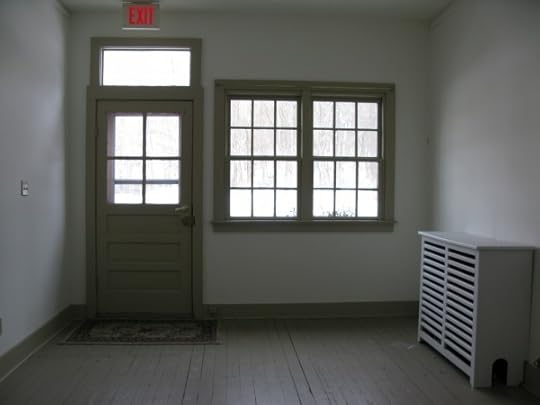
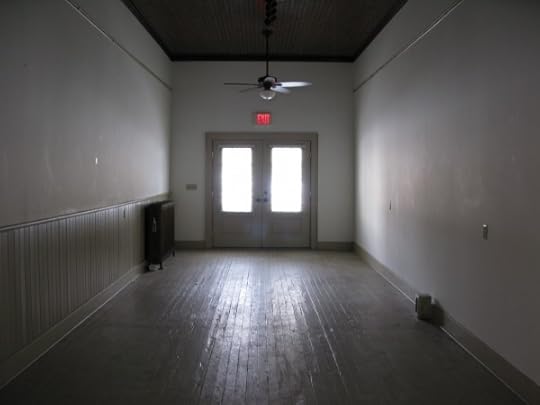
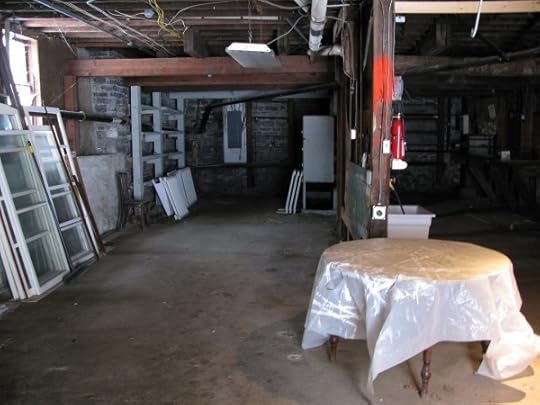
The Future Home of Beekman 1802 Mercantile
One of the things we wanted to do with our winnings from The Amazing Race was to invest in the growth and preservation of Sharon Springs’ Main Street. So when the Village Hall Gallery recently came up for sale, we saw it as the perfect opportunity to expand the Beekman 1802 Mercantile and headquarters.
We were lucky that the previous owner, our friends Leila and Philip Durkin, had already done such a fantastic job restoring the property – even winning a preservation award for their efforts. We will make some further changes to bring the building back even closer in looks to one of its earliest incarnations.
We’ll post updates frequently as work progresses, and will share some “How-To’s” for our design ideas as we go along. We plan on having a Grand Opening by this year’s Sharon Springs Garden Party (June 1 & 2) and hope to see you then!
For now, here are some “before” pictures:


<
>
5 Beautiful Things

Winter Sunlight
While winter is not my favourite season – I reserve that designation for autumn – it ranks as second in my books. Call me Canadian, but I am a sucker for blankets of white, fluffy snow stretching across open fields, or heaped like giant scoops of ice cream on the branches and boughs of fir trees. I enjoy the cold, too. I find it ivigorating to walk briskly through the chill, filling my lungs with fresh, clean air with each breath.
More than anything, though, I love winter sunlight. It lends sparkle and depth and shadow to an otherwise monochromatic landscape. It is almost otherworldly: crystalline and pure. When it shines through tall, snowy trees as the sun is setting or rising, the light is even more dazzling and dramatic: a distant sun showing off for us, refusing to be forgotten. Perhaps because winter light is so rare, I impart a certain value to it. The shorter days are made more precious by virtue of their early demise.
The next time you take your dog for a walk, or venture outdoors on a snowy day promise me that you will pause for a moment to notice the light as it shines through bare branches or illuminates the sky or snowbank, casting a subtle palette of pink and blue and orange across its canvases.

Photos:
1. Indulgy.com
2. Midwestwasp.tumblr.com
3. Ignitelight.tumblr.com
4. Apositivelybeautifulblog.tumblr.com
5. Tinywhitedaisies.tumblr.com
Andrew Ritchie is the creator of Martha Moments, a blog devoted Martha-Stewart related content and her community of supporters. He lives and works in Toronto, Canada, and has been a longtime friend of Brent & Josh, Beekman 1802 and Sharon Springs. Each week he’ll scour the world (wide web) to find the 5 most beautiful things to inspire you. Follow Andrew on Pinterest.
January 2, 2013
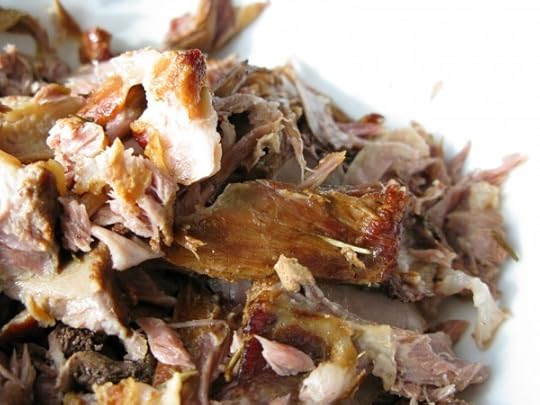
Pork Neck Bones & Beer Beans
“Pork Neck Bones & Beer Beans” Just typing those words together makes us feel butch-er. Speaking of which, next time you go to the grocery store, you should talk to yours. (Your butcher, that is.) Chances are he has a pile of neck bones somewhere stashed away in the back. They’re as underused as they are inexpensive. While they lack in meat, they make up for in flavor. The meat that they do have is tender and sweet (as the saying goes: “the meat is always sweetest next to the bone,) but the stock made from them is tremendously rich.
We use neck bone stock from our pigs all winter long to flavor our slow cooked dried beans. We also add a bottle of beer, because, if you can add a bottle of beer to anything, why wouldn’t you? As the stock and the beans cook all day long, the house fills with a fantastically rich smell – one that belies the overall cost of the meal, which is less than $.95 per person. (And that’s WITH the beer.)
This is definitely an all-day recipe. (Actually it also takes the night before to soak the beans.) But the process is very simple, and the results are worth it. Watch how we make ours in the slide show, and get the recipe below:


<
>
Beekman 1802 Pork Neck Bones & Beer Beans
Ingredients
1 lb dried beans. Navy, or any light variety.
Approx 3lbs of fresh pork bones (Not smoked.)
2 medium onions, cut in quarters
2 cloves of garlic, chopped roughly
1 Tablespoon of dried rosemary (or 1.5 Tablespoons fresh, finely chopped)
2 teaspoons whole pepper cloves
2 bay leaves
1 bottle of medium or dark beer
Salt to taste
1 bunch Fresh flat-leafed parsley for garnish, chopped.
Night before: Place beans in large bowl, picking out any small stones or discolored beans. Cover with several inches of cool water. (Beans can soak up to three times their volume.) Remove any beans that float. Soak overnight. In morning, drain beans.
Heat oven to 350F. Wash and rinse neck bones. Place bones on elevated rack in large roasting dish. Roast approximately 45 minutes until meat is brown. Remove from oven, let cool. Once cool to touch, use fingers to remove meat, discarding any fat and cartilage. Reserve meat.
Place bones, onions, garlic, rosemary, bay leaves in large, oven proof, lidded soup pot. Pour in beer. Add enough water to cover bones. Return pot to oven and cook for 3 hours, with lid. Remove. Strain and reserve all liquid through fine steel mesh. Discard bones and other solids.
Add drained, soaked beans to pot. Return strained stock. Liquid should cover beans by 2-3 inches. If it doesn’t, add more water. Cover and return to oven. (If there seems to be too much stock, return pot to over without cover to speed evaporation.) Cook beans anywhere from 1.5 – 3 hours. Check for done-ness after 1 hour. If all liquid has been absorbed, but beans aren’t yet tender, simply add more water.
After beans are cooked tender, stir in cooked pork neck meat scraps. Serve hot, in bowls, with parley garnish, and side of buttered bread
Serves 4-6


