
Josh Kilmer-Purcell's Blog, page 109
January 13, 2012
Hushed Tones
[image error]
FUNCTIONAL ART
Hereʼs the dilemma. The dining room of 204 Main Street restaurant is about 60ʼ long, by 24ʼ wide. The ceiling is 11ʼ high with the beautiful pressed tin ceiling completely intact. Floors are hardwood, walls are beadboard or sheetrock. Chairs are bentwoods, tables wood slab.
In other words, LOTS of hard surfaces. Lots of surfaces for sound to bounce off of.
Everything from the clatter of plates, to the LCD Soundsystem coming out of the "box", to the chatter of patrons anticipating their next course. It all added up to a bit of a din. On top of that, there was a large void on the main wall of the dining room that needed
something of interest. "Soft art" is not often called for, but this was a space that needed it. Something to absorb sound but at the same time be visually interesting.
Here's the solution:
Using wool felt as a medium, we constructed a large wallhanging of cork and industrial wool felt. It measures 10ʼ x 4ʼ and hangs in the middle of the dining room. Between the different densities of the wool felt, and the natural sound dampening qualities of the cork, a happy medium has been reached between visual art and functional sound dampening.
Simple, and to the point, the way we like it.
NOTE: This is also a great idea to use in a media room, children's room, garage or any place where you need to reduce noise in a stylish way
Jim & Norm are the owners of 204 Main Street in Sharon Springs, NY. They believe in good food and good design. They've been CERTIFIED FABULOUS, and will be contributing ideas whenever inspiration hits them.


Taking Stock
[image error]
At 204 Main Bar & Bistro we aim to keep the food fresh, simple and honest. Simple, though, doesn't always mean quick. That's why I begin each day at the restaurant, as I'm beginning this blog, by making chicken stock. Calling it a recipe is a bit of a stretch. I cover chicken parts with a few inches of water and heat until it comes to a slow simmer. I then skim off foam and fat and let it continue to simmer for a few hours or until I'm satisfied with the taste and the color of the stock. By keeping the stock simple, it becomes all the more versatile. I can use it as a base for almost any soup or sauce. I can use it to loosen a pasta dish if it becomes too tight without adding more oil. I even use it in my beef pot pie.
By omitting the vegetables and herbs, the stock has a cleaner taste and appearance – more like liquid gold than a murky brown. When it reduces down, there isn't any aggressive onion or herbal notes that might seem out of place in certain sauces or stews. I like to add the vegetables to the soup just before service – whenever possible. I saute them in the pot for a few minutes, then add the stock and boil for a few minutes. The vegetables retain their color and texture, particularly greens. At the very end I add fresh herbs. Salt and pepper come last.
A couple of tips to keep the stock as clear as possible:
Keep the stock on a gentle simmer. If it comes to a rolling boil, the fat could be emulsified into the stock leading to a cloudier end product.
After it's done, let the stock sit for about an hour so that the solids settle to the bottom.
Transfer to another container by a ladle. You might lose a cup or so but it much less messy than straining with cheese cloth.
Jim & Norm are the owners of 204 Main Street in Sharon Springs, NY. They believe in good food and good design. They've been CERTIFIED FABULOUS, and will be contributing ideas whenever inspiration hits them.
January 12, 2012
Cold Comfort
[image error]
Often at Beekman 1802, city meets country.
On a recent trip down the streets of NYC, we were inspired by the stacks and stacks of pashmina being peddled. And it gave us an idea.
After a little haggling, we wound up with about a dozen scarves at $5 a piece. (As an alternative, you could use your own collection of old scarves but the project will work best if all of the scarves are of similar width and length.)
Inspired by the autumnal colors and the recent trend in color blocking, we decided to try our hand at "quilting". Laying out the scarves end-to-end on the vertical and then another series of rows on the horizontal, we created a simple basket weave.
At this point, you "could" use a sewing machine and make a very uniform looking quilt, but we thought it might be cozier to do something a bit more casual.
[image error]
We first folded all of the edges under by about 1 inch so that all edges of the scarves were closed and smooth. Use straight pins to hold things in place until the next step is completed.
Using a grommet kit, we pinned each intersection together. We then put another grommet mid-way between the grommets that lined the outside edge of the quilt to provide extra strength and to keep the ends from gaping.
We found it easier to use a nut pick to pierce through the layers of fabric. An ice pick or even a large crochet needle would also work.
For our next project, we are taking scarves in hues of lavender, gray, and cream. Instead of grommets to hold the quilt we plan to use simple knots. We'll pierce the fabric in the same way, but then feed through a 2 inch piece of wool yarn and then tie a simple knot.
It's a cozy blanket unlike any you'll see, and the variations are endless.
January 11, 2012
Victorian Kitchen Garden
A facebook friend of ours, Ken Newman, recently made us aware of a television show titled "The Victorian Kitchen Garden" that first aired on BBC2 in 1987. We promptly lost ourselves in episode after episode of the series, which follows the month-by-month restoration of the Victorian walled kitchen garden at the Chilton Foliat estate in Wiltshire, England. Each half hour episode contains interesting botanical history, beautiful cinematography, and helpful gardening tips. As Ken described it, it's Masterpiece Theater for gardeners. One of the episodes (July) even describes England's Victorian gooseberry craze, which we wrote about last summer.
Since January is often the one month a year that gardeners get to sit back and dream, we thought we'd provide you with a little visual fodder by posting the episodes here. Sadly, the DVD doesn't seem to be available for purchase in the U.S., so the following links are to YouTube. Also unfortunately, it doesn't seem that the second halves of the final few episodes are available online yet either. Maybe if enough interest is shown, the entire series will be released here in the U.S. so we can find out how it ends.
Victorian Kitchen Garden Episode 1: Introduction
Victorian Kitchen Garden Episode 2: January
Victorian Kitchen Garden Episode 3: February
Victorian Kitchen Garden Episode 4: March
Victorian Kitchen Garden Episode 5: April
Victorian Kitchen Garden Episode 6: May
Victorian Kitchen Garden Episode 7: June
(Part One)
June
(Part Two)
Victorian Kitchen Garden Episode 8: July
(Part One)
July
(Part Two)
Victorian Kitchen Garden Episode 9: August
(Part One)
August
(Part Two)
Victorian Kitchen Garden Episode 10: September
(Part One)
September
(Part Two)
Victorian Kitchen Garden Episode 11: October
(Part One)
(We can't find the second parts of the rest of the series. If people do locate them online, please let us know.)
Victorian Kitchen Garden Episode 12: November
(Part One)
(We can't find the second parts of the rest of the series. If people do locate them online, please let us know.)
Victorian Kitchen Garden Episode 13: December
(Part One)
(We can't find the second parts of the rest of the series. If people do locate them online, please let us know.)[image error]
2002 Interview with Victorian Kitchen Garden Host Peter Thoday
Recounts the making of the series
(Part One)
(Part Two)
January 5, 2012
Mary and 12th Night

Mary Beekman is a four-year-old ghost who resides in The Beekman Mansion, and considers Brent and Josh her "imaginary friends." Follow Mary Beekman's Diary each week to learn what it's like to be a young child in early 19th century America
My oldest sister was at the window the first thing this early morning. She was worried it may be snowing and she would not be able to attend a celebration. But the snow was packed on the road and was not drifting. That is good. She has been invited to the home of her dearest friend. They have been friends for a very long time. Almost five years. I have been friends with Josh and Brent for that long. I wish she could see them too. Her friend is hosting a Twelfth Night Party. There will be much eating and drinking and perhaps some dancing. There will even be a king or a queen to rule over this party. My sister would really like to be the Queen. She has been arranging her hair many times. I had to leave the room because I was "chattering."
There will be a wonderful cake….a Twelfth Night Cake. Everyone who has a piece must chew carefully. There is a coin baked inside the cake. Whoever finds the coin becomes the King or the Queen of Twelfth Night. I fear that my sister will be so hasty to discover if she has the coin that she may chip her tooth. Wouldn't that be horrid??? Sister's friend and her family have costumes and will entertain everyone with plays. I would so love to be present. I might be the one to find the coin and be the Queen. My sister would not be happy about that at all. But Mother said it is a party for young people and not children. She told me that in 1759 in Williamsburg, Virginia, George and Martha Washington were married on Twelfth Night. I wonder if Martha found the coin?
Twelfth Night Cake*
Ingredients
4 pounds of flour, dried and sifted
7 pounds currents, washed and rubbed
6 pounds of the best fresh butter
2 pounds Jordan almonds, blanched and beaten with orange flour water
4 pounds eggs – put half of the whites away
3 pounds double refined sugar, beaten and sifted
1/4 ounce mace
1/4 ounce cloves
1/4 ounce cinnamon
3 large nutmegs, grated fine
A little ginger
1/2 pint sherry wine
1/2 pint of right French brandy
Sweetmeats to your liking (candied lemon peel, orange peel and citron, or melon
Directions
Work butter into cream with hands; then add sugar and mix well together, well beaten and strained through a sieve. Work in almonds first, and then put in eggs. Beat together with the set-aside egg whites until they look white and thick; then put in sherry, brandy and spices. Shake in flour by degrees, and when oven is ready, put in currents and sweet meats, as you put dough into your hoops.
Four hours baking in a quick oven (350 degrees)
You must keep beating with hands, all the while you are mixing dough
Fill two large wooden baking hoops (probably 10 normal rings – Bundt-type-baking pans)
*Art of Cookery Made Plain and Easy by Hanna Glasse
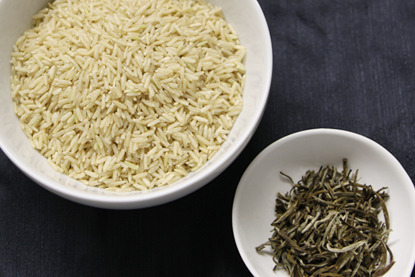
All Tea-ed Up

Brent grew up drinking well-sweetened tea, brewed over hours in the hot Southern sun. Josh spent a few of his college years brewing tea in a coffee shop (a long, long time before anyone knew what a barista was).
On a recent trip to Madison, Wisconsin, we had the pleasure of meeting another small business owner as passionate about her product as we are about ours.
"I like to think outside the teapot whenever possible. Tea should be an easy affordable luxury. High quality tea allows for multiple steepings, stretching the cost per serving. Some of the following recipes should look familiar and all of them should feel approachable. I've added tea like you would add a spice or wine in a recipe. The possibiliti-teas are endless."
–Maleah Moskoff tea enthusiast at Cha Cha Tea: where east meets west.
Tea-infused Rice or Quinoa
Done drinking that pot of tea? Steep another pot and replace the liquid called for in any rice or quinoa recipe with steeped tea. Usually a 2:1 ratio. Jasmine green tea with a basmati rice works very well.
Simple Poached Salmon with Green Tea
Ingredients
1 cup steeped Genmaicha (roasted Japanese rice tea) or Organic Jasmine Green Tea
1/2 cup white wine
½ cup chopped green onion
1 lemon or orange slice
1 teaspoon grated ginger
1/2 teaspoon salt
4 (6-ounce) salmon fillets skinned, preferably wild
Instructions
Combine the tea and wine in a medium saucepot and heat on low for 20 to 30 minutes. Add the green onion, lemon or orange, ginger, salt, and salmon.
Cover and cook on high for about 20 minutes, until the salmon is opaque and cooked through according to taste. Serve hot or cold
Classic Party Mix
Ingredients
1/2 cup butter
2 Tbsp. Worcestershire sauce
1 tsp. sea salt
1 tsp. garlic salt
1/2 tsp. onion powder
3 cups corn or rice cereal
2 cups wheat cereal
1 cup Oaties cereal
1 cup organic peanuts
1 cup pretzel sticks
½ cup Organic Houjicha green tea, loose
Instructions
Preheat oven to 250 degrees. Melt butter in large roasting pan in oven (5 minutes). Stir in seasonings and tea. Add remaining ingredients and mix until coated. Bake at 250 degrees for 1 hour, stirring every 15 minutes. Cool and store in airtight container if you don't just eat it all at once.

Poached Pears
We've made this simple by replacing all the spices with our herbal tisane blend. Fewer ingredients to shop for. Serve with a fresh whipped cream and gingerbread cake.
Ingredients
4 firm, medium-size pears, such as Anjou, Bartlett, or Bosc
1 bottle robust red wine, such as Cabernet Sauvignon, Cabernet Franc, or Merlot
1/2 cup sugar
1 vanilla bean, cut in half lengthwise
½ cup Organic Cha Cha Tea "Celebration" Herbal Tisane
Instructions
Peel the pears, and place in medium saucepan. Add wine, sugar, vanilla bean, tea, and just enough water to cover pears.
Set saucepan over high heat, and bring liquid to a boil. Reduce to a simmer, and cook, occasionally stirring gently, over medium-low heat, until a paring knife easily pierces pears, about 15 minutes. Remove pan from heat; let pears cool in liquid.
Using a slotted spoon, transfer pears to a plate. Pour poaching liquid through a sieve set over a bowl. Discard solids, and return liquid to saucepan. Place over medium-high heat, and cook until liquid has been reduced to syrup that coats the back of a wooden spoon, about 45 minutes. Let cool; store pears in an airtight container until ready to serve.
When ready to serve, arrange pears on a platter or on individual plates, and drizzle poaching liquid over them.
Cook's Note
Peel the pears carefully, leaving the stems intact. Cut a small amount off the bottom so the pear can stand upright. If you're peeling many pears at once, immerse them in a large bowl of cold water with lemon juice. The acidulated water will keep the pears from discoloring until they are ready to be poached
Tea Infused Whipped Cream
Open a half pint of heavy whipping cream and add 3-4 teaspoons of loose tea like an Organic Earl Grey, French Breakfast or Lychee black. Close and shake. Leave the cream in the fridge 6 hours–overnight to allow the tea and cream to infuse. Strain the tea out and whip the cream with a hand mixer (or whatever method you normally use). You can add a teaspoon of sugar if you like your cream sweet.

Shortbread with Cha Cha Chai Tea
This recipe makes two logs of dough. The logs can be refrigerated for up to four days or frozen for up to three months (thaw before slicing and baking).
Ingredients
Makes 36
1 cup (2 sticks) unsalted butter, room temperature
1 cup confectioners' sugar
1 teaspoon vanilla extract
1/2 teaspoon salt
2 cups all-purpose flour (spooned and leveled), plus more for rolling
1 tablespoon ground Cha Cha Chai black tea. We use a clean coffee grinder or mortar and pestle.
Instructions
With an electric mixer, beat butter, sugar, vanilla, and salt until smooth. With mixer on low speed, add flour and tea, mixing just until a dough forms.
Divide dough in half; place each half on a piece of floured waxed or parchment paper. With floured hands, gently roll each into a 1 1/2-inch-diameter log. Wrap logs tightly in the paper, and refrigerate until firm, 1 to 1 1/2 hours.
Preheat oven to 350 degrees. Unwrap logs; with a serrated knife, slice dough 3/8 inch thick (if dough crumbles, leave at room temperature 5 to 10 minutes). Arrange slices, about 1 inch apart, on baking sheets.
Bake until lightly golden around the edges, 15 to 20 minutes. Cool on baking sheets 1 to 2 minutes; transfer to a wire rack to cool completely.
Green Tea Frosting
No food coloring here! Add color and flavor naturally with powdered green tea called Matcha. A little goes a long way. Fantastic on cakes, cupcakes and brownies. Read more about it at www.cooks.com/rec/view/0,166,150190-2...
Ingredients
1 tsp Matcha
2 T milk (if needed)
1/3 c. soft butter
3 c. confectioners' sugar
1 tsp. vanilla extract
About 2 tbsp. milk if needed
Instructions
Blend butter and sugar. Stir in vanilla and milk. Beat until frosting is smooth and spreadable.
No stock? No Problem Vegetable Soup
This recipe is really about using up what you have and feeding your soul at the same time. Swap out any veggies for what you have on hand.
Ingredients
Shredded chicken- optional
4 carrots, washed and chopped
4-6 celery stalks
1 large yellow or white onion
1 cup quartered mushrooms
1 bunch kale chopped
Unblended tea like Organic Bancha (common Japanese green tea)
Salt to taste
Freshly ground pepper to taste
Instructions
Cut the carrots mushrooms and the celery stalks into 1-inch pieces. Dice the onion. Add the cut vegetables to the pot with the salt, pepper, and enough steeped tea to cover (about 8 cups). Bring to a boil. Reduce heat and simmer until the chicken is cooked through, about 30 minutes.
If desired, shred the meat and add it to the soup. Ladle into individual bowls.
Note: steep the tea per company directions. Re-infuse the leaves multiple times for the recipe and add the leaves to the pot. You can eat tea!
Tea Sparkler
Need an easy brunch cocktail? Steep a colorful tea like Organic Blueberry Rooibos or Plum Berry black. Heat the liquid in a small saucepan on low until the liquid reduces by half. Store or use when cooled. Add ½ ounce of the concentrate in a champagne flute and then fill with your favorite Proseco or sparkling wine. The tea adds color and flavor without ant artificiality or sugar.
Mocktail version: use sparkling water instead of proseco.
Oolong infused vodka
Tea is such a sensory experience and this recipe honors tea in many ways.
Choose good tasting vodka and remove about an ounce. Add 2 tablespoons of loose Yuzu, Strawberry or Grape Oolong. Let the tea infuse the vodka for 24-48 hours. Serve this tea infusion on the rocks straight or with a splash of Italian soda that would compliment each flavor of tea.
*Use tea to make ice cubes.
January 4, 2012
The Chatter

We've lobbied really hard for Garrison Keillor to give up life in Lake Wobegone and move to Sharon Springs, but thus far he has not answered our letters or returned our calls.
Sharon Springs has beautiful people and above-average children, too, so on to Plan B.
What is a small town village without a small town paper to keep track of what everyone is doing?
Leila Durkin, proprietor of The Village Hall Gallery, is now editor of our own little paper.
Each month you can check back here for a new issue and follow the lives of the real village people. If you pay a real visit, you may even want to submit a story idea of your own!
You may not live in small town, but at least you can pretend.
See below for the January 2012 Issue
January 3, 2012
Winter Reading for the Gardener
[image error]
This is the time of year when so many gardeners are starting to button things up for the winter months. Not so much in the Southwest. I'm pulling out the last of the summer vegetables and prepping for a small winter crop. We are keeping in the Hubbard squash vines as long as we can because the fruit – as freakishly large as they are – are turning out to be the hit of the season and we have a couple more ripening. I have hit on a squash soup recipe that makes Frank always ask for seconds. He always enjoys my soups but that second bowl makes this recipe a keeper.
A few weeks ago, the Wall Street Journal published a list of gardening bestsellers. I wasn't familiar with any of them so it was interesting to see the list. It got me thinking about my gardening bookshelf. This is one of those times when not having that winter respite from gardening is sorely missed. I can't spend the winter reading books, leafing through seed catalogues, and dreaming of what spring will bring.
[image error]My favorite book by far isn't my primary source for vegetable growing but it is by far the most used book in my collection. It is so well regarded in this area that you find it in almost all garden centers. When I go out and about as a Master Gardener, this is one of the references we always carry with us. The Sunset Western Garden Book.
I wonder how far and wide the Garden Book is known. Sunset magazine is the parent of the Garden Book, a periodical first published in the 1890s as a kind of publicity vehicle for Southern Pacific Railroad's Sunset Route. It was nearly wiped out by the 1906 earthquake, was saved, but didn't come into its own until it was purchased by the Lane family in 1929. Over the sixty-plus years they owned it, they steered it to its famous and current Western lifestyle emphasis.
From this magazine (to which I still subscribe), the Lane Publishing Company began a whole series of other publications. Through the 1930s, excerpts from the magazine were published as [image error]Sunset's All-Western Garden Guide. I have one from 1934. It is a wonderful and funky 100 pages of stuff from the magazine. I think I like best the one page cartoon of a Dahlia telling its own first-person story, ending with it this: "Well, here I am at the Dahlia Show and look what I'm wearing! No wonder I got first prize: I came from good stock, and I had intelligent care!"
This pamphlet has other features but the most notable was Dictionary-Encyclopedia, the detailed list taking up more than half the booklet of plants grown in the west including the characteristics of the plants, specifics of subspecies, propagation, and culture. It was that exhaustive list that in 1939 became The Complete Garden Book.
[image error]This was followed by The Western Garden Book of 1954, which for the first time included different climate zones in the West. At the time, there were 13 zones, distinguishing the different climates up and down the California coast, inland to the deserts. I have this Garden Book and I find it interesting because it has a section on native plants. I was describing the book to a gardening friend who was shocked to learn that nearly sixty years ago, gardeners were considering natives for landscaping here in the West.
The zones described in that book were expanded in later editions to 24. The precision of the zones carves my county into about ten different areas. San Diego is unique because we literally can drive from the beach to the snow and beyond to the desert in just a couple of hours. The USDA Zones don't quite do it for me here and I have always relied on the Sunset system.
Both of the books are dominated by updated versions of the Encyclopedia. My latest edition (2007) includes "More than 8,000 Plants," or so the cover tells me. Unlike the awkward 1954 version, which broke out the plant listings by category (bulbs, perennials, etc.), all plants are listed together, alphabetically by Latin name. I have a bad memory for Latin names so, conveniently, it has included common names for many of the plants. It also has a couple hundred pages of great tips and very valuable information but it is the Encyclopedia that everyone uses. The plant descriptions are so reliable for information about traits, culture, propagation, pests, and diseases that it is irreplaceable.
I don't know where the Sunset is going in the future. I did find where they had assigned zone numbers throughout the country, including Sharon Springs (Zone 42). Perhaps Sunset has plans for an Encyclopedia in your neck of the woods.
These are the other books I use most:
The Vegetable Gardener's Bible by Edward C. Smith, and I just bought the same author's The Vegetable Gardener's Container Bible. Though it is not regionally specific to me (Mr. Smith hails from northern Vermont), the information is complete enough that I can apply it to my California garden.
The Victory Garden Cookbook by Marian Morash. Strangely enough, I get really good information about harvesting and storing from this cookbook, better than I get from most. My copy of this book is nearly 30 years old and falling apart so I am tempted to pick up a new copy. It was reissued by Random House last year but already seems to have sold out. If you can get your hands on it, buy it.
The Truth about Garden Remedies by Jeff Gillman. As a professor and a scientist, Jeff Gillman brings a little sanity and lots of unexpected humor to the subject matter. Whenever I go out into the public as a Master Gardener, I come up against people who swear by beer traps for snails and vinegar-based herbicides. Gillman sifts through the fact and fiction and helps me to understand what works, what doesn't, and the why of both.
Happy reading!
December 24, 2011
Christmas Pudding
[image error]
The Christmas Pudding that Fizzled
I have always enjoyed the stories written by Charles Dickens. Over the years he has inspired me to love anything that is "Olde English" especially things that pertain to the holidays. A few years ago I spotted a tinned pudding mold while I was pre-holiday shopping at a Williams-Sonoma store. I recalled the scene in 'A Christmas Carol' when Tiny Tim's siblings rushed him to the wash-house … "that he might hear the pudding singing in the copper."[1] I purchased the mold hoping I would finally be able to make and enjoy something I had read about but never tasted – Plum Pudding. Thank you Mrs. Bob Cratchit!
I did my homework, investigating recipes for Plum Pudding and similar puddings made in the old English traditions. As I pictured the ingredients and read through the directions and the historical accounts I recalled my own grandmother's habit of making holiday fruit cakes in early spring, wrapping them in cheese cloth and soaking them in rum or brandy until the holiday season when the flavors had melded, the hard dried fruits softened and the rich moist cake-like dessert was 'just right'. I decided to do the same with my Plum Pudding and planned to surprise my family at Christmas with my special rendition of an old tradition.
As long as I was going to follow tradition I decided to follow another one I discovered while doing my research. In the 'Food and Drink' chapter of Brandreth's Christmas Book[2] I found the following admonition: "…. prepare your Christmas pudding on Stir-up Sunday. This is the Sunday nearest the Feast of St. Andrew (November 30th) and it gets its name from the collect for the day: 'Stir up, we beseech Thee, O Lord, the wills of thy faithful people'. On Stir-up Sunday you are supposed to make your puddings and children are supposed to dance through the streets singing:
Stir up, we beseech thee,
The pudding in the pot.
Because when we get home,
We're going to eat the lot!
This reminded me of carolers in Dickens' time who demanded payment for their song in the form of 'Figgy Pudding' proclaiming, "We won't go until we get some!"
And so, on the afternoon of Stir-up Sunday I assembled the dried fruits, the spices, the brandy, processed the bread crumbs and chopped up a chunk of suet I had procured from a meat market. I liberally buttered my new pudding mold and spooned in the mixture, then clamped the top down before setting it into a pan of simmering water in the oven. After several hours of carefully monitoring the temperature and water level in the pan, my first-ever Plum pudding was finally finished. I let it cool on a rack for the rest of the day before inverting it onto a plate and carefully removing the mold. The finished spicy pudding smelled wonderful and revealed the mold's decorative shape. I draped a damp cloth over it and went to bed, satisfied that my first try at making something so very different from anything I had created before had turned out so well.
The following morning I drizzled brandy over the pudding, wrapped it in a brandy-soaked piece of cheese cloth, then in plastic wrap and finally in a layer of heavy duty aluminum foil. The finished and wrapped pudding was now set to "rest" in a small wooden box in my chest freezer until late December.
A few days before Christmas I packed my car for the five-hour drive from Seattle to my family's home on the Oregon coast. I tucked the boxed pudding into the trunk along with some clipped and washed sprigs of holly for a traditional garnish and a bottle of brandy so that I could present it at table flaming on a platter. By this time the anticipation of dessert following Christmas dinner was very strong and the 'spirit of the season' had indeed lifted my spirits to a new high.
On Christmas day I helped my mother prepare a delicious turkey dinner with all the trimmings. We also had several pies: apple, pumpkin, mincemeat and cherry sitting on the buffet. Even though I had informed all of my family that I was bringing a 'special dessert' our long-standing practice of having several kinds of fresh home-baked pies to choose from prevailed in spite of my desire to institute a new tradition. But we had never been served anything brought to the table in flames before, so I crossed my fingers and excused myself as everyone was finishing their second and third helpings even as some complained they had no room for any dessert. But mother spoke up and said we would all wait because I had gone to a lot of trouble to make something special. Everyone was expected to remain seated long enough to see what it was.
I carefully arranged my slowly-thawed pudding in the center of a serving platter in the kitchen. I poked some holly sprigs around the top and then poured brandy over the pudding and around the base on the platter. I struck a long match and stood back as I touched the flame to the edge of the platter, expecting a big "whoosh" as the pudding would erupt in flaming glory. But … there was no flame. I moved the match around the pudding, trying to find a spot where the flame would take hold. Again, no flame. I decided it must need additional brandy, so I poured another half-cup or so over the pudding. A generous puddle of brandy remained on the platter. Another match sizzled and was extinguished in the puddle as I tried in vain to light the pudding again, and then again, and again. What in the world was wrong?
Then it occurred to me that I should have warmed up the brandy first. That had to be it … cold brandy was probably not as easy to light. As I slowly heated another cupful of brandy on the stove, lid at the ready to extinguish any flames that might erupt from the heating pan, I mentally kicked myself for not rehearsing this before the holidays. I wondered if I should have sought out a 'higher proof' brandy. Maybe my brandy wasn't strong enough to burn as I tried to light it with a match. I was beginning to panic. Several attempts to light the pudding after warmed brandy had been poured onto the now well-soaked molded mound met once again with failure.
My brother came into the kitchen to find out what was taking me so long. I pointed to the platter, informed him it was Plum Pudding and admitted that I couldn't get the brandy to light so that I could bring it, flaming, to the table. Without a word he picked up the brandy and took a swig right from the bottle as if it was a beer. Then he looked at me, chuckled and said, "I think I know what your problem is …. this brandy has been watered down, bro!" My own taste of the brandy confirmed what he had just discovered. With disappointment visible on my face I brought the platter of well-soaked Plum pudding to the table and informed my family of my unfortunate discovery. There were groans and sighs … and a few giggles.
Some announced they were having a piece of pie, others tried the pudding and consoled me with, "well, it tastes pretty good." And still others decided they were too full for dessert and would give it a try – later. As I picked through my own piece of the pudding I savored and enjoyed the mix of spicy and tangy flavors. The pudding was, at least in my mind, a triumph on its own even without a flaming presentation.
I thought about the bottle of brandy that had been sitting on my pantry shelf at home wondering who the culprit was who added water to the bottle. I realized that one and only one person had both access and opportunity. He was a neighbor who often fed and cared for my cat. I confronted him when I returned home whereupon he confessed that he had indeed succumbed to temptation and got into the bottle while house-sitting for me during my prior Thanksgiving trip. He figured I wouldn't notice if he replaced the brandy he consumed with an equivalent amount of water.
The Plum pudding that fizzled did not become a Christmas tradition in my family. Instead I started a new tradition — for myself. Whenever I cook with wine or spirits of any kind, I always pour a glass for me to enjoy while I'm cooking and of course to make sure it's OK.
Christmas Pudding
Here is the recipe I used to make the Plum Pudding. This is an adaptation of an original English recipe which calls for ingredients which aren't always common or easy to find in the United States. See the notes at the end for helpful explanations and substitutions.
Ingredients
1 ½ cups all-purpose flour
2 teaspoons ground mixed spice
1 teaspoon ground cinnamon
½ teaspoon grated nutmeg
1 ½ cups fresh white breadcrumbs
¼ lb. finely chopped suet
1 cup dark brown sugar
12 oz. sultanas
8 oz. dark raisins
8 oz. currants
3 oz. chopped mixed peel
Grated zest and juice of 1 orange
2 eggs, beaten
4 oz. brandy
Did you notice the one ingredient missing from this list? Answer: plums. I consulted at least a dozen recipes for plum pudding spanning over two centuries and found only one which called for "4 chopped dried prunes". That's as close to plums as any of the recipes called for. I have no explanation for this, but I found the commonality of this "missing ingredient" very interesting.
Instructions
Preheat your oven to 350 degrees Fahrenheit. Sift the flour and spices into a mixing bowl. Add the breadcrumbs and then the suet. I used a pastry blender to blend the suet into the dry ingredients. Add the sugar and stir the mixture thoroughly. Add the remaining ingredients and stir again to thoroughly mix everything. It should have the consistency of a soft sticky dough. If not, add a bit more brandy. Spoon the mixture into a well-buttered pudding mould. Clamp on the lid, or if your mould has no lid cover it with a pudding cloth or waxed paper tied down with cooking string. Place the mould into a pan of water in the center of the oven and bake for about 4 hours, replacing water in the pan as needed with more boiling water.
Cool slightly then remove the cover and allow the pudding to cool completely. Invert the mould onto a plate or platter and carefully remove the mould. It should slide out of the mould easily. Wrap the pudding in cheesecloth soaked with brandy or rum and store in a cool place until ready to serve. When serving, warm the pudding and place on a serving platter. Pour about ¼ cup of warmed brandy over and around the pudding and light with a match for a dramatic flaming presentation. Serve with whipped cream or Brandy Butter.
for the Brandy Butter:
6 oz. unsalted butter
6 oz. superfine sugar
3 Tbs. Brandy
Whip the butter until soft and creamy. Gradually add the sugar and then the brandy, beating thoroughly with each addition. Spoon into a serving dish and chill until firm.
NOTES:
"Ground Mixed Spice" in many old recipes is not further defined and can vary from region to region or differ according to manufacturer. Most authorities agree that mixed spice as used in English cooking would include the warm sweet spices including: cinnamon, nutmeg, mace, cloves, allspice, coriander, ginger. "Pumpkin Pie Spice" as now sold in the United States is often suggested as a substitution, but that would likely omit the cloves, allspice and coriander. I made a mixture of coriander, allspice, mace and cloves using small amounts of each and grinding them together in my mortar and pestle, then measuring out 2 teaspoons of this mixture which I added to the cinnamon and nutmeg called for in the recipe.
"Sultanas" are labeled and sold as such in England but are very similar to 'Golden Raisins' in the United States and are generally available everywhere.
"Mixed Peel" is the candied peel of a mixture of citrus fruits, usually lemon, orange and citron. I found all three available at my supermarket but I had to buy separate containers of each and mix them myself.
"Fresh White Breadcrumbs" – should be made from fresh white bread and are best chopped up in a food processor if you have one. If not you can shred some white bread on a box grater but don't use packaged dried bread crumbs or Panko.
"Suet" – is the hard fat found around the kidneys of cows, not to be confused with other fat taken from animals which may be sold as suet. A lot of suet sold in supermarkets now is not of this quality and is usually intended for use in bird feeders. Check with a knowledgeable butcher who knows your intended use to obtain the best suet for your pudding.
[1] Dickens, Charles, A Christmas Carol, 1998, Book-of-the-month Club, Inc. Originally published in 1843.
[2] Brandreth, Gyles, Brandreth's Christmas Book; 1975, Van Nostrand Reinhold, Berkshire, England
December 19, 2011
Twigs & Berries
[image error]
Creating an opulent Christmas tree can be a pricey endeavor. We've collected ornaments for years, buying them during after-the-holiday sales. Even so, we shutter to think at how many dollars those fragile, glittery baubles have tempted out of our wallets.
This year, we decided to decorate a tree using nothing but lights. And we were inspired by a walk down by the pond on a recent morning when just a few snowy white flakes had started to fall.
We call it the Twigs & Berries tree.
We first collected all of the strands of white lights from the attic (we were surprised at the number of unused strands we possessed—you may be, too). We used strands of bulbs of varying shapes and sizes.
Next, we went through all of the strands of multi-colored lights and removed all of the red bulbs.
After placing the strands of white lights on the tree, we then replaced the white bulbs that fell on the tips of branches with red ones to mimic the snow-dusted tree in the yard.
[image error]
Twigs & Berries Tree
It's an idea that could easily be used on outdoor trees around the yard where decorating with ornaments is not practical.
Need more ideas? Check out our Naked Christmas Tree. Click here.


