
Tracey Allen's Blog, page 4
September 6, 2013
Easy Dill Pickles
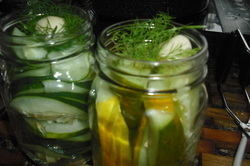 I love this time of year....harvest and preserve, not to mention walking out the door to pick fresh veggies for the next meal, just can't buy that feeling of knowing you made it yourself. I used to make all kinds of salsa, chutney, pickles, etc but decided this year that if there was leftovers then I won't make any more this year, or if it wasn't a 'loved' preserve then I would pass. Dill pickles win hands down. It can be difficult to make them if you are looking for dill pickle size but lucky for me it doesn't matter how they are cut as long as they taste like dill pickles. Pictured at the left I've sliced them or cut them length wise...the choice is yours.
 Supplies - What you will need?
About 5 medium-large sized cucumbers, 1 cup vinegar, 8 cups water, (7) 500ml mason jars with lids/covers, 1/3 cup coarse salt, 2 garlic cloves per jar (14), and fresh dill enough for a sprig on top and bottom (14).
Step 1 - Fresh Cucumbers. Option one grow your own cucumbers in a raised bed with dill planted around the edges. Pick your cucumbers fresh or Option two buy your cucumbers at the farmers market or store and preserve the same day. This can make or break good pickles...freshness.
Step 2 - Sterilized Jars get all your jars, lids, covers out and your canning pot with jar rack (see pictures below). Fill the pot half way with water and then put the washed/clean jars, lids/covers in the canning pot and make sure they are covered with water. Bring to a boil and boil for 5 minutes.
Step 3 - Prepare ingredients - cut your cucumbers in wedges, slices or whatever you like. Peel your garlic and put the dill in sprigs ready to put in your jars.
Step 4 - Brine - in a pot mix the 1 cup of vinegar, 8 cups of water, and 1/3 cup coarse salt - bring to a boil, boil five minutes and then let cool.
Step 5 - Put garlic, dill and then cucumbers in jars and top off with garlic and dill then pour brine over up until just below the top. Seal the jar with lid/cover and place back in canning pot - boil for another 5 minutes and remove to cool. You should hear popping of the lids as they properly seal. If you lid doesn't pop or indent it may have an incorrect seal and you will want to refrigerate and use.
Enjoy them! See the pictures of some of the process below....


August 26, 2013
Growing Healing Herbs
 Herbs provide many benefits including great for teas, flavouring foods, and herbal remedies. This year I've planted a number of great herbs pictured from left is
Cumin
- great in flavouring foods especially Middle Eastern foods,
Chia
- healthy for you,
Marshmallow
,
Motherwort
- herbal remedy, and
Astragalus
.
Herbs provide many benefits including great for teas, flavouring foods, and herbal remedies. This year I've planted a number of great herbs pictured from left is
Cumin
- great in flavouring foods especially Middle Eastern foods,
Chia
- healthy for you,
Marshmallow
,
Motherwort
- herbal remedy, and
Astragalus
. We plan to continue to add 'different' herbs to gardens for both diversity and possible future uses.
August 22, 2013
Straw bale Greenhouse
 Originally this year we thought we would construct an underground greenhouse, and we still might, next year. We changed our minds due to the fact that our land is a mix of hard and soft and you just don't know until you dig....and the thought of a building a retaining wall within the underground green house put us off this year and it would interest the expense and well we only budgeted so much to built one.
 So we decided to use what we had to modify and that gave us this almost finished straw bale greenhouse that you see to the left.
Process: We started with our existing shed and its south facing exposure and added three raised beds using recycled pig penning or PVC with some recycle wood. We then built the frame using the raised beds and shed structures to support clear plastic roofing made to let the sun in. We considered framing it in all the way, however decide we could remove the straw next year and use it to grow potatoes while letting our green house breath for the summer. We haven't yet and it isn't shown but we will be adding plastic sheeting on the inside and outside of the straw bales to keep moisture out. Since the shed is directly outside our east end door of the house we have easy access to water, however we plan to eventually add a rain barrel to collect water. Finally, we plan to add shelves on the wall of the shed to use in seedling/starter seeds in the spring.
This project cost just the price of the roofing - clear corrugated roofing panels was approximately $300, the remaining materials were free to us, including the straw. The size of the greenhouse is 10 feet by 14 feet.
August 16, 2013
Papercrete - Cement & Re-cycled Paper Building Material
 Our house was built using ICF or insulated concrete forms and I'm sold on them...our house is a great temperature year round without any air conditioning and heating with only the sun or 2 cords of wood for back up heat. This brings me to papercrete, I read about it and liked the idea of using recycled paper for the insulation part and concrete to make it solid and add thermal mass, the fact that it is cheaper and possibly easy to build with, has me looking at it for a future shed or bunk house on our property.
 And this is the experiment to make one block to see how it works. I'm not doing anything fancy, just as simple as possible because that is my style. NOTE: NOT PROFESSIONAL ADVICE....I'm experimenting for my personal use.
Step 1: Gather materials. (Dry Portland cement, papers shredded (colour or no colour no problem) and water) Some people add dirt and make it 1/3 of each cement, dirt, and shredded paper...you decide.
Step 2: Decide on the shape and form you will use. I'm using a coconut water box since it looks like a garden square. Others have used bricks, or larger retangles, etc.
Step 3: Container to mix your papercrete in before pouring into your mould or form. I am using an empty coconut oil bucket.
Step 4: Decide on your mix we used 1/2 cement and 1/2 paper to give a good solid one to work with.
Step 5: Start the process.
a) Shred paper and put in a bucket with water to soak for a few days...softens it up and makes it easier to mix.
b) Add cement and mix vigorously.
c) Pour into form after you notice it is well blended. Wait 20minutes to 30 minutes to remove all but the bottom coverage of cardboard. Note: Use cardboard under the papercrete to make it easy to remove.
I'm waiting now for it to dry to see what it looks like and if it will be ok to use in building....next blog I'll share how it worked or didn't....hoping it is a great mix and solid brick to use.
Resources:
Overview what it is "Unlike concrete or adobe, papercrete blocks are lightweight, less than a third of the weight of a comparably-sized adobe brick. Papercrete is mold resistant and has utility as a sound-proofing material."
DIY - Papercrete Yurt and a good FAQ website
August 12, 2013
Book a Personalized Gluten-free Cooking Class
 Well I wrote the book Easy Gluten-free Lunches and Snacks: Simple Cookbook, then I started hosting cooking classes in the fall of 2012 and the spring of 2013 plus offering gluten-free cooking classes as an invited guest chef at Annie's Table. Now I'm offering personal one-on-one or small group gluten-free cooking classes personalized to your needs, a cooking class just for you and/or your family/friends.
 Check out the details here.
July 26, 2013
Saving Seeds - Simple and Inexpensive
 The cost of food is increasing, the unlabelled content in our foods are starting to scare us, the pesticides on our food are a worry, and buying organic isn't always an option, our solution; grow our own....where possible. Sourcing seeds is now becoming an issue, with border restrictions on some tubers or finding 'pure' seed vs hybrid or frankinseeds, what can a gardener do? Well save your seed. It is actually better to save your seed from the point of view that the variety you grew, grew well on your land and is therefore a good candidate for selection in saving to replant next year. The other real benefit is you don't have to buy seeds, saving your money and the research to find the 'right' seeds.
 Pictured at left is a selection of some of the seeds we are saving this year so far carrot seeds, turnip seeds and spinach seed. To learn more about seed saving visit Seed Savers.
Happy Seed saving.
July 15, 2013
Pesto of a Different Kind - Use Kale, or Garlic Scrapes
 I had a ton of kale and while it is great for juicing, salads, etc I was looking for some other uses. That is when a friend told me she tried Kale Pesto...great idea. I tried and it is delicious. Then another person suggested garlic scrapes instead of basil for pesto...equally good idea. So here they are for your enjoyment!
Kale or Garlic Scrapes Pesto
Ingredients:
4 cups lightly packed Kale (stem removed) or garlic scrapes
1/2 cup olive oil
1/4 cup walnuts (or pine nuts or almonds)
2 Tbsp lemon juice
salt to taste
Parmesan cheese if you like but I don't add cheese to mine.
Directions:
1. Put all ingredients into a food processor and pulse or grind to chop finely....then add oil and process until pasty like the picture above. Add into cook pasta by tossing it or even add it to other dishes to add flavour.
July 7, 2013
Make Your Own Hummus - Quick, Easy, Healthy & Gluten-free
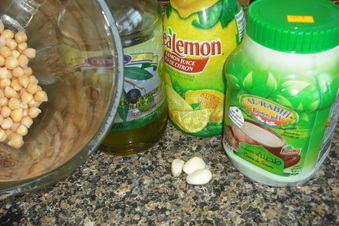 I've noticed a number of people buying hummus and at $3-5 for a small container combined with how easy it is to make...maybe you would like to be shown just how to make it. So I made a video - check out the "how to make hummus" youtube video here
The recipe can be made with dried chick peas ($3.00/bag and makes about 10 batches of hummus or .30cents each time) that are soaked overnight in water and then boiled until they are soft or you can use canned chick peas ($99/can). I've even gone as far as growing my own chick peas...not again, lovely plant but picking by hand is very labour intensive....taste was out of this world though.
Ingredients:
1 cup chick peas
1/4 cup lemon juice
3 cloves of garlic chopped (some people omit this...just to you)
1/3 cup olive oil
1/4 cup water or enough to have the mixture blend and become smooth.
1/4 cup tahini
salt to taste
July 5, 2013
Easy to make Sushi - cheap, easy, healthy and gluten-free
 Shown are nori sheets, sticky rice, roast dulse/seasame seeds ground, sliced veggies I made sushi for the tennis club I attend - Charlottetown Recreation Tennis Group or CRTG and we had a small meal after our tennis games...and I made two items sushi and hummus both of which received great reviews. Many people were surprised I made sushi as they were under the impression it is hard to make and you need a bamboo mat to make them. This couldn't be farther from the truth....they are so easy to make. So today I was making them for my sister and decided to video it to share with others to show just how easy it is to make....
see the video on
how to make sushi.
Shown are nori sheets, sticky rice, roast dulse/seasame seeds ground, sliced veggies I made sushi for the tennis club I attend - Charlottetown Recreation Tennis Group or CRTG and we had a small meal after our tennis games...and I made two items sushi and hummus both of which received great reviews. Many people were surprised I made sushi as they were under the impression it is hard to make and you need a bamboo mat to make them. This couldn't be farther from the truth....they are so easy to make. So today I was making them for my sister and decided to video it to share with others to show just how easy it is to make....
see the video on
how to make sushi. Using one cup of uncooked rice, 4 nori sheets, and a small amount of cut veggies (1/4 of an avocado, 1/4 of a pepper, and 1/5 of an English cucumber)....the cost is about $2.00 and that will make 24 sushi or .08cents each...plus whatever condiments you use i.e. dulse/sesame mixture, soya sauce, wasabi, or pickled ginger. Any seaweed food item is healthy for you and well we all need veggies...so can be forgiven for the white rice. Hope you will consider trying to make sushi yourself!
July 1, 2013
Take a look at Fava Beans, Flax, Quinoa, and Peanuts
 It is hard to believe the vast variety of foods we can grow in Prince Edward Island zone 5b. Here are a few pictures of some crops we are going....far left top - Fava Beans flowering, next top middle is quinoa, bottom far left is flowering buckwheat, next in bottom middle is flax and then the big picture to the right is of a peanut plant....cool, eh. I'm feeling pretty confident I'll have crops from the fava beans and buckwheat, likely even the quinoa and flax....the peanuts though, not as sure of, we will see.


