Aislin.'s Blog, page 4
July 15, 2016
Story Spells: Teaching Spellcraft to Young Children
I've had so many people ask me about teaching spells to children that I finally wrote a small ebook about it. This ebook can be found at most major retailers, including Amazon, Kobo, and Barnes and Noble. It's not a long book , but it doesn't have to be.
About the book:
Children can cast spells too! Kids have wonderfully open minds and perfectly vivid imaginations. This makes them natural spellcasters. With a little guidance from a parent or other loving adult, they can create and cast their own spells. These spells can help children learn to deal with the widening world, make new friends, work better with others, or even banish nightmares.
Young ones are very literal minded. For this reason, when the idea of spells is first introduced, using stories that reflect their personal experiences and goals is the way to go. Though story spells work best for children ages 1 through 5, even older children (and their parents!) can have fun with this unique form of spell casting.


July 8, 2016
Ashling Wicca, Book Three
For those interested in a continuing study of Ashling Wicca, the third book in the series is available for purchase through Amazon, Barnes and Noble, Kobo, and other retailers, as both a paperback and an ebook. Just like with the first two books in the series, there is an accompanying workbook that can be purchase in either paperback or ebook format.
From the back of the book:
Venture further down the path into the magickal world of Ashling Wicca. The seven units of this book, which are designed to be completed over the course of an entire year, build on the skills and knowledge you should have gained in the first two books in the Ashling Wiccan Series. Each lesson will guide the student to a fuller understanding of the intricacies of the Ashling Wiccan Tradition. These lessons include both the practical and theoretical, and your magickal education will be rounded out by the inclusions of rituals and spells to assist you in your practice.
This book contains all the lessons traditionally studied by those seeking to attain Water Degree within Ashling Wicca. Because initiation into the tradition can only be obtained under the direction of a High Priest/ess, the material within these pages is presented by a High Priestess of Ashling Wicca. With careful study and attention, the student should be able to complete all included material in about a year. At this time, initiation into Water Degree may be possible.
From the back of the workbook:
This workbook, which is designed to complement Ashling Wicca, Book Three, will guide you further down the path towards a thorough understanding of the Ashling tradition. Full of tests, exercises, journal entries, and reflections, it can help you make sense of the material presented in the master book. It also provides various rituals vital to the practice of Ashling Wicca. Here you will find an initiation ritual, a handfasting ritual, and two additional Sabbat rituals.
This book should be used in conjunction with Ashling Wicca, Book Three. The units in each book are identical, allowing you to easily line up the written information from the master book with the tests and other materials in the workbook. Use both to continue your study of the art of Ashling Wicca.
October 2, 2015
Herbal Preparations: Soaps
 When we think of herbs and their uses, soaps aren't necessarily the first thing that come to mind. But they can be used in herbal medicine and magick, especially if you take the time to study the herbs you'd like to use.
When we talk about making soaps at home, we're not really making soap. Instead we're purchasing a soap base, usually from a craft store, melting it, adding scents and colors, and pouring it into a mold. Truly making soap is a complicated and sometimes dangerous process. As such, it is outside the scope of this article. The melt and pour method is safer and is easy enough for just about anyone to pull off.
Besides your soap base and a double boiler (because you do not want to put melted soap directly over heat; it may catch fire), you'll need molds and soap additives. Molds are typically sold wherever you buy the soap. You can get your additives there too, but beware. While the soap colors are perfectly fine, you probably don't want to buy the scents. Instead, use true essential oils. They have medicinal and magickal properties not present in fragrance oils.
Once you have your supplies, you'll need a recipe. For the most part, you can take any essential oil recipe and convert it you a soap recipe simply by omitting the base oil. Add the oils, using just a few drops at a time, slowly increasing the amount until the scent is pleasing to your nostrils. Take into consideration your skin's sensitivity. If you have sensitive skin, you might want to be conservative with the amount of oil you add until you know how you might react.
You can also add dried herbs to your soaps, which have the added benefit of exfoliating the skin a bit. Make sure these are well distributed throughout the soap before pouring your soaps into molds. When using your soaps, bathe in warm, but not hot, water to maximize their effectiveness.
The ingredients in your soaps will determine their magickal and medicinal effects, so choose your recipes carefully.

August 14, 2015
Herbal Preparations: Salves
 The simplest of salves can be made by gently warming sesame or olive oil along with your herbs of choice. Use a very low heat in the stove and simmer for at least one hour if using fresh herbs. Dried herbs or seeds should simmer for two hours. Hard materials such as barks and roots should simmer for three hours or more.
And what about using a combination of hard, fresh, and dried material? This is quite easy, actually. Simmer the oil, add the hard materials, and let simmer for an hour. Add the dried materials and let simmer for another hour. Finally add the fresh materials and let the salve simmer for a final hour. The trick is timing, so pay attention and perhaps use a timer.
The product at this stage is not a salve yet. Strain the material through a good quality cheesecloth, making sure to get all the plant material out. You want no plant material in your salve. When this is done, you'll need to add melted beeswax. A mix of no more than 2 ounces of beeswax per pint of oil mixture is typically ideal. Stir thoroughly and consider adding a teaspoon of benzoin tincture as a preservative. If you're going to refrigerate the salve and use it often, a preservative isn't necessary.
Pour the mixture into a container of your choice, one that seals well, and store in the fridge if you haven't added a preservative. If you have, you can store the salve in a cool, dry place. If you've made a salve for your lips (such as a chap stick), consider pouring it into an empty chap stick container. You'll still need to refrigerate if you haven't added a preservative, but your chap stick will survive a few hours at room temperature. You can refrigerate overnight and carry the stick with you during the day.
Your salve can be applied directly to the area you need to treat. The exact ingredients in the salve will determine what it can be used for.

August 7, 2015
Herbal Preparations: Poultices
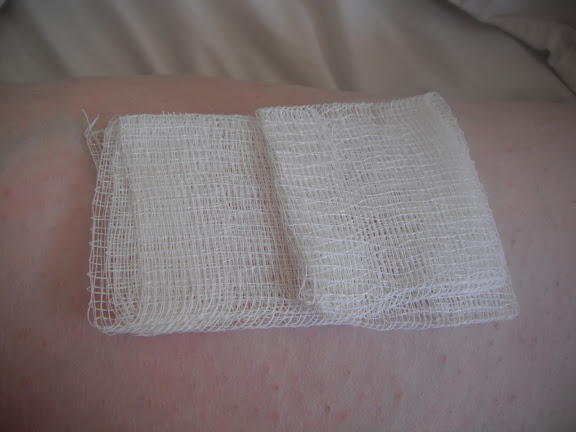 A poultice of red clover on a rash on my own leg.You might think poultices aren't used very often in the modern world, perhaps because you haven't heard the word used in common conversation, but you'd be wrong. If you've ever put a little bit of ointment, perhaps some Polysporin, on a bandage and applied it to a wound, you yourself have used a poultice. They're also used frequently in hospitals for a variety of purposes, though they are more likely to call them applications.
 Simply put, a poultice is just a sterile cloth (such as a bandage or even a sterile piece of cheesecloth) that is used to keep some for of medicine in place. This medicine might be a paste, it might be an ointment, or it might even be actual loose herbs. In general, if you do use loose herbs, you'd place a single layer of bandage or cheesecloth on the wound first, then place the loose herbs, then bandage the wound. This practice is sometimes used with pastes and ointments as well, depending on the ingredients. The poultice is often heated, but be careful of applying an overheated poultice to bare flesh. Burns can and have resulted.
Back before we knew much about infections and such, a piece of bread or other similar food product might have been used instead of the sterile cloth. I distinctly remember my grandmother applying a poultice of mustard and a few other ingredient to a piece of bread and strapping it to my spider bite. It worked and I didn't get an infection, but today it would be better to use sterile cloth. We don't always have to be stuck in the past, after all.

June 5, 2015
Herbal Preparations: Oils
 Oils have been used by many cultures around the world for thousands of years. A great deal is known about them because of their extensive use. When used for magical or medicinal purposes, you will almost always dilute your oils. There are some notable exceptions, such as lavender, but most essential oils are far too concentrated to use without dilution. Some oils are actually dangerous if they come in contact with your skin or mucous membranes before they are diluted. Because of this, if you are going to prepare your own oil mixtures you will have to know how to delete them yourself using a carrier or base oil.
 There are many base oils to choose from. you might consider almond, apricot kernel, avocado, coconut, grapeseed, hazelnut, olive, palm, peanut (if you're not allergic), sesame, or sunflower. To decide which one best suits your purpose, do a little research. Look up the properties of sesame or sunflower and decide if any of those properties make sense for your purposes. Or you could simply use jojoba oil as your base or carrier. This oil is good for almost any purpose and it has the added benefit of not going rancid. All other oils, including the ever-popular olive, will eventually become rancid and unusable. You can, of course, use a preservative such as wheat germ oil or rosemary oil extract, but I prefer to simply use jojoba and avoid the problem altogether.
When creating your oil preparations, you'll have to take into account your own personal sensitivities. Some people, for example, can place certain oils almost undiluted on their skin. Others may find that the oil in question must be diluted significantly before it can be applied. For this reason, you may have to add more or less carrier oil to your final mixture before use. Also remember your own allergies. If you're allergic to cinnamon, you probably cannot place its oil upon your skin no matter how much you dilute it. In general, however, it is best to start off with a ratio of 20 to 25 drops of pure essential oil to approximately 2 ounces a base or carrier oil. You can then make this mixture stronger or weaker depending on your own preferences and needs.
At first, you will probably want to stick with proven recipes when creating herbal mixtures. In time, however, you will certainly want to experiment a bit. When doing so, look back at the proven recipes and see what you can tweak to better suit your own personality and style. As long as your oils are not too concentrated and you're not using anything you're actually allergic to, there is little harm in this type of herbal preparation. Just keep most herbal mixtures away from your mucous membranes and out of your eyes and you should be fine.
Remember that all of the above assumes you are working with pure essential oils. Fragrance oils have no place in magical or medicinal practice. They might smell good, but they are otherwise useless.

May 15, 2015
Herbal Preparations: Incense
 If you need is to release the scent of herbs, incense is a time-honored way to do so. Incenses, in one form or another, have been used as long as spirituality has existed. There are two basic forms of incense: self-igniting and non-self-igniting. Both have their benefits, though one definitely has more drawbacks than the other.
The best and most effective incense will always be the non-self-igniting type. This kind of incense is most easily prepared by simply grinding the herbs you need in a mortar and pestle. After mixing the herbs in accordance with your needs and perhaps the recipe you're following, you simply burn the resulting mixture on charcoal disks. This is the most effective type of incense and is certainly worth a little time grinding up herbs. Charcoal disks are fairly inexpensive, so this method can be cost effective as well.
You can, if you like, use a pure wood powder as a base and add essential oils and other extractions. This works much like the non-self-igniting incense in that it has to be burned atop charcoal disks. I don't generally recommend this type of incense because it is much harder to prepare, but it is certainly an option.
Self-igniting incense is another story entirely. Fair warning: I really do not like self-igniting incense. Most of it is little better than scented sawdust and saltpeter. It burns all right, but because it uses very little actual herb, it has no real medicinal or magickal value. Even if you can manage to create an incense that is mostly herb and saltpeter, the saltpeter interferes with the scent of the herbs, thereby making it less effective than non-self-igniting incense. And most certainly you should not use self-igniting incense you find in stores. Smells great, yes, but it's worthless. If you want self-igniting incense, experiment with saltpeter and herbs until you find a mixture you like.
Then we come to the matter of incense sticks. Though sticks are convenient, NEVER buy them from a store. Almost without exception these sticks are made of resin and fragrance oils (at least in North America and most of Europe). Since fragrance oils do not have the properties of essential oils (which comes from the natural herb), they are useless for your magickal or medicinal work. Now if they made them from essential oils...but this is rarely done because the cost would be astronomical. If you can buy the incense sticks for a quarter a piece, they're certainly made with fragrance oils no matter what the sales person says.
So what about making them yourself? Well, it's possible. I have had some success dipping my own incense sticks in a mixture of resin and essential oils. I've used both wooden sticks and charcoal sticks, and both have their benefits. The wooden sticks are cleaner, but the charcoal sticks produce a superior scent (but they do make a mess). So you can certainly make your own stick incense that will work for your purposes, but be aware that this is a time consuming process. Finished sticks will have to dry for a few days (don't try to quicken this process in an oven) so you won't be able to use them immediately. Still, the process can be a fun craft if you're in to that sort of thing.
The best way to make incense is simply to grind the herbs and burn them (even by throwing them into a fire instead of using charcoal disks). There are other methods, obviously, but in this case, simple is best. Experiment, if you like, but don't skip over the easiest and most effective method for preparing incense.

April 3, 2015
Herbal Preparations: Candles
 Candles are a safe and easy way to use herbs in your own home, but its only a viable option if you only need the pure scent of the herb. If you need other properties, you're best off using another preparation method. Still, making your own candles can be fun and you can customize them for your own needs. Just remember that candles, like all forms of herbal preparations, have their limitations.
To create candles that will be effective in magickal or medicinal work, you must use either essential oils or powdered herbs to scent your candles. Synthetic oils, while cheap, are not at all useful. If all you want is a scented candle, fine, use synthetic. If you want a more magickal candle, however, you'll have to purchase quality supplies.
Powdered herbs are certainly the easiest way to make herbal candles. Just add powdered herbs to the melted wax, pour, and there you go. Sort of. If you aren't careful, a candle that includes powdered herbs can actually light on fire, and I don't mean just the wick. When you're powdering your herbs, they need to be really fine. I mean so fine they could float. Otherwise they can actually catch on fire, acting as a second wick and really ruining your day. And never, ever, put herbs on the top of your candle, even if you think it looks really pretty. You'll light the wick and suddenly everything will be on fire. No good.
The other thing to watch out for is concentration. If the herbs are too concentrated, you'll end up with a fire no matter how fine the herbs are. This means you can't add too much of the powdered herbs to your wax. Add no more than a single tablespoon of herbs to a full pound of wax. Seriously. And make sure the herbs are evenly disturbed throughout the wax. This should help you avoid any unexpected fires.
Essential oils are another problem altogether. You might think you can just add them to the wax, and you can, but heat breaks down the essential so it's really not the easy. There's a reason most commercial candles are made with synthetic oils. But you're not using synthetic oils, are you? Are you?
No? Good. To effectively use essential oils to scent your candles, you need to use a low temperature to melt your wax. If it takes you an hour to melt that pound of wax, that's great. Good temperature. Keep it low and do not add hardeners to your wax. Just don't. It won't work out well.
As for how much to add, well, I find that no more than 2 ounces for a pound of wax is best. 1 ½ ounces is even better. If you're trying to convert an herbal recipe (that uses essential oils) into a candle recipe, see the 'drops' used in most recipes as 'parts' and you should be fine, as long as your total oil doesn't exceed 2 ounces. Also, don't add a base oil when crafting candles. They really don't need it. It only takes away from the small amount of oil you can add to your wax without creating a problem.
Once final warning, add your herbs or oils right before you pour the wax. Heat breaks things down no matter how low the temperature. So add colors and such before you add herbs and oils. Make sure your herbs and oils are distributed evenly, then pour your wax immediately.
Candles may not be the most common herbal preparation, but they are at least easy to make and use. Take advantage of them when you can.
February 6, 2015
Herbal Preparations: Baths and Soaks
 There are many different ways to use herbs for healing and other purposes, but the most benign (and certainly the easiest) is probably using herbs to create a bath or soak. The difference between these two terms is slight, but it is important. In general, if you immerse your entire body (not counting the head), you've created a bath. If you only immerse a single part of the body (such as the hand or the foot), you've created a soak.
The easiest way to create a bath or soak is to use a bit of cheesecloth to completely enclose the plant material. Make sure not a bit of it escapes. You can also use an organza bag if you like. I prefer the bags because I can clean them and reuse them, but you might like the cheesecloth. You could, of course, just leave the herbs loose, but they cling to your body or the tub or they may even clog your drain. Do yourself a favor and contain those herbs before they cause a problem.
Don't use powdered herbs. They don't stay in the bags and they can irritate the more sensitive areas of the body. Use herbs that are large enough to stay inside the bag you use.
Once you have your bag or packet prepared, it's time to draw the water. Don't use warm or lukewarm water for the bath. Instead, drop the herb packet in the bottom of the rub (or container if preparing a soak) and draw the water as hot as possible. Close to boiling is best. Allow the herbs to steep as the water cools to a tolerable temperature. This may take a while, especially if you're using an entire bathtub of water, so be patient. You may have to wait up to sixty minutes to be able to use the water, but allowing the herbs to fully take effect is worth it.
Once the water has cooled to a tolerable temperature, sink into the water (or immerse the body part that needs to be immersed) and relax. Most recipes for baths and soaks will indicate how long you should stay in the water. If this information is not given, assume that you should stay in the water until the fingers or toes begin to wrinkle. You might want to light candles or incense to compliment the purpose of the herbal bath.
Baths and soaks are a popular way to utilize the magickal and healing properties of many herbs. Not all of them, however, are water soluble and some are toxic, so do your research before preparing an herbal bath or soak.
January 30, 2015
Herbology: Extraction Methods
 There are several methods by which you can extract the herbal properties you're looking for. Which herbal preparation you choose depends on the herb and the purpose for which you'll be using it. Because of this, different methods can and will be used for the same herb. An herbal infusion will have different properties than an herbal tincture, even if the same herb is used in both. So be aware of the different methods as you continue your study of herbology.
Infusion
This method is absolutely the most common in herbology. It is simple, typically quick (in term of effort, not necessarily time), and doesn't require much in the way of equipment. Do you have a glass jar and some water? You can make an herbal infusion. Feel free to do so in your own home with the materials you have on hand.
The infusion may be either hot or cold. In a hot water infusion, the water is boiled, then taken off the heat until its not boiling, and poured over the herbs while still hot. Because boiling water can destroy some of the medicinal properties of herbs, waiting until the boiling stops is essential. Cold water infusions are done when the water is no longer hot at all.
Hot water infusions are faster because they extract the medicinal properties of herbs faster. They are not, however, always the best choice. Some of the more delicate herbs are better done in a cold water infusion, even if you have to set the infusion in the sun for a week before using it. Always consider the particular herb before choosing an infusion method.
Decoction
Though this term can be used to refer to any preparation created by using boiling water, it is typically used in herbology when the extraction made is to be boiled into a concentration. Though you might call the non-concentrated liquid a "tea", this liquid has little medicinal value. It is simply not concentrate enough, so the decoction is almost always boiled down. This method is easy enough to do at home.
Bear in mind that boiling an herb often destroys some of its more subtle medicinal properties, so it's not ideal in most cases. Still, there are decoctions that are highly effective, so keep this extraction method in your back pocket until you need it.
Tincture
Tinctures are basically infusions made with something other than water. Grain alcohols are the most common, but you can also make them with vinegar and wine (which is not grain-based). Like infusions, this one is simple to do at home. Since you don't generally heat the alcohol, tinctures typically take at least a few hours to prepare. Luckily this method also allows you to ignore the tincture for a while, so you're not actually having to tend it all day.
Maceration There's a lot of confusion surrounding this term, so I'll be very clear. A maceration involves soaking plant material in liquid for so long it becomes a pulp. The liquid can be anything from water to alcohol to vinegar. This method take a long time and is quite irritating (because sometimes it all starts to ferment on you and you have to start all over again). Luckily, macerations aren't all that common in modern herbology.
Expression This one should be easy enough to remember because to make an expression you "express" the liquid directly from the plant material. Note that you are not adding any of the plant material to your preparation. There should be no pulp in your expression. Think of it like making orange juice. You can squeeze the orange to get a pulp-free expression or you can twist the orange on a juicer to get a pulp-juice mix. With expressions you are after just the juice, not the pulp. Expressions are not easy to make at home unless you have the right equipment. If you want to make your own expressions, invest in professional-grade equipment to assist you. Percolation
If you've ever made percolated coffee, then you already know how to make a percolation. This extraction method can be done at home. You're better off buying professional equipment, but you can make due if you have to. To make an herbal percolation you'll need the following materials:
a large pota screen suspended in the vertical center of your pota domed lid for the pot that does not have a handleOnce you have all these items, place the herbs on the screen, right in the middle. Fill the pot with water until it is about an inch or two below the screen (the herbs should not be in the water). Put the lid of the pot on, but upside down. Looks a little silly, but trust me.
Now you can either make a cold water percolation or a warm water percolation. Fair warning: cold water percolations take a LONG time. Days. Many, many days. If you warm the water gently, the entire process happens faster (though still not fast). Either way, you should see water condense on the lid as it evaporates, roll down to the tip of the dome, and drip onto the herbs. You can speed up the process by putting ice on the inverted lid, but it will still take a while. This is not a method I recommend at home because of the frustrations involved.
Reflux
I'd rather eat glass than make a reflux at home, so do yourself a favor and leave the refluxing to the professionals. Refluxes are basically percolations using something other than water. Alcohol is the most common. Since alcohol tends to ignite on the stove, you absolutely must have professional equipment for this method. And hopefully a processional to show you how to do it. Don't do this at home.
As you can see, some of these methods are easier to pull off at home than others. Most recipes you will encounter will either be tinctures or infusions (or may just use the whole herb instead), so you don't really need complicated equipment. Just space to store your creations.