
Heather Balog's Blog, page 4
December 9, 2018
Nana’s Christmas Struffoli
Once upon a time, Christmas Eve was the most magical night of the year. I spent all day looking forward to going to my grandparents’ house to enjoy the Feast of the Seven Fishes, opening presents, and of course, Nana’s Christmas Struffoli.
What is Struffoli, You Ask?
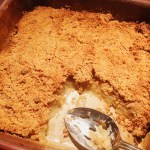
Well, you ask only if you never had an Italian grandma. Struffoli is basically dough deep fried to a golden brown and drizzled with honey and nonpareils. My nana used to make this sweet treat for Christmas Eve and no Christmas Eve was complete until I was sticky with honey dripping off my fingers. Nana would stack the struffoli in a tower and add more honey—it would inevitably pool at the bottom of the plate along with rogue red and green nonpareils. I would dip my struffoli in the honey to coat it even more. My God it was delicious. I can taste it now.
When Nana passed away in 2002, it had been several years since she had actually made struffoli. When Hubby and I took over the Christmas Eve traditional meal, I wanted to make it as close to the Christmas Eve meals of my childhood. It’s the only day of the year where we can co-exist in the kitche together. We made made many of the dishes that my grandma and Nana used to make, but year after year, it seemed like something was missing. The struffoli.
I Needed to Fix That
So I asked my mother if she had Nana’s recipe and she looked at me like a deer in headlights. Nana was not good at actually writing down any recipes—that seems to be a theme among Italian grandmas. (They also don’t seem to measure anything, opting for a dash or this and a pinch of that…) I was still determined to find a recipe that was comparable to Nana’s recipe. After several tries (and fails) I finally found two years ago. It was as close to Nana’s struffoli as I was going to get—my honey balls were bigger than she ever made them, but they still had the same delicious flavor and crunch. And of course, the honey. Yum…
Quick Instructions
I’ve scaled back this recipe because the first time I tried it it took me seven hours. Now that I’ve halved it and got a deep fryer it takes just about an hour and a half.
2 cups flour
3 Tbs butter
1/8 cup sugar
3/4 tsp baking powder
pinch of salt
2 eggs
1 tsp vanilla
1 cup honey
1 container of nonpareil
Mix the butter and flour together with your hands in a bowl until butter is in small bits. Add sugar, baking powder, and salt, stirring to incorporate. Add eggs and vanilla, and stir until a dough forms. Knead a few times, then leave in bowl to rest for 1/2 hour in fridge.
Roll out dough in ropes—cut into 1/4 inch pieces and roll the pieces into balls. Fry up in small batches (they will expand as they cook). Heat up honey in a saucepan and then toss cooked balls in the honey. Stack into a pyramid shape, add remaining honey to the top, and sprinkle with nonpareils. Enjoy and Merry Christmas!
[image error]
The post Nana’s Christmas Struffoli appeared first on Author Heather Balog.


December 2, 2018
5 Reasons Why I Love Our Elf on the Shelf
As the days tick closer to Christmas, the height of the frenzy is upon us. I’ve seen a lot of complaints on Facebook lately about the Elf on the Shelf (mostly from people without kids) about how it is “creepy” and “lazy” parenting. People are saying it’s a cop out to hide the elf around the house and expect kids to behave so that he or she doesn’t report back to Santa. They don’t want to see pictures of the cleverly posed elves invading people’s homes. They think it’s not the “right” way to encourage kids to behave. That kids should be taught to behave and if you can’t get them to do that without threats or bribes, you’re a bad parent.
You know what I say to that? Bah Humbug—get the stick out of your butt. Parenting is really just a series of eighteen (or more) years worth of threats and bribes. When you’re a parent, if something works, you go with it, no matter how crazy it is—and the Elf on the Shelf is crazy, but a lovable kind of crazy (like that aunt everyone has who knits us all toilet paper covers).
***I first published a blog about Why I Love That Creepy Elf on a Shelf in 2013—some things have certainly changed since then—the competition between Pinterest Momsters has risen to an uncomfortable height. Also, the Elf return has gotten earlier and earlier every year, thoroughly stressing out parents everywhere as they struggle to come up with new and exciting hiding places. But I’m still a fan of the elf…even though my kids are way too old for it.
Here are 5 Reasons Why I Still Love the Elf on a Shelf:
5. The Elf does encourage some good behavior.
I worked as a school nurse in an elementary school for 14 years and the 8 weeks or so between Halloween and Christmas are a nightmare of epic proportions. If you’ve never had the pleasure of herding a large group of elementary aged students during the holiday season, you’re probably a lot more sane than the rest of us. (And yes, it is like tending sheep, except sheep are more cooperative, don’t ask you to tie their shoes fifteen times a day, and never comment on the pimple in the middle of your forehead.)
I know some teachers who have used the Elf in their classrooms and they report a slight improvement in behavior because of it. Hey, in the throes of the holiday season, any improvement is good—those kids are practically mainlining sugar for 8 weeks. Remember the Mogwais turning into Gremlins? Same thing with kids ages 5 through 10 at Christmas time.
It also does help at home for kids to think that maybe, just maybe their $hitty behavior could get back to the big guy in the North Pole. Sometimes, this is enough to get them to reconsider hitting their younger sister in the head with a Tonka truck. (My own two children, who made sibling rivalry an Olympic sport—they actually broke into a sweat when hating on each other—snapped to attention the first time they encountered the Elf on a Shelf.)
When I was younger, my grandmother claimed an Elf was hiding in her attic after Thanksgiving and was watching us. It was mainly a ploy to keep us out of the upstairs room where she hid our Christmas presents. But Grandma was definitely ahead of her time. I not only stayed out of that area, I was convinced an Elf had drilled a little hole in the ceiling and was watching me. You better believe I was well behaved at Grandma’s house.
4. The Elf gets everyone out of bed in the morning
When my kids were littler and actually cared about the Elf, they would bound out of bed every morning to see where he had hidden the night before. And I would usually bound out of bed at 4 am when I realized I forgot to hide the Elf the night before because someone gave me such a hard time about going to bed that I practically passed out standing up.
But it made the kids laugh to see where their silly Elf was or what shenanigans he was up to. And that made me smile. As an added bonus, I didn’t have to beg and plead and threaten to get the kids to put their feet on the floor in the morning like I normally do. Sure, the rest of the day was pure chaos, rushing from school and work to dance classes and basketball practice, but there were 5 minutes every morning when the day was simple.
3. He’s fun for the whole family
Sort of. The first couple years I was knocking myself out to move the Elf and not repeat the same spots. This was the only time I was thankful for people posting on social media…I got new Elf ideas on a daily basis. This was pre-Pinterest world, people—the parents nowadays have a lot more options for ideas than I did five years ago. They also have more “keeping up with the Joneses” stress than I ever had. My friend told me the kids actually discuss the antics of their Elves with the other kids at school. I doubt this is a water cooler like discussion, but more like a Snapchat documented Elf antic forum.
So now the kids are pretty much grown and we still have the Elf on the Shelf. Our Elf lifts weights and hides behind the iceberg lettuce. He ziplines across the living room and makes a mess with the cotton balls. It’s fun to see what the kids will come up and they still look for the Elf when I hide it. Yeah, we forget to move it all the time. But it’s become a family holiday activity—like making a gingerbread house or baking cookies. And it’s a heck of a lot less stressful than either of those other activities. (See Crazy for Christmas Cookies)
2. He’s not breakable…in fact, he’s indestructible
My son actually tried to “kill” our Elf on the Shelf a few years ago by “touching” him. The legend goes that if you touch an Elf, they lose their magic. The boy child was in middle school at the time. If you know anything about middle schoolers, you know that they’re a pretty miserable bunch of hormone-fueled jerks…Christmas time and the other 11 months of the year. So his touching of the Elf was not some red flag that he needed psychiatric help, in case you were wondering. He touched the Elf and the Elf tumbled to the ground. He did not shatter like the dozen or so hand blown glass ornaments that my children (and dogs) have broken over the years. Sprocket (our Elf) remained intact.
Thank God the younger one didn’t see this whole scenario play out in front of her—she would have needed to be hospitalized for dehydration that would undoubtedly ensue from the river of tears she would have cried.
The Elf, due to his indestructible nature, can be hidden in so many places. The tree doesn’t scratch him up. He can be suspended from the ceiling because he’s so lightweight. He can go in the fridge (to eat the cookie dough I meant to bake…) because he can withstand cold temperatures. He can be tossed behind the couch easily when your child walks in on you hiding him. He can be squished into a mason jar or any other tight space humans cannot fit into.
Over the years, he’s also fallen from his hiding spot and into the jowls of our family dog, Colt. Colt chews on everything that was not meant to be chewed. He has eaten ornaments, shoes, couches (he pooped out foam for a month), and siding. Yes, siding…as in, siding off the side of the house. He however, did not succeed in chewing Sprocket into an early Elf grave. Maybe it’s because of my next point:
1. The Elf on the Shelf is magical
Some people think the Elf is creepy. “He’s watching you all the time? Spying on you? That’s stalker-ish! Proposterous!” Those same people have apparently forgotten the little ditty about Santa watching you while you’re sleeping and all that other nonsense. When I was a kid, I thought Santa was this omnipresent being that was watching me take a bath and go to the bathroom. Talk about creepy. At least the Elf is only watching over you while you feed your vegetables to the dog or peek at the Christmas presents under the tree—behaviors any parent wants to curtail anyway.
I don’t think he’s creepy—I think he’s magical. He reminds us of a time when everything was much simpler—behave and your wishes will come true. Santa is real. Christmas is a magical time of year that makes your heart light and air with joy.
He reminds me of being a kid…something I don’t often remember being of advanced maternal age and all that. And being a kid isn’t all that bad of a thing for kids these days to be. They have too many burdens at a young age as it is. Everything in their life is competitive and stressful. They’re constantly being barraged by technology and social media. There is no playing outside in the dirt and building treehouses or playing wiffleball with friends. Those days are gone. But the one thing that we still have to give our kids is the magic of Christmas. The magic that the Elf on the Shelf brings into our homes.
[image error]
***Some of my posts include affiliate links, which means, if you click on those links and make a purchase, I may receive a commission***
If you don’t have an Elf on the Shelf, you can get it here:
The post 5 Reasons Why I Love Our Elf on the Shelf appeared first on Author Heather Balog.
November 13, 2018
Cast Iron Skillet Cornbread
Are you tired of the same old biscuits for your holiday feasts? Yeah, me too. Those biscuits in the popping can that scare the bejeezus out of you and end up like overdone hockey pucks or with gooey, mushy middles. That’s why I will be making something new for our Thanksgiving dinner this year…cast iron skillet cornbread.
Hubby has been pretty much obsessed with the 12 inch cast iron skillet he got last year. He’s also be obsessing about buying a smaller 8 inch cast iron skillet. Every single time we go into one of those kitchen outlet stores, he lovingly strokes the baby skillets and picks them up with the intention of buying it. But for some reason, he can never pull the trigger. Well, I finally forced him to buy it a few weeks ago and low and behold, it’s sat unused in the cabinet. Until now.
Cornbread = Love
I love cornbread. Especially with Hubby’s Crab Corn Chowder, which he made on Sunday. It was perfect for a chilly football Sunday. And what was even better was the skillet cornbread that I made to go with it.
I had wanted to make cornbread in the cast iron skillet for awhile now—but just like Hubby, I had yet to pull the trigger. It was mostly because I was convinced that it would be too difficult to do. And plus, Hubby can be really possessive of his skillet. But after we got this new one and he hadn’t used it yet, I decided that it would be perfect to try it out on football Sunday…before making it for our Thanksgiving dinner. And lordy I wish I had tried it sooner.
I scrolled through Pinterest as I do, and I found a recipe that I liked, except…it didn’t have any corn in it. So, I adapted the recipe that I found from Pumpkin N Spice, but I changed it to make it my own by adding…creamed corn.
It Was SOOOOO Easy
You guys know by now—I LOVE easy. This recipe had minimal steps and created the most moist and delicious cornbread I’ve had in quite some time. A lot of times store-bought cornbread can be “gritty”, but this one was not like that at all. The secret to this fabulous cornbread is the creamed corn. And the cast iron skillet. Apparently, the ONLY way any self respecting cornbread maker would make cornbread is in a cast iron skillet. (Or so I gathered from what I’ve read.)
Five Simple Steps
You start off by placing the pieces of butter in the skillet and stick the skillet in the preheated oven (425 degrees). This helps brown the outside of the cornbread, while the inside cooks slowly.
While the butter is melting, whisk together the flour, cornmeal, sugar, baking soda, baking powder, and salt. Then mix the egg, buttermilk, and 10 oz of creamed corn. Incorporate the dry mixture with the wet and mix until combined well. Remove skillet from the oven (the Lodge cast iron skillet rubber pot holder is great for that) and pour batter into the skillet. Bake in the oven for 20-25 minutes or until a toothpick stuck in the center comes out clean.
THAT’S IT. Bam! Cornbread is done.
[image error]
Don’t Forget to Clean the Skillet
Hubby reminded me no less than twenty times to clean his precious cast iron skillet, but do you know what? The clean up was so easy, I couldn’t believe it. The cornbread slid right out…leaving nothing but a few crumbs. But to appease him, I did rinse it out and oil it like you’re supposed to:
[image error]
I think I may adopt this little skillet and make it mine…shhhhh, don’t tell Hubby! This recipe was so simple, I’m dying to try out some other cast iron skillet recipes soon. I’ll let you know how it goes. But if you’re looking for your own cast iron skillet, the ones below are what we use and recommend. (Plus the handle cover and skillet brush are really great as well!) Try this cornbread for your holiday meal this year—you’ll have your guests raving!
***These are affiliate links. If you should click on the links and make a purchase, I will receive a small commission, at no cost to you.***
Print Yum
Cast Iron Skillet Cornbread
Ingredients
4 TBSP unsalted butter1 c. yellow cornmeal
1 c. all purpose flour
2 TBSP granulated sugar
1/2 tsp baking soda
1 1/2 tsp baking powder
1 tsp Kosher salt
1 egg
1 c. buttermilk
10 oz of creamed cornSchema/Recipe SEO Data Markup by Yummly Rich Recipes0.1https://thebadmommydiaries.com/cast-iron-skillet-cornbread/[image error]
The post Cast Iron Skillet Cornbread appeared first on Author Heather Balog.
November 11, 2018
Slow Cooker Garlic Mashed Potatoes
Like I mentioned earlier this week when I posted the recipe for The Best Apple Crisp You’ll Ever Make, I love Thanksgiving. It’s the perfect excuse to pull up a seat at the table and gorge yourself until your pants don’t fit anymore. And the best news is, calories consumed on Thanksgiving don’t count! Okay, I made that last part up, but who cares when you’re eating great food? I know how nerve wrack it can be to make a turkey—it’s time consuming and you have to get up at 4 o’clock in the morning to put it in the oven and then it’s either done 2 hours before your guests arrive, or close to Friday morning. It’s easy for even the best cooks to doubt their turkey skills. That’s why the stars of the Thanksgiving meal are the SIDE DISHES. And the slow cooker garlic mashed potatoes I’m about to tell you how to make? Both simple and stress free.
I Met A Lot of Resistance About The Slow Cooker Garlic Mashed Potatoes
It was mostly because of the “slow cooker” part. Hubby isn’t a fan of the slow cooker to make meals. That is, until they turn out fabulous like my Mississippi River Roast and then he’s clamoring for the slow cooker meals. I personally think the slow cooker is the best invention of the 20th century, besides deodorant, of course. It’s probably the biggest time saver of my life. I have a lot of great recipes that I dump into the slow cooker and they come out way better than if I had spent hours making them. Of course, I have my slow cooker fails, too, but this blog post isn’t about THEM. It’s about a WIN—slow cooker garlic mashed potatoes.
Simple Steps with a Creamy, Delicious Result
First, cube the potatoes. I think red skin potatoes are the best potatoes for this recipe. One of my favorite things about the garlic slow cooker mashed potatoes is that you don’t have to peel the potatoes. Yup, easy peasy, lemon squeezy. Just chop and plop. (In the slow cooker, that is.)
[image error]
Add buttermilk, butter, garlic, dried rosemary, salt, and pepper. Set slow cooker for 5 hours on low and let it do its thing. Check on it from time to time to make sure it’s not burning—it may occasionally need to be stirred.
There’s also a lot of speculation about herbs and spices in the slow cooker and how you may need to add them closer to the end of the cooking process. Apparently, this has a lot to do with the particular herb or spice, and also the flavor you are trying to achieve. If you’re looking for more on this topic, this article from the Gourmet Garden might help.
[image error]
While everything else is cooking, you’ll have garlic mashed potatoes bursting with flavor. It’s a WIN because you didn’t need to peel the potatoes AND you don’t need to mash them either. And if you’re worried that your kids won’t eat the mashed potatoes with the skin on them, you may be pleasantly surprised. My son LITERALLY peels the skin off red skin potatoes when I bake them. He’ll have a pile of skin on his plate and red bits stuck to his fingers. AND he never eats mashed potatoes when I make them. But even he loved these garlic mashed potatoes.
You NEED a Slow Cooker in Your Life!
***By the way, my posts occasionally include affiliate links, which means that if you should click on those links to make a purchase, I may receive a commission, at no cost to you.
Are you sold on these garlic mashed potatoes yet? No? Wait, what??? You don’t have a slow cooker? You must have a ton of time on your hands to stand over the stove every night then, right? No? Well then do yourself a favor and GET A SLOW COOKER!!!! You’ll love this one that I use. I’ve been through a few slow cookers and this is my favorite:
But if you’re really not a fan of the slow cooker, the good news is, you can make these garlic mashed potatoes on the stove, using what we call in my house, a spaghetti pot. You can set it to low, but you need to keep on top of it to prevent it from burning. Whichever method you pick, you will love these garlic mashed potatoes and your family will be “thankful” that you made them.
Print Yum
Slow Cooker Garlic Mashed Potatoes
Ingredients
6 red skin potatoes (I use about 1 1/2 potato per person as my rule of thumb on how many to make)1/2 c. buttermilk
1/2 stick of butter, cut up in small pieces
4 cloves of garlic, minced
1 TBSP of rosemary, dried (or a few sprigs of fresh)
salt and pepper to tasteSchema/Recipe SEO Data Markup by Yummly Rich Recipes0.1https://thebadmommydiaries.com/slow-cooker-garlic-mashed-potatoes/[image error]
The post Slow Cooker Garlic Mashed Potatoes appeared first on Author Heather Balog.
November 10, 2018
The Best Apple Crisp You’ll Ever Make
Thanksgiving is less than two weeks away and I am one of those crazy people that love Thanksgiving more than Christmas. And I LOVE Christmas. Thanksgiving, though, is by far a better holiday, for me. Why? Well, for starters, you don’t need to stress yourself by buying gifts for everyone and decorating like crazy and being festive all the time. All you need to enjoy Thanksgiving is a healthy appetite and a pair of fat pants. And Thanksgiving recipes don’t need to be complicated at all—I’m going to share some of them with you over the next few weeks. In fact, my favorite recipe is so easy that your KIDS could make it—Apple Crisp.
Why Not Start With Dessert First?
Life is uncertain. Eat dessert first. Or at least, make dessert first. While you’re busy putting the turkey in the deep fryer (keep your local fire department on standby!) or mashing your potatoes, you could have your kids making this quick apple crisp. I actually had my daughter make it and it came out almost as good as mine.
One of my favorite things about this apple crisp (besides the fact that it’s quick and simple to make) is that it only requires 5 ingredients…most of which I usually have on hand in the house:
[image error]
You can add granulated sugar to the cake mix—if you don’t like it super sweet, omit that part—it will come out just as delicious. And I know many people prefer apple pie on Thanksgiving (it is a totally American dessert), but honestly, try this quick apple crisp this year instead and I think you will love it just as much…if not, MORE because it’s so simple. If you REALLY want Homemade Apple Pie, you can try this recipe.
***By the way, some of my posts contain affiliate links, which means that if you click on those links to make a purchase, I may receive a small commission at no cost to you.
The Easy Steps to a Delicious Apple Crisp
Start off by melting the butter in a microwave safe dish. I love the Pampered Chef Classic Batter Bowls because they are safe in the microwave (and oven) AND you can see through them so you know you’re mixing everything together well enough. Plus, they have the measurements on the side. It’s a win win!
Then add the cake mix, sugar, and cinnamon—stir until crumbly. Set aside while you peel the apples. I used Granny Smith, but I have used other types like Honeycrisp and Gala and they’re great, too. I just wouldn’t use really soft apples like McIntosh because they’re difficult to peel. The Apple Peeler Corer Slicer from Pampered Chef has been my best friend whenever I need to peel apples. I’ve had it for almost 17 years and it’s never let me down. Anyone who loves apple recipes should invest in a good apple peeler/corer/slicer because it takes a ton of work off your hands.
The apples will come out like rings—the kids used to love to eat the apple rings when they were little (and they still do now…)—-another great reason to have an Apple peeler/corer/slicer—fast, healthy snacks. Cut the rings in half and layer in a baking dish. Then add the crumb to the top.
[image error]
Stick it in the preheated oven at 350 and bake for 35-45 minutes or until bubbly. I usually stick a piece of foil over the top for the first 25 minutes or so—it prevents the crumb topping from browning too fast.
And that’s IT. You can heat the apple crisp when you’re ready to eat, but a word of warning, let it cool for a few minutes so you don’t burn the roof of your mouth like I did. This quick apple crisp is perfect with a scoop (or two) of ice cream and a cup of tea. Perfect ending for your Thanksgiving meal!

Print Yum
The Easiest Apple Crisp You’ll Ever Make
Ingredients
5 medium apples1/2 stick of butter
1 box of yellow cake mix
3 tsp cinnamon
2 TBSP granulated sugar
Instructions
Melt butter.Add cake mix, cinnamon, and sugar to bowl with butter.
Stir until crumbly.
Peel, core, and slice apples. Cut them into 2 inch pieces. Place in bottom of baking dish.
Add crumb mixture on top.
Bake in oven on 350 for 35-45 minutes, or until bubbly.
Serve with ice cream or whipped cream.Schema/Recipe SEO Data Markup by Yummly Rich Recipes0.1https://thebadmommydiaries.com/the-easiest-apple-crisp-youll-ever-make/[image error]
The post The Best Apple Crisp You’ll Ever Make appeared first on Author Heather Balog.
November 4, 2018
Chile Colorado (Bad Mommy Style)
Seven states left in our USA cuisine tour—state number 43 is Colorado. For our Colorado meal, we made some Chile Colorado. Actually…I made Chile Colorado. And it turns out, I made a huge mistake.
I Really Messed This One Up…State Food Wise
Okay so we got to the end of the states and my head is a little fuzzy with all the different cuisines…and all the similar cuisines. I mean, everything in the Southwest in similar, everything in the Midwest is kind of the same. So when I looked up Colorado cuisine of course I saw that chili was popular in this state…you know because of cowboys needing to throw things in a pot and heat it up over a campfire and all that.
Somewhere along the line, I latched onto a Chile Colorado recipe because”Colorado” and “chile” were both in the name. In case you were wondering, where the “Colorado” part comes from isn’t completely know. It could be named after a type of RED pepper…grown in Mexico, NOT Colorado, the state. (Insert face palm here) The actual type of Chili that is popular in Colorado (chili with an I), is a green chili. (Chile usually describes the pepper and chili is the meal.)
Hence My Confusion
At this point in time, I’ve done so much research on foods that can you really blame me if things get kind of muddled in my head? You’ve only read three paragraphs about chili and chile and you’re already confused, aren’t you? Go ahead, Google “Colorado Chili”. I’ll wait…yeah, all those chile Colorado recipes come up, don’t they?
In addition, I had gotten all the ingredients for a “Chile Colorado Slow Cooker Beef”, not even Chile Colorado itself. It was a royal disaster—as far as the state tour was concerned. By the time I realized my mistake, I was already prepping the meal.
I Forged Ahead Anyway
Honestly, what was I going to do? Waste a perfectly good piece of beef? I had spent a half hour looking for the canned red chile sauce in my grocery store and ended up making my OWN.
I had to dehydrate chiles and then re-hydrate them. And then blend the chiles with spices in the Ninja and then cook it on the stove. This was all before actually making the beef in the slow cooker. Yeah, you better believe I was making this Chile Colorado.
Besides, what were we going to have for our Colorado meal if we didn’t have Chile Colorado? Rocky Mountain Oysters? By the way…new discovery…those aren’t actually oysters. They’re bull testicles. (Vomit here) Why is everything misnamed in Colorado? It’s confusing me. And why are there so many different types of chili? We made Cincinnati Chili for our Ohio meal, and I know a different kind of chili is popular in Texas (probably closer to the type of chili that’s popular in Colorado). Why do the chili people need to confuse things????
On To the Chile Colorado Sauce
The chile sauce was, of course, the star of this meal. So therefore, if I couldn’t find the sauce, we couldn’t have this meal. I was determined to make Chile Colorado, come hell or high water. This was before I realized I was making the wrong thing, of course. I stood in the Hispanic foods section of my grocery store in tears, traumatized by the fact that there were seven billion different sauces and none of them were the sauce I needed for this meal. I went up and down that aisle ten times…no luck.
But I wasn’t going to admit defeat (even though if I had admitted defeat, I could have made something else…like a Denver omelet or something like that…live and learn). So I quickly googled a recipe for red chile sauce on my phone and started to gather the ingredients for that. The only problem was…I had bad service in the store so my phone kept shutting down. And I had to keep reopening the recipe. Except, I might have opened several DIFFERENT recipes instead of the same one. (Listen, it’s been a stressful month…my brain feels pickled.)
I gathered my multi-recipe ingredients and left the store in the middle of a Nor’Ester in order to make this Chile Colorado, people. So what if it wasn’t the right thing.
The Fact the Chiles Were RED Should Have Been the Tip-off
[image error]
Considering that it’s a green chili that’s popular in Colorado that is…
Anyway, like I mentioned before, you have to further dehydrate these chiles after you remove the stems and seeds (the seeds just fall out when you shake the chiles), by placing them single layer on a baking sheet and baking them in the oven at 375 for 3 minutes. You will smell a sweet aroma from the oven—it’s pretty delightful, actually. Then soak the chiles in a bowl of warm water for about a half hour.
Take the peppers and soaking water and blend them with garlic, cumin, and chili powder. Try the Ninja for this–it works so well!
Then stir flour into the oil over medium heat to create a roux. Add the blended chile mixture. Simmer for about ten minutes.
Now On To the Slow Cooker
Put the chuck roast in the slow cooker and pour on the chile sauce. Add bouillon, chili powder, cumin, onions, garlic, oregano, and red pepper. Cover and cook for 5 hours. The meat should pull apart easily with forks. This is very similar to the Mississippi River Roast that I make.
[image error]
That’s It?
Yup. That’s it. Looking for the sauce and then making my own was the most difficult part of this recipe.
One of the great things about this recipe is you can eat it a variety of ways—in burritos, in tacos, over rice, or even by itself. We had it over rice, mixed with some broccoli, ‘cuz that’s how we roll. I also sprinkled some more chili powder over the top. It was quite delicious. You can add more chili powder to the slow cooker as it cooks as well, if you like it more flavorful. Enjoy it any way you’d like…just know if you go to a restaurant in Colorado…they most likely won’t have this Chile Colorado on the menu.
[image error]
Print Yum
Chile Colorado (Bad Mommy Style)
Ingredients
For the sauce:10 dried guajillo chiles (pods)
4 garlic cloves
1 TBSP cumin
1 TBSP chili powder
1 tsp salt
2 tsp olive oil
2 tsp all purpose flour
For the Meat:
3 lbs chuck roast
Chile sauce (made above)
4 TBSP Chili powder
1 TBSP cumin
2 garlic cloves
1 small onion, diced
1 TBSP dried oregano
1 TBSP red pepper
Instructions
For the sauce:Place the chiles in a single layer on a baking sheet after removing stems and seeds.
Bake at 375 for 3 minutes or until you smell a sweet aroma.
Remove from oven and soak in a bowl of warm water for a half an hour.
Blend chiles with cumin, chili powder, garlic, salt, and 2 cups of the water it was soaking in.
Heat olive oil in a skillet.
Add flour and whisk until browned.
Add chile mixture and cook on low for 10 minutes.
For Meat:
Place chuck roast in slow cooker.
Pour sauce on top.
Add more cumin and garlic.
Add oregano, red pepper, chili powder, and onion.
Cook on low until meat is tender enough to pull apart with a fork. Schema/Recipe SEO Data Markup by Yummly Rich Recipes0.1https://thebadmommydiaries.com/chile-colorado-bad-mommy-style/[image error]
The post Chile Colorado (Bad Mommy Style) appeared first on Author Heather Balog.
November 2, 2018
4 Books to Curl Up With For Book Lover’s Day
Today is Book Lover’s Day! It’s celebrated the first Saturday of November…and for some reason, it’s also celebrated every year on August 9th. Why 2 days? I have no idea. But the more days to celebrate loving books, the better. Every day could be Book Lover’s Day as far as I’m concerned. To celebrate this momentous occasion, I’d like to present to you 4 books that are about Love that I think you should curl up with on this Book Lover’s Day. And if you know me, you know I don’t do sappy romance, so if I liked these, you should read them too.
Why 4? Probably because it’s late and I still have to do my NaNoWriMo words for the day and I’m too lazy to come up with 5 books. None of these (with the exception of the first one) are blockbuster bestsellers. I think the world is missing out—try one of these lesser known authors for Book Lover’s Day. Also, if you click on these links and make a purchase, I will receive a commission, at no cost to you.
Where the Heart Is
by Billie Letts
I can count on one hand the number of books that I’ve read more than once. I figure, there are so many great books in this world, I want to read as many as I can and not waste time re-reading ones I know the ending to. With the exception of only a few books—Where the Heart Is is one of those books.
I think I fell in love with the character of Novalee before the end of the first chapter. Here she was, 17 and pregnant, traveling with her jerk of a boyfriend to California, her life in tatters and all she wants him to do is feel the baby’s heartbeat. When he won’t do it, that’s what makes her cry. Not the fact that they don’t know where they’re going to live or that they don’t have money. It’s the fact that she realizes her boyfriend doesn’t love this baby like she does.
Aforementioned boyfriend proceeds to abandon Novalee in the next few pages—at a Wal-Mart of all places. This is where Novalee gets her life on track. Which is weird because you would think that being left at Wal-mart would be absolute rock bottom, but not for Novalee—being left in the Wal-Mart ends up being the best thing that ever happened to her because she makes the best of it.
***By the way, this movie was also one of my favorites, but it does change the book a bit. In the movie Novalee hates the number 5 and in the book, it’s 7…I don’t know why, but things like that drive me nuts. Like, why couldn’t she just hate 7 in the movie? What’s the difference? (Besides 2…lol.)
Suffer Love
by Ashley Herring Blake
Hadley St. Clair’s father cheated on her mother. It destroys her family, but in the midst of all the destruction, she meets Sam Bennett, a boy she feels an immediate connection to. But Sam has a secret that could destroy their relationship completely.
*Sigh*. This is one of those books you feel a sadness in your bones when you finish it. This was John Green, only better. I’m not a hopeless romantic at all…I rarely even read romance, but I couldn’t get enough of Hadley and Sam surprisingly. At times I even forgot they were only teenagers because of the maturity they had to display after their parents’ poor choices. They really came to life and almost seemed to jump off the pages. Excellent book. You have to read this book, I highly recommend it.
The Awkward Path to Getting Lucky
by Summer Heacock
Kat Carmichael has a successful cupcake shop. She also hasn’t had sex in over two years due to a medical, erm, ailment, despite the fact she has a steady boyfriend. She decides to call a break in her relationship…to get herself taken care of. And when she meets Ben? Boy, does she get herself taken care of….
When I first won this from Goodreads, I read the blurb on the back cover and cringed. It seemed crass and plotless. I felt like it was going to be one of those harlequin romances my grandmother used to hide in her nightstand because it was so dirty. For the record—I don’t read “those” kind of books. I even put the book aside for a few weeks, vowing never to read it unless I was desperate.
Well I decided to take the plunge when I ran out of books to read and I’m delighted I did. While the subject matter was a bit unusual and of the “adult” variety, this was not some trashy bodice ripper that I was expecting. It was a delightfully crafted foray into relationships—sexual relationships and even friendships. The characters were witty and their interactions made me LOL. The women talked like truck drivers and embarrassed the men. It was hilarious. While the plot itself was predictable (as chick lit is expected to be), the way the plot developed was unexpectedly funny and even a little raw at times. Seriously, all the feels. Congrats to the author on creating genuine and flawed characters that the reader can actually feel for and relate to. I’ll be looking for more by this author.
November 9
by Colleen Hoover
In a chance encounter, Fallon meets Ben the day before her scheduled cross country move. Her eventful life becomes his muse, because of course, he is a novelist. They meet every year on the same date, until one year, Fallon starts to question everything she knows about Ben. Was their first meeting, really a chance encounter or is Ben hiding a secret from Fallon?
I originally picked up this book because, based on the cover, I thought it was a suspense novel. I briefly skimmed the blurb and got a suspens-y vibe so I started the book. Just to clarify, I don’t read romance. I repeat…romance is not my thing at all. It usually makes me want to barf at its cheesiness and predictability. That is, until I read Colleen Hoover’s brand of romance. It should I say, romance with a mystery wrapped in it. What a fabulous, poignant novel! I literally read it in one sitting at the beach and could not function in the real world till I finished.
***This was my first Colleen Hoover novel—she is fantastic—funny and has a crazy ability to wring your heart out with emotion. I’ve even met her at a book signing (and acted like a total fan girl) and she is everything I thought she would be.
Even Colt is ready to read for Book Lover’s Day! (Also, he’s annoyed with me for taking pictures.)
The post 4 Books to Curl Up With For Book Lover’s Day appeared first on Author Heather Balog.
October 28, 2018
Apple Cider Sangria
Fall is in the air and summer has left the building. I used to think that once the days got colder and the nights got longer, sangria (my drink of choice) was a thing of the past, not to be enjoyed again until the weather warmed up. That is, until I discovered Apple Cider Sangria.
Truthfully, you can craft a sangria for any season. There’s spring sangria with peaches and strawberries and Granny Smith apples. There’s summer sangria like the one I make for Cinco de Mayo with apples and blueberries. In the winter, I love a cranberry and orange sangria. So of course, the best kind of sangria for the fall weather would be an apple cider sangria.
The Best Thing About Sangria?
It’s so simple to make. Even a monkey could make it. Hence why it’s one of my specialty recipes. I’ve been playing around with a basic recipe for years now, adjusting it to the ingredients of the season.
Everyone makes sangria different—I honestly believe that homemade sangria, especially this apple cider sangria, is far superior to anything you’re going to get in a restaurant. In fact, I had an apple cider sangria when we went out the other night and it was NOTHING like the homemade one I made tonight. I think restaurants skimp on the ingredients…especially the fruit. I love my sangria chock full o’ fruit. Look at this apple cider sangria I got at the restaurant. One pitiful slice of apple in it:
[image error]
And I barely tasted the cider. The apple cider sangria I make is full of fruit AND flavor.
Wine is Always the Base
I use a cheaper Pinot Grigio for the apple cider sangria. When it comes to sangria, expensive wines are NOT the way to go. The type of wine you use depends on the type of sangria you are making. Check out this awesome article by Food & Wine. They break down the reasoning behind the wine types much better than I ever could.
Then Add the Other Alcohol to the Apple Cider Sangria
I like ginger brandy for the “colder weather” sangrias. Add 6 oz of ginger brandy. Some people will include other alcohols like apple vodka or a spiced rum, but I think the ginger brandy does the trick.
Then add 8 oz of Sprite and apple cider. Combine with 6 oz of orange juice, apple slices (Honeycrisp apples are the BEST), orange slices, and cinnamon sticks. Chill for at least an hour (this helps the fruit and cinnamon flavor seep into the sangria). Pour and enjoy!
[image error]
The post Apple Cider Sangria appeared first on Author Heather Balog.
October 26, 2018
Pumpkin Pie Mini Cheesecakes
Back in the groove! Pumpkin is definitely pulling into the lead against apple in the “easier” recipe department after the lengthy process to make Homemade Apple Pie. I made pumpkin pie mini cheesecakes last night and OMG they were so easy. And tasty, too—a clear winner in my book. Is there anything more fitting for National Pumpkin Day???
So How Easy Was It?
The entire process took me less than 40 minutes. Wow! That NEVER happens. And I had all the ingredients in the house, so I didn’t even need to go to the store to get anything. Definitely a huge bonus as far as I’m concerned.
First I preheated the oven to 325 before I made the crumb crust for the bottom. I doubled the original recipe because I like a lot of crumb and I didn’t feel like the original recipe yielded enough crumb crust per mini cheesecake. (In the recipe section, I put what I used.) It’s so simple—mix graham cracker crumbs with melted butter and salt and voila!
Fill a muffin pan with muffin liners and scoop approximately 1 1/2 TBSP of the crumb mixture into each liner and pack it down. I finally found a use for this “muddler” that Hubby brought in some cooking store awhile back:

I baked these for 5 minutes while I made the pumpkin pie mini cheesecake filling.
Yes, It’s That Quick to Make These Pumpkin Pie Mini Cheesecakes
I think it might take longer to say “Pumpkin Pie Mini Cheesecakes” than it does to make them. Okay, maybe that’s slight exaggeration…
Combine pumpkin puree, cream cheese, sour cream, brown sugar, eggs, pumpkin spice, and cloves in a medium bowl. Beat on high until smooth. ***Tip: Make sure the cream cheese is room temperature—makes it easier to mix.
[image error]
Remove muffin cups from oven and spoon the batter into the muffin cups, filling all the way. Bake for an additional 20-25 minutes or until the pumpkin pie mixture sets. (They will be kind of spongy on top when you poke them.)
Remove the muffin pan from the oven and top with whip cream. I took them out of the muffin wrappers, but you can leave them in to hold them together. A couple fell apart when I did this—the dog welcomed an extra treat. After all the pumpkin cupcakes he had the other day and what misery it wrecked on his intestines, you would think he wouldn’t want to see anything with pumpkin again. No one ever accused him of being smart, though…
Sprinkle cinnamon on top of the pumpkin pie mini cheesecakes to make them look a little fancy:
[image error]
And seriously, THAT’S it. There is nothing more to this recipe than to enjoy!
Print Yum
Pumpkin Pie Mini Cheesecakes
Ingredients
For the Crumb Crust:2 c. graham cracker crumbs
4 TBSP unsalted butter, melted
1/2 tsp. salt
For the Filling:
1 c. pumpkin puree
3 eggs
1/2 c. brown sugar
2 tsp. pumpkin spice
1/2 tsp. ground cloves
8 oz cream cheese
2 TBSP sour cream
Instructions
Preheat oven to 325.Mix melted butter with graham cracker crumbs and salt.
Fill bottom of muffin cups with 1 1/2 TBSP of crumb mixture.
Press down to pack.
Bake for 5 minutes and then remove from oven.
Combine pumpkin puree, cream cheese, sour cream, brown sugar, eggs, pumpkin spice, and cloves in a bowl.
Beat until smooth.
Spoon mixture on top of baked crumb mixture.
Bake for 20-25 minutes or until mixture is set.Schema/Recipe SEO Data Markup by Yummly Rich Recipes0.1https://thebadmommydiaries.com/pumpkin-pie-mini-cheesecakes/[image error]
The post Pumpkin Pie Mini Cheesecakes appeared first on Author Heather Balog.
October 25, 2018
Homemade Apple Pie
Well, I knew it was too good to last…the kick a$$ quick AND easy baked goods being churned out of my kitchen. Sigh. It was a good run. Two different muffins in two days, Apple Streusel Muffins and Pumpkin Swirl Muffins. Both were delicious—moist and full of flavor. Just ask my dog. 


![[image error]](https://i0.wp.com/thebadmommydiaries.com/wp-content/uploads/2018/11/1541962267999.jpg?ssl=1)
![[image error]](https://i1.wp.com/thebadmommydiaries.com/wp-content/uploads/2018/11/img_2730.jpg?ssl=1)