Mandi Ehman's Blog, page 118
April 29, 2013
Simple Ways to Get in the Habit of Saving
The following post is from Christina of Northern Cheapskate :

source: SeniorLiving.org
As my husband and I dug our way out of debt, we often reminded ourselves that getting to debt-free was a marathon, not a sprint. While it was easy to get into debt, it takes an incredible amount of time, energy, and determination to get rid of that debt.
So, if the journey out of debt is a marathon, then learning to save money is lot like marathon training. You have to condition those saving muscles so that you are able to keep saving even when things are tough. You’ve got to develop the stamina to keep moving toward your financial goals.
Here are several great ways to create a savings habit:
Pay yourself first.
One of the simplest ways to develop the savings habit is to pay yourself first. What does that mean? It means that whenever you come into money – whether it is a paycheck or a windfall – put some of it into savings before you do anything else. It’s easy to set up a direct deposit to your savings account, and you can make sure money is automatically transferred from your paycheck to a retirement account, too. Ideally, you should be setting aside 10 to 20 percent of your income into savings, but just remember that every little bit counts.
By putting money into savings first, you’re training yourself to live within your means. And because you’re making saving automatic, you won’t be as tempted to spend that money.
Save your spare change.
Another simple way to save is to put all of your spare change into a jar. Other folks pledge to put every $1 or every $5 bill they get into a savings jar. It doesn’t take long at all for that little bit of “extra” money to add up. And when you can visibly see your savings grow, you’ll be more motivated to save even more.
Focus on your goals.
Set good financial goals and regularly review them. If you’re saving for something special, post a picture of it on your bathroom mirror or put a snapshot of the item with your wallet. When you are reminded of what you are saving for, it becomes easier to stay on course.
Surround yourself with other savers.
Connect with family and friends who are also making it a goal to save money. You’ll be able to share experiences and frugal living ideas to help you reach your goals, and you won’t be tempted to spend money frivolously. Read inspiring money-saving books and websites to keep you motivated.
Celebrate your success.
Once you’re in the habit of developing savings habits, don’t forget to celebrate your success with a small reward. By treating yourself (maybe with a dinner out or a small gadget), you’re reminding yourself of the accomplishments you’ve made. Saving without goals and without rewards is far too daunting and makes you more likely to go back to spendthrift ways.
Learning to save money is hard, but when you start slowly and confidently, you will develop the skills to make saving automatic.
How do you stay motivated when it comes to saving money?

Christina Brown is the creator of Northern Cheapskate, a blog dedicated to frugal living through coupons, freebies, and money-saving ideas. She lives in the rural north woods of Minnesota where she clips coupons, pinches pennies, and chases her three boys (a 7-year-old and twin 5-year olds) as a stay-at-home mom.
Simple Ways to Get in the Habit of Saving is a post from Life Your Way
© 2010-2013 Purple Martin Press, LLC | All rights reserved - This feed is provided for the convenience of Money Your Way subscribers. Any reproduction of the content within this feed is strictly prohibited. If you are reading this content elsewhere, please send an email to contact@yourway.net to let us know. Thanks.


Weekly Reads + Books That Change Your Life {4/29/13}

I though that I might get a few hours of reading in during our 18-hour drive last week, but I ended up just chatting with Sean and the girls for most of the drive instead (and discovered I’m a lot more patient when I don’t have a book in my hand in the car!), and so I only got about halfway through one book this week. Hopefully our vacation will afford me more reading time at some point, although that doesn’t seem to be happening so far!
Head here to see Katie’s post for this week. We also want to know what you’re reading! Add your blog post to the linky below or leave a comment with your favorite reads from this week.
This Week’s Reads

The Screwtape Letters by C.S. Lewis
The first time I picked up The Screwtape Letters, I had no idea what it was, and I was pretty confused by the conversation taking place between Screwtape and Wormwood. Once I figured out the premise of the book — letters between two devils about how to best lead a new Christian astray — I thoroughly enjoyed both the writing and the insight into the human condition that C.S. Lewis is known for. So much of what he writes hits close to home for my own struggles in relationships and faith even 70+ years after it was written.
And like most classics, I enjoy it more each time I read it, underlining and highlighting more and more each time!
A Question for You
When I was in junior high and highschool, I often reread books, including most of Janette Oke’s historical fiction and both China Cry and Run Baby Run, which got me hooked on biographies/memoirs and are still part of my collection. These books all had a huge impact on my faith during those years, and when I discovered The Screwtape Letters as a young adult, I added it to the list of books that had actually impacted my life and faith.
What is your all-time favorite book? What book has had the biggest impact on your life? What book have you reread multiple times?
Share Your Reading List
Productive Thinking: What to Do with All Those Ideas in Your Head
The following post is from Prerna of The Mom Writes :
[image error]
source: pixabay
My head is often abuzz with ideas. Every book I read sparks a new creative light. Every blog post I go through inspires me to create something. It’s not always work-related. Projects related to the home, crafts to do with my daughter, baking experiments waiting to be tried out. The list is endless and my head becomes a whirlwind of activity.
The thing is that creative surges like these happen all too often and to nearly all of us. With the inflow of a HUGE amount of visual{thank you, Pinterest!} and textual inspiration these days, it is relatively easy to be inspired, motivated and filled with ideas to change our own lives.
However, there are questions that need to be answered so that we actually get something done and don’t lose our mind in the process.
Questions like,
What to do?
Which idea to implement first?
Which area of my life needed the brightest spark right away?
Which idea may not be a “good idea” after all?
Yes, too many ideas is a good problem to have if you know what to do with them. I realized I had to come up with a system to channelize my creative surges and find a way to actually realize at least some of these ideas productively and intentionally.
Here is my 4-step approach to productive thinking when you have too many ideas and honestly, too little time:
1. Have a recording system.
The first thing to do is have some sort of recording system for all those ideas. It can be a simple journal, the Notes app on your smartphone, a fancier tool like, Evernote or Pinterest even. Whatever you do, try not to have too many of your recording systems. For instance, don’t have a journal, a recorder AND Post-Its. If you have to have multiple systems, choose TWO and stick to them.
The idea is that you have someplace to record all those flashes of inspiration so that you have them in ONE handy place to review. {see next step}
2. Review your idea file weekly and monthly.
Every week, spend some time reviewing each idea and sorting it into categories – life, kids, work, home, husband, relationships. I like to keep the categories broad so I have Self, Home, Family, Business. You can create a system that works well for you and your needs.
I also recommend reviewing the file monthly to see which of those ideas you may have already implemented without even realizing it. For instance, one of the ideas I had sometime last month was to create a monthly summer activity calendar for my 5-year old with links to posts that had the craft ideas. I started a simple Word document on my laptop and kept plugging in links I found interesting. When I did my monthly review, I realized I’d already actioned the idea and just crossed it off.
A monthly review is also a good time for a quality audit, which is our next step.
3. Run a quality audit…objectively.
When you’re doing your monthly review of the Ideas file, sort through the ideas and objectively see which ones are the real diamonds-in-the-rough and which ones are well, too rough to be anything. Now this exercise does depend upon the season of your life.
However, there are some basic guidelines that I follow:
Will implementing this idea improve the quality of my life/family/business?
Will actioning this idea give me immense joy/happiness/money?
Will the idea have a good return on investment or ROI in terms of effort investment vs experience?
Do I REALLY, like truly, madly, deeply want to do this?
If I answer “yes” to at least 2 out of the 4 questions, I let the idea simmer awhile longer in the file, else I cross it off and move on.
4. Create an action plan and act on it.
My final step and probably the most crucial one to dealing with too many ideas is to create an action plan for the real gems and then, work it. My process is to pick at least ONE idea each month for all 4 categories. But we all know life as a mom and entrepreneur. Nothing predictable. Some months, it may be just ONE idea in all. Some months, none. Yes, it happens.
BUT once I create the action plan, I focus on working it and bringing that idea to life.
Like I said earlier, not every idea needs this step and some may get actioned without a plan. That is good but having a system in place to be more productive about what I work on and how I do it is always a blessing.
What do YOU think is the challenge of having too many ideas?

Prerna Malik is a mom, a wife, a writer and woman who believes in being postively productive, parenting with love and creating a home that invites you to put your feet up and relax. Find her sharing her journey and experiences with productivity and parenting at The Mom Writes.
Productive Thinking: What to Do with All Those Ideas in Your Head is a post from Life Your Way
© 2010-2013 Purple Martin Press, LLC | All rights reserved - This feed is provided for the convenience of Work Your Way subscribers. Any reproduction of the content within this feed is strictly prohibited. If you are reading this content elsewhere, please send an email to contact@yourway.net to let us know. Thanks.

Get 5 eBooks for Your Digital Life for $7.40! {BundleoftheWeek.com}
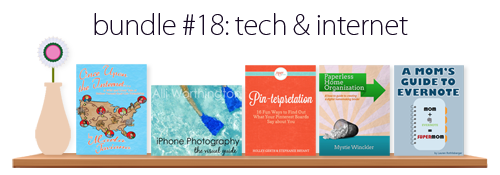 Learn how to use the technology in your life to your advantage with this week’s collection of ebooks. You’ll discover the secrets to beautiful iPhone photos, how to get organized using free apps and programs, the beauty of online friendships and more. But don’t wait because this bundle is on sale for 70% off this week only!
With your purchase, you’ll get all five of the following ebooks:
Once Upon the Internet by Marla Taviano
iPhone Photography by Alli Worthington
Pin-terpretation by Holley Gerth & Stephanie Bryant
Paperless Home Organization by Mystie Winckler
Evernote for Moms by Lauren Rothlisberger
Even if you’re not interested in this week’s bundle, be sure to sign up for the BundleoftheWeek.com weekly newsletter so you can be the first to know about the latest bundle:
Get 5 eBooks for Your Digital Life for $7.40! {BundleoftheWeek.com} is a post from Life Your Way
© 2010-2013 Purple Martin Press, LLC | All rights reserved - This feed is provided for the convenience of Tech Your Way subscribers. Any reproduction of the content within this feed is strictly prohibited. If you are reading this content elsewhere, please send an email to contact@yourway.net to let us know. Thanks.

April 27, 2013
Get a FREE Dose of Vectra Flea & Tick Control for Your Dog!
This is a Sponsored post written by me on behalf of Vectra flea & tick control for SocialSpark. All opinions are 100% mine.

source: Mandi Ehman
Because our winter felt long and cold, we thought we might finally get a break from the abundance of ticks we deal with each summer. Unfortunately, as it turns out, this year’s tick season started off earlier and stronger than usual.
We’re removing and flushing multiple ticks per day from our girls (and looking forward to our vacation to relatively tick-free Florida!), but thankfully we haven’t had to remove any from our sweet husky puppy, Bella.
Despite her love for exploring the tall grass around our home, she hasn’t gotten a single tick this year (unlike the one we had to remove from between her toes last fall!). We’ve tried a variety of flea and tick medicines with our cats and dogs in the past, but this year we picked up a free dose of Vectra flea & tick control from our vet, and we’ve been so happy with the results so far. I even find myself almost wishing they made a version for our kids, LOL!
Vectra 3D works fast, repelling and killing parasites (including fleas, ticks, mosquitoes, flies, lice and certain mites) on contact, is easy to apply, and lasts for a month, even after bathing and swimming.
You won’t find Vectra at the store, but its carried by vets across the country. If our teeny town vet carries it, I’m pretty confident in saying one of your local vets does as well!
Protect the Love Sweepstakes

Enter Vectra’s Protect the Love sweepstakes on Facebook to win a $100 gift card toward your next vet visit! Entrants will also receive a coupon for a FREE dose of Vectra Flea and Tick Control when they visit FirstDoseFree.com.
Hurry and get your free dose today!
Be sure to like Vectra on Facebook and follow @VectraPet on Twitter for special offers, cute pet photos and more!

Get a FREE Dose of Vectra Flea & Tick Control for Your Dog! is a post from Life Your Way
© 2010-2013 Purple Martin Press, LLC | All rights reserved - This feed is provided for the convenience of Family Your Way subscribers. Any reproduction of the content within this feed is strictly prohibited. If you are reading this content elsewhere, please send an email to contact@yourway.net to let us know. Thanks.

Weekend Reading: April 27, 2013

source: mandiehman on Instagram
Eighteen hours in the car with four tired little girls and a very curious puppy was well worth it for a full day spent swimming, eating fro-yo and hanging out with Nona and Pop yesterday…and the promise of many more of those days to come!
Our weekly newsletter is currently on hold as I muddle through the first trimester, but be sure to subscribe so you don’t miss future issues!
Here are some of my favorite posts from this week. As always, check out what I’m reading to see the other posts that make me stop and think. You’ll find new posts all week long!
Family {We’re Going to Disney World!}
Random Acts of Disney: 10 Magical Stories | Babble
Epic Fail: Disneyland Surprises Gone Wrong | Roadside Assistance
Home {Simple Living with Kids}
Decluttering & Kids: Inspiring Kids to Live Simply | Keeper of the Home
5 Ways to Manage Home and School | SimpleHomeschool.net
Life {Intentional and Joyful}
Speak Joy | Becoming Minimalist
Stuck in the Doldrums: An Attack Plan | Jen Hatmaker
Flowing with the Stresses of Kids (or anyone else) | ZenHabits
Have a great weekend!

Mandi Ehman is the founder and publisher behind Life Your Way and the co-author of All in Good Time, as well as a wife and the homeschooling mom to four beautiful girls. She lives with her family on a little slice of heaven in wild, wonderful West Virginia and loves coffee, chocolate, easy meals, beautiful things and minimalist spaces.
Weekend Reading: April 27, 2013 is a post from Life Your Way
© 2010-2013 Purple Martin Press, LLC | All rights reserved - This feed is provided for the convenience of Life Your Way subscribers. Any reproduction of the content within this feed is strictly prohibited. If you are reading this content elsewhere, please send an email to contact@yourway.net to let us know. Thanks.


April 26, 2013
Recycled Lid Flower Craft
The following post is from Kristina of Toddler Approved:

source: Kristina Buskirk
Spring is here! We’ve done several spring flower crafts lately inspired by the blossoms we are seeing all over. We made bubble wrap printed Spring lilies and we did Spring spin art.
Today I wanted to share two different ways you can make a recycled lid flower craft. Both versions are simple and beautiful, but one is better for toddlers while the other works well for school age kids. Both could be turned into gifts for Teacher Appreciation Week or Mother’s Day.
We love to recycle lids and bottle caps. They can be used in so many creative ways as you or create educational games. They are especially cool to use in mixed media art projects to make the art pop off the page.

source: Kristina Buskirk
Toddler Lid Flower Craft
Supplies: lids, Elmers glue, cardstock paper, scissors, ribbon, buttons (various sizes/colors), and pre-cut green leaves from paper.

source: Kristina Buskirk
Toddlers love exploring objects with a variety of textures and colors. This lid craft is a fun way to explore new objects while talking about color names and learning concepts like bigger, smaller, smooth, bumpy, etc.
Directions:
For this version I helped my toddler draw several glue lines on her paper, and then we worked together to stick ribbon onto the lines.
Next, we put big glue dots at the end of each ribbon stem and she added a big playdough lid as the flower. Then, she added more glue to the center of each lid and stuck a button right in the middle.
To finish off the project, she glued some pre-cut leaves onto the ribbon stems, and then we let her masterpiece dry.
School Age Kid Lid Craft

source: Kristina Buskirk
Supplies: green floss or yarn, fabric scissors, colorful felt, lids, buttons, ribbon, Tacky craft glue, and cardstock
Directions:
This felt lid flower craft version is a bit more challenging to make and requires kids to use scissors and cut through felt, so it is more appropriate for school age kids.
First we laid out green floss and cut it a variety of lengths to make flower stems. Then we glued the floss onto a larger piece of felt.
After we glued the stems onto the white felt base, we glued a ribbon border around the felt to add some color and hold the ends of the floss in place.
Next we cut felt into several circles and then we began layering the felt, bottle caps, and buttons to create flowers. We glued everything in place using tacky glue.
We finished off the flowers by cutting some small cardstock leaves and gluing them onto the flower stems.

source: Kristina Buskirk
After letting the glue dry, we added a little ribbon loop to the top so that we could hang our flower creation on the wall.
It is so cool to see how little bottle caps and lids can be transformed into such gorgeous works of art! Just add a note to your art work that says, “Mom (or teacher), Thanks for helping me grow!” and add in a personal message and you’ve got a beautiful gift ready to give. You could even pair your flower artwork with a potted plant or bouquet of flowers.
Here are a few other lid and bottle cap crafts that we love:
Recycled Lid Craft: Glitter Bugs via Crafts by Amanda
Cap Stamps via The Long Thread
Bottle Cap Art Magnets via Paint Cut Paste
What else have you created with lids or bottle caps? What other gifts could you give for Mother’s Day or Teacher Appreciation Week?

Kristina is a mom of 3 and a former Special Ed teacher for children with communication disabilities. She blogs at Toddler Approved as she looks for ways to make life a little more fun and creative with her kids while embedding learning into everything that she does. Kristina tweets as @ToddlerApproved and can be found on FB and Pinterest.
Recycled Lid Flower Craft is a post from Life Your Way
© 2010-2013 Purple Martin Press, LLC | All rights reserved - This feed is provided for the convenience of Family Your Way subscribers. Any reproduction of the content within this feed is strictly prohibited. If you are reading this content elsewhere, please send an email to contact@yourway.net to let us know. Thanks.

Homemade Whipped Body Butter Recipe
The following post is from Micaela of Mindful Momma:

source: Micaela
Living in the Upper Midwest, I am used to the dry skin that long winters and too much time in artificially heated air bring on. My bathroom cabinets are filled with lotions and potions geared to combat dry skin, but I’ve found that there’s nothing like a creamy body butter to give my skin that drink of moisture that it desperately needs. Body butters are richer than regular lotions and typically contain a high percentage of oils to moisturize skin. But when you buy a body butter from the drugstore or department store, who knows what’s really in there. Check out the ingredients and you’ll see a list of chemicals you can hardly pronounce.
That’s where making your own moisturizer comes in. Homemade body butter is super easy, and the whipped formula makes it just as luxurious as something you would find in a high-end store. Even better, this recipe contains only 3 ingredients – plus essential oils if you prefer a scented cream – so you know exactly what you are putting on your skin.
This body butter would also make a great addition to your DIY Mother’s Day gift basket!

source: Micaela
Ingredients
1/2 cup unrefined shea butter (I purchase shea butter in bulk from my local co-op but you can buy it online through mountainroseherbs.com or on Amazon.com.)
1/4 cup cocoa butter (available in a jar or as disks like you see in the photo above. Just be sure your kids don’t think they are candy!)
1/4 cup sweet almond oil
10 to 24 drops essential oil of your choice
Recipe makes about 1 cup of body butter.
Instructions
Bring water to a simmer in the bottom of a double boiler. Measure out the shea butter (you have to pack into the measuring cup like you would brown sugar) and place in the top of the double boiler. Add the cocoa butter disks or chunks from your jar of cocoa butter (cocoa butter is a solid so you have to dig it out of the jar). Allow both ingredients to melt together.

source: Micaela
Next, add the sweet almond oil. Mix together and turn off the heat on the double boiler. Now you can add the essential oils. My favorite is a blend of sandalwood, sweet orange and geranium that I call my tranquility blend. Let the mixture cool until it has started to set up but is not yet solid. This could take a couple of hours if you leave it at room temperature. Or you can speed up the process by putting it in the refrigerator for about an hour. It should look slightly opaque – as you see in this photo:

source: Micaela
Now for the fun part! Get out your mixer (hand or stand) and start whipping. You will see it change from a thick, yellowish, lemon curd-like mixture into a fluffy whipped cream right before your eyes in only a few minutes.

source: Micaela
Finally, spoon the cream into a jar. A repurposed jelly jar works just fine if the body butter is for yourself, but you may want to upgrade to a nicer jar if you are giving it as a gift. The jar you see in this photo is from Organized Living.

source: Micaela
Note: Body Butter can be stored at room temperature but, in the summer months, it may liquefy depending on how warm it gets. In that case, you might want to store it in the refrigerator. Since this product contains no preservatives, the shelf life is approximately 3 months.
Do you have a favorite homemade body care product?

Micaela Preston is a green lifestyle writer and marketing consultant with a passion for sustainable products and brands. Her award winning blog, Mindful Momma, focuses on living a green and healthy lifestyle while balancing the realities of life with young children. Micaela lives in Minneapolis with her husband and two boys. When she is not writing, she is busy whipping up a healthy meal or the eco-craft du jour.
Homemade Whipped Body Butter Recipe is a post from Life Your Way
© 2010-2013 Purple Martin Press, LLC | All rights reserved - This feed is provided for the convenience of Green Your Way subscribers. Any reproduction of the content within this feed is strictly prohibited. If you are reading this content elsewhere, please send an email to contact@yourway.net to let us know. Thanks.

April 25, 2013
Have You Ever Been to Missouri?
This is a Sponsored post written by me on behalf of Missouri Department of Tourism for SocialSpark. All opinions are 100% mine.

Our family is currently planning a cross-country roadtrip for either 2014 or 2015 (mostly depending on the temperament of our newest addition!). While our focus is on southwestern Utah, where we lived for two years after getting married and where our oldest daughter was born, we hope to use our travel time to explore other great destinations along the way.
A week ago, I wouldn’t have included Missouri on that list, but the more I learn about this beautiful state (and its 51 state parks and dozens of museums and historical sites!), the more convinced I am that it needs to be a big part of our plans!
If we had a few days to stop and explore, I’d want to visit the homes of both Laura Ingalls Wilder and Mark Twain (and of course we’d have to read Little House on the Prairie, Adventures of Huckleberry Finn and Tom Sawyer again before we go!).
We’d also take advantage of these great FREE destinations to stretch our vacation budget: The Saint Louis Zoo, the Saint Louis Science Center, Grant’s Farm, and the St. Louis Citygarden!
And if you’re gonna be in St. Louis, you have to get your picture taken in front of the Gateway Arch, right?
We’d need at least two days in the St.. Louis area to see everything we want to see, plus a day to explore Laura Ingalls Wilder’s home and museum, and I’d love to add at least one day for outdoor adventures like this Arcadia Valley Serenity tour!

Visit the Missouri Divison of Tourism for more pictures and information to help you plan your trip!
Be sure to like VisitMO on Facebook and follow VisitMO on Twitter to learn more about the attractions and special events in Missouri!

Have You Ever Been to Missouri? is a post from Life Your Way
© 2010-2013 Purple Martin Press, LLC | All rights reserved - This feed is provided for the convenience of Family Your Way subscribers. Any reproduction of the content within this feed is strictly prohibited. If you are reading this content elsewhere, please send an email to contact@yourway.net to let us know. Thanks.

Beautifying Your Closet Space
The following post is from Lisa of The Pennington Point:

source: Love of Family and Home
Closets…..the forgotten space in our homes. We get the rooms all fixed up and leave the closets in the dark. The closet does so much work for us that I thought we needed to dedicate a moment for some closet love.
What a gorgeous way to store your shoes in this closet!

source: Love of Family and Home
I love the curtains on this closet and the peek inside to the pretty lined drawers.

source: Organizing Made Fun
Look at this beautiful way to use an entryway closet.

source: The House of Smiths
How about turning a closet into a work space?

source: Killer B Designs
Here’s another closet turned office…I’m obsessed with it!

source: Love of Family and Home
I love this idea of turning a plain closet into a craft space.

source: Beneath My Heart
I’m inspired to take a look at my tired old closets and do something pretty.
Do you have a closet that needs a makeover?

Lisa winds through her little Texas farm house every night, tucking in her nine homeschooled children and turning off lights. Then she scans the rooms & makes a mental list of what she wants to rearrange, restore or paint. Her husband of 26 years hangs on for the ride while she blogs about it over at The Pennington Point.
Beautifying Your Closet Space is a post from Life Your Way
© 2010-2013 Purple Martin Press, LLC | All rights reserved - This feed is provided for the convenience of DIY Your Way subscribers. Any reproduction of the content within this feed is strictly prohibited. If you are reading this content elsewhere, please send an email to contact@yourway.net to let us know. Thanks.