
Benny Lewis's Blog, page 48
August 1, 2019
Easy Spanish Pronouns: Understanding Spanish Pronouns and Their Verb Pairs

Pronouns are the key to understanding who or what the subject is in a sentence. Without them, sentences would get very confusing, very quickly!
Unlike English, Spanish doesn’t always use pronouns. In fact, Spanish often uses verb conjugation to show the subject of a sentence.
But that doesn’t mean you can get away with skipping over Spanish pronouns. You still need to master them.
So, let’s start by learning the basics.
What is a Spanish Pronoun?
A pronoun is a word that takes the place of names or nouns in a sentence. For instance, if I say “Diego is my friend. He lives near me, and he works nearby,” I’m using the pronouns “my”, “he” and “me”. That sentence would be pretty clunky without pronouns. Here’s how it would look: “Diego is Benny’s friend. Diego lives near Benny, and Diego works nearby.”
In my view, talking in the third person all the time seems strange and unnecessary! So, that’s why we need pronouns.
You might have noticed in my sample sentence about Diego there are two different types of pronouns that express me, Benny, in English: “my” and “me”. They express different things, even though they both represent the same subject: Benny. “My” is possessive, while “me” is relative - how Diego relates to me (“he lives near me”).
What about in Spanish? That same sentence looks like, "Diego es mi amigo. Él vive cerca de mí, y trabaja cerca.”
Pronouns change depending on where and how they’re used in a sentence. They can change depending on whether you’re expressing possession, direction, or using them after prepositional phrases. It’s sounds complicated, but it’s a lot like English -- think of how the personal pronoun “I” changes to “me” or “my” depending on where and how it’s used.
Spanish Personal Subject Pronouns
Grammar review: The subject of a sentence is the person, object or place being discussed or performing the action of the verb.
For example, in the sentence “He runs a marathon”, “He” is the subject, and “to run” is the verb.
Here are the subject pronouns:
I: Yo
You: Tú (informal) / Usted (Formal):
He: Él
She: Ella
We: Nosotros / Nosotras
You, plural and informal: Vosotros / Vosotras
You, plural and formal: Ustedes
They: Ellos / Ellas
To learn Spanish verb conjugation, you need to memorize the Spanish personal subject pronouns, starting with “I”, “we”, “they” and “you”.
Pronouns ending with -o indicate the masculine form, used for either groups of men or both men and women. The -a endings are feminine and used only if “we”, “they” or “you” refer to a group of all women.
The other thing to know is that “you” in Spanish has a formal and informal version. You use tú for friends and family, and usted to show respect or address someone you don’t know. For the plural form, vosotros is only used in Spain as an informal “you”. In Latin America, ustedes is used in both formal and informal situations.
Connecting Subjects to Verbs and Dropping the Pronoun
In Spanish, the subject of a sentence changes the ending of the verb. It makes the subject clear and easy to understand.
Let’s try some examples of Spanish pronouns in sentences, and see how that changes the verb “to go” (ir).
“I” in Spanish: Yo voy a la tienda. (“I am going to the store”)
“You” in Spanish: Tú vas a la tienda (“You are going to the store”)
“He” in Spanish: Él va a la tienda (“He is going to the store”)
“She” in Spanish: Ella va a la tienda (“She is going to the store”)
“We” in Spanish: Nosotros vamos a la tienda (“We are going to the store”)
“You” (plural, informal) in Spanish: Vosotros váis a la tienda (“You all are going to the store”)
“You” (plural, formal) in Spanish: Ustedes van a la tienda (“You all are going to the store”)
“They” in Spanish: Ellos van a la tienda. (“They are going to the store”)
As you can see, when the subject changes, so does the verb “to go” (ir). The rest of the sentence stays the same (a la tienda). Ir is an irregular verb in Spanish, but the idea is the same. Verbs endings (also known as verb conjugations) change in a sentence based on the subject of that sentence
English is similar for some verbs. For example, with the verb “to run”, you’d say “I run”, and “she runs”. The ending of the verb changes based on the subject of the sentence. But this is only sometimes the case in English. In Spanish, it’s always the case, and the ending is different for every subject.
That’s why in Spanish, the subject can often be dropped since it’s understood by the verb structure alone. Those sentences could then be “Voy a la tienda” and “Vas a la tienda”, and you would still know the subject was “I” and “you”.
Spanish Possessive Pronouns
Possessive pronouns in Spanish answer the question “Whose is it?” They give the pronoun ownership of an object. For example, in English you might say “That’s mine” or “It’s her house”.
In Spanish, there are four forms for each pronoun: singular masculine, singular feminine, plural masculine and plural feminine. And for possessive pronouns, they are always used with “the” (which also must match one of the four forms - el, la, los and las). Which one you use is based on the gender of the word you’re saying is owned.
For instance, singular masculine possessive for “mine” is el mío. Singular feminine is la mía. And for plural masculine and feminine, it’s los míos/las mías. If you’re saying a book (el libro, masculine) is yours, you would say “Es el mío” (“It is mine”). For books, it’s Son los míos (“They are mine”). If the apple (la manzana, feminine) is yours, then it’s Es la mía, or plural Son las mías.
Mine: El mío, los míos, la mía, las mías
Yours: El tuyo, los tuyos, la tuya, las tuyas
His, hers or its: El tuyo, los tuyos, la tuya, las tuyas
Ours: El nuestro, los nuestros, la nuestra, las nuestras
Yours: El vuestro, los vuestros, la vuestra, las vuestras*
Theirs: El suyo, los suyos, la suya, las suyas*
Now, this is different from when you say “my book” or “my apple”. In that situation, you’re using “my” as an adjective, not a pronoun, because you aren’t replacing the noun but describing it. Then it’s mi libro or mis manzanas. Here are those possessive adjectives:
My: Mi, mis
Your: Tu, tus
His, her, its, their: Su, sus
Our: Nuestro, nuestros, nuestra, nuestras
Your (plural): Vuestro, vuestros, vuestra, vuestras
Spanish Prepositional Pronouns
Only two pronouns change when following a preposition. (If you need a refresher of prepositions, check out this list.)
When following a preposition:
“I” or Yo becomes mí (“me”)
“You” or Tú becomes ti (“you”)
All other Spanish pronouns stay the same after a preposition, so that makes this set of pronouns easy to remember.
For example:
Esto es para mí, eso es para ti. (“This is for me, that’s for you.”)
The only exception is con (“with”). That’s comitative form, and it changes mí and ti to conmigo and contigo, respectively.
Spanish Direct Object Pronouns
Do you remember what a direct object is in a sentence? The object is what receives the action of the verb. So the subject performs the action, and the direct object is on the receiving end of that action. If I said, “I ate pizza” (Yo comí pizza in Spanish), “I” is the subject, “ate” is the verb and “pizza” is the direct object.
But if someone asked me, “Who ate the last slice of pizza?” I could say “I ate it,” which is Me lo comí. I’m using the direct object pronoun lo for “it” in Spanish. (In this situation, Me is “I, myself”... a reflexive pronoun. We’ll get to that in a second.)
Notice that the direct object pronoun goes before the verb, though. In most situations, Spanish has the same sentence structure as English (Subject-Verb-Object). But when it comes to direct object pronouns, it’s Subject-Direct Object Pronoun-Verb.
Here are the direct object pronouns:
Me: Me
You: Te
Him, her, it: Lo, la
Us: Nos
You: Os
Them: Los, las
Something to note: “them” in Spanish can be either people or items, which is why it’s plural for him, her or it. This is the same as English, but sometimes confuses people when they’re trying to remember it in Spanish.
Spanish Reflexive Pronouns
Before we talk about indirect object pronouns, let’s cover reflexive pronouns. I used it in the sentence above, Me lo comí, so let’s explain how that works.
Reflexive pronouns are words that end in “-self” or “-selves”. Oneself, myself, yourself, etc. When using a Spanish reflexive verb, such as lavarse or llamarse, you pair it with the Spanish reflexive pronoun.
How do you know when a verb is reflexive?
A verb is reflexive when the subject and object are the same. So, if I said Me llama Benny, I’m saying “I call myself Benny.” That’s why it’s me instead of yo. In Me lo comí, I’m saying “I, myself, did the action. I, myself, ate it.”
Here’s the list of reflexive pronouns:
Myself: Me
Yourself: Te
Himself, herself, itself: Se
Ourselves: Nos
Yourselves: Os
Themselves: Se
Reflexive pronouns seem confusing, but there’s a simple way to think about it. Take a look at that list, and then the direct object pronouns. There’s only one change: lo/la or los/las becomes se. That’s it! Everything else remains the same. If it’s easier, for now, you can think “Me, I ate it” to explain why Me lo comí uses me instead of yo.
Spanish Indirect Object Pronouns
The indirect object is someone or something affected by the action of the verb, but it’s not the main recipient of the action. Grammatically, the direct object doesn’t follow a preposition, while an indirect object comes after “to” or “for”. So the direct object is going to, or is for, the indirect object.
To/for me: Me
To/for you: Te
To/for him, her or it: Le
To/for us: Nos
To/for you all: Os
To/for them: Les
Notice that once again, only “it” has changed. Now it’s le or les. The rest is same as the direct object list.
If I said “I bought pizza,” that’s subject-verb-direct object. If I expand on that and say “I bought pizza for my friend,” then the direct object is “pizza” and “my friend” is the indirect object. In Spanish, that would be Compré pizza para mi amigo.
Now let’s say that same sentence using indirect object pronouns. In English, it would be “I bought pizza for him.” In Spanish, that would be Le compré pizza. Like the direct object pronouns, indirect object pronouns come before the verb, too.
Spanish Relative Pronouns
Relative pronouns connect phrases to a noun or pronoun. They’re words like “who”, “which”, “that”, “where” and “when”. They can help connect two sentences or to connect an adjectival clause to the noun.
In English, this would look like: “The new car that I bought is red.” I could’ve said “The new car is red” but I wanted to express it was my new car. So I used the relative pronoun “that” to connect it.
In Spanish, it’s El nuevo carro que compré es rojo.
The main two relative pronouns you’ll use in Spanish are que and quien. Que can mean “that”, “which”, “who” or “whom”. It connects to the noun directly. Quien means “who” or “whom” and comes after a preposition, like para (“for”) or con (“with”).
Here’s a couple examples:
El libro que tomaste prestado. (“The book that you borrowed.”)
Mi amigo para quien compré pizza se fue a casa. (“The friend, who I bought pizza for, went home.”)
Note that que is directly after libro, and is followed by a reflexive verb, tomaste. And quien follows the preposition para to describe specifically which friend I’m talking about.
There’s also cual, cuyo, el que, cuando and donde... Which gets pretty in-depth on the grammar aspect of building your sentences. For now, get comfortable using que and quien and understanding their differences.
Spanish Pronoun Power!
How’d it go? Is your head swimming from all of that, or did you find it easy to pick up? There are many different forms for Spanish pronouns, but if you start with mastering the subject pronouns, it gets easier from there. And three of the forms stay the same except the ever-changing “it”. Don’t forget to pay attention to the Spanish accent marks as you go.
How do you practice using different pronouns? Do you have any language hacking tips that have helped you? Share them in the comments!
The post Easy Spanish Pronouns: Understanding Spanish Pronouns and Their Verb Pairs appeared first on Fluent in 3 months - Language Hacking and Travel Tips.


July 28, 2019
Japanese N5 Kanji List: All 100 Kanji You Need to Know to Pass the JLPT N5

Do you know those kanji yet? They’re some of the JLPT N5 kanji. If you’re going to take the test, it’s time to memorize them!
If you don’t know, “JLPT” stands for the Japanese Language Proficiency Test. It’s one of the most well-known and acknowledged tests for Japanese proficiency around the world, with five levels of proficiency. N1 is the hardest level, considered near-fluent. N5 is the easiest level, covering the basic level of Japanese.
If you’re looking to test your skills and see where you’re at in Japanese, the JLPT is a great place to try it out. So here’s your quick guide to learning the necessary JLPT N5 kanji.
What to Expect on the JLPT N5 Test
Even though the JLPT N5 test is the most basic formal Japanese test, passing the test is still a big achievement.
To pass the JLPT N5 test, you have to be able to read Japanese at a basic level and understand simple conversations from daily life and school. You should know around 800 vocabulary words. I recommend starting with the Core 101 Japanese words, and about 50 basic grammar patterns.
My two favorite resources for studying grammar at this level are Genki I and JTest4U. Plus, you’ll need to be totally comfortable reading all the hiragana and katakana characters.
Why You Need to Know Kanji for the JLPT N5 Test
One of the most daunting tasks when starting to learn Japanese? Kanji.
At the N5 level, the JLPT expects you to know about 100 kanji to pass. These kanji can change slightly between tests, but you can generally expect to see the 100 most common kanji for verbs, numbers, time, places, people, basic adjectives, and directions.
The good news? These kanji are used so often you’ll see them over and over again in the vocab you learn and the texts you read. The bad news is that you’ll need to independently memorize most of these kanji because they’re radicals, or roots. Radicals in Japanese are simple kanji -- they’re the building blocks that make up complex kanji.
So, the more radicals you learn in kanji, the easier it becomes to understand more complex kanji. Learning the radicals first, then advancing onto complex kanji, is the most popular method for memorizing kanji (more on that later). For the first 100, because they’re radicals, you’ve just got to memorize them.
That being said, you can still come up with mnemonics to help you remember the kanji and their readings -- and I highly recommend that you do, because it will help you immensely down the road.
Japanese N5 Kanji List -- the 100 Kanji You Need to Know for the JLPT N5
Alright, so let’s start learning these kanji! I’ve broken them up into categories, such as numbers, time, people and places, because I’ve found that kanji are easiest to learn when I associate them with related words.
In the lists below, you’ll see the kanji and the English meaning, followed by the onyomi and kunyomi readings.
Why these different readings? Kanji originated with Chinese hànzì characters which the Japanese adapted and gave Japanese readings. Thus, onyomi (Chinese readings) and kunyomi (Japanese readings) were born. Almost all kanji have two readings (and most, unfortunately, have many more than two). A rare few gems will only have one reading.
For the most part, these different readings are less important for the JLPT N5. If you learn these kanji with a vocab word that might also be on the test, then you should be able to remember the most common reading. This won’t always be true, but it usually will be. It’ll help you get the most out of your study time.
For that reason, I also include an N5 vocabulary word that uses that kanji.
Japanese Kanji for Numbers
First, let’s look at numbers. The first three are very straightforward to remember: a single line (one), two lines (two), three lines (three). Easy.
The rest can be more difficult. The drawback is that most of the time in Japan, they use 1 - 10 romanized numbers instead of kanji. But you still have to learn them. Be careful with 千: it looks almost identical to チ (katakana chi) and one of the readings is the same.
Also, you may think 万年筆 (“fountain pen”) will never show up in the JLPT N5 and yet it somehow it always does. It translates as “ten thousand year writing brush” aka a pen that outlasts all others.
Kanji
English Meaning
Onyomi
Kunyomi
JLPT N5 Vocab with Kanji
一
One
ichi, itsu
hito(tsu), hito
一人 (one person, alone)
二
Two
ni
futa(tsu), futa
二人 (two people, pair)
三
Three
san
mit(tsu), mi
三日 (3rd day of the month)
四
Four
shi
yo(tsu), yo, yon
四日 (4th day of the month)
五
Five
go
itsu(tsu), itsu
五日 (5th day of the month)
六
Six
roku
mut(tsu), mu
六日 (6th day of the month)
七
Seven
shichi
nana(tsu), nana
七日 (7th day of the month)
八
Eight
hachi
yat(tsu), ya
八日 (8th day of the month)
九
Nine
kyuu, ku
kokono(tsu), kokono
九日 (9th day of the month)
十
Ten
juu, ji
tou, to
十日 (10th day of the month)
百
Hundred
hyaku
---
百万円 (1 million Yen)
千
Thousand
sen
chi
千万円 (10 million Yen)
万
Ten thousand
man, ban
---
万年筆 (fountain pen)
円
Yen, circle, and round
en
maru(i)
円い (round)
Japanese Kanji for Time
These kanji are often used together with numbers, so I’ve included them next. You’ll pair numbers up with kanji like 月 to create the months of the year, like 一月 (“January”).
Some of the kanji on this list have more uses than just time, such as 来る which is an irregular verb. But, 来 also reads as らい, meaning “future”. Combined with other time kanji you get: 来週 (“next week”), 来月 (“next month”), and 来年 (“next year”).
Kanji
English Meaning
Onyomi
Kunyomi
JLPT N5 Vocab with Kanji
日
Day, sun
nichi, jitsu
hi, ka
明日 (tomorrow)
週
Week
shuu
---
毎週 (every week)
月
Month, moon
getsu, gatsu
tsuki
月曜日 (Monday)
年
Year
nen
toshi
今年 (this year), 去年 (last year)
時
Time, hour
ji
toki
時計 (clock, watch)
間
Time frame, span of time
kan, ken
aida
時間 (time, hours)
分
Minute, part, to understand, to divide
bun, bu, fun
wa(karu)
三十分 (thirty minutes), 自分 (oneself)
午
Noon
go
---
午前 (morning, A.M.)
前
Before
zen
mae
名前 (name)
後
After, later, behind
go, kou
ato
午後 (afternoon, P.M.)
今
Now
kon, kin
ima
今晩 (this evening), 今朝 (this morning)
先
Before, ahead, future
sen
saki
先週 (last week), 先生 (teacher, master)
来
To come
rai
ku(ru)
来月 (next month), 来る (to come)
半
Half, middle
han
naka(ba)
半分 (half)
毎
Every, each
mai
---
毎日(every day)
何
What, which, how many
ka
nan, nani
何曜日 (what day of the week)
Japanese Kanji for People & Things
This category includes many of the basic natural elements (very important in Japanese culture, so they pop up a lot), people, and body parts. Because these kanji are used in so many words, they’ve evolved the most over time and have a lot of readings. I’ve included most of the top ones to know, but you’ll often find these have irregular readings, too.
Consider, for example, 母 and 父. When talking about your own mom and dad to others, you would read/say them as haha and chichi. But when talking to your parents, they would be kaa as in okaasan (お母さん) and tou as in otousan (お父さん). These kanji also change when used for grandparents, aunts, and uncles.
Just be on the lookout. You’ll have to memorize them on a word-by-word basis.
Kanji
English Meaning
Onyomi
Kunyomi
JLPT N5 Vocab with Kanji
人
Person
jin, nin
hito
人々 (people)
男
Man, boy, male
dan, nan
otoko
男の子 (boy)
女
Woman, girl, female
jo, nyo
onna, me
女の子 (girl)
子
Child
shi, su
ko
子供 (child)
母
Mother
bo
haha
母 (mother)
父
Father
fu
chichi
父 (father)
友
Friend
yuu
tomo
友達 (friend)
火
Fire
ka
hi
火曜日 (Tuesday)
水
Water
sui
mizu
水曜日 (Wednesday)
木
Tree, wood
moku, boku
ki, ko
木曜日 (Thursday)
土
Earth, ground
do, to
tsuchi
土曜日 (Saturday)
金
Money, gold
kin, kon
kane
金曜日 (Friday)
本
Book, source
hon
moto
日本語 (Japanese)
川
River
sen
kawa
川 (river)
花
Flower
ka
hana
花火 (fireworks)
気
Spirit
ki, ke
---
元気 (healthy, spirit, fine)
生
Life, to live, to be born, to grow
sei, shou
i(kiru), u(mareru), ha(yasu)
生徒 (pupil)
魚
Fish
gyo
sakana
魚 (fish)
天
Heaven
ten
ame, ama
天気 (weather)
空
Sky, empty
kuu
sora, a(keru)
空 (sky)
山
Mountain
san
yama
山 (mountain)
雨
Rain
u
ame
雨 (rain)
電
Electricity
den
---
電気 (electricity)
車
Car, vehicle
sha
kuruma
電車 (electric train)
語
Language, word, to chat
go
kata(ru)
英語 (English)
耳
Ear
ji
mimi
耳 (ear)
手
Hand
shu
te
手紙 (letter)
足
Foot, to add
soku
ashi, ta(su)
足 (foot)
目
Eye
moku
me
目 (eye)
口
Mouth
kou, ku
kuchi
出口 (exit)
名
Name
mei, myou
na
名前 (name)
Japanese Kanji for Places & Directions
It’s a good idea to memorize each reading really well for these common kanji. 店 is read as ten almost as often as mise. 外 is just as often read as gai as it is soto. But, they have patterns. 店 reads as ten when combined with other kanji, like 喫茶店. On its own, it’s mise. It’s the same with 外: gai describes something foreign or outside the norm of one’s own country or group. Soto is used to just say “outside.”
Kanji
English Meaning
Onyomi
Kunyomi
JLPT N5 Vocab with Kanji
店
Shop
ten
mise
喫茶店 (coffee shop)
駅
Station
eki
---
駅前 (in front of the station)
道
Street, path, way
dou
michi
道具 (tool)
社
Shrine, society
sha
yashiro
社長 (president of a company)
国
Country
koku
kuni
外国人 (foreigner)
外
Outside
gai, ge
soto, hazu(reru), hoka
外国 (foreign country)
学
School, learning
gaku
mana(bu)
大学 (university)
校
School
kou
---
学校 (school)
上
Up, above
shou, jou
ue, u, a(geru)
上着 (jacket)
下
Down, below
ka, ge
ku(daru), shita
靴下 (socks)
中
Middle, center, inner, between
chuu
naka
日中 (during the day, midday)
北
North
hoku
kita
北 (north)
西
West
sai, sei
nishi
西 (west)
東
East
tou
higashi
東京 (Tokyo)
南
South
nan
minami
南 (south)
右
Right
yuu
migi
右 (right)
左
Left
sa
hidari
左 (left)
Japanese Kanji for Verbs
These are among the most common verbs, besides する (suru, “to do”) which doesn’t use kanji. When used as verbs, you’ll almost always be using the kunyomi readings. For this test, those are the readings you’ll most likely be quizzed on, and the onyomi reading will be less important.
The most important onyomi readings that may pop up would be for 聞, 読, 書, 食, and 会. The first three -- hear, read, and write -- appear in their onyomi readings in the test descriptions themselves that state the test section you’re on. Most likely you won’t be quizzed on them, but you’ll want to know them to understand what you’re looking at on the test. The last two -- eat and meet -- have common onyomi readings like 食品 (“food,” or “food goods”) and 会社 (company).
Kanji
English Meaning
Onyomi
Kunyomi
JLPT N5 Vocab with Kanji
見
To see, to be visible, to show
ken
mi(ru)
見せる (to show)
聞
To hear, to listen, to ask
mon, bun
ki(ku)
聞く (to listen, to hear)
書
To write
sho
ka(ku)
辞書 (dictionary)
読
To read
doku
yo(mu)
読む (to read)
話
To talk, conversation
wa
hanashi, hana(su)
電話 (telephone)
買
To buy
bai
ka(u)
買い物 (shopping)
行
To go, to carry out
kou
i(ku), okona(u)
銀行 (bank)
出
To go out, to leave
shutsu
de(ru), da(su)
出かける (to go out)
入
To enter, to put in
nyuu
hai(ru), i(reru)
入口 (entrance)
休
To rest, break, holiday, vacation
kyuu
yasu(mu), yasu(mi)
休む (to take a day off)
食
To eat, food
shoku
ta(beru)
食堂 (dining room)
飲
To drink, a drink
in
no(mu)
飲み物 (beverage)
言
To talk, word
gen, gon
i(u)
言う (to say)
立
To stand
ritsu
ta(tsu)
立つ (to stand)
会
To meet, society
kai, e
a(u)
会社 (company)
Japanese Kanji for Adjectives
Lastly, we have the most basic and common adjectives to describe things. You will most likely be quizzed on the kunyomi readings, as those are more commonly used as adjectives, while the onyomi readings combine with other kanji to give a more descriptive noun.
For example, 小 (little) + 学校 (school) means “elementary school.” You’ll definitely need to know them for later tests and vocab, but for N5 purposes your time would be better focused reviewing the kunyomi readings.
Kanji
English Meaning
Onyomi
Kunyomi
JLPT N5 Vocab with Kanji
多
A lot, many
ta
oo(i)
多い (many), 多分 (probably)
少
A little, few
shou
suko(shi), suku(nai)
少ない (few)
古
Old
ko
furu(i)
古い (old)
新
New
shin
atara(shii)
新しい (new), 新聞 (newspaper)
大
Big, a lot
dai, tai
oo(kii)
大きい (big), 大変 (dreadful, immense)
小
Little, small
shou
chii(sai), ko
小さい (little)
安
Cheap, safety, peace
an
yasu(i)
安い (cheap)
高
Expensive, high
kou
taka(i)
高い (expensive)
長
Long, leader
chou
naga(i)
長い (long), 部長 (manager)
白
White
haku, byaku
shiro, shiro(i)
白い (white), 面白い (interesting)
Japanese Kanji Practice: The Best Ways to Memorize Kanji
Okay, so now you’ve seen the JLPT N5 kanji lists and know what you should study. But what’s the best way to memorize kanji?
The best way to practice kanji is to use a combination of James Heisig’s Remembering the Kanji method, the Anki app, and your own mnemonics. You can definitely do it in as few as four days if you followed this schedule to learn all the essential kanji in three months.
Heisig’s method is one of the best methods to memorize kanji. He introduces the kanji based on radical elements so you can learn each one by “stacking” your mnemonic stories together. It’s really ingenious. It still takes effort, time, and patience. But it’s worth it!
Alongside that, l use the NihongoShark kanji deck in the Anki app, or create your own Anki deck specifically for N5 kanji only. Enter in your mnemonic phrases and how to read them. Bonus points if you can tie how to read the kanji (or a word that uses it) into your mnemonic phrase.
I also suggest using Genki I and JTest4U, the most popular textbook for beginner Japanese that I mentioned earlier. It has a section in the back dedicated to learning kanji and reading practice that uses those kanji. It helps reinforce what you’re learning, at your level, without being incredibly tiresome.
And honestly, the sooner you knock out kanji, the better. Kanji helps you memorize vocab better, read with ease (making learning through native resources much easier), and have a deeper understanding of how the language works. And if you knock out these 100 kanji quickly, you can move on to focusing on the truly difficult parts of the test -- like listening comprehension.
It may seem impossible to memorize the kanji quickly, but you will get there.
Drill. Everyday. Rinse and repeat until the test!
Of course, there are other methods or apps you can use to learn the kanji. But this is how I learned, and how many others have learned with success.
頑張って、皆さん! (Good luck, Everyone!)
Don’t let the JLPT N5 test intimidate you -- you’ve got this! The best advice I have? Try to relax and keep calm. If you go in stressed and nervous, you may struggle to focus, especially when listening.
What are your best tips for learning the kanji? Are there other methods or apps that have helped you? Leave a comment and share your thoughts!
And most importantly, 頑張って、皆さん!
The post Japanese N5 Kanji List: All 100 Kanji You Need to Know to Pass the JLPT N5 appeared first on Fluent in 3 months - Language Hacking and Travel Tips.


July 25, 2019
How to Say “I Love You” in Spanish (and 50+ Other Romantic Phrases)

After all, in English, we tend to overuse the word “love”. We love this show, and we love that book. We love our parents, our kids and our spouse. We love our friends, we love our jobs.
And even though all of those forms of “love” are different, they’re expressed with the same word: “love”.
In Spanish, that’s not the case.
You have many options for expressing your affection! In fact, it’s one of the things I like about Spanish that English is missing. You can concisely share your like, love or even enchantment in Spanish, using different expressions.
How to Say “I Love You” in Spanish
As I mentioned above, how to say “I love you” in Spanish depends on the context, situation and what or who you’re talking about. Most people have learned that te amo means “I love you” in Spanish, and it does. But this is a very serious, deep love. It’s used mostly between spouses and when announcing your love, such as while proposing.
Another way to say “I love you” is te quiero. Here’s where those degrees of affection come in. It literally means, “I want you,” but that’s a poor translation, in my opinion. This phrase doesn’t quite translate at all in English, because we have no equivalent at that degree. To say “I want you” in English has a lusty sound to it, and not very romantic. But in Spanish, a better translation is “I want you in my life.” It’s a step down from te amo, and usually said when you’re in a committed relationship, but not necessarily married (or at least, not yet).
And with both phrases, you can make them more passionate by adding mucho (“very much”). Te amo mucho or te quiero mucho both mean “I love you very much.”
A less direct way to express your love is to say Significas mucho para mí. This means “You mean so much to me.”
Here are a couple more ways to express romantic affection:
Me gustas: “I like you”. The play-it-safe approach to expressing your affection in those early days of dating.
Me caes bien: Also “I like you”. It’s a step down from me gustas, and more friendly.
Me encantas: “I adore you” or “You enchant me”. It’s more romantic than me gustas and me caes bien, but it’s less serious than te quiero.
What about talking to family or friends? Usually, te quiero is for that kind of platonic love, or even affection for your pets. And if you’re wondering, “love” for things like objects or hobbies would be either me gusta (“I like”) or me encanta (“I’m enchanted by”, “I strongly like”).
How to Say “Beautiful” in Spanish
In Spanish, there are a quite a few ways you can talk about someone’s beauty or attractiveness. To say “beautiful” in Spanish, it’s hermosa or hermoso. This is the strongest way to say “beautiful” and it’s similar to “striking” or “gorgeous”. Because hermosa is so strong, it’s more common to use bella or bello (“beautiful” or “lovely”), though.To just say “beauty” as a noun, it’s belleza.
To call someone “pretty”, you use bonita or bonito. This is more casual, almost like saying “You look nice” instead of “You look beautiful”. It’s still a nice compliment, though, and can be used to talk about anything.
And to say someone is “handsome” or “attractive”, you say guapo or guapa. It’s more common to hear women called bonita, and men guapo. But, unlike English, these terms aren’t gender exclusive. Sometimes guapo is also used to say someone or something is “cool”.
In Latin America, it’s most common to describe someone’s beauty as linda or lindo, which means “lovely”.
How to Say “My Love” in Spanish
To call someone “my love” in Spanish, you can say mi amor. But Spanish has a lot of you could use instead. Here are a few:
Mi vida: “My life”
Mi sol: “My sun”
Mi rey: “My king”
Mi dulzura: “My sweetness”
Mi querido: “My dear”
Ojos de ángel: “Angel eyes”
You could also make them “cute” by adding the diminutive -ito. So mi amor could be mi amorcito (“my little love”). It can be used for anyone, but it’s most often used for children to add cuteness.
How to Say “You’re My Other Half” in Spanish
In Spanish, they have a sweet, unique phrase to tell someone “you’re my other half.” It’s eres mi media naranja, which translates as “you’re my half orange.” It’s best used for serious relationships, obviously, but it’s a cute and humorous way to say “my better half” like in English.
Why an orange? There are quite a few theories, but one explanation is that the dome of a church (cúpula or cimborrio) is also sometimes called media naranja. So it represents something beloved, a gift from heaven. Another theory is that every orange is different, and there can only be one perfect match for a half-orange. Either way, it’s a fun expression.
Because it’s used to say someone is your perfect match, it’s also used to say “my soulmate”. But you could also use alma gemela (“soulmate”). That’s just a heavier way to say it, while media naranja is lighthearted.
How to Say “My Heart” in Spanish
Another romantic way to express your love is to call someone “my heart”, which is mi corazón. There are a few romantic phrases we can use this for, too:
Tienes todo mi corazón: “You have all my heart”
Mi corazón es tuyo: “My heart is yours”
Te amo con todo mi corazón: “I love you with all my heart”
Mi corazón late por ti: “My heart beats for you”
Talk about sparking some romance!
How to Say “My Darling” in Spanish
In English, there are so many nicknames we call our lovers: darling, dear, babe, sweetheart. We’ve talked about some of them so far, but here are some other common nicknames for your loved one.
Cariño: This is one of the most common nicknames you’ll hear. It has many different meanings: “sweetie”, “darling”, “dear”, “love”, “honey”, etc. It captures a lot of English nicknames in one.
Cielo: It means “sky”, but it also translates as “heaven” or “paradise”. So you’re calling someone your own slice of heaven here on earth. It’s pretty romantic! Make it cuter with mi cielito (“my little heaven”).
Bebé: “Baby” in Spanish, but essentially used the same as “babe” or “baby” in English when talking to your loved one. You could also use nena for “babe”.
How to Say “Sexy” in Spanish
“Sexy” in Spanish is the same as it is in English: sexy. Although, you’ll see it written as sexi as well because it’s a better fit for Spanish pronunciation and spelling.
If you’re wanting to call someone “hot”, though, don’t use caliente! It doesn’t directly translate in Spanish. It’s used for hot food, yes, but when talking about a person? It means you’re horny, not “hot/sexy”. Instead, you can use the slang term maciza or macizo, which means “hot” in the same sense as English.
How to Say “Cute” in Spanish
“Cute” in Spanish doesn’t have quite the exact translation. But there are a few ways you could get the same idea across. Rico or rica is one way to say someone is “cute”, but it also means “sexy” or even “rich”. Sexy and cute don’t normally go together in English, but this word captures both.
Mono and mona also mean “cute” as an adjective, like “nice-looking”.
And linda or lindo, which we covered earlier, can also mean “cute”. Even listo -- which means “ready”, “clever” or “prepared” -- can also be used for cute.
How to Say “I Can’t Live Without You” in Spanish
Still looking for a different, special way to say how much you love someone? Here are some romantic phrases to express your love:
No puedo vivir sin ti: “I can’t live without you”
Te necesito: “I need you”
Te echo de menos mi amor: “I miss you, my love”
No puedo esperar a verte: “I can’t wait to see you”
Estoy loco por ti: “I’m crazy about you”
Quiero estar contigo para siempre: “I want to be with you forever”
Estoy pensando en ti: “I’m thinking of you”
Eres el amor de mi vida: “You’re the love of my life”
How to Say “Amazing” in Spanish
There isn’t only one way to say “amazing” in Spanish -- there are a few words that work. You could use increíble (“incredible”), asombroso (“astounding”) or maravilloso (“marvellous”). All of them have similar meanings. So if you want to tell your loved one they’re amazing, say Eres increíble!
And if you want to know how to talk about your feelings, the word in Spanish is sentimientos -- a “sentiment”. You could say Tengo sentimientos por ti (“I have feelings for you”) in Spanish, but it would sound a bit strange. Sentimientos is more general feelings, not just loved ones, so using me encantas would sound more natural.
If you want to express those sentimientos to other people though, these phrases will help:
Estoy enamorada / enamorado: “I’m in love”
Estoy saliendo con alguien: “I’m dating someone”
Amor verdadero: “True love”
No puedo dejar de pensar en él / ella.: “I can’t stop thinking about him/her.”
And if you want to pop the big question in Spanish:
¿Te casarías conmigo? (“Will you marry me?”)
How Will You Say “I Love You” in Spanish?
Which phrase will you use for your loved ones? Will you start calling your significant other mi cielo, or tell those you care about te quiero?
Are there any romantic words in Spanish that I missed? Leave me a comment and share it with me!
The post How to Say “I Love You” in Spanish (and 50+ Other Romantic Phrases) appeared first on Fluent in 3 months - Language Hacking and Travel Tips.


July 21, 2019
Add1 Stories: How Randal Learned Conversational Thai in 90 Days

“What about a language like Chinese? Korean Or Thai? If I’m learning a language like that, can I do Add1?”
As someone who speaks Chinese, Japanese, Korean and Russian, I can understand where these questions are coming from.
Languages like Korean, Russian, Chinese, Japanese, and Thai often get a bad rap as “difficult” languages.
Can you really get the same results in 90 days with a difficult language as you can with an “easier” language like French, German, or Italian?
Actually, yes.
I’ve watched hundreds of learners of these languages do it. And I have even done it myself with Korean and Japanese. But don’t take my word for it. Here are excerpts of an interview I did with Randal Rhoade, an Add1 student who took on Thai.
Learning Thai to Conversational Level in 90 Days with Add1
Randal Rhoade: Hello everyone. My name is Randal. I am currently living in Bangkok, and I learned Thai because I just got a new job and I was moving to Bangkok from Lao.
Shannon Kennedy: What drew you to the Add1Challenge?
RR: I had been frustrated with learning Lao [a language spoken in Laos], and it was very difficult to find some teachers who were adequate. So I started searching online to see what was available. I never thought to go online as a resource. Then I started seeing this community out there, and Benny and the Add1Challenge... so I just started. I love to challenge myself on my own, and I thought this was a good opportunity to do a challenge with a community.
Watch Randal’s Progress from Day 0 to Day 90
httpvh://www.youtube.com/watch?v=aTw4SFsyMqs
How Randal Succeeded and Learned Thai in 90 Days
SK: When you started the challenge what were your initial plans? What did you think you would be doing to study the language?
RR: I had fortunately already made contact with a tutor, a Thai tutor, and it was great timing that we just started lessons the week that the challenge started. Tutoring with her became the fundamental aspect of my training.
SK: What was your weekly study commitment? How many days per week did you study, and how many minutes?
RR: Because I was working full time, which is more than normal hours, I wasn't sure at first, but I had committed to 45 minutes, 5, 6 days a week, I believe. I was very determined to learn Thai, because I wasn't learning Lao very easily.
I love to challenge myself on my own, and I thought this was a good opportunity to do a challenge with a community.
I ended up doing well over an hour a day. I had determined what worked well early in the morning, and then what I could do during lunch hour, for example, and then my heaviest study times were usually in the evening.
My commute to work would be listening to audio. Pimsleur was what seemed to be the easiest because it was an audio recording, they're very short excerpts, and it had me actually speaking, not just working something through my mind. I would actually have to verbalize what they would be saying on the audio.
Just do enough to make you feel excited about learning more tomorrow.
Then lunchtime, sometimes I would have flashcards or I would just start practicing a word that I had learned for the day, and then the evening was much more studious lecture-type study. Writing the words, trying to learn the vocabulary, and sentence structure.
Randal’s Top Resources for Learning Thai
SK: As far as what other specific resources you found helpful to you in the challenge, what would those be?
RR: The tutor became the core investment. Then I purchased Pimsleur, and then I purchased a few books.
How Randal Broke Through His Anxiety to Speak Thai on Video
Note: For *Add1, students create videos of themselves speaking their target language on Day 0, 30, 60 and 90. The Day 90 video is a recording of them having a 15 minute conversation with a native speaker.*
SK: Tell me about how you approached making the videos. What your feelings were going into making them, and what your feelings were after you had made them.
RR: Initially I was anxious and nervous, and what worked for me is meditation. I try to incorporate that into my daily life, so I just relaxed. I would be nervous and then I would work myself through a relaxation period, and then became comfortable with just focusing on what I was able to speak.
I just determined, in my mind, that I'm not performing for anyone. [The videos are] an exercise just to indicate your progress, and it should be more celebratory than anything, because you should always be better than you were before and introducing new vocabulary. I would just relax, and then most of the time I was quite spontaneous. I didn't want anything too scripted. I would make sure I was familiar with the subject and the words I was going to use, just run it through my mind, and then I just would record.
Randal’s Obstacles in Learning Thai -- And How He Overcame Them
SK: What about any obstacles you might have faced during the challenge. Did you have anything like that come up during the challenge, and if it did, how did you overcome it?
RR: I had to travel twice around the world, going back to the US, which is a long haul. I prepared some materials that I knew I would be able to handle on the plane. I just did some preparation I knew I couldn't push myself too much because it's very tiresome to travel that far, and that long.
I knew I couldn't push myself too much because it's very tiresome to travel that far, and that long.
I think the biggest challenge to that was taking a break. I became quite determined, and I was thinking of taking a break. It was hard for me to actually take the break because I was just so persistent and determined to do the best I could with this experience.
SK: Did you end up taking your break, or did you end up pushing through and studying anyways?
RR: Over the 90 days I think I took three days off. I didn't do any study, and I realized I was about three weeks into the challenge before I decided to take my first break. I didn't really feel like I needed it because I was excited.
There was a quote that I saw in the beginning of the challenge that someone posted and I thought it was really neat. It was the saying, it said "Do enough to make you excited to do more tomorrow."
If you have work, and you have a family, and you have other demands, it's very difficult to do it any faster than just in small increments.
Randal’s 15-Minute Conversation in Thai after 90 Days
SK: Let's talk about your 90 day video. How did you feel going into your video? What did you expect? Were you worried about making it to the 15 minutes? Were you confident that you were going to make it to the 15 minutes? How did it go?
RR: Yes, I was concerned. This was the big one and I had been frustrated with myself the whole process, because this has been a very difficult language for me.
I was using a few italki teachers to speak more frequently, and I just let the teacher know beforehand, this is roughly my vocabulary levels, these are the subjects I can speak about, if we can keep the conversation around this particular subject that I would stand a better chance at reaching 15 minutes. Because the conversations can go off into different directions and you're not really prepared with the vocabulary. To go from zero to 15 minutes within 90 days, you need to focus.
SK: What were some of these specific subjects that you prepared, that you were working on during the challenge that you felt comfortable discussing during your 90 day video?
RR: Some of the subjects were my free time, interactions I would have with people in the street, food, taking a taxi, what are my daily routines. That was a big part of the conversation. What do I do on a daily basis?
Randal’s Biggest Takeaway from Add1
*SK: What would you say your biggest takeaway was from the *Add1Challenge?*
RR: Focusing on small wins is really what this helped me. If you open a book for example, and you just have all this vocabulary, it really doesn't mean anything to you, or to me. It's gotta be relevant.
Randal’s Advice to Future Add1 Students
SK: If you have advice to someone just starting the Add1Challenge now, what would that be?
RR: Get a tutor. I would invest in a tutor.
Being part of the community of people who are also interested in doing something similar was also motivating. Winning or not, being focused, having that accountability, and having a team leader who was sending out encouraging notes, sending out guidelines, you were very responsive with emails and questions about the challenge. I think it was a very worthwhile investment if you're serious about learning a language.
It was a very worthwhile investment if you're serious about learning a language.
The challenge is a great place to start to get the motivation and keep the motivation with accountability.
Learn a New Language in 90 Days with Add1
Thanks for sharing your story with us Randal! Randal is one of thousands of people who’ve learned a new language with Add1.
Would you like to have a 15 minute conversation in your target language after 90 days? Then join us in Add1. You can find out more here.
The post Add1 Stories: How Randal Learned Conversational Thai in 90 Days appeared first on Fluent in 3 months - Language Hacking and Travel Tips.


July 18, 2019
Amikumu Review: Will You Find Language Learners in Your Area?

Now, many of us language learners like to travel. We travel to see new things, get an inside view of the local culture, and to practice the languages we’re learning.
But where do you go if the language you’re learning doesn’t have a place where it’s spoken? A language like Esperanto?
The answer?
Anywhere.
I’ll touch on this more in a moment...
If you’re anything like me, you’re probably wondering where to find language exchange partners and what the best platforms are. You’ve probably tried at least one in the past.
I’ve signed up for more than a few language exchange platforms since I started learning languages on my own. And there’s one thing that I’ve learned:
The platform itself may have a lot of useful features that make it easy to use, but the value of a language exchange platform is in its members.
Are the other members active? Do they speak your target language? Are they responsive to messages? Do they want to help other members as much as they want to be helped? All of these are questions to ask about the community on a language exchange platform.

What is Amikumu?
“Do the friend thing.” That’s what “amikumu” means in Esperanto and it’s a true description of just what this tool helps you do.
Amikumu is a language exchange app and social network that helps you find language practice partners geographically close to you. It was originally designed to connect Esperanto speakers, but it now supports the world's 7,000+ languages, including 100+ sign languages.
The brainchild of Richard Delamore and Chuck Smith, the app first launched in 2017. Today, it has members from nearly 200 countries and it continues to grow.
Getting Started with Amikumu
After downloading Amikumu to your mobile device, setting up your account is easy and free. Upon opening the app, you’re asked to select an interface language. This is the language the app will be in, so bonus points if you select a language you’re learning. It’s one quick way to create immersion at home.

From there, you have the option to log in or register. When you choose to register, a popup appears on your screen reminding you that any information you share in your profile is public and visible by the Amikumu community. Because you’re sharing your location, this is particularly important to note. For your safety, it’s important to be very selective of the information you share and the fact that Amikumu reminds you of this is definitely a good thing. It’s also worth noting that Amikumu does not show your exact location nor store it.

From there you enter your name, email, date of birth, and a password to create your account. Accept the terms and conditions and then tap “sign up.” And don’t worry -- your birthdate isn’t visible on your profile unless you opt for it to be!


That’s it! You’re in.
Now that you’re in, how do you use this social app?
Amikumu has a few different ways you can engage with the app. The first is called “Flow”. This is essentially the social feed, showing updates from those closest to you who speak your selected language. Members can post questions or update their status and you can comment or “heart” anything displayed in your feed. It’s a great place to get to know the other people using Amikumu in a public forum before moving your chat to a private 1-on-1.
The next option is “Nearby” and it’s where you can find other language learners near you. They’re organized by distance from you. If you’d like to search from a different location -- for example, if you wanted to arrange to meet up with someone on an upcoming trip -- there’s a location button up in the top left corner. If you’d like to change which language you’re looking to practice, there’s a small icon up in the top right corner you can use to change languages.

The third tab is where you’ll find the conversations you’ve started with other Amikumu members. They’re organized with the most recent at the top. Much like other chat platforms, Amikumu shows you a single checkmark when your message is sent and a double checkmark when your message is read.
And finally, the fourth tab is where you’ll find your profile and app settings. Here you can adjust your notifications, choose what information is shown on your profile, select your languages, and more. You can also choose to hide your profile so that other users cannot find and contact you if you prefer to make initial contact.
When editing your profile, you can create a separate profile for each of your languages. This is useful in a couple of ways:
Your expertise in each language may be slightly different, so you can create a bio that notes this. For example, I’m much better at talking about music in Japanese than Hungarian, but better at talking about tech in Hungarian than Japanese. By having separate profiles for each language, I can share what I like to talk about, what I’m good at talking about and what I’d like to improve in each language.
You can practice writing in each language. By writing a bio in each language, you get the chance to practice your writing and very me-specific vocabulary. Plus, other members who speak your language may offer corrections if you need them.
My Experience Using Amikumu: The Good
Amikumu is a fun way to chat with other people who share your passion for language learning. You can find other members both near and far with knowledge of tons of different languages. You can choose to meet up with other learners in person or keep your conversation in the app -- it’s flexible for you to use as you see fit.
And although I do not yet have any personal experience in this scenario, I’ve also heard that the app is an amazing tool to have on hand when attending language events like LangFest, the Polyglot Gathering or the Polyglot Conference. This is because it helps you connect with others who know your languages, something that can be surprisingly difficult to do even at a language event! You even get a badge added to your profile when you use the app at an event. I started using Amikumu just a few months after attending my last LangFest, so I’m a bit bummed I missed earning the badge!
But the badges aren’t just a way to spruce up your profile, they’re great conversation starters, too. How so? When I see someone who has a badge for an event that I’ve been to, that initial message is easy: “Hey, I saw you were at LangFest last year. I was, too! What was your favorite talk?” And even when I see a badge for an event that I haven’t been to, I can ask: “I see you went to the Polyglot Conference. I couldn’t make it this year. How was it?” In your new language, of course.
I also really liked that there was a public social feed. It gave me a place to test the waters contacting active members without having to create private 1-on-1 conversations right away. Plus, it gave me the ability to interact with more than one person at once, getting more language input from multiple speakers.
Finally, I mentioned earlier that the value of a language exchange platform is in its members. I found that the people I connected with using Amikumu responded well, and they seemed like engaged, motivated language learners (this isn’t true for all language exchange platforms). I even found some folks from our 90-day language program, Add1!
There were some issues though…
My Experience Using Amikumu: What Could Be Better?
Amikumu is designed to help language learners not just connect on the app, but in-person. Unfortunately, for the languages I speak or am learning, there wasn’t anyone I could meet with face-to-face in my area (Southern California). That isn’t to say that there aren’t people in my area on the app. In fact, there were several. The majority, however, were Esperanto learners and speakers. A language that I don’t speak and am not currently learning.
Because the app was originally designed and marketed to the Esperanto community, the majority of their users (at least in my area) are a part of that demographic. If you’re an Esperanto speaker, this is fantastic. If you’re not, you may need to wait until more people begin using the platform to find someone who speaks your language(s) in your area. In the meantime, you can enjoy the chat feature and reach out to those who speak your language regardless of location.
Amikumu also requires that you have location turned on your phone in order to work. So if you just wanted to pop on to chat with other members in your languages without sharing your location, you’re not able to do so. If privacy is a major concern for you, this may be a dealbreaker.
Will I Keep Using Amikumu?
Amikumu has the potential to be an excellent app whether you’re looking to practice a language or connect with fellow language lovers in your area. The only way that can happen is if its user base continues to grow. It’s designed by language learners for language learners, so the developers are attuned to your needs in order to continue to build Amikumu into an even better social language learning app than it already is.
Something to keep in mind is that Amikumu will not teach you a language. Instead, it’s a platform where you can practice the language you’re studying with other tools and resources.
At this time, I would give Amikumu 3 stars, but once it grows and membership increases, I would increase this to 4 stars without hesitation.
You can download Amikumu for iOS or Android devices.
The post Amikumu Review: Will You Find Language Learners in Your Area? appeared first on Fluent in 3 months - Language Hacking and Travel Tips.


July 16, 2019
Language Mentors #5: Nikki Prša (Amercian Polyglot, Speaks 7 Languages)

“My goal is to inspire others to just begin. You never know where life can take you when you’re able to communicate with people in their mother tongue.” -Nikki Prša
After hearing her speak at Women In Language, I knew that I had to interview Nikki Prša for our new Language Mentors series.
Nikki is the polyglot behind Speak at Home Tonight. Her company provides personalized language instruction to individuals and companies online. She knows exactly what it takes to learn a language, folks. She speaks seven languages!
Nikki has always been a language lover. Growing up, she spoke Polish at home and English at school. She studied German and Arabic in Germany and Egypt. She picked up Croatian, Serbian and Bosnian while living in Croatia and Slovenia. This polyglot is unstoppable!
[caption id="attachment_26163" align="aligncenter" width="1024"]
 Solo travel in NYC, USA where more than 800 languages are spoken daily![/caption]
Language Mentors: Learn a New Language in 90 Days
Language Mentors is our regular feature where we interview polyglots, language teachers, language learners and even folks from outside the field of language learning. We’re getting straight to the point, asking for their top tips on language acquisition, steadfast motivation, and rapid learning.
We want to give you the inside scoop on what it takes to learn a new language, fast (in as little as 90 days).
We’ve actually seen hundreds of people learn a new language to a conversational level in just 90 days. You can do it too by putting what you learn from our Language Mentors into practice.
And if you need extra support, then join us in Fluent in 3 Months Challenge -- where you’ll make lots of new friends who share your goal of learning a new language fast (plus you’ll have a 15 minute conversation in your new language after 90 days -- we guarantee it).
Read on to learn some of Nikki’s language learning hacks. And get to know some fascinating facts about this energetic polyglot at the same time.
[caption id="attachment_26164" align="aligncenter" width="720"]
 A road trip where I can practice learning the Cyrillic alphabet equals heaven. This is in Albania![/caption]
What Are the Top Three Activities You Would Advise to Have a 15 Minute Conversation in a New Language after 90 Days??
This goal is absolutely attainable. I would recommend doing the following:
Listen to music in your target language. Look up the lyrics. Translate them (on your own) into your native language. Mark any useful phrases. Add them to a list in your notebook or your phone. Try to use them in conversation immediately.
Take group classes or individual lessons online or in person. This way, you will have someone to practice with and are able to ask any questions you may have.
Be brave and try to communicate with others! If you have no one to talk to, record yourself and post on social media. You can converse with other speakers of your target language online. It is great to see and hear your progress in the language you are learning.
What Are the Top Three Roadblocks You See Learners Face?
Insecurity (especially when learners are not speaking the language enough to make progress)
Getting stuck and giving up
Lack of time which often leads to lack of motivation
What Are Your Top Three Keys for Dealing with Those Roadblocks?
A lot of people study the written language and lack the confidence they need to try to speak the language. It can be hard when you try to say something in another language and the other person does not understand you. It’s a blow to your confidence. You can be bummed for a little bit, but try to get over it. Move on quickly and try again! Everyone makes mistakes. The only way to get better is to keep going.
Sometimes people get stuck on a certain grammar point. For example, they cannot figure out how to say things in the future. They may give up on trying to learn the language. Try to figure out another way to look at the topic. Watch another explanation on YouTube. DM a native speaker of your target language on Instagram or Twitter and ask them for help. Or take part in a language exchange or online/in person class. Hearing as much of the language as possible can help your speaking skills as much as your listening skills.
If you find you don’t have enough time or you’re not feeling motivated to study, discover the way you learn best. You may not be the online language app type. You may need to do something in person to have fun with language learning. If you like watching TV or movies, watch something you’ve seen before in your target language! It’ll be entertaining and educational. You can do a quick lesson on Memrise or DuoLingo](https://www.fluentin3months.com/duoli...). Or go through your list of phrases on your phone or in your notebook to review what you already know. If I ever feel stuck, my favorite thing to do is take a song in English and translate it into the target language. It can be so silly but it is a blast to figure out how to sing “Party in the USA” in Croatian. I get a kick out of trying to get the words to match up to the melody.
[caption id="attachment_26165" align="aligncenter" width="848"]
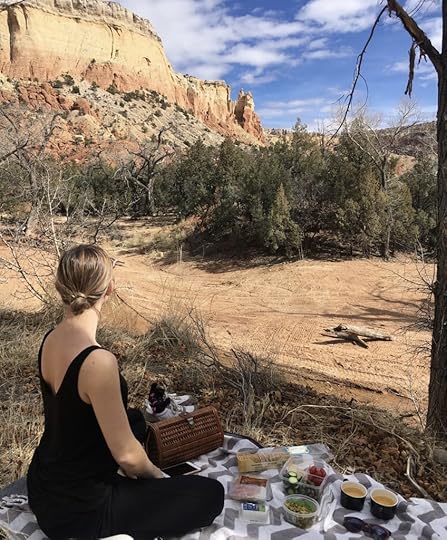 Sometimes, you just have to soak up nature like here in Santa Fe, New Mexico.[/caption]
What Are Your Top Three Favorite Memories of a Language Win?
It is so hard to pick three!
Riding in taxis in Cairo and surprising the driver by speaking Egyptian Arabic
When people think I’m a native speaker of any of my target languages
Appearing in a segment on Good Morning Croatia. I spoke in Croatian about my company. I was visiting my in-laws in Croatia. And I had a feeling that I could make it happen. I reached out to the show to see if they’d be interested. They were. It was so fun!
What Are Your Top Three Favorite Places to Practice Speaking a Target Language?
At a language meetup at the [insert language here] Society of the town where you live. For example, there is a German Society of Philadelphia that has regular meetings. You can also find a language exchange from Meetup.com in your area.
In the country or place where they speak the language I am learning. I adore a good immersion experience.
On Facetime with friends and family who speak that language! The internet is amazing. I relish being able to communicate easily with people all over the world.
[caption id="attachment_26166" align="aligncenter" width="604"]
 Cairo, Egypt: I lucky to have met many incredible people. We studied Arabic for 8 hours a day and then went out to practice speaking Egyptian colloquial Arabic in the real life situations.[/caption]
What Are Your Top Three Favorite Cities?
Mošćenička Draga isn’t a city but rather a small town on the Croatian coast. I love the seaside in Croatia! It is beautiful and clean. The sea helps me to recharge my batteries.
Paris, France is all about food, language, and exploring this gorgeous city on foot. You can’t help but feel the romance when you are in this dreamy metropolis.
San Diego, USA offers amazing weather. You can explore the outdoors in the most entertaining ways! Seeing all the seals chillin’ out in nearby La Jolla. Taking an adventurous yoga class. Discovering the Italian market downtown and all the goodies from nearby Mexico.
What Are the Top Three Biggest Challenges You Face in Your Target Language?
Grammar in general can be difficult. Especially remembering different case endings when you are speaking in another language
When I speak a lot of one language for a while, it can be hard to remember a simple word in another language. When my in-laws were visiting from Croatia, I was speaking so much Croatian. I then went to an event where I had to speak German all the time. I kept wanting to say opet “again” in Croation instead of wieder “again” in German!
Arabic is a beautiful but difficult language for me. If I don’t use it, I lose it. I have to practice a little bit every day. It is challenging for me to put myself out of my comfort zone and record myself speaking Arabic. When I was taking classes regularly, I was much better. I would come up with freestyle raps in Arabic!
[caption id="attachment_26167" align="aligncenter" width="400"]
 Representing Bavaria, Germany at a recent international conference in Philadelphia, USA. Just call me Frau![/caption]
How Do You Work on These Challenges?
I read multiple textbooks and do a variety of written exercises to work on grammar. I also use my list of phrases that I keep in my notebook or phone to review grammar patterns in the spoken language. I listen to native speakers. When I hear something new, I make a note of it to figure out what it means.
The more you speak your target language, the more comfortable you will feel! I practice speaking the language as much as I can . Everyone makes mistakes. I will get better if I speak with more native speakers.
I just do it. I make myself practice. I am not a big fan of preparing what I am going to say before I record a video of myself but I know that can help a lot of people. I used to read a lot in Arabic and translate to English. A big tip I can give for studying Arabic is do not transliterate! Learn the alphabet. Once comfortable with the alphabet, Arabic is just like learning any other language.
What Are Your Top Three Pearls of Wisdom for Language Learners?
Combine your other hobbies with language learning. I love to cook. I enjoy looking up recipes from different countries in different languages. I also watch YouTube videos and cooking shows in different languages. I learn how to prepare a dish from another culture. Make sure you are having a good time! If you are enjoying yourself, you’ll want to continue.
Do not be shy. You have to try in order to get better. Being quiet won’t get you to the next level. Be brave and practice. If you hear someone speaking the language, at least say hello! You might be able to get a little speaking practice in - or you may even make a new friend!
Learn phrases instead of single words. Once you have a few phrases under your belt, you can learn more individual words. Always learn the gender along with the word if the language uses genders. Learn phrases so you can have a conversation as soon as possible.
If You Were Going to Try the Fi3M Challenge, What Are the Top Three Languages You Might Attempt to Learn?
I have always found French delightful and only know the basics. I’ve wanted to dedicate more time to it but I haven’t found the right teacher yet. So I’ve just been dabbling on my own.
People assume I speak Spanish because I live in the U.S. I know a lot of random words and phrases. But I would need to focus for a few months so I could become properly conversational.
I enjoy a good language challenge. There is no better feeling than delighting someone by speaking their native tongue. When I do share the few words I know in Mandarin to someone I meet, they are so excited. It makes me want to learn more so I can communicate further!
What Are Your Top Three Guilty Pleasures When Learning a Language?
Scream singing 80s/90s Croatian pop music. It reminds me of being at a wedding in Croatia.
Disco Polo. Polish people know what this is.
Reality TV shows from other countries. You can learn a lot of conversational phrases from reality shows. They show real life conversations between the contestants.
What Are Your Top Three Tips for Starting to Learn Another Language
When I was younger, I first learned to count to ten, say “I love you”, and basic greetings in 20 languages. I was bold and just asked people who spoke the language how to say certain things. You never know when something you learn and tuck away in your brain might come in handy. In one very important case, a Croatian guy was hired at the restaurant that I worked at in college. I was excited to meet him and tried to think of anything I knew about Croatia. I remembered from back in the AIM days, a friend would write Volim te to his Croatian girlfriend as an away message. As I met the new guy at the restaurant, I said Volim te since it was the only thing I knew how to say. If you don’t know - that means “I love you.” He responded to me in Croatian but I told him that was the only thing I knew in his language. We totally hit it off...and that guy eventually became my husband. ❤
Go to your local library and get a book, DVD or something that you can bring home to begin to study the language. Take notes while you are going through the materials in a notebook. It helps you remember things more when you write it down by hand.
Ask for help when you need it. Hire a teacher through an online school or from a local school. If things aren’t working with your current teacher, get another one. If you can’t afford to pay for lessons, get onto a Facebook group. There are so many! You can connect with speakers of your target language and learn something new.
[caption id="attachment_26168" align="aligncenter" width="1024"]
 My husband, Tomislav and baby boy, Gulliver at his baptism. We speak a mix of languages at home and hope that Gully will like languages as much as we do![/caption]
What Are Your Top Three Tips for Starting a Conversation with a Stranger in Your Target Language
Greet them! Consider their culture. In the States, people are very friendly and say “How are you” as a greeting rather than wanting to know what is going on with you. If you’re talking to someone from Eastern Europe, a “hello” will do just fine!
Discuss a topic that could go in many directions. Travel is always a good one that won’t offend anyone.
If you don’t know what else to say, ask for directions or a recommendation! Ask the person if they know how to get to a certain place. Ask if they have any tips for you to learn their language. Or ask if they have a favorite food that you should try.
What about You?
This was an article jam-packed with language learning hacks. Which of Nikki’s tips resonate most with you? We’d love to hear about it in the comments section. And to our Fi3M Challengers, best of luck on your language adventure!
Want to learn a new language in 90 days? Come join us in the Fi3M Challenge.
A gigantic thank you for Nikki for sharing her insights and winning strategies with us.
To learn more about Nikki, you can visit her Facebook page, her Instagram account or her website.
The post Language Mentors #5: Nikki Prša (Amercian Polyglot, Speaks 7 Languages) appeared first on Fluent in 3 months - Language Hacking and Travel Tips.


July 13, 2019
14 Ways Show Your Gratitude and Say “Thank You” in Dutch

Even though the Dutch can be quite direct and quick-to-the-point in their conversations, saying thank you is just as appreciated by them.
In this article, I’ll teach you 14 ways how to say “thank you” in the Netherlands. So the next time someone gives you a beautiful bouquet of Dutch roses, or invites you to a birthday party, you’ll have plenty of options to thank them for it.
Plus, I’ve divided them into formal and informal responses, so you’ll be expressing gratitude in the proper Dutch way..
It’s probably one of the first things most tourists/beginner learners want to know: “How do you say thank you in Dutch?” It’s one of the main building blocks of conversation. So let’s get started!
How to Say an Informal “Thank You” in Dutch
You wouldn’t write ‘thank u’ to your boss in an email regarding an important meeting you had yesterday after lunch. It’s the same in the Netherlands: You’ve got to watch out a little when you say the Dutch word for “thank you”. The Dutch language has both a formal and informal way to address other people (je and u).
Even though you'll find many natives saying je to everyone, in the beginning, it’s a good practice to use u in the following situations:
with someone who’s obviously older than you
with someone who’s in a higher “authority” position (doctors, police officers or your boss)
So in these cases, you’d use the formal way of saying “thank you” (I’ll share those in a moment).
But since you most likely won’t find yourself in those highly formal situations often, let’s start with the most common informal way of saying “thank you” in Holland.
1. “Thank you” in Dutch - Dankjewel
You’ll hear this all the time in the Netherlands. And for good reason: It’s the simplest way of saying thank you in the Dutch language. It’s also the one that most beginners learn first.
It’s actually very easy to learn. It’s almost a straight translation from English, but with the adverb “well” added to the end. It emphasizes that you’re thanking someone with good intention.
If you’re reading Dutch, then you might see several different spellings of this word/words.
Dankjewel
Dank je wel
Both are correct. Also, there’s no difference in pronunciation, as most Dutch people speak these words quickly. At first, you may not be able to distinguish that those are actually three words, melded together as one.
Fun experiment: If you want to confuse a Dutch person about their own language, ask them which of the two versions is the correct spelling. Most will likely not know the answer, and will be pleasantly surprised when you tell them they’re both correct!
2. “Thank u” in Dutch - Dankje
If you want to quickly thank someone, and you’re speaking to someone you’re close to,shorten dankjewel by skipping the wel at the end. This makes it a little more affectionate and conversational.
3. “Thank you very much” in Dutch - Echt heel erg bedankt
If you want to know how to say “thank you very much” in Dutch, this is the correct way to say it.
I recommend only saying it when you’re indeed incredibly grateful for something someone did for you. It would be slightly weird to thank a friend for passing the salt for your patat met mayonaise, for example. It’s a perfect way of saying thanks when you get a great giftt for your birthday -- or when a Dutch person takes the time to speak Dutch with you for 20 minutes, instead of switching to English right away!
It’s a tough phrase to translate directly into English, but the translation would be something like “Really very much thanks”.
4. “Super thanks” in Dutch - Superbedankt
This one isn’t that common, but you might hear it between close friends or family. When saying this, it’s obvious that you’re very grateful to the other person. It can also be funny to say this in a sarcastic way, when someone feels as if he’s doing you a huge favour -- whereas in reality, it doesn’t help you at all.
5. “Thanks” in Dutch - T(h)anks
The Dutch language is incorporating English more and more. And the language is already one of the closest to English in the first place! (It’s also very close to German, so if you know German already, you have a huge advantage when learning Dutch).
With this in mind, it shouldn’t come as a surprise that you can simply say thanks in Dutch.
The only difference to the English “thanks” is that many Dutchies skip the “h”. It creates a Dutch version that can sound funny to native English speakers. It sounds like “tanks”. Yes, like the ones that drive around on battlefields shooting at the enemy. So if you hear someone screaming “tanks” on the street, you don't need to be worried about World War 3 -- it’s just someone thanking another person!
How to Say a Formal “Thank You” in Dutch
Now you’ve learned some informal ways of saying “thank you” in Dutch, so let’s look at the more formal phrases for showing gratitude.
As a reminder, it’s a good idea to use these formal ways of saying “thank you”:
with someone who’s obviously older than you
with someone who’s in a higher “authority” position (doctors, police officers or your boss)
6. Formal “Thank you” in Dutch - Dankuwel
Dankuwel is very similar to dankjewel, only the informal je has been replaced by the formal u. You can say this in virtually any formal situation, such as when you get your passport back from customs. Or when a police officer helps you find directions to the Dam Square, after you got lost wandering around the Amsterdam canals (that all look so incredibly similar - even natives who don’t live in Amsterdam tend to get lost there over and over again).
7. “Hearty thanks” in Dutch - Hartelijk dank
If you want to add some emotion to your formal thanks, then this is the way to go. It’s commonly used by public speakers after a long presentation.
8. “Thank you a lot” in Dutch - Dank u zeer
There’s a high chance you’ll never hear this direct translation of “thanks a lot” in Dutch. The word zeer has two meanings, both “very” and “hurt”. So it’s good to know that when someone says this, it means he or she is very grateful. I asked my Dutch friends, and they said this phrase is mainly used by older people. Young people don’t use this phrase anymore, and you can safely skip it unless you want to be a really advanced speaker.
9. “Thanks in advance” in Dutch - Bij voorbaat dank/alvast bedankt
If you’re writing emails in Dutch, then you might want to finish your message by thanking the recipient in advance. Since this will most likely already be a (slightly) formal email exchange, there are two ways to say this.
Very formal: bij voorbaat dank
A little less formal: alvast bedankt
As far as its use is concerned, you can ask yourself the question: “If I were writing this email in English, would I add thanks in advance?” If yes, you can also safely use it in Dutch.
Both Formal and Informal Ways to Say “Thank You” in Dutch
Since the Netherlands has a low ‘power distance’, everyone feels equal. For instance, the boss isn’t considered better than an employee. As such, there are several ways to thank someone that can be used in both formal and informal situations. These are great to know if you’re quite unsure about the formality you need in a specific situation.
10. “Thanks” in Dutch - Bedankt
If you like to keep things simple and want to learn just one word to say “thank you” in every situation, that would be bedankt.
Bedankt is the past participle of the verb “to thank” (bedanken). So it’s safe to assume that in the past people used to say ik heb je bedankt (“I have you thanked”). This shortened over time to just bedankt.
It’s probably the second most common way of thanking someone, and it’s slightly more formal than dankjewel. The absence of je or u makes the word very easy to use, as you cannot accidentally mistake the formality.
You can say bedankt to a cashier when you're doing groceries, or when thanking your captain after a boat trip through Amsterdam.
11. “Many thanks” in Dutch - Heel erg bedankt
“Many thanks” in Dutch is like a shortened version of echt heel erg bedankt, which we discussed before. The absence of echt makes it a bit less emotional, although it’s still something you’d only say when you’re really grateful.
12. “Thank you so much” in Dutch - Ontzettend bedankt
The literal translation of ontzettend is “enormous”, so the literal translation of ontzettend bedankt would be “enormous thanks”. A better translation is “thank you so much”. It can be compared to super bedankt, but more suited for general use.
13. “Thank you all” in Dutch - Dank jullie wel
In English, the word “you” can be used to address individuals and groups in both formal and informal situations. Dutch isn’t like that. There’s a separate word for “you” in Dutch when you’re addressing a group: jullie.
So naturally, as you’d expect from dankjewel (informal) and dankuwel (formal), there’s also dankjulliewel (plural). This is used when you’re thanking more than one person. For example, you might say dankjulliewel after you’ve had a delicious boerenkool stamppot met braadworst dinner at a Dutch couple’s home.
14. How to say “Thank you for…” in Dutch
Often when you say “thanks”, you want to show your gratitude for something specific. This is another part where Dutch and English are similar, as you simply say dankje voor….
When the Pope visits the Netherlands, he always says bedankt voor de bloemen (“thanks for the flowers”).
When you’re saying “thank you for” in Dutch, you can use this simple formula:
Any “thank you” in Dutch + voor + de/het + noun
One Final Thing to Watch Out For When Saying “Thank You” in Dutch
In English, if someone asks if you’d like a beer or coffee, and you say “thank you”, people will assume you mean “yes”, or at least double check to see whether you meant “no, thank you”.
In Holland, if you only say dankjewel, there’s a good chance people would assume you mean “no”. It’s seen as a polite refusal of your offer.
So if someone asks you if you want something, be sure to say ja (“yes”), before thanking them for the offer.
Now it’s over to you! Do you now feel comfortable expressing your gratitude in Dutch? Heel erg bedankt for taking the time to read my tips!
The post 14 Ways Show Your Gratitude and Say “Thank You” in Dutch appeared first on Fluent in 3 months - Language Hacking and Travel Tips.


July 11, 2019
How I SHOCKED My Boss in Budapest [I Learned Hungarian in 60 Days!]

My mission?
To learn Hungarian. But here was the catch, I hadn’t studied Hungarian before at all. Not a word. I was starting from absolute zero.
And while Fluent in 3 Month’s very own Benny Lewis proved two months was enough to start chatting in Hungarian during his mission, mine came with additional challenges.
During the two months I’d be learning Hungarian, I had just over a week that my studies would be interrupted by a trip to Shanghai, China where focusing on my Chinese and Japanese was paramount. That meant I could only dabble in Hungarian until I returned from that trip just two weeks before I headed to Hungary.
Could I do it?
I turned to Benny for advice:
httpvh://www.youtube.com/watch?v=0B0X6ImHVrw&a...
The Power of Focus
This wasn’t my first Add1 (and it wasn’t my last). I’m the Add1 Head Coach, so I have plenty to be getting on with supporting our students. It’s my choice whether I learn a language alongside our Add1 students.
And I keep doing it! In fact, Hungarian would be my fifth language with Add1.
What kept me coming back?
I knew that if I followed the program, I’d speak Hungarian. And I trusted in that process.
Normally, during a challenge, I just like to focus on one language. This would have been Hungarian, but my other work trip threw in a new challenge for me -- the need to work on Japanese and Chinese at the same time.
Thankfully, my Japanese and Chinese were both at a level where conversing regularly and a bit of daily study were enough to support what I needed to do. That way, most of my energy could go to Hungarian.
Here’s where I started:
httpvh://www.youtube.com/watch?v=uVAaohv1kuI
That’s my Day 0 video for Add1 -- one of the four videos we use to document our progress during the 90 days.
You see, the start of my Hungarian project happened to time perfectly with the start of Add1 , though my “Day 90” would be closer to Day 60 of the challenge and my test wouldn’t be a 15-minute conversation (though that did come later).
Instead, I aimed to reach a high enough level to surprise my bosses at a company I work for, Drops. They’re both native Hungarian speakers.

How a Small, Fun Project Became a Big Deal
Initially, the idea came to me as something fun to do. A nice gesture I could make, showing my co-workers how invested I was in the company. It was going to be small. I’d work on the language and then surprise them at some point during our week in Budapest. I was pretty excited about the idea, so I shared it with two of my American co-workers. And then it quickly spiraled into something bigger. MUCH bigger.
Suddenly we were talking about camera crews, staging, a marketing plan… I started to get nervous, wondering what I had gotten myself into.
But instead of letting that nervousness get in my way, I channeled it into my learning. Using it as motivation to succeed.
That nervousness stemmed from fear of failure. The easiest way to quash it? Not fail.
Learning Hungarian in 2 Months: How I Did It
I started by setting myself milestones, then aimed to hit as many of them as I could, as quickly as possible:
Milestone 1: Get into the Drops dojo by Day 3. Drops was the primary way I studied the Hungarian language and also happens to be one of the companies I worked for (I also work for Fluent in 3 Months and Add1, it’s the life of a professional polyglot!). That was part of the big surprise -- learning the language to surprise my bosses with our very own app! To get into the Dojo, I needed to learn 50 words within the first three days (it’s the minimum requirement to start using the Dojo).
Milestone 2: Find someone to practice with. Fluent in 3 Months came to the rescue here and one of my fellow team members, Balint, jumped in to help me out. We scheduled a time to chat, and that date on the calendar helped me keep moving forward with my studies.
Milestone 3: Write my first Hungarian script. Benny often discusses the power of scripting in learning a language.
Milestone 4: Have a Hungarian lesson. I had my first Hungarian lesson early on during my Hungarian mission, but didn’t have another until after I returned from China. During that period, I made up for lost time -- remember we learn in hours not years or even days! -- by having anywhere from one to four lessons a day!
Milestone 5: Have an unscripted chat in Hungarian. My chat with my bosses wouldn’t be scripted, so I needed to make sure I was comfortable moving “off-script” before the time came.
Milestone 6: Learn all the words in Drops. There are around 2,600 words in Drops currently for the 32+ languages it teaches and I wanted to study all of them before my mission’s big finale. This, however, was the only milestone I didn’t reach prior to the chat in Budapest. It turns out it takes some time to really master that many words and two months wasn’t enough. I did reach this milestone shortly after the trip, so not all was lost!
Milestone 7: Try out some of my Hungarian in Budapest before the big surprise. I didn’t want my first time using Hungarian outside of the safe confines of a lesson or exchange session to be during my reveal. Instead, I wanted to have my fair share of failures and successes before so that I’d be as prepared as possible for my final milestone.
Milestone 8: The big reveal.
I planned to hit all my milestones during the first 60 days of Add1. My main tools were Drops, and then later, my sessions with my italki tutors. There was another Hungarian learner in Add1 as well. She was significantly farther along than I was when I started, and her success was my inspiration to keep going (and to be honest, perhaps catch up to!).
The Big Reveal
Finding a time to get the founders of Drops alone during our work week proved difficult and it ended up falling on the last day. While this gave me extra days to study and practice, it gave me extra days to fret over how it would go, too.
It also meant more days of keeping the fact I knew Hungarian a secret while in Hungary…
I constantly caught myself slipping up, ordering in Hungarian at restaurants within earshot of the other team members. Answering something in Hungarian. And paying attention when Hungarian conversations happened around me.
Thankfully, no one seemed to notice, but keeping my Hungarian a secret proved difficult! Especially when both of the founders asked me if I had learned Hungarian on multiple occasions and it meant I had to outright lie to keep the surprise, well, a surprise.
The final day arrived and the camera crew ended up being the other members of the marketing team rather than a professional crew. We met in a small room at one of our co-working spaces and my fitness tracker let me know that my heart rate was through the roof.

How did I deal with those nerves? I just kept plowing through. I clasped my hands together to hide any shaking, laughed a little more than I might have normally, but most importantly I did it.
At the time, I avoided making eye contact with either of the founders, worried it would throw me off or I’d lose my train of thought. I stared at my hands, and it meant I missed their reactions. Happily, the cameras caught them and I was rewarded with seeing them after the fact. Their expressions say everything and it made all the nerves, all the study, and all of the preparation worth it.
Here’s the final video:
httpvh://www.youtube.com/watch?v=UWRQsYriO7U
If you’d like to follow my project step-by-step to see exactly how I used Drops and Add1 to learn Hungarian, this page includes all of the information about the project with updates and videos for each milestone.
See Rapid Results with Add1Challenge
My success with Hungarian was a big occasion for me. And because of it, I have a new “forever” language that I get to share with my team members at Drops (and Fluent in 3 Months). But my story is only one of thousands of success stories in Add1. The community is full of passionate language learners encouraging one another to get to that 15-minute conversation in 90 days. If anyone is struggling, it’s easy to find someone who can relate and offer advice. And every day, challengers are sharing their wins.
Do you want that to be you, too? What language have you hoped to speak? Are you ready to finally have a conversation in your target language like I did? Find out more about Add1Challenge here!
The post How I SHOCKED My Boss in Budapest [I Learned Hungarian in 60 Days!] appeared first on Fluent in 3 months - Language Hacking and Travel Tips.


July 7, 2019
How to use Anki Cards to Learn a Language

Anki cards are basically digital flashcards that you can use on both your computer and your mobile device, but they’re so, so much more than that.
If you think I love Anki because it saves paper, you’re… well you’re not wrong, but you’re not completely right, either. Honestly, Anki is a dream for language learners, because instead of forcing you to learn the same terms over and over and over and over again, it puts the easy stuff to the side and drills you on what you’re having a hard time with.
Here’s an overview of all the Anki features that I love and why they make Anki the perfect tool for language learners.
How to Use Anki to Learn a Language
Anki only shows you words that you’re on the verge of forgetting. This little trick of knowing what terms to show you, and when, is known as Spaced Repetition. It’s only one of the features of Anki. Nonetheless, let me explain what Spaced Repetition is, and why you absolutely need it in your language learning life.
You Tell Anki Which Words You Find Easy, Medium or Difficult to Recall
The Anki language app works like this: you plug in your vocab, review your words for the day, then tell Anki how easy or difficult those words were to remember. You do this by selecting: easy, medium, or hard. Anki uses this information to plug these cards into its algorithm. It then waits longer and longer to show you the cards that were easier for you to remember, and shows you the most difficult ones (the ones you got wrong) right away, as if they were brand new.
As the days go by, you’ll see the timing between when you see these easier cards increases -- from three days, to a week, to a couple of weeks, then a month, etc. When you remember a work correctly, Anki slowly creates more and more space between reminders for that word. This is how the Anki language app gets these cards into your long term memory, which is exactly what we’re going for. Instead of seeing the easy cards every day forever, which takes up more time than any of us have, we only see them just enough times to remember them, and at just the right time.
And that, my friends, is a major time saver. I mean, depending on how you approach your language learning, you could be learning hundreds of words, phrases, and grammatical concepts at a time! That’s a lot, and nobody has time to review every single thing over and over again. And even if that’s a thing that you do with normal flashcards, you shouldn’t just put away the easy cards forever, but, at the same time, we can’t be expected to know the optimal time for reviewing them.
So, instead, the Anki language app puts the easier stuff away for just enough time so that you can focus on what you should actually be focusing on: drilling the flashcards that your brain just doesn’t like. Then, every once in a while, it flashes an easy card at you so you don’t forget.
You Can Add Images and Audio to Anki Flashcards Too!
Although Anki’s Spaced Repetition algorithm is amazing, it’s not even the only thing it has to offer. See, these aren’t just your average “word on the front, definition on the back” flashcards. Nope, the Anki language app has a lot more.
Are you a visual learner? Do you recognize people’s faces, but can’t remember their names? Well, Anki gives you the option to upload images directly onto your card. You can add images to either side of your cards, and they can be anything. If you can’t find a picture, Anki even connects to the camera on your phone, so you can take a picture of your desk directly in the app to learn that term.

Another wonderful option for us language learners is the ability to upload audio. The amount of time you spend learning your vocab and training your ear to hear it can be combined into one, just by uploading an audio file of the word. You definitely can’t do that with normal flashcards!
Anki Can Even Help with Spelling, Sentence Structures, and More
There’s yet another way that Anki blows regular flashcards out of the water: typing. You don’t have to just stick to basic recall. You have a couple more options than that. For example, typing your terms in instead of just seeing them. I personally love this, it’s the only way I learn vocab these days.
This way, I’m not just learning to vaguely recognize the word, but I’m learning to spell it, which is important for learning to write in the language. I tell ya, it makes a world of difference to have to really understand the word and how to spell it, accents and all, as opposed to just going “yeah that word, not sure how to pronounce it or spell it, but yeah, it looks like that!”

Or, you can opt to use Anki’s “cloze” feature, which takes any part of a word, phrase, or sentence, and replaces it with an ellipsis, so you can use Anki to practice any number of things: spelling, conjugating verbs, completing a new phrase, etc.
That’s right: you can use Anki flashcards to learn to conjugate your verbs. Crazy, right? That’s much better than sitting there and copying down your “I/you/he/she/it/they/us” verb charts for all of eternity.
Anki Lets You “Borrow” Flashcard Decks from Other Language Learners
What if you love the opportunities that all these features have to offer, but you don’t want to go through the motions of making Anki cards yourself? Well, fortunately, Anki hosts shared decks. Shared decks are Anki decks created by other users made public, so anybody can access them and learn with them. And you can find a variety of topics, from languages to geography to random history facts.
If you go to the Anki shared decks, you can click through to the most popular subjects. Or, if you’re looking for something else, there’s a search bar on the upper righthand corner. Search for literally anything in the world and I can guarantee that you’ll find something. You’d be amazed by the kinds of things people are using Anki to learn.
If you’ve built up a really helpful Anki deck, you can share it, either with just a couple friends or the entire world. The Anki site is completely open to anybody to access or create any kind of cards imaginable, which is amazing. Plus, users take their Anki decks seriously, so you can find some really helpful, in-depth information.
You Can Use Anki for Language Learning on Your Laptop or Your Phone
Anki is available for both desktop and mobile, which makes it great for everybody, no matter what device you use. There are plenty of language learning services out there that only work on mobile (which, even though I’m more than comfortable using my phone, is still incredibly annoying to me), and others that don’t offer the same functionality on mobile.
Fortunately, Anki is almost exactly the same both on desktop and mobile, which I love. It’s simple enough that I’m totally okay just using the mobile app, but there’s really no difference between it and the desktop version - the desktop app is just bigger text on a bigger screen.
And I know what you’re thinking: “it must be complicated, though, to keep track of where you are in your flashcards between two different devices!” Well, it’s not. Both devices sync easily to the Anki database. Not only do you not lose your cards if something happens to a computer or phone, but you just need to check back in with the database when switching devices to make sure you’re all up to date.

What do you have to do to sync? Refresh your page (on mobile) or press a button (on desktop). And that’s it. Anki syncs deleted cards, new cards, edited cards, recently reviewed cards... everything. And because the program is so bare-bones, it’s quick. So even if you need a good refresh on your device, you won’t have to wait long before studying.
Anki Cards: Ugly, But Worth It
We live in this glorious age of technology where everything is beautiful. We get huge, 4k Ultra HD TVs, cute apps on our phones that make little noises, and fun memorization games. So I get it when you first take a look at Anki and you’re underwhelmed. We’re spoiled by pretty tech and Anki is definitely not pretty.
It’s, honestly, the ugliest language learning resource on the market. But it’s also the best. I use it every single day, I’m obsessed. Other websites try to do a similar thing, and they’re much more aesthetically pleasing, but they just don’t have the power that Anki has. Duolingo and Memrise, for example, are really pretty programs that attempt Spaced Repetition but don’t quite hit the mark. Nobody does flashcards better than Anki cards. Pretty is great, but it’s not everything.
So there you have it. In my opinion, the one language learning resource that every language learner needs. There is no better way to learn your vocab, practice conjugations, passively practice listening, or any number of other skills that you can improve with Anki’s options. I know, it’s ugly, but looks aren’t everything!
Want to try it for yourself? Anki is available for iPhone, Android, and desktop.
The post How to use Anki Cards to Learn a Language appeared first on Fluent in 3 months - Language Hacking and Travel Tips.


July 4, 2019
Talking About the Weather in Spanish: 77 Spanish Weather Words (and Phrases) that are Good to Know

“Nice day today, huh?”
“I’m enjoying this sunny weather.”
“I wish the rain would stop.” (And yes, it does rain a lot on the Atlantic coast of Spain, especially in the north)
Weather is what we use as small talk and conversation fillers. That’s because it’s something easy everyone can relate to. So it’s the perfect place to start when learning Spanish!
Talking about the weather in Spanish also makes it incredibly easy to practice speaking. There will never be a time you can’t look out the window and describe the weather out loud. You can ask your language exchange partner what the weather is like where he or she lives. In fact, a lot of online tutors and language exchange partners that I’ve used start a conversation by asking about the weather. And you can even set up Google to recognize Spanish and ask it for today’s forecast. Then you’ll get listening and speaking practice, too!
Learning how to talk about the weather is usually among my first topics to learn in a new language. Because when I travel, it will always save me from awkward pauses. If I don’t know what else to say I can throw in something about the weather, and the conversation sparks up again. Especially in most Spanish-speaking countries, where the weather can rapidly change or have extreme conditions. Everyone’s willing to vent a little about the too-hot days, or a rapid cold snap.
So let’s learn how to talk about the easiest of conversation starters: the weather in Spanish.
Spanish Weather Vocab
First, let’s learn the words that describe the weather. There are many weather conditions you could talk about, and a lot of words to go with them. But, there are common themes and ways to memorize them, which I’ll talk about in a moment.
Spanish Weather Nouns:
Weather: el tiempo or el clima
Sun: el sol
Clouds: las nubes
Rain: la lluvia
Thunder: el trueno
Lightning: el relámpago
Fog: la niebla
Snow: la nieve
Wind: el viento
Storm: la tormenta
Sleet: las aguanieve
Frost: la helada
Hail: el granizo
Rainbow: los arco iris
Breeze: la brisa
Temperature: la temperatura
Degrees: los grados
Season: la temporada
Spring: la primavera
Summer: el verano
Fall: el otoño
Winter: el invierno
Note: The word tiempo (“weather”) has many different meanings in Spanish, including “time”, “tempo” and “grammar tense”. So if you want to be clear, you can use clima. That means both “climate” and “weather”. Unlike the English word “climate”, clima can be used to describe current weather, not just the general weather of an area.
Spanish Weather Adjectives:
Sunny: soleado
Cloudy: nublado
Windy: ventoso
Misty: neblina
Foggy: niebla
Clear: despajado
Bad weather: mal tiempo
Good weather: buen tiempo
Hot: calor
Cold: frío.
Warm: cálido
Cool: fresco
Humid: húmedo
Bitter cold or freezing: glacial
Chilly: friolero
Spanish Weather Verbs:
Shining: brillando
Raining: lloviendo
Snowing: nevando
Storming: asaltando
Sleeting: agobiante
Drizzling: llovizna
Pouring: torrencial
Hailing: llamando
Spanish Words for Extreme Weather Conditions:
Hailstorm: la granizada
Hurricane: el huracán
Tornado: el tornado
Blizzard: la tormenta de nieve
Earthquake: el terremoto
Flood: la inundación
Windstorm: la tormenta de viento
How to Memorise Spanish Weather Words
You’re probably thinking that I’ve shared a lot of Spanish weather words, and you’re wondering how you can memorise so many words. Thankfully there are some simple memory hacks you can use.
Memory Hack 1: Look for Spanish Weather Cognates
Some Spanish weather words are cognates, which means they resemble their English counterpart in some way. This makes them easier to remember!
These are words like sol for “sun”, which is similar to “solar”. Or el huracán, which is almost the same as “hurricane”.
Others, like glacial and torrencial are similar to how we describe a glacial cold or torrential downpour. Terremoto resembles both “tremble” and “terrestrial”, meaning the earth trembles. And aguanieve, which is “sleet”, describes the exact state of the weather: a mix of water (agua) and snow (nieve).
Memory Hack 2: Look for Patterns
Most Spanish weather words relating to rain start with “lla”. And words relating to snow start with “nie” or “ne”.
Memory Hack 3: Focus Your Energies
Instead of trying to learn all the Spanish weather words at once, focus on those you’re most likely to use in real conversations. For example, since I’m from Ireland, when I’m talking about the weather of my home country I’ll talk about la lluvia (“the rain”) a lot, so that’s an important word for me to know.
Memory Hack 4: Use What You’ve Learned in Real Conversations
My number one tip for learning a new language is to Speak from Day One. This will build your confidence, and cement what you’ve learned into your memory.
If you’d like to do this, I recommend booking a sessions with a Spanish italki tutor. For complete beginners, I recommend starting with my free Speak in a Week course.
Talking about the Weather in Spanish: Helping Verbs
In Spanish, you almost always need helping verbs to talk about the weather. There are three verbs you’ll use: hacer, estar and haber.
It may seem a bit strange to use phrases that literally translate as “The weather makes rain,” or “There is weather.” But that’s just how it works in Spanish.
There are only a handful of exceptions to this rule. Very common weather conditions have been simplified to single words. They are:
It rains: llueve
It drizzles: llovizna
It snows: nieva
It thunders: truena
You can simply say these on their own, and they make sense. For example, looking out the window and commenting, “Llueve”.
Helping Verb 1: Hacer -- The Weather “Does” or “Makes”
The Spanish verb hacer pairs with most words to talk about the weather. Although we normally translate this as “to make”, in this case the more natural English translation would be “it is”.
So what does the weather “make”?
It’s hot: Hace calor
It’s cold: Hace frío
It’s nice weather: Hace buen tiempo
It’s very bad weather: Hace muy mal tiempo
It’s sunny: Hace sol
Hacer is usually used to describe the feeling of the weather, so you can think of it like “It makes it feel hot” or “It makes it feel cold.” You pair hacer with descriptive words about the feeling of the weather outside.
Helping Verb 2: Estar -- The Weather “is”
When referring to the weather, estar takes on the third person form, está. Which makes sense - you’re not talking about yourself, or another person, but an “it”. Estar is the verb for “to be” when it’s not permanent, so don’t confuse it with ser (permanent “to be”).
Estar can be used with both verbs and adjectives to describe the current condition.
It’s raining very hard: Está lloviendo muy fuerte
It’s sunny: Está soleado
It’s stormy: Está tormentoso
It’s very humid: Está muy húmedo
Helping Verb 3: Haber: “There is” Weather
Haber is used as hay when talking about the weather, and it’s mostly for factual statements such as “There is a hurricane” or “There is a storm”.
It’s usually translated as “it is”. For instance, “It is foggy” is Hay niebla. Literally, “There is fog.” Hay is most often paired with the noun form of the weather.
It’s stormy: Hay tormenta
There’s a flood: Hay una inundación
There’s rain: Hay lluvia
It’s windy: Hay viento
There’s snow: Hay nieve
It can be a bit confusing to get used to which helping verb to use. If you think of hacer for adjectives, estar for verbs and haber for nouns, you’ll usually get it right.
Asking about the Weather in Spanish
Okay, we know how to say some basic things about the current weather. But how do we ask others?
When you want to ask about the weather outside, or in someone else’s area, here are some phrases you can use:
What’s the weather like today?: ¿Qué tiempo hace hoy?
How is the weather today?: ¿Cómo está el clima hoy? or ¿Cómo está el tiempo hoy?
What’s it like outside?: ¿Cómo es afuera? or ¿Cómo está por fuera?
What’s the weather like in ?: *¿Cómo es el clima en ?*
Is it cold outside?: ¿Hace frío afuera?
Is it raining outside?: ¿Está lloviendo afuera?
Is there snow?: ¿Hay nieve?
So you can see how to turn phrases with hacer, estar and haber into questions.
Spanish Weather Phrases
We have quite a few English idioms about weather. The most famous example is probably “it’s raining cats and dogs,” or “it’s pouring buckets.” Spanish has phrases like that, too. You’ll also want to know how to ask someone how the weather makes them feel, or how to describe your own feelings.
Common Spanish Weather Phrases
A few popular idiomatic phrases are Llueve a mares (“It’s raining the seas”), which is closest to “it’s raining cats and dogs.” You could also describe heavy rains with Llueve a cántaros, or “It’s raining jugs.”
To talk about how cold it is, you might say Hace un frío que pela. It translates to “it’s so cold, it burns,” but it means “It’s freezing!” And for heat, you can use Hace un calor tremendo (“It makes a tremendous heat.”)
In springtime, you can say La primavera, la sangre altera, or “Spring alters blood.” It just means that you can feel in the air that spring is coming.
There’s also the idiom, Siempre que llovió, paró which translates to “Every time it rained, it stopped,” or “This too will pass.”
Spanish Phrases to Describe How the Weather Makes You Feel
Usually, when making small talk about the weather, you discuss how it makes you feel. “Hace un calor tremendo!” would be followed with Lo sé. Estoy sudando como un pollo! (“I know. I’m sweating like a chicken!”)
If you want to ask how someone’s feeling, you can say ¿Tienes ____? For instance, “Are you feeling hot?” would be ¿Tienes calor? To which they might respond, Si, tengo calor.
Here are a few other Spanish weather words and phrases to know:
Burning up: quemando
Dying of heat: muero de calor
Sweaty: sudoroso or sudorosa
Really cold: mucho frio
Freezing: congelando
It’s an oven outside: Es un horno afuera
It’s an icebox outside: Es una nevera fuera
Cool as a cucumber: Más fresco que una lechuga (Literally: “Cooler than lettuce”)
Mastering Spanish Weather Small Talk
Now it’s over to you! Practice these expressions to describe your daily weather, and you’ll be prepared for small talk in any situation. You can also look up the weather in Spanish, and listen to the forecast or read about it. That will help instil how native speakers hear and talk about the weather. You could even use Instagram to boost your language skills and search for things like “#tiempo” or “#clima”.
If you’re ready to move on to other icebreakers to keep the conversation flowing, make sure to master your questions to ask about others. You can even learn about the other universal small talk topic: Spanish food culture and vocab.
What about you? Are there any weather-related phrases you use all the time in Spanish? What other ways can you practice weather vocab in Spanish? Leave us a comment and let me know.
The post Talking About the Weather in Spanish: 77 Spanish Weather Words (and Phrases) that are Good to Know appeared first on Fluent in 3 months - Language Hacking and Travel Tips.


