
Cindy C. Bennett's Blog, page 74
September 26, 2011
Ready to Laugh?
I just stumbled upon a gem of a blog today called Humor Stories. I do not know how this woman has managed to keep herself hidden for so long. So, in the interest of sharing things I love, click on the link and be ready for some laughter.


September 23, 2011
Banned Books Blog Hop

In celebration of Banned Books Week I'm joining several other blogs to giveaway a book that has been banned at some point or another, or to bring awareness to these books, as there are some missed gems among them. Enter below to win a copy of Flowers in the Attic. The contest runs until midnight, Oct. 1, 2011.
 My Banned Book of Choice:
Flowers in the Attic
by VC AndrewsSynopsis: After the death of her loving husband and doting father of her children, Corinne Dollanganger takes her four children home to live with her parents. Unfortunately, one of the conditions of their living there is that the children must be hidden from Corinne's father who doesn't know of their existence. Corrine stands to inherit her father's vast fortune but only if there are no children from her first marriage. Why? Because her husband was her half-uncle, half-brother to her father. Her extremely religious parents believe she is a sinner as she lived in incest.
My Banned Book of Choice:
Flowers in the Attic
by VC AndrewsSynopsis: After the death of her loving husband and doting father of her children, Corinne Dollanganger takes her four children home to live with her parents. Unfortunately, one of the conditions of their living there is that the children must be hidden from Corinne's father who doesn't know of their existence. Corrine stands to inherit her father's vast fortune but only if there are no children from her first marriage. Why? Because her husband was her half-uncle, half-brother to her father. Her extremely religious parents believe she is a sinner as she lived in incest.The children, Chris, 14, Cathy, 12, and the twins Cory and Carrie, 5, are unaware of this. They are locked in the attic where they are sadistically treated by their grandmother: constantly called "the devil's spawn" and "abominations", whipped, starved, Cathy's hair coated in tar, and poisoned, among other cruelties. Their mother, who at first visits with gifts and promises to get them out of there at the first chance possible, soon stops coming to visit at all. Not long after, the twins get ill, and it's discovered by Chris that their mother has been poisoning them. She has remarried, and needs the children to disappear so as to not interrupt her idyllic new life.
As they are locked up with no one else to interact with, they soon make up their own family unit, with Chris and Cathy acting as parents to the twins. As Chris and Cathy go through puberty in their three-and-a-half year confinement, Chris and Cathy become attracted to one another. After the death of Cory due to the poisoning, they decide they must escape to save their lives and the life of Carrie.
Why I chose this book: I remember reading this book as a young teen. It really struck me, how unfair and cruelly these kids were treated. I wanted to jump into the pages of the book and rescue them. It's one of VC Andrews' best works, when it was really VC Andrews writing and not a ghost writer as writes under her name now. She touches on so many deep issues in this single book. As an adult I can understand things I couldn't as a child. Back then I was shocked by the incest between Chris and Cathy; as an adult—not that I approve or think it's okay in any way—I can't help but think if you put two adolescents who are going through puberty while being locked up for years on end with nothing to look forward to but abuse, who have formed a sort of family unit to retain a sense of normalcy, it stands to reason that without any guidance they would naturally turn to one another.
It also delves into the deep greed of one woman, who would rather keep her wealthy, fantasy life with her trophy husband and pseudo happiness than keep her children alive, let alone healthy and free. As much as we'd like to believe that couldn't really happen, that would be deluding ourselves. Abuse is nothing new and is perpetrated by selfish people.
It also opens the debate as to whether a person can call themselves Christian when they use it as an excuse for brutality and vindictiveness. I personally feel that God is about love, and would not condone such behavior.
Why this book was banned: It seems pretty obvious. Not only does it deal with abuse and incest, there is a rape scene between the siblings—pretty heavy, blatant, graphic material. The book has been banned at various times from various places, and I don't know that you'd be able to find it in any school library due to the graphic rape scene and incestuous passages. Do I think it should be banned? I don't think any book should be banned, per se. I think every parent has the responsibility to make sure that what their children are reading is appropriate. I also think that each individual librarian has the right to choose whether they think a book is appropriate to be carried in their schools library. That being said, if a student wishes to bring the book from home to read in school, or to write a book report on, I don't think the school has a right to tell them no if their parent(s) has already said yes. Personally, I think Andrews could have written the same book without being so graphic, and it would have the same impact. Still, she chose to write it her way, and I respect that. And I'm a fan of the book. It ranks up there in probably my top 20 or so of all-time favorite books.
The giveaway: Now, for the good stuff! I'm going to send the winner of the contest a copy of the controversial Flowers in the Attic, your choice of paperback or Kindle edition. All you have to do is fill out the form below with your email (so I can contact you if you're the winner). That's the only requirement to enter. Want an extra entry? Leave a comment below telling me if you've read the book and what you think of it, why you'd like to read it if you haven't, if you think it should be banned, or what your favorite banned book is—anything that has to do with this or any banned book, really.Good luck!
<p><p><p>Loading...</p></p></p>
Use the links below to hop on over to the next blog.

September 22, 2011
Interview with Author Jeffery Moore

Tell us a little about yourself.
I've been married to my lovely wife for 28 years. We have two great daughters. I work for a large, global IT company as a senior training specialist—my role is to develop technical training content for consumption by a global audience. Many times I find my work challenging, keeping up with the latest industry technology trends, and yet rewarding. There is a great sense of accomplishment developing something people want…material that professionals use to help them in their jobs and further their careers.
I live in Massachusetts and have lived here for eleven years. Love it here. I think because we experience all four seasons, though winters can be a bit too long. I've lived in many different places both in country and abroad. I was born in Germany (West Germany back then), and have lived in Italy and South Korea when serving in the military. I've visited many other countries, Australia, India, Great Britain, Croatia, Greece, and others as well as living in Maryland, Kansas, Tennessee, Alabama, California, yada, yada, and yada. Massachusetts is where I plan to retire.
At what point did you decide to become a writer? Was there someone or something that specifically inspired you?
I don't think I can pinpoint any defining thing or epiphany. Fantasy has been my genre of choice, but it seemed to me that the genre lacked creativity and imagination. I felt like I was reading stories with the same races of people and the same adventures in the same settings—it's just too repetitive for me. I drifted more towards speculative fiction with books by Conni Willis, Jean Auel, Jose Farmer, Stephen Donaldson, and Octavia Butler. It seems the fantasy shelves crowd-out these types of speculative fiction stories.I think the driving reason for me becoming a writer is that the publishing industry was not printing the kinds of stories I like.
How do you write: outline or seat of your pants, and why?
I say a combination of both. My first effort at writing was a story called "Awakenings". It was awful in that it followed no path. My characters had no goals and I just let them run around having cool adventures that had no rhyme or reason. Now I form a plot outline. This helps me keep my characters focused and aiming toward a goal. When I write, the outline becomes fluid and dynamic (seat of my pants), but the goal for the characters and the story remain the same.
Where are you when you are writing, and what implements/addictions do you have with you when you're writing?
I write just about anywhere. For editing it can be impromptu; on my lunch break at work, in the living room, or in the waiting room to see the dentist. I'm fairly regimented once I have an outline and begin the first draft. I typically spend an hour before I leave for work and an hour in the evening.
I love music and typically listen while I write. When editing, I like to smell a nectarine or I'll grab a pepper from my garden and smell that. Sounds crazy, but for some reasons it tends to focus me for the details in a scene.
You've written two books, The Keepers and The Lylia, as part of The Bounds series. Can you tell us what inspired those books, how you came up with the idea for them?
While in the military, I was deployed fairly often. I wrote my wife hundreds of letters and poems, which were really little actions scenes. From my poetry I formed my characters and then the story that wrapped around them. I struggled with the plot, but I think once I got the story on paper (so to speak), I was able to work the plot in. It took me years before I actually sat down and wrote the story.
Your books take place in a different world. Can you give us an overview of that world, and tell us how hard was it to come up with all of the specifics for their world?
One of the important things I wanted to accomplish with the story was for the setting to be different. I wanted to remove as much as the Earth-isms as possible. A huge problem I have with the mainstream fantasy genre is the lack of imagination applied to setting. Writers have fantastic stories with fantastic characters having fantastic adventures, but many of their settings are boring and overused.
My society is not built upon feudalism or have the feudalistic overtones. My characters are not dwarfs, elves, ogres, etc. I wanted an infrastructure and people that doesn't resemble Earth (or Middle Earth) and yet something readers can still envision. Though my world is Earth-like physically (i.e. a single sun that rises in the east, flora and fauna), the things that make up the world are different. Sometimes making up foods, plants, and animals came easy and other times not so much.
You are currently working on your third book in the series, The Untouched. Can you tell us about the book, and when it will be released?
I expect to be done with "The Untouched" by October and available mid-October*. My stories are melancholy and this doesn't change in the last book of the series. The Bounds' back story and their relationship with the Saarmoor and the Humans come to fruition. We understand how Robyn came to be and discover what happened to the fate of the Saarmoor and human races.
Following the death of Keeper Alcad, the heroes move to rid Midlen of Keeper Passer who remains a threat to the peoples of Midlen. Oaths are an important element in this story. Broken oaths are why the Bounds had abandoned the Saarmoor and why the Keepers are being killed. Shirking oaths is what nearly destroyed the Saarmoor. Entering an oath is what pulls Robyn away from Devon.
The premise of the book is the untouched Brin—those for whom the Keepers cannot siphon their dom (energy or life force). With an army of untouched, our heroes can assault Keeper Passer without being snared by Keeper Passer's Bound. When Keeper Passer sees he cannot hope to increase his power in Midlen, he move his army to the fertile lands of Lolen. Can the untouched army prevent Keeper Passer from conquering the Lolen? Can they stop Keeper Passer although Robyn, Devon, and Jessa have broken apart from the party of heroes?
*Note: The Untouched is available now as an ebook. Links are listed below.
What is your next project?
My next story, Jericho Solus, is about a man's struggle to keep his sanity. One of the concepts I'm going to explore is memory and how much we can retain. Jericho wakes in a foreign environment not knowing how he arrived or why he is imprisoned. He's always been paranoid that people have been after him and always took precaution to keep hidden and inconspicuous. Now his paranoia is realized, but he doesn't know what these strange people want.
Jericho is a Kamai, one of the blenders, and had been abandoned thousands of years ago on Earth. His assignment was simple: Live among the people as one of them; gather intelligence; assess the viability of the indigenous inhabitants for harvest. When his people return to retrieve Jericho, they find a man with no memory of who he is or what his mission was—they find a Kamai who had lost his identity and became human.
Why did you choose to self-publish over going with traditional publishing?
I tried traditional publishing, but gave up. It's simply not worth the frustration. I took the self-publishing route because I felt I needed a sense of finality for my first novel. For me, I needed that first book to be "out there" before continuing with my story. I doubt I'll ever attempt traditional publishing, but may go that route if approached, which, I believe, is a hugely remote possibility.
You're marooned on an island. What three inanimate objects must you have with you for your survival and/or sanity?
Aside from the obvious—satellite phone, lighter, and duct tape—to stay sane, I'd need my iPod, pen and paper, and a solar powered light…oops, is that four? I suppose my iPod is useless without earphones and something to charge it with. That makes pen, paper, and light. But, I would need a magic pen that never runs out of ink and a massive supply of paper. Well, I suppose I would need a container to keep the paper dry. So I guess my choice would be a magic pen, endless paper, and a huge Tupperware container.
Anything else you wish to say, or tell us?
I can attribute to my continued passion for writing upon several reasons. First and foremost is my imagination and the desire to share my stories; second is my group of critique buddies for whom I get the motivation, encouragement, and assistance that challenges me to produce a better and clearer story; third is the ease at which the internet has made it possible to publish my stories.
I have a "work-in-progress" website with links to my books.
I'm open to suggestions and constructive comments, and always looking to improve my writing skills.

The newest book in The Bounds trilogy, The Untouched, can currently be found as an ebook at both Amazon and Barnes & Noble The print version will soon be available. Check back here, or on Jeffery Moore's website for updated information.

The first book in the The Bounds trilogy, The Keepers , can be found at Amazon, Barnes & Noble, Smashwords, CreateSpace, and Sony ReaderStore

The second book in The Bounds series, The Lylia , can be found at Amazon, Barnes & Noble, CreateSpace, Smashwords, and Sony ReaderStore

September 19, 2011
On Writing and Publishing: A Writer Shares Her Limited Knowledge!
Ebook Formatting
 This section is where you're going to be really grateful that you used the formatting as outlined in Section 1. It will save you a bunch of time in undoing formatting for your ebook. If you haven't done that, you can undo all formatting by clicking Home>Styles>Clear All. Keep in mind, though, that this will remove your bold, italics, and other special formatting that you may want to keep. The better way is to go through and remove all formatting by hand (make sure you turn on the show formatting marks to see what you're doing). You can use the Find and Replace feature as well. For example, ^t is the symbol for tabs. So you can Home>Replace, type ^t in the find box, and leave the replace with box blank to remove all tabs. (Don't know what the symbols are? They're easy to discover. Replace>Special gives you formatting options to remove.) Leaving the replace with box blank deletes the specific formatting, or you can replace it with a different kind of formatting from the same place.
Ebook formatting is completely different than any other formatting. The reason for that is that the words show up completely different on an ereader. If you've ever read anything on an ereader you know what I'm talking about.
Most ereaders give an option for making the font larger or smaller (which is great for those of us too lazy or prideful to get our glasses out when reading). Obviously, if a document was formatted with full justification it would really look screwy, because it can't reformat itself and continue to retain the full justification. What that means is that when the font size is changed, you might have one word on a sentence by itself because it's pulled part of the previous sentence down to make room on the previous line for the justification. So for an ebook, it's always going to be left justified.
You cannot have any breaks between chapters, because if someone has the font enlarged, this will create many blank pages. You don't want someone so frustrated by trying to read your book that they either don't finish or leave you a bad review. This is also why you use returns to create new paragraphs, and not the "tab" key. It is suggested to not have more than 8 returns to stop from creating blank pages, but it is suggested to only use 4.
Cutesy, unusual fonts won't translate, and neither will drop caps. If you prefer something to make the beginning of the chapter stand out, bold the first three words. Use a basic text such as Times New Roman (recommended), Calibri, Arial, etc. Centered text will also look strange, so put your chapter headings to the left. If you have something such as a letter or dream in your book that you've formatted to be indented, un-indent the right side. You can leave the left side indented, however I suggest you keep it small (.2) so that on an enlarged text screen, it won't be pushed so far to the left. If you have a poem, you can keep it centered, though on enlarged text it might only have a few words per line.
Here is the specific formatting for your ebook in Word. As always, begin with a copy of the original manuscript, and turn on your show/hide to make sure your formatting is correct. 1. Turn on the hide/show feature!!! Otherwise, you may as well be formatting with your eyes closed. 2. Front Matter: The only thing you should have at the beginning of your ebook is your title page and the copyright page. You can add a few short reviews also if you want to try to appeal to those who are downloading the sample, but keep them short and place them before the title. Make sure these are true reviews, never falsify unless you have a desire to destroy your career. Move ALL other front matter to the end of the book, including author's notes, acknowledgments, about the author, etc. Nothing annoys ebook readers more than having to shuffle through a bunch of pages to get to the book a. Your copyright page should be different for each format as far as reflecting the platform you are uploading it to: "Smashwords Edition" for a Smashwords ebook, "Kindle Edition" for a Kindle ebook, etc. b. Make sure you are using your ebook ISBN, not your printed book ISBN 3. Page>Page Layout a. Margins: 1" b. Paper Size: Letter 4. Justificaton a. Left justify the body of the text b. Center your title and copyright page i. Change your © to read copyright, as some converters may not be able to read the code correctly, and will put a question mark in its place. 5. Font a. Body: 12pt Times New roman b. Title, chapter titles: 14pt Times New Roman, Calibri, Arial, etc. 6. Paragraph Formatting You can choose whether to keep your indented paragraphs (auto indented, never with the tab key) or you can choose block-style paragraphs where there is no indent, and there is a space between paragraphs. Both look equally well on an ereader. However, if you're going to do the block style, don't use a return to create the space, use Page Layout>Spacing. Set either the before or after (not both) at 6 pt minimum and 10 pt maximum. Never use both types of paragraph formatting together. It looks really strange. a. Block Style Paragraph i. Home>Paragraph 1. Alignment: Left 2. Indentation: 0 on all 3. Spacing: Before: 0, After: 10, Line Spacing: Single (or 1.5 max) 4. When formatting a poem, for example, for this style change the spacing to 0, and change the indentation to .5 - .75 to center the poem. b. Indent Style Paragraph i. Home>Paragraph 1. Alignment: Left 2. Indentation: 0 on all 3. Spacing: 0 on all, Line Spacing: Single (or 1.5 max) 4. Tabs>Default Tab Stops: .25 or .3, Alignment: Left, Leader: None 5. When formatting a poem, for example, for this style change the indentation to .5 - .75 on left and right to center the poem. 7. To Separate 2 paragraphs, simply return twice or use something such as **** or ^^^^ 8. To Separate 2 chapters, use 4 returns (more, and you risk leaving blank pages, definitely 8 is max) 9. Remove all headers and footers 10. At the end of your ebook, feel free to link to other versions of your book, or to other titles you have available, including your website, blog, FB, Twitter, etc. So, now you've formatted your print book, and your ebook. What next? Well, now it's time to publish. But, we'll save that for next time. :o) Use the links below for further and more comprehensive instructions on formatting for your ebook. And, as always, have a happy week! http://www.cjs-easy-as-pie.com/ http://www.smashwords.com/books/download/52/1/latest/0/0/smashwords-style-guide.pdf http://daiya.mvps.org/bookword.htm http://jakonrath.blogspot.com/ http://www.isbn.org/
September 13, 2011
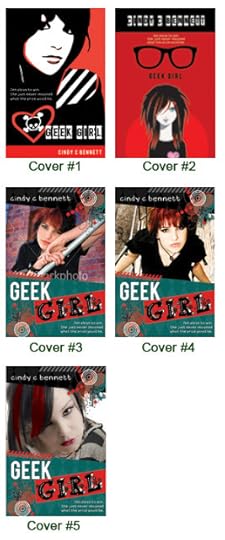
New GEEK GIRL Cover Contest
My publisher, Sweetwater Books, has given me the top 5 choices for the new cover for Geek Girl. So now I'm leaving it up to you, my friends, cohorts, and readers. Vote using the form below for your favorite! Everyone who votes will be entered in the contest no matter which cover is the final cover chosen. The winner will receive a signed copy of Geek Girl when it is released December 8th.
Contest ends at midnight, Sunday, Sept. 18.
 <p><p><p><p>Loading...</p></p></p></p>

Contest ends at midnight, Sunday, Sept. 18.
 <p><p><p><p>Loading...</p></p></p></p>
September 11, 2011
My Interview with Author Karey White
 Tell us a little bit about yourself:
 I'm a wife to one, a mom to four a sister to ten, and a daughter to two. I love creativity and have to reign in my desire to try every crafty thing I see. Writing has helped me with that. I try to channel most of my creative energy into my writing. I love to read and write. I love to cook and I've set a scary goal to run a half marathon next year.
At what point did you decide you wanted to become a writer, and why: I decided in High School. I loved my creative writing classes in High School and college and was encouraged by teachers to continue writing. I love words and literature. Then I got married and had my children and the idea got pushed aside. But it didn't go away. It sat there stewing for years. The year before my youngest child started school, my family gave me an online writing course to give me a little jumpstart. Then when Joe started school, I started writing.
When you are writing, where are you, and what do you have with you? I write on the computer, either at the desk or on the couch. I'm usually alone, except for Pepper, our Great Dane, who lounges somewhere nearby. I like it pretty quiet when I write, so I don't listen to music. If I'm really in the groove, I have to remind myself to stop and eat. If I'm in a rut, I have to remind myself to stop eating.
How do you write: outline or seat of your pants, and why? I just start writing. I've written down a few ideas in the past, but most of the time I just write. Rewrites and revisions are a big job after this kind of writing, but I find that for me, it flows better this way and I feel free to take it where it seems to want to go.
Do you see writing as a career? I see being a homemaker as my career. I see writing as a bonus that I'm lucky to be able to do. That's not to say that I wouldn't love to make it a career if the stars aligned right.
What are your hobbies outside of writing? I enjoy cooking and baking. I love to read and never have enough time to read all I'd like to. I love traveling and spending time with my family. If there was a way to make a career out of traveling the world with my family, that would be fabulous.
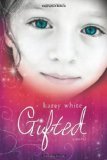
Tell us about your inspiration for Gifted: Our neighbors were an older couple who took in their wayward grand-daughter. She got pregnant and just a few weeks before she was to have the baby, she was killed in a drunk driving accident. They managed to save the baby, so my neighbors had to find a home for this little baby. I was worried about them and thinking about their situation when I went to bed one night. During the night I had a dream about the baby. In the dream, she was an unusual baby with unusual gifts. When I woke up the next morning, I couldn't stop thinking about this dream and what it would be like to have a baby like the one I'd dreamed about. That's where the story came from.
What was the hardest part about writing Gifted? The emotions. It was a really emotional experience writing about Anna and Susan and Kelsey. They felt like real people to me.
Gifted does not have the happy ending that many might expect from a novel. Were you tempted to change that, and give it the fairytale ending, or did you always know how it was going to end: It went where it was supposed to go and that was the hard thing. I wished I could give it a fairytale ending, but I knew I couldn't. However, even though there is heartbreak, there's also hope and joy and something beautiful and good comes from that sadness.
What are you working on next? I'm just finishing up For What It's Worth. It's a romance about a girl who owns a wedding cake shop. I've also started The Husbandmaker, but it's still an infant.
You can visit Karey and learn more about her projects and her life at http://kareywhite.blogspot.com and follow her on Twitter. Get her book, Gifted, by clicking on the book cover below:

September 6, 2011
On Writing and Publishing: A Writer Shares Her Limited Knowledge!
Formatting: And You Thought Editing was a Nightmare!
Part II: Formatting for Your Self-Published Physical Copy
This section assumes you've decided to publish yourself, and it's time to get your manuscript ready for print. Of course you're formatting one of your copies, right? Leave the original as is—always.
For the sake of ease, let's also assume the trim size you've decided on is 6" x 9", a pretty standard paperback size. This is also given as it would be used in Word 2010. If you have an earlier version, you may have to search a little to find the same commands, but I promise you will find them. You will now be turning back on many of those things we turned off in the first section of formatting—plus some you've probably never even touched.
1. Page Layout>Page Setup
a. Paper: Width: 6", Height: 9", Apply to: Whole Document
b. Layout: Section start: Odd page, Headers & Footers: Checkmark both boxes. Leave them set at .5" (you can change this later if you want it different)
c. Margins: .5" on all sides, Gutter position: Left, Gutter: .75".** Multiple pages: Mirror margins
** Whichever POD you decide to go with, read their specific requirements for trim size and page count
2. Page Layout>Paragraph
a. Indents and Spacing: Alignment: Justified; Line spacing: Single
b. Line and Page Breaks: Everything UN-checked, except for Don't Hyphenate (unless you don't mind having hyphenated words in your book, in which case you will also uncheck this)
3. Page Layout (Setting your section breaks)
a. By now you should have your title page, your front matter, dedication page, and any other pages that you wish to have included in your book.
b. In this area you will see a button called "breaks". Click on the arrow to the right of that and you will see all of your break options. You will always use section breaks. Anywhere you have a "page break" you need to delete it and change it to a "section break". If you went with multiple returns, you will also delete those and replace them with a section break. The section break is placed right after the final period or letter of the page which you are breaking from. Below are the specific breaks you'll use for each section.
i. Facing title page: If you choose to have a facing title page, under "section breaks" choose "even page". It will place a blank page first then your facing page will be on the backside of that blank page.
ii. Title page: The section break before this will be "odd page". Formatting font for your title should be larger than your name, and this is where you can get fancy with your fonts and design. Generally the title font will reflect the title font on the cover. You can add a line or design after the title, a border . . . whatever you want, just make sure you don't overcrowd the page. The title should be centered horizontally, and either centered vertically or just above center with your author name just below
iii. Copyright page: This will be on the backside of the title page, and so should begin with "even page"
iv. Dedication page: "odd page" puts this opposite the copyright page
v. Contents page: "odd page" put this on the right side, with a blank page on the left
vi. Preface or acknowledgements: "odd page" whether at the beginning or end of the book
vii. First page: always "odd page" to begin your book on the right side. Never have it begin on the left—it will look and feel odd to your readers.
viii. Following chapters: this is a personal choice. I prefer each new chapter to begin on the right side, so I always choose "odd page". If you don't care which side your chapter begins on, then choose "next page". It is essential that you use a section break between each chapter in order for your page numbers, headers and footers to appear correctly.
** Make sure that at the end of each paragraph you've deleted the page break or the returns you've entered. The new break always goes at the last word of your paragraph.
4. Font
a. Home>Font: This is where you can play with the font, and decide what you want your text to look like. It's suggested you never use larger than 12pt for a chapter book or smaller than 10pt—and only use that if it's a larger-type font. You're not going to want to use anything too fancy, or difficult to read. Keep it fairly basic: Times New Roman, Calibri, Cambria, Arial, for example, or another serif font. Definitely do whatever font you really love—as long as it's readable at a small font. Not sure? Print a single page and see how it appears.
5. Chapter Titles and Headings
a. If you want to add chapter titles, make them all uniform font and size.
b. If you want to add drop caps at the beginning of the chapter, this is done on the "insert" tab under "drop cap". Make sure you use dropped, rather than in margin. It defaults to 3 lines, but you can make it as many or few as you want with the options. Make them all a uniform font size.
6. Returns at the Beginning of a New Chapter
a. There's probably an easier way to space all your chapters the same distance down the page, but I don't know what it is. This is how I do it: After you've added a section break, it will place your cursor at the top of the next page. Hit return however many lines it takes to place your chapter beginning about 1/3 of the way down the page (I use 8). Make sure you use the same amount on each chapter beginning.
7. On Orphans and Widows
a. Orphans are when there is a single sentence from a larger paragraph left at the bottom of a page; widows are when there is a single sentence from a larger paragraph sitting by itself at the top of a page. This is not speaking of a single sentence that is not part of a larger paragraph. Those are fine, no matter where they land. Orphans and widows, in this case, are unattractive and generally considered a no-no. How to get rid of them? Let me begin by telling you how not to get rid of them. Earlier, in basic formatting, this is one of the boxes in Paragraphs>Line and Page Breaks that you were told to make sure is unchecked. Keep it unchecked or you will have pages with uneven sentence numbers, which looks even worse than orphans and widows. Once you have completely finished all other formatting, and you're happy with the layout, go to the beginning of your story. If you see an orphan or widow, add a few words, an extra sentence, something that will push the widow or orphan back together with another sentence. This little thing can become quite time consuming, as getting rid of an orphan on one page may create one on the next page. So be very careful with this piece of formatting. The reason I tell you to wait until the end is that if you don't, and then decide to change some small aspect of your formatting, you might create new orphans and widows after having rid yourself of them all. If they don't bother you, then just skip this whole step (other than making sure that you keep the Orphan/Widow box unchecked).
8. Numbering Pages
a. Word has many options for numbering your pages, which is great for those with a creative bent. Under "Insert" you will find a tab called Header & Footer, with a button called Page Number. For a book, you will generally want the page number at the bottom, though again that's a personal choice. Page numbers should not begin until the very first page of your actual story—in other words, no page numbers on any of the title page, front page, dedication page, etc.
b. When you add the page numbers, it will open up a design tool for the headers & footers. Set how close you want the footer to the edge of the page (.5 works well)
c. Make sure all 3 boxes ("different first page", "different odd & even pages", "show document text") are checked.
d. On the navigation tab, click on "link to previous"
9. Header Title/Name
a. Some books have nothing in their header, some have the book title on one side and author name on the other, some will have book title on one side and chapter name on the other. This is another one of those personal choices. Pull out some of your personal novels and see how it's been done in some of them, and which look you like the best.
b. Double-click in the header area, and this will again open the design tab. Make sure it is set as explained above, and decide how close you want your wording to the top of the page. I set mine at .1
c. This is where it's extremely important to have those 3 boxes under the options tab a checked, and to have section breaks rather than page breaks in order to have no header on the first page of each chapter, and a differing text on your odd and even pages. If you use page breaks, you cannot format your headers and footers correctly.
d. On the very first page of your story (again, not the title or any of the other pages), don't type anything. This will keep the first page of every chapter blank, which looks much better than having some random typing on the top of the page, taking away from the clean look. On the second page of your story, type whatever information you want to show up on all of the even, or left side, pages. For example, say you want your title to be on the left. Type it on that page and it will show up on all of your even pages. Type your name on the right, and it will show up on all your odd pages.
Now that you're all formatted, you're ready to save it as a PDF. This is the required format for publication. This is simply done with the "save as" feature under File. Change the Save as Type to PDF. Once you have the PDF you need to go through the whole thing, word by word. Check for spelling, grammar, punctuation, and particularly formatting errors. Your manuscript looks completely different in this format, making it easier to see things you may have missed before. Once you've gone through the whole thing, walk away for a few days, then go through it again. See if you can get extra sets of eyes to go through it for you as well.
There are some templates that you can use to format your book. I have never used one so I can't give an opinion as to how they work. I'm sure there are also services to do this for you. For me, I prefer to do it myself, so that if it's wrong, it's on my head. Either way, there are options available, so I wanted to give you a few links for that.Self-Pub.NetSelf-Pub.Info BookLoops
Adobe
ScribusWizards for Word
Also, here are some sites with great info on formatting, which you may find more clear and concise than what I've written, or complements what I have here.12 on 14 Pothi
New Self-Publishing
Daiya MVPS Bookword
Daiya MVPS IndexAs always, joyous formatting, and have a happy week!
September 2, 2011
Interview with Mandi Tucker Slack
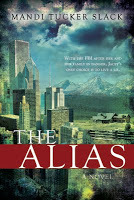
 Mandi Tucker Slack is the author of The Alias.
 You can meet Mandi in person, and get your own signed copy of her book this weekend, September 3, at Pioneer Book - 858 South State Street, Orem, Utah from 1-3 pm
The Alias: After a long and difficult divorce, Jacey thinks the worst is over. Little does she know she'll soon be forced to go undercover to protect her family, and in the process, she'll risk losing her identity, her future, and her heart. With a lightning pace, a good dose of humor, and a plot that's full of suspense, this thrilling novel is an edge-of-your-seat read.
Tell us about yourself:I'm a mom of three great kids. I have two boys, ages 6 and 5 and a little girl, who is 2. I've been married for 11 years and we love living in Utah. I grew up in Emery County and I feel very blessed for the memories I have. I love the desert and mountains, and I've been interested in everything from archeology to paleontology…and I could go on and on. Really, I just love the outdoors. One of my favorite hobbies is collecting and searching for fossils in the desert and surrounding areas. I also grew up frequenting museums and accompanying my parents on archeological digs in the San Rafael, and I love to incorporate my hobbies and interests into my writing. I love spending time with my husband and children and we spend most weekends rock hounding or exploring new places as a family.
When did you first start writing? As a young woman I loved to read. I devoured books and little-by-little my interest in writing developed. I wrote my first full-length novel when I was 12 years-old. It's terrible, but I've held onto it through the years because, really, I am very proud of that tattered manuscript. Writing my very own adventure story was such a thrill, and since that time, I've always aspired to become a published author. Unfortunately, as I grew older, time became scarce and my writing fell to the background. Then, about three years ago, my husband returned to school and in the evenings while he attended classes, I wrote. I finished my first novel, The Alias, during his first semester. Not long after, I decided to take a chance and send my manuscript into a publisher. I had to work hard to see my dreams realized, but I don't regret a minute of my time spent.
Tell us about The Alias:Jacey Grayson is a recently divorced mother, who learns some frightening news about her ex-husband, John. Frightened, she and her son Blaze flee to Utah to hide among rural Mormons.
Is there a message or theme that you wanted to convey in this novel?
The main theme in The Alias is Jacey's attempt to overcome years of abuse and develop a sense of who she really is. As the story progresses we see her desire to change and grow. She struggles with feelings of guilt and remorse for staying with her ex-husband so long and exposing her son to abuse, but as the story progresses we also see how she uses the lessons from her past to move forward into a more promising future.
What is your favorite hobby besides writing?Rock hounding. I love to search for fossils and minerals. I spend most weekends in the desert or mountains looking for new rocks or fossil locales.
Do you see writing as a career?
I would like nothing more than to become a career author. I love to write novels. I have so much fun developing new characters and creating fun, suspenseful stories. Writing is just a part of who I am. I have several manuscripts, all in various stages of editing, and one day, I'd like to see more of my books on the shelves. Writing is a lot of work and very time-consuming, but it's worth every minute. One of my greatest rewards has been the feedback from my readers. I'm so touched when someone tells me that they could relate to my characters or that my writing has touched them.
What was the hardest part of writing your book?
I think the hardest part of writing is simply finding time and…commas. I hate commas. I'm not sure why, but correct comma use is beyond my comprehension at times. I feel bad for my editor.
 Get your copy of
The Alias
today Learn more about this amazing author at MandiTuckerSlack.com or on her blog Mudrock and Pink Nail PolishFollow her on Facebook, Twitter, Goodreads
Get your copy of
The Alias
today Learn more about this amazing author at MandiTuckerSlack.com or on her blog Mudrock and Pink Nail PolishFollow her on Facebook, Twitter, Goodreads
September 1, 2011
On Writing and Publishing: An Author Shares Her Limited Knowledge! Part IV
Formatting: And You Thought Editing was a Nightmare!
Part I: Basic Formatting
As I was writing this section, I realized how long it was getting when I'd hit 6 pages on Word and had only gotten as far as formatting for your paper book. So I decided to divide it into 3 sections to make it an easier read.
I: Basic formatting II: Formatting for your self-published physical copy III: Formatting for your ebook
Now that we've covered the absolute joy that is editing, we can move on to formatting. Insert big, dramatic sigh here. Why? Because formatting can be frustrating, and time consuming. However, there are some tricks that will help make this less painful. Unfortunately, those tricks are something you needed to do before you began writing.
Thanks for telling me now, you're thinking. But I figure you have already completed—or at least mostly completed—you manuscript before you began searching out information about editing, formatting, and publishing. Just to keep everyone happy, though, I'll go back and add a note to the first of these posts letting future writers know to come here first.
The main thing is to begin by removing most formatting rules before you begin writing. This is because once you've finished your manuscript then you go in and remove all formatting it also deletes all of your italics. Then you've gotta try to remember where they were, or make a copy of your manuscript before removing formatting, then go back through and add them back in. The other option is to go through and remove each piece of formatting. I personally think both would be just as time consuming as the other.
The reason for using loose formatting when you begin writing is that it's much easier to go back and add formatting than to try to remove it. I'm going on the assumption that now, or at some point, you will be submitting as an ebook. It requires a very different kind of formatting, so that's why we begin with the loose formatting.
Let me begin by saying this all refers to Microsoft Word. This is the program I use, am familiar with, and is probably the most used program by writers because it is so accessible. Of course, if you have a Mac, then this section may not help you—other than that most of the rules are probably the same. If you have a PC, and don't have Word, invest in a copy now! Notepad just isn't going to do it for you. This is also mainly for those of you who think you may decide to go the self-publishing route. If you plan to try to find an agent, and then a publisher, then formatting may not be quite as important, other than you'll want it to look as good as possible when someone does read it. If it's a mess, it may hit the slush pile before the potential agent/publisher gets to the good part of your story.
So, here are the nuts and bolts of how you want to set up word before you begin. We'll get to re-formatting soon enough. If you're doing this on a document which you've already started, then place your cursor somewhere in your document, and hit CTRL+A. This selects all of your text, and will apply changes to the whole document.
Before you do one single thing on formatting, turn your formatting marks on, otherwise you may as well be formatting with a blindfold on. Sometimes Word is tricky—what you see is not always what you get. No matter what step in the formatting process, you should always have this on. Of course you won't want it on when you're writing—that would be annoying. But you MUST have it one for anything formatting. How do you do that? you ask. Easy peasy. Find the little button at the top of your page that looks like a little paragraph mark. On Word 2010 it's in the third pane over on the home page. On all you can find it under "options". On all of them it looks like this: ¶. Keep in mind you need to set everything like this, no matter what size of book you'll do later. We will go over specific formatting later.
1. Paragraph (in 2010 this is under Home)
a. Indents and Spacing: Alignment: Left, Indentation: Left, Special: First Line, by: .25 or .3, Spacing Before and After: 0, Line Spacing: Double
b. Tabs (bottom corner of dialog box): .25 or .3, Alignment: Left, Leader: 0
c. Line and Page Breaks: Everything should be unchecked except: Don't hyphenate
2. Page Setup (in 2010 this is under page layout)
a. Margins: 1" all sides, Gutter: 0, Gutter position: Left, Multiple Pages: Normal
b. Paper: 8.5" x 11"
c. Layout: Section start: New page, Headers and Footers: everything unchecked, both set at .5", Vertical alignment: Top
3. Proofing, or Word Options (in 2010 this is under File>Options)
a. Proofing: This is something of a personal thing. Whatever auto corrections you want Word to make as you type can be set here.
b. Save: You can set your Auto-Recovery here. I suggest it be set for no longer than 10 minutes. 10 minutes of work lost is better than 10 hours of work lost.
c. Advanced: Again, most of this is personal preference. The exception is for Cut, Copy, and Paste. On this, I suggest you change Pasting between documents and Pasting from other programs to: Merge Formatting. That way you don't have to reformat something you've copied & pasted from somewhere else to match your formatting.
d. This is also where you can customize your ribbon and toolbar.
4. Specialized formatting: If you have somewhere within your text a letter, or note that you're showing, you'll want to italicize it, then highlight the specific paragraph and format it as follows:
a. Paragraph: Indents and spacing: Indentation: Set Left and Right the same, usually 1" works well
If you have a dream sequence, you should italicize it, but keep the paragraph boundaries the same as the rest of your text.
5. Extras: Make sure you've added all of your extras (which should probably be done when the manuscript is completed and not before):
a. Facing title page: this is where you can list previous works. If you have no previous works, you can omit this and just begin with the title page
b. Title page: Full title and author's name. If you are self-publishing, and have created a "publishing company" you can list that at the bottom of the page. The title should be centered horizontally. No punctuation on this page, unless it's a specific part of the title, or your name (example: M.D.).
c. Copyright page: This is an important page! You don't have to go out and apply for a specific copyright. Books are considered the intellectual copyrighted property of the author and/or publisher without any official copyright. Make sure you use the © symbol, year, and your name. Example ©2011 Cindy C Bennett. You also put your ISBN on this page. Your ISBN will be different for a paper book and an ebook, so you will want to just put the letters for now, and add the numbers later as your format for each type of book. Any credits for the cover design or cover photos belong here. Most books will also use this page for "Printed in the United States" or wherever you are having it printed.
d. Dedication page: This is where you dedicate your book to the nice person who wrote a blog teaching you how to format! :o) All right, fine, go ahead and dedicate it to someone you love/admire/are grateful to.
e. Contents page: This is completely optional, and will depend on whether you want it in your book, or not
f. Preface or acknowledgements: If you want a preface, it goes here. You would then want to put your (optional) acknowledgments page at the end. If you have no preface, you can choose to put an acknowledgments page here, or at the end. Or nowhere, if you don't want one.
6. ¶ You've turned this little guy on, right? If not, do it now. You page will suddenly be filled with all kinds of strange marks. This is good; it means you've done it right. Now, you need to go through your entire manuscript looking for inconsistencies in your formatting if you've already finished the manuscript, or are even just a few pages in.
a. The beginning of each paragraph should have this exact same mark ¶ (called a pilcrow, if you care). It should never have an arrow. An arrow is caused when you've returned/entered, then manually hit tab rather than having your document formatted to automatically tab for you. If there is an arrow, you haven't set up your formatting correctly. Set up your Indents and Spacing (below) then back space all those arrows out. A note: if you are using numbering or bullets for something, it will show an arrow between the letter/number/symbol and your text. That's the way it should be for that.
b. There should be no more than ONE dot between each word. It looks like this: · sort of a period hanging mid-air. If there is anywhere you have two or more, remove those spaces. Former college student who was taught to put two spaces between sentences? Change those habits now! It looks bad in a book to have more than one space between words and/or sentences.
c. The end of each chapter should have no more than 8 hard returns. This will show as 8 of the pilcrow (or paragraph) marks. DO NOT put in page breaks, section breaks, or anything else at this point. If you can't stand not having the page breaks, that's fine. Just know you'll have to go back and undo them all when you are formatting for ebooks, and change them to section breaks when formatting for a paper book.
d. Keep this feature turned on as you are doing specific formatting as well.
So now you have your basic formatting. And that truly is basic formatting. Save** your document then make a copy of it (you'll have to go to your documents folder for this step). The basic formatting is going to be the preferred formatting of most agents and publishers. However, if you are going to submit, read their specific formatting requirements first then format your copy accordingly. Once this is complete, you're ready for specific formatting.
**A note on saving: Give your doc a name at the very beginning, when you first start, and train yourself to hit CTRL+S as often as possible, preferably every 10 minutes. Save yourself the heartache of a crash or shutdown that loses your manuscript!Have a happy week, and a joyous formatting experience!
August 26, 2011
An Interview with Camelia Miron Skiba

Tell us a little about yourself:
I'm Chris' wife, Patrick's mom and Bella's owner. During the day, I'm the assistant to the Director in SESE at Arizona State University, and romance's slave at night. I'm also Hidden Heart's author, which is my debut novel.I moved to the U.S almost eight years ago, following my heart and the man who stole it. I love comedies, historical dramas and happily-ever-after stories. English is not my native, not my second, but my third language (Cindy once told me it sounds like I have a disease…). Each year I participate in one big event that requires me to train. My biggest sportive accomplishment was the 3-day 60 miles Susan Komen Walk. Annually I pick a color I decree my favorite (this year is salmon). I refused to text until 2010, always preferring to hear voices rather than sending emotionless messages. Politic bores me to death and I have no tolerance for arrogance. At what point did you decide to become a writer? Was there someone or something that specifically inspired you?Summer of 2009. I'll never forget, driving down the road with Patrick, my son one day and talking about childhood dreams, the need to fulfill them, the need to dream more even as adults. He told me his, I told him mine. I told him one of my childhood dreams was to write novels. I also told him about all the heroes I had in my head, and their incredible stories. But I also told him I doubted myself. My heart drummed in my chest, fearing my own son will think I'm crazy. He listened and said, "I know you can do it, mom. Just sit at your desk, and write. Whatever comes to your mind, just put it on the paper." And for some inexplicable reason, I did as he suggested. He trusted me I can do it. Probably I could disappoint someone else, but not my son. Fast forward to March 2011, I held in my hands my debut novel "Hidden Heart." Where are you when you are writing, and what implements/addictions do you have with you when you're writing?In a lavander guest room. I have a table set up by the window, with green palms waving their green leaves at me, several books (dictionaries, grammar, etc); a few trinkets (three bears, two elephant candle-holders and a rare round stone). I need complete silence when I write. I love my milk with coffee (yes, you read correct—it's milk with coffee and not vice-versa. It takes a cup of coffee divided in 4, then add milk to the brim and drink one hot cup at the time, until about 2pm). You were born in Romania, and now live in the US. Tell us about your journey from one country to another and all the places you've lived: Before I moved to the U.S. in September of 2003, I lived in Austria, Germany and Hungary. Love took me to Austria, work to Germany and month-long vacations to Hungary. Then I returned to Romania for about five years, before love found me again. This time it brought me here to the States. In looking back, I realize that every single place I've been to, its people, its traditions, culture and language, every memory helped me create characters with different backgrounds and lifestyles, adding spices to the story. Aside from the romantic tone in my novels, my heroes are always coming from different countries. I use English as the books' language not necessary because it's my adoptive tongue, but because no matter where we travel in the world, English is the catalytic, love's language as I like to call it. Your book, Hidden Heart, is written in English, even though that isn't your native language. How difficult was it to write an entire novel in English? Oh, boy! Ask Cindy J! She probably scratched her head so many times trying to decipher what my sentences meant. I never looked at it as being difficult. English just comes to me so easily; I dream in English, I think in English. Can't tell exactly when in happened (the transition from thinking in Romanian to English), but it's so natural now (my mom asked me to write my books also in Romanian so she can read them. I told her maybe when I retire LOL). Humor aside, I try to expand my vocabulary on a daily basis. Not only expand it, but also find antonyms and synonyms for words. Verbs are my weakness. Tell us about Hidden Heart. What is it about? Where did you get the idea for the novel? Believe it or not, I cringe when people ask me this question. Because I know that I have about 30seconds to say something so interesting, that the person who asked is intrigued enough to try to find more, and eventually want to read the book. So, begin the countdown: 30- 29-28… Hidden Heart is a multicultural women fiction novel, with a strong romance influence. Did I put you to sleep? Just checking. If not, it's a tale of love, betrayal and friendship. A woman's journey to forgiveness and redemption. A man's fight for a second chance. Dark secrets threatening to destroy everything and more. I'd say more, but the 30 seconds are up J Hidden Heart deals with some heavy subjects, including living with the aftermath of violence. How difficult was it to write those scenes of violence? How did you decide the way your heroine was going to overcome her challenges? This subject used to be a sore one for me. I grew up in a society where violence was and unfortunately still is considered a matter of fact—parents beat their children, teachers spank their students, husbands abuse their wives. I was no exception to the rule. I have memories of my father's belt, my teacher's ruler and my first husband's fists. When someone grows up like this, there are only two ways to come out of it: either accept it and live a miserable life, or revolt against it and stop it. Tessa, my heroine represents my victory against violence. It's my healing miracle. Regardless of how many other books I'll write, Tessa will always have a special place in my heart, and if her story can touch at least one other woman, giving her hope through the healing process, then I did my job. What is your next project?My next project is called "A World Apart", coming out (I hope) in December 2011. It's a multicultural novel that, while set in the middle of the Iraqi war, is about the romance between two opposites. Maj. David Hunt is an American doctor in the US Air Force, and Lt. Cassandra Toma is a Romanian doctor in the Romanian Army. Fate has them both deployed to the M. Kogalniceanu (try to say this word, please) Joint Air Base shortly after Saddam Hussein's execution. They meet. They clash. A forbidden passion consumes them with the intensity of an erupting volcano, leaving her heartbroken and him with tarnished honor and pride as an officer. The only way out for David is disappearing into the dangerous warzone in Kirkuk, Iraq. Their flame was supposed to be over when destiny brings them back under the same roof, this time with a common goal—to find Cassandra's brother, Maj. Robert Toma, kidnapped by insurgents while on patrol. To rescue Robert, Cassandra and David put aside their resentments, uniting forces against a common enemy. Trying to forget the painful past, Cassandra opens up to give David—and their love—another chance. What she doesn't realize is that her anguish is the result of David's impetuous action—one reckless choice he made for which she may never forgive him.His mistake, his secret, could cost them both the love they've finally found. Why did you choose to self-publish over going with traditional publishing? Simply put, I'm a control freak. I decide the format, the cover, the edits. Don't get me wrong; I have a lot of admiration for a lot of agents. It must be as hard for them to sell a book, as it is for us, the writers, especially with the way the economy, in particular the book industry threads murky waters these days. I follow several of them on a daily basis. But my time is as precious as theirs and life is too short to sit around and wait a rejection letter when I can self-publish, hold my book in my hands and move onto the next one. I have way too many stories in my head, but not enough time to write them all, even less time to wait for THE CALL. You're marooned on an island. What three inanimate objects must you have with you for your survival and/or sanity? Only a gallon of Haagen Dazs ice cream (vanilla with Swiss almonds). I won't survive the first night since I'm scared of darkness. But I'll die happy. Thank you for inviting me, I really had fun sharing glimpses from Cami's land with you. You can find more about me at www.CameliaMironSkiba.com Find Cameila on:


Purchase Cami's current novel Hidden Heart on:


Want Hidden Heart FREE? Sign up for Cami's GoodReads Giveaway here!
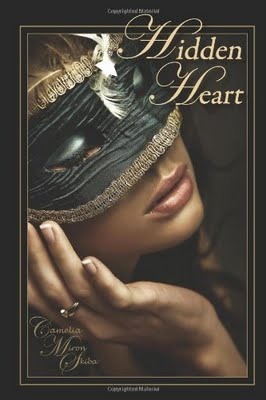


