
Donna Smallin Kuper's Blog: The One-Minute Organizer Blog, page 4
December 2, 2019
3 Steps to Reclaim Your Once Orderly Home
 Photo by Johnson Wang on Unsplash
If you’re feeling overwhelmed by your less than orderly home, you’re not alone. There are many stories – all variations on a single theme. Once upon a time, everything was very organized.
Bills were paid on time, incoming mail was handled in a timely fashion, and errands accomplished. Laundry was done regularly. Things were put away when not in use and everything had its place. Then there was a death, divorce, or other loss. Maybe you or a family member got sick. Or, in addition to taking care of your own life, you were taking care of your parents’ everyday lives, leaving you little time for your own life.
Whatever the story, the result is generally the same. Something happened to upset the balance within your orderly home and you never quite recovered any sense of equilibrium.
Step
1: Take the Blinders Off
When’s the last time you really looked at your surroundings? Many of us go through our home with blinders on. We think we know what’s there, but we don’t REALLY see it. Or we see things getting out of hand, but we make a mental note to get after the mess on our next day off.
When the blinders come off, we suddenly see what’s right in front of us. And yes, it can be quite a shock to see that our once carefully organized and tidy home has become overrun.
Perhaps your kitchen counters are piled with unopened mail, unread magazines, unsorted papers and unfinished tasks. With no clear space for meal prep, cooking is a challenge and you’ve resorted to take-out meals.
Or maybe your den or guest bedroom is now full of extra furniture or other stuff you inherited from your parents. You didn’t know what to do with it, so you moved it into your home – YIKES!
What happened to cause the organization in your home get sidetracked? If you were once very organized, it’s hard – painful even – to look around and admit that you are not at all organized. The good news is that if you were once able to maintain an orderly home, you can do it again.
Step 2: Reclaim Orderly Home Habits One at a Time
How do you regain your footing? Where do you start? Honestly, since the disorganization didn’t happen overnight. It cannot be turned around overnight either. It probably started with letting go of one routine or system after another until there were no more routines or systems to follow.
For instance, if your habit was to deal with the mail every day after breakfast, start with that. Pick up a pile of mail. Sort it into three piles: Shred, Recycle, or Deal with.
Then look at each piece of mail in your “Deal with” pile. Label and sort each one with the next action you will take. Is it a bill? Label it PAY. Does it require a phone call? Label it CALL. Is it an email? Label it EMAIL. Is it a document to file? Label it FILE.
Now, schedule time to do these things in your planner or calendar. If you only have one or two phone calls to make, consider doing them right away. That would make one less task to schedule and one more thing accomplished.
If you do this every day, the piles of mail will disappear, and you will feel more in control of that aspect of your life. By the way, it also helps to reduce the amount of unwanted mail coming in by opting out of delivery.
Step 3: Assert Yourself Over Clutter
I have a friend who only keeps magazines for one month. Her rule is that if she hasn’t read a magazine in 30 days, she will take it to the doctor’s office and let the people in the waiting room enjoy it.
To reclaim your orderly home, assert yourself by setting some personal rules for how long you will keep things like magazines. If they are more than one or two months old, why not recycle them or pass them on to your library, senior center, or doctor’s office?
Every little bit that you can do will clear space. Focusing on one area at a time, like the mail, helps you practice one habit at a time.
As you become comfortable with that first orderly home habit, pick another habit to re-institute. Look around your home and decide where you want to focus your efforts. Be kind to yourself. Give yourself the grace to get back in control of your home one small space at a time.
Before you know it, your home will once again be neat, tidy, and organized.
###
Diane N. Quintana is a Certified Professional Organizer, Certified Professional Organizer in Chronic Disorganization, Master Trainer and owner of DNQ Solutions, LLC based in Atlanta, Georgia. Diane teaches busy people how to become organized and provides them with strategies and solutions for maintaining order in their lives. She specializes in residential and home-office organizing and in working with people affected by ADD, Hoarding, and Chronic Disorganization. She’s currently writing a book entitled Filled-Up and Overflowing: What to Do When Life Events, Chronic Disorganization and Hoarding Go Overboard.
The post 3 Steps to Reclaim Your Once Orderly Home appeared first on Declutter Your Life with Donna Smallin Kuper.


November 22, 2019
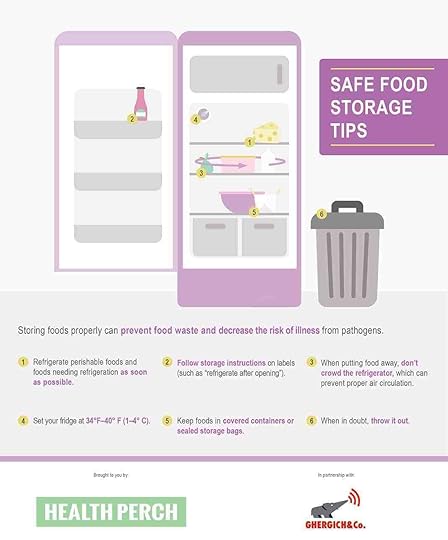
Prevent Food Waste + Save Money – Here’s How
 Photo by Blake Weyland on Unsplash
How much food goes to waste in your home? What steps do you take to prevent food waste?
According to an October 2019 article in the AARP magazine, the average American tosses out almost a pound of food per day. This article also mentions that one survey found American households waste $640 every year.
Let’s face it: Groceries can be expensive. Especially if you spend time and effort purchasing produce, you want to make sure you do everything you can to keep it as fresh as possible for as long as possible. And part of that process means figuring out what goes in the fridge, what goes in the pantry, and what you should never swap.
Storage Smarts from the Experts
Of course there are a lot of rules that you can establish for yourself just by looking at the grocery store aisles. Take cereal, for example. Of course cereal goes in the pantry. It doesn’t need refrigeration at all. And then take things like yogurt. You buy that in the fridge aisles in the grocery store, so of course you should put it in your fridge when you get home.
But what are some trickier things to store? The graphic below offers tips to keep your food in great shape, prevent food waste, and save money. For more expert tips, click on the link below the graphic to learn the 13 foods you should move from your pantry to the fridge to maximize shelf life.
The AARP article I mentioned earlier suggested making good use of your freezer to prevent food waste. For example, instead of letting leftovers go bad in your fridge, try this. Store individual portions in freezer-safe containers for quick and easy weeknight meals or healthy lunches.
Any other ideas for how to prevent food waste? Please share in the comments section below!
Prevent Food Waste + Save Money: Here’s How
Photo by Blake Weyland on UnsplashHow much food goes to waste in your home? What steps do you take to prevent food waste?
According to an October 2019 article in the AARP magazine, the average American tosses out almost a pound of food per day. This article also mentions that one survey found American households waste $640 every year.
Let’s face it: Groceries can be expensive. Especially if you spend time and effort purchasing produce, you want to make sure you do everything you can to keep it as fresh as possible for as long as possible. And part of that process means figuring out what goes in the fridge, what goes in the pantry, and what you should never swap.
Storage Smarts from the Experts
Of course there are a lot of rules that you can establish for yourself just by looking at the grocery store aisles. Take cereal, for example. Of course cereal goes in the pantry. It doesn’t need refrigeration at all. And then take things like yogurt. You buy that in the fridge aisles in the grocery store, so of course you should put it in your fridge when you get home.
But what are some trickier things to store? The graphic below offers tips to keep your food in great shape, prevent food waste, and save money. For more expert tips, click on the link below the graphic to learn the 13 foods you should move from your pantry to the fridge to maximize shelf life.
The AARP article I mentioned earlier suggested making good use of your freezer to prevent food waste. For example, instead of letting leftovers go bad in your fridge, try this. Store individual portions in freezer-safe containers for quick and easy weeknight meals or healthy lunches.
Any other ideas for how to prevent food waste? Please share in the comments section below!
November 11, 2019
Are You Cleaning Your Floors Wrong?
The floors in your home take a lot of abuse. Wear and tear is inevitable, especially if you’re cleaning your floors wrong.
You might think all you need is a vacuum, broom, or a mop to keep floors clean. But if you’re not careful, you can seriously damage your floors.
Are you cleaning your floors wrong? We created this guide with three simple rules to follow for beautiful floors.
Choose cleaning products carefully
Most vinyl floors are the no-wax type and very resilient. Pretty much any general floor cleaning product is fine. You can even use a mild de-greasing product if needed to remove stains.
To clean stone flooring, your safest bet is a special stone cleaner. Be sure to dry the grout after cleaning to remove the soil that is suspended in the cleaning solution. The stone itself will dry quickly, but water will collect in the grout and the soil will redeposit itself there. Wiping will keep your grout cleaner longer.
A common mistake is cleaning hardwood floors with vinegar and water. The makers of wood and wood laminate flooring beg you not to do that as vinegar is acidic and can harm the surface of your floors. They recommend vacuuming first and then using a only a damp mop.
Also, never use an eraser-type sponge to remove a stain from wood flooring as it will remove the finish as well as the stain.
Use the right tools for cleaning your floors
Different types of floors require different cleaning tools and methods. Wood floors, for example, should be dust mopped or vacuumed frequently to prevent grit, dirt and sand from being ground in.
Wood flooring – especially wood laminate flooring – is moisture-sensitive. So be sure to wring out that mop well before cleaning. Note that steam cleaning is an easy, effective, and eco-friendly way of cleaning and disinfecting hard floors, whether they’re linoleum, tile, or hardwood. But, don’t steam clean wood laminate flooring as moisture from steam can cause the laminate to warp.
Vacuuming is the single best way to remove dust and debris from any floor type. However, you should be cautious of which vacuum cleaner type you’re using.
Beater vacuums are specially designed for use on carpets and rugs. The beater brushes dig into carpet fibers to remove dirt. For that reason, they shouldn’t be used on hard surfaces, especially hardwood floors, as they can scratch the finish.
If your vacuum cleaner does have a brush roller – or you’re in the market for a new vacuum cleaner for your hardwood floors – look for the option to turn it off. Also ensure that its wheels are made of rubber and not plastic or metal. Check BestVacuumExpert for some tips and suggestions on the right vacuum models for your floors.
Don’t skip critical steps
First things first…get into the habit of cleaning rooms from the top down. This means dusting ceiling fans, tops of bookcases, picture frames, and windows as well as tabletops before you start cleaning your floors. Flooring should always be the last area to clean.
Before mopping your floor, vacuum to remove debris. Vacuuming is preferable to sweeping because it will remove more dust and dirt than sweeping. Even if you can’t see dust or debris on your floor, it’s there. So don’t skip this step,
Take the time to pick up small objects like coins or cat toys that could clog your vacuum cleaner. Make sure that your vacuum bag or canister is no more than 2/3 full before starting to vacuum. And clean/change your vacuum filter monthly for maximum performance.
Lastly, when vacuuming, remember that one pass is never enough. You’ll want to make at least 3-5 passes to ensure that you’re removing all loose dirt from your carpets and rugs.
When cleaning your floors, it’s always best that you use the right products, tools, and procedures. Well-maintained floors are not only more attractive, but also last for a long time.
###
Meet today’s guest blogger: Liz is part of the content team at Best Vacuum Expert, sharing expert knowledge and best tips on how to have a clean and organized house.
FULL DISCLOSURE: This post contains affiliate links that may result in a small referral commission to me at no additional cost to you. Thanks for supporting my work by shopping via my links.
The post Are You Cleaning Your Floors Wrong? appeared first on Declutter Your Life with Donna Smallin Kuper.
October 30, 2019
7 Greatest Hollywood Cleaning Scenes
Who would have thought that Hollywood could teach us so much about cleaning? We have scoured the archives for Hollywood’s best cleaning scenes. Enjoy the clips below and learn a thing or two about cleaning!
Cleaning Scene 1 – Mrs. Doubtfire
Pure comic genius, Robin Williams, dances with a vacuum cleaner to Aerosmith’s Dude Looks Like a Lady. Robin Williams proves that house cleaning can be fun and can also do us a lot of good.
Scientific research has shown that house cleaning is good for both our physical and mental well-being. For an aerobic workout with practical benefits, put your favorite music on and get house cleaning! Your clean and tidy home will also lift your mood.
Cleaning Scene 2 – Enchanted
In this lovely musical number, Happy Working Song, Amy Adams calls on assorted New York City creatures and vermin to help clean the apartment where she is staying. You may not want pigeons, rats or cockroaches doing your home cleaning, but there are some interesting techniques in this classic Disney scene.
The rats use toothbrushes to clean the toilet, which is not recommended. However, toothbrushes are incredibly useful for cleaning because their bristles pick up grime and they can be used in tight spaces. Try using them to clean hairbrushes, shower heads, sliding door tracks, kitchen sink drains, faucet surrounds, jewelry, even laundry stains.
Cleaning Scene 3 – Mary Poppins
With a spoon full of sugar, Julie Andrews magically tidies and cleans the nursery in a few minutes. Although Julie Andrews may have cheated with some telekinesis, she did make cleaning fun for the children.
You can inspire your kids to help with the cleaning through challenges and rewards. They will get a sense of satisfaction from completing tasks and perhaps a reward for their efforts. It can also reduce your stress, save you time and be a fun experience with your kids. And it teaches them life skills that will be appreciated for years to come.
Cleaning Scene 4 – American Hustle
In this brilliant scene, Jennifer Lawrence performs a high-energy cleaning routine while lip-synching to Paul McCartney’s Live and Let Die. The lip-synching is absolutely perfect, but the cleaning routine could be improved!
Firstly, always do the dusting before the vacuuming! Secondly, it is better to start with the dirtier and more difficult rooms first, such as the kitchen or bathroom rather than the living room or bedrooms. (Jennifer moves from the living room to the kitchen). Apart from that, a great effort from Jennifer.
Cleaning Scene 5 – Pulp Fiction
[Pulp Fiction video clip purposely omitted for bad language]
When John Travolta inadvertently blows the head off his backseat passenger, there is only one person to call, Winston Wolf. Mr. Wolf is not only the go-to guy to “solve problems,” but he is also a master of difficult cleaning jobs.
Mr. Wolf knows that you need to act fast. Cleaning blood stains after they have set is much, much more difficult than when they are fresh. A simple trick to remove blood stains from fabric is to first rinse with cold water then pour hydrogen peroxide on the stain and watch the stain disappear! Rinse, and then launder as usual.
Cleaning Scene 6 – American Beauty
“I will sell this house today,” vows Annette Bening before stripping down to her slip and getting on her hands and knees to scrub the kitchen. She knows that appearance is all in the details, including removing that smear from the mirror and rearranging the fresh flowers.
However, Annette did not sell the house that day. Perhaps she should have used microfiber cloths spritzed with water for streak-free mirrors and windows. It was probably the use of paper towels that caused those smears! Advice for Annette: Next time, hire a professional cleaner who knows all the best tricks for getting your home spotless.
Cleaning Scene 7 – Snow White and the Seven Dwarfs
The all-time classic cleaning scene! Despite the lack of modern cleaning equipment and materials, the team sing their way through the toughest cleaning chores. Absolutely faultless!
Contributing author, Sunil, is a Digital Marketing Intern at TidyChoice. He has written extensively about domestic cleaning and family life for the company’s social media channels and for guest blogs.
FULL DISCLOSURE: This post contains affiliate links that may result in a small referral commission to me at no additional cost to you. Thanks for supporting my work by shopping via my links.
The post 7 Greatest Hollywood Cleaning Scenes appeared first on Declutter Your Life with Donna Smallin Kuper.
October 24, 2019
Digital Minimalism: A Case for Seeking Out Solitude
If you’re anything like me, the term “digital minimalism” immediately made you think about your too-full inbox, your bulging folders of uncategorised photos and the horrifying mess that is your iTunes account or computer desktop.
Digital clutter is real and it needs to be dealt with, but digital minimalism actually speaks to a more concerning issue than the years-old emails you’ve been hoarding for no good reason. (I see you.)

It’s Time to Declutter Your Mind
You’re busy. As in, really busy. All the time. More than anything, you crave a little solitude to quiet your mind and stop you from going stir crazy. That’s fine, but how on earth do you find the time?
Between work deadlines, family obligations and chores at home, eking out an hour for yourself is a Herculean effort. Days can go by without so much as five minutes of peace and quiet.
Even if you’re retired, making time for yourself can be a real challenge. We live in an age of second careers and third acts, there’s simply no space left to hang out on the porch with a glass of chardonnay and a juicy novel.
Why is Solitude So Elusive?
Most people dream of escaping the mayhem of everyday life. A little cabin by the lake sounds downright idyllic, doesn’t it? It absolutely is, and there’s no reason you shouldn’t aim for that at some point.
But right now, you can’t afford to up and leave. You’ve got responsibilities (work, volunteering, family, etc.) and they’re not going to take care of themselves. For now, that weekend getaway will have to remain on your bucket list.
All is not lost, though. I have a simple solution to your problem. It’s not that difficult to master, and once you do, you’ll find yourself inundated with micro-moments of solitude. Sounds good, right?
Freedom from the Input of Other Minds
In their book, Lead Yourself First, co-authors Raymond M. Kethledge and Michael S. Erwin, unpack the importance of solitude from a leader’s perspective. It makes sense. Without sufficient solitude to “do the work” — as Steven Pressfield puts it — a leader’s ability to lead is compromised.
Interestingly, their definition of solitude isn’t what you’d expect. Rather than suggesting you hide out in the woods, Thoreau-style, the authors claim solitude is simply freedom from the input of other minds.
Solitude is crucial for all of us, not just leaders. In our “always on” world, we’re constantly receiving input from other minds. We listen to podcasts, scroll through social media, watch Netflix and television and YouTube, read the news online, the list goes on.
Input from other minds is the norm nowadays, leaving no time for solitude, no time for our own thoughts, no time to ponder and assimilate the information we’re taking in. Cluttering up our mind like this comes at a price though.
Things like clarity, creativity, emotional balance and moral courage wane without solitude. You’ve likely noticed this in your own life. Perhaps you’ve been feeling more anxious than usual. Maybe your creative output isn’t what is used to be. It could be you’re not as patient as you usually are.
Finding Solitude in Everyday Life
Humans aren’t wired for constant input. No living being is. So, where can you find time for solitude when your daily schedule is packed tighter than a can of plump sardines? It’s simpler than you might imagine.
The advent of first the iPod and then the iPhone has made it incredibly easy for us to distract ourselves when we’re alone. We’ve become experts at filling moments of potential solitude with input from other minds.
The next time you find yourself alone, resist the urge to plug into a device. Instead of listening to yet another podcast or watching yet another YouTube clip or reading yet another article online, just be in the moment.
Following are some of the places we humans are inclined to clutter our mind with unnecessary information. Places where we can (and should) indulge in solitude. They’re so mundane you probably wouldn’t recognize them as opportunities for solitude, but they absolutely are.
on your work commutewaiting in lineat the doctor’s officemaking dinnereating lunchdrinking coffeeexercisingin the elevatorgetting your hair donein the bath or shower
Anytime you find yourself engaged in some routine task, whether it’s sitting at the hairdresser, doing your grocery shopping or waiting in line at the post office, embrace it as an opportunity to declutter your thoughts.
Leave your smartphone in your pocket or handbag, don’t immediately pick up a magazine, forget about the podcast you downloaded. We’ve been conditioned to believe we must fill every minute with something productive, but it’s not as beneficial as we’d like to believe.
If you listen to a podcast on your way to the office, then spend your commute home in silence. It might not seem like much, but these micro-moments of solitude add up over time. Little by little, you’ll find yourself becoming calmer and more relaxed.
When you do finally get to go on that weekend getaway, you’ll be able to appreciate the experience more fully. You may even find you that you’re quite comfortable to disconnect completely.
[Watch] Digital Minimalism with Cal Newport & Rich Roll
Running just shy of two hours, this interview is way longer than our modern day attention span can cope with. Watch it anyway. Despite having chatted to well over four hundred people on his podcast, Rich Roll rates this episode among his most consequential.
If you’re at all worried about the amount of time you spend in the digital space and the effect that is having on you, this talk with Cal Newport is well worth the time spent. In it, he unpacks exactly why we’re so addicted to our devices.
It’s fascinating and more than a little concerning. Fortunately, it’s not all doom and gloom. Newport also provides a bunch of action steps to help you free up precious time, declutter your mind and connect more deeply to the things that matter most. It’s like a roadmap back to solitude.
Angela Horn is a Cape Town-based freelance writer, minimalist lifestyle blogger and backslidden java junkie. She pens her missives on her blog Mostly Mindful and has been known to give the odd TEDx talk.
FULL DISCLOSURE: This post contains affiliate links that may result in a small referral commission to me at no additional cost to you. Thanks for supporting my work by shopping via my links.
The post Digital Minimalism: A Case for Seeking Out Solitude appeared first on Declutter Your Life with Donna Smallin Kuper.
October 7, 2019
How to Be a More Mindful Homeowner

The act of being mindful means that you are aware of what you do – or don’t do. When it comes to homeownership, it’s safe to say that many of us are not mindful homeowners. That’s because we aren’t aware of, let alone taking care of, critical cleaning and home maintenance tasks.
Seasonal maintenance routines
As important as it is to regularly clean and declutter our homes, regular home maintenance is equally essential to being a mindful homeowner and creating a happy, healthy and safe home. Having a seasonal routine will help you prioritize and complete your maintenance tasks sooner – and help create a space you love to come home to each day.
The season of change: Fall
Fall is the perfect time to take on home maintenance projects and deep clean your home. Make a checklist of things you can accomplish both in and outside the home to help you get ready for fall. Here are five common home maintenance and cleaning tasks to prioritize this fall:
Avoid a plumbing disaster or frozen interior pipes this winter by disconnecting water to outdoor faucets.Inspect your fireplace or wood stove for potential hazards, such as rusted grates or soot build-up that could cause a fire. Check and clean your chimney flue. Inspect your roofing. You’ll want to look for any damaged, loose or missing shingles. Make sure you replace them before winter to avoid any damage to your home from possible leaks.Check for pest and/or rodent infestation. Be on the lookout for signs of unwanted pests like rats or mice living in your home. Check your garage, basement, and attic. If you see fresh droppings, nests, or gnaw marks, it’s probably time to call in your local pest control professional. Schedule annual maintenance tasks. Clean smoke and carbon monoxide detectors and change batteries. Inspect dryer vents and clean if needed. Get your carpets professionally cleaned if it’s been more than 12-18 months since they were last cleaned.
Home improvement projects
Cooler fall weather isn’t just perfect for cleaning and decluttering your home. It’s also the best season to complete home improvement and remodeling projects you’ve been putting off or wanting to finish before the colder winter months.
The holiday
season: kitchen upgrades
With the holiday season quickly approaching, it’s a great time to make changes or updates to your home in order to prepare for added foot traffic in your home. As a mindful homeowner, you’ll want to plan ahead, so you can complete these projects on time.
If you’ve been waiting on making updates to your kitchen, now is the time to begin. Kitchens are often the main hub for many families to gather, converse, and celebrate together, especially during the holidays. Consider your budget and project goals. Once you know what you want to accomplish, you can find out and what it might cost to renovate your kitchen and go from there.
A complete renovation presents an opportunity to give your kitchen a complete overhaul. You can create your dream kitchen, one that’s equipped with everything you need to keep a clean and tidy home. You may want to hire a project planner or professional organizer to help plan out cabinetry.
Keep in mind that the easier you make it on yourself to avoid a cluttered space, the easier it is to maintain it. Consider things like pull-out shelves or hanging racks – easy, affordable upgrades for those of us who plan to age in the home we know and love.
If you aren’t looking to take on a full renovation project, you can still create a more maintenance-free environment in time for the holidays. For example: Think about replacing outdated home appliances with newer, smarter versions that make cooking easier.
Smart appliances can help you save money, time, and energy. Plus, many smart kitchen appliances connect with apps on your smartphone, allowing more time to relax and enjoy your family and guests.
If you don’t plan to update appliances, now’s a good time to make sure your current ones are in working order. You don’t want to deal with expensive repairs during the upcoming holiday season!
Start by making sure that the temperature of your refrigerator is properly set. Then schedule time to clean out your refrigerator. Toss expired items and donate unopened items you know you won’t use in time. Take all items out to deep clean drawers. Then replace items and organize as needed with containers to organize and maximize your refrigerator storage space.
Develop a year-round schedule and stick to
it
Maintaining your home year-round is part of being a responsible and mindful homeowner. Here are ways to accomplish this throughout each season:
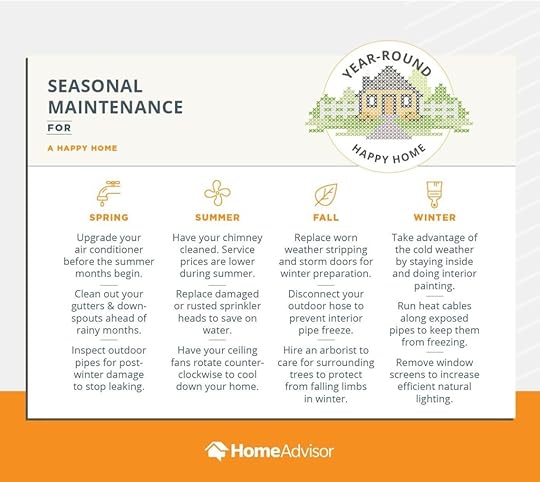
All in all, being a mindful homeowner starts with prioritizing regular cleaning and maintenance, as well as keeping up with seasonal tasks both inside and out. Once you have a set schedule, you’ll be able to quickly and easily get things done around the house, so you can relax and enjoy your home, whatever the season.
###
Jessica loves writing uplifting and inspiring content about cleaning, home maintenance and renovations to help homeowners get maximum enjoyment from their homes.
FULL DISCLOSURE: This post contains affiliate links that may result in a small referral commission to me at no additional cost to you. Thanks for supporting my work by shopping via my links.
The post How to Be a More Mindful Homeowner appeared first on Declutter Your Life with Donna Smallin Kuper.
September 28, 2019
5 Pro Tips for Organizing Digital Photos

Taking photos is easy. But organizing digital photos is a different story.
We live in a world where more people than ever have a smartphone. Photographing the world around us has become a way of life. Most of us have hundreds, if not thousands, of photos stored on our phones or computers or both.
As a photographer, I’d like to share five easy steps for organizing digital photos. Once that’s done, it will be quicker and easier to find your photos and share them with others.
1. Delete, delete, delete
Do you really need to save every photo you take? No. The first step for organizing digital photos is to delete the ones that you can live without. This includes photos that have already served their purpose. Example: photos of restaurant meals that you took to post on Facebook.
If you find more than one version of the same picture in your mobile device, choose the best one and delete the others. Having fewer photos will make it easier to organize the photos that you want to keep.
2. Create sub-folders
Having sub-folders for different photos is quite useful, but what is the best way to do it?
One way is to create a folder for each year, so you can search your photos faster by dates. Then you can create a sub-folder for each month of that year and put all the images that you took in that month into a corresponding folder.
Another option is to create folders for different occasions. Having different folders such as Friends, Family, Selfies, Vacations, etc. can be useful. This method will also allow you to search for a specific photo even quicker as you will remember in what folder each photo is located.
3. Back up your photos
You’ll want to have a copy of all your photos in a safe place – and that’s not on your phone. If you accidentally break or lose your phone, you can say goodbye to your precious memories. Plus, if your photos are backed up, you can delete them from your phone so you have plenty of storage space available to take more.
My preferred method of backing up photos is to transfer them to a safe place such as a USB drive. Then use that USB drive only for your photos. Don’t loan it to a friend or record anything else but photos on it. Transfer photos regularly – I recommend once a month.
Moving your files to a cloud server is becoming more popular these days, and this is also a great option to consider. Servers like Google Photos and Amazon Prime are not only free, but also considered by many to be the safest.
If you decide to go for a cloud server option, be sure to save your username and password by using a secure password saver or writing it down. It’s almost impossible to log in without it unless you chose alternative methods of resetting your password.
4. Rename your photos
Let’s admit that we don’t have time to name all our photos as it will take too long. But renaming photos is useful since it will help you to find a specific image easier and faster.
What you want to do is create a standard naming system for your photos. For example: Let’s say you went on a trip to the Grand Canyon on the 15th of December 2016 and took a photo of your friend named Jack. And let’s assume that your photo is in the sub-folder “December” of a central “2016” folder.
Name the photo something like “15 My friend jack in Grand Canyon.” The number 15 will tell you on which date the photo has been taken and the rest of the name will clearly describe what the photo is about.
This might seem like a tedious method, and to be honest with you, it is. But spending a few hours of your time renaming all your old photos is worth it as you will have all your photos organized.
Even if you choose not go back and rename older photos, if you start doing it now, all of your photos from today forward will be better organized.
5. Select your favorites
The last method for organizing digital photos you took with your camera is to create a separate album that will include only your favorite photos. Go through all of them and copy the images that mean the most to you. Then place them in a folder named “Favorites.”
This folder should contain only one or two photos of each trip or your favorite moments from special events. By creating a folder with only your favorite photos, you are allowing yourself an easy way to re-live the best moments of your life and share them with your friends and family.
John Bennet is a professional photographer with a great knowledge of and passion for camera lenses. He’s also the co-founder of Lensespro.org , a website that helps photographers find and choose the best lenses.

The post 5 Pro Tips for Organizing Digital Photos appeared first on Declutter Your Life with Donna Smallin Kuper.
September 22, 2019
Prevent Accidental Falls by Decluttering
Did you know that accidental falls are the leading cause of nonfatal injury among basically every age group? According to the National Institute on Aging, six out of 10 falls occur at home. And guess what’s the #1 hazard in your home? Anything you can trip over.
Today, the first day of fall, is also the first day of Falls Prevention Awareness Week. What better time to address how you can make your home safer for your family and guests by decluttering!
Don’t fall for clutter
How many times have you tripped over something in your home because you didn’t see it? Let’s take a look at some of the most offensive tripping hazards lurking in your home – and some easy fixes.
Full disclosure: The links in this section are affiliate links, meaning, at no additional cost to you, I may receive compensation if you click through and make a purchase.
ENTRY WAY CLUTTER – Many of us take our shoes off at the door so we don’t track dirt into our homes. But shoes on the floor in front of the door could trip up you or a guest. The entry way is also a popular drop spot for backpacks, bags, and other items that could potentially cause a fall.
Easy Fix: Corral shoes in a basket or on a shoe rack. Install a Shaker peg rack on the wall for hanging things like backpacks, purses, and your dog’s leash. Or invest in a narrow bench or shelving unit with storage bins.
STAIR CLUTTER – Are you in the habit of leaving items on the stairs to carry up with you next time you go up? It might seem like a good idea because one trip up or down is more efficient – until you slip on something. Stair clutter is especially dangerous when coming down the stairs. It can act like the proverbial banana peel in a cartoon, but with less-than-comical results.
Easy Fix: Collect items in a stair-step basket with a handle for easy carrying up or down. For maximum efficiency, you’ll want one at the top and one at the bottom. Better yet, leave the stairs completely free for safe walking. Instead, place a decorative handled basket off to one side of the stairs and out of traffic.
CORD CLUTTER – Not only is cord clutter unsightly, it can be a tripping hazard when it runs across the floor to an electrical outlet.
Easy Fix: First, look at the possibility of rearranging furniture, such as a end table to bring the corded item closer to an electrical outlet. Another simple solution is to run the offending cord through the channel of a floor cord cover.
What else can you do?
Aside from decluttering, there are other simple things you can do to prevent accidental falls inside and outside your home. Here’s what home safety experts recommend:
Stay active. Research shows simply staying active can reduce your risk of a tumble by 10 to 20 percent, and exercising more than three hours a week is linked to a 39 percent reduction in falls.
Improve your balance. Strength and balance starts to decline after the age of 50, which can make us more susceptible to accidental falls. That’s why it’s especially important to include exercises to improve your balance.
A personal note about accidental falls…
I decided to write this blog post earlier this month after my 85-year-old dad fell and fractured his hip. He had just got out of the car and took a few steps when he lost his balance.
What I learned is that accidental falls send one out of four adults over the age of 65 to the emergency room each year. I don’t know about you, but I don’t want to be that ONE in four. At 59, I’m doing everything I can to stay fit and strong to reduce the odds of an accidental fall as I age.
Anyway, my dad is heading home from rehab today – yay! Coincidentally, I already had a visit scheduled for next week. (I’m in California and my parents live in Vermont.) Meanwhile, he’s lucky to have my sisters – a nurse and a physical therapist – there to help him get back into his old routine.
I’ll close with this photo of my parents dancing on a boat cruise last summer.

The post Prevent Accidental Falls by Decluttering appeared first on Declutter Your Life with Donna Smallin Kuper.
September 19, 2019
How to Create a Wellness Space
 Photo credit: Homethods.com
When’s the last time you took the time to unclutter your mind? If it feels like you never have time for yourself, it’s time to make time. In addition to carving out “you” time, consider creating a wellness space in your home.
A wellness space is a place that invites you to shift your state of mind. It’s a place where you can relax, refresh and recharge your body and spirit. When you have a specific place dedicated to your personal well-being you’re more likely to incorporate wellness into your day-to-day life.
Following are four tips on how to create a wellness space without spending a fortune and without adding unnecessary clutter.
Define your needs
The first step in creating your wellness space is to define the purpose of the space. Wellness means different things to different people. Self-care activities could include meditation, journaling, pilates, stretching, yoga, music or art. Obviously, each of these activities requires different types of space. Once you’ve determined what your needs are, then you can begin to scout around and find a place to accommodate them.
Map out your wellness space
Narrow down the possible areas where you can relax and accomplish your goals. Depending on what your chosen activity is, you may want to consider taking it outside. The fresh air and natural light found outdoors are beneficial to physical and mental health. Perhaps you can choose a section of the patio and put up a privacy screen.
Once you’ve located the right area, consider the visual, auditory, and physical conditions you want to minimize or enhance. Then comes the fun job of designing your wellness space.
Set the mood
After choosing your space, give it the look and feel you want. If you plan to meditate, you’ll need something comfortable to sit on. Drown out street traffic and any other distracting noises. A white noise generating machine is great, but plenty of smartphone apps will do the trick, too.
If your idea of wellness is drinking a glass of lemon water and writing in your journal each morning, consider repurposing a card table or small desk. You can use a tablecloth or some vibrantly colored fabric to indicate “game on,” and put it away along with the table when you’re done.
If you want to do yoga, using a rug in the area will add some suppleness to your yoga mat. Burn incense or add an essential oil diffuser to create a strong mood through fragrance.
Partition your space
A permanent, separate wellness space may not be feasible. But it’s still possible to partition off an area so that it feels private. A privacy screen or curtains hung from the ceiling can section off the room. You can always pull back the curtain or screen when you’re finished.
An even-less cumbersome solution is to use special lighting or a colored bulb to illuminate your space when you’re using it. Just turn it off when you’re done. Colored bulbs also help influence your state of mind.
The thing about creating a wellness space at home is to make it yours. You don’t need a lot of space, and you certainly don’t need to buy a bunch of stuff. Once you create a space where you feel inspired and energized, you’ll be more likely to take time for yourself. And that’s important because when you take better care of yourself, you’re better able to live your best life.
Katie Marie is a writer, yoga
enthusiast, and outdoor explorer. She spends most of her time practicing
meditation and wellness using organic elements within nature.

The post How to Create a Wellness Space appeared first on Declutter Your Life with Donna Smallin Kuper.
The One-Minute Organizer Blog

- Donna Smallin Kuper's profile
- 45 followers

