
Beth Cato's Blog, page 75
January 11, 2017
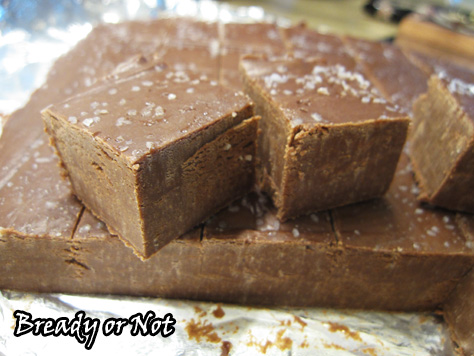
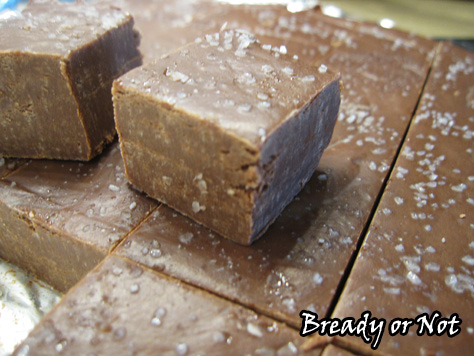
Bready or Not: Five-Minute Spicy Mexican Fudge
I am here today to preach about fudge inclusiveness as I share a recipe for Five Minute Spicy Mexican Fudge.

I do not sneer at some fudges as being “better” or “real.” To me, it does not matter if the fudge is produced on stove top with a candy thermometer, or with a jar of marshmallow cream, or melted in the microwave.
When it comes to fudge, what matters is this:
Does the fudge taste good? Is the texture pleasing to the palate? Does it make me mutter, “Calories be darned to heck,” and reach for another piece?
That is the criteria by which fudge should be judged.
That said, I present to you a fudge that is zapped in the microwave and assembled all of five minutes. Let it set in the fridge for a few hours, and ta-da! You have a fudge that will keep well for days. It also holds up well at room temperature if you’re serving it at a party.
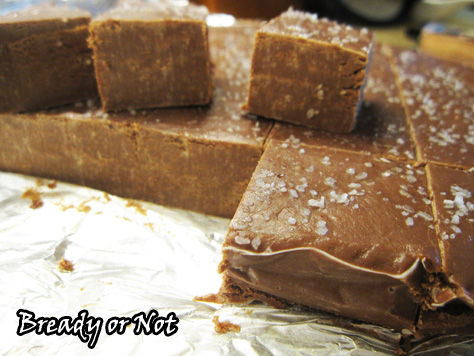
The Mexican spice element comes from cinnamon and cayenne pepper. I used the minimal amount of pepper, 1/8 teaspoon, which provides complexity but absolutely no discernible heat. Tweak the scorch level to your personal taste. Do, however, sprinkle coarse salt to add some lovely contrast.
Originally featured at the Holy Taco Church. Recipe adapted from Wine and Glue.
OM NOM NOM!\n","cookTime":"P","prepTime":"P","totalTime":"P"}
Bready or Not: Five-Minute Spicy Mexican Fudge
Save
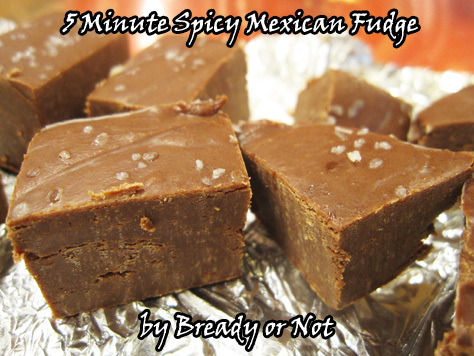
The fudge comes together in mere minutes in the microwave, creating dense, chocolatey fudge that lasts well at room temperature or in longer-term storage in the fridge. Adjust the amount of cayenne pepper to your preferred heat level!
3 cups milk chocolate morsels (bag and a half)
1 14-ounce can sweetened condensed milk
1 tsp vanilla extract
1 tsp cinnamon (Mexican cinnamon preferred!)
1/8-3/4 tsp cayenne pepper
kosher or coarse sea salt
Line an 8 or 9-inch square pan with aluminum foil or parchment paper. Lightly grease it.
Use a microwave or sauce pan to melt together the chocolate and sweetened condensed milk. If you're using the microwave, use short bursts of 20-30 seconds and stir well between each.
Once the chocolate mix is smooth, pour in the vanilla extract, cinnamon, and cayenne pepper. (Note that 1/8 teaspoon provides a little flavor, not much heat, so add cayenne and taste to adjust to desired heat level.)
Immediately pour the fudge into the prepared pan. Smooth out to edges and sprinkle salt all over the top. Let set in fridge at least four hours before cutting. Keeps in covered dish in fridge for upwards of a week.
OM NOM NOM!


January 8, 2017
Sunday Quote summons Steinbeck again
“I’ll get the book done if I just set one day’s work in front of the last day’s work. That’s the way it comes out. And that’s the only way it does.”
~John Steinbeck
January 6, 2017
The Impulse Buy Newsletter – And a Forthcoming Giveaway!

My fellow Harper Voyager Impulse author Liana Brooks runs a great newsletter called Impulse Buy. Every Tuesday, she highlights books that are on sale for under $5. This month, it features a giveaway of Chuck Wendig’s novel Invasive. Next month… I’ll be giving away a Kindle copy of the second book in my Clockwork Dagger duology, Clockwork Crown!
Sign up for Impulse Buy over here. Good luck!
#SFWAPro
January 4, 2017
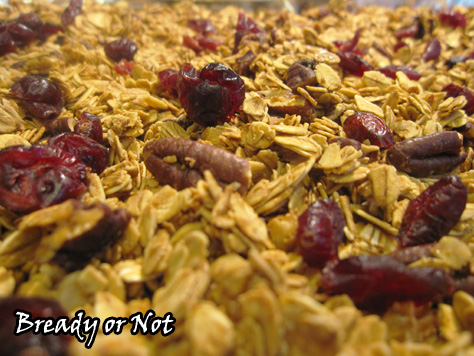
Bready or Not: Maple Cranberry Pecan Granola
Let’s start off 2017 with something delicious and healthy: Maple Cranberry Pecan Granola.

It’s super easy to make granola at home, and wow, is it cheaper than buying the stuff at the store. If you have a nearby store that sells oats in bins, that’s the way to go–my Sprouts often puts their oats on sale, too.
It’s easy to customize this to your preferences. Switch out the pecans for walnuts. Use raisins or dried blueberries for the cranberries. Whatever. Make it your own.
If you need gluten-free food, that’s easy, too–just use gluten-free oats! Ta-da.

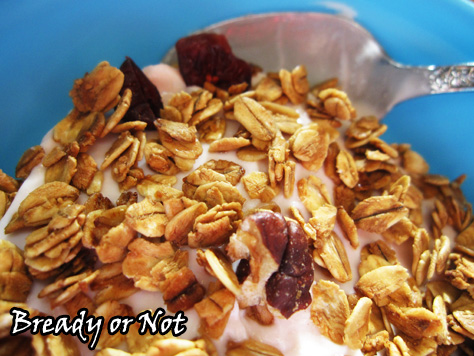
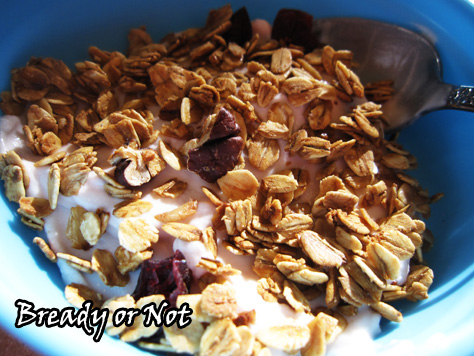
Eat this granola by itself, or with milk or almond milk as cereal, or as a topping for yogurt or ice cream. Heck, you could even use it in cookie or granola bar recipes.
However you eat it, know that it’s delicious–and good for you, too!
OM NOM NOM!\n","cookTime":"P","prepTime":"P","totalTime":"P"}
Bready or Not: Maple Cranberry Pecan Granola
Save
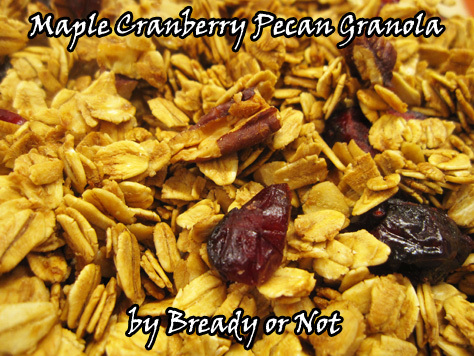
A Bready or Not Original! This healthy granola is great by the handful, mixed into milk as cereal, or as a topping for yogurt or ice cream. Use gluten-free oats to make this gluten-free. Double or quadruple this recipe to jar it for gifts.
2 cups rolled (old-fashioned) oats
1/4 cup chopped pecans
1/4 cup maple syrup
1/2 Tb avocado or olive oil
sprinkle of salt
1/4 cup dried cranberries
Preheat oven at 325-degrees. Line a large, rimmed cookie sheet with foil and apply nonstick spray.
In a large mixing bowl, stir together all of the ingredients EXCEPT the cranberries. Spread the mixture on the cookie sheet. Bake for about 20 minutes, gently stir the granola, and bake for another 10 to 15 minutes, until it's crisp and golden. Let set out on stove top to cool; it will continue to crisp up.
Once it is room temperature, gently stir in the cranberries. Store in a sealed container up to 1 month.
OM NOM NOM!
Save
January 3, 2017
New Publications at the Start of 2017!
Well, hi there. Things have been awfully busy here. I have a wee bit of breathing space between major deadlines, so I’m trying to get a thousand other things done. It looks like the next few months will stay pretty intense, too.
I sent out my newsletter today. If you’re signed up, check your spam folder! You don’t want to miss my Apple Snickerdoodle Bar recipe. If you’re not signed up, what the heck is wrong with you you can remedy that by looking at the right hand side of BethCato.com and putting your email address in that convenient little box. I’ll be revealing the cover of my new story collection on the Cato Log on January 12th, so sign up now so you won’t miss that!
I had several new works released in November and December. Here’s the latest:
Stories
– 10 Things Newly Manifested Wizards Should Never Do at Daily Science Fiction
– reprint podcast of “Overlap” at StarshipSofa
Poetry
– “A Net to Snare a Unicorn” and “Preventative Measures” in Mythic Delirium 3.3
– At the Very Least in Grievous Angel
Geeking Out
– A Binge-Watcher’s Guide to the Great British Bake Off at B&N SFF Blog

Save
Save
January 2, 2017
Goals for 2017
2017 is here! I did pretty well with my 2016 goals, though I am frustrated with the amount of short fiction that I wrote and kept on submission. I haven’t had so few stories in circulation since I first started writing year-round in 2008. I’ve heard magazine editors lament that this is what happens to authors once they have novel contracts. Even so, I hope to be more prolific in 2017.
Here are my goals for the new year:
 1) Write a new novel in the first part of the year.
2) Complete the next two edit stages for Call of Fire (copy-edits and first pass pages).
3) Prepare comprehensive marketing plan for release of Call of Fire in August. This includes regular updates on my personal blog, scheduling interviews and blog posts for other blogs and sites, and seizing other viable opportunities.
a) Don’t have a mental breakdown.
4) Release Call of Fire in August.
a) Don’t have a mental breakdown.
5) Write a new story (fiction or nonfiction) or poem each month, if balanced with novel obligations. Aim to have at least ten works on submission at all times.
6) Read at least 100 books during 2017 and post reviews for each.
7) Attend several conventions and book festivals; at this point, that includes the Tucson Festival of Books (March 12th), Phoenix Comicon (May 25th-27th), and World Fantasy in San Antonio November (2nd-5th).
8) Develop concepts for new novels.
9) Be honest with myself about my stress and personal limits. Don’t hold it all inside. Reach out to writer friends. Let my agent know what is going on. Take time out for my husband, son, cat, and family. Read. Bake. Go thrift store shopping.
10) Don’t give up. I’ve come a long way in the past year and there’s plenty of mountain left to climb. If tired of climbing, use dynamite.
Along the lines of goal #3, my January newsletter will be sent out tomorrow! Sign up to get the previous month’s recipes all in one spot along with the latest book news.
Beth Cato Newsletter Signup
Book news plus the latest recipes!
Please wait...
Ta-da! You're now subscribed to the Cato Log.
#SFWAPro
Save
January 1, 2017
Sunday Quote finds this very relevant
“In a time of destruction, create something.”
~Maxine Hong Kingston
December 28, 2016
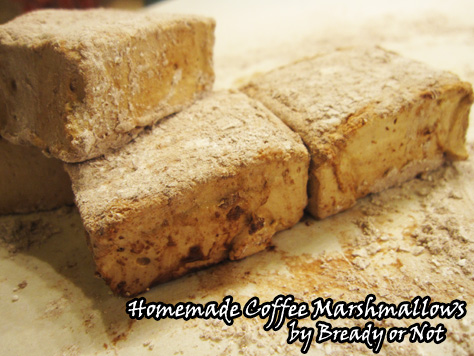
Bready or Not: Coffee Marshmallows
Let’s end the year on an obnoxiously sweet note with homemade Coffee Marshmallows. If you want to send someone a late gift or sabotage a New Year’s resolution, here you go.
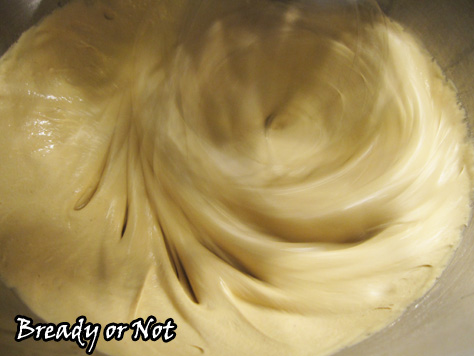
This recipe involves lots of beating. No, not with a stick. You’ll want a good stand mixer, or be ready for your hand to vibrate to numbness if you use a hand mixer. I don’t recommend doing this with a whisk in hand. Your hand might fall off.
Not recommended, unless your last name is Skywalker and you have access to cool prostheses.
Once I started the recipe, I had the bulk of it done in about an hour. My stove is reeeeaaally slow to heat up. I did the mixing in my valiant Kitchen Aid.
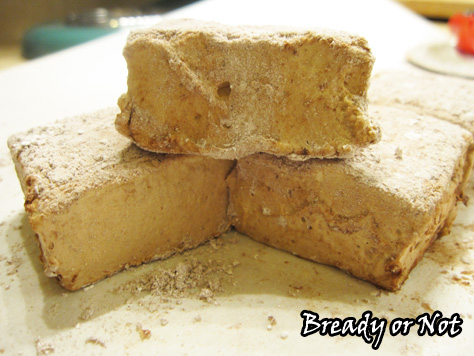
The results were fantastic: soft yet dense blocks of sugary goodness, coated in more sugary goodness.
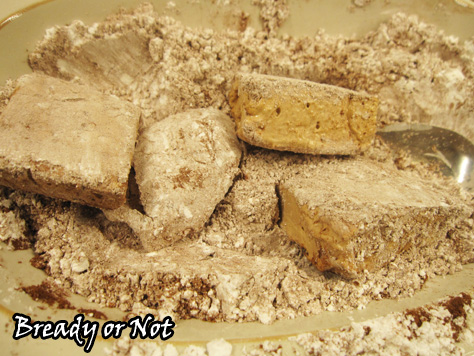
This makes a 9×13 pan. That’s a lot of mallows. They’re supposed to stay fresh up to a week if they are well-sealed. Bag these things up! Eat them by themselves, or plunked in coffee or hot chocolate.
Originally posted at the Holy Taco Church.
OM NOM NOM!\n","cookTime":"P","prepTime":"P","totalTime":"P"}
Bready or Not: Coffee Marshmallows
Save

This recipe makes a big batch of Coffee Marshmallows! Eat them straight or plonked in hot chocolate or coffee. They make for a lovely homemade gift.
Powder coating
1/4 cup powdered sugar
1/4 cup corn starch
1 tablespoon Dutch-processed cocoa powder, sifted
Marshmallows
3/4 cup warm water, divided
1 tablespoon instant espresso granules
3 envelopes of Knox gelatin
1 1/2 cups granulated sugar
1 cup light corn syrup
1/2 teaspoon salt
Later mixing stage additions
2 tablespoons Dutch-processed cocoa powder, sifted
2 teaspoons vanilla extract
Pam or oil for pan
Whisk together 1/2 cup warm water and the instant espresso. Let this cool in the fridge for a bit.
In a medium bowl, sift together the powdered sugar, corn starch and cocoa powder.
Grease a large casserole dish (like 9x13 or 10x8) with Pam or vegetable oil. Sift a small bit of the powdered sugar/cocoa mix over the bottom of the pan.
Pour the cooled coffee into the large bowl you will use for the mixing phase. Sprinkle the gelatin onto the coffee and let it sit for at least 10 minutes. Have a whisk attachment ready on your mixer.
In a medium sauce pan with an attached candy thermometer, combine the granulated sugar, corn syrup, salt and remaining 1/4 cup of water. Start heating this on medium until the sugar is dissolved and then crank it to high heat. Bring the mixture to a hard boil and cook for 1 minute, until the candy thermometer reaches 240 degrees. The color will start to change.
With the mixer on low, VERY CAREFULLY pour the boiling liquid into the gelatin/coffee mix. Once it's all in there, turn it to high and beat for 10-15 minutes, until it has doubled in volume and holds stiff peaks. Note that the color will change dramatically in stages.
Add in the remaining cocoa powder and vanilla extract and beat for another minute or so, until they are mixed in.
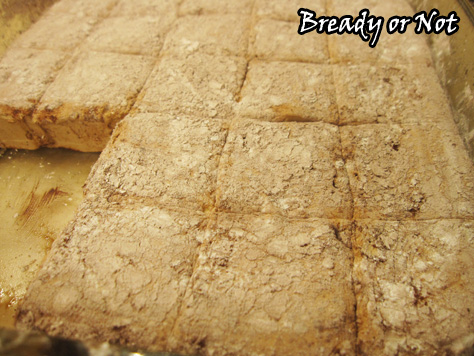
Pour the very sticky goop into the ready casserole dish. Use a well-greased spatula to even it out. Add a few tablespoons of the cocoa/sugar mix and use your fingers to dust that over the top. Cover the dish with foil or plastic wrap and let it firm up. Give it at least four hours, or overnight.
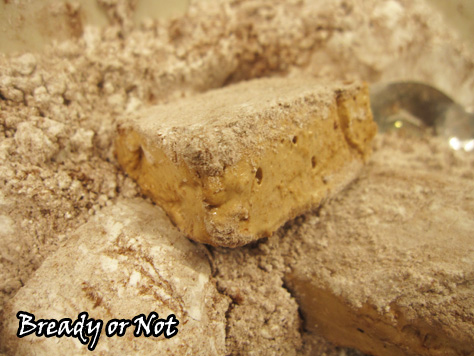
Run a knife along the edges of the pan to loosen the marshmallows. You can try inverting the whole block onto a large cutting board, or use a knife or pizza cutter to do basic rectangles and then remove portions at a time. Cut the marshmallows into 1-inch cubes and toss them in the cocoa/sugar mix.
Store the coffee marshmallows in an airtight container for up to one week. Enjoy them straight-up, or in coffee or hot cocoa.
OM NOM NOM!
Save
Save
December 25, 2016
Sunday Quote wishes you a blessed day
“There is no real ending. It’s just the place where you stop the story.”
~ Frank Herbert
December 21, 2016
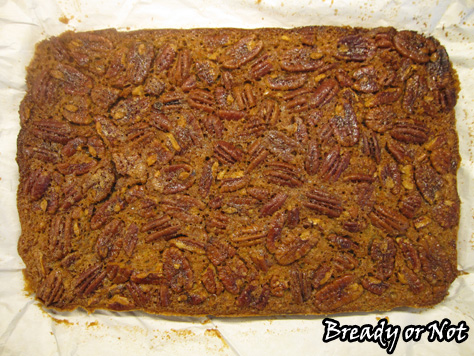
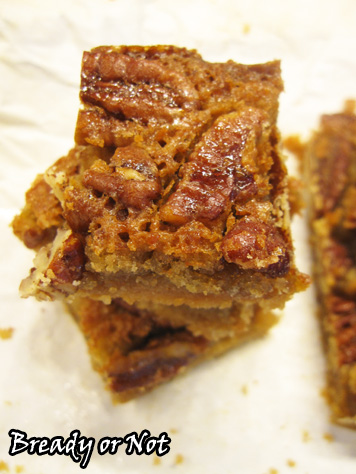
Bready or Not: Maple Pecan Pie Bars
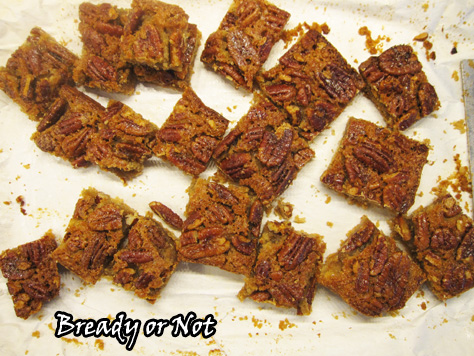
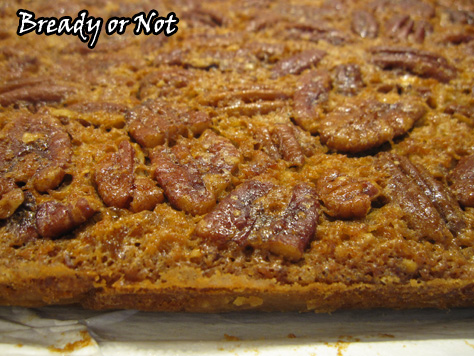
These Maple Pecan Pie Bars offer all the goodness of pecan pie in a form that is 1) more readily portable, 2) keeps well for up to a week, 3) freezable.
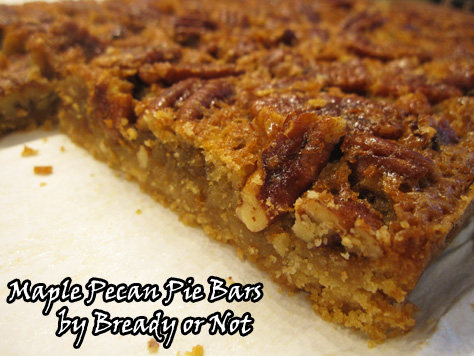
Oh, and did I mention these are DELICIOUS? They seriously are. My dad is a native Alabaman and he knows pecan pie and pecan in all forms. He LOVED these bars.
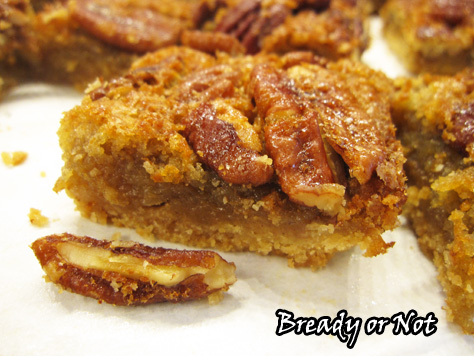
The base is shortbread, and atop that is a just-right thickness of pecans in syrup. This avoids the usual butt-ton of corn syrup that other recipes use and relies on a combo of maple syrup and brown sugar. Which is… maybe healthier? Kinda?
What matters to me, though, is that it tastes good. The maple syrup adds the right sweetness here to complement the nuts.
You don’t have to use pecans here, either. You could certainly try walnuts, cashews, or a combination. Do go for “softer” nuts, though, to make it easier to cut the bars.
I froze a bunch of pecan bars between layers of waxed paper in a freezer container. They thawed again with no difference in taste. They also keep well for at least a week, making these a good candidate for shipping.
As my dad can attest, these bars are perfect for breakfast, snack, or dessert. While you could eat them along with vanilla ice cream, they are good eaten out of hand. Heck, you can even zap them in the microwave if you want them warmed.
However or whenever you eat them, these Maple Pecan Bars will be delicious.
Modified from Bake or Break.
OM NOM NOM!\n","cookTime":"P","prepTime":"P","totalTime":"P"}
Bready or Not: Maple Pecan Pie Bars
Save

These Maple Pecan Pie Bars offer the deliciousness of pecan pie in a portable, delicious hand-sized bar. These bars keep for up to a week and also can be frozen for later enjoyment.
Crust
1 1/2 cups all-purpose flour
3/4 cup light brown sugar, packed
1/2 teaspoon salt
1/2 cup unsalted butter, cold, cut into pieces
Filling
3 large eggs, room temperature
1/2 cup maple syrup
1/4 cup (1/2 a stick) unsalted butter, melted and cooled for a few minutes
1/2 cup packed light brown sugar
1/4 cup granulated sugar
1/2 teaspoon salt
1 1/2 cups pecans (or mixed soft nuts like walnuts or cashews)
Preheat oven to 350-degrees. Line a 13x9-inch pan with parchment paper and lightly apply butter or nonstick spray along the bottom and sides.
In a large bowl, mix the flour, brown sugar, and salt. Add the cold butter and use a pastry blender or a fork to mash it down into small crumbles. The overall mix will feel sandy, but it'll hold together after baking.
Pour the crust mixture into the prepared pan. Use some wax paper and a heavy glass to compress the crumbs.
Bake for 15 minutes or until edges are lightly browned. Set aside as you make the filling.
Lightly beat the eggs in a large bowl. Add the maple syrup, melted-and-cooled butter, brown sugar, white sugar, and salt, stirring until combined. Stir in the pecans to coat.
Pour filling over the partially baked crust. Bake for another 30 to 35 minutes, or until filling is set.
Cool bars to room temperature and then use the overhanging parchment to lift the contents out to cut into bars. Store in a sealed container for up to a week, or freeze bars for later enjoyment.
OM NOM NOM!
Save
Save


