
Beth Cato's Blog, page 40
December 19, 2019
Breath of Earth $1.99 Ebook Sale! Happy Holidays!
For a limited time, snag the ebook of Breath of Earth for a mere $1.99! This book hasn’t been on sale for nearly a year. Get it while you can, then go on to read the next two books in the completed Blood of Earth trilogy. No wait required!
Amazon
Barnes & Noble Nook
Kobo
iTunes
Google Play

About Breath of Earth:
After the earth’s power under her city is suddenly left unprotected, a young geomancer must rely on her unique magic to survive in this fresh fantasy novel from the author of the acclaimed The Clockwork Dagger.
In an alternate 1906, the United States and Japan have forged a powerful confederation— the Unified Pacific—in an attempt to dominate the world. Their first target is a vulnerable China. In San Francisco, headstrong secretary Ingrid Carmichael is assisting a group of powerful geomancer wardens who have no idea of the depth of her own talent—or that she is the only woman to possess such skills.
When assassins kill the wardens, Ingrid and her mentor are protected by her incredible magic. But the pair is far from safe. Without its full force of guardian geomancers, the city is on the brink of a cataclysmic earthquake that will expose the earth’s power to masterminds determined to control the energy for their own dark ends. The danger escalates when Chinese refugees, preparing to fight the encroaching American and Japanese forces, fracture the uneasy alliance between the Pacific allies, transforming San Francisco into a veritable powder keg. And the slightest tremor will set it off. . . .
Forced on the run, Ingrid makes some shocking discoveries about herself. Her already considerable magic has grown even more fearsome . . . and she may be the fulcrum on which the balance of world power rests.
#SFWAPro


December 18, 2019
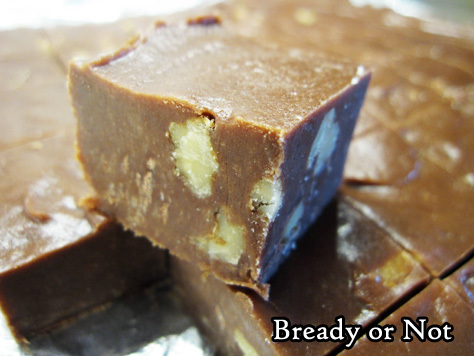
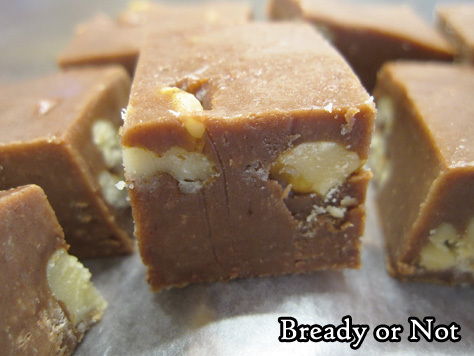
Bready or Not Original: Quick Peanut Butter Chocolate Fudge
Holiday time can be all kinds of hectic, but if you need a sweet treat in limited time, this Quick Peanut Butter Fudge will be adored by all chocolate and peanut butter lovers!
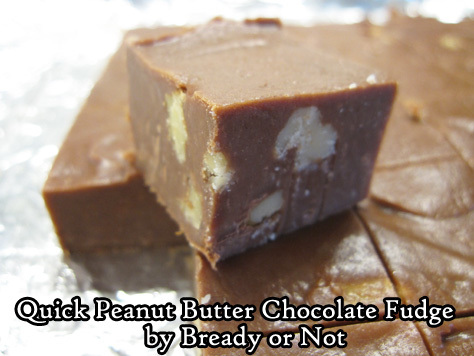
This thing literally comes together in under five minutes. Give it a couple hours to set in the fridge, and there you go. Plus, it keeps for weeks in the fridge (if you can make it last that long) and it can be frozen for ages.
I love using walnuts in this fudge, but any nut will do. Can you make it without nuts? Sure, but I find that a little bit of crunch is great for texture. Some seeds could work in this, too, if you need to avoid an allergen (keeping in mind, this already includes peanut butter chips!).
My husband had co-workers describe this fudge as “crack.” Consider yourself warned.
I’ve shared a number of quick fudge recipes over the years. Here are some others to try out!
Five-Minute Spicy Mexican Fudge
Quick Cake Batter White Chocolate Fudge
Gingerbread Cookie Dough Fudge
No-Bake Peanut Butter Pretzel Fudge
Bready or Not Original: Quick Peanut Butter Chocolate Fudge
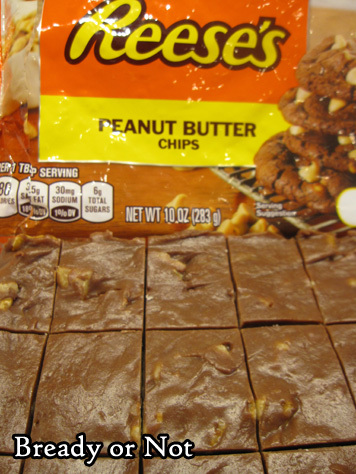
This fudge come together in about 5 minutes thanks to the microwave, and results in a smooth fudge reminiscent of peanut butter cups. Cut the pieces small–they are decadent and addictive!
1/4 cup unsalted butter
10- ounce bag peanut butter chips (1 bag)
8- ounces semi-sweet chocolate chips (about 3/4 bag)
14-ounce can sweetened condensed milk
1 cup walnuts (or other nuts, chopped)
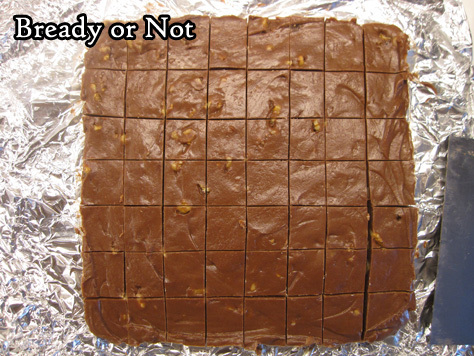
Line a small square pan with foil and apply nonstick spray or butter.
In a large microwave-safe bowl, melt butter with a zap or two in microwave. Add peanut butter, chips, chocolate chips, and sweetened condensed milk. Heat in a couple 30-second bursts, stirring well between each, and continuing until the mixture is smooth. Fold in nuts.
Pour into prepared pan. Smooth out using an uneven spatula, taking fudge to edges and pressing down to remove any bubbles.
Chill in fudge for at least two hours. Use foil to lift onto cutting board for easy slicing. Store in a sealed container with waxed paper between the layers; keep in fridge as long as a month, or freeze for longer.
OM NOM NOM!
December 11, 2019
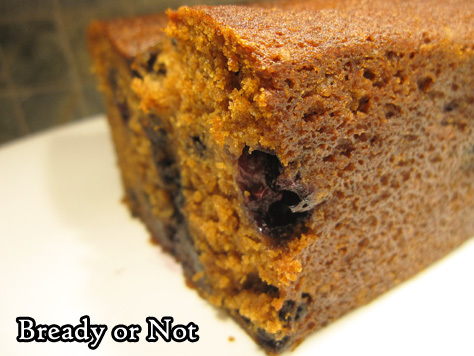
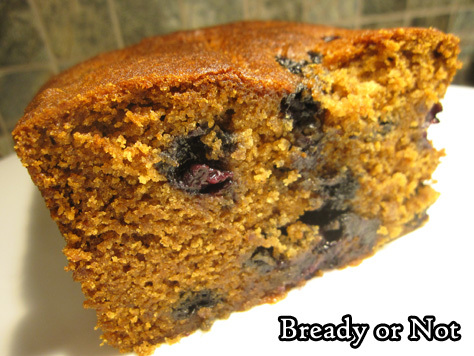
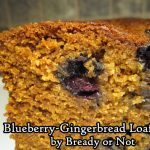
Bready or Not Original: Blueberry-Gingerbread Loaf
Fresh blueberries and gingerbread! This combo never occurred to me before, and wow was I missing out. Find out how good it is when you bake this Blueberry-Gingerbread Loaf.
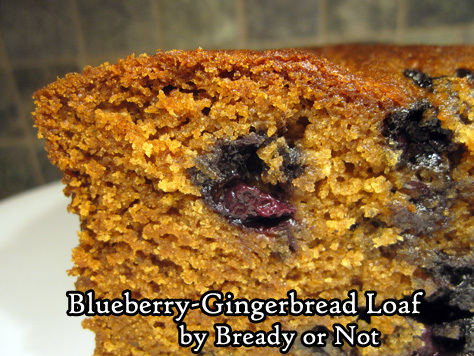
I’m growing increasingly convinced that blueberries can make almost everything better. Case in point: Wensleydale Cheese with Blueberries. DIVINE. This recipe ranks up there, too.

As any gingerbread should be, this loaf is packed with spices that sing of autumn and winter. Blueberries add an incredibly fresh note, a literal burst of flavor that stands apart from the usual tart cranberry.
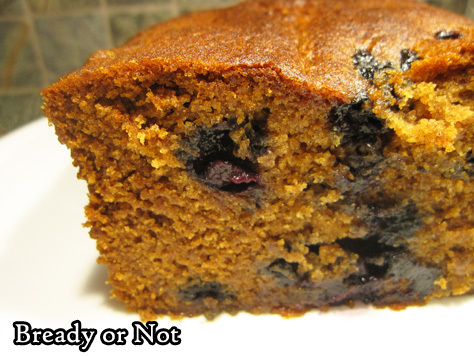
This bread is very moist and tender. It is perfect to slice for breakfasts or snacks, and it doesn’t even need an additional pat of butter.
I’m sharing this recipe in December because of the gingerbread/Christmas association, but let me fervently remind you that delicious foods should not be confined to any season. Print this out and save it for when summer blueberries are bountiful and cheap. Heck, even bake the bread and freeze it for later.
This bread smells so good, though, I bet you’ll find it hard to resist a slice or two.
Bready or Not Original: Blueberry-Gingerbread Loaf
Fresh blueberries and moist, tender gingerbread make a perfect pairing in this loaf that combines the best of summer and autumn.
1/2 cup fresh blueberries (6 ounce pack)
1 1/2 cups all-purpose flour (or mix in whole-wheat, plus extra flour)
2 teaspoons ground cinnamon
2 teaspoons ground ginger
1 teaspoon salt
1/4 teaspoon ground cloves
1/2 cup unsalted butter (1 stick, softened)
1/2 cup white sugar
1/2 cup brown sugar (packed)
1 cup applesauce
1/2 teaspoon vanilla extract
1 teaspoon baking soda
Preheat oven at 350-degrees. Cut a piece of parchment to fit inside a 9×5 loaf pan, with paper extending up the two long sides to form a sling. Apply nonstick spray or butter to pan, place parchment inside to adhere, then grease paper as well.
Wash and pick through blueberries to remove any stems, smashed berries, or moldy ones. Dry blueberries and gently toss with a couple spoons of flour to coat. Set aside.
In a medium-sized bowl, combine the 1 1/2 cups flour, cinnamon, ginger, salt, and cloves.
In a big bowl, beat butter until creamy. Add both sugars, beating until combined and fluffy. Add applesauce, vanilla, and baking soda. Follow up with flour mixture, mixing until combined. Gently fold in the blueberries. Pour batter into prepared loaf pan.
Bake for 1 hour to 1 hour and 10 minutes, removing loaf only after middle has passed the toothpick test. Cool in pan no more than 20 minutes. THIS IS IMPORTANT, as otherwise the loaf can steam up and collapse! Let loaf continue to cool on a rack.
Keep stored in a plastic bag or plastic wrap for at least two days. Loaf can also be frozen for later enjoyment.
OM NOM NOM!
December 10, 2019
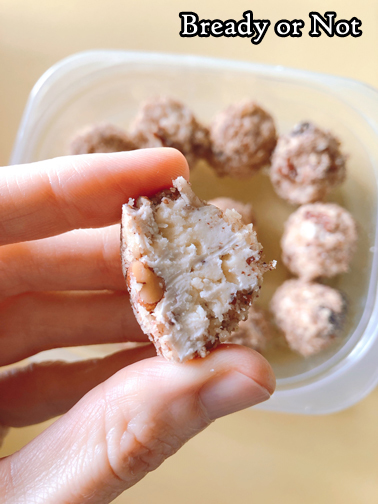
Giftmas 2019: Fruity Wensleydale Cream Cheese Balls & a Fundraiser for the Edmonton Food Bank

If people know only a few things about me, it’s that I bake, I share lots of cute cat gifs, I write some stuff, and that I love, love, LOVE cheese. As part of the Giftmas Fundraiser, I’m sharing a recipe I just made for the first time during my American Thanksgiving last month–and I’m hoping you’ll share some money and goodwill to help the Edmonton Food Bank, too. Your donation (in Canadian dollars) will help a lot of folks in need this season. One dollar equals three meals.
Please give to the Edmonton Food Bank for Giftmas!
Scroll down past the recipe to enter an incredible Rafflecopter giveaway that includes loads of stuff, including a signed Chicken Soup for the Soul Christmas book featuring one of my stories. You needn’t donate to enter the giveaway–in fact, even spreading the news about Giftmas is a big help. Use #Giftmas2019 on social media to do that.
As part of Giftmas, there’s also a Snowman drawing contest. The whole family can take part in this one! Find out the details from Rhonda Parrish.
2019 has been a cruel year, and 2020 could go straight-out apocalyptic. Let’s help each other stay warm and fed.
Let’s start that effort with some delicious cheese.
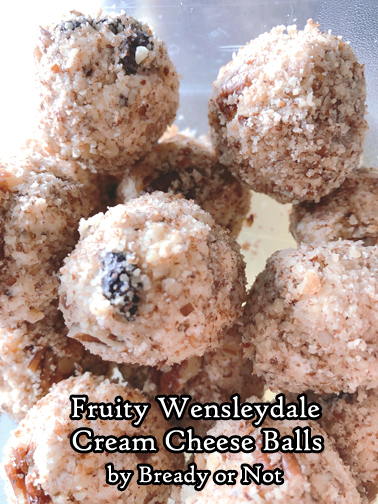
This recipe is inspired by a glorious cheesecake I experience at the Wensleydale Creamery during my dream-come-true trip to the UK in June. I immediately began mulling ways that my cheese-loving mom could enjoy a facsimile of the cheesecake, but with a lot less carbs.

The result is this recipe for Fruity Wensleydale Cream Cheese Balls. This is gluten-free, keto-friendly, low-carb, and probably other buzz words with dashes, too. More importantly, it’s DELICIOUS.
Please support the Edmonton Food Bank for Giftmas!
Bready or Not Original: Fruity Wensleydale Cream Cheese Balls
A delicious, cheesy treat that is low-carb, gluten-free, and keto-friendly! Form tablespoon-sized balls using equal portions of Wensleydale cheese with fruit (though fruity Stilton or cheddar may also work) and cream cheese; add extra dried fruit that matches the cheese; roll them in ground pecans (or maybe even walnuts), and ta-da! Makes about 15 tablespoon-sized balls. Recipe is easily doubled if you need to feed a crowd!
4 oz Wensleydale cheese with fruit (such as blueberry or cranberry)
4 oz cream cheese (half block)
2 Tablespoons dried fruit (that matches cheese)
1/2 cup ground pecans
Use a fork to chop cheese into chunks of various sizes. Add dollops of cream cheese and extra dried fruit and stir together, taking care distribute the Wensleydale without breaking it apart too much.
Place ground pecan pieces in a small bowl. Use a tablespoon and hands to form small balls. Roll in pecan bits to coat. Store in a sealed dish in fridge. Flavor improves after a day as the pecan flavor infuses the cheese balls more. Keeps for at least four days.
OM NOM NOM!
December 4, 2019
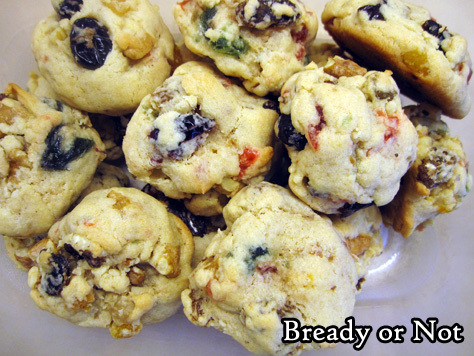
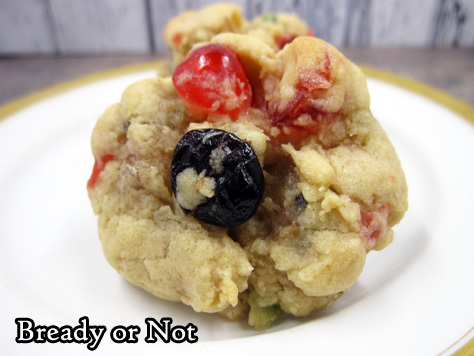
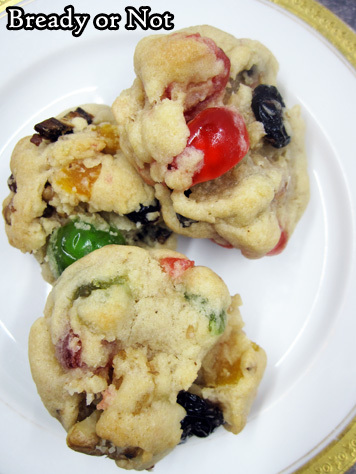
Bready or Not Original: Fruitcake Cookies
These Fruitcake Cookies turned out gorgeous AND delicious, but could’ve been a total disaster.

I completely rewrote a base recipe for these cookies before I even got to the kitchen. Once I started combining ingredients, I realized I had a major problem.
I had too little dough to hold my fruit and nuts. Uh oh! If I continued as planned, they would not be the slightest bit cohesive.
So, I winged it. I added more flour, more brown sugar, another egg. The dough became cohesive. I baked the first batch. They stayed cohesive.
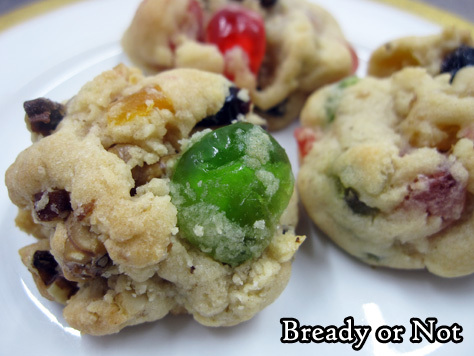
Whew! The cookies were saved. Not only saved, but absolutely delicious. The combination of ingredients brings all the best elements of fruitcake without all the fuss.
Want more fruitcake? Here’s my recipe for Mini Loaves–which wouldn’t be ripened by Christmas, unfortunately–and also another Fruitcake Cookies recipe, this one like oatmeal cookies. I also have a recipe for brownies that uses candied cherries and one that uses candied orange peel in delicious scones. Keep in mind that a lot of fruitcake ingredients can be found for fabulous clearance prices after Christmas, so bake up these recipes in the new year! Good food shouldn’t be confined to one season.
Bready or Not Original: Fruitcake Cookies

The fruit listed in the ingredients is a suggestion. Customize these cookies however desired, to not exceed 2 1/2 cups. The result is a crisp, chewy cookie packed with fruit and nuts (but not too packed). Be sure to include the almond extract; that small amount adds some major oomph. Makes 40 cookies using a tablespoon scoop.
1/2 cup golden raisins
1/2 cup dried cranberries
1/4 cup dried apricots (finely chopped)
1/4 cup dried dates (finely chopped)
1 cup candied cherries (coarsely chopped)
1 cup walnuts (and/or pecans, coarsely chopped)
2 1/2 cups all-purpose flour
1/4 cup unsalted butter (1/2 stick, softened)
1/4 cup shortening
1/2 cup white sugar
1/2 cup brown sugar (packed)
2 eggs (room temperature)
1 teaspoon vanilla extract
1/2 teaspoon almond extract
1/2 teaspoon baking soda
1/2 teaspoon salt
Preheat oven at 350-degrees. Line baking sheet with parchment.
Combine fruit and nuts with 1 cup of flour, coating everything. This will prevent the fruit from sinking as the cookies bake.
Cream together the butter, shortening, and sugars. Add the eggs with the vanilla and almond extract. Stir in the remaining flour with the baking soda and salt.
Stir in the fruit/nut/flour mixture until just combined.
Drop dough by tablespoons onto the prepared baking sheet. Bake for 10 to 12 minutes.
OM NOM NOM!
November 27, 2019
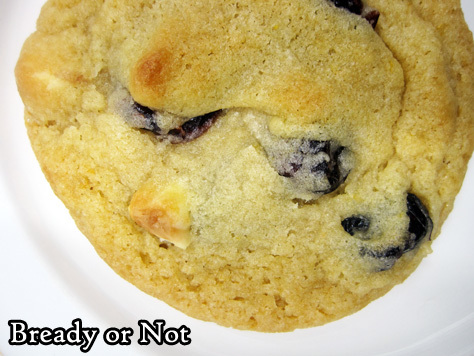
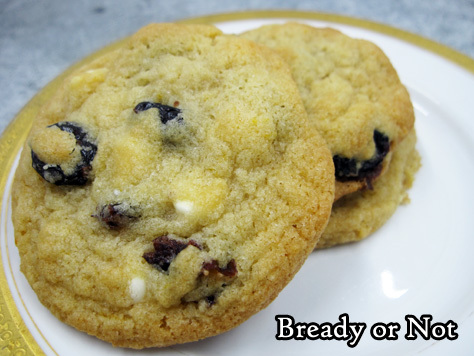
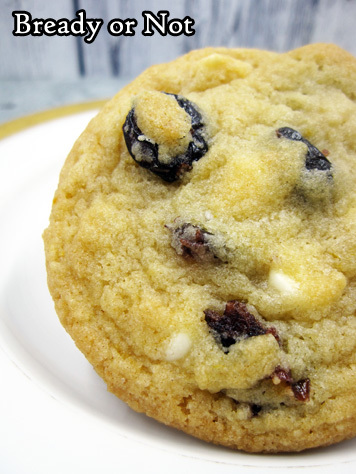
Bready or Not Original: Cranberry-Orange Cookies
These Cranberry-Orange Cookies are packed with vivid, fresh flavor, and a sure way to brighten your day, whatever the season!

The order of ingredients is important here. You take one orange and zest and juice it. The zest goes straight into the dough, while the juice is used to soak the dried cranberries.
Not only does this plump up the desiccated berries, but it naturally amplifies their flavor, too. The tartness becomes stronger, in perfect complement to the citrusy freshness.
Then, you add two tablespoons of the juice to the dough. The rest, do whatever with. It’s mighty tasty to drink!
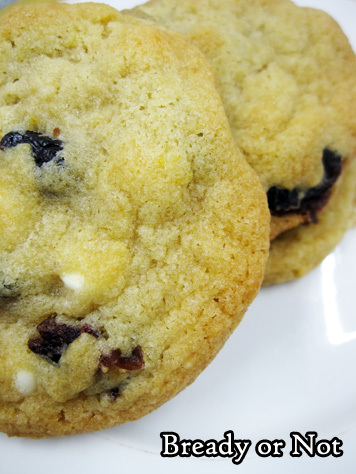
The white chocolate chips add sporadic sweetness to balance the tartness, and it goes so well with the orange flavor, too.
Plus, these cookies are downright pretty on a holiday tray, packed as a gift, or eaten whenever, all the year long!
Bready or Not Original: Cranberry-Orange Cookies

These cookies boast of an incredibly fresh, fruity flavor, with just enough white chocolate chips to balance the tartness of the dried cranberries. Recipe makes 36 cookies using a tablespoon scoop.
1 orange
1 1/2 cups dried cranberries
1 cup unsalted butter ( 2 sticks, softened)
1 cup white sugar
1/2 cups brown sugar (packed)
1 egg
2 1/2 cups all-purpose flour
1/2 teaspoon baking soda
1/2 teaspoon salt
1/2 cup white chocolate chips
Preheat oven at 375-degrees.
Zest then juice the orange. Place dried cranberries in bowl and pour orange juice over them, stir, then set aside to soak
In a large bowl, beat together butter and sugars. Add the egg. Stir in orange zest.
In a separate bowl, stir together the flour, baking soda, and salt. Gradually blend with butter mixture. Measure 2 tablespoons of orange juice from the bowl, and add to the dough. Drain off the rest of the orange juice (discard it or save it to drink) and add the dried cranberries and white chocolate chips to the dough. Combine.
Use a tablespoon scoop or spoon to space out dollops of dough on baking sheet; cookies will spread. Bake for 12 to 14 minutes, until cookies are golden and set. Let set on sheet for 5 minutes, then transfer to a rack to completely cool. Repeat with the next batch(es).
Store in a sealed container.
OM NOM NOM!
November 21, 2019
Forthcoming: a poem in THE BOOK OF DRAGONS next July
This has been in the works for ages, but I’m still gobsmacked: I’ll have a poem in the hardcover, fully illustrated anthology The Book of Dragons edited by Jonathan Strahan, due out on July 7, 2020. The table of contents is like a full list of the best living authors in genre fiction… and then there’s me, like this.

Every story and poem is illustrated by Rovina Cai, who just won the World Fantasy Award for best artist. The book will be a whopping 640 pages. I’m guessing this will be very much a treasury book to keep on a coffee table–beautiful to look and to read. Read the full announcement on the Barnes & Noble SFF Blog! Behold the authors involved!

#SFWAPro
November 20, 2019
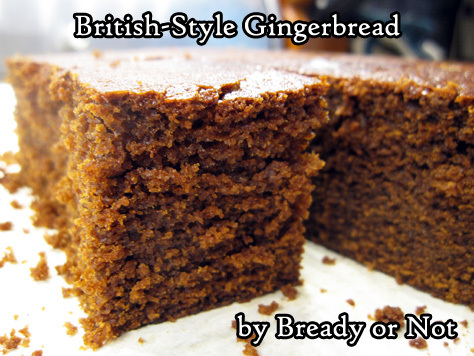
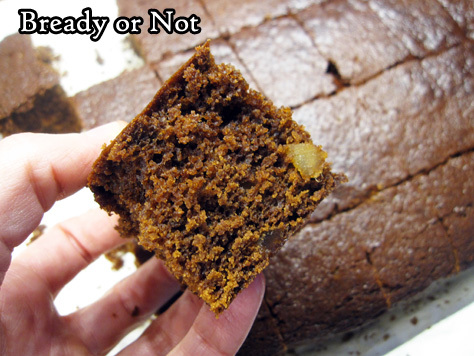
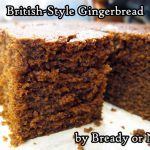
Bready or Not: British-Style Gingerbread
I adore famed British baker Mary Berry, one of the original judges on the Great British Bake Off. This British-Style Gingerbread recipe is modified from her cookbook Cooking with Mary Berry.
She has published a ton of cookbooks in the UK, but this particular cookbook has the measurements translated to American standards! Click on the picture below to order a copy for yourself–but maybe try my take on one of her recipes first, as it’s a great example of what you’ll find.

I’ve eaten and baked a number of American-style gingerbread recipe. This one is different in a lot of ways. First of all, the cooking method. It’s prepared on the stovetop, then baked.
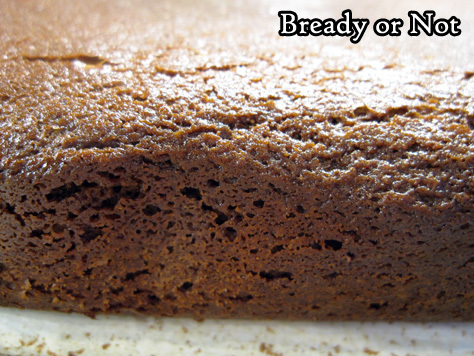
The end result is tall, spongy, and cakey, with a solid ginger kick. And like chocolate recipes, this gingerbread actually improves after a day, as the flavors become deeper and more complex. Almost coffee-like, though it contains no coffee.
Oh yeah, and it’s REALLY REALLY GOOD.
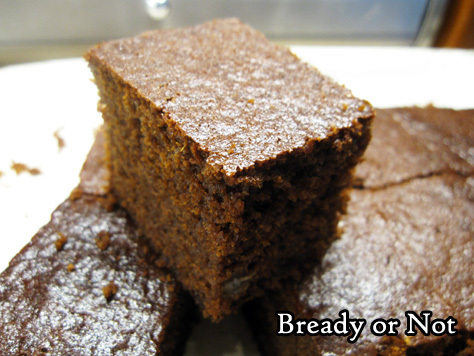
The sporadic candied ginger pieces throughout add vivid pops of flavor, in an already ginger-filled cake.
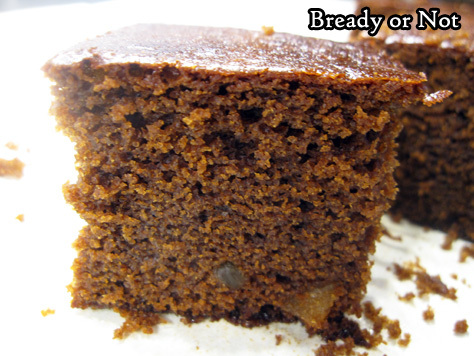
This would be especially good paired with tea, coffee, or a good, stout beer (Guinness, in particular, comes to mind).
Bready or Not: British-Style Gingerbread
This recipe, modified from Baking with Mary Berry, produces a British-style gingerbread cake that is spicier and more complex than the usual American gingerbread. The flavors deepens and improves after a day.
1 cup unsalted butter (2 sticks)
1 cup brown sugar (light or dark, packed)
1 cup molasses
3 cups all-purpose flour
5 teaspoons ground ginger
2 teaspoons ground cinnamon
2 large eggs
3 pieces candied ginger (coarsely chopped)
1 1/4 cups milk
2 teaspoons baking soda
Preheat oven at 325-degrees. Line baking pan with aluminum and apply butter or nonstick spray.
In a large pot, warm the butter, sugar, and molasses until it is combined and smooth. Set aside to cool.
Mix the flour and spices into the big pot, followed by the eggs and the candied ginger pieces.
In a small saucepan, warm the milk–don’t boil! Add the baking soda. Pour into the gingerbread mixture and mix together.
Pour everything into the prepared pan. Bake for 1 hour. When done, it will be spongy to the touch and pass the toothpick test in the middle.
Let cool in pan, either at room temperature or in the fridge. Once cool, use the foil to lift onto a cutting board and slice into bars.
Store in a covered dish with waxed paper or parchment between the layers. Flavor will grow deeper and more complex over the next day.
OM NOM NOM!
November 18, 2019
2019 Works for Award Consideration
The end of the year is nigh. Time for a retrospective with the vain hope that I might garner some award nominations from my fellow writers.
Short stories
– The major story I’m promoting for awards is “The Blighted Godling of Company Town H” published at Beneath Ceaseless Skies #268 the very first week of 2019. It can be read online and is also available for free in podcast form, read by Tina Connolly.
My other new stories this year include:
– “Consider the Monsters” in Diabolical Plots;
– “The Wind Knows All” in Nature
– “By Footpad and Clenched Paw” in Monarchies of Mau: Tales of Excellent Cats available in PDF and print at DriveThruFiction and in ebook at Amazon
– “Clouds Gleam Across Her Eyes” in Daily Science Fiction
– Letter Z in F is for Fairy
– “A Picture is Worth” in Nature
– “The Peculiar Gravity of Home” in Future SF Issue 2; available in print and ebook
– “Awaken My Bones Old and New” in Gorgon: Stories of Emergence

Poetry
If you’re a member of SFPA and reading works for consideration for the Rhysling and Dwarf Stars, please keep these poems in mind–but most of all, this first one, which is a dream publication for me!
– “My Ghost Will Know the Way” in The Magazine of Fantasy & Science Fiction #744 July/August 2019
– “Old Coyote” in Eye to the Telescope Issue 34: Tricksters
– “A Purring Cat is a Time Machine,” “Dollar Store Monsters,” and “Drought and Dryad” in Daikaijuzine
– “These Rocks, This Soul” in Sycorax Journal issue 3
– “Stranger Danger” in Star*Line 42.3
– “Consequences of a Stolen Star” in Kaleidotrope
– “Childhood Memory from the Old Victorian House on Warner” in Uncanny Magazine #27
#SFWAPro
November 13, 2019
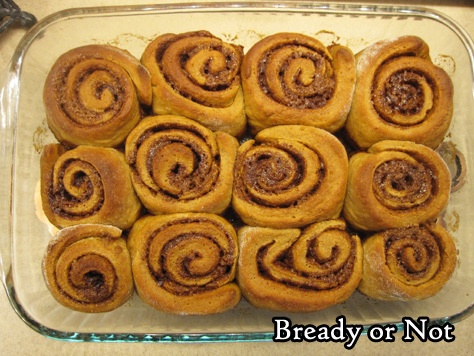
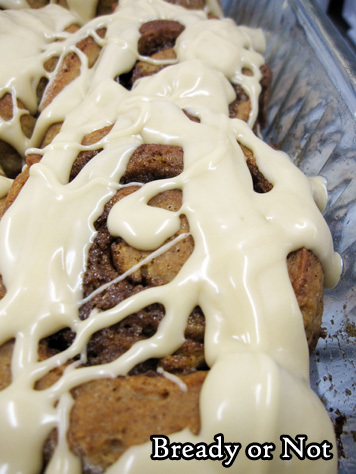
Bready or Not Original: Glazed Gingerbread Rolls
Imagine cinnamon rolls that taste like gingerbread, and you have these incredible Gingerbread Rolls.
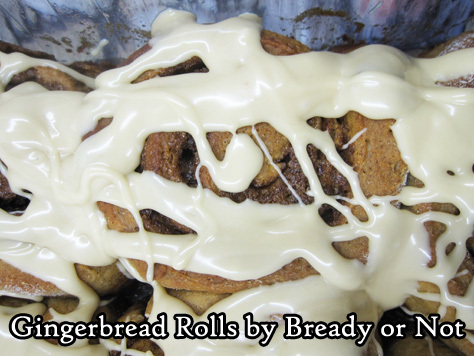
These things are a TREAT. Make them for a special holiday breakfast or brunch, or make them just because.
I had to make this twice to get it right. I followed another recipe closely at first and did a cream cheese frosting, which was delicious, but required the rolls be refrigerated, which made them end up pretty stiff before being eaten the next day.
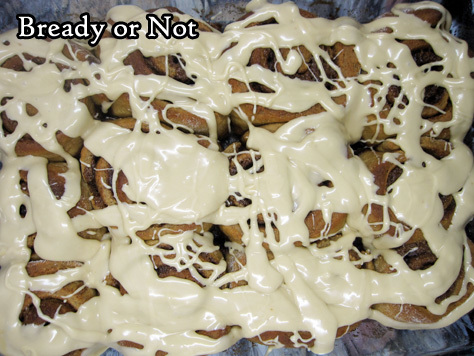
So, take two. This time, I made up my own glaze, and that worked beautifully. The rolls could stay at room temperature, and stay nice and pliable.

One of my husband’s co-workers described these rolls as “not as soft as Cinnabon, but better flavor.” By golly, I’ll take that, especially since the rolls had been made the day before.
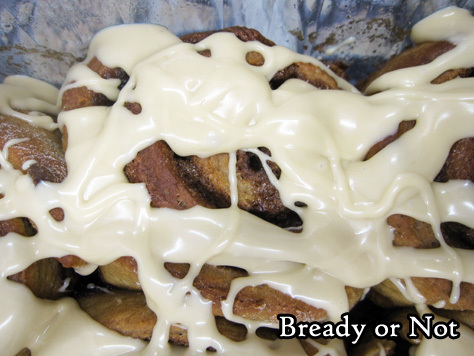
These rolls are as delicious as they look… and they look pretty good, don’t they?
Bready or Not Original: Glazed Gingerbread Rolls

These delicious treats pack gingerbread flavor into soft, delicious cinnamon roll-like form! Store covered at room temperature. They are best eaten within a day or two.
Dough:
1/4 cup white sugar
1 teaspoon ground cinnamon
3/4 teaspoon ground ginger
1/2 teaspoon kosher salt
3 1/2 cups all-purpose flour (divided)
1 Tablespoon dry active yeast
1 cup whole milk (or substitute 3/4 cup half & half and 1/4 cup water)
2 Tablespoons unsalted butter (room temperature)
1 large egg
2 Tablespoons molasses
Filling:
1/2 cup brown sugar (packed)
6 Tablespoons unsalted butter (room temperature)
1 Tablespoon ground cinnamon
1 1/2 teaspoons ground ginger
1/4 teaspoon ground cloves
all-purpose flour (to dust work surface)
Glaze:
2 1/2 cups confectioners' sugar
1 teaspoon molasses
1 teaspoon vanilla extract
1 Tablespoon milk (or half & half, use more as needed)
Make the dough:
In a large bowl (such as a Kitchen Aid bowl), combine sugar, ground cinnamon, ginger, salt, and 1 3/4 cups of flour. Stir in yeast.
In a small saucepan, warm milk and butter. Cook until butter is melted and the milk/butter is between 105 and 110-degrees.
Pour the milk mixture into the flour mixture. Stir. Add the egg and molasses, and stir well.
Use a dough hook on a stand mixer or arm power to beat the dough. Gradually add the remaining 1 3/4 cups flour, kneading until the dough is smooth and pliable. Using a dough hook, this will be 4 to 5 minutes.
Transfer dough to a lightly buttered or greased bowl and cover with plastic wrap or a towel. Let rise until doubled in size, about 1 hour.
Make the filling and assemble rolls:
After the dough has risen, butter or grease a 9×13 OR 8×8 OR 9×9 casserole dish.
In a small bowl, combine the filling ingredients: brown sugar, butter, cinnamon, ginger, and cloves.
Prepare a clean stretch of counter or table with a dusting of flour. Roll out the dough to about a 12×16 rectangle. Spread the filling all over, but not quite to the edges. Starting with the long side, roll into a log.
If using a 9×13 pan, cut the rolls into 12 equal rounds; if using a smaller pan, cut into 9. A piece of unwaxed dental floss makes this easy; wrap around dough log, then pull two ends of floss opposite directions to slice through.
Once the pan is full of rolls, cover with plastic wrap or a towel and let rise again until doubled, about an hour.
Preheat oven at 375-degrees. Once it comes to temperature, place rolls inside. Bake for about 12 minutes then cover with foil to reduce browning, then bake about 8 to 12 minutes. Let cool a bit.
Glazing:
Combine the glaze ingredients to each a thick yet loose texture. Add more milk or confectioners' sugar, as needed, to reach a good consistency. Spoon and spread over the rolls.
Eat immediately, or cover with foil and keep at room temperature. Enjoy right from the pan or warmed slightly in the microwave. Best within a day or two.
OM NOM NOM!


