
Candy Spelling's Blog, page 9
September 6, 2016
3 Kitchen Organization Tips to Save Time
If you’re like me, you and your loved ones live in the kitchen. Whether you’re preparing a delicious feast or gathering around the island swapping stories, your kitchen is one of the places in your home that gets the most traffic. Set yourself up to enjoy these special times by creating a fully functioning kitchen. Here are a few kitchen organization tips that I’ve picked up along the years that help me get the most out of my kitchen.
Grocery List
Creating a grocery list is a no-brainer. There is much to be said about meal planning – it’s cheaper than going out and also helps you stick to a healthier diet. I’ve found that having a list will save time and keeps me from straying into the cookie aisle! I love working off a grocery list that goes by each section of the market, instead of lists based on recipe ingredient lists. My list (see above) is organized by sections: drinks, bread, canned foods, frozen foods, meats, household, deli, vegetables, fruit, and misc. I simply go through the recipes that I want to make for the week and write the ingredients under the corresponding section.
Reusable Bags
I hate opening my cabinets to overflowing bags stuffed away from a previous shopping trip. I’ve long stayed away from paper and plastic shopping bags and opted for reusable tote bags because they are environmentally responsible, long lasting and you never have to worry about food bursting through the bottom. Create a designated space in your kitchen for these bags by adding a hook in the pantry for hanging them or choose a handy drawer where you can fold and store them. I also love this trolley cart. It’s a great place for you reusable shopping bags and to pack your goods at the market checkout. Best of all, they are so easy to store.


Pantry Organization
A well-organized pantry makes it easy to find what you need, when you need it. If yours is a mess you might want to empty it entirely and start over. Discard items unfit for consumption; donate canned goods that you don’t want anymore; and then sort and organize the rest. Find containers that are aesthetically pleasing and functional. Group similar items in bags and in baskets. Utilize lazy susans for oils, vinegars and extracts because glass containers can take up unnecessary space on countertops and shelves. Add in shelving additions like this if you have taller shelves, so you can maximize the space for more storage.


I hope that you will get a lot out of these time saving tips!
XOXO,
Candy
The post 3 Kitchen Organization Tips to Save Time appeared first on Spelling It Out: Candy Spelling on Living, Home Decor, Entertaining, Style & More.


August 31, 2016
How To Style Shelves
When I scroll through Pinterest, I’m bombarded with amazing shelving that is flawlessly styled. Whether you have bookshelves or built-in units in your home, it can be overwhelming to decide which objects to display. Decide on a color palette and then choose your items accordingly. Below are a few tips to create beautifully curated shelves:
 Photo: Summerfield
Have the Right Foundation: You may have a great collection of books and objects but not necessarily the right shelving for display. Make sure to select a shelving unit that enhances the aesthetic of the room. I find that the simplest shelving units create the greatest impact. If you want your curated shelves to be the focal point of the room opt for a simple shelving unit with clean lines.
 Photo: My Domaine
Beyond Books: Don’t limit your shelves to only housing books. It doesn’t have to be completely functional. Use your shelves to display beautiful objects that you’ve collected. You might also consider adding greenery to give your shelves texture and color. You can sprinkle in books to enhance the design scheme you want to achieve.
 Photo: Emily Henderson
 Photo: Centsational Girl
Think in Vignettes: What stories do your objects tell? I think it is important that the objects you choose create a story with texture, color, & height. One way to create an impactful story is to add art. Stylist Emily Henderson says adding art “draws your eye to the back of the shelf, thus making it look deeper and bigger and creating a sense of layer.” Take it one shelf at a time.
 Photo: Studio McGee
Rule of 3: Objects look best in groupings of 3, 5, or 7. It is balanced without looking overly symmetrical or staged. When you use an even amount of objects, the mind automatically looks for the third object in the sequence.
Let your inner interior designer out. Enjoy creating your very own shelving story. These tips should guide you in the right direction, but don’t forget to have fun with it!
Happy Designing!
Xoxo,
Candy
The post How To Style Shelves appeared first on Spelling It Out: Candy Spelling on Living, Home Decor, Entertaining, Style & More.
August 29, 2016
3 Ways to Thank Your Host
Whether you are staying at friend’s house for a week or attending a simple get together, it’s always important to thank your host. No one wants their planning and energy to go unnoticed; organizing a celebration, no matter the scale, is a ton of work that should be recognized. Here are 3 ways to thank your host!
Bring a Gift: No matter the occasion, people love a token of appreciation. It doesn’t have to be anything huge. I think it’s great to bring a small floral arrangement or candle when you are visiting someone’s home. These are no brainers especially for people you do not spend a lot of time with or you are just getting to know. Everyone loves flowers and candles! If the host is a person you are close to you, consider a gift that evokes a memory of a time you spent together. Maybe it’s ticket to an event or concert that you both enjoy, or a reservation to a restaurant you both love. When in doubt, wine or a sweet treat is always a good idea and is appreciated by both the guests and the host!
 Photo: Savvy Home Blog
Post on Social Media: These days, everything lives online! Share a photo from the event and tag the host and guests, and make sure to thank them in the caption. It’s also great to snap a photo of a detail that you loved from the event and share that on social media. This small gesture shows the host that you noticed all the details that went into planning and orchestrating their event.
Send a Note: Break out the stationary. Even if you brought a gift to the gathering, it is always a good idea to send a note of appreciation to your host. No need to write a novel, but make sure you personalize the note. I can sniff out a pre-written thank you note from a mile away! Simply state your appreciation and if possible, share a small anecdote from the party or a special detail. And always hand write these notes!

August 26, 2016
Recipe: Grilled Pineapple & Sorbet Dessert
The summer is coming to an end but things are still heating up here in Los Angeles. These last few weeks of summer are going to be jam packed (and sweltering!) with summer soirees so why not bring a treat that will help everyone cool down and enjoy the last moments of the season! I have a tasty Labor Day dessert recipe for Grilled Pineapple and Coconut Sorbet that is refreshing and health conscious! It’s especially great if you’re going to a BBQ since it is so easy to throw the pineapple on the grill. This recipe can be your swan song to a wonderful summer!
 Grilled Pineapple and Coconut Sorbet
Serves 6
What you’ll need:
3 Tbsp dried shredded and sweetened coconut meat
6 ring slices of pineapple
1 Tbsp honey
1 1/2 cups of coconut sorbet (I love Ciao Bella’s Coconut Sorbet)
Let’s Make Dessert:
Fire up the grill or stovetop grill pan. Like I said before, this is a great dessert recipe for a BBQ because you don’t have to heat up the kitchen.
Spread the dried shredded and sweetened coconut meat evenly on a microwave-safe plate. Microwave on high for 30 second intervals until the pieces of coconut are lightly browned.
Lightly brush the pineapple with honey on both sides.
Grill the pineapple on each side until it lightly charred. (approx. 3 minutes on each side)
Place the pineapple slice on a plate. Top the pineapple with ¼ cup sorbet. Sprinkle ½ tbsp of coconut.
Note: Mint is another great topping for this dish. Replace the shredded coconut shavings with mint leaves for an even more refreshing summer treat!
Let this recipe transport you to a cabana in a tropical location. Happy BBQing and enjoy your last bits of summer!
The post Recipe: Grilled Pineapple & Sorbet Dessert appeared first on Spelling It Out: Candy Spelling on Living, Home Decor, Entertaining, Style & More.
August 22, 2016
Tips to Make Flowers Last Longer
We all know how much I love having fresh cut flowers in the home! An arrangement can be and extremely impactful visual for a room or tablescape. The tricky part with flowers is making sure the bounty produced by your green thumb doesn’t turn brown and wilt as soon as they are in your space! Get the most out of your arrangements by following these easy steps.
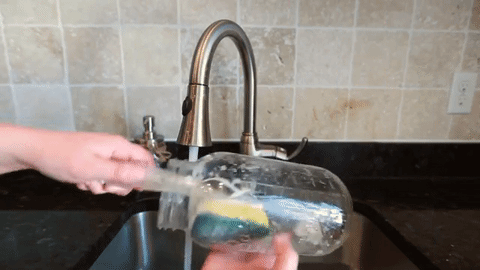 Gif via YouTube
Clean Vessel
Make sure that the vessel or vase that you use to showcase your flowers is clean. Use a little soap and water every day to clean out the vase (while removing the flowers, of course). This will remove any bacteria or fungus growing in the vase that might damage your blooms.
 Gif via YouTube
Water Temperature
Blooms love warm water. The water should be anywhere from 100-110 degrees. Fill the vase with warm water and let it sit until all the air bubbles vanish. Replace the water everyday with this same process and you’ll be able to squeeze a couple more days out of your beautiful blooms.
 Gif via YouTube
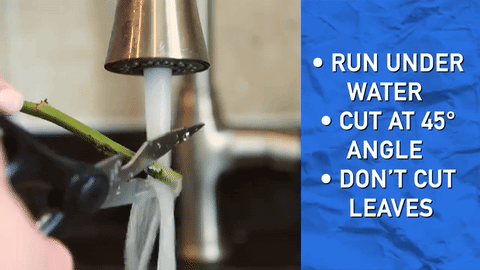
Cut the Stems
Keep the water flowing! Hold the stems underneath the water and cut them at a 45 degree angle. Cut 1-2 inches off. This will create a wide opening for your plants to drink up water. By cutting them under water, you can avoid giving your blooms an air embolism, which affects the way they suck up water. It’s best to cut the stems every time you replace the water.
Use Household Hacks
Some of the best things to keep your blooms alive are within reach. Bleach, aspirin, hair spray, sugar and even vodka help keep your arrangement look garden fresh. The flower food packet that comes with most delivered bouquets provides 3 components to a longer bloom life: sugar (nutrients), an acidifier (to maintain the water’s pH level and help the stems soak up water), and bleach (to reduce bacteria in the water). If you have the packet, sprinkle a bit into the fresh water each day, if not try these at home solutions.
Bleach: I know it seems crazy but if you add 1/4 teaspoon bleach per quart (1 liter) of vase water, your arrangement will definitely last longer. The bleach clouds the water, but in that process it kills bacteria that is detrimental to the life of your blooms.
Aspirin: Most flowering plants prefer acidic soil. They crave that acidity once they’ve been cut. By adding Aspirin to water, you are creating a preservation solution, but your plants still need nutrition. Just crush up an advil and let it dissolve into the water.
Sugar: This is the nutrition component that your flowers desire. Dissolve 3 tablespoons sugar and 2 tablespoons white vinegar per quart (liter) of warm water. Or use a different anti-bacterial solution like bleach or vodka if you are in a pinch.
Vodka: Keep those flowers lush. A couple drops of vodka in your arrangement will prevent bacteria from growing.
Hairspray: Use hair spray just like you would on your own head, and it will keep your bouquet looking fresh. Spray the the arrangement from a foot away on the undersides of the leaves and petals.
 Gif via YouTube
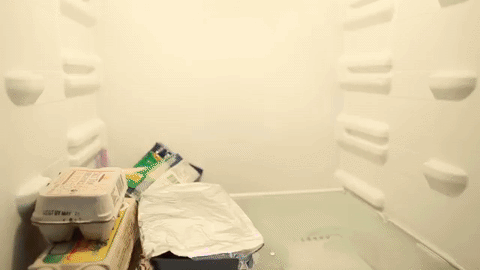
Keep them Cool
The best way to preserve your arrangements is by keeping them in a cool environment. If you are heading out, keep your arrangement in the refrigerator but away from fruit. The cold reduces microbial growth and the metabolic rate of your flowers, which gives them a longer life!
 Gif via YouTube
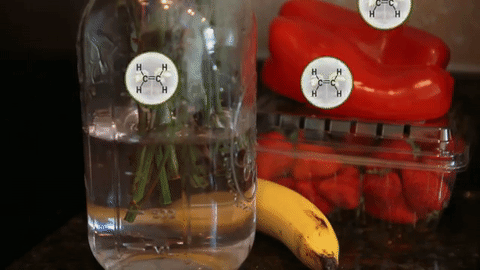
Forbidden Fruit
Keep them away from fruit! Fruit produces ethylene, which tells a plant to ripen, and that will shorten the lifespan of your flowers.
I hope that these tips help your hold onto that arrangement a bit longer!
Xoxo,
Candy
The post Tips to Make Flowers Last Longer appeared first on Spelling It Out: Candy Spelling on Living, Home Decor, Entertaining, Style & More.
August 17, 2016
5 Ways To Wear A Scarf
Don’t you love a great scarf? For me, after a purse and jewelry, it is the ultimate accessory. A scarf is one of the most versatile pieces in your wardrobe and can be used in any season. I like to find scarves that have the same colors as most of my clothes so I can wear it with anything. The pattern doesn’t matter so much as long as the colors are close or complimentary. With this in mind, and your favorite one in hand, here are 5 ways wear a scarf!
The Classic Loop
This is the “throw on & go” way to wear it. Fold the scarf in half and drape it around the back of your neck. Grab the side with both ends and loop it through the other folded side. Center the “knot” at the front and out the door you go!
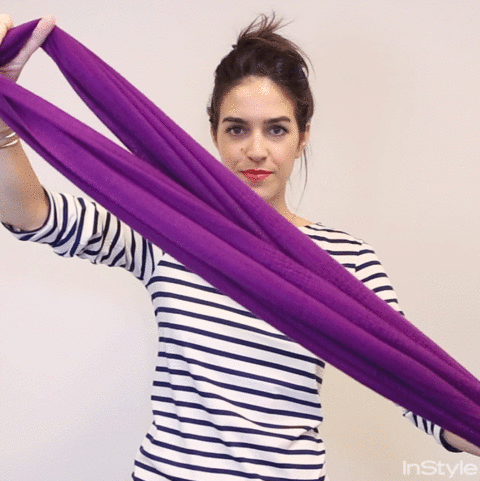 Gif: InStyle
The Half Tie
The half tie can be a sophisticated accessory on any outfit. It’s modern yet relaxed. Start by folding the scarf diagonally and throw it over the back of your shoulders, evenly. Bunch up one side of the scarf so it is completely off your arm. Take the opposite side and wrap it over the other shoulder. Walk out in effortlessly chic style. 
August 15, 2016
Household Chores with The Family
Now that summer is coming to a close, it’s time to get the family organized and ready for another school year by doing chores! Easier said than done, right? Here are some helpful tips to keep you and your family’s space spotless!
The Task at Hand
Unsure of what chores to assign to your kids? Here is a helpful list of age appropriate chores that I found on Pinterest.
Move Over Chore Wheel
Chore Wheels are a great visual reminder of the tasks at hand. I found these printable chore cards from The Idea Room that give your kids detailed instructions for cleaning the spaces they were assigned. This way the expectations are spelled out for them and there is less room for error.
 (Photo and Chore Cards from: The Idea Room)
Divide and Conquer
Finding time in everyone’s busy schedule to clean can be a very daunting task, and it’s always easiest if everyone can chip in based on his or her schedule. This will set a precedent that everyone participates and contributes to the family home. To keep everyone accountable throughout the week, use visuals like a chore chart to mark everyone’s progress (or lack thereof).
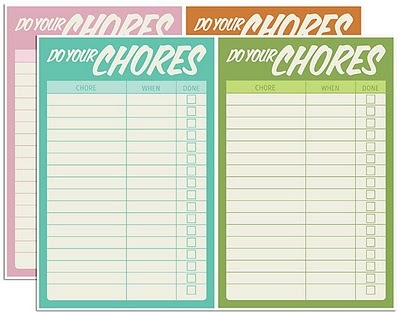 Free Printable Chore Cards via Babble
Payment for a Job Well-Done
The proof is in the pudding; kids love rewards. It doesn’t have to be cash; it could be more screen time or time to spend hanging out with friends. Make sure that your kids know the expectations for the “job” and that their reward will only be granted when the tasks are done. I think “Work For Hire” board is fantastic for budding entrepreneurs.
August 10, 2016
Packing Like A Travel Pro
We spend so much time dreaming of big vacations but the stress of packing can be daunting! Over the years, I’ve packed unnecessary items, forgotten things I need and packed so much that I surpassed the checked-bag weight limit at the airport. Knowing what I know now, here are some of my favorite rules to follow when packing for a vacation!
Roll Your Clothes, Don’t Fold Them
This is the proven method to maximize luggage capacity. Folding can take up so much space that you could use to bring things home.
August 8, 2016
Caring For Your Candles
Candles can add so much to the ambiance of a room. If you’re like me, you want to make them last as long as possible so I thought I’d share a few tips to keep them around for awhile!
Start Strong: When you first light a new candle, make sure that the wax melts across the entire surface area of the candle. This process can take up to 4 hours (depending on the size of the candle). Extinguish the flame once the pool of wax reaches the edges of the vessel. This first burn prevents your candle from tunneling, which is when the outer wax of the candle remains untouched throughout the life of the candle.
Trim the Wick: Repeat after me — “I will trim the wick with each burn.”
Trimming the wick will prevent the vessel from being consumed with smoke and ensure that your candle will burn evenly and slowly. If the wick is too long, your glass holder will soon be covered in soot! You might want to invest in a wick trimmer like this one from Diptyque – its lifted bevel will prevent the trimmed wick from getting lost in the melted wax and it’s even long enough for a tall candle holder. It’s also attractive enough to be left in plain sight, unlike scissors or clippers.
Never Blow it Out: Extinguish the flame with a candle snuffer. Blowing out the flame can damage the wax and life of your candle because particles of the wick get into the wax and will lead to an uneven burn and tunneling candles! It also makes for a better ambiance when you snuff a candle. Your room won’t be left with the scent of smoke.
Know when to extinguish: It’s probably best to extinguish the flame when you notice that it’s flickering or has gotten too high. When it cools off, be sure to trim the wick so you’ll be ready to go next time you light it!
There are many beautiful candles to choose from and here’s a link to a few of my favorites!

Diptyque “Baies”– $62

Jo Malone “Mimosa and Cardamom”– $65
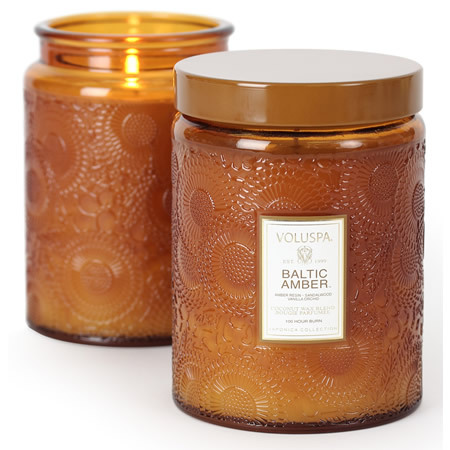
Voluspa Baltic Amber– $24
(Main image via Home Via Laura)
The post Caring For Your Candles appeared first on Spelling It Out: Candy Spelling on Living, Home Decor, Entertaining, Style & More.
August 5, 2016
DIY Centerpiece
If you are hosting a dinner party this summer, you can really elevate your tabletop (and impress your guests with your green thumb) by DIY-ing a leafy table runner made from eucalyptus! It’s a great alternative to fresh blooms since greens are generally much cheaper and have a fragrant, clean scent that won’t overpower your meal.
You can add floral arrangements and candles of different heights around a eucalyptus table garland for a more engaging presentation or simply let the eucalyptus runner “speak for itself”. The eucalyptus runner can be as thick or thin as you need for your table; it is totally buildable. First things first: measure the length of your table. I love garlands that hang off the edges of a long table, but I’ve seen shorter ones that look just as nice; it is up to your vision and aesthetic.
What you’ll need:
Plant materials:
Seeded eucalyptus for the base of the garland
Blue gum eucalyptus
Bonus: Adding florals, succulents, and air plants to the garland
Tools:
Gardening shears
Floral wire (hint: it’s green)
This process is as simple as getting the eucalyptus and wrapping floral wire around it, but I found great detailed step-by-step instructions from Sammy Go of Bud Botanical Banditry, which you can find here.
For a more summer specific garland, I would replace Silver Bells eucalyptus pods and paper whites with blooms like ranunculus, succulents, and air plants. Symmetry is important for the end result, but don’t overthink it. Part of the charm of this particular centerpiece is how understated and natural it looks. Remember: you can always add/remove eucalyptus bunches!
Steps from Sammy Go of Bud Botanical Banditry
Start with one large branch of seeded eucalyptus, and then add a few smaller branches to it, fanning them out to the sides. The width you make this beginning bunch will determine the final overall width of the garland.
Secure each section with floral wire. Tie loosely so the leaves look natural and stay open.
Continue to add more eucalyptus leaves below the starting point and secure them with floral wire.
Bonus: Add succulents, air plants, and blooms throughout the garland. If you want the blooms to last longer than the duration of your party, you can buy floral water tubes.
Stop adding material when you reach the halfway point of what you want the final length of the garland to be. For example, if you want it to be 4 feet long, stop when this first piece reaches about 2 feet long.
Repeat the process to make the other half of the garland. By having two pieces rather than a single one, the ends will match and the piece will look more symmetrical.
To connect the two halves, lay the two ends side by side and nestle them closely together so there are no gaps. Use the floral wire to tie them together. Then lay out the entire centerpiece and remove any excess foliage.
Note: Because eucalyptus is pretty hardy, the garland will last a week or possibly two. To preserve it as long as possible, keep it in a cool place out of direct sunlight.
Finishing Touches:
Once your eucalyptus runner is complete, there are several finishing touches you can add to your table’s cape. Placing white candles in glass holders in a weaving formation around the runner creates a very romantic and whimsical setting. You can also play with different size candles in glass holders to create more dimension and height to your setting. If you want to add more texture to your table setting, a fabric runner underneath the eucalyptus will make it look more dynamic. I would stick to a simple muted color story (think: white dishes and linens with gold accents) for this tables cape and let the green leafy eucalyptus be the focal point.
Happy Hosting!
Xoxo,
Candy


The post DIY Centerpiece appeared first on Spelling It Out: Candy Spelling on Living, Home Decor, Entertaining, Style & More.
Candy Spelling's Blog

- Candy Spelling's profile
- 14 followers

