Kim Hunt's Blog, page 2
September 10, 2023
So, Winter happened … and now it’s Spring.
It rained.
And rained.
And it kept on raining.
And it was bitter cold.
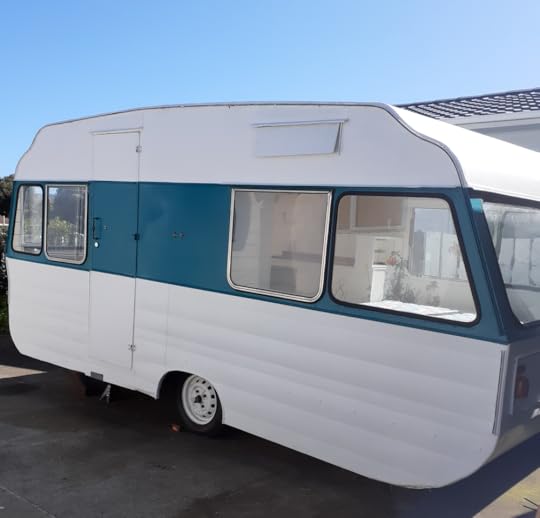
Despite this, I finished most of the Capri fit-out and externals; new running lights front and rear, roof and body sanded and re-painted. All the chassis underneath had been de-rusted and painted at the start of the project, a pretty unpleasant but essential job which took a week to complete.
Inside the caravan, I framed up a permanent queen-sized bed and fitted a new bench made from a recycled timber which I gave several coats of varnish. I have new filament lights for the tarted-up wall fittings. All the surfaces on the ceiling, cupboards and walls were sanded before numerous coats of fresh paint. (Still a few drop-sheets and uncovered squabs lying around in there.)
[image error][image error][image error]Sadly, it was too cold to lay the new vinyl flooring and it was too wet to do any tweaks and touch-ups on the exterior. So those few things had to wait until Spring.
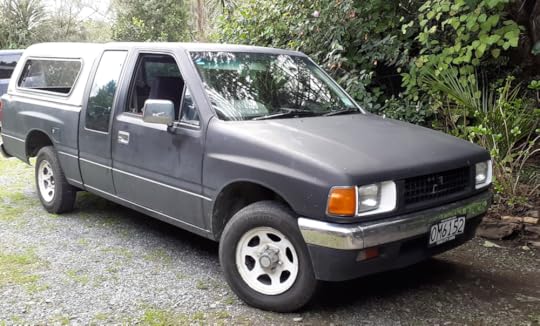
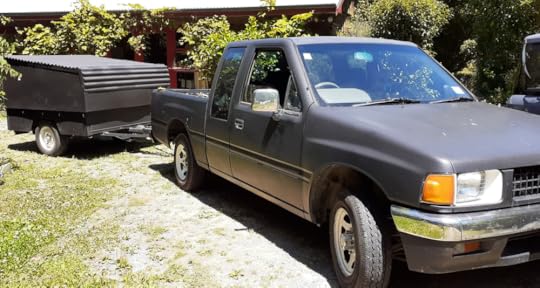
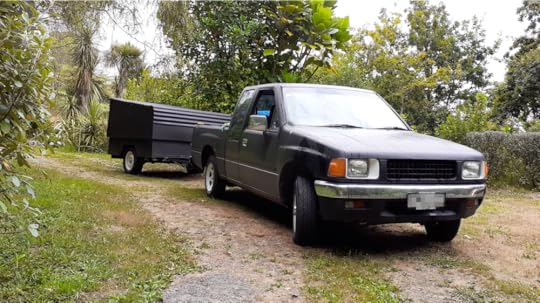
Meantime, my mate Al followed me down the coast to help with taking the beastie for its WOF check. It’s a BIG caravan. Two point four metres wide, nearly four metres long and low to the ground. It tows fine but jeez you can’t see much around it.
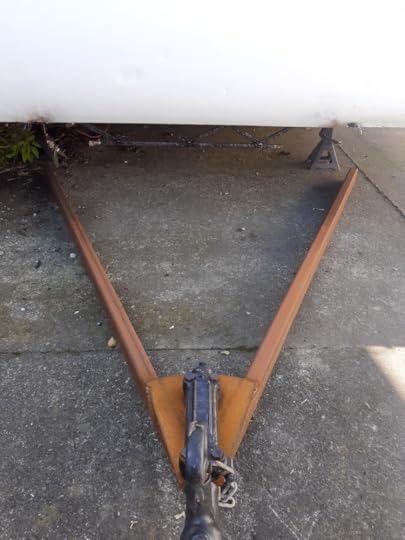
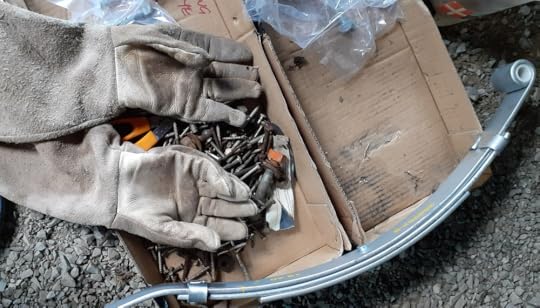
[image error][image error][image error]I was hoping the draw-bar would pass muster, but it didn’t. As it’s a crucial part of the entire structure, linking the tow vehicle to the caravan frame, it has to be sound. The inspector wasn’t happy with a small section and suggested a patch or draw-bar replacement.
Since it’s a critical and specialised piece and not the kind of thing you want to fall-short with, it required a professional.
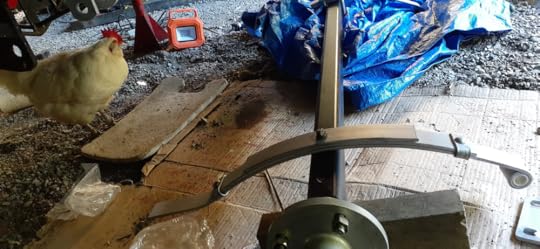
Luckily for me, Al is a welder. He offered to fabricate and fit a new draw-bar. Halleluyah. He’s had the caravan at his place since then, waiting for the weather to improve so he can weld the new draw-bar to the frame.
But the rain …
So, if you were wondering what ever happened to the Capri project, it’s ongoing. Just flooring, curtains and squabs to finish it off.
Meantime, I’ve been publishing the next Cal Nyx novel (available as an ebook and paperback, see website for deets) and working on several other projects. So stay tuned…


April 19, 2023
Project du jour
So, this old girl needs to go. She's nearly 50 years old and needs a spruce-up top to bottom and inside-out. A mighty big order.

This is one of the things I do when I'm not writing, and the writing timetable is intense at
the moment with a publishing date looming in May. Writing is sedentary and a long game in terms of results. You face that blank page or screen and it can be years before the book reaches your readers.
Practical jobs are the perfect foil because I get to move around and do varied tasks that show results.
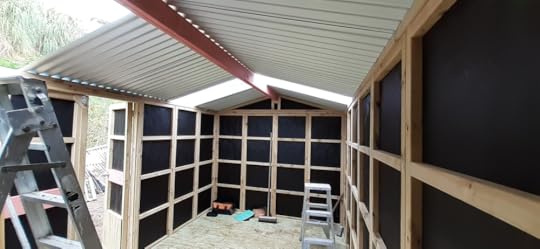
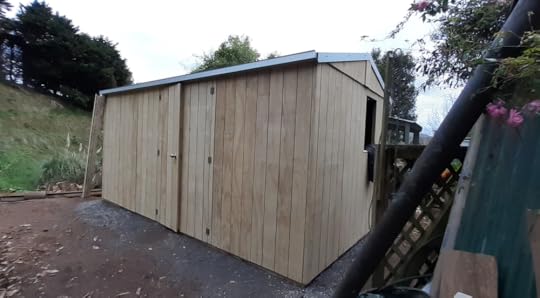
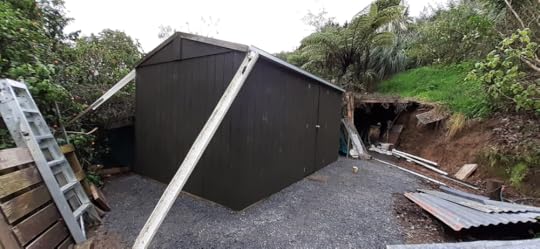
[image error][image error][image error][image error][image error][image error]Wish I could do the big reveal on this one when it's utterly transformed and stunning, but that's a ways off, and with the weather now colder and wetter, the exterior tart-up is stymied for the moment.
Still, there's been plenty done in the 20-odd work days so far. I began at the bottom, literally. The chassis is the metal frame the whole shebang is attached to. Being steel, it's prone to rust, especially in Aotearoa's salty, coastal climate.
I de-rusted and painted the frame 20-plus years ago, which has helped to preserve it. But it needed re-doing and it's not a pleasant job.
I spent 8 days underneath the van grinding and wire-brushing the rust scale and old paint from the entire frame and axles. Then it all had to be cleaned down and rust-converted to neutralise the surface. After that, paint. Two coats. What a mission.
So happy to tick that job off the list, which is a lengthy one.
Next up, prep of the roof and exterior for total repaint.
[image error][image error][image error]Ditto the inside where some small repairs are also needed for dinged-up doors, a broken window to replace, bench-top removal and replacement, build a full-time double bed-frame, replace some framing timber in the rear corner from a historic leak and move a couple of power-points. Oh, and new flooring. Then everything has to be sanded and primed and painted.
[image error][image error][image error]And there's always more fiddly little jobs like revamping the interior light fittings and fixing the exterior running lights and routing new wiring for that,
[image error][image error][image error]Maybe I won't be done 'til spring. But I can assure you it's gonna look a damn sight brighter and prettier than it currently does in the images above.
In fact, here's a little teaser below of how the outside is shaping up.
[image error][image error][image error]Anyway, there's a new Cal Nyx adventure about to be released and later this year, a standalone crime novel set in Aotearoa. So, if that's your cup-of-tea, sign up on the Contact page for updates or follow on the FB author page or TikTok.
Right, back into it. Be patient ... the before and after pics will be worth it I reckon. :)
#butchDIY #butch4femme #workingclassartist
January 4, 2023
The Double-Banger: Fake Fur and Fairy Lights
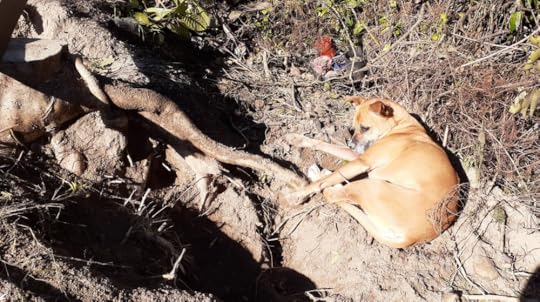
The missus has an upcoming exhibition up North and I want to be there to support her, plus a roadie is long overdue. However, my little camper only accomodates me and the dawg, Gabby. And it's a cosy fit at that.
So I decided to make a slightly larger camper so the three of us can have adventures together. I still plan to take off with Gabby at regular intervals in the Lil Monster.
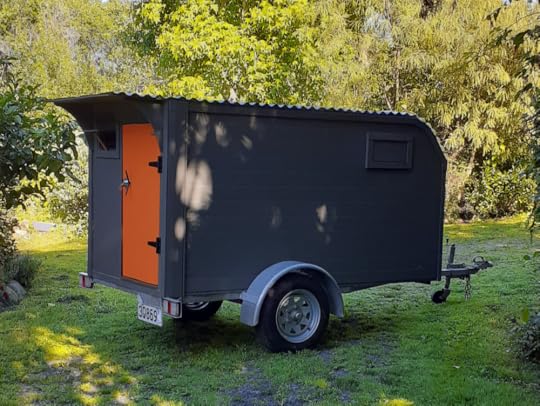
I wanted to make something light and towable with room to sleep two adults and one lump of concrete canine. I also wanted to use materials I already have to keep the costs down. I began with a second-hand jetski trailer.
Traditional stick building requires framing, outside sheathing, vapour barrier, insulation and inner lining. Then painting or some other waterproofing finish. Quite a number of steps and weight and complexity.
I decided to use second-hand refrigeration panels. These come in large pieces which are riveted or screwed together to form walk-in freezer rooms and the like. They're thick poly foam sandwiched between thin steel or aluminium skins. I bought 4 for $30.00 on Marketplace. Approximately 2.3m long and 1.2m wide, they looked ugly and battered but were mostly sound and you can get big sections cut and mounted very quickly. They're also relatively light and strong.
[image error][image error][image error]I cut a curved front to make the leading edge of the camper more aerodynamic for towing. We discussed the dimensions of the build at length wanting to get maximum height within the wind-shadow of the truck. Ditto staying within the wheel track so we decided not to bump-out the camper sides over the wheels.
For the time being, the camper is just for sleeping. We'll carry a small camp sink-unit I made which just slides out of the back of the truck.
[image error][image error][image error]I've spent about 8 days so far on the build and the outside is pretty much done.
Nearly everything is recycled. I mixed paint from a whole lot of free stuff I got at the Tip-Shop. The inside walls are lined with hessian fabric I paid $8 at an op-shop several years back and have used on many projects so far. The roof supports I cut from a leftover piece of 2x2 from a previous project and doubled up ply cut to size. All the trim timber and corner pieces were scavenged from roadside throw-outs from joinery businesses and an old collapsed lattice screen from the garden. The corro roof was second hand from my dismantled sheds. The wool carpet for under the mattress was given to us. It will also provide floor insulation. The door I made from more rescued timber, the hinges were reused from an old gate set. I de-rusted and tarted them up with black zinc paint. For the door handles I repurposed old TV screen legs.
The front 'light-well" was created with an old piece of polycarb panel bent into a curve and topped with a piece of corrugated Clearlite, also reused.
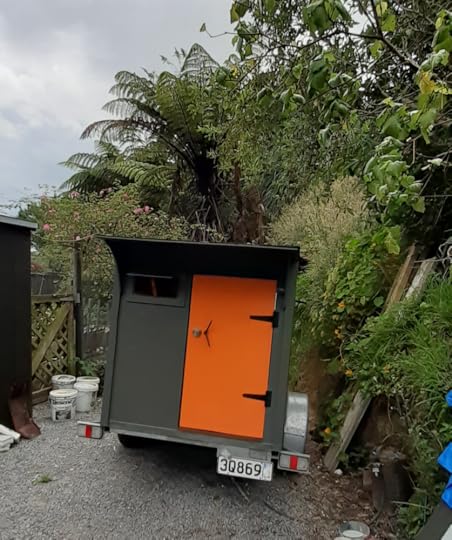
The three vents and wide door should give ample fresh air and the fabric on the walls will prevent any condensation issues inside. The doorstop was made from a rubber cup-washer and a length of old broom handle. The vent cover hinges were all second hand ones I've collected. The covers were made from ply off-cuts.
The only unavoidable new purchases were butyl tape for waterproofing the outside seams and joints, tek-screws, brackets and rivets for attaching the sides, floor and roof. Also sealing caulk, back-door paint and spray adhesive for attaching the hessian to the inside walls.
I'm leaving the inside fripperies for the missus to attend to once her exhibition is over.
Meantime, I'm off for a quick a test-run with Gabby.
Happy days.
November 12, 2022
Oh-oh, she planted her snips

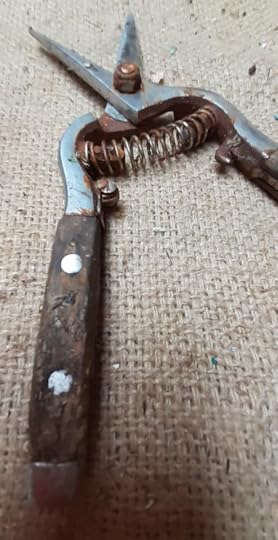
The missus came in yesterday looking disturbed. In her hand, one of her prized "lady tools", the Kent and Stowe pruning snips, jaws rusted and frozen wide, wooden hand grips covered in debris.
"I planted them in the rose bed." she looked forlorn.
"Want me to have a go?' I held out my hand.
"Would you?'
I took them to the workshop. The blades were jammed open and seized with corrosion. I didn't want to force them.
I sprayed the nut holding them together with marine penetrating oil, then loosened it and tapped the rusted bolt out with a small hammer. I wanted to remove the spring as well to de-rust all around that but the lugs holding it in place were a tight fit. I didn't want to damage the spring by forcing it off. I left it attached and worked around it.
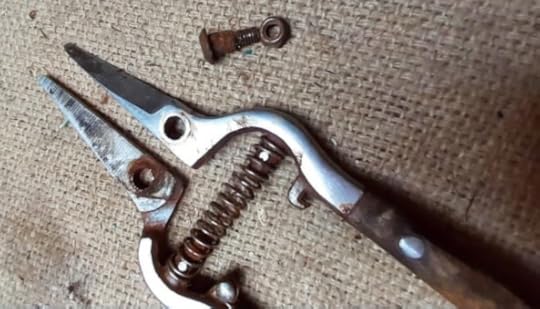
I set to, alternating with a small wire wheel and a nylon buffer in my drill.
Once I'd removed as much muntation as I could on the metal parts, I started on the wooden handles which were showing signs of decay. I gave them a sand and a good dose of linseed oil to help preserve them. Then I wiped over all the metal with Inox marine protectant. Lovely stuff. Not petroleum based, non-toxic.
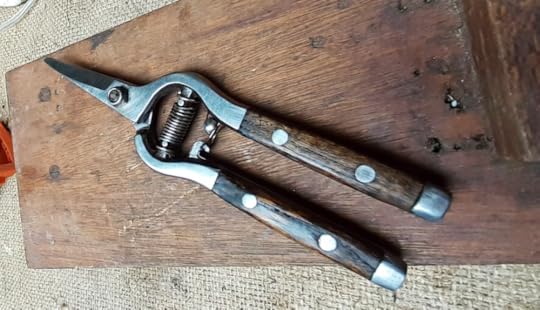
I delivered the tool.
She immediately trimmed a stem of the Dublin Bay rose in a vase on the windowsill.
The snips seem to be in working order. Happy missus.

October 26, 2022
Surprise Topper for the Mini-Truck
On a recent trip, parked up by the sea, I got talking with a friendly fellow who had noticed my camper and pick-up in the past. He was intrigued by the camper, it being a one-off. He'd also seen an old canopy/topper on a mates property and wondered if it might fit my pick-up deck. For those of you not familiar with utes or pick-ups, the open rear deck is so useful for loading timber and gravel etc, but also, having a closed canopy or topper (usually made of fibreglass, steel or aluminium) which is weatherproof and lockable means you can carry extra gear which frees up room inside the camper trailer, where space is often at a premium.
So, I was definitely interested in the canopy. The kind fellow, I'll call him Mr M, said his mate would be happy with $10-00 for it. Winner winner chicken dinner.
We arranged to meet up at his friend's place to check it out. I picked up Mr M and had my tape measure with me. My Isuzu is more than 30 years old. What were the chances a canopy would fit? All utes are different, and each manufacturer can make toppers to fit single or double cab configurations. Still, they cost thousands new, so even if I had to make a few alterations and figure out the fitting, it was worth a look.
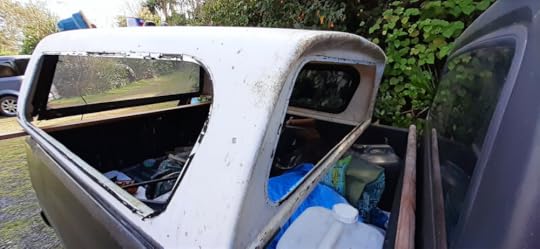
Long story short, the canopy was definitely a goer, slightly shorter than my deck but narrower in width, sitting just inside my top rails. Sweet. Two windows were smashed completely but I figured I could replace them with perspex which is lighter and stronger than glass. Not that I'd ever worked with it but hey, how hard could it be???
Other than the broken windows, the main problem was that my deck-top was about 5cm longer than the topper. We decided it was better to marry the tailgate end up and fabricate a waterproof flashing to cover the gap at the cab end.
First attempt at flashing, I used shower-liner plastic, molding a bend along its length by warming with a heat gun. I spent a lot of time trying to do this having never worked with plastics. I could only heat and bend a small section at a time. Easy to overheat, and as each section cooled as I moved along, the change in temperature caused warping and rippling. I was really unhappy with the result and ditched it. (See below, centre image. Last image is metal flashing in place before the canopy is shifted forwards.)
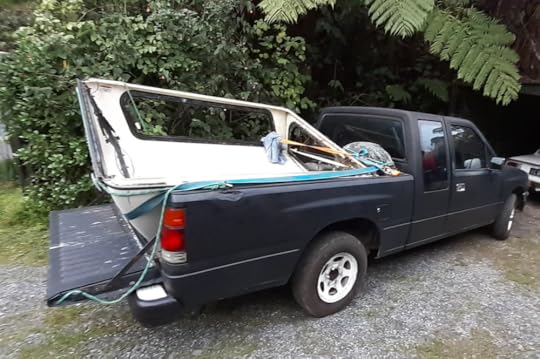
[image error][image error][image error]I don't have metal fabricating gear either, but I found an old piece of roof flashing lying about. It was long enough to span the deck space and I cut it to size with snips. It looked the business, neat and nifty. All I had to do was seal it well when I clamped the topper to the ute deck.
On the topper roof there was a non-functioning high-mount tail-light and the fibre-glass surround was cracked. There were also holes where something had been mounted in the past. I didn't want leaking issues so decided to patch over the whole area. Once I'd filled and sanded, I primed the area and hit it with some shite gold spray-paint I found in the shed to protect it until I had the whole topper prepped for final paint.
[image error][image error][image error]
I removed the broken windows and outer frames, measured up and bought a sheet of perspex from a hardware store. This was about $150.00, by far the most expensive repair piece for the whole job. Pretty happy about that.
The inner window frames were held together with screws and rivets. I had to drill and grind out the rivets to separate the sections as the window is a tight fit and there is no other way to refit the new glazing.
I've not had experience cutting perspex before. I tried using a fine jigsaw blade but it caused cracking so I used a thin metal cut-off wheel on my grinder and it worked fine. Kinda melted its way through but no cracks.
Fitting the perspex into the frames was a bit of a mission. I couldn't use the original seals as they were had it and new rubbers are pricey, so I used a silicon-type sealer on one side, between the perspex and frame, then left it in overnight to cure. Next day I flipped the perspex and frame over and sealed in the other side.
I re-fitted the windows and outer frames into the canopy shell. Some of the hydraulic lift struts were failing so I replaced them with a pair made for large toolbox lids. I bought these for under $20, about one tenth the cost of auto ones, exactly the same size. I just had to swap the swivel-end fittings to suit mine.
One of the rear latches for the tailgate window was munted and the frame was twisted and weak. I cut off the rivets, strengthened the aluminium channel with a section of galv angle and welded the broken latch to another piece of galv angle. I bolted this into the existing aluminium channel. I also strengthened another broken section of channel where the strut attached.
[image error][image error][image error]I didn't have keys to the rear tailgate window locks so I sent away to the manufacturer for replacements. I've temporarily screwed down the windows inside for security. If I decide to make a camper in the bed of the topper, I'll do something more user-friendly with the window locks as there's great airflow with both sides open. But for now, I'm just using the truck to pull my camper and the canopy is for weatherproof storage.
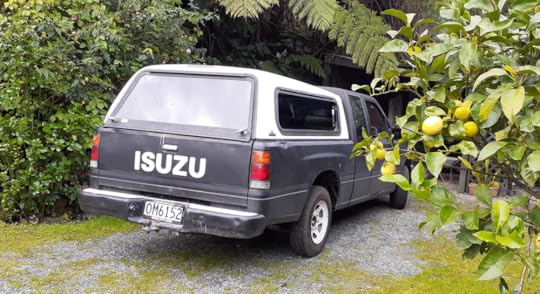
I got paint for the topper from a local supplier to kinda match the truck. It's just water-based (easier than auto paint), and I applied several coats with a mini-roller.
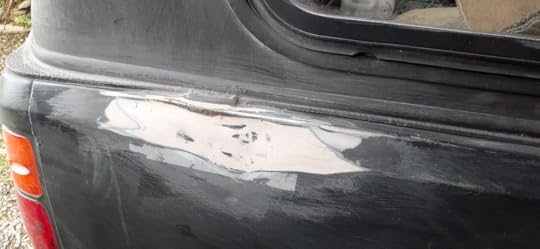
I also fixed a ding in the side of the truck (there when I bought it), to tidy that up as well.
My maiden trip to the beach was just before a public holiday, which I normally avoid. But it was great to get away. The beach was chokka with campers by morning and that evening Mr M, Mr C and a friend happened by for their own get together and bonfire nearby. I was chuffed to be able to show them the transformation of the truck topper.
Total cost for perspex, sealers, paint, keys and struts, was under $250.00. Canopies cost thousands new and often many hundreds second-hand so I'm very happy with the "gifted" addition.
All in all I'm so pleased to have the extra weatherproof, lockable space. I can chuck my water containers, camp chair and bike in the back and not worry about rain. Happy days.
September 18, 2022
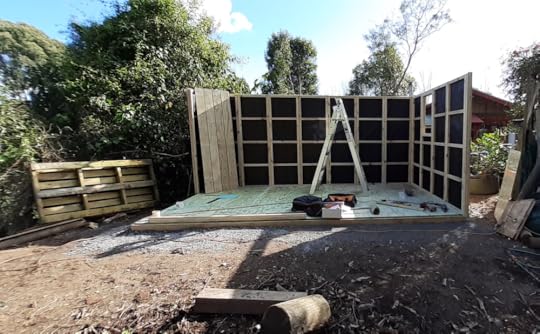
Between Deluges
I've never had a proper workshop, a dry organised place to keep tools where there's clean bench-space to work on projects. Having lived more than six decades, the situation needed rectifying. I bought myself a wooden kitset shed. All I needed to do was build it.
However, the weather had other ideas. It rained and kept doing so for weeks and then months. This held up preparation of the the ground. Meanwhile, my kitset panels were stored in a leaky carport. Not ideal. Despite tarps and corro laid over the top, some of the floor panels got drenched and warped while in storage. Oh dear. Hopefully extra screws at construction time would pull them into line.
I had to clear the site of old falling down pallet sheds which had served some purpose for nearly 20 years but were now riddled with borer. An old chook shed also needed removal and the site had to be leveled and graveled for the new shed foundations and floor.
Doing all this in mud between torrential downpours was tiresome and pretty unpleasant at times. But I had a short window of fine days to get the shed up and watertight before the next onslaught of wet. I ploughed on.
[image error][image error][image error]After barrowing 20 odd loads of top-course from the driveway, I was ready to level and compact for the foundations. Then I laid out the floor bearers, squared them, screwed them up and re-checked all the levels. All good-to-go for the walls.
The wall-panels were 600mm wide and easy to manage on my own. The main roof beam was massive but I figured a way of getting it up and secured. The only thing I couldn't manage by myself was moving and setting the double-doors. The missus came to the rescue.
Rain threatened and the roof wasn't done so I put up tarps two nights in a row.
[image error][image error][image error][image error]That's a solid pool of ice on the tarp. And more on the ground. Very chilly work in the mornings.
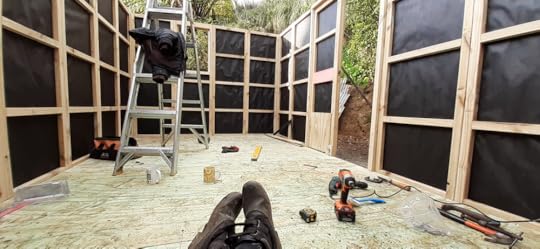
Finally, ready for roofing. I made myself work slowly. Too old for bouncing off ladders these days.
And she's weather-tight, yay.
I love it. I quickly realised the first thing I needed inside was a shelf for my tea mug. A few tweaks are still needed obviously; proper spouting, another coat of paint, more organised storage. Plus tidying up the surrounds. But still ... sometimes I just sit in wonder.
I've already completed several projects in the comfort of the new shed, the biggest being new perspex windows for the truck canopy - an upcoming post - and several small repairs for the missus. It feels luxurious to just open the doors to the quiet, clean workspace and have everything to hand.
One anxious moment: The missus was looking at the window in the gable end where I've nailed an old curtain remnant. She suggested making me some new curtains which was so kind and then she mentioned the word "net." I've since locked the doors.
June 5, 2022
“You’re not putting anything ruched in my chook-shed”
After putting a cob plaster coating on the lower earthbag walls, I lined the ceiling with the same hessian I’d used in my stealth camper. I’d originally used a combo of cardboard and leftover polystyrene insulation (I know, not particularly green but gifted to us and better than going to landfill) in the ceiling and to prevent any poly coming adrift and landing on the floor where the chooks peck about. I just wanted to contain things. It looks heaps better too.
I left all the windows and door open to dry the cob plaster and air things through. The cob on the earthbag half-wall has dried a lot and there’s some cracking which is normal. I probably should have added a bit of sharp-sand to the mix to give it strength and also straw for its tensile qualities … but I didn’t have either and was keen to just have a go. The mud method is pretty forgiving, especially as I just wanted an earth plaster to cover the polyprop bags and keep them protected from sunlight.
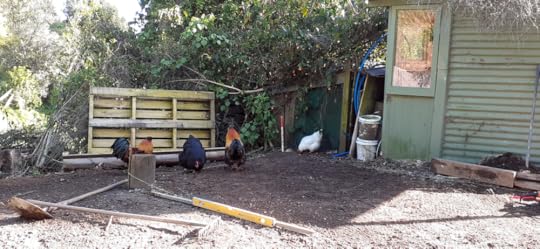
The hut will mostly be kept open anyway as it’s plenty dry and warm enough for the chooks who will only sleep in there at night.
[image error][image error][image error][image error]I left the phone in case anyone wants to call mum.
I lined the floor and bottom of the walls with black plastic (free and used for numerous projects), which is a bit huckery looking I guess but I want to use the deep mulch method which keeps warm, doesn’t smell, gives the chooks a soft landing when they leave their roosts and starts the composting process for when the mulch is eventually removed.
I fixed two new roosts, one a long tool handle, the other a tree branch. I filed down any sharp knots on the branch so it’s comfy for their feet. I brought in the nest boxes and set them up.
The missus came to inspect and when she saw what I’d done to the ceiling she mentioned gingham curtains for the windows. I thought about a padlock on the door to prevent such a twee happening and I left for a couple of days in the camper with Gabby.
This is what I came home to.
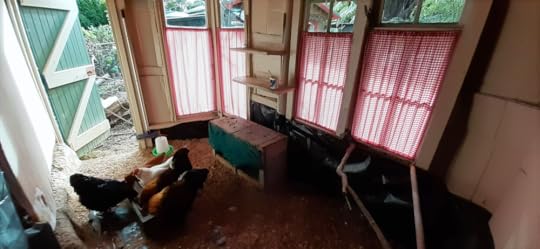
We’ve been slowly introducing the critters to the new digs. We’re feeding them near the doorway and have fenced a new run around the veggie garden. They have a dry spot under the veranda for dustbathing which will hopefully provide a year-round spa for them.
Darcy the white chook still has a view to the day spa from the top of the nest box where she likes to sit so, all’s well despite the curtains.
[image error][image error][image error]So, the chooks are sorted.
Next cob/earthbuilding project: The Teaching Space. Stay tuned.
Oh, and watch out for a new and ongoing series, The Butch Chronicles.
April 30, 2022
Start the day with Cob
We’re making a few changes around the garden and sheds for my new workshop space and I’m turning an old hut into the new chook house, henceforth known as Cob Palace. The base of the walls in the old hut were formed using earth-building technique called earthbag. They were partly plastered with cob mix, but I never finished them. The cob plaster protects the polyprop bags (a “waste” material), from deteriorating in sunlight and gives a good surface for earth or lime plaster later, not that I ever got to that stage.
The missus and I have recently done a weekend Natural Building Workshop run locally by two guys, Tom Beauchamp and Blue Forsyth. I’ve been interested in this stuff for decades and have dabbled in the past, but never been involved in a hands-on learning environment with others. The workshops were very affordable, another factor that made them accessible for us. I’ve built many different shelters over the years, and I love simple structures. I also love any building method that is non-toxic and low-impact on our precious planet. The majority of people on this orb still make their own shelters. It’s empowering and a wonderful thing to live in a space you know intimately because you literally created it and formed it with your own hands. And you don’t need to mortgage your life away to do it.
So, what better on a crisp autumn morning than sinking your digits into a tub of mud. The site foreman, Gabby, had helpfully excavated masses of clay from beneath a tree stump in the new chook run. (The chooks free-range so the idea of a run is simply where they get corralled at night.) Add some sawdust for fibre, water to mix and voila; cob building mix.
Building with cob is totally unmediated by tools. You make the mud, form it into a ball or cob, and smack it into the wall. I found myself using my knuckles, the heel of my hand, my fingers to massage and shape the material. It’s so primal. The cob gives feedback to your hands immediately as to whether you need more or less water in the mix, more or less sand or fibre.
So, that’s how I ended up early yesterday morning, my forgotten cup of tea going cold on the potato mound outside in the garden as I sat on the floor sculpting clay-mud onto the walls.
February 5, 2022
Tweakin' the Lil Monster *
After several trips with the little beast, I figured it could ride better. The inside is cozy and dry and everything works well as a camper. However, the original trailer was built in the 60’s and I reckon it was a farm rig; sturdy and high-off the ground for rough country. All well and good, but on the highways and without half a dozen sheep in the tray, the suspension barely budges and the ride is a bit stiff and harsh. This transfers through to the tow vehicle and I want to reduce the inherent wear and tear. Also, the trailer frame engineering is so heavy duty, I could do with losing the weight of the current axle and suspension: 8 leaf springs!

My plan was to also lower the ride height of the trailer with smaller 13” wheels, (two of the original rims from my Triumph), keeping it within the wind-shadow of the car to reduce drag. Losing the existing 16" wheels would also drop weight from the rig.
To remove the old axle and suspension took 2 hours manually oiling the blade on a recipro saw as I cut through the 4 sets of massive 10mm hangers. 2 hours!!!!!!
When I cut off the old axle and suspension, I had to weld up mounting plates for the new leaf-springs hangers as they were shorter than the originals.
I hadn’t done any welding for 35 years so after borrowing a mates combo, I needed a few practice swipes with the handpiece.
Any fantasies as a result of having no engineering career options available when I was younger have dissipated for all time. Gravity changes everything. Lying on gravel and dirt under the trailer, my neck supporting the weight of the welding helmet, striking an arc overhead when blind, weld spatter burning through my clothing, negotiating cables and electrical connections through the available space amongst the dust and dirt, stinging sweat dripping into my eyes … no, not the same as standing upright making a few practice fillet welds on a clear workshop bench with a lump of mild steel.
I’m stubborn. Two sessions of swearing, ranting and groveling over the weekend and the new brackets were lined up, re-measured multiple times and finally welded on.


I bolted the new leaf springs to the axle and jacked it up into place. A few adjustments, then everything lined up and fitted. Praise Jah.
I put the refurbished wheels on, dropped the trailer off the stands and pushed it out of the carport. So much lower than before. Great, less wind-resistance.
I did a test trip with Gabby the dawg, an overnighter on the coast. Big thumbs up for the barely noticeable trailer, smooth and quiet behind the tow vehicle.
Next job, air in our hair. (To be explained.)
* With thanks to Teja Brooks Pribac for the moniker
January 22, 2022
Six Little Creatures
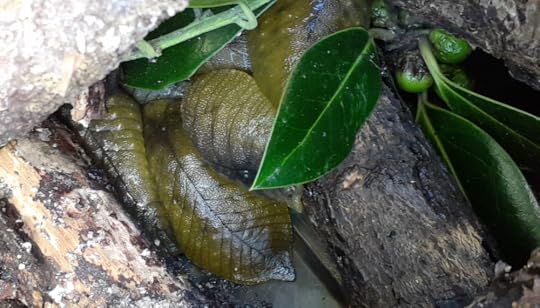
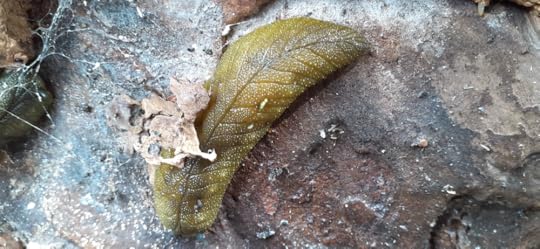
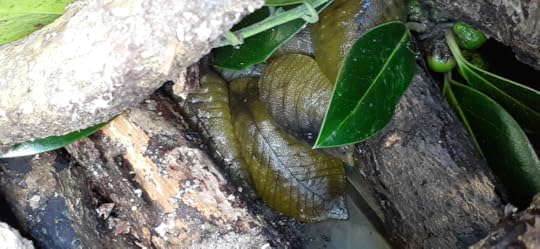
We’d just dropped a 17m high holly tree at a friend’s property. The massive trunk split in two when it thumped into the ground and continued to creak and crack, vines attached to the top branches, stretched taut, and caught in nearby trees. I cautiously inspected the now horizontal trunk, just to make sure it was safe and wouldn’t roll. The cleft where the rend occurred was narrow and calloused with bark. An acute joint between trunks or branches is inherently weak. Though it was hot and dry, and the ground dusty with weeds curling and desiccated, there was water evident in the broken trunk. It must have been trapped, pooled in the narrow, protected space between the trunks.
I noticed something when I looked closely at the bare wood and folds of bark callous. Shapes, green and humped, some with little nodules. Native leaf-veined slugs.
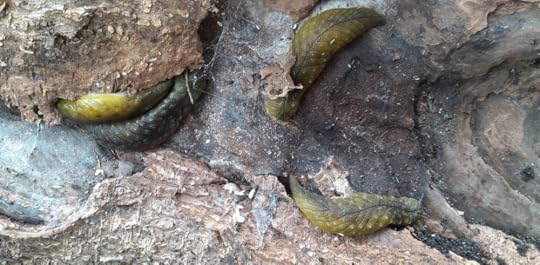
I’d read about them but never ever seen one. And here were four.
I called Biz over and showed her.
We couldn’t just leave them, they’d dry out in the heat and the ground was impenetrable, no sheltering humus layer.
“We’ll make a vivarium," she said.
“A what?” Not liking the beginning of that word.
“Like a terrarium, for reptiles.”
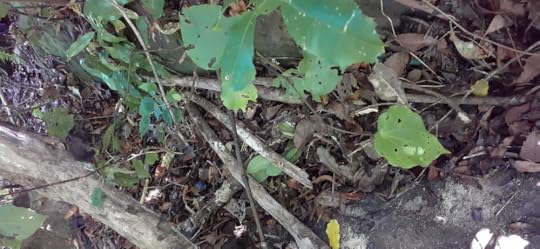
We collected junk. We emptied an old vegetable crisper from a fridge we’d brought our camping gear in. Lined with leaves and pieces of decayed branches, we made a bed for the critters and covered them with more leaves. Biz got water and sprinkled it in to dampen the wood.
Were there any we’d missed? I climbed around the other side of the huge trunk, checked the opposite face of the cleft. Sure enough, two more little flat gherkins. I couldn’t reach them and had to guide Biz from the other side, my eyes, her hands.
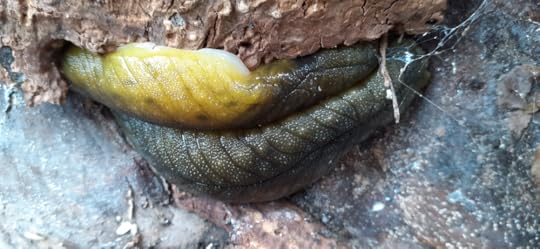
Six in total, between 4 and 6 cm long, their bodies either flattened or humped. We covered the container with a piece of broken corrugated plastic, topped that with an unturned, rusted roasting pan to keep it dark and put them in the shade under the truck.
When it was time to go home, I nestled rubber kneeler pads around the sides of the slug house and tucked it beneath a tarp with our gear for the journey.
We got home late so I left them be in the cool of the carport. Next morning, I got them out. I found all 6 huddled in a pile together on the bottom of the crisper. Apparently, they do this to maintain humidity.
I’d decided on a spot on a south facing bank, cool and shady, covered in established native trees I’d planted years ago. Lots of leaf litter on the ground. I gently laid them in a hollow under a bank, chatting softly to them. I covered them with lots of decaying leaf matter and criss-crossed branches to protect them (hopefully) from rats and hedgehogs.
I’m sprinkling them daily with water as it's parched and hot out. Haven’t uncovered them to check as I figure they need some peace ... but so tempted.