
David duChemin's Blog, page 39
March 7, 2013
Different Ways to Point
 We had an interesting conversation in Hokkaido one evening, and it stands out because when you put 15 photographers together for a meal, and there’s no shortage of drink, conversation tends to end up with everyone telling lies about how long they can hand-hold their long lens, or how Ansel Adams was a total hack. This time it was about the potential for photographers to tell better stories, which I believe we have. But I mis-communicated on a point when I emphasized the story-telling to the exclusion of other ways of pointing.
What I mean by that is this: Anne Lamott says that “art, to be art, must point at something.” I think she’s being descriptive here, and not saying what art must or must not be, but I think she’s right. I want my photography to point to the world I see, and in which I find great delight, and say, Look at this! I want my art to move the imagination and heart. And I believe stories, and the implied stories we can make with our photographs, are powerful. But stories are not the only way to move the human heart or mind.
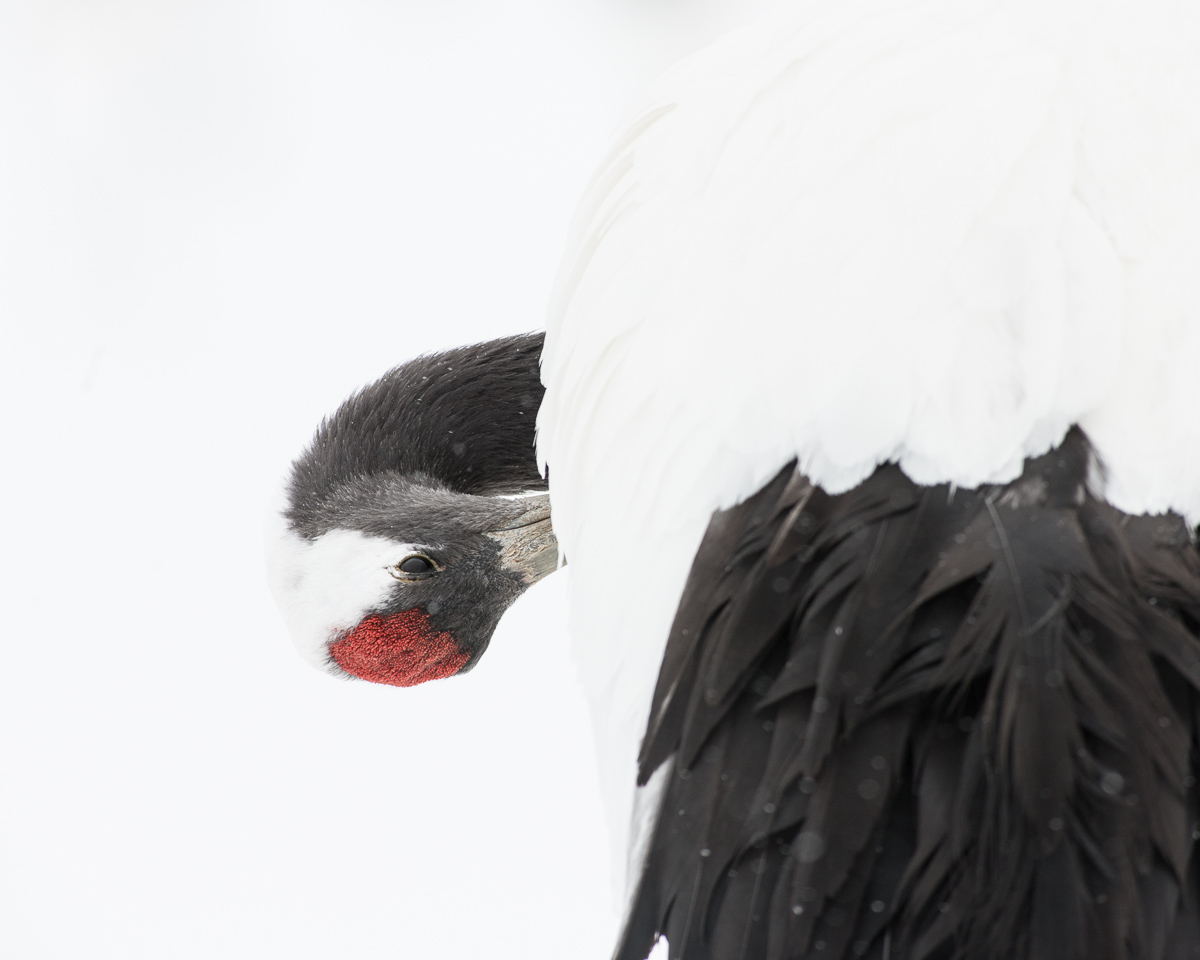
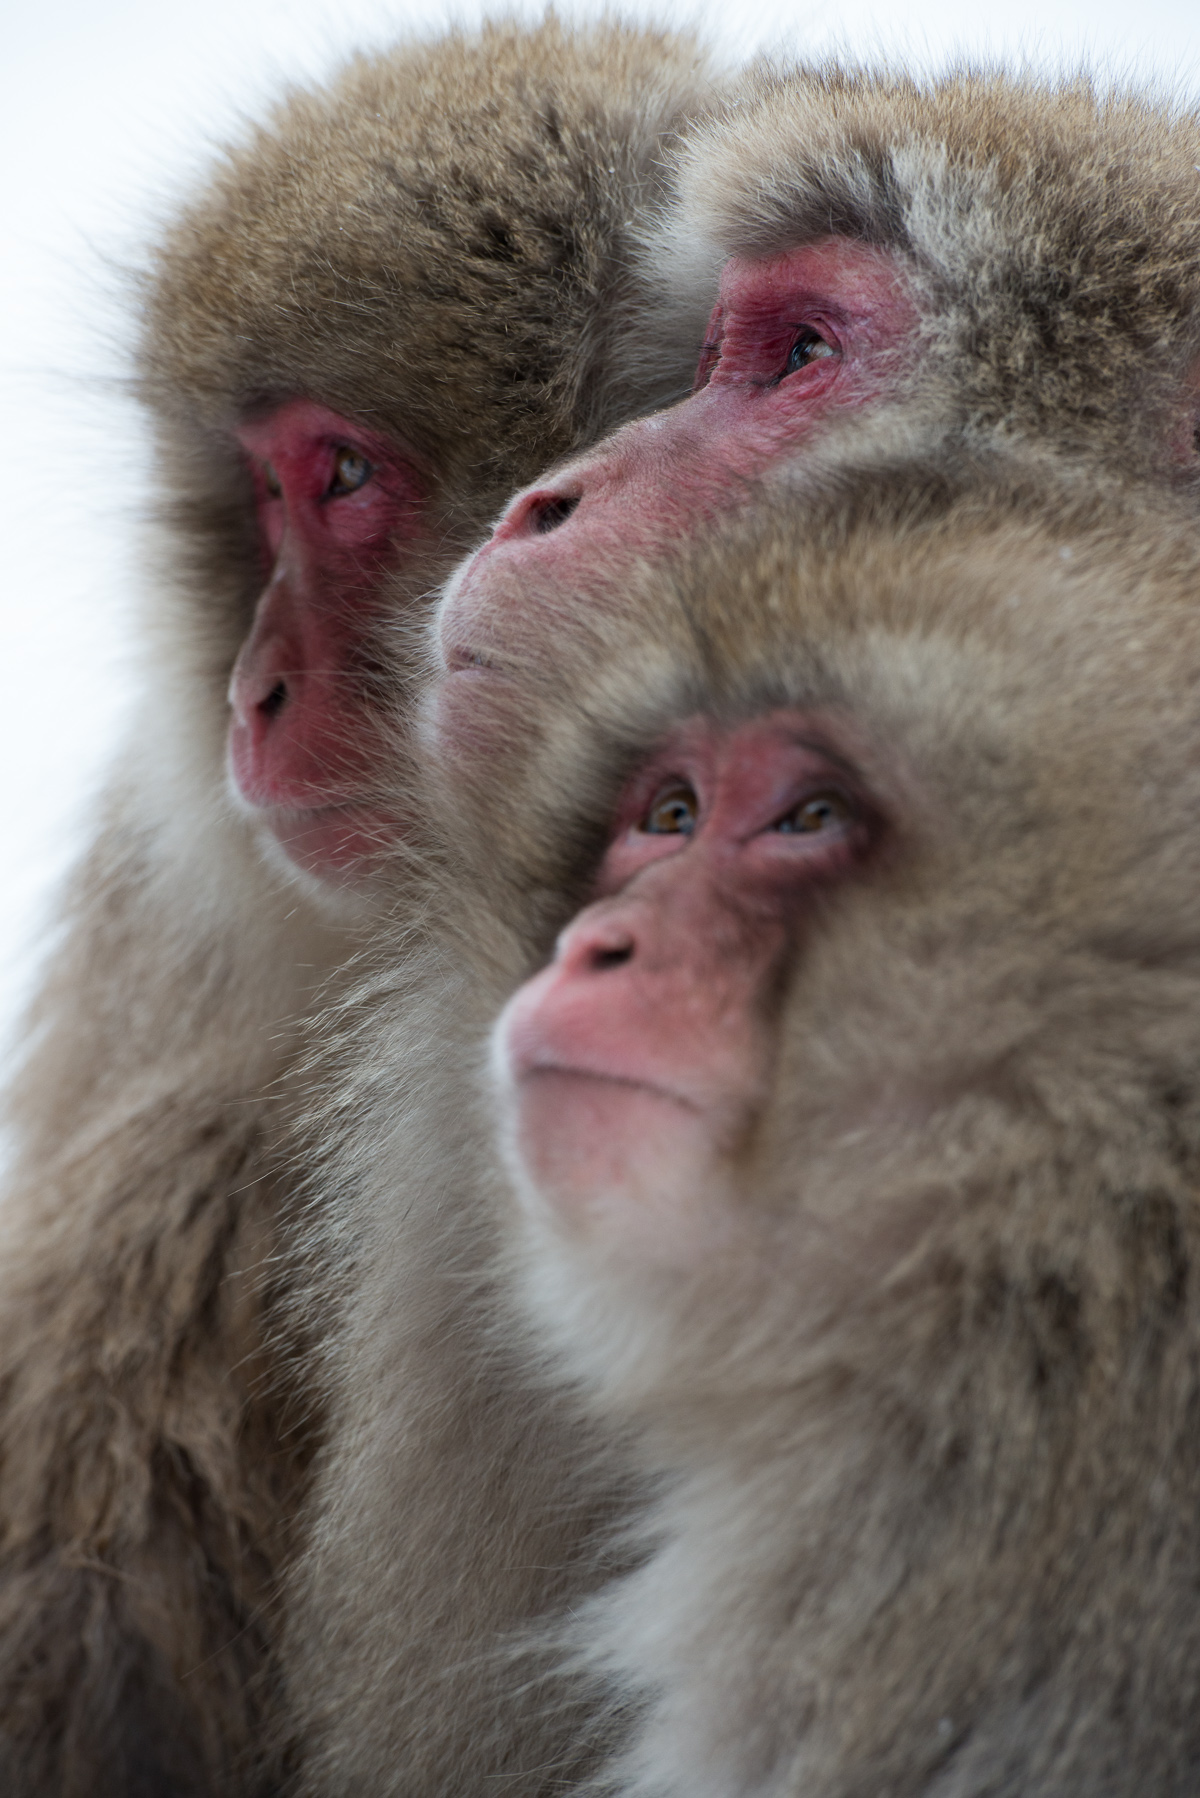
Sometimes someone asks, David, what’s the story you’re trying to tell here? I stare at them blankly, because I’ve got no answer. It’s the wrong question. The question, for me, is What are you pointing at? Sometimes I’ll use elements of story. And sometimes I won’t. Words can be used to write narrative, but they can also be used to write poetry. Photographs, likewise, can be abstract or impressionist. They can be, simply, about line, shape, harmony, balance, tension, or colour. The image at the top of this post is not about story to me. Sure, I could make something up, but to me this photograph is more poetry than prose. It doesn’t make it weaker.
If you choose to use story, in your photograph, to point to something, it can be truly compelling. The human race has relied on story and the power of myth to give and communicate meaning, for thousands of years. But we point in many ways and there are things a story can not do. Don’t burden your work with the need to tell stories. Burden it, if it’s a burden at all, with the task of moving hearts and minds. The rest is a matter of how.


March 5, 2013
Editing Hokkaido
 Coming home from Hokkaido with 8000 images to edit should seem intimidating, but it isn’t. I got a couple requests from people to share my editing process, which hadn’t even occurred to me until I got them, because I’m pretty much done already. So then I went and told Twitter and Facebook I’d show people how I do this painlessly and I’m worried people are going to read this looking for a magic bullet. So, here are my caveats: This is how I do it. For me it’s painless. By editing I mean the process of choosing images, not processing them. And finally, the software doesn’t make a spot of difference – use what works for you. Hell, use contact sheets and a red marker, if you want. It’s the photographs that matter, not which tool you use to get there.
If you haven’t seen some of the images here are links to Postcard from Yamanouchi, Postcard from Hokkaido, Last Postcard from Hokkaido, and a Hokkaid Re-Cap, with more images and the March Desktop Wallpaper.
1. Field Edit.
When I say I had 8000 images, understand that I was shooting on high-speed burst. Way too many frames of monkeys, but the snow was falling hard and I wanted the best chance at useable frames without a snowflake over an eye or something. Same with the birds, all of which move fast. The eagles were incredibly hard at times, and one morning I shot 1000 images, all panning with slow shutter speeds, knowing my failure rate would be through the roof. My usual practice is to shoot fewer frames and be more selective in-camera. But daily I do a field edit. Very rarely do I let a day go by without doing this. Let it slide and it begins to backlog. If it’s an assignment, then this is the stage I do captioning and add notes about model releases. I do it this way:
Import and view as smallish thumbnails in Lightroom. Small thumbnails show me the gesture/composition. If I like it, I give it a 5-star rating. If I don’t, I leave it. I tend to be very binary this way. It’s either Hell, Yes – or it’s No. I don’t polish my turds. If it’s not right, I let it lie. This immediately cuts my editing down to fractions of my total capture. I don’t create so I can have a ton of images. I don’t care if I get one in 1000. Keeper-rate means nothing to me. I learn, I move on, and I’m grateful I got one. I usually get a couple more, but quantity of rejects is irrelevant – they’re what it takes to get to the good stuff, part of my process. If you find yourself looking at a sequence and asking which image sucks less, do yourself a favour – they all suck. Move on. Your photography will get better if you spend less time justifying your weaker frames, and more time learning from them. Edit to find your best frames, not the most frames you can squeeze out of a shoot. 12 beautiful, compelling, images, are better than 100 mediocre ones.
Sort images to show only 5-Star ratings, then view at 100% and eliminate images that are unacceptable for technical reasons. If they’re not sharp enough, or not blurry enough, or show some other reason – perhaps on viewing it larger the gesture isn’t right – someone blinked, or something – I remove the 5-star rating and it disappears from my cut. I could use flagged picks, but I use 5-stars or nothing. Just the system that fits my way of thinking. But there are lots of ways to use ratings, and this isn’t about that. An image is either a yes or no to me.
I make photographs because I love lines, light, and moments. I think these are our basic building blocks of composition, no matter what you’re shooting, so that’s the Holy Trinity of my editing process. It’s the same I use when I have the camera to my face. What are the lines doing? What is the light doing? What’s the moment? If there are no lines, light, or moment that wows me in some way, I move on and the images don’t get a second chance until step 3.
2. Home Edit.
A small 11″ MacBook Air can only show so much. By the time I get home I’ve got a roughly edited body of work that I immediately export to my main computer, a 27″ iMac. I don’t wait. I can do everything else, including sleep, unpacking, and laundry, while files are being ingested. Then:
I back the files up to my RAID unit, and immediately to one of two off-site backup drives.
Convert all images to DNG and delete the Nikon NEF files. All I use is DNG. This takes a while. I let the computer do its thing overnight.
Look through all 5-star images, remove spots, tweak histograms, do any dodging and burning.
Remove anything suffering from monitor-shock, that sick feeling you get when that killer image on the back of the camera doesn’t pass muster when you see it at 100%. Hit 0 and the 5-star rating disappears.
Create a collection. Best of Hokkaido. Run a Lightroom backup again.
Print work. This often takes days or weeks. Happy not to rush this stage.
3. 6-Month Edit.
I’ll come back to this work. I always do. I let the best rise to the top immediately, and let the rest sit. New images show themselves with time, while that same time shows me weakness in images I initially thought stronger. Printing that work helps with this too. After living with those prints for a few months, even a year, I’ll pull some from my collection, replace them with others. I’ll often do a 1 or 2 year Edit as well, for the same reasons. A little distance helps you see things differently, often more clearly.
I think the most important part of the edit for me is in not allowing myself the luxury of the angst-filled second-guessing. I know photographers who lose sleep over picking images. Is it strong? Isn’t it? Is it a 3-star or a 4-star? I admit that my own tastes and ability to know which images are strongest to me is something I’ve acquired over 25 years, but listen, if you love the image, make it a pick (Love it, don’t just pick it because you need 12 mediocre shots. Love it!). You can un-pick it later. This isn’t Sophie’s Choice. If you don’t like an image, let it lie, you can change your mind later during the 6-month edit. What is most important is that you know what you like. If sharpness is the be-all/end-all for you, then allow that to guide you. I’m not sure most people are moved first by how sharp an image is, and I’m not either, so I go with composition and gesture first, which is why I use the small thumbails. I can see little else except the lines, shapes, balance, tension, and colour. The rest doesn’t matter. Don’t let this process grind you down.
It’s important to remember that any task will fill the time you’ve budgeted for it, and if you’ve budgeted to just “edit until I am finished,” then you’ll be going for weeks. Give yourself tight time limits. Work within that constraint. You’ll begin to get a little more ruthless and that’s a good thing. Photographers can afford to have fewer delusions about their work. To misquote Hemingway, “photograph drunk, but edit sober.” Anyways, this is my way, it doesn’t have to be your way, but if any of this is helpful, run with it.
For more, I’ve written an articles on The Art of the Edit, and Missing The Shot / Capturing the Moment, in the first two issues of PHOTOGRAPH which I publish, adore, and am happy to shamelessly promote. You can see them here at Craft & Vision.
March 1, 2013
Hokkaido Re-Cap
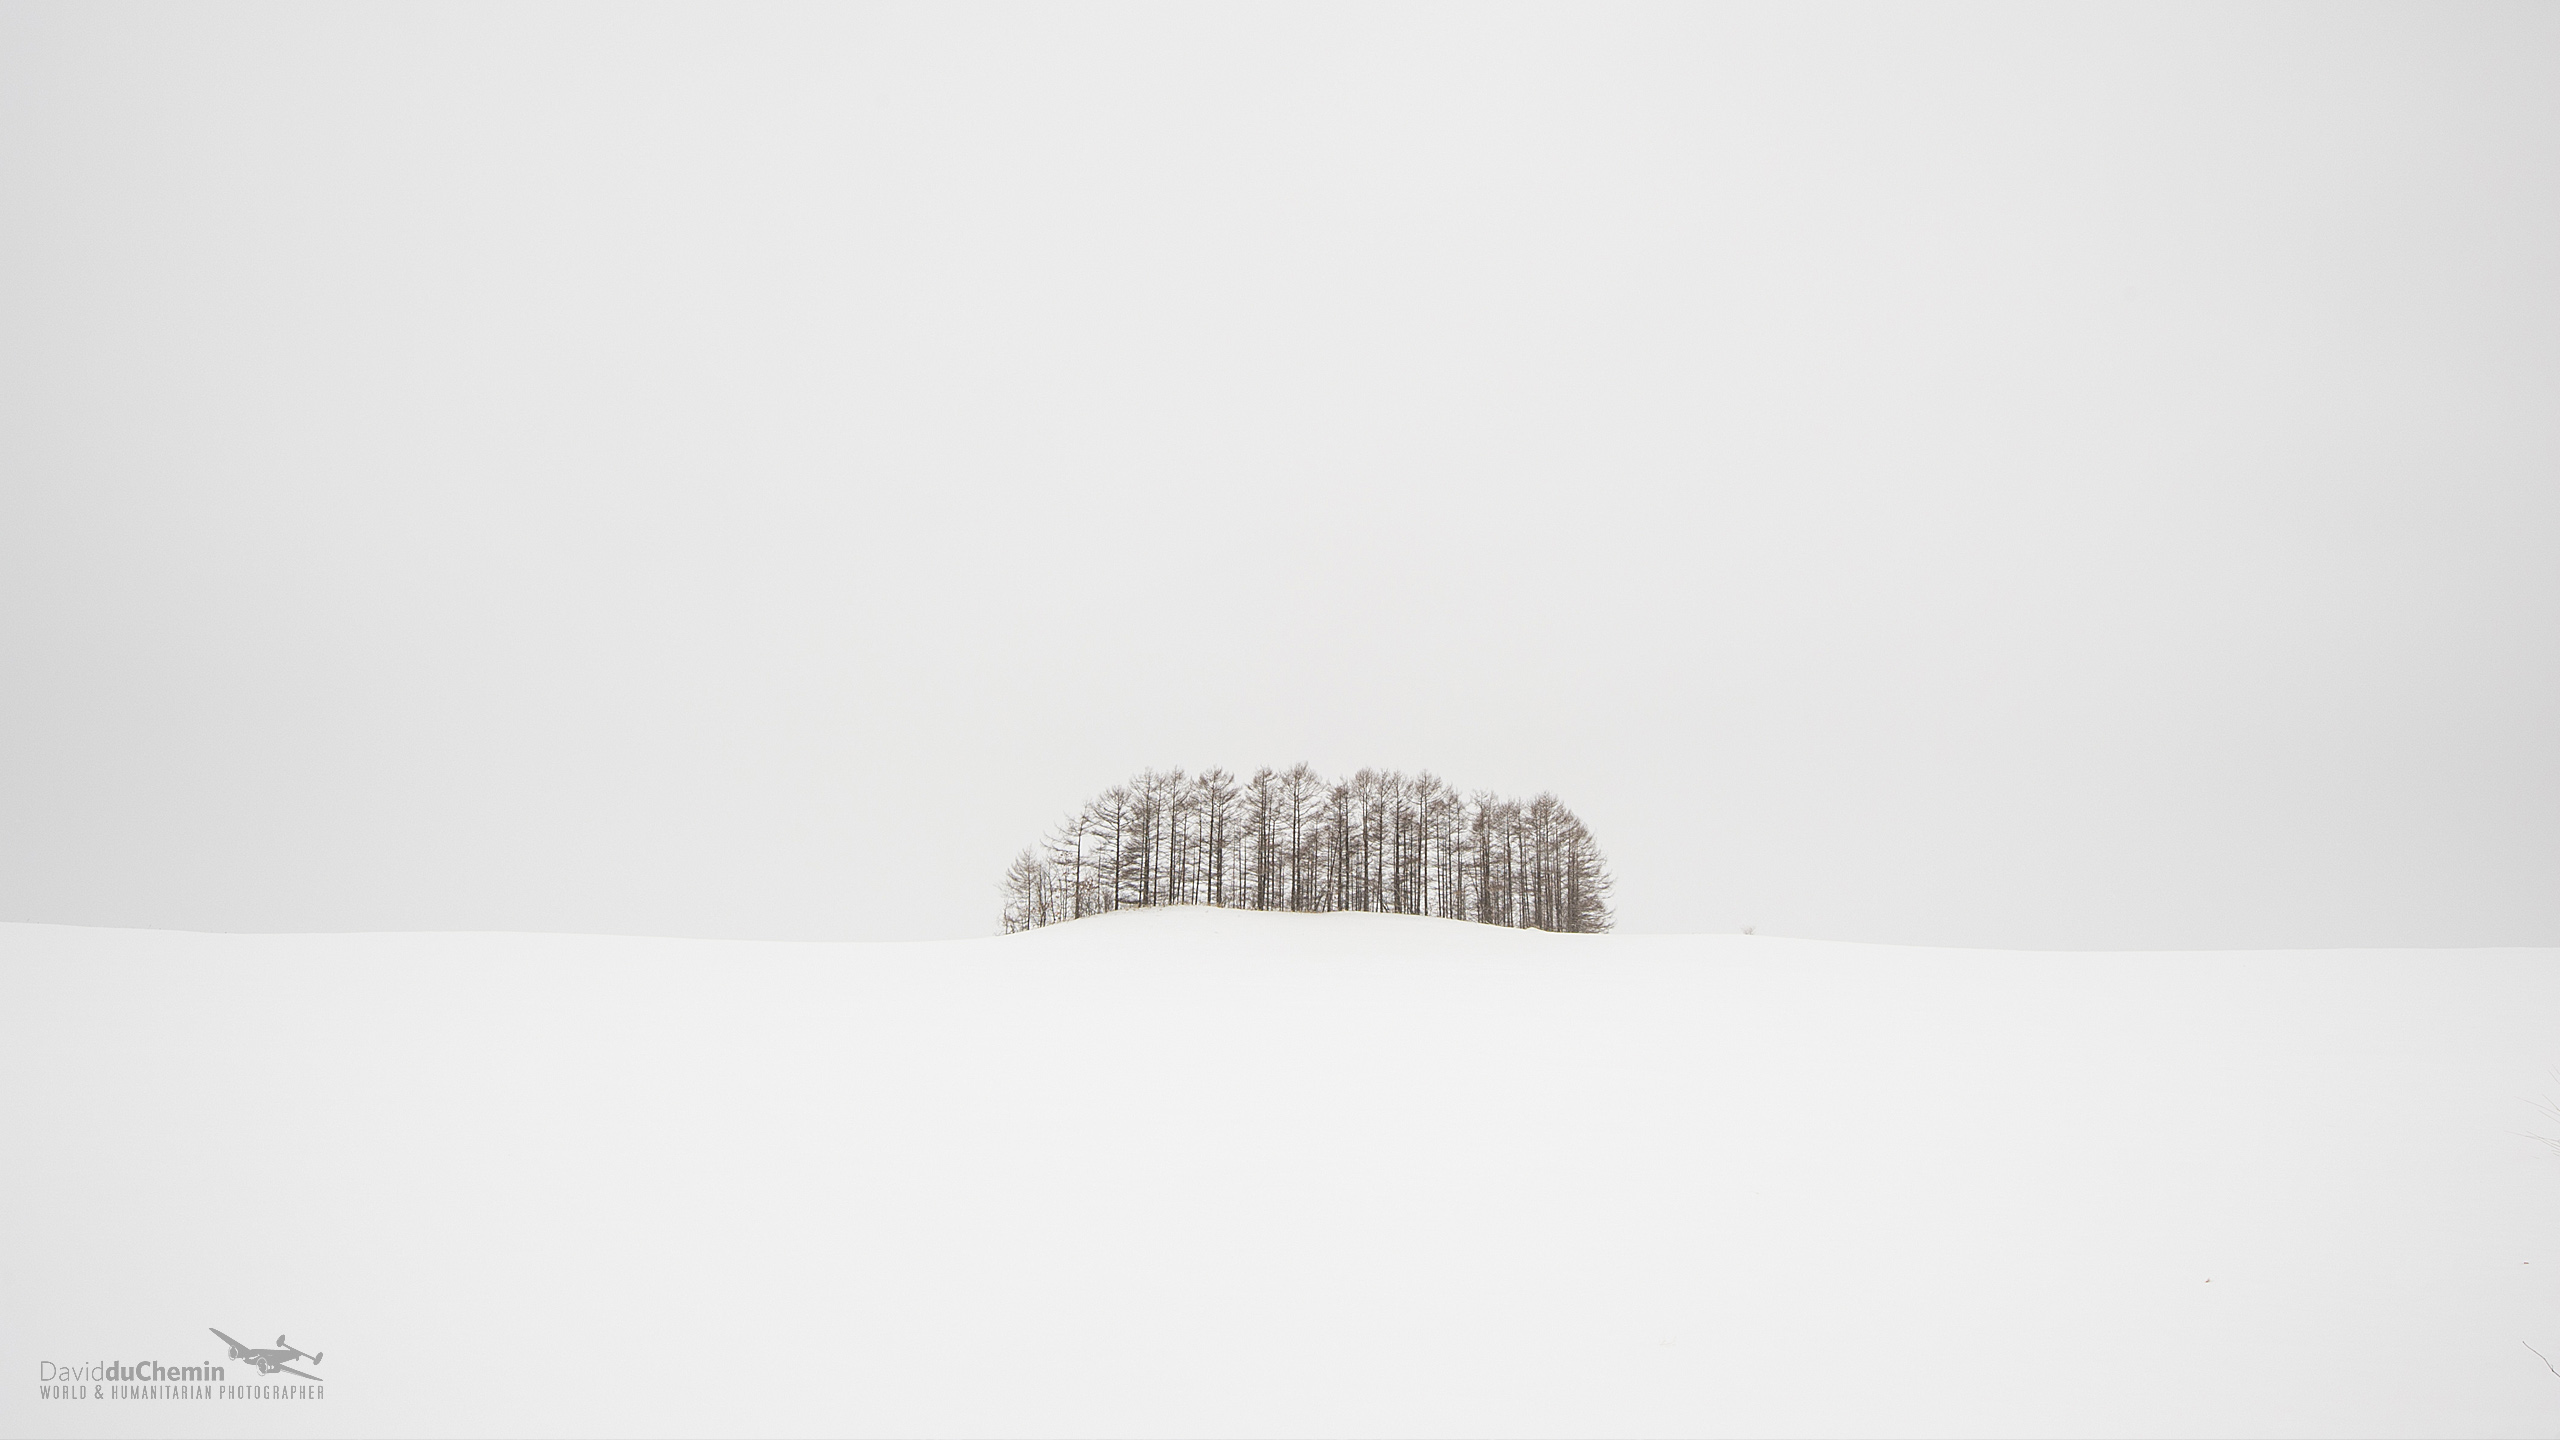
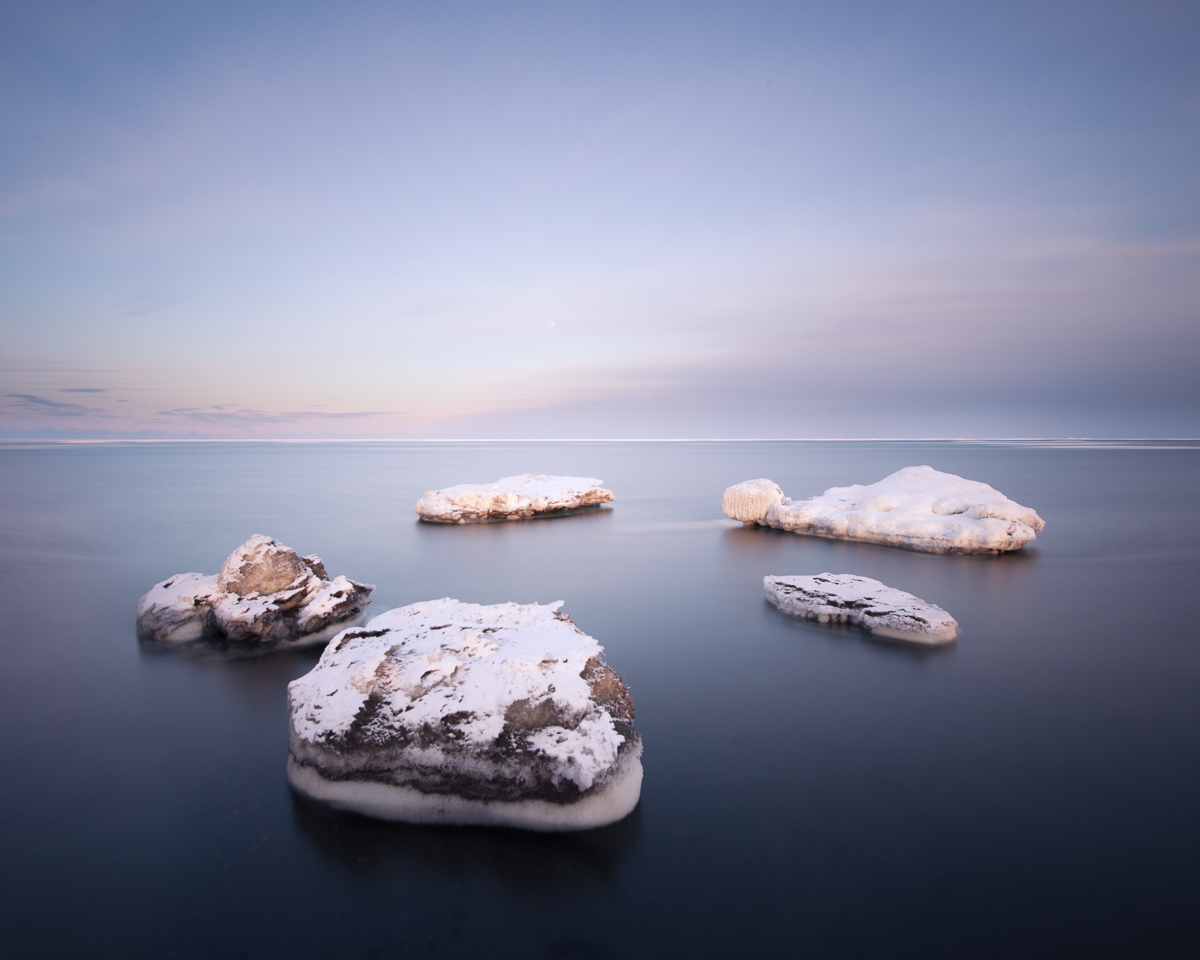
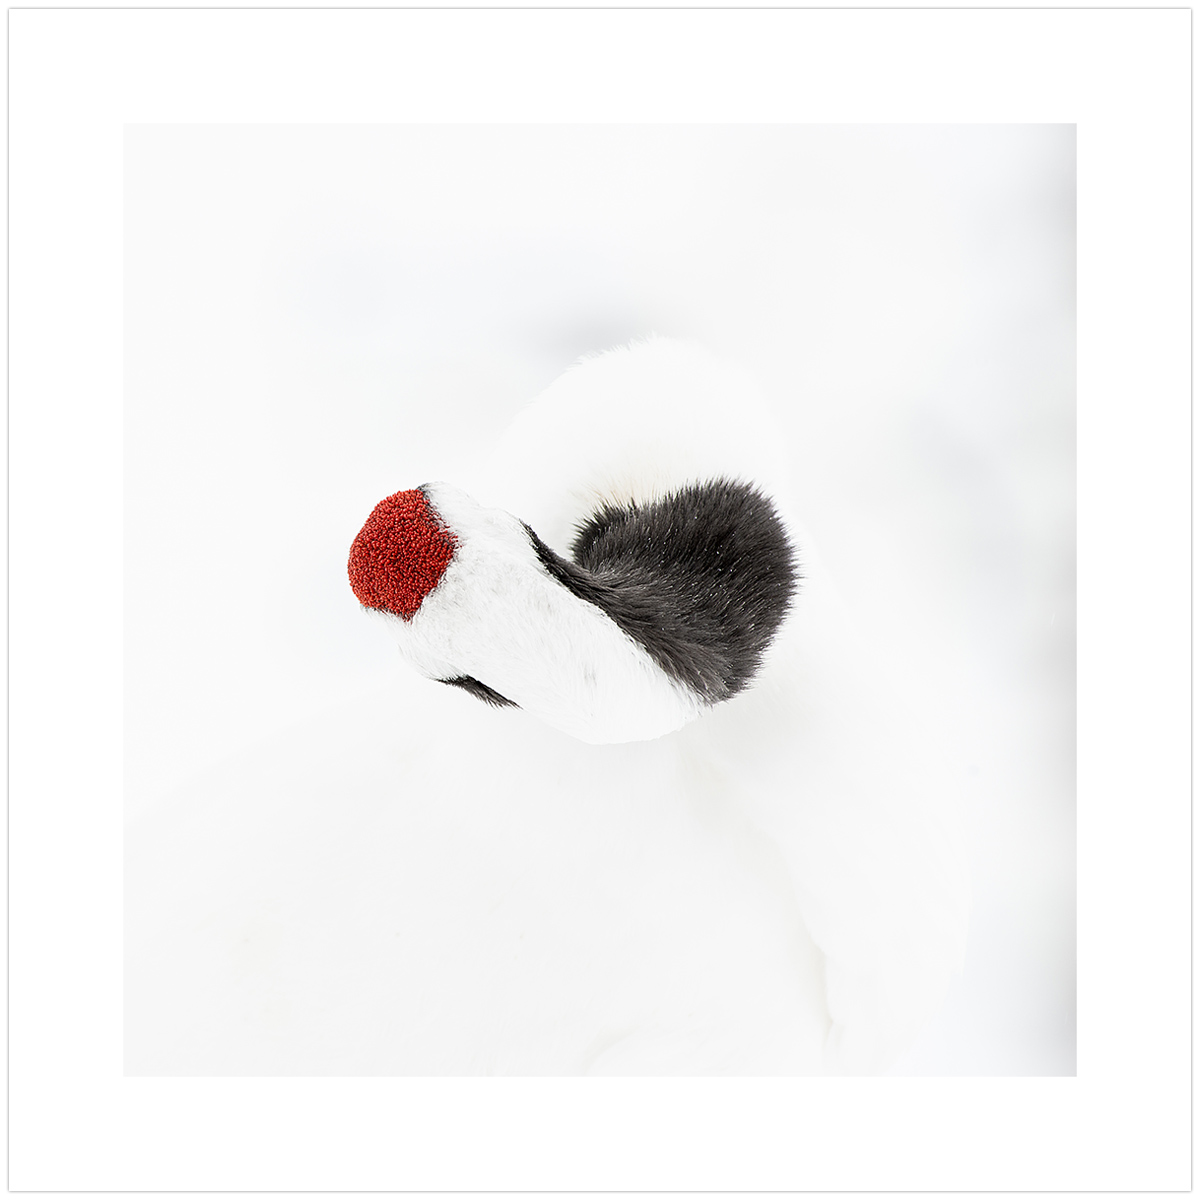
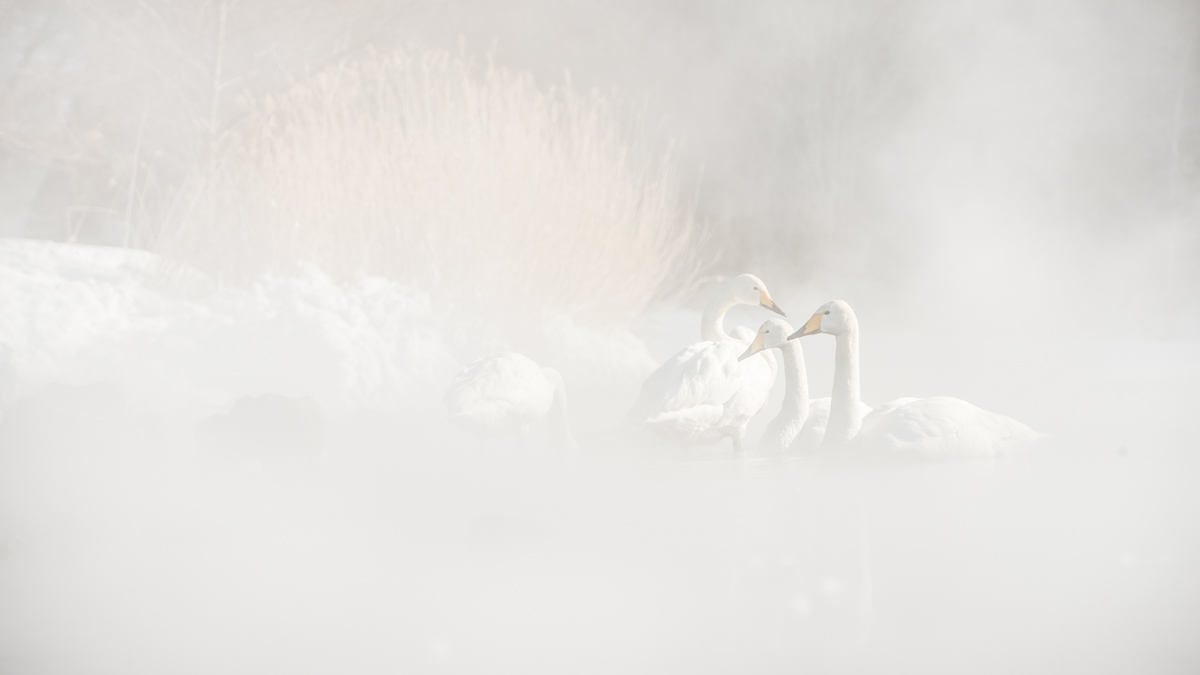
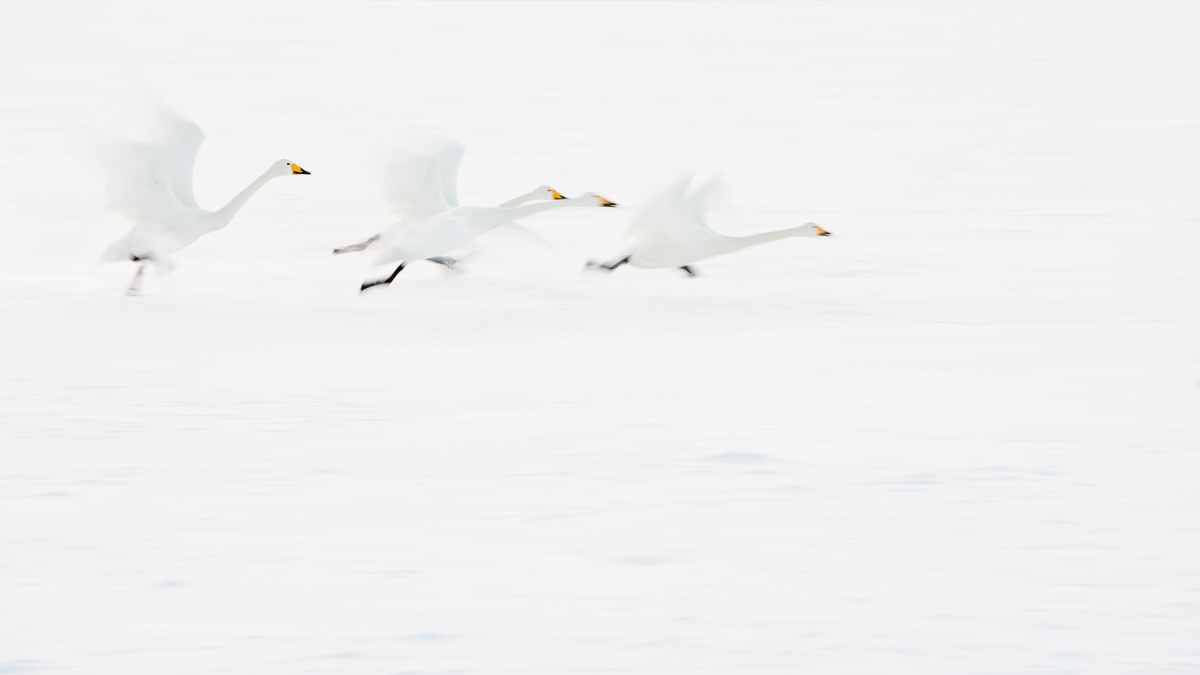
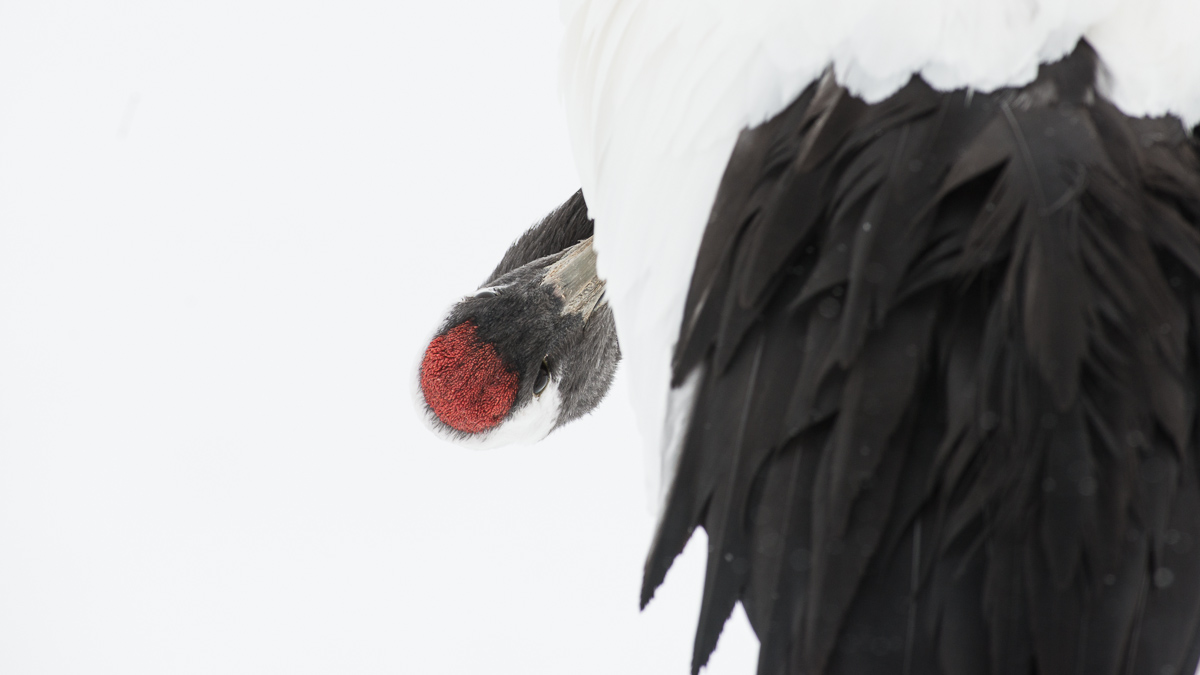
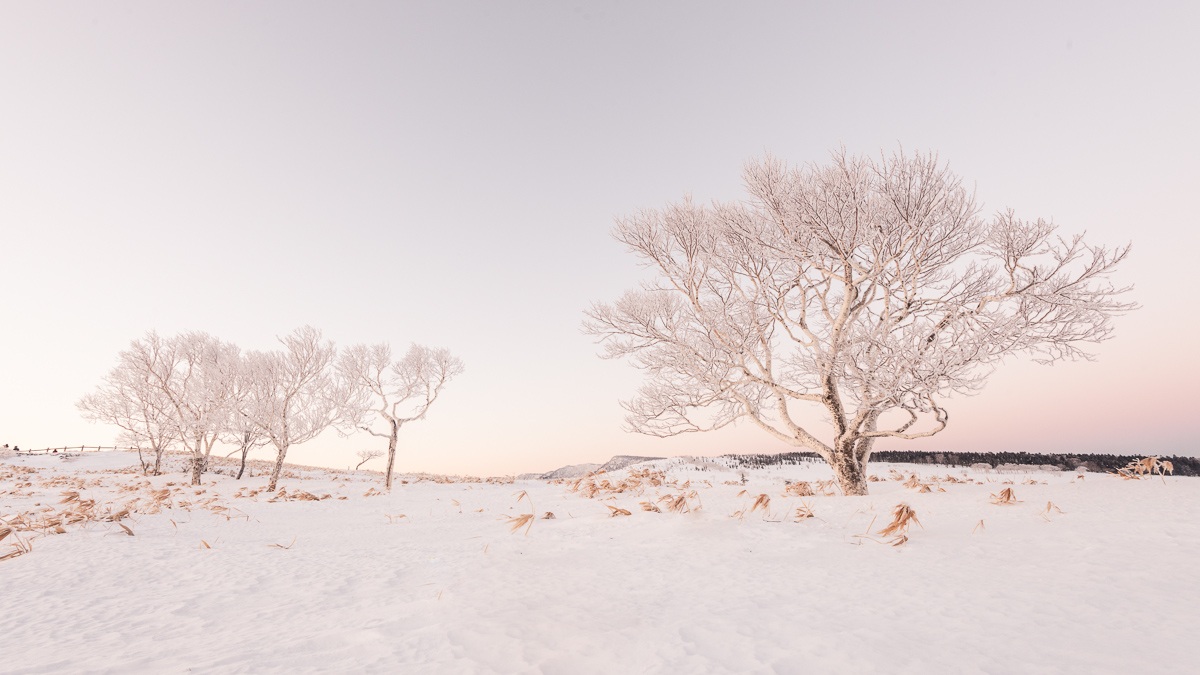
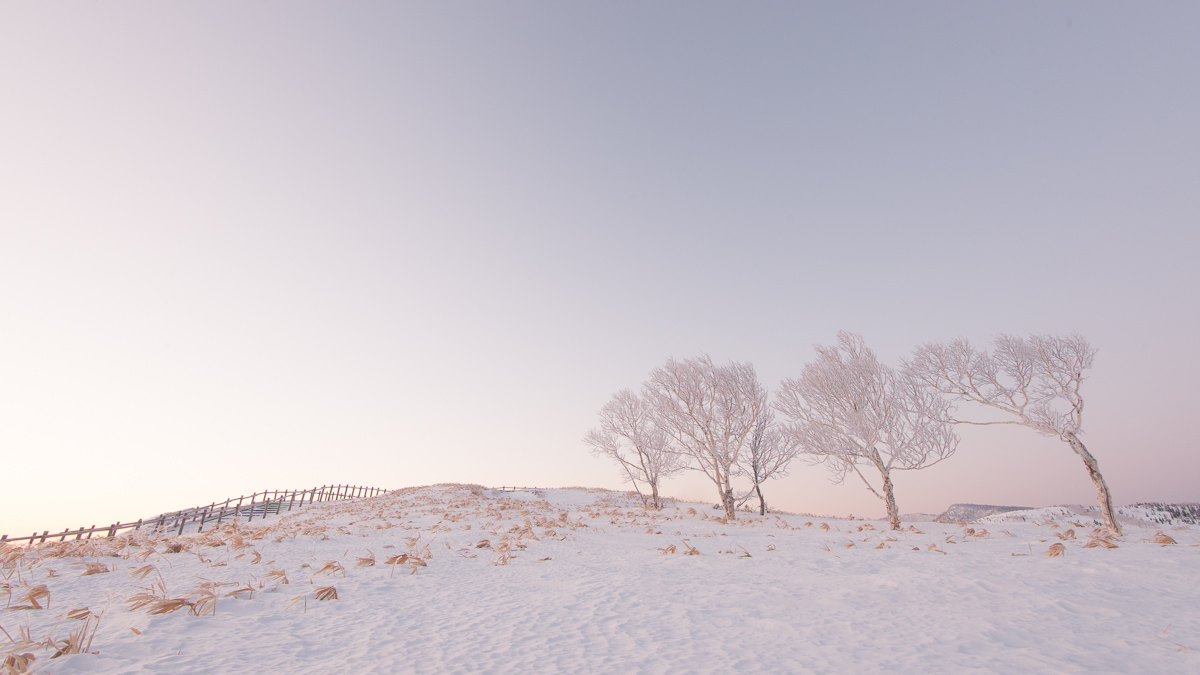
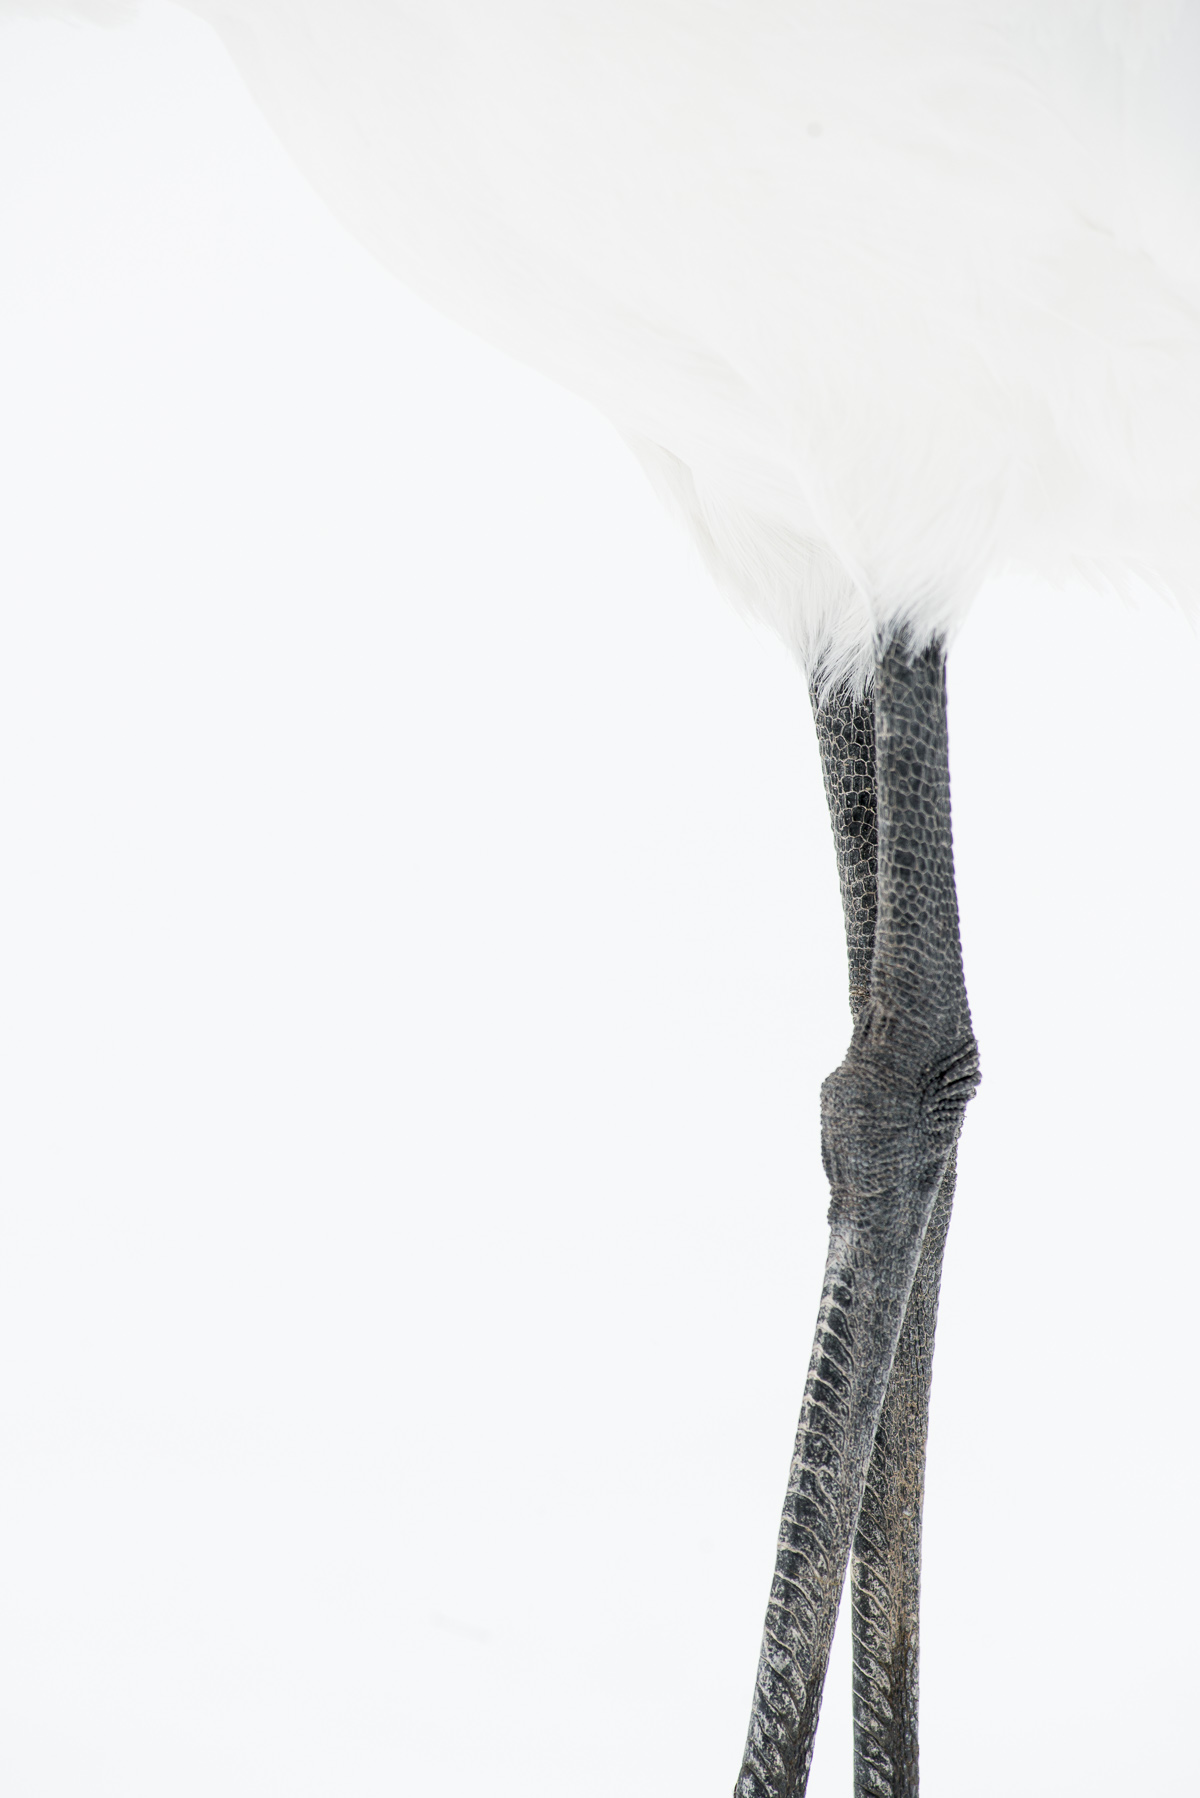
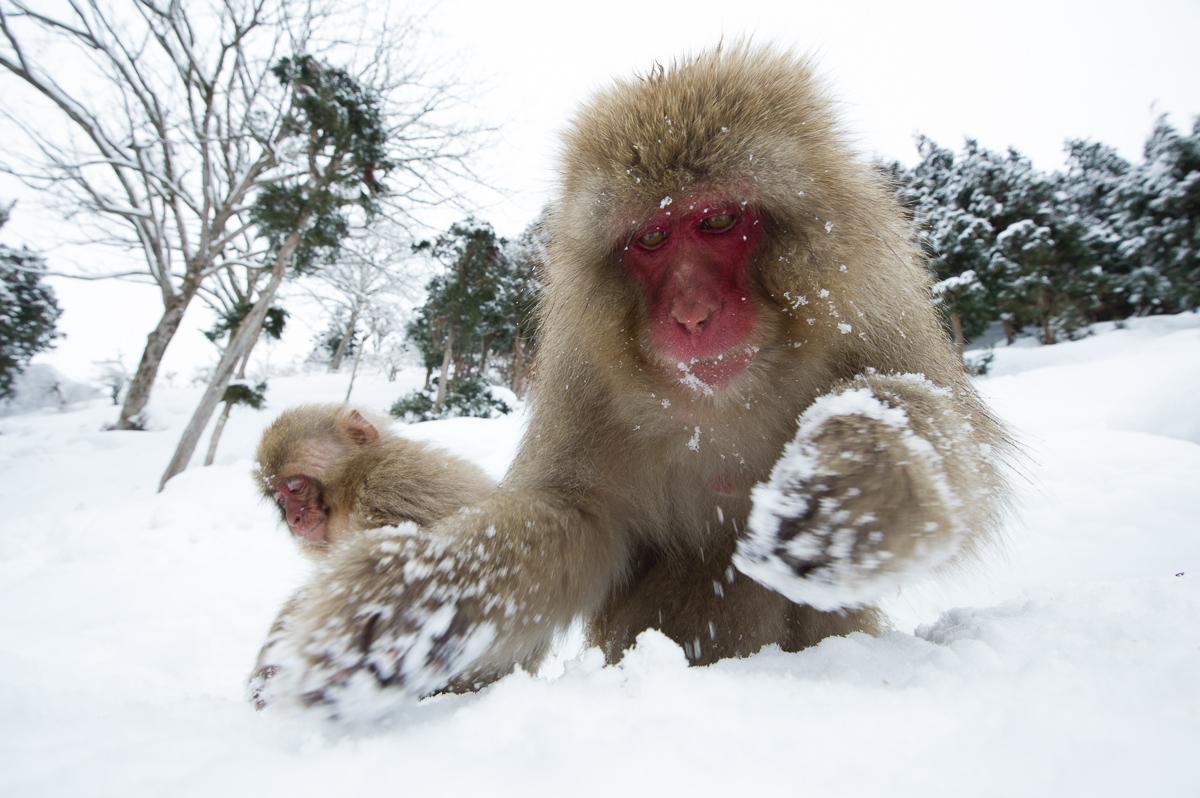
 I’m not one to pigeon-hole, but all the same, I’m no wildlife photographer. Of course I said that about landscapes three years ago as well, so what do I know? I’ve spent almost 2 weeks in Japan, mostly in Hokkaido, with birds and monkeys, often flopping around gracelessly and hip deep in snow, and almost always freezing my arse off. It’s been amazing. I came to meet Martin Bailey, a friend I’ve never met in person until now, and to learn from a man I consider a peer and a colleague. 14 of us traveled around this northern island of Japan, with enough outdoor wear to open an outfitters and enough camera gear to keep B&H stakeholders very happy for a very long time. It’s been a wonderful trip and so much of that is to Martin’s credit.
Martin is an excellent teacher. Very patient, and with a wonderful sense of humour. He knows Japan, particularly Hokkaido, because he’s lived here for 20 years, and has chosen excellent locations, none of which disappointed – no small feat considering how reliant on weather we were. He’s well-organized and if anything didn’t go according to plan I certainly didn’t notice a glitch in the matrix. But for a guy who’s so easy-going he can really march his troops, and we were up at some lunatic hours, one morning my alarm went as early as 3:30am. Thank God you can get coffee in the vending machines. If you’re looking for a relaxing holiday, this isn’t it, though the food, sake, and abundant hot springs took the sting out of the early mornings and long hours.
I came not only to meet, and learn from, Martin, but to work, and to create something new in my portfolio. I’m returning home with over 300GB of image files from both my D3s and D800 bodies. Of those 8000+ images, I’ve got 200 selects that I’ll edit down to something closer to 30 or 40 printed photographs, some of which I’m showing here, and the best of which might also make it into SEVEN, the fine art book I’m releasing this year (details and pre-orders are coming soon, I promise!)
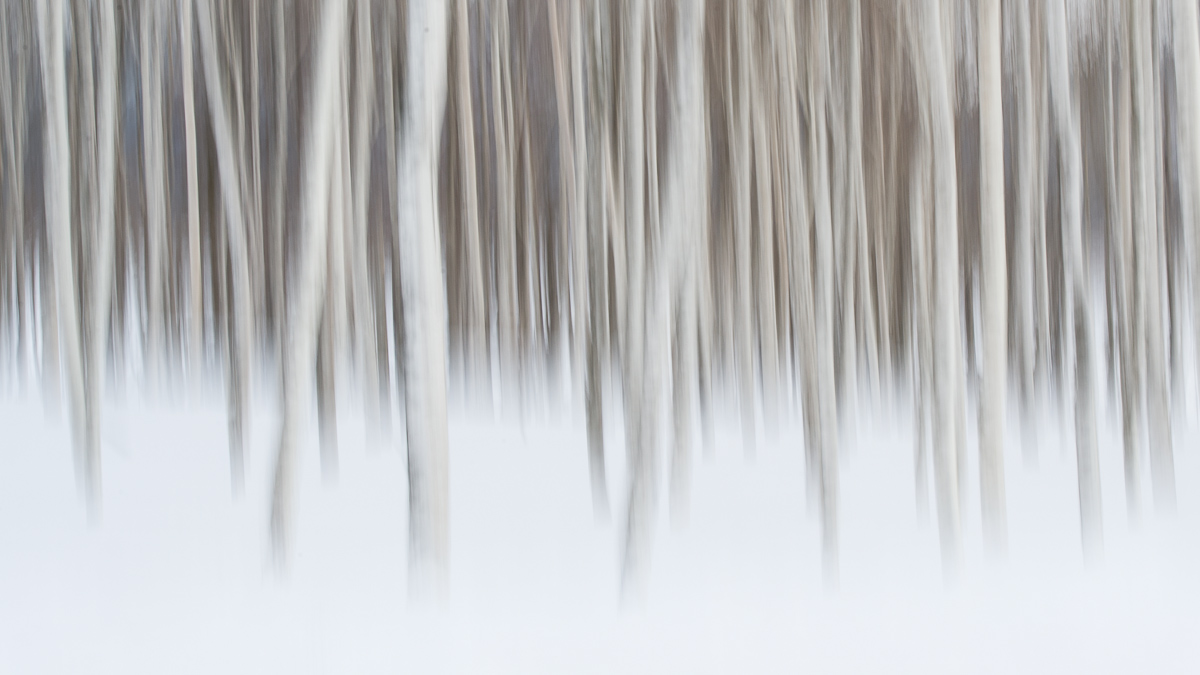
What I hope shows in this new body of work is my love for this place. If there’s a serenity in the images, it’s because this place has been, despite the long hours and hard work, deeply calming for me. There’s a blanket of snow here that simplifies things, quiets them, and makes it easier for me to work. It’s like that when I’m working outside and in touch with wild things; I feel it especially here for some reason. It feels wide open here, so I cropped many of my images to 16:9 which is unusual for me, but feels like the best choice for these photographs. Can’t wait to get home and print the work over the coming days.
If you click the image below, it’ll go large and from there you can scroll through them; a much nicer way to look at these.

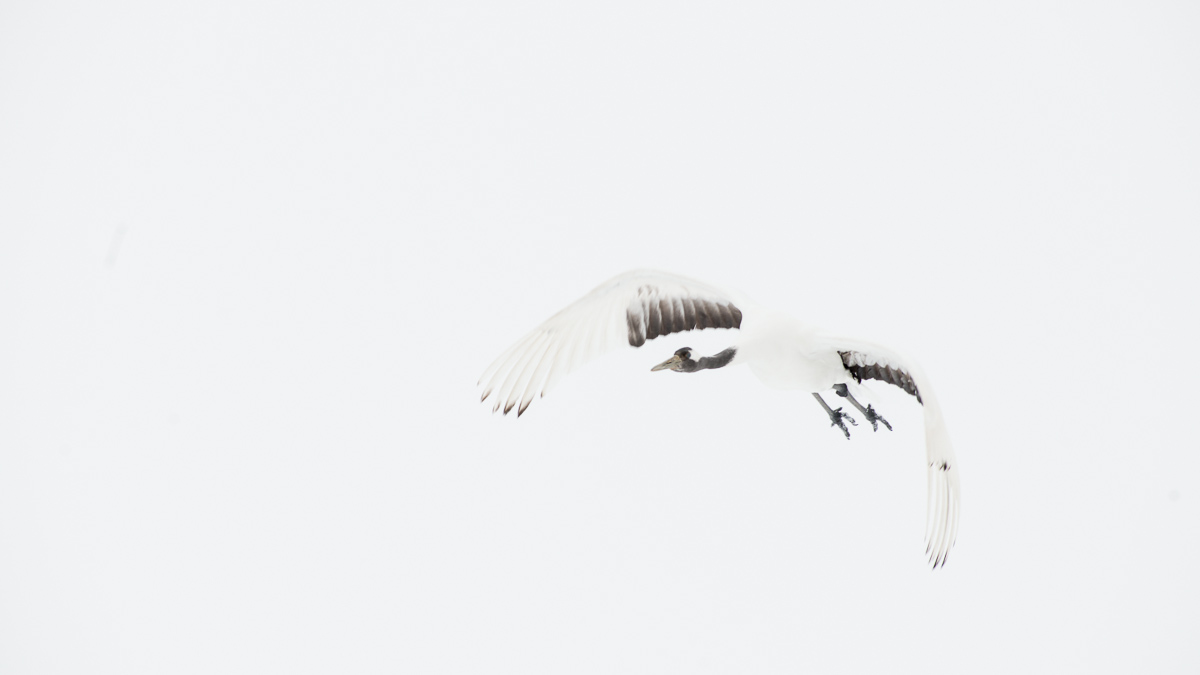
 What you might not see so readily in the images is the learning curve. I mentioned in my last post that I felt the learning curve was steep and one commenter said, based on a couple good images, it didn’t seem like it was that steep. Just because you make it to the top of the mountain doesn’t mean you didn’t have to work your ass off to get there. For me it was an endless battle with focus modes – I never use servo/continuous focus modes, and I fought with them the whole time. And it was a battle with the large files and slow buffer of the D800, learning to pace myself against the limited frames I had until the inevitable waiting for the buffer to clear, giving me more frames to shoot. It was learning the behavior of the animals and learning to anticipate their actions. But most of all it was a re-learning a lesson I’ve taught over and over again to my own students – you need to fall in love with your subject without getting seduced by it.
It’s easy, even after making photographs for 25 years, to forget that a photograph of a beautiful bird is not the same thing, necessarily, as a beautiful photograph of a beautiful bird. A beautiful bird, or person, or landscape, is it’s own beauty, but the moment it becomes a photograph it’s reduced to light, line, and moments, and it’s those that you have to be thinking about. Making a sharp photograph of an eagle is one (sometimes very difficult) thing, making one that’s alive, that people care about, is entirely another. Tom Kostes left a great quote in the comments of my first Hokkaido post, and I’ll finish with it, because it so perfectly sums up the goal of my struggle – as joyful and truly fun as it’s been – here in Hokkaido.
“Paint the flying spirit of the bird rather than its feathers.” ~ Robert Henri
The image at the top of this post is a downloadable desktop wallpaper. Enjoy!
Read the Postcard from Yamanouchi.
Read the first Postcard from Hokkaido
If you want more information on Martin Bailey, he’s got a great podcast on his website HERE, and more information on his workshops HERE. I’d travel with, and learn from, Martin again in a heartbeat. He’s also a Craft & Vision author and writes a regular column in PHOTOGRAPH, the Digital Quarterly Magazine for Creative Photographers.
February 28, 2013
Last Postcards from Hokkaido

Last moments in Hokkaido before flying back to Tokyo. I’ve got a longer post in the works about this trip, and have a small collection of photographs to post as well – I’ll get that up in the next 24 hours, along with your desktop wallpaper for March. In the meantime, a couple last hours behind big lenses, spending time with these big, beautiful birds.
February 22, 2013
Postcard from Hokkaido
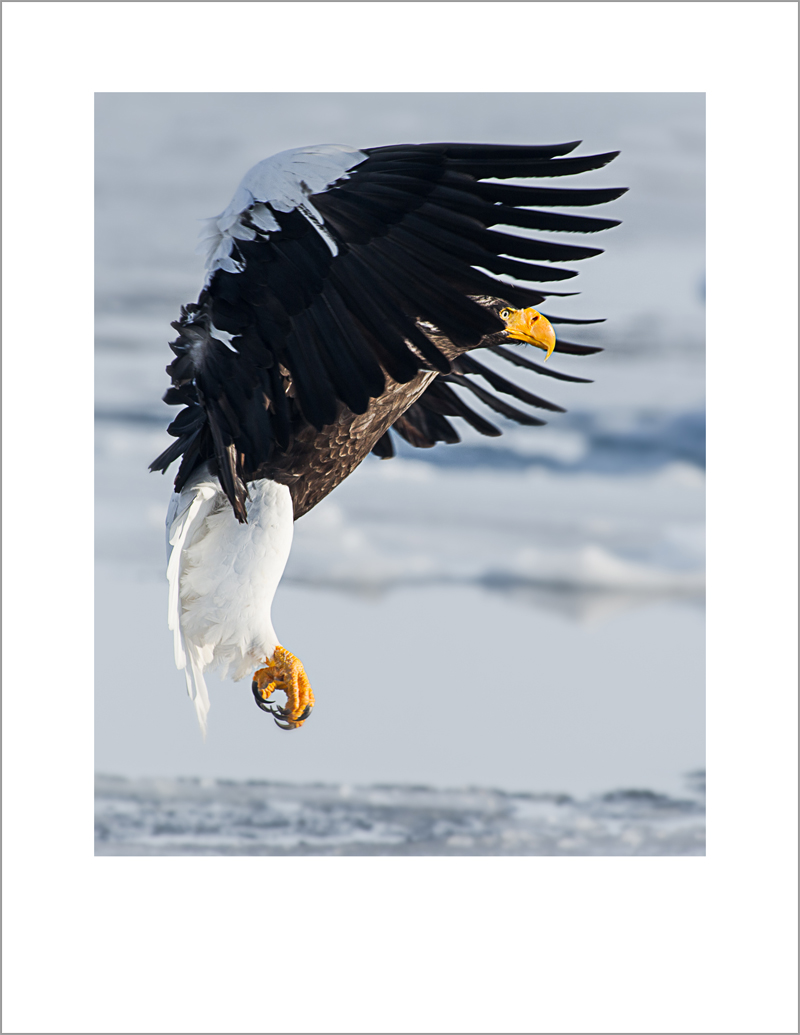
A quick hello from Hokkaido, Japan. I’ve got a few seconds to fire this off before we’re back out into the cold with cameras and tripods. I’ll do a fuller re-cap later, but this tour has been truly exceptional. This morning we were up at 4 and out the door an hour later to photograph the Stellar Sea Eagles, and were treated to a truly beautiful morning with the most magnificent birds. It’s a rough learning curve for someone who doesn’t photograph a lot of fast-moving wildlife, but I’m loving the challenge. And even if the photographs all failed to do what I wanted them to, and they didn’t, I’d still be having the time of my life with this group of people and these astonishing birds.
February 19, 2013
Postcard from Yamanouchi
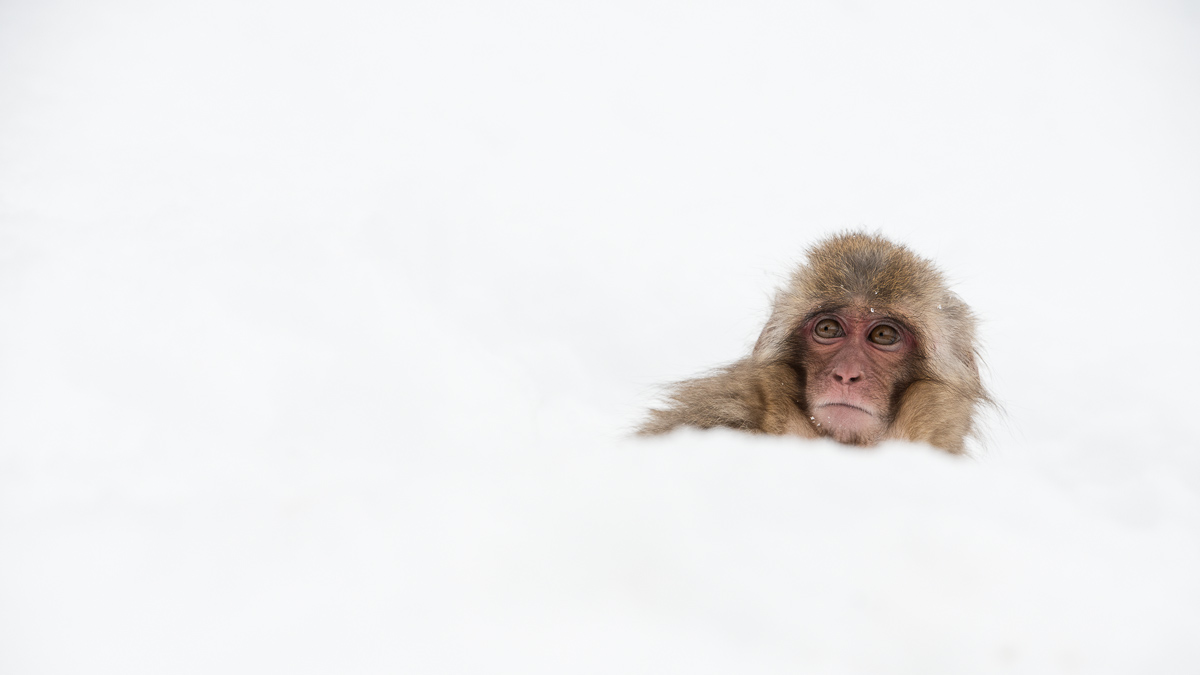
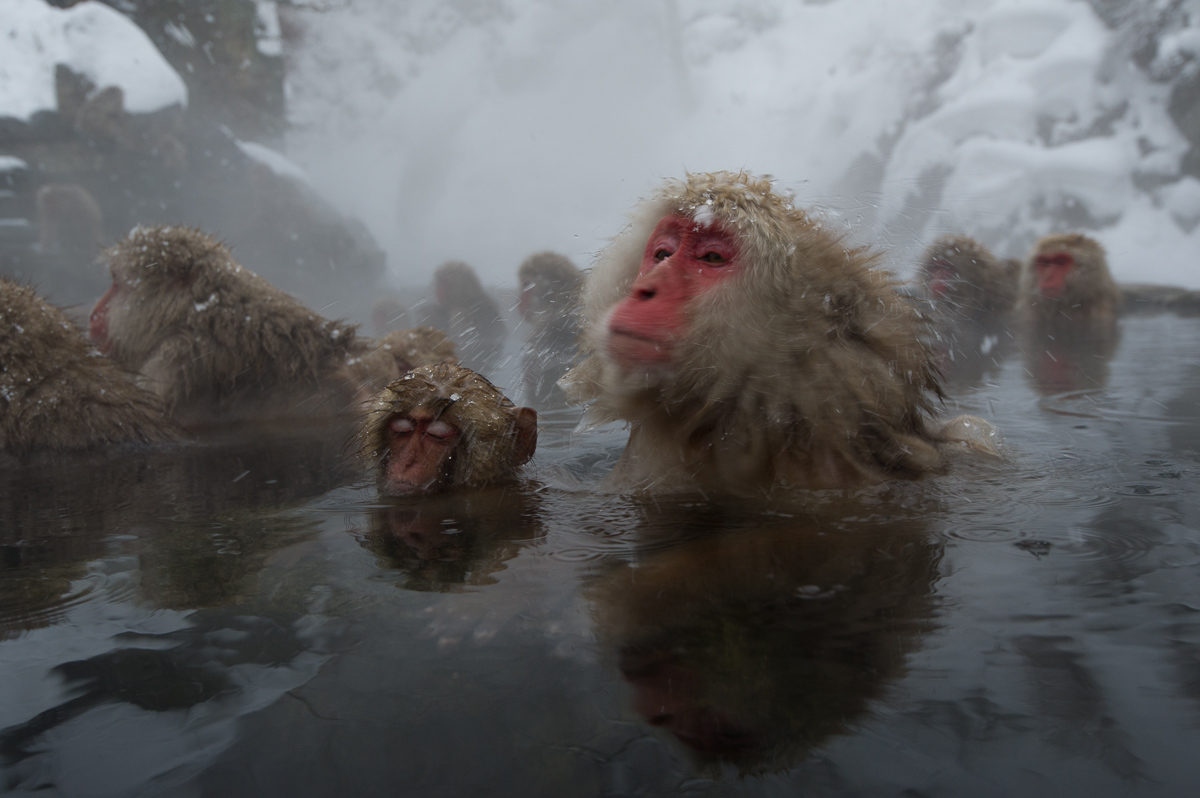
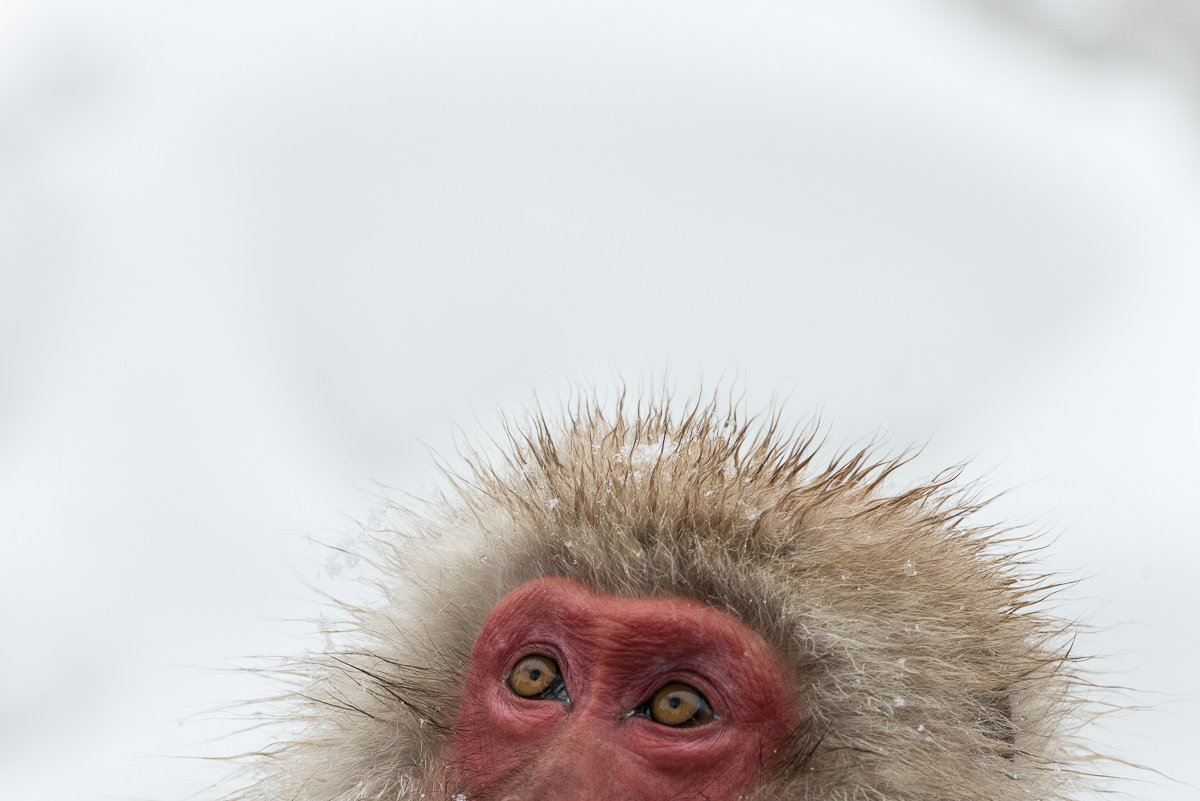 A quick postcard from Yamanouchi, near Nagano, Japan. We’re three days into a workshop with Martin Bailey, and have spent those three days photographing the Japanese Macaque, or Snow Monkeys. This is the only place in the world where the monkeys have taken to hot springs, and like the wildlife in the Antarctic, these monkeys are just completely indifferent to human presence. That indifference is a good thing because the monkeys are wildly popular and while I had a tremendous time photographing them, my experience was somewhat dampened by the aggressive behaviour of the some of the groups of photographers that show up here. It’s a lovely spot, though, and after a 30-minute walk through snowy forests, it’s a treat to spend time so close to such interesting animals.
 We spent the last couple nights in traditional accommodations, eating delicious food, drinking abundant sake, and enjoying the beautiful natural hot springs baths. By the time I post this we’ll be back in Tokyo and readying for an inhumanely early flight to Hokkaido in the morning. For the next 9 days or so we’ll be photographing sea eagles, swans, cranes, and the beautiful landscapes of this northern Japanese island. And shivering our asses off: the mornings have been -30C lately in Hokkaido.
February 14, 2013
Favourite Travel Accessories
 I spend enough time on the road each year to give the stuff I travel with some serious consideration, but travel’s tough enough on us that anyone that spends much time living even a little nomadically can benefit from the best gear. Here’s my favourite travel stuff these days. It fits the way I live and work. Got something you won’t travel without? Leave a comment and let us know!
1. Blundstone Boots. Still my favourites. These days I favour the Rigger style, but no matter which you choose, they’re comfortable, easy to pull off and on at security, on planes, and at the doorways of temples and mosques, and with a quick wipe and some hand lotion from the hotel they look great even after 2 weeks in the bush. $200
2. Filson Feather Cloth shirts. I’ve been wearing Filson Feather Cloth long and short sleeve shirts for my travels for years. By now they’re like a uniform to me. I’ve mostly given up on the fancy nylon shirts made by people like the North Face. These ones are comfortable, super-durable, and look good. I’ve worn them happily on all seven continents and I love them. $75.00
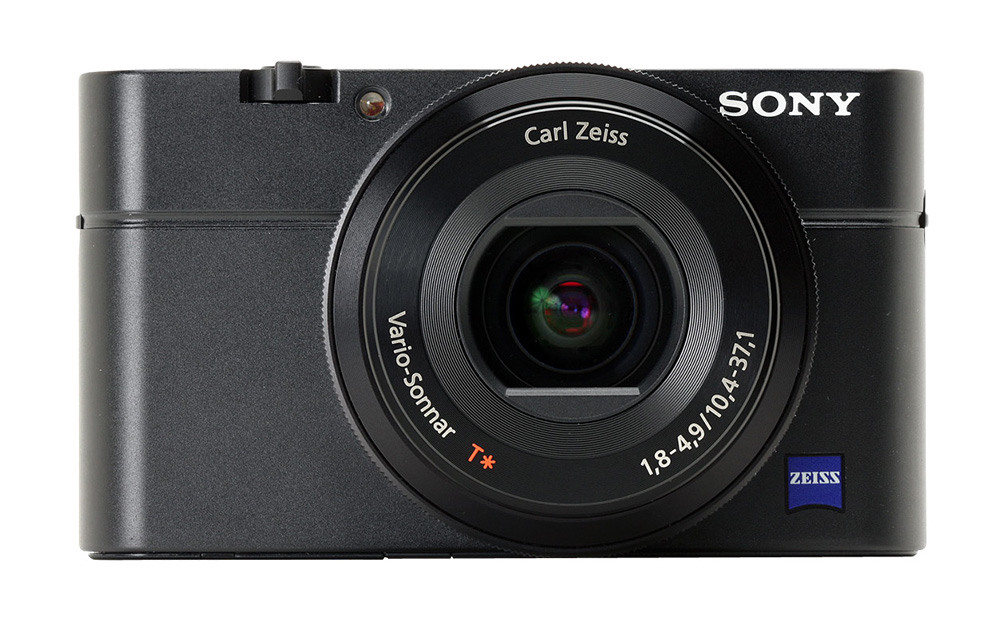
3. Sony Rx100 (Cyber-Shot DSC-RX100) I’ve had this little camera for less time than most of this other gear but it’s quickly become a favourite. Killer optics, large, beautiful RAW files, with excellent dynamic range, from a larger sensor (20 MP, 1″ CMOS sensor) than most, all in a really compact little pocket camera. It’s a little pricier than most cameras of the same size, but you pay more for the optics and the larger sensor, the two best things you can spend your money on if image quality matters to you. I find the controls, for such a small camera, relatively easy to get at – and the programmable ring on the lens is great. I mostly use it in Aperture mode and use the front ring for E/V compensation. I was looking at one of the smaller Canon’s but it’s hard to beat Zeiss optics and a larger sensor. This one’s not often not in my pocket. As an added bonues, there’s at least one serious water housing available for the Rx100. The one I’m looking at is a Nauticam, and it runs for about $950. The Sony Rx100 retails for about $650.00
4. Gura Gear Bataflae Backpacks. My camera gear all goes into these bags, the beautiful successor to Gura Gear’s excellent Kiboko. I use both the 26L and 32L, and they hold a mountain of gear that’s easy to access. The workmanship is excellent, the harnesses are really comfortable, and they look better to my eye than any other bag out there. And I’ve not met a plane yet that has seats that the Bataflae won’t slide under, even if the overhead bins are non-existent. $399 – $449.00
5. Black Diamond Ion Headlamp. I love these little headlamps. They’re bright, small, and cheap. I bring a couple with me on each trip, mostly because I tend to lose things. But out in the bush or on road trips with my Jeep, my Ion rarely comes off. I just wear it around my neck. Or around my wrist when I’m sleeping. My first headlamp was a $100 Petzl that weighed a tonne. I’m still surprised it didn’t give me some kind of neck injury. LEDs make these Ions at least as bright, way cheaper, and much more comfortable. Great for reading on the plane, or seeing the back of the camera after the light’s fallen. $17.50
6. 5.11 Rush 12 Tactical Pack. I love this bag for day-to-day travel. It goes into my duffel and comes out when I land. Laptop compartment, fleece-lined sunglasses pocket, lots of pockets for notebooks, ipods, batteries, etc., and large enough to carry a sweater, DSLR, spare lens, and extras. It’s killer durable and has the most comfortable harness of any daypack I’ve ever worn. It’s a little military-looking, but I’ve given up looking cool. If you want a really light daypack, this isn’t it, but you won’t get the same durability and features in one of those high-tech lightweight nylon bags. If light-weight is important to you, then this might be heavier than you want, but if you want something durable for more extreme field work, check this one out. $109.00
7. 11″ MacBook Air. After traveling for a couple years with a beloved 12″ Powerbook I was crushed when Apple abandoned it. The 13″ was fine, but still larger than I wanted. And then I got an 11″ MacBook Air and traveling with a computer stopped being an added burden. Mine’s a current 2GHz with 8 GB RAM and a 500GB flash drive. It handles Photoshop and Lightroom fine, and does a brave job with my massive D800 files. The display is small but I do very little critical work when I travel, saving it for home. I carry two very small back-up drives, also flash memory, and my power cables and that’s it. Right now they’ll run you $999 to about $2200 depending on configuration.
8. APC Universal Plug Adaptor. I love these. They’re easy to use after the first couple tries, and best of all they are light and flat. I can’t stand the big round ones, they’re so heavy they fall out of half the wall sockets I try to use. I only carry one because I also carry a small 6-outlet powerstrip.
9. Bose IE2 Headphones. I love Bose headphones, and I’ve got a pair of the fancy noise-cancelling ones, which I love, but they’re way too big for me to travel with. A couple years ago I tried a series of in-ear headphones, some of which I hated, some of which broke. Then I found the Bose IE2 which I bought to listen to music in the hospital while I tried to sleep. They’re perfect for me. Small, light, great fit, excellent sound, and the MIE2i works with my iPhone so I can do podcast interviews or Skype calls while I am on the road. $150.00
10. Icebreaker underwear and socks. Comfortable. Durable. Warm in the cool and cool in the warm, and the merino wool has a way of keeping odour at bay, so you can wear them a few days if you have to, without offending anyone other than yourself. Three pairs of both and I’m set. Come to think of it, the Icebreaker merino t-shirts, sweaters, and hats are also in my bags for most trips. It’s pricey stuff, and you might make an argument for just finding a cheaper brand that makes merino stuff, but I’m loyal to Icebreaker. They treated me well after my fall in Italy when the paramedics cut all my clothes off. Good folks, those Kiwis. Pack a small bottle of biodegradable Campsuds and you’re set.
February 11, 2013
Ongeli Elders

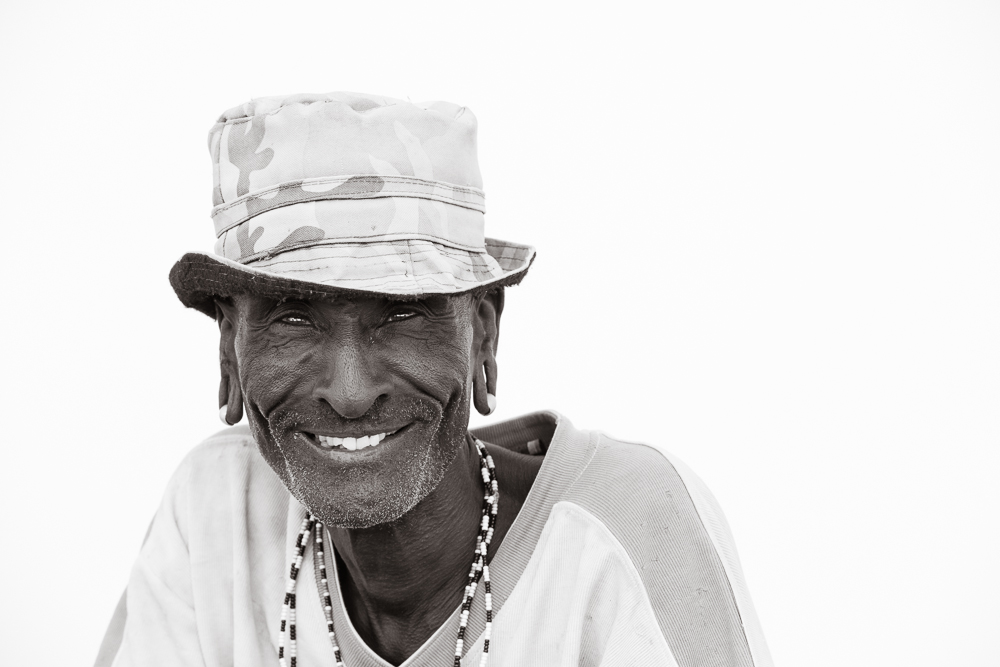
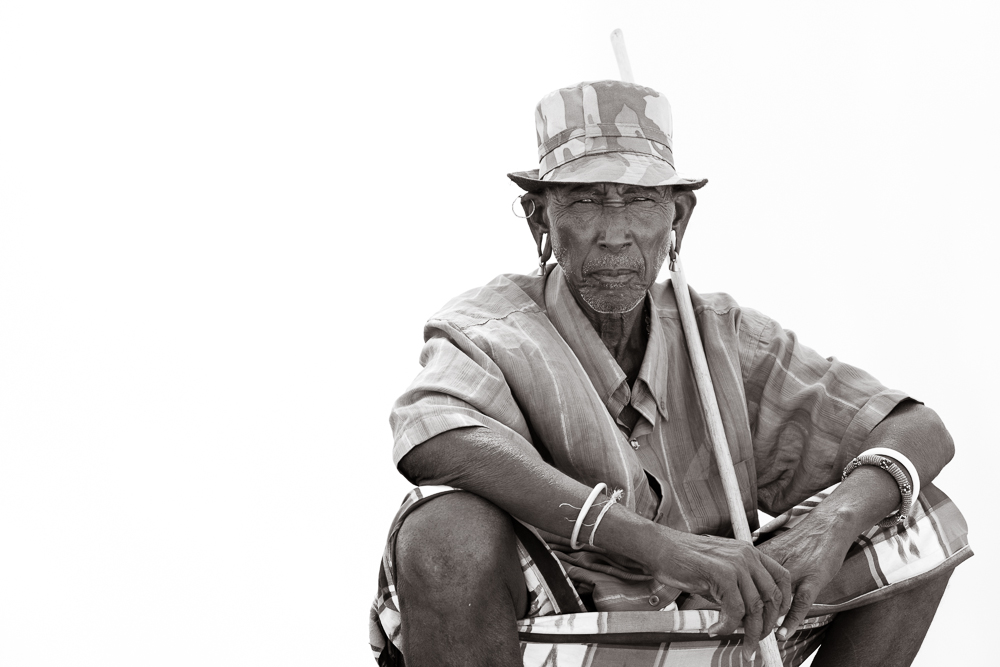
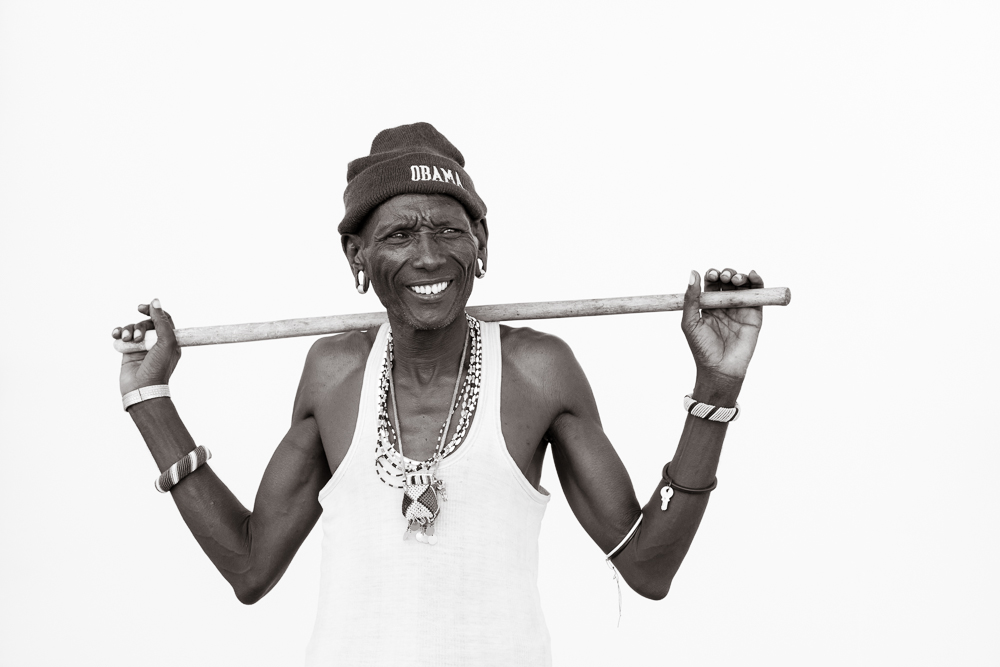

On my last day on the field in Northern Kenya, I returned to the village that adopted me two years ago. I brought a bull camel, bags of rice, and assorted goods, and we had a fantastic feast. While the camel was cooking, the elders gathered around me and, with a lot of hand gestures, they re-told the story of my adoption into the village, and my subsequent accident in Italy, then about my recovery and my return to the village. Then they all picked up their sticks and, holding them vertically in front of themselves began to chant prayers and blessings. It was other-worldly, deeply moving, and a little hard to process. And it went on for quite some time. It was, I think, a defining experience in my life, something like a right of passage for a man from a culture which has so few of them. The portraits above are of some of the men from that circle, taken that morning. These are portraits I will cherish for the rest of my life.
These were processed with my B+W Green Filter Warm Duo, available in my LR4 Develop Presets package. I offered this for sale a few months ago for $10 and you can still get the complete set of 36 of my own daily-use presets, along with the PDF guide, here for the same price. But if you want to try one out, here’s a free download of the B+W Green Filter Warm Duo preset I used on these portraits. Presets are no substitue for learning your craft, but they’re an excellent starting point, and if you dig around under the hood of the presets you get from others, you can learn a lot. Hope this one helps in some way. Let me know what you think.
February 9, 2013
The Created Image: Turkana Fisherman
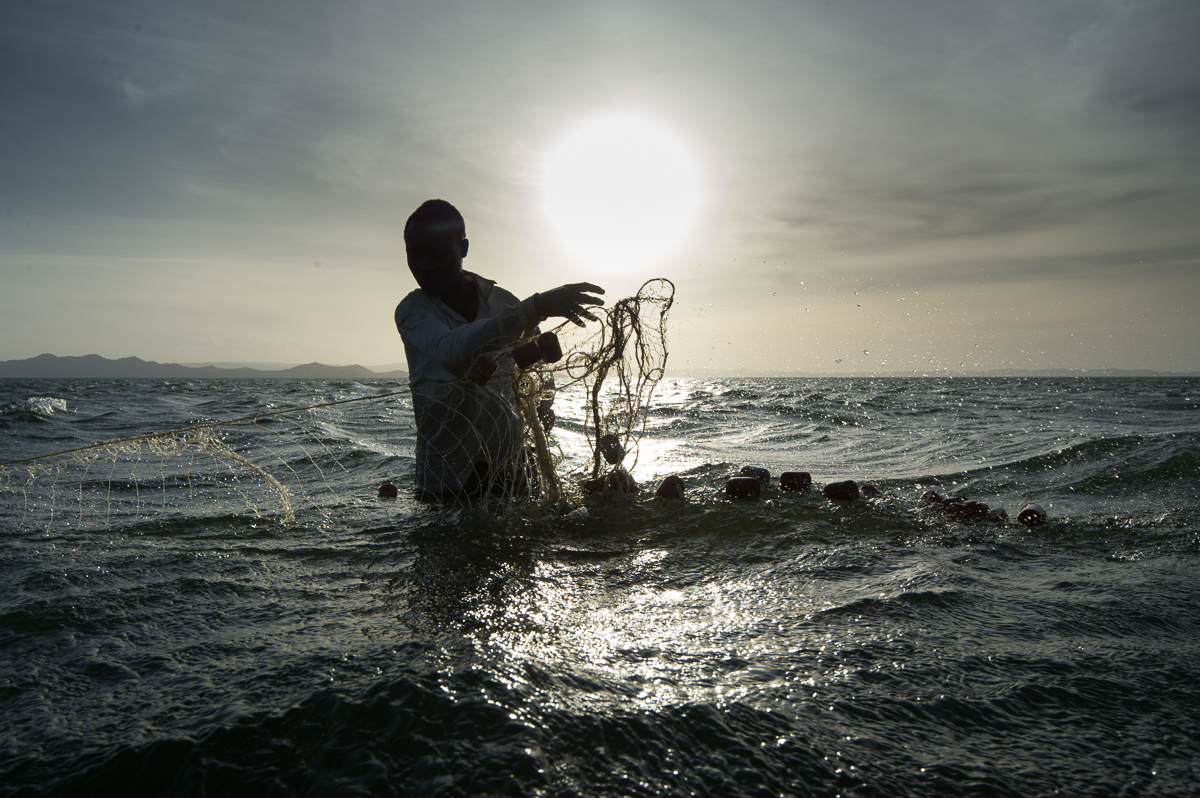
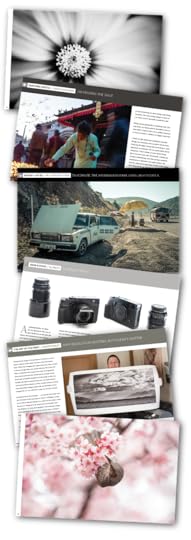
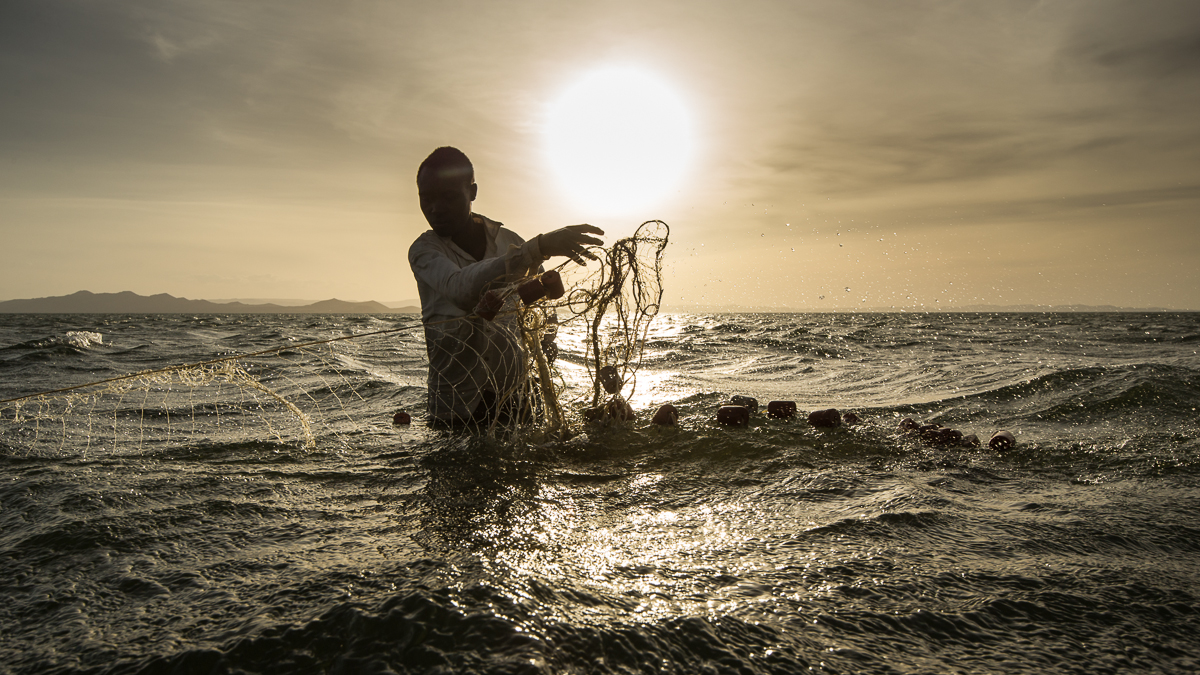 I was swimming in Lake Turkana, just outside of the town of Loiyangalani, Kenya, when I saw this fisherman on the shore mending nets. Lake Turkana, I am told, has the highest concentration of crocodiles in the world, so while the swimming was lovely, this was as good a reason as any to get out. Kura, my Kenyan friend, went over to speak to the young man, Benjamin, while I dried off, put my clothes on, and grabbed my camera. I shot for a few minutes while he mended nets on the shore, before standing up, wrapping his nets on his shoulders and striding into the water. I hadn’t anticipated this. I’d assumed he was done fishing for the day, not beginning. I’d already changed out of my swim trunks so I stripped down to my underwear, put my sandals back on (not the first time I’ve done this, but it’s never pretty) and walked into the waves after him. I’m not sure Benjamin knew what was going on, but he was a good sport about it. He set his nets slowly and paid no attention to me, except to smile occasionally or show concern that I might fall. By now we were chest deep and the waves were kicking up in the wind. I finished shooting and walked towards shore, turning back to wave to Benjamin.
And then I realized I’d done it all wrong. I’d been on the wrong side of Benjamin, shooting with the light instead of against it, which is odd for me, as addicted to backlight as I am. So I waded back out, arm high in the air and getting tired, and shot it all again, now deeper and with more spray. No time to set my white-balance, but I could deal with that later. I wish I could say I paid a great deal of attention to the histogram, but I didn’t. I trust the meter on my D3s in light like this. I left the settings where they were, the depth of field deep enough to account for missed focus, and the shutter speed high enough to freeze the water. The rest was trying not to fall over, keeping the lens out of the spray, and putting my subject where I wanted him. Nikon D3s, 16-35/4.0 @ 26mm. 1/1000 @ f/11. ISO 400.
In Lightroom I did very little. Here’s the RAW image without adjustments, followed by a screenshot of the global tweaks – mostly lightening the shadows a little, and warming it up with a Cloudy WB. I added clarity to bring out the texture of the water, then sharpened locally in Photoshop after cropping to a 16:9 ratio. The last thing I did was drink a cold Tusker and try to stop grinning; these are the unexpected experiences that make me glad to have a camera in my hand in some beautiful part of this planet.
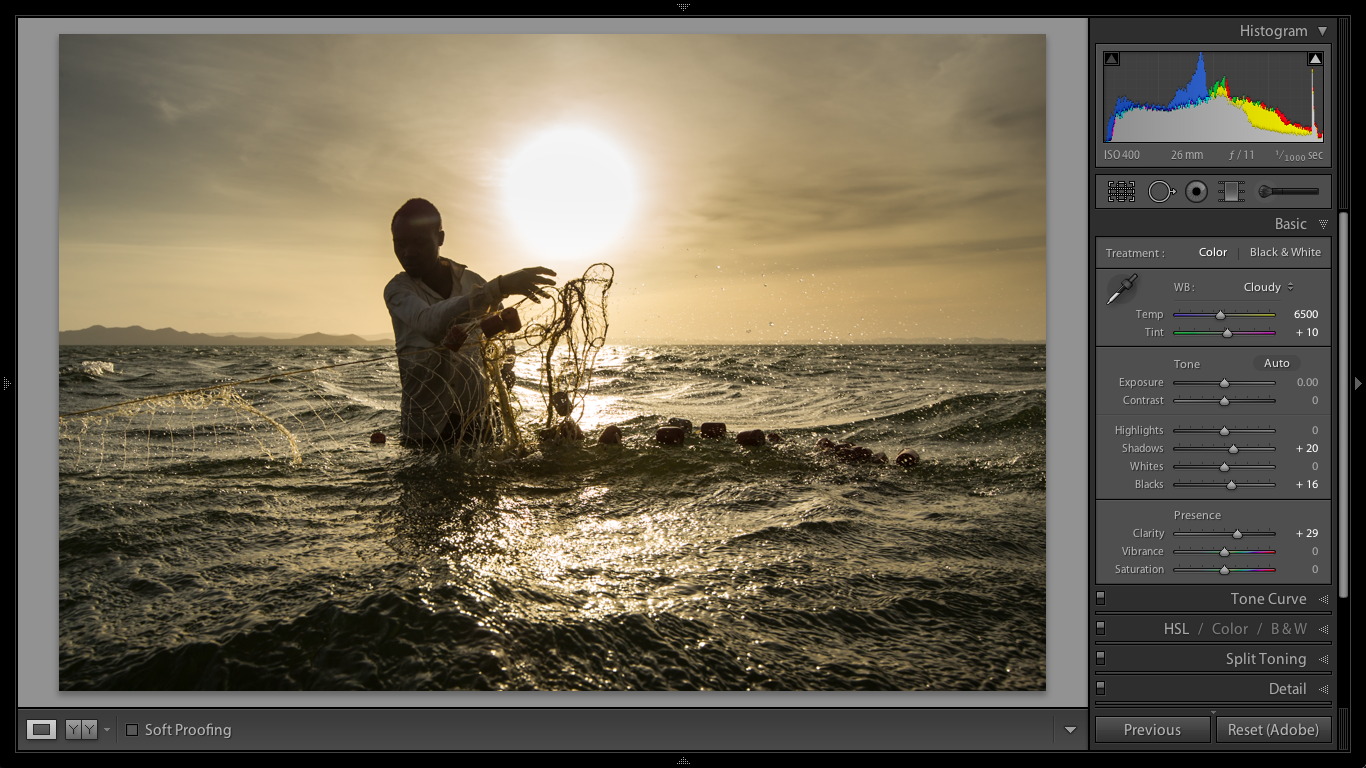 Click the images to make them larger.
By the way, this week we launched Issue Two of PHOTOGRAPH, our quarterly digital magazine for creative photographers. If you missed it, or haven’t subscribed yet, you can find more details here on the blog. Don’t miss out on this. Our first two issues are getting overwhelming feedback, and we want you to be part of it. Big, beautiful, issues featuring excellent photography and teaching, with no ads.
February 6, 2013
PHOTOGRAPH – Issue Two
BUY ISSUE TWO 
ONE-YEAR SUBSCRIPTION
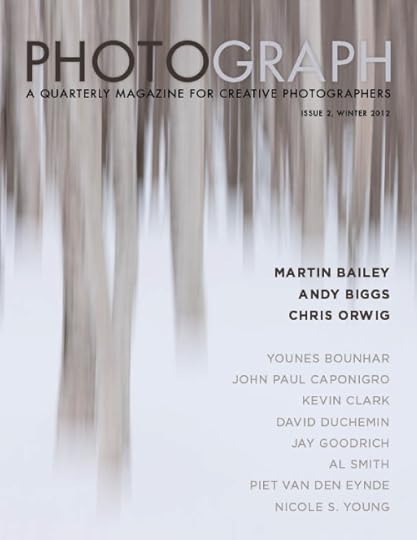
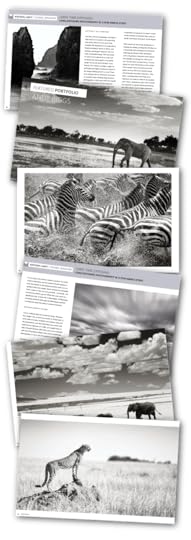
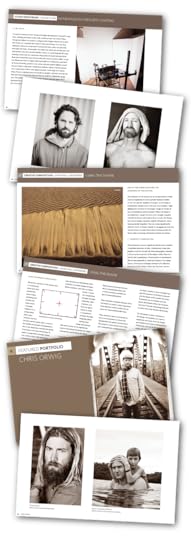
Today we’re launching Issue Two of PHOTOGRAPH, A Digital Quarterly Magazine for Creative Photographers. It’s 122 spreads long, and it’s gorgeous! The featured portfolios come from Martin Bailey, Andy Biggs, and Chris Orwig, and are followed up with short interviews.
We have great columns from John Paul Caponigro (Creative Composition), Younes Bounhar (Natural Light), Martin Bailey (The Art of the Print), Chris Orwig (Creativity), Nicole S. Young (Camera Craft), Piet van Den Eynde (Before + After), Al Smith (Gear is Good), Jay Goodrich (Inscape), and Kevin Clark (The Studio Sketchbook). My regular column called Without The Camera focuses on Capturing the Moment; I also wrote this issue’s featured article, Missing The Shot. Download the Table of Contents.
 If you got the last issue, you know how proud we are of this. We’ve taken our time on this and made something really beautiful. Your response has been completely overwhelming. For those that haven’t seen it yet, the magazine is ad-free and will always be ad-free. It’s quarterly, not monthly, so we can concentrate on making something truly worthwhile and beautiful. And because we believe in being part of the solution, not part of the problem, we’re paying our authors and our photographers, and we’re proud of that.
 We’ve always been, and will always be, champions of the amateurs, the ones who do this for the love of it, we’re committed to profiling photographers who you already know and look up to as well as those you’ve not, and giving you a chance to submit your work too.
BUY ISSUE TWO
ONE-YEAR SUBSCRIPTION
Photography, like any creative endeavour, is about creating and sharing, and we wanted to create a platform where that can happen alongside solid education about both the craft, and art, of photography. PHOTOGRAPH, Issue Two is available now through Craft & Vision, as a PDF download, for USD$8. Because we’ve always given discounts, we’re offering a 4-issue subscription for US$24, which means you buy 3 issues, and get one free.


