
Helen Hiebert's Blog, page 50
December 20, 2016
A Papery Solstice
Happy Solstice Everyone!
The October project in the Twelve Months of Paper calendar is a shadow ornament.
For those of you who have the calendar, you have the instructions for this project. And if you purchased a custom paper pack, you also have the parts!
And for all of you, I invite you to watch the 3-minute video trailer I’ve just completed for my upcoming on-line class. If you watch to the end, you’ll find the link to a tutorial for making the shadow ornament. Enjoy!
——————————————————————————————————————–
About the 25 Days of Paper 2016: It’s a great time to celebrate paper, and I’m delighted to share my ideas for using this amazing material with you. If you’d like more info about the Twelve Months of Paper Calendar, click here. Receive these blog updates via e-mail by adding your address in the upper right hand corner of this page. Enjoy the season, and feel free to leave a comment below and check out what people are making in the 25 Days of Paper FB Group!


December 19, 2016
Peace on Paper
True confession: Doing 25 blog posts in a row is challenging! I’m thankful that I have content from years past that many of you haven’t seen, and hopefully the rest of you will enjoy seeing again!
Last year I created and sold a custom paper pack and posted the instructions for twelve projects on this blog. This proved so successful that I decided to publish the 2017 Twelve Months of Paper calendar. I’m happy to report that the success has continued, so you can expect another calendar in 2018. Below you will find one of the projects from 2015.

I designed this card several decades ago. I think it was for an assignment at the School of Visual Arts, where I took a few classes. I remember that my instructor was impressed!
My assistant made the denim paper this past summer. That’s right, this is 100% blue jean paper. Cool, huh?

Make this from card stock. You might want to make a mock-up before cutting your finest paper. There are a few things that could go wrong… like accidentally cutting on a fold line.
For this project you will need:
This template
Card stock
Ruler
Craft Knife
Bone folder
Cutting mat
Tape (to adhere template to paper)
Decorative items (optional)

Step 1: Tape Template: Rough cut the template and tape it on top of the paper, making sure that you line up that first fold to match the score line between the P and the E. Also make sure that the tree top isn’t sticking up over the edge of the paper (I almost chopped mine off)!

Step 2: Score: Cut along all of the solid lines.

Step 3: Score: Score along all of the dashed lines.

Step 4: Fold: Accordion fold your card!

Step 5: Trim the Tree: This is optional. I stitched snowflake/stars onto my tree, but you could also punch, stamp, draw, … you show me!
2016 BONUS! Ann Martin of All Things Paper recently posted her rendition of this Peace Card here. If you don’t know about or follow her blog, what are you waiting for?!
——————————————————————————————————————–
About the 25 Days of Paper 2016: It’s a great time to celebrate paper, and I’m delighted to share my ideas for using this amazing material with you. If you’d like more info about the Twelve Months of Paper Calendar, click here. Receive these blog updates via e-mail by adding your address in the upper right hand corner of this page. Enjoy the season, and feel free to leave a comment below and check out what people are making in the 25 Days of Paper FB Group!
December 18, 2016
Pushing the Envelope
Sometimes you have to wonder about progress and extinction. Now I’m not saying that envelopes will go extinct, but the art of letter writing has surely diminished. But the colors and sizes of envelopes for invitations has continued to evolve, and envelopes make clever little pockets.
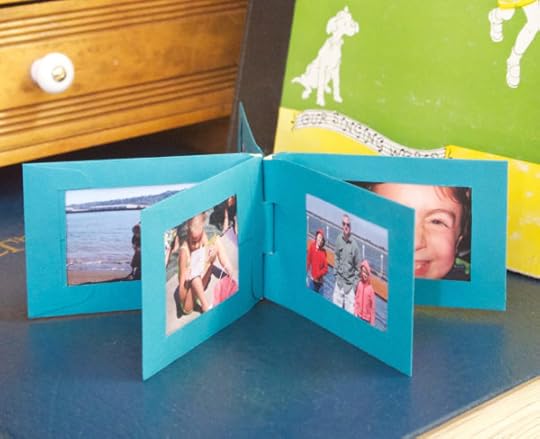
The September project in the Twelve Months of Paper calendar features this Envelope Photo Album. Cut windows through the envelopes, tuck photos inside, and bind the envelopes together with bamboo skewers.
The possibilities are endless: vary the colors and sizes; try using see-through glassine envelopes; use the flaps to stick one envelope to the next, and more! I created this pinterest board, which is full of other ideas.
What about you? Have you used envelopes in other creative ways?
——————————————————————————————————————–
About the 25 Days of Paper 2016: It’s a great time to celebrate paper, and I’m delighted to share my ideas for using this amazing material with you. If you’d like more info about the Twelve Months of Paper Calendar, click here. Receive these blog updates via e-mail by adding your address in the upper right hand corner of this page. Enjoy the season, and feel free to leave a comment below and check out what people are making in the 25 Days of Paper FB Group!
December 17, 2016
Blue Window Arts
25 Days of Paper 2016, Day 18
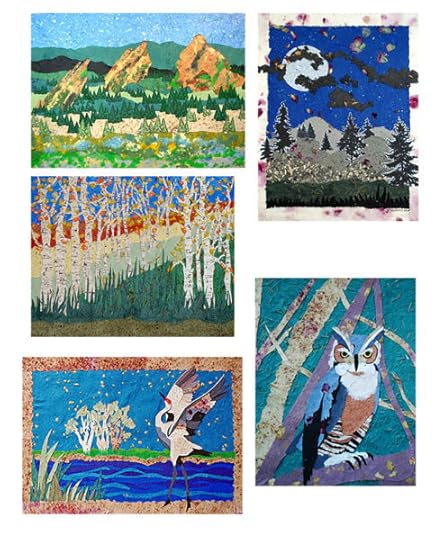
At Blue Window Arts, Master Artist, Wendy Rochman creates large and luscious hand made paper in her solar powered studio using sustainable fibers, recycled materials, mineral pigments, and natural inclusions that she gathers or grows in the Colorado Rocky Mountains.

Wendy’s large format (18X24″) papers incorporate a variety of techniques, and are designed for specific visual and textural qualities to resemble rocks or sky, or dappled sunlight on fluttering leaves, or other archetypal patterns found in nature.
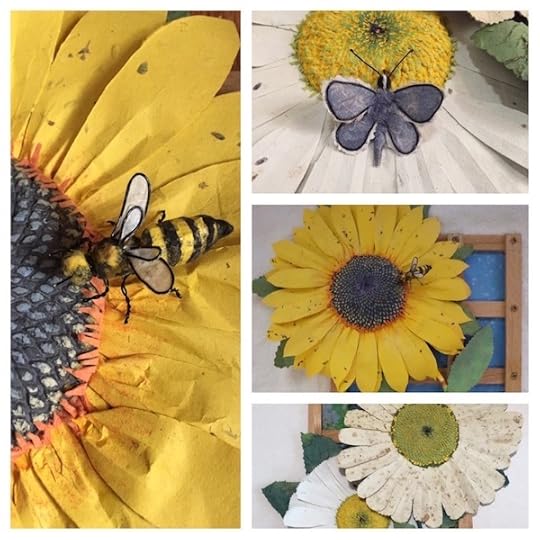
Wendy uses these art papers as the palette for her detailed layered collages and three dimensional wall sculptures.
Blue Window Arts greeting cards are reprints of her original collages. Receive a free greeting card with any order of $25 or more!
——————————————————————————————————————–
About our sponsor: Blue Window Arts is a 100% sustainable, solar powered small business in Boulder Colorado. In addition to selling her original art and greeting cards, owner/director Wendy Rochman teaches classes in basic paper making, and creative paper techniques.
——————————————————————————————————————–
About the 25 Days of Paper 2016: It’s a great time to celebrate paper, and I’m delighted to share my ideas for using this amazing material with you. If you’d like more info about the Twelve Months of Paper Calendar, click here. Receive these blog updates via e-mail by adding your address in the upper right hand corner of this page. Enjoy the season, and feel free to leave a comment below and check out what people are making in the 25 Days of Paper FB Group!
——————————————————————————————————————–
And here’s your Sunday Paper, in a slightly different order.
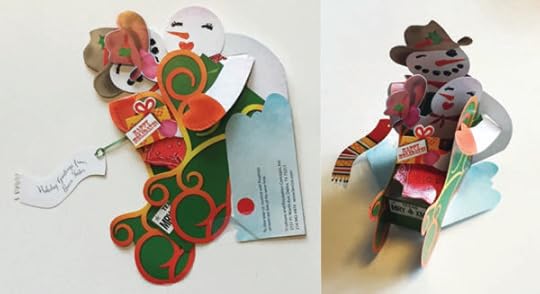
I received a fun pop-up card in the mail this week from paper engineer Bruce Foster. Bruce was a contributor to my book Playing With Pop-Ups and does truly amazing things with paper.
One of the first people I met when I moved to Portland, OR years ago was longtime bookbinder and writer Margaret E. Davis. As many of you know, paper was invented in China—so, too, moveable type, woodblock printing, and bookbinding itself. Margaret won a grant to study bookbinding where books began, and now has a manual-memoir coming out that teaches four of the oldest bindings on paper. With dozens of illustrations and images of techniques, tools, and artifacts, China under the Covers weaves history, how-to expertise, and a journalist’s eye for detail into a compelling narrative that embraces both cultural continuity and contemporary change. I received the honor of getting to read her manuscript! Please join me in preordering a copy and watch a movie covering some hundreds of years of bookbinding history in three minutes.

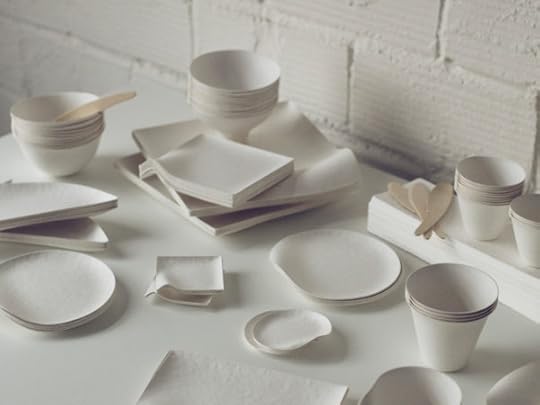
These dishes by Wasara bring paper plates and disposable dishware to a whole new level!
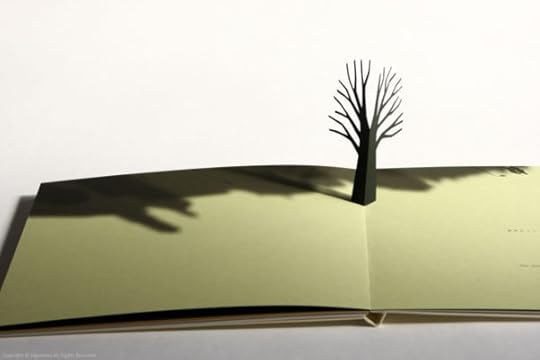
Do you know about the blog Brainpickings? Maria Popova recently reviewed a sweet pop-up book called Little Tree by Japanese graphic designer and book artist Katsumi Komagata.
Best Pop-Up Cards recently published this review of…. you guessed it…. Christmas Pop-Ups! Enjoy.
———————————————————————————————–––––––––
In the Studio:
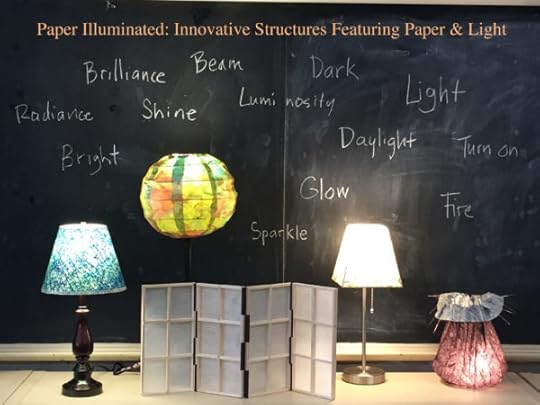
I found a good use for the chalkboards in my studio, which is an old classroom in the old schoolhouse in Red Cliff, Colorado. These are the five projects we’ll be making in my first on-line class. Registration begins in January and I’m working on a short video about the class which will debut later this week!
———————————————————————————————–––––––––

If you read this blog regularly, would you consider making a donation to support the research, writing, design and delivery of The Sunday Paper? Click on the paper button at the left (I made that paper) to see how you can provide support.
And if you run a paper-related business, you might be interested in promoting your business in The Sunday Paper.
Thanks again to those of you who have pledged your support, and enjoy your Sunday!
December 16, 2016
Paper Balloons
The August project in the Twelve Months of Paper calendar is a Paper Balloon. This is a repost from 2012, when I did the first 25 Days of Paper!
Remember the origami balloons, or water bombs, we learned to make in elementary school? I taught my after school paper club kids to make them today, and the high energy group had fun tossing and kicking them around the room like hacky sacks. But here’s another idea – use them as holiday light covers.

Origami paper balloon light covers, by JuuniOrigami
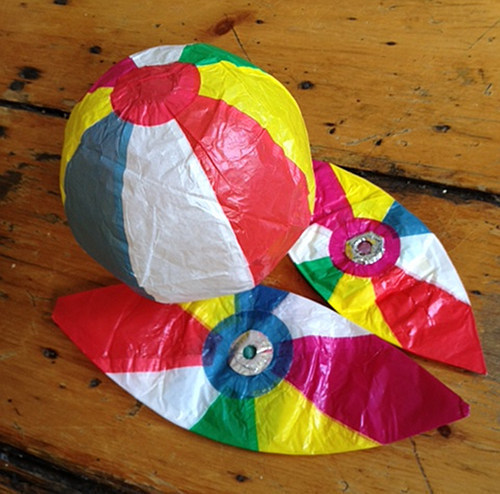
When I was in Japan in the late 80’s, I picked up a few of these inflatable paper balls. They come packaged flat, and with just a breath of air they inflate.
I made a large version (5′ in diameter) of this ball out of tracing paper in 2006. The Text Ball has part of a poem by Ezra Pound printed on it using rubber stamps: “The Book Should be a Ball of Light in One’s Hand”.
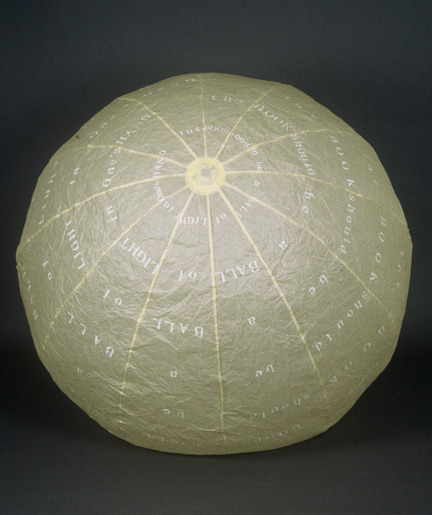
Text Ball, by Helen Hiebert
Instructions for how to make an inflatable ball that is one foot in diameter are included in my book, Playing With Paper. And, as stated above, a mini-version (about 4″ diameter) is included in the Twelve Months of Paper calendar. Here’s a picture from the book, featuring van dyke brown prints by Alyssa Salomon on handmade abaca paper that I made.

Inflatable paper ball by Alyssa Salamon & Helen Hiebert
Another project featured in the book is how to make a hot air balloon that you can launch with heat from a heat gun, hair dryer or propane stove into the sky. I read an article by Brian Queen in Hand Papermaking Magazine in the summer of 2006, just prior to teaching a class at The Penland School. I decided to have my class make a collaborative hot air balloon. We constructed one from tissue paper which was about seven feet tall. Here’s my class trying to launch the balloon in front of the breakfast crowd near The Pines. That attempt failed (it was too warm outside), but it still looked pretty good.

We tried the launch again a few mornings later. I don’t think any of us expected it to work, but we hooted and hollered as that balloon soared up into the sky and over the photo studio and landed, sigh, high up in a tree.
Check out this inflatable sofa made from recycled paper, by Malafor in Poland.

Blow Sofa, by Malafor
What other sorts of inflatables have you seen? Please share by e-mailing or leaving me a comment below.
——————————————————————————————————————–
About the 25 Days of Paper 2016: It’s a great time to celebrate paper, and I’m delighted to share my ideas for using this amazing material with you. If you’d like more info about the Twelve Months of Paper Calendar, click here. Receive these blog updates via e-mail by adding your address in the upper right hand corner of this page. Enjoy the season, and feel free to leave a comment below and check out what people are making in the 25 Days of Paper FB Group!
December 15, 2016
Madeleine’s Paste Paper
New One-of-a-Kind piece on Arches Text Wove. See more One-of-a-Kind pieces on Etsy
Madeleine Durham creates paste paper designs using a brush technique she has been perfecting over the last four years.
Madeleine’s Paste Papers is offering a 15% discount through the month of Dec on her Etsy shop. Enter the code – HHpaper – to receive your discount.
She works on Arches Text Wove and recently has added a beautiful Japanese Kozo paper to her selection.

Madeleine sells her papers to book artists, book binders, calligraphers and collage artists to name a few. She is also available for edition work by special order. In 2016 she created editions for The Palace Press in Santa Fe, NM and Nawakum Press in Santa Rosa, CA. Her papers are archival using only the highest quality elements.
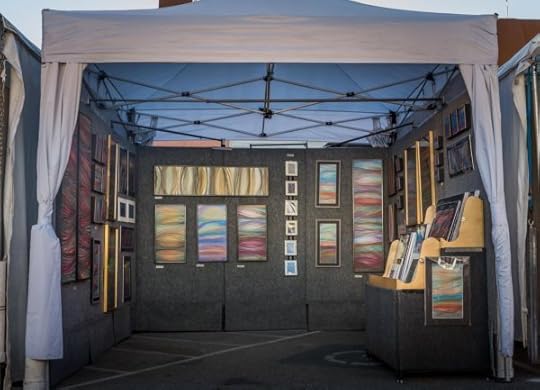
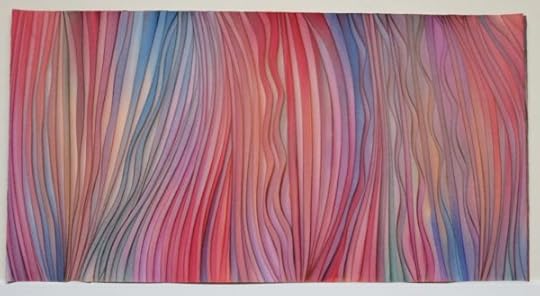
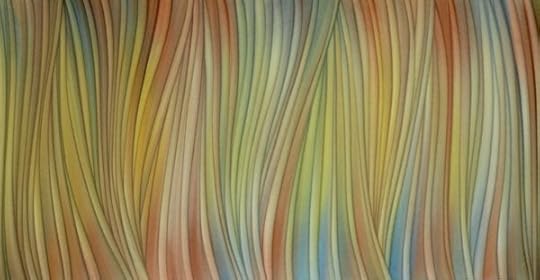
Santa Fe Society of Artists outdoor show just off the Santa Fe Plaza – May though October
She was recently accepted into the Santa Fe Society of Artists where she sells her abstract landscapes created with her paste paper technique.
——————————————————————————————————————–
About our Sponsor: Madeleine Durham is a paste paper artist working from her home studio in Santa Fe in the high desert of New Mexico. From October through April Madeleine has a showroom in the El Museo Cultural Indoor Winter Market which is open to visitors Saturdays 8-3 and Sundays 9-4. A member of the Santa Fe Society of Artists, Madeleine displays her wall art during the warmer months at the Santa Fe Society of Artist’s outdoor show just off the plaza in downtown Santa Fe. You can also follow her on Facebook.
——————————————————————————————————————–
About the 25 Days of Paper 2016: It’s a great time to celebrate paper, and I’m delighted to share my ideas for using this amazing material with you. If you’d like more info about the Twelve Months of Paper Calendar, click here. Receive these blog updates via e-mail by adding your address in the upper right hand corner of this page. Enjoy the season, and feel free to leave a comment below and check out what people are making in the 25 Days of Paper FB Group!
December 14, 2016
Write Your Letters!
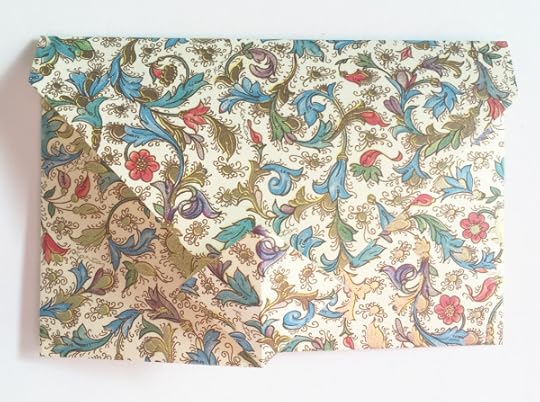
This is a repeat from last year since the July project in the Twelve Months of Paper calendar (the Zig Zag Book) has already been covered during the blog marathon.
These envelopes are simple and fun to make, and they’ll put to good use any wrapping and/or origami papers you have laying around. ‘Tis the season to write letters! This particular paper is an Italian printed paper from GPC Papers.
For this project you will need:
A 9″ x 9″ square of paper (but feel free to try various sizes)
Bone Folder: optional
Ruler: optional

Step 1: Fold the square of paper in half diagonally with the printed design on the outside.
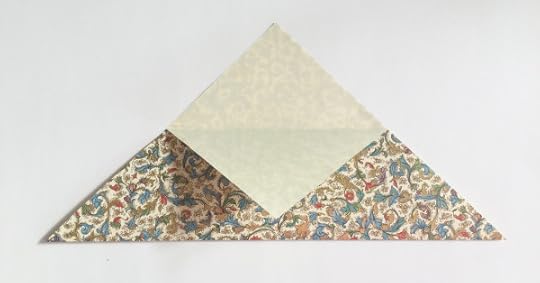
Step 2: Fold the top flap of the triangle down to the center point on the folded edge as shown.
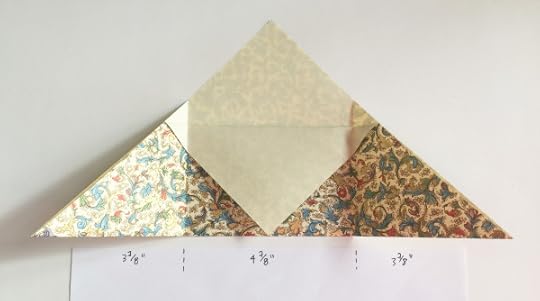
Step 3: You can guess at this step or measure, but basically you need to fold each side corner of the triangle in towards the center at slightly less than one third of the dimension of the bottom edge, keeping the bottom edges aligned. Fold the right flap down first, with the left flap on top (you can also do this vice versa).

Step 4: You do not need a ruler and bone folder for this step; it just depends on how precise you like to be. Either fold back that top left-hand flap in the center, or score the mini-triangle you see created to the right of the ruler in the photo above and then fold it back towards the left along the crease.
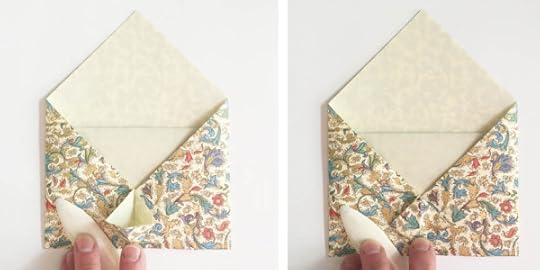
Step 5: Now create a squash fold (you can look this up if you need more visuals). Open up that little triangle that you just folded back and press the paper down to create a small diamond-shaped pocket and squash it down flat.

Step 6: Fold the top flap of your envelope down, tuck it into the diamond-shaped pocket and crease that last fold, forming your envelope.
NOTE: This particular envelope is too small to mail by itself (the post office has size restrictions). You can scale this up if you’d like to actually mail your envelopes!
——————————————————————————————————————–
About the 25 Days of Paper 2016: It’s a great time to celebrate paper, and I’m delighted to share my ideas for using this amazing material with you. If you’d like more info about the Twelve Months of Paper Calendar, click here. Receive these blog updates via e-mail by adding your address in the upper right hand corner of this page. Enjoy the season, and feel free to leave a comment below and check out what people are making in the 25 Days of Paper FB Group!
December 13, 2016
Handmade in India
Inspired by textile designs, patterns and colors, Indian Cotton Rag Papers make outstanding papers for all art and design applications. Indian Cotton Papers are made by hand using recycled, refined cotton from rags, clothing and textiles instead of pulp from the cotton seed as other papers. Longer cotton fibers in the paper providing exceptional strength and durability.
Mulberry Paper & More is offering free shipping on any order with coupon code HHFREE

Beautiful designs are hand silk-screened onto this rugged base paper. Each color in the pattern is applied individually and allowed to dry. The silkscreening process provides richer colors and more depth than machine printed papers. There are as many eye-catching designs for your project as there are fabric patterns.
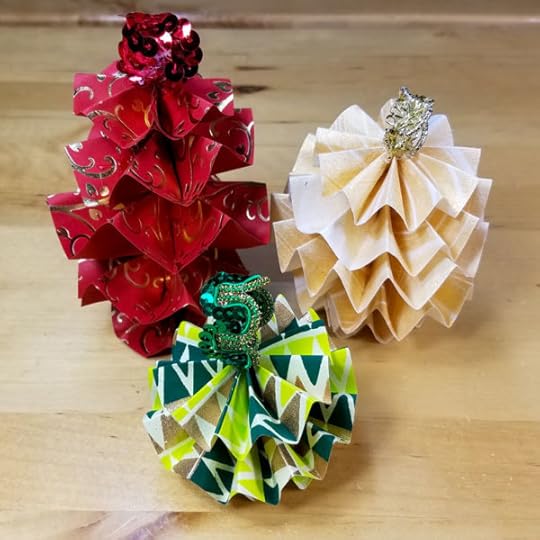
Make this cute ornament, courtesy of Mulberry Papers & More!
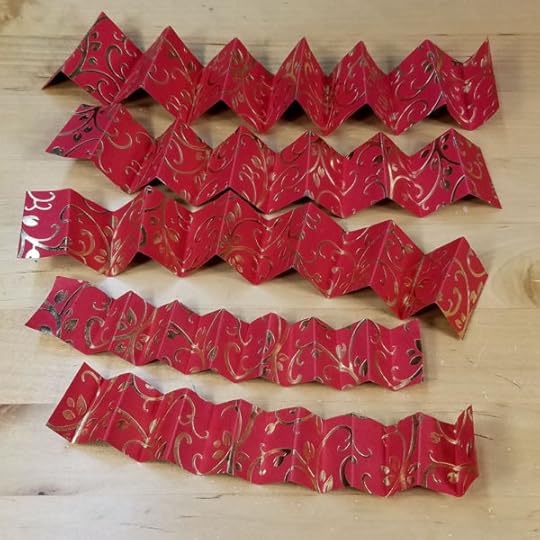
Cut paper into strips. For each large ornament, you need:
1- 12” x 1.5” strip
2- 10” x 1.25” strips
2- 8” x 1” strips
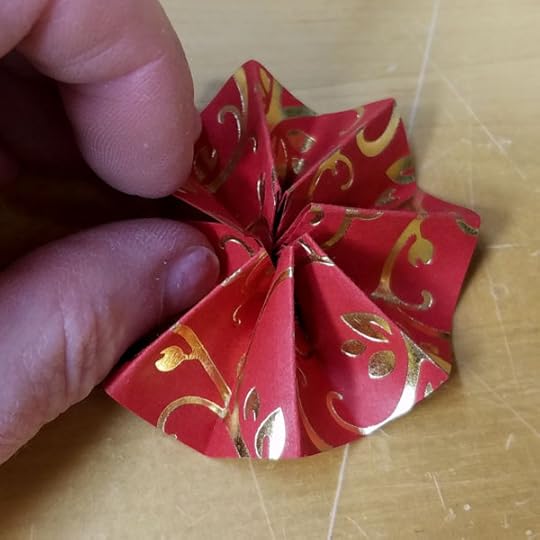
Accordion fold the strips and attach ends with hot glue to form a rosette. Also glue the middle to help keep the shape.
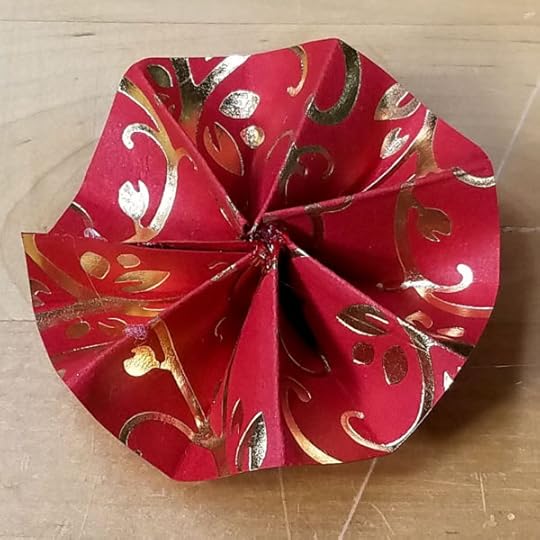
Hot glue the rosettes together and attach a ribbon for a hanger.
Indian Cotton Rag Papers are acid-free and weigh approximately 100 to 110 gsm for a moderate weight, handmade paper lending itself to a multitude of art, craft and home décor uses as well as an excellent gift wrap.
——————————————————————————————————————–
About our sponsor: Mulberry Paper & More carries an extensive selection of specialty papers from around the world. They offer a number of size selections in each paper to allow customers to choose the correct paper for their project.
——————————————————————————————————————–
About the 25 Days of Paper 2016: It’s a great time to celebrate paper, and I’m delighted to share my ideas for using this amazing material with you. If you’d like more info about the Twelve Months of Paper Calendar, click here. Receive these blog updates via e-mail by adding your address in the upper right hand corner of this page. Enjoy the season, and feel free to leave a comment below and check out what people are making in the 25 Days of Paper FB Group!
December 12, 2016
Tessellating Tyvek

Indigo Petal Cascade Necklace: Brass and abaca paper indigo petals, ombre dyed, on a sterling silver chain.
Editor’s correction: Yesterday, I forgot to include the discount code for Verso’s lovely jewelry. Please click here to view Verso’s Etsy shop and enter papermaker to receive a 20% discount on your purchase!
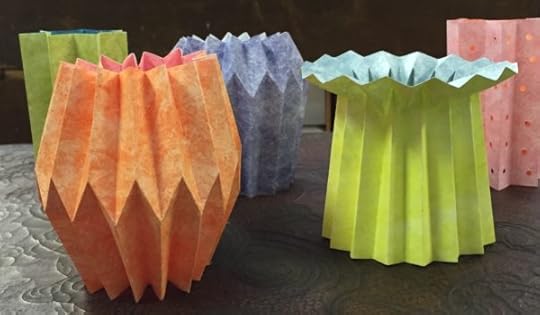
These Tessellating Tyvek Lanterns are the June project in the Twelve Months of Paper calendar. Tyvek is one of those wonder materials. It acts like paper, but is water resistant and virtually tear-proof. It folds really well too.
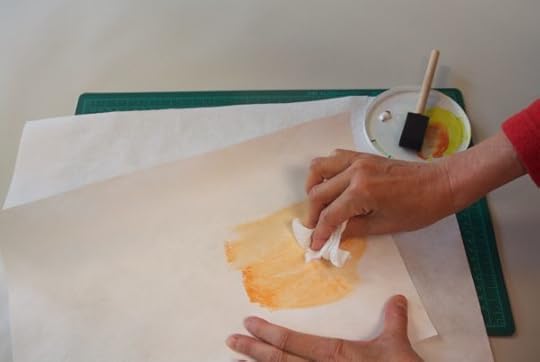
It comes in white and black (I bought a discounted roll here) and you can stain it with acrylic paint, watercolor or ink. As you can see, I stained both sides of the Tyvek for these lanterns.
Do you know how to fold an accordion? I made a short video (this video shows the technique, although not with the actual paper for this project).
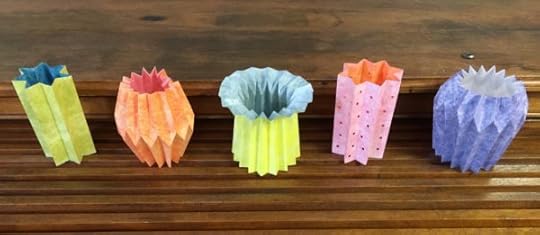
Here you can see the many possibilities of this structure. Vary the shape, punch holes through each accordion, or alter the tessellating folds. I’ve used double-sided tape, glue or velcro dots to bind the seam (the velcro dots make the lanterns reversible).
——————————————————————————————————————–
About the 25 Days of Paper 2016: It’s a great time to celebrate paper, and I’m delighted to share my ideas for using this amazing material with you. If you’d like more info about the Twelve Months of Paper Calendar, click here. Receive these blog updates via e-mail by adding your address in the upper right hand corner of this page. Enjoy the season, and feel free to leave a comment below and check out what people are making in the 25 Days of Paper FB Group!
December 11, 2016
Verso Jewelry

Indigo Lily Crown or Neckpiece: This one-of-a-kind piece can be worn as a crown or a neckpiece. The lilies are dyed with indigo dye and the pistils are made of brass and orange glass.
Melanie Brauner’s jewelry is made from abaca paper fibers cast onto metal. First, she fabricates three-dimensional shapes from copper, brass, and sterling silver, and beats abaca in her Critter beater for at least 4 hours, to achieve a beautiful translucency when she casts it.
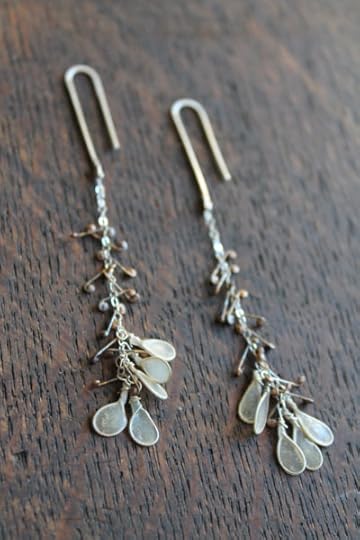
Frond Earrings: Sterling silver with abaca paper dewdrops.
Next she dip-casts the metal forms between 2 and 4 times, dipping and drying, dipping and drying, gathering another thin layer of fibers each time they’re dipped into the pulp, until a paper skin is built up. The she adds dye to some of the pieces and seals everything to make them water resistant and durable.
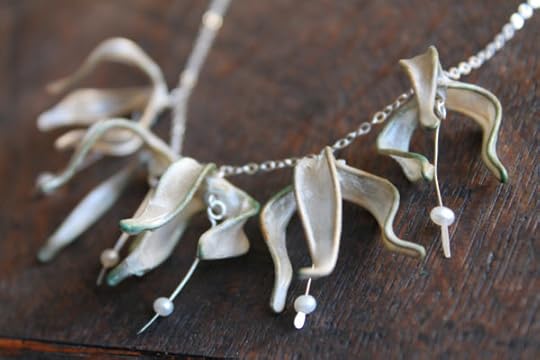
Lily Garland Necklace: Brass and abaca flowers with sterling silver and freshwater pearl drops, on a sterling silver chain.
Melanie’s inspiration comes from the details you experience when you walk through forests and gardens: moss, rivers, flowers, leaves, chrysalises, dewdrops, gates and bridges, the night sky, insects, spiderwebs, rain….
——————————————————————————————————————–
About our Sponsor: VERSO is a two year old, one woman business in Shoreline, Washington, run by Melanie Brauner. In addition to making her jewelry line, Melanie creates one-of-a-kind art jewelry pieces and artist’s books intended for gallery shows, and she’s a custom bookbinder and box maker.
You can buy VERSO jewelry through her website or Etsy shop, and in the Tacoma Art Museum, the Bellevue Art Museum, the Bainbridge Island Museum of the Arts, the Nevada Art Museum, Whitebird Gallery in Cannon Beach OR, Scott Milo Gallery in Anacortes WA, Good Eye Gallery in Los Angeles CA, and a handful of shops and boutiques. Follow Verso on facebook and instagram.
——————————————————————————————————————–
About the 25 Days of Paper 2016: It’s a great time to celebrate paper, and I’m delighted to share my ideas for using this amazing material with you. If you’d like more info about the Twelve Months of Paper Calendar, click here. Receive these blog updates via e-mail by adding your address in the upper right hand corner of this page. Enjoy the season, and feel free to leave a comment below and check out what people are making in the 25 Days of Paper FB Group!


