
Heather Reyburn's Blog, page 2
May 25, 2021
Lime and Coconut Cake Gluten Free
As we approach winter here in Australia, our citrus trees are bursting with fruit, encouraging me to find 101 ways of using them. I made this cake recently and it has proved to be such a favourite, I thought I would share it with you all.
As a Coeliac, I have modified the recipe to suit me – and have made notes at the foot of this recipe to assist any of you who made need to do the same.
Enjoy!
Lime and Coconut Cake Gluten Free
Ingredients:
1 ½ cups Self Raising Flour
½ cup Coconut
2 teaspoons grated lime rind
1 cup sugar
125gms melted butter
2 eggs
1 cup coconut milk
Icing:
1 ½ cups icing sugar
2 tablespoons lime juice
Method:
Turn oven to 180C. Grease loaf tin or prepare patty pans
In a large bowl, combine flour, coconut, rind, and sugar together
In a smaller bowl, melt butter then allow to cool slightly before adding milk and eggs – whisk together.
Bake for approximately 45 minutes (less if in patty pans/cases) or until golden and cooked through.
Cool, turn onto plate and ice.
Dietary Alternatives:
This is an easy recipe to adapt for gluten and dairy intolerances or if you are Vegan
Substitute the flour for gluten free
Substitute the butter for a non-dairy/vegan alternative
Use a Vegan egg replacer
Note: It is also nice if you use dairy milk instead of coconut
The post Lime and Coconut Cake Gluten Free first appeared on Heather Reyburn.


Lime and Coconut Cake
As we approach winter here in Australia, our citrus trees are bursting with fruit, encouraging me to find 101 ways of using them. I made this cake recently and it has proved to be such a favourite, I thought I would share it with you all.
As a Coeliac, I have modified the recipe to suit me – and have made notes at the foot of this recipe to assist any of you who made need to do the same.
Enjoy!
Lime and Coconut Cake
Ingredients:
1 ½ cups Self Raising Flour
½ cup Coconut
2 teaspoons grated lime rind
1 cup sugar
125gms melted butter
2 eggs
1 cup coconut milk
Icing:
1 ½ cups icing sugar
2 tablespoons lime juice
Method:
Turn oven to 180C. Grease loaf tin or prepare patty pans
In a large bowl, combine flour, coconut, rind, and sugar together
In a smaller bowl, melt butter then allow to cool slightly before adding milk and eggs – whisk together.
Bake for approximately 45 minutes (less if in patty pans/cases) or until golden and cooked through.
Cool, turn onto plate and ice.
Dietary Alternatives:
This is an easy recipe to adapt for gluten and dairy intolerances or if you are Vegan
Substitute the flour for gluten free
Substitute the butter for a non-dairy/vegan alternative
Use a Vegan egg replacer
Note: It is also nice if you use dairy milk instead of coconut
The post Lime and Coconut Cake first appeared on Heather Reyburn.February 27, 2021
Super Sheep Excursion

It’s all about Wool!
Many years ago I decided I wanted to learn as much about the wool industry as possible. Not just because I loved sheep, but also because I consider natural fibres to be so important and sustainable.
The more I learned, the more I realised how little I knew. I was fortunate that our local Tertiary College offered the full approved training with the outcome of becoming a “Wool Classer”—and so I began.
The Wool Classer is an important member of a shearing team as without one, especially in the Merino industry, a huge portion of the value of a property’s wool clip could be lost. Therefore, the skills of a good classer are vital to the farmer.
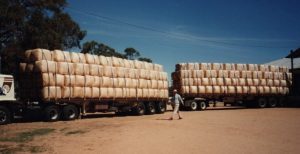
As the wool is shorn from a sheep, it is picked up by a handler and thrown high in the air (and art in itself) to land on a slatted table in a wide-spread but connected blanket, ready for classing (or inspecting). The classer deftly removes the pieces of the fleece that have any staining, burr or vegetable matter in them, together with any wool that is a different length to the rest of the fleece. The various pieces of the fleece are kept separate in wool bins (partitioned areas against a wall). As the bins fill, the wool is gathered by the Presser and, using a special box like machine, is pressed into a large bale, labelled clearly and when shearing is over, sent for sale.
To demonstrate the variety of Merino wool grown within Australia, a group of ten of us (including our two wonderful teachers) travelled from southern Queensland to the Riverina area of New South Wales (NSW) where we spent several days inspecting numerous studs and their stock. The distance we covered was considerable, however, in the small bus, there was no shortage of fun, talk and song. One of the other women was a young Maori girl from New Zealand who brought a guitar with her, so each evening as we sat around the table or fire, anyone who could play, took turns while those who could, sang, and those who couldn’t, enjoyed the concert!
On our first day we travelled almost 750kms to visit one of Australia’s most famous Merino Studs near Warren in north western NSW called Haddon Rig. From there, we headed down to West Wyalong and at night, camped in the shearer’s quarters on each property we visited, marvelled at the massive woolsheds on the route, and fell in love with the many beautiful old homesteads. A further two to three thousand kilometres were covered as we made our way to our base at “The Yanco” just north of Narrandera. From there we circumnavigated the district and visited many studs from Jerilderie to Deniliquin, Hay and back again. On these days, we visited many famous Merino studs including Uardry, Wanganella, Willurah, Boonoke and Pooginook—all displaying the best of their rams and ewes, wool and many stunning homes and gardens.
To a sheep and garden lover, it was a fabulous trip, an educational overload, and a thoroughly enjoyable week!
 The post Super Sheep Excursion first appeared on Heather Reyburn.
December 20, 2020
Christmas Shortbread Recipe
Christmas Shortbread Recipe
Ingredients:
250 grams butter
1 cup icing sugar
1 cup cornflour
2 cups plain flour
Method:
Melt butter in a large saucepan then allow to cool to room temperature
Stir in the icing sugar and flours and mix well.
Roll out on a lightly floured board and cut into squares or shapes, before placing on a baking
tray.
Bake at 160 degrees for approximately 20 minutes or until just beginning to colour around
the edges.
Tip:
For those who need to make the recipe gluten free, ensure the icing sugar and flours are
gluten free. For extra “stickability” (ie. Not crumbly), add 1-2 teaspoons of Xanthan Gum.
ENJOY!
The post Christmas Shortbread Recipe first appeared on Heather Reyburn.
November 22, 2020
Strawberry, Orange and Almond Cake Gluten Free
Strawberry, Orange and Almond Cake Gluten Free
The original recipe used coconut and there were coconut threads on top of the icing, but I use ground almonds in the cake and leave out the coconut on top as a personal preference.
Feel free to swap the ground almonds for the same amount of coconut and to sprinkle coconut threads liberally!
150g butter at room temperature,
1c caster sugar,
3 size 7 eggs
1 c plain or gluten free flour,
1 1/2 tsps baking powder,
1/2 tsp cardamom
1/2 c ground almonds (or coconut),
1/2 c plain yoghurt,
finely grated zest of 1 orange
2 tbsp orange juice,
about 12-15 medium sized strawberries, hulled and cut into chunks
Grease a 22 cm loose based cake tin and line the bottom and sides OR put non-stick muffin papers into standard muffin tins for individual cakes. Heat the oven to 150 degrees C
Cream the butter and sugar until pale. Whisk the eggs together and gradually beat in until well combined.
Mix the flour, baking powder, cardamom and almonds/coconut together.
Gently fold into the butter mix with the yoghurt, orange zest and juice.
Lightly mix in the strawberries until they are evenly incorporated.
Pour into the tin or cases and smooth the top/s. Bake for 1 hour until golden or about 12-15 minutes for individual cakelets. Test for done-ness by inserting a skewer into the centre…it should come out clean.
Cool cake/s in the tin completely before moving to a rack.
The cake can be served as is as a dessert, warmed or at room temperature OR it can be iced with a cream cheese and strawberry frosting. Quite delicious!
Store any leftovers in the fridge.
Frosting:
Beat 100g room-temperature cream cheese; add 100g soft butter and beat again.
Beat in 2 c sifted icing sugar. Crush 3-4 strawberries with a fork and beat in enough to
make the frosting pink, yummy and spreadable… but not runny. Spread on the cake/s and decorate with crushed freeze-dried strawberry slices, halved fresh strawberries and/or coconut threads.

The post Strawberry, Orange and Almond Cake Gluten Free first appeared on Heather Reyburn.
Strawberry, Orange and Almond Cake
Strawberry, Orange and Almond Cake
The original recipe used coconut and there were coconut threads on top of the icing, but I use ground almonds in the cake and leave out the coconut on top as a personal preference.
Feel free to swap the ground almonds for the same amount of coconut and to sprinkle coconut threads liberally!
150g butter at room temperature,
1c caster sugar,
3 size 7 eggs
1 c plain or gluten free flour,
1 1/2 tsps baking powder,
1/2 tsp cardamom
1/2 c ground almonds (or coconut),
1/2 c plain yoghurt,
finely grated zest of 1 orange
2 tbsp orange juice,
about 12-15 medium sized strawberries, hulled and cut into chunks
Grease a 22 cm loose based cake tin and line the bottom and sides OR put non-stick muffin papers into standard muffin tins for individual cakes. Heat the oven to 150 degrees C
Cream the butter and sugar until pale. Whisk the eggs together and gradually beat in until well combined.
Mix the flour, baking powder, cardamom and almonds/coconut together.
Gently fold into the butter mix with the yoghurt, orange zest and juice.
Lightly mix in the strawberries until they are evenly incorporated.
Pour into the tin or cases and smooth the top/s. Bake for 1 hour until golden or about 12-15 minutes for individual cakelets. Test for done-ness by inserting a skewer into the centre…it should come out clean.
Cool cake/s in the tin completely before moving to a rack.
The cake can be served as is as a dessert, warmed or at room temperature OR it can be iced with a cream cheese and strawberry frosting. Quite delicious!
Store any leftovers in the fridge.
Frosting:
Beat 100g room-temperature cream cheese; add 100g soft butter and beat again.
Beat in 2 c sifted icing sugar. Crush 3-4 strawberries with a fork and beat in enough to
make the frosting pink, yummy and spreadable… but not runny. Spread on the cake/s and decorate with crushed freeze-dried strawberry slices, halved fresh strawberries and/or coconut threads.
The post Strawberry, Orange and Almond Cake first appeared on Heather Reyburn.
October 28, 2020
Cedar Trees (Toona Ciliata)
Commonly known as the red cedar, these trees can be found growing throughout Asia, – from Afghanistan to Papua New Guinea and Australia. It is one of only a few deciduous native trees, losing their leaves in winter.
It is a large rainforest tree, commonly used for veneers and panelling. In early pioneering days in Australia the ‘Cedar Cutters’ frequently preceded more permanent settlers and were often responsible for the opening up of new areas for the ever expanding European arrivals. Unfortunately, the efficiency of the Cedar Cutters also resulted in the over exploitation of our rainforests with the most precious of rainforest trees – the Red Cedar (Toona ciliata) or ‘Red Gold’ as it was known, being cut to commercial extinction by the beginning of the 20th century.
The timber has a rich red depth and a wood-workers dream. The wood is soft, making it easy to work with and is pest and water resistant.
Although mostly found in rainforest areas, with the right start, it has been known to survive and give delight to keen gardeners throughout Australia – including those living west of the Great Dividing Range.
The post Cedar Trees (Toona Ciliata) first appeared on Heather Reyburn.
September 20, 2020
The Pepperina Grove
I am super excited to announce the release of my latest novel in the Tullagulla series!
“The Pepperina Grove” is now with Amazon and will be available for purchase from 23 September.
As with my first two books in the Tullagulla series, paperback copies of The Pepperina Grove will be available through Amazon and other online bookstores. Signed copies will also be available directly from me.
It has been a wonderful month with sales continuing to increase and the second book in the series “The English Oak” making it into the top fourteen on Amazon Australia.
Sincere thanks to you all, lovely readers, for reading my books and providing such lovely comments and reviews. I hope you enjoy your third visit to Tullagulla and love getting to know Lou as much as I do.
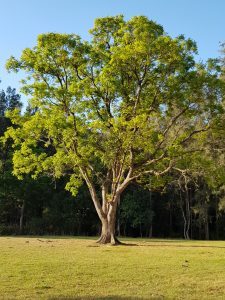
For those of you who don’t have a Pepperina tree in your area, I hope you are able to find one. Here is a photo to assist you in recognising them. They are a nice tree with rough, gnarly bark and soft, feathery leaves – and along with the hardy Bougainvillea, were planted near almost every rural homestead in country Queensland over the last two hundred years. They produce small red berries which were popular in the early days of settlement in Australia for both culinary and medicinal purposes.

So – until next time, enjoy the glorious colours and smell of spring (in Australia). Happy reading and stay safe!
Love Heather
The post The Pepperina Grove first appeared on Heather Reyburn.
August 24, 2020
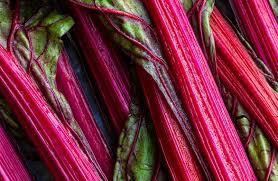
My Favourite Rhubarb Recipes
Rhubarb Cordial
2 kgs chopped rhubarb stalks – place in bowl
2 litres boiling water – pour over chopped rhubarb stalks
Allow to sit for 24 hours
Then tip above into a large saucepan and add the following:
1.25kgs sugar
1 litre pineapple juice (canned, bottled or fresh)
Bring to the boil, stirring, then switch off and allow to cool
When cold, push through a sieve (Save pulp to make rhubarb crumble or have on cereal etc)
Pour liquid into bottles (makes approximately 4 litres)
Store in fridge until required
Note: This is very refreshing in hot weather – dilute with water and serve with ice
Rhubarb Crumble
This is a delicious topping to put on the rhubarb pulp left over after making the cordial
Mix together:
200gms melted butter
Half a cup of brown or raw sugar
Half a cup of desiccated or shredded coconut
1 ½ cups Rolled Oats (OR 1 cup Rice flakes or Quinoa flakes, plus ½ cup flaked almonds for a Gluten free option)
Spread on top of rhubarb and bake in moderate oven until topping is brown and crunchy.
Serve with custard and/or ice-cream.
The post My Favourite Rhubarb Recipes first appeared on Heather Reyburn.
July 26, 2020
Mysterious Machinery
On every farm, machinery is necessary for so many reasons. However, as more of an animal oriented person, to me, machinery has always been a challenge—and a mystery.
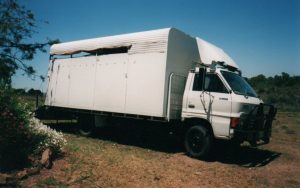
During my life on the land, I became adept at driving any vehicle, large or small, maintaining equipment and generally grasping enough basics required to run a successful property. In all the years of vehicles and equipment, the two standouts that provided both character and loving memories were my little Ford tractor and the Isuzu truck that we used to transport competition horses around the country.
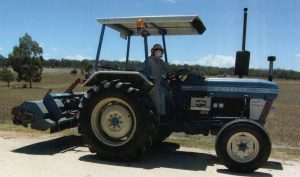
The tractor was easy to drive, easy to attach and detach accessories from and—mostly–very reliable. Used for many jobs, the most common purposes were to rake hay and mow pasture. I had a Behrend mulching mower that attached to the back of the tractor— a noisy but incredible invention, allowing me to regularly slash paddocks for weed control and to spread the native grass seeds. This encouraged the hardy, nutritious feed for sheep and stabilised the ground. However, the mower blades were sharp and efficient, and as we chuffed around the paddocks, it not only chomped up the clumps of horse manure and tidied up the grasses, but also rapidly destroyed anything that blew into its path, including my well-worn and much loved Akubra hat, caught by an unexpected gust of wind.
The truck was a much loved 1980 Isuzu with a permanently fixed horse crate on the back. My daughters and I travelled many kilometres with up to five horses on board, attending shows, Pony Club and all manner of horse competitions. The engine took a while to warm up, and during the essential warm up routine, the glow plugs had to be lit for a full minute before attempting to pull the start button. Then, once it burst into life, the exhaust blew clouds of grey smoke for a couple of minutes. This meant that the horses (and people) needed to stand back until the old girl was warm and happy to move, then we loaded up and travelled without attracting attention. On one occasion, we had parked well away from others at a two day competition. We camped in the back of it and, on the final day of competition, I started her up in preparation for the homeward journey. The smoke billowed and we had a frantic visitor come running down the hill, thinking we were on fire. Sadly, we knew the truck would need an engine rebuild before too long, however we ploughed on with the help of our wonderful diesel mechanic for another two years after that.
On another occasion, we were driving home from the Goondiwindi Show, a distance that took a little over two hours. As we left the Showgrounds, the girls suggested we stop at the Omanama shop for an ice-cream. Lovely idea! As we drew near the turn off, I put my foot on the clutch and went to change down. To my horror, the clutch dropped straight to the floor without resistance. I had no clutch! Ice-creams forgotten, I informed the girls we wouldn’t be stopping until we got home—or at least close enough to be able to ride the horses the remainder of the journey if we had to stop. My memory dredged up a driving lesson given by an ex-boyfriend many years before—one who’s hobby was car rallying. He had taught me how to listen to my revs and change gears without using the clutch. At the time, I had no idea that this lesson was to become such a life saver thirty years later.
With about fifty kilometres of hills to negotiate in the middle of the flatter areas, the three of us sat in complete silence, listening attentively to the revs while I changed between third, fourth and fifth gears as we traversed the hills. We flew down as fast as the old girl would go in order to have enough oomph to get up the other side without needing second gear. Managing in this way, we made it back into Warwick with only three major turns to home. The first two were in third gear, necessitating a pathetic chug, chug away from the corner but the last was a sharp T-intersection which I knew I would not be able to negotiate in any gear above second. With no synchromesh in the two lowest gears, we slowed as much as possible, and with the help of my daughter sitting in the middle, we wrestled and graunched the gear stick until it dropped into second. We breathed a sigh of relief, puttered home, turned into our driveway and did a stalling stop! A journey never to be forgotten.
On another occasion, my sister from New Zealand was staying with us on holiday. After an early morning start in mid-winter, the girls headed off in the car, leaving my sister and I to follow in the truck with the horses and two dogs—who loved to come with us. I went through the usual starting procedure and backed the truck out of the shed. We loaded the horses, then hoisted the dogs into the cab. My sister climbed in and pushed the dogs into the middle seat (they much preferred to sit by the window). I hopped into the drivers seat and we set off. Half-way along the New England Highway, my sister shouted, her horrified voice several notches higher than usual. She could see the road passing underneath us and must have been concerned that the truck was falling apart. I reassured her that it was normal—just the lack of seals in some areas and the worn matting on the floor and passed her the cushion I kept behind my back. She stuffed it against the door underneath her feet, blocking the vision—and the draught–and we proceeded onwards for a successful weekend.
As the girls grew up and left home, our horse numbers reduced and we were able to return to using the horse-float—so the dear old truck was sold. We have no idea where she is now but hope her owner has as much fun in her as we did.


