
Harold Davis's Blog, page 188
February 14, 2014
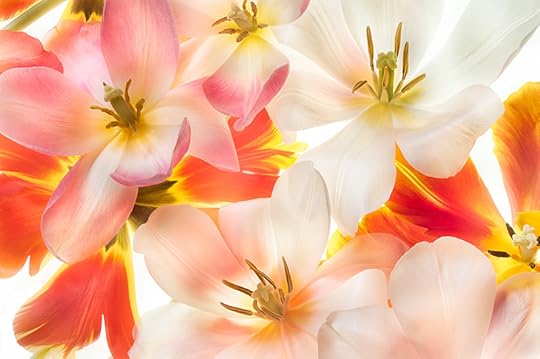
Tulip Pano
This tulip panorama was shot on a light box in three segments. Each segment is made up of six exposures, so there are eighteen exposures in all. In post-production, first I combined the exposures and then stitched the segments together. My idea was to create a cheerful image that promotes health and happiness to the viewer. It makes a nice print on Moab Slickrock Pearl. You can click here, or on the image, to view it larger.

Tulip Pano © Harold Davis
If you like this image, you may be interested in some other Tulip imagery I created at the same time!


February 12, 2014
Tulips
I have been working on a series of Tulip imagery that I shot almost a year ago, and haven’t had the time to process before now. These were shot on my light box in a bracketed high-key sequence, so combining the RAW captures takes craft, effort and creativity—which is what it is all about, after all!

Tulips 1 © Harold Davis
The tulips themselves came from the organic farmer’s market in North Berkeley that takes place each Thursday in the “gourmet ghetto.” I am looking forward to the coming of spring so that there are more wonderful flowers to shoot straight from the growers.
Tulips 2 © Harold Davis
Once I have three or four of these Tulip images processed, I am looking forward to printing them. There is a brightness and optimism that they show that is very heartening—maybe these images even have healing qualities!
I think the series will make nice prints, possibly in a group or as an installation.

February 8, 2014
Opium Poppies
It’s perfectly legal in this country to cultivate the Opium Poppy, Papaver somniferum, for decorative purposes. But this pretty flower, shown in the image below, has long caused wild dreams and flights of fancy. For example, the poet Samuel Coleridge wrote his poem Kubla Khan in 1797 following an opium-inspired dream that was interrupted by a bill collector. Equally, this innocent-looking flower is responsible for much human misery, from the killing fields of Afghanistan to the addictions and overdose deaths caused by the stronger products refined or synthesized based on opium.
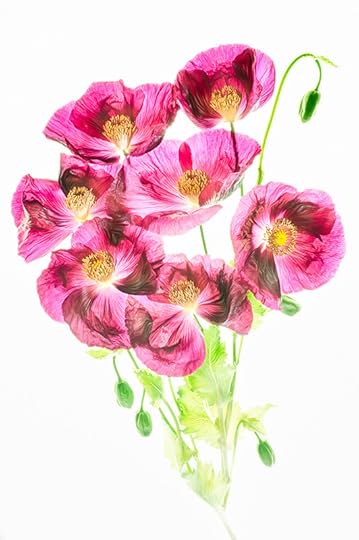
Opium Poppies © Harold Davis
When you buy an opium poppy plant from an American horticultural nursery, the name is likely to be changed, as if naming this flower something other than what it is makes it less deadly, or more licit. So one nursery I know calls the Opium Poppy a “Purple Breadseed Poppy,” and there are other cloaked names in use as well.
By whatever name, it is an easy flower to grow (the ones shown here are from my garden, for decorative purposes only of course!). In case you are curious, opium is refined from the paste that accumulates inside the seed pods that form after the flower has bloomed. A single poppy pod wouldn’t be enough—it takes a great many poppies to make a usable quantity of opium.
Want to learn how to make images like this one from beginning to end? There are three spots left in my Photographing Flowers for Transparency workshop next weekend (I won’t be giving this workshop again in this country until 2015).

February 6, 2014
Louvre Reflection
I shot this image last year during a night photography session with my Paris photography workshop. Paris is a great city to photograph at night, with many opportunities for dramatic image making!

Louvre Refections © Harold Davis

February 4, 2014
Quince by Moon
Here’s my red flowering quince shot, with the moon in an alternate position. Good argument for archiving one’s layers unflattened—that way it is easy to go back and move the moon!

Quince by Moon © Harold Davis

February 3, 2014
Sunrise in the rice fields
Waking up just before dawn in the small Japanese village of Chikatsuyu (see bottom image), I threw my clothes on and hurried out with my camera. There were pockets of fog, and crystalline ice structures on some of the plants. As the sun rose, moisture evaporated up from the earth, and I headed for the nearby rice fields.

Field, Chikatsuyu © Harold Davis
The trick when shooting into the sun is usually to radically underexpose—otherwise your image will be overexposed and full of blown-out highlights. The exposure data for this image in the rice fields using a 300mm lens on a full frame camera was 1/3200 of a second at f/5.6 and ISO, hand held. As you can see, I purposely selected a wide open aperture for shallow depth-of-field. My underexposure was by about 2 EV relative to what the light meter indicated.
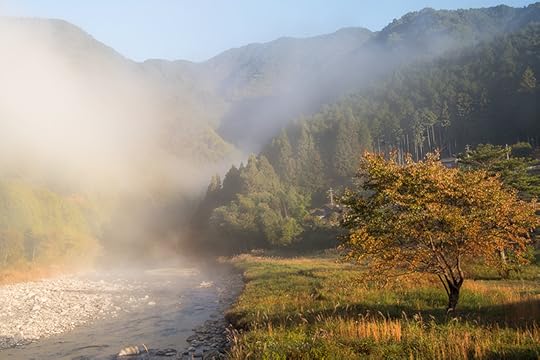
Morning Mist on the Hiki River © Harold Davis
Back along the Hiki River, the morning mists were rapidly clearing. I turned my camera away from the fields, and shot an image back towards the mountains.

Chikatsuyu © Harold Davis
The Minshuku—a budget version of a ryokan, roughly speaking a Japanese bed & breakfast—where I stayed is to the left in this photo, right along the river.

January 31, 2014
New review of Monochromatic HDR Photography by Harold Davis
The following short review of Monochromatic HDR Photography appears in the January 2014 issue of Rangefinder Magazine (page 32):
Monochromatic HDR Photography
By Harold Davis
Among his multifarious skills—photographer, author, publisher, post-processing whiz, blogger, teacher and workshop leader—Harold Davis is the acknowledged maestro of HDR imaging. (See Rangefinder September, 2012).
In Monochromatic HDR Photography, Davis brings another technique for dynamic range manipulation: taking color out and putting artistry in.
His comprehensive and readable creative tips, his workflow regimen and his powerful imagery will ignite (or reignite) your interest in black-and-white conversions with any subject you shoot. You’ll see Ansel Adams’ tonal spectrum appear in your landscapes and Edward Weston’s luminosity in your portraits.
Welcome to yet another Davis title that belongs in your digital darkroom.


January 30, 2014
Flowering Quince
The red flowering quince are particularly gorgeous this year in my neighborhood, and I can’t resist putting some of them on my light box. These flowers have a simple elegance that is really special.

Flowering Quince © Harold Davis
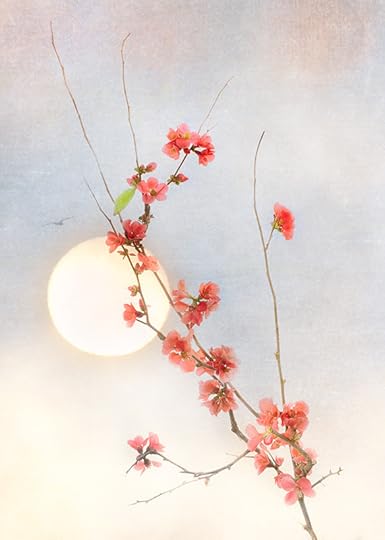
Flowering Quince with Moon © Harold Davis
Do you prefer the version of this image with the moon (above) or just the branch of flowering quince (far above)?

January 29, 2014
Harold Davis “Red Poppies” on Awagami washi at Paperworld Frankfurt
My friend Hermann Will of Fine Art Printer Magazine sent me a snapshot, shown here on Facebook, of my Red Poppies print on kozo washi at the Awagami exhibit in Frankfurt.
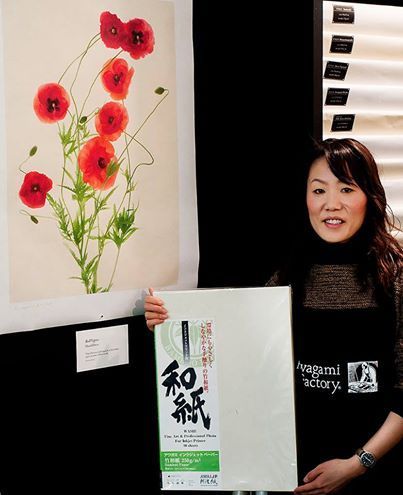
Red Poppies by Harold Davis on Awagami washi in Frankfurt
Click here to see the Facebook Post by FineArtPrinter. It’s wonderful for me to see the conjunction of my work in Germany with Hermann and Fine Art Printer Magazine, which has featured my Botanique and reviewed my Monochromatic HDR book, and also with Awagami and my friend Aya Fujimori, who was so kind to me when I visited Japan recently.
There is truly something very satisfying about this conjunction of worlds—with work by an American artist (that would be me!) on traditional paper from Japan that has been modified for modern inkjet printers exhibited in Germany, and sent to me by a German friend!

January 28, 2014
Photographing Flowers for Transparency: Only four spots left in February session
As one participant in the 2013 weekend workshop noted, “Learned a new photographic technique that I can apply not only to flowers, but to other subject materials.” Another workshop photographer added, “Thank you for an amazing weekend workshop. Have waited a long time to take this workshop. The weekend flew by. Have much to digest and process. Highly recommended.”
There are no plans to give this workshop again in the United States until 2015, and there is nowhere else you can learn the techniques I have pioneered for photographing and processing flowers for transparency on a light box.
As workshop size is strictly limited, to avoid disappointment don’t delay. Here’s the registration link for this opportunity.
Also please note two free presentations, The Art & Craft of Photography in Berkeley, CA on February 8, and Making the Botanical Photo: The Digital Print as Artifact at PHOTO Fine Art Photography in Oakland on June 7.
You can also join my ongoing Photographing Flowers online workshop via this link (and get $10 off the normal full price of $59.95).
Finally, registration is now available for my two courses over the summer in Heidleberg, Germany at the Heidelberger Sommerschule der Fotografie. Click here for Creative Flower Photography, and here for Creative Black & White Masterclass. Please consider joining me for some exciting photography in charming Heidelberg.
Due to many requests I have added a new session of the Photographing Flowers for Transparency workshop, Saturday, February 22—Sunday, February 23, 2014. Click here for information and online registration for the February Photographing Flowers for Transparency workshop.
Synopsis: In this unique workshop offering master photographer Harold Davis shows the techniques he uses to create his floral masterpieces. Arrangement, composition, photography, post-production will all be covered, as will Harold’s special techniques for shooting on a lightbox.
Here are some details about the workshop:
Master photographer Harold Davis is well-known for his often imitated—but seldom equaled—digital images of luscious transparent and translucent flowers.
In this unique workshop offering master photographer Harold Davis shows the techniques he uses to create his floral masterpieces. Arrangement, composition, photography, post-production will all be covered, as will Harold’s special techniques for shooting on a light box.
Who is this workshop for?
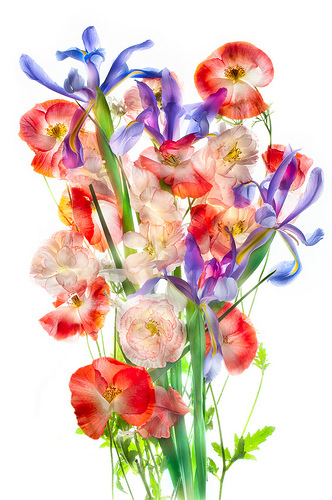
Papaver and Iridaceae © Harold Davis
The workshop is intended for photographers of all levels with an interest in flower photography.
Harold is only planning to give this workshop once this year. There is no better way to learn the floral transparency techniques that he has pioneered. The two-day format will give participants the chance to complete their imagery using the techniques that Harold will demonstrate.
Here are some comments from the 2012 and 2013 Floral Transparency Workshops:
“Loved the pace, in-depth instruction and generous sharing.”
“EXCELLENT PRESENTATION AND COVERAGE OF MATERIAL. MR. DAVIS WAS PATIENT TO ANSWER ALL QUESTIONS.”
“Harold, thank you for the time, expense and effort it took to put on a great one-day workshop….You are a wealth of information and share it so graciously.”
“Outstanding workshop!”
“A very packed day! Harold is very clear and organized; an outstanding photographer who is also an outstanding teacher.”
“Thank you for an amazing weekend workshop. Have waited a long time to take this workshop. The weekend flew by. Have much to digest and process. Highly recommended.”
“Learned a new photographic technique that I can apply not only to flowers, but to other subject materials.”
“A great workshop! Learned about creating translucent flower photographs and also about important features of Photoshop.”
“Great workshop with a good balance of instruction and practical application. Plenty of opportunity to ask questions and more importantly get answers.”
Where: MIG Meeting Place, 800 Hearst Avenue, Berkeley, CA 94710
When: Saturday February 22, 2014, 9:30AM to 5:30PM and Sunday February 23, 2013, 10:00AM to 5:00PM
Tuition: The cost of the workshop is $695 per person. Workshop limited to 16 participants.

2014 Harold Davis Workshop and Event Offerings
2012.02.08—Free event at The Lighthouse in Berkeley, CA. Harold Davis presents “The Art and Craft of Photography.” Click here for more information.
2014.02.22—2014.02.23—Photographing Flowers for Transparency: Two Day Workshop with Harold Davis—a unique opportunity to learn Harold’s techniques, workshop location is Berkeley, California (Limited space availability, click here for information and registration).

Tulip © Harold Davis
2014.03.15—Achieving Your Potential As a Digital Photographer: A Multi-Modal Ongoing Six Month Workshop
This workshop provides a platform for ongoing mentoring in the context of a supportive group environment. Customized individual assignments will be given. After the initial intensive two-day in-person session, we will keep in touch with monthly private group online webinars and individual phone or email consultations. A final dinner to review work and celebrate our progress will be provided at the conclusion of the workshop. Limited to 12 photographers. A portfolio review is required—Limited space availability, click here for info and instructions on how to apply.
2014.04.12—2014.04.13—Advanced Black and White Photography and Photoshop—This workshop includes field photography in several Bay area locations, monochromatic HDR shooting techniques in the field, black & white conversion in Photoshop and Nik Silver Efex, and monochromatic HDR processing. Click here for information, curriculum and registration.
2014.04.26—2014.05.04—Photograph Paris with Harold Davis featuring Paris at night, the gardens at Giverny, black & white, and more. Click here for detailed information and itinerary, and click here for online registration. Here’s what one participant in a previous Harold Davis Photograph Paris workshop had to say: “Had an awesome time with Harold, Mark, and the workshop participants. Itching to go back. If you’re a photographer, Paris at night is a ‘Must Do!’. Put it on your bucket list ‘cause you may not see this in Heaven.”
2014.05.31—2014.06.01—Mastering Creative Photoshop: The Way of the Digital Photographer—This workshop covers developing a personal digital Photoshop workflow. Topics explained in detail include archiving and checkpoints, RAW processing, multi-RAW processing, HDR, hand-HDR, stacking, LAB color creative effects, using backgrounds and textures, layers, layers masks, working with channels, Photoshop filters, and plugins from Nik Software and Topaz—Click here for information and registration.
2014.06.07—Free event at Photo Oakland: Harold will show his botanical prints and discuss “Making the Botanical Photo: The Digital Print As an Artifact.” Click here for more information about the event.
2014.6.27-2014.6.30—I will be teaching Creative Flower Photography at Summer School in Heidelberg, Germany from June 27 – June 30, 3014. Click here for more information about Heidelberger Sommerschule der Fotografie, here for workshop information and curriculum, here for nearby hotel information (with special participant discounts), and here to register for enrollment.
2014.7.04-2014.7.07—I will be teaching a Creative Black & White Masterclass at Summer School in Heidelberg, Germany from July 4 – July 7, 3014. Click here for more information about Heidelberger Sommerschule der Fotografie, here for workshop information and curriculum, here for nearby hotel information (with special participant discounts), and here to register for enrollment.
2014.08.01-2014.08.03—Night Photography in the Big Sur Landscape sponsored by the Center for Photographic Art in Carmel, CA. Link for details and registration to follow.
2014.08.08-2014.08.10—Creative Landscape Photography in Point Reyes sponsored by the Point Reyes Field Institute. Link for details and registration to follow.
2014.11.04-2014.11.20—Photography Caravan to Morocco (with Bill Bachmann). Details and registration link to follow.
Also of note: We are in the planning stages for two destination workshops: Morocco Photographic Caravan in November 2014, and off-the-beaten track Japan in the spring of 2015.
The adventure to Morocco will start in Barcelona, head down the southern coast of Spain, and with a pause to take in the Rock of Gibralter will cross over to Africa. Highlights will include a stay in the Sahara under the stars with time for night photography and camel rides. The group will be co-led by well-known commercial and travel photographer Bill Bachmann, who will help partipants learn how to make money from the photos they shoot.
Wanted: A few photographers for serious fun!
Can you handle photographing Paris in April? Are you serious about your photography and looking to have fun with it in an environment that has nurtured artists over the centuries? Are you ready for a great learning experience in the company of a master photographer and educator in a group of dedicated colleagues? Are you ready to have fun with your photography??
I am looking for a few photographers to join me and my wonderful group in Paris this year from
April 26 – May 4, 2014. Click here to register now!
Photography begins with the medium of light, which the artist captures and applies to the canvas in endlessly surprising ways. And what better place to explore this medium than in Paris, the City of Light, and one of the birthplaces of photography?

Paris City of Light © Harold Davis
When we work together to photograph Paris, you’ll experience firsthand the places and sights that have inspired artists for centuries, and find new creative and unusual ways to make photos of the City of Light!
We’ll focus our lenses on Paris in bloom, Paris at night, and Paris in black & white, reinterpreting for ourselves some of the images that have been captured in paint and on film by many great artists, including Daguerre, Monet, Atget, Picasso, and Erwitt. We’ll have a grand time photographing and we’ll return home with many priceless shots to treasure!

Giverny © Harold Davis
We’ve included many of the highlights from previous workshops, such as the visit to Monet’s garden at Giverny with after hours access (a personal favorite!), as well as new places to explore.
If you check out the itinerary, I think you’ll find many wonderful locations, such as the view from the top of the Tour Montparnasse at night, Père Lachaise, and Vaux-le-Vicomte.
As one of the participants in last year’s workshop said, “Put Paris on your bucket list ‘cause you may not see this in Heaven.” Another workshop participant added, “I already admired Harold Davis, and had confidence that he would lead us to fantastic places – and he did!”
The workshop cost is $5,639.00, excluding airfare. The workshop fee includes eight nights in a delightful 4-star hotel as well as numerous excursions and extras. We’ve got great deals on the hotel and excursions—if you reserved these on your own you’d pay more—even without Harold’s teaching fee for eight days and nights!
Click here for the complete itinerary, terms and conditions, and online registration.
What folks have said about Harold Davis workshops and events:
“A great artist and speaker!”—W. Anglin
“Harold is genuine, generous, and gracious – He has a world of knowledge and expertise that he loves to share – his wonderful books show his monumental talents and skill set- his workshops shows the depth of his connecting with others in a very real and personal way.”—P. Borrelli
“Awesome! He patiently addressed questions from the audience which contained photographers of all levels , molding his answers to the level of understanding for each of us. His presentations covered a wonderful range of technical knowledge as well as emphasizing the need for images to have an emotional quality. The images he shares are breathtaking and he is generous in sharing many facets of how he captures such beauty.”—J. Phillips
“Not all photographers are good verbal communicators. Harold is someone who can DO and TEACH. A rare combination of talents.”—B. Sawyer
“Inspiring!”
“You were very giving of your talents and time. The course was very organized and thorough. Loved it! Learned so much! … I also wanted to let you know that I have more than paid the cost of the workshops I’ve done with you by selling some photos! I have sold three prints already.”—L. Beck
“Very creative and a marvelous instructor.”—Kay S.
For information and registration links for Harold Davis workshops, please go to http://www.digitalfieldguide.com/about/workshops-events.

About Harold Davis
Harold Davis is an internationally-known digital artist and award-winning professional photographer. He is the author of many photography books. His most recent titles are The Way of the Digital Photographer (Peachpit) and Monochromatic HDR Photography (Focal Press).
In addition to his activity as a bestselling book author, Harold Davis is a Moab Master printmaker and a Zeiss Lens Ambassador. Harold Davis’s work is widely collected, licensed by art publishers, and has appeared in numerous magazines and other publications. His black and white prints are described as “hauntingly beautiful” [Fine Art Printer Magazine] and his floral prints have been called “ethereal,” with a “a purity and translucence that borders on spiritual” [Popular Photography].
Harold Davis leads popular technique and destination photography workshops to many locations including Paris, France; Heidelberg, Germany; and the ancient Bristlecone Pines of the eastern Sierra Nevada.
More information: Botanique; Harold Davis website; Harold Davis blog; books; workshops.


