
Harold Davis's Blog, page 137
March 9, 2016
Flowers for Transparency December Session (early-bird discount)
Due to many requests, I have opened a new weekend workshop session of Photographing Flowers for Transparency for the Saturday December 3 and Sunday December 4 weekend (2016) here in Berkeley, CA. The workshop provides end-to-end hands-on instruction in my photography and post-production techniques for photographing on a light box (more info and curriculum below). Note, this workshop often fills quickly once it has been announced. There is a $50 discount for early registration by May 1, 2016.
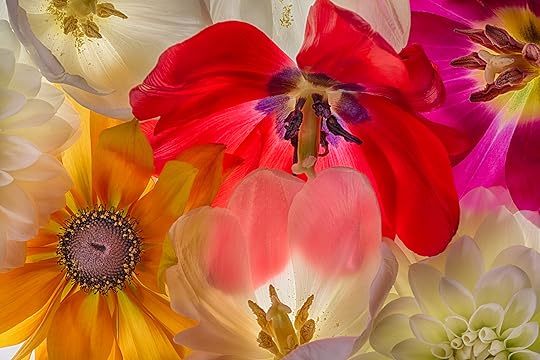
Floral Lecture © Harold Davis
Click here for my 2016 Workshops & Events Calendar.
Photographing Flowers for Transparency with Harold Davis (Weekend Workshop)
Where: Berkeley, CA
When: Saturday December 3 – Sunday December 4, 2016
Tuition: $645 until May 1, 2016; $695 thereafter.
Workshop limited to 16 participants.

Cymbidium Orchid © Harold Davis
Photographing Flowers for Transparency with Harold Davis
Master photographer Harold Davis is well-known for his often imitated—but seldom equaled—digital images of luscious transparent and translucent flowers.
In this unique workshop offering master photographer Harold Davis shows the techniques he uses to create his floral masterpieces. Arrangement, composition, photography, post-production will all be covered, as will Harold’s special techniques for shooting on a light box.
Who is this workshop for?
The workshop is intended for photographers of all levels with an interest in flower photography.
Harold is only planning to give this workshop infrequently. There is no better way to learn the floral transparency techniques that he has pioneered. The multi-day format will give participants the chance to complete their imagery using the techniques that Harold will demonstrate.
Here are some comments from previous Floral Transparency Workshops:
“Loved the pace, in-depth instruction and generous sharing.”
“EXCELLENT PRESENTATION AND COVERAGE OF MATERIAL. MR. DAVIS WAS PATIENT TO ANSWER ALL QUESTIONS.”
“Harold, thank you for the time, expense and effort it took to put on a great one-day workshop….You are a wealth of information and share it so graciously.”
“Outstanding workshop!”
“A very packed weekend! Harold is very clear and organized; an outstanding photographer who is also an outstanding teacher.”
Click here to read more comments about Harold Davis workshops.

Salutation to the Sun © Harold Davis
What to bring: Your creative imagination and sense of fun, a love of flowers, camera (preferably capable of shooting in RAW and with a manual exposiure mode), camera manual, tripod (if you have one), and a way to make notes!
If you’d like to follow the post-production examples please bring a laptop loaded with Photoshop, and HDR Efex Pro from Nik Software (trial versions of this software are available for free download).
Curriculum – Subject to modification
Day 1
9:30AM – Workshop orientation
10:30 – Glory of the tranlucent petal (understanding translucency and transparency)
11:30 – Introduction to Floral arrangement and composition
12:30 – Lunch break
1:30 – Advanced floral compositon
2:30 – Shooting on a lightbox
3:30 – Understanding high-key hand HDR post-production
4:30 – Advanced HDR topics
5:00 – Review, wrap-up and Q&A
Curriculum – Day 2
10:00AM – Day 1 recap
10:30 – Individual post-production guided practice
11:30 – Backgrounds and Textures
12:30 – Lunch break
1:30 – LAB Color effects
2:15 – Individual practice
4:00 – Fine art botannical prints
4:30 – Review, wrap-up and Q&A
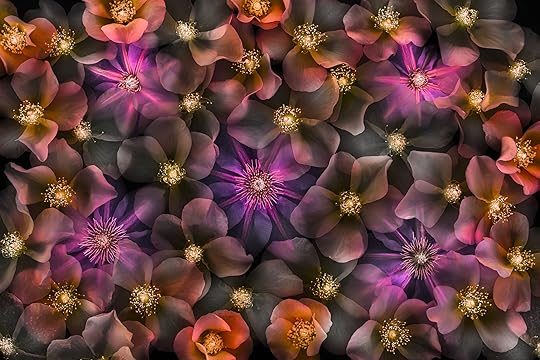
Translucency of Rosa on Black © Harold Davis


March 8, 2016
Multnomah Falls Redux
This is Multnomah Falls in the Columbia River Gorge photographed with my DSLR, in compare and contrast mode with my iPhone capture of the same location. I used my Nikon D810 mounted on a tripod with the 28-300mm Nikkor lens equipped with a circular polarizer.
The image combines three exposures, with each exposure shot at 32mm, f/22, and ISO 31. The shutter speeds were 2.5 seconds, 8 seconds, and 13 seconds. I post-processed the image over a number of hours (and several days) using Adobe Bridge, Adobe Camera Raw (ACR), Photoshop, Nik Color Efex, Nik HDR Efex, Topaz Adjust, Topaz Glow, and Topaz Simplify.

Multnomah Falls © Harold Davis
Here’s the compare and contrast:
The iPhone images were easy to take without fear of the incredible spray coming out of the waterfall; the camera was (obviously) lightweight to “schlepp”; processing of each version took less than ten minutes; resolution and final file size is intermediate (12MP to 14MP base file size).
The DSLR images were hard to make because of the continuous blast of icy water coming at my camera, which was a “sitting duck” on its tripod (as much as I protected it, I still needed to be a “human windshield wiper” for the lens); the camera and tripod were relatively heavy to carry; processing was time consuming; resolution is high as you’d expect from three native 36MP RAW captures (4912 X 7360 px at 300 ppi); flowing water can be rendered flexibly depending on the shutter speed setting used, with possibilities ranging from Waterfall after Turner to Cold is the colour of crystal.
Does this comparison make it more likely you would choose your phone camera or your DSLR? In my life as a photographer, there is room for both—and each has differing strengths and weaknesses.

March 6, 2016
Multnomah Falls
Multnomah Falls, in the Columbia River Gorge, looks like the entrance to Rivendell or some other magical place, with its high, double waterfall, and seductive foot bridge between the upper and lower falls.
These are two variations processed on my iPhone from a single iPhone 6s camera app capture. The first one was processed using Snapseed, Mextures, and Distressed FX.

Multnomah Falls © Harold Davis
I processed the version below using the Bold preset in Waterlogue.

Multnomah Falls © Harold Davis
Which version do you prefer? Of course, I photographed Multnomah Falls with my “big boy” camera as well as my iPhone, and I am looking forward to processing these images when I get the chance!
Want to learn my iPhone techniques? Check out my iPhone to Art workshop coming up in May.

March 4, 2016
Waterfall after Turner
This is a close-in view of White River Falls. Standing by the edge of the falls, the whole world seemed loud and in motion. My intention was to use the camera to create a painterly image, with light and water flying around in an inchoate and impressionistic mass of light and wet spray—much as J.M.W. Turner did in his later paintings of storms at sea.

Waterfall after Turner © Harold Davis

March 2, 2016
Eye of the Cave Panorama
This is a panorama view from behind Upper Horsetail Falls in the Columbia River Gorge. I shot the panorama in fourteen vertical photos, with each capture a RAW file translated at the default 16-bit settings via ACR to 4912 X 7360 pixels (roughly 36MP) at 300 ppi.
I used a tripod with a regular ballhead, in other words there was no effort to swivel around the nodal point, and varied the exposure for each shot. As you can see, there is a great deal of difference in dynamic range between the bright water falls, and the dark cave walls. So exposures varied at f/22 and ISO 64 from 10 seconds (for the cave walls) to 0.6 of a second (for the water fall).

Eye of the Cave © Harold Davis
I stitched the fourteen images together in ACR and Photoshop, and after merging, cropping, and tweaking came up with a file sized at 19,746 X 6695 pixels at 300 ppi in a horizontal format. I am pleased that my production computer made fairly short work of the large files involved in the extensive processing of this panorama. Obviously, at some point I can make a mural sized print from this file with good resolution. In the meantime, you can see the panoramic image a little larger by clicking on it.

March 1, 2016
Under the Yaquina Bay Bridge
The Yaquina Bay Bridge is a spectacular structure along the coast of Oregon. It’s easy to get underneath to photograph, as shown in this image. Do you prefer the color or black & white version?

Under the Yaquina Bay Bridge (color) © Harold Davis

Under the Yaquina Bay Bridge (B&W) © Harold Davis
Related image: Old Train Bridge.

February 29, 2016
New Session of Photographing Flowers for Transparency Announced
Due to many requests, I have opened a new session of Photographing Flowers for Transparency for the December 3-4 weekend (2016) here in Berkeley, CA. The workshop provides end-to-end hands-on instruction in my photography and post-production techniques for photographing on a light box. Note, this workshop often fills quickly once it has been announced.

Best Friends © Harold Davis
Click here for my 2016 Workshops & Events Calendar.

February 26, 2016
Yaquina Bay Bridge
In the fog, the Yaquina Bay Bridge seemed to stretch on forever. The ending was obscure, and vanishingly difficult to find.

Yaquina Bay Bridge © Harold Davis

February 25, 2016
From Darkness into Light
Photography is famously about “writing with light”—or rendering light. In fact, light is integral to photography. You can’t photograph a physical object. You can only capture the light reflected or emitted by your subject.

Upper Horsetail Falls © Harold Davis
How interesting then that the choice of rendering can lead a subject—such as Upper Horsetail Falls, shown in these two images—from darkness into light. Keep in mind that the choice is yours. But often the dark side is more mysterious, and therefore potentially more interesting!

Behind the Waterfall © Harold Davis
Related stories: Fairy Falls; Cold is the colour of crystal; White River Falls.

February 24, 2016
Fairy Falls
Yesterday, after photographing Multnomah Falls, I walked up the icy path to Benson Bridge. From this bridge, I climbed the numbered switchbacks to the top of Multnomah Falls. From the vertiginous overlook I peered down the rushing waters to the floor of the Columbia River Gorge.

Fairy Falls © Harold Davis
From this cliff-top vantage point I continued up the trail past Dutchman Falls, Weisendanger Falls, and Ecola Falls. I turned right on a side trail to contour round towards Wahkeena Springs. From Wahkeena Springs, I headed down the long loop trail back to the Multnomah Falls lodge. Along the way I passed many waterfalls, including Fairy Falls, shown in the image.
As I started photographing Fairy Falls, I was struck by the way the light funneled from the top of the falls, almost as if the arc of lighted was flowing with purpose with the water.
Waterfalls are one of those subjects that are inherently uplifting—the majesty of nature is easily apparent. When it’s possible I’d like to try for something more in my waterfall imagery, a suggestion of the spiritual and a deeper echo of the emotional resonance that waterfalls have for us. Here’s to falling water, and here’s to something deeper than a pretty face!


