
Laura Pohl's Blog, page 2
February 15, 2018
How to Get a Literary Agent, Part 5: Talking to Other Clients
 One of the most important things after getting an offer is talking to the agent’s clients. You want to talk to other clients to see if they’re happy in their relationship with this agent, and to get a feel of what it’s like working with them.
This part of the process can be enlightening. One agent may say they’ll usually get back to you in the same day, and the clients will say “usually a week”. So you can have the balance between all the answers, as well have a feel of what it’s like to work with said agent. Don’t be afraid to ask clients blunt questions, or to ask them if they’ve been through a rough patch. They’ll answer because they are writers like you: and writers stick together and want the best for each other.
That said, I’ve compiled a list of questions to ask other clients in the e-mail. Feel free to add yours too, but make sure you’ve introduced yourself — “Hey, I’m so and so, your agent offered me representation and I wanted to talk to you a little about what it’s like working with them”.
TO ASK OTHER CLIENTS
How long does it take the agent to respond to your emails?
How long does it take the agent to read and give revision notes on client manuscripts?
Does the agent answer questions about your bigger picture career path, or only the manuscript at hand?
How editorial is the agent?
At what stage do they like to read a manuscript and begin to offer input?
Do they do line edits, editorial letters, both, or neither?
Whatever their feedback style, is it clear? Do you understand what they’re asking? Do you know how to proceed after you’ve received and digested their revision notes? Do you feel comfortable asking clarifying questions about their notes?
Does the agent read pitches and give feedback on which new projects to pursue, or do you write a whole new manuscript before showing it to your agent?
When things are rough, is the agent warm and encouraging and/or does the agent give tough love as needed?
Do you trust your agent’s business instincts and experience?
Are you comfortable telling your agent what you need, asking questions, and expressing concerns?
These are all excellent questions, and if you ask them to one or two clients, you can see if their answers and their experience match, and whether or not you’ll be comfortable working with them.
Make sure you check out the next posts in the series, and what happens if you have multiple offers!
How to Get a Literary Agent, Part 5: Talking to Other Clients


January 24, 2018
How to Get a Literary Agent, Part 4: The Call
Hi everyone!
I’m doing a series of posts on getting an agent and the whole process we go through as writers, and I feel like there are already a bunch of posts on it out there. With that in mind, I’ve compiled the most useful advice I received and am putting it on a series of posts. This one is about the call.
You’ve done your research! You’ve done your query, and it got requests! And now an agent has e-mailed saying they want to talk to you about an offer of representation.
The call is like a mysterious entity, we all want to get it, but we all also dread it. It’s getting to talk to the agent who may be your dream agent, and getting to know the person you’ll be working with.
With that in mind, I’ve compiled a series of questions that it’s good to ask during the call. Don’t be shy and ask them all, or get through to the points you’re confused about. The literary agent is someone you’ll hopefully be working with for years to come. You do not want to not know the answer to all the questions you have.
I’ve broken the list down into different topics to make for an easier read.
AGENCY AGREEMENT
What is your commission structure?
What does the agency agreement look like?
How will payment work, exactly? What changes since I’m living in a different country? (The last one is because I live in Brazil, and I wanted to know if the process changed).
What professional organizations are you a part of?
Do you handle film rights? Foreign rights? Audio rights?
Can I see a copy of your agency agreement?
EDITORIAL PROCESS BEFORE SUBMISSION
What is your editorial input for it? How many revisions do you think it’ll go through?
What is your editorial style?
In what “state” do you think my book is? In other words, how much editing do feel it still needs?
How do you work on revisions with clients?
SUBMISSION
Who do you plan on submitting to? Do you already have editors in mind?
What is your submission strategy? Do you go on a big round to editors or do you do smaller rounds that let us hear feedback and make changes, should we need to?
How would you position this book to editors? Where do you see this fitting in to publishers’ lists?
What would be your timeline for submitting?
WHAT HAPPENS NEXT?
What happens if this book doesn’t sell?
How many editors before giving up?
How long is your average client relationship?
Can I speak to one or two of your clients?
Are you open to authors who work in multiple genres? What happens if I write something that you don’t represent?
What happens if you don’t like what I’m working on or my next book? Is this a one-book agreement, or are you a career agent?
How do you work with clients as they’re generating new ideas?
GENERAL
Which part of the book connected with you?
Typical response time? How often do you check in?
How do you like to communicate? email – phone? And how does it work during submission time?
Have you read the book all the way through? (You’d be surprised that some agents don’t. A good agent will have read through your whole book).
What would you expect from me as a client?
If I sign with you, what will happen next?
Now that is said and done, and you’re ready to move on to the next part! The offering agent will usually come back with the standard agency agreement as well as other client’s e-mails.
Make sure you also settle on a date in which you’ll make your decision. The standard is two-weeks time, if it falls during holiday season, ask for three weeks.
Now that you’re through with the call, you should also e-mail all the other agents who have your partial or your full manuscript. If you’re interested in an specific agent but they only have your query, e-mail them also. Make sure it’s in the same e-mail thread, but change the subject line to OFFER OF REPRESENTATION. That gets their attention fast.
Here’s a template of an e-mail you can send.
Dear Agent,
I would like to inform you that an agent has made offer of representation for my novel, . I wish to make a decision regarding this offer within the next , but I also want to give you a chance to read the I sent. If you could please let me know your position with regards to by , I would greatly appreciate it.
Thanks so much, and I look forward to hearing from you.
(This template was taken from Susan Dennard’s website).
Now you’ve sent off all the e-mails, it’s time to wait till they get back to you with answers. Mark your calendar with your dates, and it’s time to get back to work and talk to some of that offering agent’s clients.
December 14, 2017
How to Get a Literary Agent, Part 3: The Query Trenches
Congratulations! You know have both your well-researched list of agents as well as your query letter, ready to go. It’s now time to get in there and submit your queries to said agents, and hopefully one of them will turn out to be an offer.
There is a good method of submission, which is to take the middle ground: you don’t want to query your top ten list of agents all at once. You want to give time to see if your query works, and if your chapter is getting request. You must taste the waters first.
From that first list of agents you have compiled, make sure you select 30 to be your top thirty agents: the A-list, the B-list and the C-list. My preference was a combination of client’s work, sales, interviews, and me stalking through twitter and seeing what they liked.
Then you’re ready to send out queries.
Make sure all queries are tailored to the agents you’re sending within that opening paragraph. It shows agents you’re professional and you’ve done all your research.
Make sure to reread your query before sending. Catching typos and other things that are life savers.
Read my post on querying tips that can be super helpful.
After you’ve done all this, you’re ready to open up your e-mail and start sending them off. I used the batch method myself — sent the queries in batches. Some people recommend contacting one person from the A-list, one from b-list, and one from C-list. If you’ve had relative success with your query and pages, then you can send out more queries.
For me, I used to send them in batches of ten. One from each list, and seven from my general list, at least for a start. Then I’d see how many requests I’d gotten, and tweak accordingly. One of the good things of sending queries in batches is that often you’ll get useful feedback from agents telling you how you can improve your novel. I’ve received many rejections, but some of them included valuable feedback to make my novel better.
Batches help keeping you busy — when I had about five or six rejections from that batch, I sent out one more batch of ten queries to other agents, using the same method. When I started finally getting all requests from dream agents, I sent it to all of my top ten list.
The query trenches can be miserable, but they can also be great. It’s hard having your work out there and getting rejections, but remember: you only need one yes.
Tune in for the next post in the series, where I talk about getting the call!
December 1, 2017
How to Use Scrivener, Part 3: Compiling your Files
Hi everyone, and welcome to Part 3 of my tutorial on how to use Scrivener!
Today we’re talking about compiling your files until they’re in the manuscript format and ready to hand in to your critique partners or agents.
If you’re new to Scrivener, make sure you check out the other posts in the series:
Part One.
Part Two.
And let’s get to it!
The last part I can teach you about when using Scrivener is compiling your document for print or for reader’s hands. This is the time where it stops being a bunch of different scenes and folders and it becomes a complete word document.
The first thing you need to know is that in Scrivener, when you want to make your manuscript into a document, it’s called COMPILING.

Here you can see the compiling screen easily. Once you click it, a completely new tab will open which will show all the compiling options Scrivener offers.
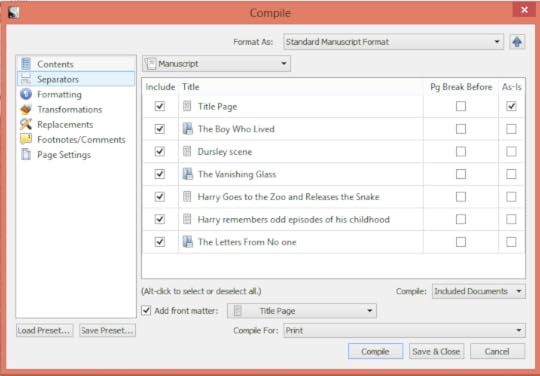
This is the first image that will show. You can see that in ‘contents’ we ave all the chapters and the scenes under each chapter. That way, you can see what is selected. Make sure you’ve selected all your documents. You can also include front matter like the title page.
Notice the: FORMAT AS. I usually click on the “Standard Manuscript Format” which makes it easily readable. If your manuscript has parts, you can use “Standard Manuscript Format with parts”.
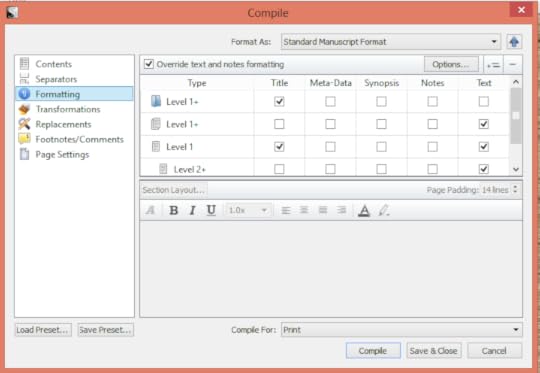
Another thing that gets me is the formatting. For example, my chapters don’t always include titles, so I uncheck the TITLE section on level 1, so it doesn’t include a title. Here you can see how it usually goes.
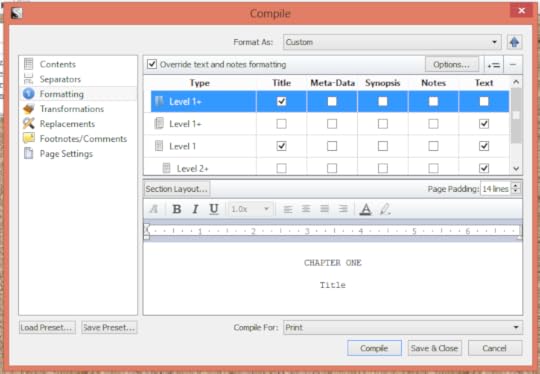
You can see how it reads CHAPTER ONE and Title underneath. If you don’t want titles, just uncheck it. You can also select the texts and put on the formatting you want, if you want to change fonts, make it bigger, etc.
I usually do not name my chapters, so I uncheck the box with title names, but make sure all the text boxs are checked just in case. You can also format your entry accordingly.
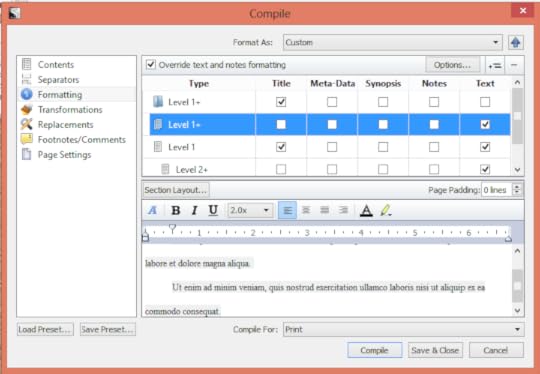
Here you see an example of text, and you can change it around, make it bold, or change the font. I leave it as is, as always.
On the “Compile For” section, make sure you save the correct format. I usually save for .docx, but you can save it as PDF or any other formats.
Of course, overall, this is a very simple tutorial, just to get you started on the basics of using Scrivener. This is in fact all the features I use constantly, but there are many other ways you can explore Scrivener and make it work perfectly for you. I think it’s one of the best writing tools out there, and I can’t recommend it enough. My writing changed completely after I began using it.
I hope you liked this tutorial, and let me know if you think there’s something missing!
November 22, 2017
How to Use Scrivener, Part 2: Tracking your Goals and Revising
Hello everyone, and welcome to the second post in the How to Use Scrivener series!
Read part one here.
Read part three here.
On this post, we’ll talk more about great features of Scrivener, like tracking your daily word goals as well great features that help with the revising portion of your novel. Let’s get to it!
Tracking your Goals
One feature I really love about Scrivener is how it allows you to track your daily word goals through each scene and chapter.
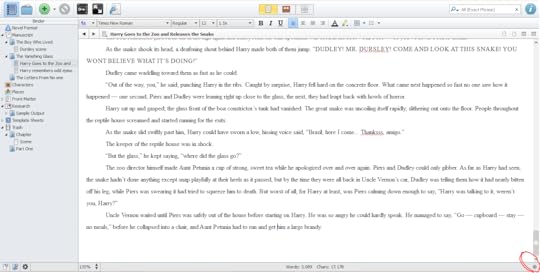
See this little gray ball at the right corner? When you click on it, a new screen will pop up that’ll allow you to input your goal for this specific scene you’re working on.
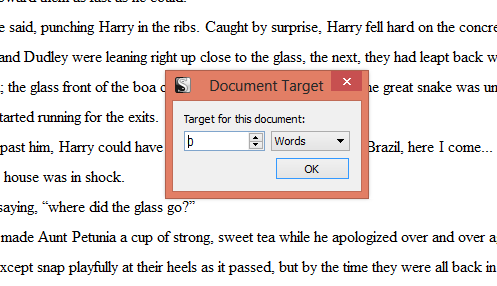
Here it shows ‘Document Target’. It can be words, characters, or any other goal you’d like. A line will show up at the bottom of the document to show whether or not you’ve achieved your goal.

For example, here I put my goal as 3,500 words. I only have 3,000 words for now, so the bar is green, because I’m almost to my goal, and it shows exactly how many words I still need to write.
Not only this, but you can track goals for your whole manuscript as well. Go to ‘Project’, and then ‘Project Targets’, as it’s shown below. You can also view Project Statistics, which will give the overall status for your project like word count and number of pages when you compile your manuscript.
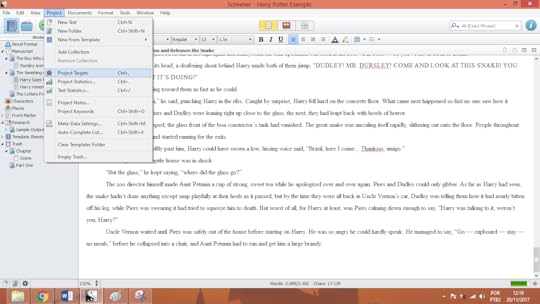
When you click on Project Targets, you’ll be able to see a new screen with new goals to track.
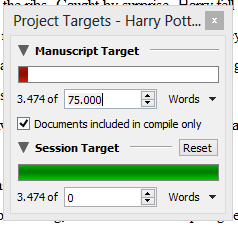
Here you can see your project targets, and insert how long you think this manuscript will be. I put 75k for the first Harry Potter. Under session target, you can reset it everytime you are starting a new sprint. Usually, ‘session’ means everytime you open Scrivener, and how many words you’ve written since you did.
Research
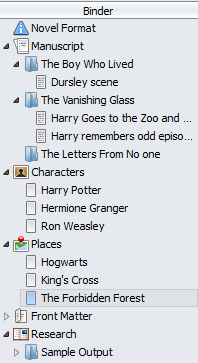
As I said on the previous post, one of the things I love the most about Scrivener is how you can put all your research in one single place. In this example you can see that under character I’ve created a new text for each character, in which you can add their personalities, their background, and anything else you’d like to have reference for. Under places, you can put your settings. You can create as many folders as you like. I have also one for revision notes, another for plot, and ideas for sequels, as well as dialogue snippets.
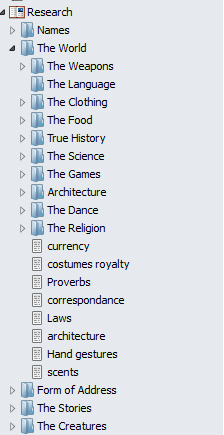
You can create a new document for each character and place, and also put your research all at once. I use this feature a lot so I don’t have to hop in between folders for checking things. Under research, for my Arabian Nights inspired story, for example, I put a list of Arabic names, as well as research divided into clothing, weapons, army, kingdoms, history, etc.
Scrivener allows you to create as many folders as you like, which is one of the things that make it so useful for writer brains.
Revisions
Although Scrivener is very useful for drafting because it allows you to move scenes around, another thing I love about it is what it allows me to do with revisions.
Split Screen
One of the features I like the most is split screen, and it allows you to have a bigger view of your revisions.
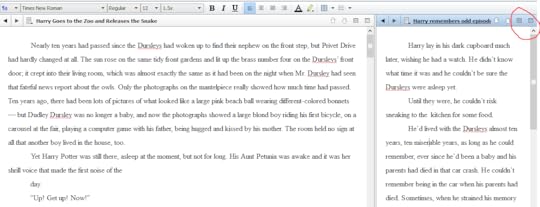
When you click on that button, your screen will automatically split in two. You can put an older version of the chapter on one side, and the one you’re revising on the other. It’s also very useful if you have the same scene from different POVs, and you want to keep your dialogue straight.
You can also lock one of the screens in place.
The ‘lock in place’ feature allows you to not move one single chapter around when you click it, so you don’t have to keep going back if you ended up losing yourself.
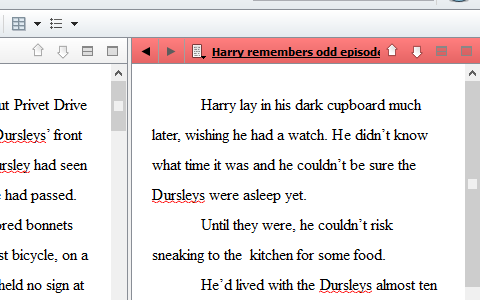
When it’s locked in place, a red bar will cover the chapter that’s locked into place with your split screen.
Infocards & Notes
Another thing that’s super useful is the feature for the infocards and notes. It’s a big blue I in the top right corner of your screen. When you click on it, a new screen will pop up that looks like this:
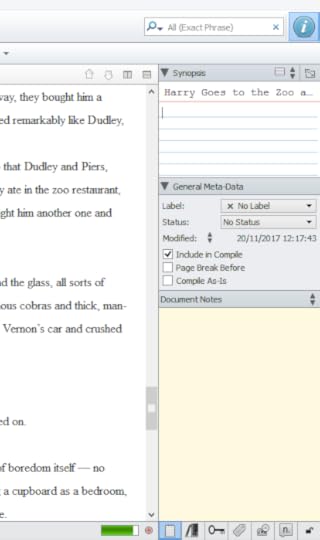
You’ll notice that there are many different parts to this section, but I only use a couple of them. In the infocard you can write down what happens in this chapter, as well as any other notes you think will be particularly useful in the future for when you revise.
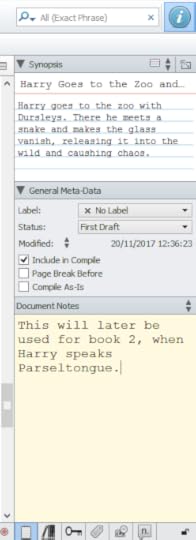
Here you can see I’ve added a small synopsis of this scene. I write one for each chapter and each scene, so when I get to revisions, I know which scenes are useful and which ones I can cut, and it makes it easier for me to locate a particular scene when I need it.
You’ll see that under the general meta-data there is a LABEL status. You can create your own labels with different colors. I found it super useful when writing multi-POV books that I have to keep track in who is doing what in each scene, and make sure it’s all balanced.
You can also see under that N balloon that those are footnotes. Scrivener allows you to add footnotes to each chapter, either to include it in the final text, or you can just include notes to yourself.
Now you see when you select corkboard mode how you can do the same for each chapter, including one small synopsis to each chapter to see what’s happening in it.
When you click on that button which I’ve indicated with red, it’ll take you to a view of scenes within your chapter, or in my case, as I have manuscript selected, it takes me to a view with all my chapters. I’ve added a small synopsis to each one so I can keep track of them.
This is so much easier when revising, I can’t recommend it enough. Instead of a billion cards written by hand, you get these ones.
Don’t miss the third post in the series, which will be out tomorrow! I’ll talk about compiling your manuscript and making sure it’s on the right shape to send to beta readers and agents.
Are there any questions you’d like to answer about Scrivener?
How to Use Scrivener, Part 2: Tracking your Goals and Revising
November 21, 2017
How to use Scrivener, Part 1: Creating Your Novel
Hello, everyone!
Today we’re going to talk about one of my favorite topics: Scrivener!
For those of you who don’t know, Scrivener is an amazing writing tool that many writers use to draft their manuscripts. It’s designed for both writers and screenwriters, and has an amazing set of features that allows you to move chapters and scenes around, as well as keep all of your research in only one place. This series of posts will be broken down in 3 parts.
Read Part 2 here.
Read part 3 here.
I used to be intimidated by Scrivener when I began, since it seems like a really complicated tool, but I’ve fallen in love when I started using it. It’s so easy to just organize everything in my drafts, as well as never be afraid I’m going to lose something when Word crashed or decided it wasn’t going to scroll down my monstruous 350-page document.
If you always wanted to use Scrivener but never got around to it, this post is for you!
I have to add a disclaimer here since I’m one of Scrivener’s most basic users. Although I’ve done the tutorials, I almost never use all of the software’s features. It’s got an enormous arrange to fit all of your needs, but I only use the most simple ones.
This is a guide to get you started. So let’s get to it!
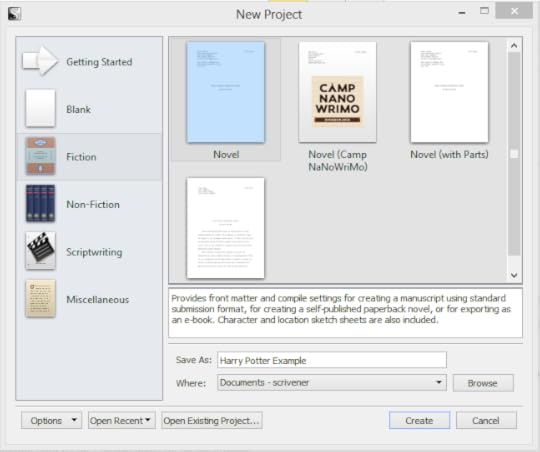
Creating a New Manuscript
When you open a new project, the first thing you’re going to see is this. There are many different format to fit your needs, but I usually just go with Fiction, and then Novel. Don’t forget to name your project as well — in this example I’m going to pretend I’m drafting Harry Potter, so I named it accordingly.
A new screen will pop up where you’ll be able to start drafting. You’ll see that it has already even created a new folder under manuscript. I don’t particularly like Scrivener’s pre-sets, so I usually just throw that folder in the trash and create a new one.
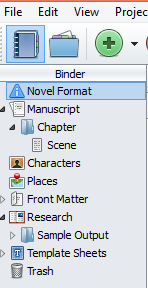
The thing titled as ‘MANUSCRIPT’ is all the documents that will be compiled when you’re done writing your book. Each folder marks a chapter, and each new document is a scene. Only the documents put under manuscript will be put into the book. You can see here folders for characters, places, front matter (with your name, address, dedication, acknowledgments and such), and a folder where you can put your research.
Another thing you’ll have to fix is the Meta-Data settings, and all the usual settings before you start writing. When you press Ctrl+Shift+M, one new screen will pop up.
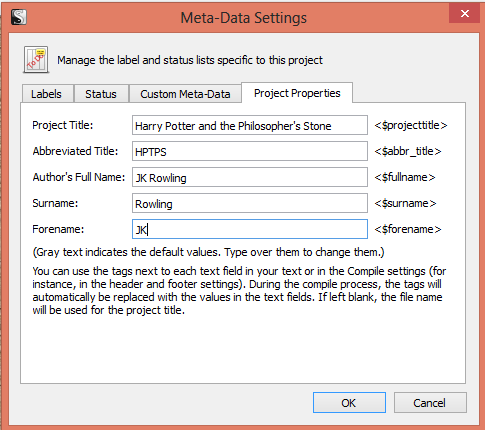
In this screen, you’ll be able to manage all the things related to the overall status of your project. I usually ignore the labels and status (Which you can use to determine if the document is a first draft, or if you’ve already revised it), but I like to adjust this Project Properties. Here you’ll insert the title of your manuscript, as well as the name of the author.
Another thing I like to adjust before really beginning my novel are the draft settings. Now when you press F12, you’ll be able to access this panel titled ‘Options’.
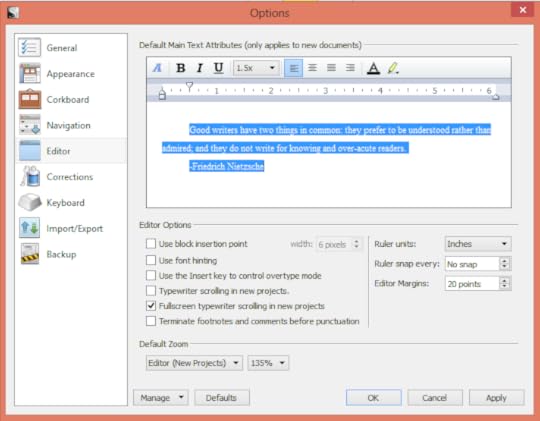
This allows you to adjust the settings that will appear in all the other documents you create for this manuscript. I like to draft using Times New Roman, so I change it on that little blue A. You can also change Paragraph parameters and space, as well as a bunch of other options.
I almost never change any of the other options, with the exception of turning on automatic back-up, which is very useful.
Now that this is all said and done, let’s get to the fun part!
Starting Your Novel
Here you can see what your panel looks like. See this little green button with a plus sign on it? This button is your new best friend. It allows you to create folders and documents that will shape your book. I created a new folder, below named “Untitled”, which will be my first chapter.
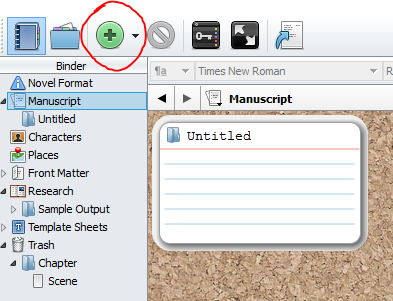
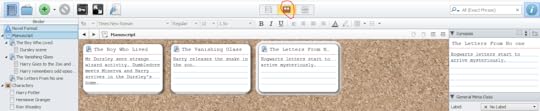
Now that I’ve created a new folder, I’ve renamed it to be my Chapter One, titled “The Boy Who Lived”. Under this I created a new text, which will be the first scene in my book, and I have typed the first line.

Notice that I have only named the chapter, but I only put “Dursley scene” on the text. Scenes don’t have to be named, you can leave them blank — I like to usually put something that’ll happen on this chapter, or who’s in it, so I can always remember what I’m writing.
You can create as many scenes as you like under each chapter, as many as you feel necessary.
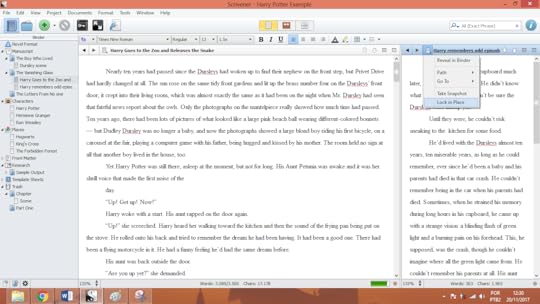
In the second chapter of Harry Potter, we actually have two scenes.
Here we can see how scenes work inside a folder:
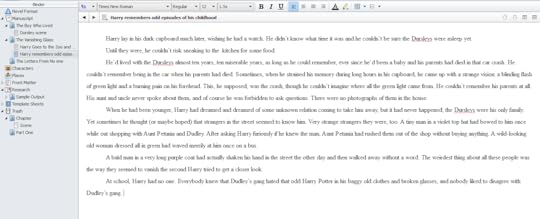
You’ll see that under the chapter “The Vanishing Glass”, we have two scenes. One where Harry goes to the zoo, and the second one where Harry remembers odd things from his childhood.
Manuscript With Parts
Now suppose you’re JK Rowling, and instead, you want to split your book into Parts, rather than just chapters. This is how you can go about doing this.
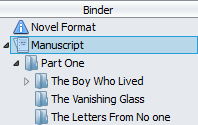
You’ll notice here that there is Part One, and all the chapters underneath it are contained under that. You can click and drag to move them around as much as you like., and there’s no limits to how many chapters you create. You can also rename the folders. Scrivener will number them automatically when it’s time to compile the archives.
Full Screen Background
Another feature I really love about Scrivener is the full screen drafting mode. It lessens the distraction of having your full desktop at your disposal, and makes you concentrate only on your writing and words. One of the thing that it also allows you is to change the background of the story.
You can do it here.
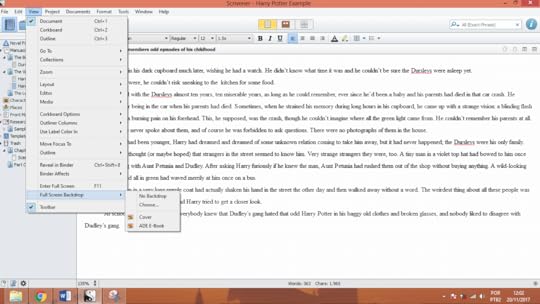
You can choose it under this screen, with View > Full Screen Backdrop > Choose.
Once you do that, you can enter Full Screen mode by clicking F11.
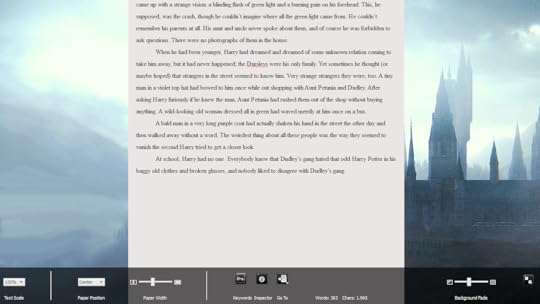
For me, I especially like this feature because it allows me to really get into the setting of my story. I always change the background so it allows me to set a mood/tone — a tone I want to follow throughout the story, and the background is there to help me with it. As I’m drafting Harry Poter, I chose a screen that reflects Hogwarts.
This is it for today’s lesson!
In the next post of the series, I’ll teach you how to track your goals and revise using Scrivener. Read part 2 here.
If there’s anything you’d like to know about using this program, please comment below!
November 16, 2017
How to Get a Literary Agent, Part 2: The Query
Hi everyone!
This is post 2 in the series of How to get a Literary Agent.Read Part 1 here.
This week we’re tackling one of the most difficult issues of the writing life: the query.
I love queries. That might sound weird, but I’ve loved them ever since I’ve learned to write them. I particularly recommend the guide that you get when you sign up for Susan Dennard’s newsletter on her site, and here you go through the same principle.
We’re tackling queries, from beginning to end.
As an example, I’m using my own query that got me my agent. It’s not a perfect query (perfect queries are hard), but it fits enough all that we should look for in a query. This book not only got me my agent, but my first book deal. You can add it to goodreads here. I’m keeping the original title for the query, but this book now is called THE LAST 8.
Let’s get to it!
The Beginning
Always start with “Dear Agent Name”. Make sure you’ve addressed them the right way, with their prefered pronouns, etc. Begin introducing a little about yourself and your manuscript, but don’t give away too much. I usually start with why I queried the agent in the first place. So it looks a little like this:
Dear Agent,
I’m querying you because I read in your twitter that you’re interested in represeting authors from marginalized backgrounds, as well as would like a book about girls in STEM. As such, I thought you’d like my novel, THERE’S SOMETHING ABOUT EARTH.
You’ve got an introduction, why you’re querying said agent, and the title of your novel. Keep it short and simple. The parts in italic is what you can change and adapt for your own needs, and tailor it specifically to each agent you’re querying on your list, and why you think you’re a good fit for their list. Also notice your title in caps: it brings attention to the book you’re writing.
The Opening
Now you’re ready to get to your query. The opening should present two things: your setting and your main character. Agents should care about your concept and your main character before getting to the rest of the story. We want to know who your MC is and what they want, and why they can’t get it.
When the aliens land on Earth, Clover Martinez – a 17-year-old who comes from a family of fighter pilots – wants to prove she’s ready to fight. But after a close encounter with the invaders, Clover narrowly escapes with her life while the rest of humanity perishes in the invasion.
Here you can see I’ve done both things. I’ve introduced the setting, the alien invasion, and I’ve introduced the MC, Clover Martinez. You should not only introduce them by name, but tell them what they like and what they want. Clover is a 17yo from a family of fighter pilots, and she wants to prove she’s ready to fight the aliens. In the same paragraph, I introduce what happens next: she has a close encounter and escapes, but the rest of humanity perishes. You have the opening image, the setting, and the main character, all wrapped in one.
The Middle
The middle of the query should be around 2 paragraphs long at most, and introduces the rest of the story. We get the obstacles, the problems the MC must face, and what choices they have to make.
Six months after the attack and struggling with PTSD and suicidal thoughts in a post-apocalyptic world, Clover discovers survivors in the former Area 51, the self-titled “Last Teenagers on Earth.” Finally, there’s hope for fighting back.
What Clover isn’t expecting is their unwillingness to take on the enemy. Not a single person will stand by Clover, and worse, one of them might be one of the aliens she has sworn to fight. Area 51 piles secret on top of secret, and when she finds a spaceship hidden in the basement, Clover doesn’t know what to believe anymore. Everyone is a potential liar, and if she trusts the wrong person, she puts the last stronghold of humanity in danger. Clover needs answers, even as her mind spins with thoughts of suicide.
I’ve put all the obstacles and the events that happen in the story here in these paragraphs, because that way the agent knows what happens in the story. Clover finds survivors, and she wants to fight: but they don’t. She needs to convince them to fight the aliens with her, and she’s struggling with her own PTSD and suicidal thoughts at the same time. She needs the answers and to discover all the secrets that Area 51 hides if she wants to fight the aliens. These are the obstacles she must face, and these are the choices she must make if she wants to succeed.
The Stakes
The stakes are one of the most important part of the queries — an agent must know what’s at stake for that main character to succeed, and what happens if they don’t. They need to be invested in the story you’re about to tell them.
There’s only one thing keeping her grounded: fighting for Earth. And if Clover wants to live, she needs to spot the liar and convince her friends to fight – and, most of all, convince herself there’s more waiting for her than putting a bullet to her head.
There are two types of stakes: the personal ones, and the general ones. The general ones are “if they don’t save the world, everyone is going to die”. I’ve decided to take a more personal route – Clover needs to convince her friends to fight or else she may lose herself to her own suicidal thoughts. These are the stakes I’m telling the agent, and this is what my story is about. It’s about a girl who wants to fight, but she needs to convince herself or others that there is a good reason for living.
The Ending
Now it’s time to introduce the particulars of your novel.
THERE’S SOMETHING ABOUT EARTH is a stand-alone post-apocalyptic YA sci-fi complete at 90,000 words. The manuscript is “Independence Day,” but seen through the eyes of a girl who suffers from mental illness. I believe it will appeal to fans of Rick Yancey’s THE 5TH WAVE and Courtney Summers’s THIS IS NOT A TEST. This is a ownvoices novel.
Here you can see I’ve not only added my title, but the genre of my novel and my word count. My pitch can also be seen here “Independence day through the eyes of a girl sho suffers from mental illness”. I’ve added my comp titles, which are extremely important to help the agent place it in a book shelf and know where the novel fits in the market, and I’ve added that the novel is also ownvoices. This paragraph contains all the technical information an agent needs to know about my novel.
The Bio
The Bio should include something small and personal about you. It doesn’t matter if you have publishing credits or not. Include a line about who you are, what you do, and why it’s relevant that you on particular have written this novel.
I live in Brazil, where I’m currently finishing my BA in Literature and where I work in a game development company. I’m also the creator of #PitchAmérica, a pitch contest that focuses on bringing Latinx voices to light in publishing.
Sign off with your name, and your query is done!
Please remember other important info: your query should have less than 250 words. It’s short and only an introduction to your novel. Your pitch should not take more than 250 words. It must contain the MC’s goal, why the MC is choosing to act and what happens to them, and the stakes if they fail. Do not ever tell the ending in a query, that is for the synopsis only.
Your query is the agent’s first contact with your book. Send it to your CPs, and polish it as many times as you’d polish your manuscript. Your query has to be great so the agent knows what they’re reading, but also because it makes you look professional when you hand in a polished query. Send it to your CPs, get feedback, rewrite it, rewrite it again. It took me four different drafts to get to this query you see now
Make sure you check out the other posts in the series! And let me know if you have any other ideas that help you write a good query.
November 10, 2017
How to Get a Literary Agent, Part 1: Research
Hi everyone!
I’m kicking off a series of posts in the blog on how to get an agent. It’s a list of resources and questions and everything else you need to know about the process of getting an agent.
The first thing you need is: you have to write a book.
Seriously, do not think of querying before your first draft is finished. It has to be complete, and you must have told a story and everything is set in place. Now it’s time to revise.
Do not, under any circunstances, query a book that has not been through heavy revisions. You should get CPs, beta readers, and everything in between to make sure your book is in good shape. The great thing about revisions is that they take a while, and you can write another book while you’re waiting for feedback. But you can also do your research on who you’re going to query once revisions are done.
Most agents will only look at a book once, and not if they’re revised. Don’t throw away your shot! If your book is in the best shape, then your chances are high of requesting. But first: resarch.
What does research consist of? It makes sure that your book gets into the hands of the right agents. That means: if you’re writing an YA fantasy, don’t query an agent who only represents adult literary fiction. He will not be a good fit for you, and you’ll end up only getting rejections you could have avoided.
While you’re waiting for the feedback, start looking at sites like QueryTracker and Manuscript Wishlist. They compile a great list of agents and what they’re looking for. Note down the agent, the agency, whether the agency accepts multiple submissions (meaning is if a ‘no from one is a no from all’ agency), their e-mail, response times, and anything that might look useful to you. When I was ready to query, I had a list of over 150 agents I could look at.
My own agent list looked like this:

You can see here AGENT NAME, WHERE (which Literary agency they’re with), GENRE (meaning which genres in writing they represent), READING LEVEL (YA, MG, Adult), SUBMISSION GUIDELINES, CURRENTLY SEEKING (any MSWL relevant to my book), EDITORIAL INPUT (whether they do revisions with their clients or not), RESPONSE TIME (how long does it take for them to consider a query), and REPRESENTING (the clients they currently work with). Of course, this list can change, and I had a separate excel sheet for when I was querying, but this helps you keep track of people in the business and who you want to work with.
Doing your research
Doing your research can be hard, and here is a list of interesting websites to look at:
Manuscript Wishlist . Manuscript Wishlist is an awesome resource for querying writers that has the profile of each agent and exactly what they’re looking for and what they represent.
Query Tracker. Query Tracker is an excellent website that offers info on agents and how long it takes for them to respond. It also lists when agents are open and closed to queries, and you can make your own to-query list when you create a profile.
Publisher’s Marketplace . Although it’s a paid resource, it can be invaluable to know what deals agents are brokering in PM and what exactly is going down on the inside of things. This is a complete and excellent website for any serious querying writer.
Literary Rambles Agent Spotlight . The Literary Rambles Agent Spotlight has a complete set of interviews with agents and what they represent, as well as compiles a list of other interviews with agents that could be interesting to look at.
Facebook groups like Sub it Club. Often Facebook groups talk about agents and good resources to find them. Be a part of them and participate on the community to have good insider info on agents and publishing professionals.
Researching is extensive and complicated, but it pays off. That’s the first thing you should be doing with your time. Friends may even have a list they’ve already compiled. Follow agents on twitter and make sure you’re up to date with news. You can also look at the ‘Acknowledgments’ part of all the books you love — writers will usually thank their agents, and you can start from there. If you look at the page for book deals from Publisher’s Marketplace as well as Publisher’s Weekly you’ll also find agents who have recent deals.
This list will really help you when you get to the querying stage. It’ll guide you and facilitate a lot of the work when you’re ready to query.
In the next post of this series, we’re tackling what stops a lot of people from getting an agent: the query.
Stay tuned!
Getting a Literary Agent, Part 1: Research
Hi everyone!
I’m kicking off a series of posts in the blog on how to get an agent. It’s a list of resources and questions and everything else you need to know about the process of getting an agent.
The first thing you need is: you have to write a book.
Seriously, do not think of querying before your first draft is finished. It has to be complete, and you must have told a story and everything is set in place. Now it’s time to revise.
Do not, under any circunstances, query a book that has not been through heavy revisions. You should get CPs, beta readers, and everything in between to make sure your book is in good shape. The great thing about revisions is that they take a while, and you can write another book while you’re waiting for feedback. But you can also do your research on who you’re going to query once revisions are done.
Most agents will only look at a book once, and not if they’re revised. Don’t throw away your shot! If your book is in the best shape, then your chances are high of requesting. But first: resarch.
What does research consist of? It makes sure that your book gets into the hands of the right agents. That means: if you’re writing an YA fantasy, don’t query an agent who only represents adult literary fiction. He will not be a good fit for you, and you’ll end up only getting rejections you could have avoided.
While you’re waiting for the feedback, start looking at sites like QueryTracker and Manuscript Wishlist. They compile a great list of agents and what they’re looking for. Note down the agent, the agency, whether the agency accepts multiple submissions (meaning is if a ‘no from one is a no from all’ agency), their e-mail, response times, and anything that might look useful to you. When I was ready to query, I had a list of over 150 agents I could look at.
My own agent list looked like this:
You can see here AGENT NAME, WHERE (which Literary agency they’re with), GENRE (meaning which genres in writing they represent), READING LEVEL (YA, MG, Adult), SUBMISSION GUIDELINES, CURRENTLY SEEKING (any MSWL relevant to my book), EDITORIAL INPUT (whether they do revisions with their clients or not), RESPONSE TIME (how long does it take for them to consider a query), and REPRESENTING (the clients they currently work with). Of course, this list can change, and I had a separate excel sheet for when I was querying, but this helps you keep track of people in the business and who you want to work with.
Doing your research
Doing your research can be hard, and here is a list of interesting websites to look at:
Manuscript Wishlist . Manuscript Wishlist is an awesome resource for querying writers that has the profile of each agent and exactly what they’re looking for and what they represent.
Query Tracker. Query Tracker is an excellent website that offers info on agents and how long it takes for them to respond. It also lists when agents are open and closed to queries, and you can make your own to-query list when you create a profile.
Publisher’s Marketplace . Although it’s a paid resource, it can be invaluable to know what deals agents are brokering in PM and what exactly is going down on the inside of things. This is a complete and excellent website for any serious querying writer.
Literary Rambles Agent Spotlight . The Literary Rambles Agent Spotlight has a complete set of interviews with agents and what they represent, as well as compiles a list of other interviews with agents that could be interesting to look at.
Facebook groups like Sub it Club. Often Facebook groups talk about agents and good resources to find them. Be a part of them and participate on the community to have good insider info on agents and publishing professionals.
Researching is extensive and complicated, but it pays off. That’s the first thing you should be doing with your time. Friends may even have a list they’ve already compiled. Follow agents on twitter and make sure you’re up to date with news. You can also look at the ‘Acknowledgments’ part of all the books you love — writers will usually thank their agents, and you can start from there. If you look at the page for book deals from Publisher’s Marketplace as well as Publisher’s Weekly you’ll also find agents who have recent deals.
This list will really help you when you get to the querying stage. It’ll guide you and facilitate a lot of the work when you’re ready to query.
In the next post of this series, we’re tackling what stops a lot of people from getting an agent: the query.
Stay tuned!
November 2, 2017
Knowing Your Genre, Part Five: The Last One
Hey everyone!
For those who have been following my blog for a while, you know I’m writing a big series of posts on genres in fiction and how to identify what your book is, and what it’s not. It helps especially when you’re querying, because when an agent sees “time-travel sci-fi”, they know exactly what they’re in for, and that’s a good thing. You can find part one here.
For now, I’ll be wrapping up the last post on the series, which I’ll talk about the “easier” genres to identify. While all the others have a series of subgenres that may confuse people, the last ones are quite simple, which is why I’ll be brief about them.
Literary
Literary is a genre that’s most easily identified with purple prose and “lack of plot”. It is very character-driven, and we follow the life of a character throughout a difficult period or just his entire life. Literary is what many people describe as “adult fiction”, although we can also have literary YA. Literary is often used as a synonym for “serious” fiction, which is a term I particularly dislike.
Mystery
Mystery is the classic who-dun-it narrative we’re so familiar with, as in Poirot and Sherlock Holmes novels. It’s usually familiar and quiet, and we have a list of suspects and in the end, the detective solves the mystery and everyone finds out what happened and live happily ever after. Yay! Mystery novels can have many different settings, but they’re usually set in a place where the list of suspects is confined, or all live in a small town.
Thrillers
Thrillers are James Bond and Jason Bourne types of novels. They rely on action scenes, on big bad guys with mafia, on a chase throughout the world to get the bad guy. Thrillers can also be quieter — an unsolved murder in the 70s that now comes back to haunt someone in particular, or a series of gruesome murders that a small town only wants to forget. It can go from Gone Girl to Dan Brown.
Romance
Romance is what it is. There’s no secret here. It’s about two people falling in love, the difficulties presented because they want to get together, the obstacles they must overcome, and the happily ever after. Romances can be considered as a formula, but a good romance will make you care about the characters most of all, and then you’ll be hoping everything works out in the end.
Chick-lit
Chick-lit is a bit of a derogatory term for fiction written by women centering on women. It’s contemporary adult fiction, but because it has a happier or light tone, it’s considered as lesser by the general public and reviewers. Chick-lit is Becky Bloom and The Devil Wears Prada.
Women’s Fiction
Like chick-lit, it’s stories written by women centering on other women. But unlike the other genre, it usually centers on more painful or “serious” experiences on the life — difficulties of marriage, raising children, or juggling jobs. Women’s fiction can also often contain romance, but it’s not the main focus of the narrative.
Western
Western is a genre everyone knows and loves, and that is set on the Old West, and often center around a cowboy or gunfighter. They focus on the harshness of the desert and the lifestyle of that time, and have common settings like saloons, ranches, mines, trains and other tropes.
Thanks so much for following me through this series of posts, and I really hope they helped in clarifying genres. Make sure you check out all my other writing resources on the website!


