
Stephanie A. Wascha's Blog, page 2
December 5, 2018
Join Stephanie in the classroom March 16th, 2019
Homeowners, save the date! The American Institute of Architects had great success with their 2018 seminar, Ask An Architect: Navigating Your Building Project. The 2019 lineup will be available soon for registration. Join Stephanie as she co-teaches the March 16th class in Seattle at the AIA office. More information coming soon!
[image error]
Dreaming about a home design project and not sure where to start? Wondering how to make the most of your budget? Curious about green design or how to plan for your family’s changing needs?
Whether your project is a small remodel or new construction — or if you are just curious about the design process — AIA architects can help. Join us for an information-packed overview of the design and construction process including budget and schedule, tips for hiring the right team, and how you and your designer can work together to make the most of any project.
The classes will be held at the Center for Architecture & Design // 1010 Western Avenue- DATES/TIMES COMING SOON…


November 5, 2018
Join Stephanie in the classroom March 16th, 2019
Dreaming about a home design project and not sure where to start? Wondering how to make the most of your budget? Curious about green design or how to plan for your family’s changing needs?
Whether your project is a small remodel or new construction — or if you are just curious about the design process — AIA architects can help. Join us for an information-packed overview of the design and construction process including budget and schedule, tips for hiring the right team, and how you and your designer can work together to make the most of any project.
The classes will be held at the Center for Architecture & Design // 1010 Western Avenue- Registration for 2019 opens soon…. stay tuned! More information to follow.

April 4, 2018
How Much $ Should You Withhold Until Your Project Is Complete?
How much of the contract sum should you withhold from your contractor until your project is complete?
How do you get the leverage you need to ensure your project is finished per your contract?
In the contract with your contractor, you want to include a pre-determined amount of money to withhold (retainage) from the final payment, and here are the things you need to know to do that successfully…
First, understand what the phases are. Your contract with your contractor will most likely require that you provide the final payment after “substantial completion” once you get your Certificate of Occupancy… less any pre-determined retainage to deal with punch list items. Did that sound like a jumbled foreign language? It won’t shortly… keep reading.
Substantial Completion essentially means that your contractor has, for the most part, completed the job per your contract documents, and you can move back in to your wonderful, new home. After substantial completion, you get your Certificate of Occupancy (“C of O” for those in the know) from your building department. This pretty much means the same thing as substantial completion, but it is a certificate from the building department agreeing that your home is usable and move-in ready less some minor loose ends. The loose ends that still need to be completed are typically noted on a final “punch list.” After substantial completion, you and your architect will walk through your new home and make a list of things that are damaged and/or not complete. This could include a ding in your drywall, touch-up painting, a small piece of missing trim, etc. This does NOT include something that would need to be completed in order to pass one of your inspections like major electrical or plumbing work. If those things weren’t finished, you wouldn’t get your C of O in the first place, so keep in mind that punch list items shouldn’t be big and scary things. Once everything on the punch list is fixed, you and your architect do a final walk-through with the contractor to ensure everything is satisfactory. THEN you make your final-final (or your second-final) punch list payment.
Your main leverage comes from withholding that first-final payment until you get your C of O. This is like paying for a meal at a restaurant, while the second-final punch list payment is more like tipping the waiter after dinner. The waiter knows he or she hasn’t been tipped yet, so they still refill your water fifty times in anticipation of that payment. However, you cannot release that C of O payment until after you’ve negotiated what is on the punch list and how much that will cost. You then withhold the money needed to complete the punch list from that C of O payment. So, you essentially retain part of your retainage to make your punch list payment later once everything is truly 100% complete. The typical amount you should withhold for punch list items should equal about twice the amount it costs to fix the punch list items. This is industry standard, so don’t shy away from insisting this be part of your contract. I’ve seen clients include language in their contracts in the amount of 5 times the cost of the punch list items. This gives you the ability to withhold enough to hire someone else to do the job in the rare instance your contractor can’t successfully complete the task. Just remember to include your agreed-upon amounts in your contract before the project starts.
The amount of retainage you withhold until you get your C of O can vary depending on the project size. You might withhold 10% on smaller jobs and 5% on larger jobs. 10% of a $100,000 budget might be enough money give you peace of mind, whereas 5% of $100,000 might not. You will need to determine what makes you comfortable and feel like you have a decent amount of leverage. Ask your architect to weigh in on this if you are unsure what to include. Once that number is determined, you reduce EACH payment to your contractor by a percentage of the predetermined retainage. Meaning, if your contractor bills you once a month, and you are expecting the project to take 5 months, then you have a total of 5 payments to make. Each payment would be reduced by 1/5th of the predetermined retainage.
Let’s say you have a $300,000 job and agree to withhold 7% until C of O. You are retaining a total of $21,000. If the project is expected to take 5 months (billed monthly in this example), then you reduce each monthly invoice from the contractor by $4,200 (1/5th of $21,000k). If it is determined that your punch list items will cost $3000 to fix, then you withhold $6,000 from the final $21,000 C of O payment. Your C of O payment will be $15,000 and your punch list payment will be $6,000. If you decide to make a change and say, add a 3rd story, then your budget will go up. Your retainage should go up with it, and your contract re-negotiated.
A word to the wise: Include your architect in each phase of the negotiations, including what should be in your contract with your contractor, what to include on your punch list, how much that might cost, and the final walk through. It is also very common for architects to review/approve each invoice from the contractor before they are paid by the owner. We have experience, and we are your advocate. Take advantage of that. For more super useful information on how to protect yourself from crappy contractors, please see my blog titled How to Protect Yourself From Crappy Contractors.
September 14, 2017
Monthly class for homeowners to prepare for their project!
I will be co-teaching the first class on September 23rd! We have an information PACKED seminar for you and are available to help answer project specific questions. If you can't make it this month, then try for next month. Space fills up quickly so sign up soon!
Join the Small Practice and Residential Committee (SPARC) for an information packed overview of the design and construction process including budget and schedule, tips for hiring the right team, and how you and your architect can work together to make the most of any project.
August 10, 2017
Homeowners That Ask These Questions Save Money
Were you one of those persistent children who always asked, “Why? What about this? How about that?” While you may have a distant recollection of your parents pulling their hair out, exasperated at having to answer yet one more question, I wanted to let you in on a little secret. Homeowners that ask questions save money. Period. And, contrary to your predisposition to think you are being annoying, you are most likely providing key feedback to your architect, contractor (or heck, even dentist) that will ultimately save you money or just make for a better project. Come mid-construction when your head is spinning, and you are at the end of your rope trying to determine which of the many heating systems (and brands for that matter) are right for your addition, you will ask your contractor and/or architect for a recommendation. When they respond, “Frank’s Heating and Cooling is the best.” Ask why. Ask how much it costs. Ask how it compares to other brands/sub-contractors. Ask for one other bid so you have something with which to compare the first bid. It will save you money and even if it doesn’t, it will give you peace of mind knowing that you did your homework and selected the best possible option for your needs (and you can impress your friends with your detailed understanding of mechanical systems!).
The point is, there will inevitably be portions of your project with which you will be unfamiliar, and you can’t let that stop you from asking, “WHY?”. Unlike seeing the price of an expensive tile and simply asking if there is a less expensive option, the structural drawings, mechanical and electrical systems, how things actually get built, or other similarly less familiar portions of the project could be a bit more baffling. Instead of hiding behind uncertainty, I would simply ask a few basic questions. Try, “What is the costliest structural portion of my new second story addition?” You might be surprised to find that it isn’t the actual second story addition. It might be that you must remove large sections of siding on the main floor in areas you weren’t planning on touching to make some key structural connections. If so, ask, “Is there a way we can avoid that? Is there some small change that could make that go away that wouldn’t destroy the design intent or result in a large delay?” You might find that something as small as shrinking a few windows could allow you to circumvent this costly work.
It is up to you to ask questions. You don’t have to have the solution. You just have to ask if there is a different end result that is better. Let the professionals figure out how to get there. Engineers can come up with 6 ways to do everything, and their first attempt might not be the least expensive way to get the results you need.
What if you learn that you need a crane to boom in a large beam called out on the structural drawings? Ask, “Can we break that beam up so we don’t need to pay for a crane?”
What if part of your newly finished basement will need to get ripped up to allow for a new post that supposedly will hold up the house? Ask, “Can we….. um….. just NOT DO THAT? Can we accomplish what we need to accomplish without ripping up the Basement?” (If you find yourself in this particular situation, you should have read my blog titled What Is A Master Plan and Why Do You Need One?)
I realize this may sound obvious. However, it is super rare for homeowners to ask for less costly alternatives, because they worry that they don’t fully understand what they are asking or how it will affect sixteen other things… or that it will make them appear “cheap.” Well stop worrying. There is absolutely nothing wrong with saving money on your heating ducts, so you have more money to put into your Kitchen.
I would be remiss if I didn’t mention one extremely vital piece to this money saving puzzle. Just because it is less expensive doesn’t always mean it is better. Don’t lose sight of the fact that you and your architect likely spent months making a multitude of decisions that got you to where you are at today. Remember when we shrunk some windows a few paragraphs ago to avoid some added structural costs? You and your architect might have painstakingly framed Mount Rainier from the bed in your new Master Suite so that you could have perfect views from both sides of the bed. If you shrink the windows without recalling that ever-so-thoughtful design consideration, then who gets the side of the bed without the view? There are a million decisions that will be made over the course of your project. There is literally no way for you to remember every single decision unless you are a super-human database. If you willy nilly go changing everything just to save a buck, you might just botch up a big portion of your design that you really REALLY wanted when your head wasn’t in mid-construction manic mode. So always ask WHY, determine the factors at play, check your assumptions with your architect, and then decide which change is worth the savings.
June 26, 2017
Can You Do a DADU?
As our cities get more and more crowded, more and more buildings are popping up to house an influx of newcomers, but it just doesn’t seem to be enough. Many cities have come up with an abundant of “creative” ideas to increase their housing densities to pack more people into less space in a sardine-like fashion. One seemingly golden front runner was the idea of building a DADU (Detached Accessory Dwelling Unit), or rather, a second small DETACHED structure on a single residential lot. I get a LOT of phone calls from eager homeowners in love with the idea of more habitable space (and possibly rental income) from this golden ticket of an opportunity. Before you get all excited about your man cave, art studio, rental, storage space, etc., I need to fill you in on a caveat that may unfortunately dash your dreams before you start.
Typically, when my clients get ready to build, they might pull a little money from savings, a home equity line of credit, their mattress, etc. Many times, however, the bulk of the funding is from a construction loan. Hold on to your hats… Unfortunately, most banks are currently unwilling to fund DADUs. (Did you feel that huge punch to your gut?) Even if you have a good income, good credit, hell- even if you have an uncle who is a banker… It is still unlikely you will be able to get a loan at most banks for a DADU. There has recently been some rumbling at a few local credit unions about making changes, but you will have to do some homework and call around to know for sure. Here's the thing: While cities like Seattle could benefit greatly from the many benefits of allowing DADUs, they are currently only a regional phenomenon, so there is little national data that can be used to determine their resale values. You see, bank rules are generally created on a national level, not on a local level, so banks are very reluctant to assign DADUs with anything more than a nominal value. When trying to get a construction loan, banks use a projected appraisal amount of the finished structure to determine the loan amount. Being that they view the value of your DADU as being on par with your child’s doll house, they just aren’t going to fork over the cash. As a result, unless you have a mattress full of money, enough equity in your current home to cover the cost of construction, or a magic wand, you may have to re-think how to get that art studio you are dreaming about.
Even though we architects are professional bearers of bad news, I won’t just dump this on you without also sharing an alternate way of getting the spaces you need. If you simply take those same desired spaces and ATTACH them to your house, then you can change that fun acronym from DADU to ADU (you guessed it…. Accessory Dwelling Unit) and get your man cave. (I personally think it should more suitably be called AADU (Attached Accessory Dwelling Unit), but that doesn't roll off your tongue with quite the same ring to it.) Banks just look at ADUs as regular additions or remodels for which you can typically get funding. Chat with your favorite local architect to find out how you can get the spaces you need.
There is one other bit of info you should know. SPARC (The Small Practice and Residential Committee) is currently working with some local lenders and the Seattle City Council to come up with a feasible way to get homeowners what they need to make their DADU dreams come true. I am a member of SPARC, so stay tuned. I will bring you updates as they become available.
May 25, 2017
How to protect yourself from crappy contractors
You must understand that working with a contractor is a business decision, and while it is common to want to be buddy-buddy with your contractor (who will eventually spend more time in your home than do most of your relatives), for the duration of the project it must be business as usual. Below are a few things you should know before hiring your contractor.
1. What Is THE MOST IMPORTANT Element in Protecting Yourself?
2. What Key Elements Should You Have In Your Contract With Your Contractor?
3. What If Your Contractor Doesn’t Pay His Or Her Sub-Contractors?
4. How Do You Avoid Getting a Huge Unsubstantiated Invoice At The End Of Your Project?
5. Worried About Your Project Taking WWAAAYYYY Longer Than It Should?
6. What if your contractor just isn’t cutting it and needs to be fired?
7. Does Your Contractor Have His Or Her Act Together?
8. What Kind Of (and How Much) Insurance Does Your Contractor Have?
9. Lastly, You Must, Must, Must, Must Check References and Trust Your Gut.
And if you thought this info was good.... check out my book to properly prepare for your project!
April 20, 2017
Can you change your project AFTER you have your building permit?
Many homeowners believe that once they have their building permit that they are locked into exactly what is shown on the drawings, but that isn’t the case and here’s why…. If you are in the middle of your project and you suddenly decide that you want to add a window, move a wall, or increase the size of your addition because mom is moving in, there is a process to make that happen which varies depending on the scope of the change. The building department won’t deny you that ability to make changes, but they will want to ensure you are still abiding by all of the same codes. Let’s take mom moving in as an example. Just because you have the extra space in the yard for the larger addition, it doesn’t mean you can automatically make it bigger. You might be over your lot coverage, building in a restricted setback, or any number of fun tidbits like that. Don’t worry, your architect will figure all of that out so you don’t have to. Assuming you are within your code boundaries however, the building department should be willing to work with you to get you the home you desire. Don’t forget that they WANT you to make improvements to your home (and pay them fees for their time correcting drawings), so they have a process in place to keep you happy and spending money on your house and their fees.
I’m guessing you are wondering things like how long of a delay can you expect, how much more it will cost in permit fees, and if your contractor can keep working under the original permit while you wait for your changes to be approved, right? Good questions.
Let’s say you want to remove a structural wall between two rooms (a change to your original permit) so there is more living space for mom to join the party. This could be as easy as just getting a stamped sketch from your structural engineer stating that he or she has approved the change. Your contractor keeps working away, the inspector is called out to verify recent changes, the contractor explains the desire to remove the wall and hands over the engineer verified sketch. Done. You’ve just opened a wall. Super quick and sans additional permit fees.
What happens if mom needs a bedroom and bathroom added to the back of the house that wasn’t part of the original permit? Your architect will verify if you are in the clear with respect to the codes, but this isn’t just a quick structural change that can be handled in the field with an engineer’s sketch. The building department will want to ensure that you still comply with those pesky codes mentioned above. Your architect will draft up the change, include the necessary code information, attach a sketch from the engineer, and resubmit the drawings. Obviously, every building department’s schedule and review time will be different, but in Seattle at the time of this writing, I’ve had projects with small changes like that approved in about 3 weeks… with an added few hundred dollars in permit fees. Don’t forget that there will be added fees paid to your architect and engineer, but it shouldn’t scare you away from making a necessary change.
And just to nail home this idea…. I also recently resubmitted a completely new home design under the original permit. In this particular case, the clients had been coveting their neighbor’s lot, but conversations to purchase it proved fruitless. As a result, we permitted a beautiful home they loved on their current lot. After some more negotiating (and wine) they finally secured its purchase, and I redesigned the entire home to utilize the newly acquired land. This required additional demo permits for the neighbor’s house, boundary line adjustments, and about seventeen other things that sound like they came out of a lawyer’s handbook. Nonetheless, I drew it up, included the code info, attached the structural changes, and resubmitted under the same permit. So yes, you have the ABILITIY to make changes…. Just verify with your architect that you have permission to as well.
March 20, 2017
Should you pay your contractor’s markup? (Yep.)
Contractors typically charge homeowners a 10-20% markup on their subcontractor’s (“subs” for short) work. If you think you might want to pay your contractor’s subs directly (like the plumber or electrician for example) to avoid your contractor’s markup, I want you to understand what you are getting and giving up by going that route.
When your contractor pays his or her subs and marks up their services, then he/she is essentially taking responsibility for said services. If something goes wrong, you can count on the fact that it will be covered under your standard one year contract with your contractor. If you pay the subs yourself to avoid that markup, and something goes wrong, then it is up to you to remedy the situation.
Let’s say you remodel your upper floor and decide to pay the painter $3000 directly to avoid your contractor’s 15% markup so you are saving $450. Nice! That’s a short weekend getaway waiting to happen! 6 months later you realize that the painter neglected to put the mold and mildew additive in the paint in your bathroom, and it needs to be repainted. You have to call them up, be home while they are working, deal with the mess, etc. Not a huge deal but annoying…. And that may or may not happen, so it could be worth paying them directly after all. That’s for you to decide.
Now let’s look at a different, more risky type of work. Let’s say you paid a plumber directly to install the plumbing in that same bathroom. Once complete, the insulation went in, the electrical was routed around it, the sheetrock was installed, and the tile was artfully applied to your walls and floor. If a little gasket wasn’t installed properly and water begins to leak, then up comes the tile, off goes the sheetrock, out goes all of the wet insulation and wood… AND if water made its way to the floor below, well then, you can fill in the blanks there.
Now who is going to fix all of the damage? You? The plumber? Who is paying for it all? It wouldn’t be covered under your contractor’s warranty, because you took responsibility for that sub. You have to chase everyone down, be there while all of the various trades come back, protect the house as the damaged materials are hauled out and fresh materials are hauled in, etc. Sound fun? If your plumber charged you roughly $3000 to do the plumbing in that Bathroom (to make our math easy), is that $450 savings worth the massive headache in which you now find yourself? It wouldn’t be for me.
With those more risk-laden tasks including things moving or containing water (plumbing, tile in a shower, waterproofing, roofing, etc.), I would highly recommend that you look at that markup as a cheap insurance policy. The same can be said for electrical (can cause a fire if not done properly), structural work, etc. For those less risky tasks (such as painting) feel free to get out that calculator and decide what your time is worth to you.
July 13, 2016
EVER WONDER WHAT GOES INTO TAKING THOSE PHOTOS?
You might not realize how much of an architect’s time is spent creating and maintaining his or her portfolio. This is our lifeline to getting more work… to getting you interested in us. A major portion of that is having our work photographed. If you’ve ever tried to take a picture of a building, you know that actually having it LOOK like a building, let alone an attractive one, is a lot more difficult than it looks. I’ve followed photographer, Ed Sozinho, around enough of my finished projects to grasp the periphery of the painstaking details that go into making a 3-dimensional structure look amazing in 2-dimensions, and I have to say, it is totally shocking. I realized, however, that I had no idea what goes on AFTER the pictures are taken, as I’ve only seen the portion of his job where he is actually shooting the photos. After all, how many changes could there possibly be after taking a full 45 minutes just to shoot one view of one room? I was surprised to learn that for every 1 day spent in the field shooting photos, he spends 3 days manipulating the images (and apparently even longer if he lets his geeky/techy side get the better of him)! WHAT?! I decided to stray from my typical blog post topics to have Ed out for an interview and find out what goes on behind the scenes. I have to share this with you.
Ed is actually a licensed architect in disguise. I’m convinced he keeps drafting equipment in his glove box, but if you check out his website (and you should… http://www.sozinhoimagery.com/) the first thing you will see is a wet, bearded fly fisherman lugging a huge metal chain out of splashing water. When I asked him to explain why there was a fisherman on the front page of his website, he explained that regardless of whether the subject is a lumberjack (yes, seriously, check out his website), a building, or a starry night’s sky, they all actually have something in common. He uses both photographs and film to tell a 3-dimensional story in 2 dimensions, and the means to doing that well are totally baffling.
Ed admits that in his early years working in an architectural firm, when his boss sent him out to finished projects to be the in-house photographer, it was more the physical act of just having the camera in his hands that inspired him. Later, he began studying the work of his favorite photographer, National Geographic’s long time veteran Sam Abell, and ultimately spending time learning from him personally which changed his photography forever. Abell teaches photography using setting, gesture and expression. These elements are what turn a regular old snapshot into an artful image. Over time, as Ed began to develop his own style, these fundamentals evolved into a slightly different set of criteria.
TAKING THE PHOTO:
The 4 key elements you need to master to create a great image are setting, framing, composition and gesture. “The setting is an easy one to explain with respect to architectural photography,” Ed described. “You have your building, your Kitchen, your Bathroom, etc. That’s your setting.” When shooting, however, Ed’s goal is to tell a story so it is more than just, say, a Bathroom. “Is there a linear spine through the building from an important tree on one side to the water on the other side, for example?” He wants there to be a relationship between his photographs and the architect’s vision, so he asks about themes, ideas, etc. and uses his images to reinforce them.

Framing is a bit more difficult when it comes to shooting architecture. Most photographs of buildings inevitably need to be wide shots which, if not done correctly, can look flat, boring and blah. As a result, he creatively uses framing to generate depth and draw the viewer’s eye to the focal point of each shot. For example, we were once shooting a photo of my client’s living room, looking through the Dining Room to the Kitchen beyond. While I was looking through the viewfinder on his camera, Ed began rearranging the furniture completely out of whack. The sofa was in the middle of the hall and you would literally not be able to walk through the room without climbing over something. When I politely asked him if he’d gone mad, all he told me was to take another look through the viewfinder. Suddenly the image had so much more depth, just because there was a small snippet of the sofa in the foreground framing the focal point of the photo beyond! From the point of view of the camera, it looked like the sofa was sitting in the exact location for which it was intended all along. “That’s framing,” he chimed. Additionally, do you ever wonder why magazine images never show the 212 items we typically have sitting out on our Kitchen counters (olive oil, a bucket of spoons, fruit bowl, paper towel, coffee maker, etc.)? “We de-clutter the rooms we are shooting because in a 2-dimensional plane, the more you give each object its own space without overlap, the more three dimensionality the image has.” He went on, “The simplicity clarifies the image, because we as viewers can’t move around an object to see what’s on the other side.”

A combination of those key factors helps create important relationships between the rooms. Also, the various proportions and other secret spy tactics make up a good composition. “Everything in a photo makes a difference when it comes to composition, not just the objects themselves which you are trying to shoot.” For example, we don’t really notice shadows, because in our brains, they are just part of what gives the building next to it the 3-dimensionality we need to understand it as being real. In a photo, however, a shadow has as much value, and therefore is just as tangible as the building itself. I think I’ll leave figuring out “good composition” to the professionals because honestly, it just seems like good old fashioned experience is the only thing that will help with this one.

The photographs of Ed’s fly fishermen on his website or the horse above just ooze gesture. Gesture is exactly what it sounds like. The physical and facial gestures coming from the people in the shot can tell a story in and of themselves. If he is shooting a lifestyle image for a well-known national brand, he uses the people to tell a story about the products with which they are interacting. If he is shooting an image of a public plaza on a newly finished building, the people tell a whole different story about gathering, community, and place. It is fascinating how much this can influence our perception of the inanimate objects and theme of a photo.
Similar to Sam Abell, Ed’s main focus of his personal photography is to be as truthful as possible, and he relies on the aforementioned elements (setting, framing, composition and gesture) to create his art. However, the type of photography his clients request usually requires that he employ some creative wizardry, as they are sometimes less interested in artful expression and more interested in making sure their product looks perfect. “It’s like going on a first date,” he describes. “You wouldn’t wear old sweatpants and a dirty t-shirt. You have to make a good first impression!” His photos are his clients’ first impressions. He enjoys both types of photography, but in his mind they are very different beasts.
When I originally set out to write this article, my focus was going to be to inspire homeowners to avoid getting caught up in magazine images of perfect homes… as is easy to do. I was going to illustrate that it is okay to want and need those 212 things if they make life better. When I’m designing a home, I try to embrace those needs to inspire my designs, because if you do actually use olive oil, a bucket of spoons, fruit bowls, paper towels and coffee makers, and you don’t design around them, that’s how they all end up on the counter in an annoying mess. I naively set out to demystify those pretty printed photos, demonstrate that they aren’t real and embolden you to design around your own needs instead of focusing on creating something that looks like it came from a magazine. However, when we got into the nitty gritty of the interview, I realized I couldn’t have been more off base. Ed explained that there is a reason why it is necessary to remove that bowl of spoons (among other things) from the photo, and it isn’t just to create a perfect fairyland looking image. He wants the viewer of the photo to see the closest possible rendition of what is actually there in physical space, and he utilizes various tactics to make up for the limitations of a camera. The classic “red eye effect” (the one where your eyes glow and make you look like a devil in the photo) is a perfect example. This occurs when a camera captures light reflecting off the retina at the back of your eyes. You don’t actually look like a devil in real life, but this is one of the limitations of using a camera. Light is a tricky one actually. One of my favorites of Ed’s repertoire deals with light. When you shoot a picture towards a window, all sorts of annoying things end up inside the camera. You will see a lot of glare on the horizontal surfaces (floor, table, counters, etc.) from the light pouring in, the inside face of the window wall turns out super dark, and you can’t see anything outside of the window, so it appears like a bright white, flat surface… just to name a few.

He shoots something on the order of a few dozen images of the same exact shot, while employing different lighting maneuvers to ultimately get the picture back to what you would see if you were standing there in the room. What does he then do with the dozens of different images you ask? He stitches them together. He will shoot the first few images with his assistant holding up a huge black blanket to block the light on the glaring horizontal surfaces and then Photoshop her right out of the picture. He will then shoot a few more of that same photo with a huge flash aimed to brighten up the inside of that dark wall. A few more shots will be super dark inside for the sole purpose of being able to see what is outside of the window (a tree, the sky, etc.).
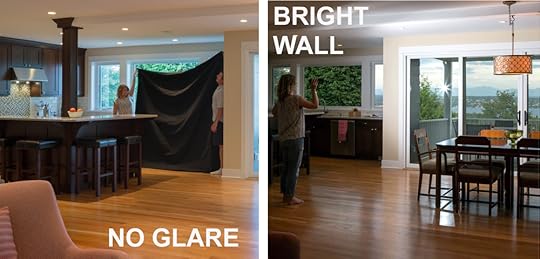
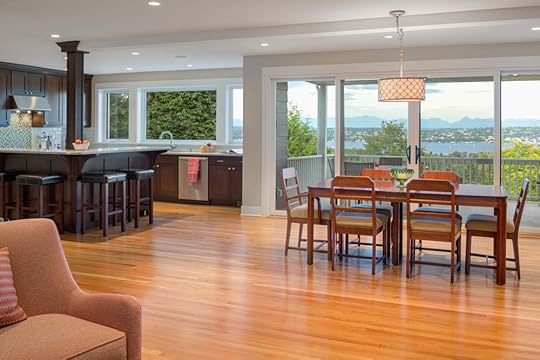
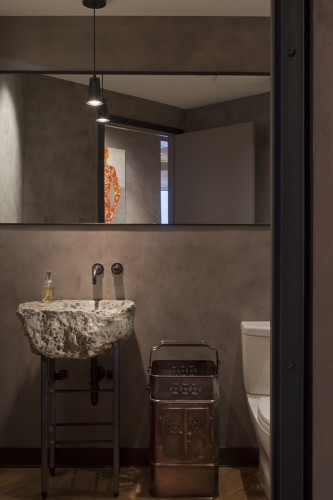
Then, like an expert seamstress, he stitches the right parts and pieces of each set of images together (the horizontal surfaces from one, the window wall from another and actual windows from yet another) so that the “correct” portions from each photo make up the end result. Crazy right? This next example takes stitching to an entirely new level! When shooting a wide angle photo, the image can get really distorted. Things in the foreground get really stretched out. The walls look lopsided (called “the keystone effect” in the biz), and there might be only one or two things actually in focus. To fix these inaccuracies, he will shoot various parts of what will ultimately make up the final image from an angle that makes each shot look “normal”. He then stitches away, so when combined, they look like one easy picture of exactly what you would see if you were there in person. How many stitched photographs do you think it took to create the image of the Powder Room below? No, try again. FORTY FIVE! Yes, believe it.
AFTER TAKING THE PHOTO:
Gone are the days where we drop off our film at the local drugstore, wait for what seems like forever to retrieve them, only to find that we had our finger over the lense for the entire birthday party. Oh, that was just me who did that? Well, our new digital cameras allow us see our mistakes instantly, delete anything we want and try again. We also have the luxury of perfecting the images after the fact. He uses a software program called Lightroom for image processing (big picture changes) and Adobe Photoshop for localized processing (details), all in the name of getting images as close to what the human eye sees as possible. Not being a photo buff, I had no idea that Ansel Adams actually had his own version of our software modifications. He used to adjust his developing processes to make up for limitations in the camera, just as we do with Photoshop! Ed doesn’t use HDR (high dynamic range). He made me promise to include that, but in reality, I can see why. He said multiple times during the interview that he sets out to do the very best possible job on every single photo. He clearly takes pride in his work, and using HDR is a method of faking a number of techy things (that I won’t bore you with) that allows someone who doesn’t know the infinite techniques noted above, to create a slightly better image than he or she would otherwise be able to. It is kind of like autopilot; it will get the job done, but not in an artistic thoughtful, purist-kind of way. This is Ed’s art, and he is the purist of purists. Every pixel matters to him when creating his images.
Just as I suspected, he still has his hand in architecture. His guise can’t fool me. Half way through the interview, he admitted that he is currently designing his own home and participating in more architectural committees than an eager intern: American Institute of Architect’s Future Shack, The Strategic Advisory Council and The Honor Awards Committee for starters. He also photographs all homes for Home of Distinction among others. (Really ED? You make me feel lazy!) All that said, I finally realized that while he will forever love architecture, photography is his true passion. When I asked him what his next big thing was coming down the pipeline, he looked like a kid in a candy store as he described RED cinema. This is a video camera (a very expensive video camera) that has the capability of correcting that issue we all have with our photographed walls looking cockeyed (Keystoning). In addition to keystoning, regular cameras can’t see inside and outside space the same, but RED cinema corrects these and many other issues with which photographers and videographers typically have to contend. Film is definitely his next big thing. “The ability to shoot film with our digital cameras has made videos more mainstream, so clients began asking for it. I love it.” He is currently working with an award-winning local architect to create a movie, and there will be more to come. Ed always wanted to film architecture, because still-images are hard to understand 3-dimensionally, and being a purist, he wants the images he creates to depict reality in the best way possible. There you have it. Photography 101….and that is just the tip of the iceberg.
Stephanie A. Wascha's Blog

- Stephanie A. Wascha's profile
- 4 followers

