Kay Nimitz Smith's Blog, page 6
February 2, 2019
Jack Diamond and Harry Potter

For those of you who are waiting anxiously for me to finish No One Noticed, the Jack Diamond sequel, I have some bummer news for you. Don't worry, it's happy news for me. And it will eventually result in happy news for you too.
So here's the deal.
I took December off to scamper about and frolic amongst the flours (and sugars), making all sorts of tasty treats for the hubs and his coworkers, and family, and well, let's face it, me too.
So January came around and I thought for sure I'd get to my editing.
But alas, no.
So here it is, February, and it's time to go on vacation.
So, the editing continues to wait for me.
And that means Jack Diamond and all his friends are waiting too.
But here comes the good news:
Harry Potter, Mickey Mouse and I are going to play together in Florida next week, and for this I am super duper ally ooper excited. Even more excited that I didn't have to pay for the trip! Because, well, let's be honest. Who has money for an expensive vacation when they haven't been paid for their second book which they haven't finished?!? Hmmmm.
Yes, this is a work trip too.
So, even though I am not finished (um, well, haven't really gotten past chapter two) with the editing, I can tell you that I shall be working on the edits on the plane rides. And if the weather back east is any prediction, I'm guessing I'm going to get stuck somewhere during a layover for enormous lengths of time, and will have nothing to do but write, write, write and edit, edit, edit. So yay for you!!
AND, after this lovely time in sunny 76º weather, whilst all the rest of the world is shivering in -30º something or other, I shall come home rested and relaxed and filled to the brim with chocolate.
As one should.
When one returns from vacation.
So, to answer your questions, no, I don't have an estimated time of arrival on the book. And yes, I know that I am now officially so far behind I'm going to have to change the dates in the book (note to self, don't forget to change the dates in the book).
But hey, when a (mostly) free trip to visit Harry Potter and Mickey Mouse arises,
you just don't say no.
Even if you have to work a wee bit.
While at the pool.
Eating chocolate.
* * * * *
* * * * *
I wrote a murder mystery! Here is the link so you can buy it:

You can buy my book in both e-book and paperback on Amazon here: Diamonds for Diamond by Kay Nimitz Smith
* * * * *


December 12, 2018
Gingerbread Houses
Gingerbread Houses

source
Every year I strive to make a gingerbread house for the holidays.
Sometimes I get around to it. Sometimes I don't. But I always want to.I've used cookie cutters to make houses. I've made up my own designs. I've 'borrowed' designs from other people. I've bought books with designs in them.
This book is my favorite so far, although it has its flaws.
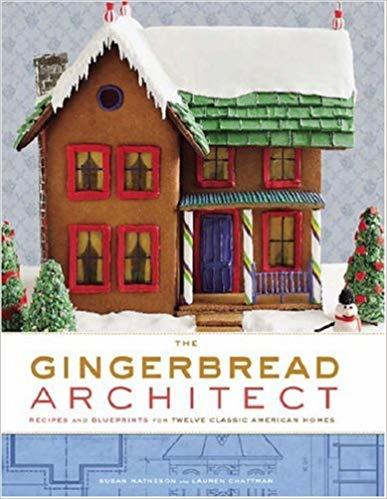 You can buy it here
And yes, I've even bought ready made houses, and just decorated a house.
For those of you who are inspired this year to make your own house, here's a link to a GBH cookie cutter kit that has a tried and true recipe that I've used for a gajillion years.
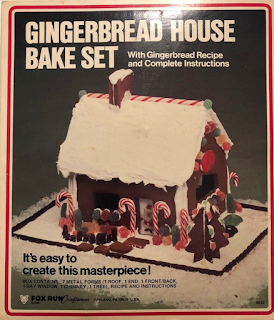
You can buy it new here
The cookie cutters look like this:
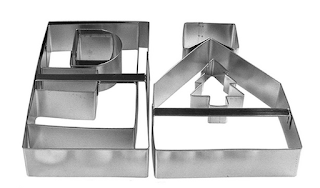
The kit is basic and simple, and it does a fair enough job at putting together a decent, but simple, GBH.
Here's the recipe, slightly adjusted, and some of my notes on how to put the whole thing together.Recipe4 to 4 1/2 cups flour1 cup sugar3 teaspoons powdered ginger1 teaspoon cinnamon1 teaspoon baking soda1 teaspoon nutmeg1/2 teaspoon salt1 cup Crisco1 cup molassesoptional: clear, solid colored candies (I usually pick out three different colors -- most fav colors are red (cinnamon), green (apple), gold (butterscotch). But if you're using Jolly Ranchers, you can choose from a wider variety of colors).
Icing:4 egg whites3 to 4 cups of powdered sugar2 teaspoons cream of tartarDirectionsMelt shortening in saucepan. Add sugar and molasses and mix well. Make sure the sugar is fully dissolved. Sift the flour, baking soda, nutmeg, salt and ginger together in a mixing bowl. Gradually stir in 3 1/2 cups of the flour. Place the dough on the counter, and knead in the remaining cup of flour little by little. Your dough may need less flour (or more) depending upon the humidity in your kitchen. Wrap your dough in plastic wrap and let the dough rest for about 15 minutes.
Unwrap your colored candies. Make a pile of each color. Place all the candies of one color in a heavy zip lock bag. Release all the air out of the bag. Place the bag on top of a dishtowel. With a hammer, bash the bajizzles out of the candies until they've been pulverized into smithereens.
Repeat with new bags for each of the separate colors of candy. Set aside.
Split the dough into three sections. I wrap up the two sections I am not currently using. With your first section, place a piece of parchment paper onto your cookie sheet, and roll the dough out into a lovely rectangle (or as close to it as you can get).
Cut 2 fronts and a back from ball #1. Cut 2 ends from ball #2. Cut roofs from ball #3. Cut chimneys from excess dough.
If you want windows & doors, feel free to use a cookie cutter (or a knife) to cut those out now. I have been known to cut the windows, but leave the dough inside the holes until the dough has baked for 7 minutes. Then, I pull the cookie sheet out of the oven, cut the windows out again, and remove inner part. Then I put the dough back in the oven for another 7 minutes. **
*If you want to have lights INSIDE your house, you will need to cut a little small arch out of the corner of one of your sides (or one of your ends) just big enough for your Christmas light cord can go through so you can plug in your lights. I've tried battery operated lights, but they always seem to run out of batteries before I'm done having people look at my house. And, since the batteries are perma-glued inside the house, it's not like you can just pop in there and change your batteries. So I just run a cord through my house, and I put the lights on a timer. The lights WILL warm up your gingerbread, making it smell amazing, but they will also making the gingerbread soften, so it might not last quite as long as if you don't add lights on the inside. If you're not doing stained glass windows, don't bother with the lights.*
Only bake one cookie sheet at a time. Trust me.
Straighten all your edges before putting the shaped/cut dough into the oven, and then trim then IMMEDIATELY after removing them from the oven. The dough will spread, so it's important to trim & straighten your edges AFTER they've been cooked.
Bake only one cookie sheet at a time so that you will have time to fuss with the edges and the windows without having to worry about the other pieces.
Bake the dough for 7 minutes, and then adjust the dough as needed, then bake for another 7 minutes.
**If you want a 'stained glass window' effect, you will be baking your dough for 7 minutes. Then remove the cookie sheet from the oven. If you haven't yet removed the window dough out from the window you previously cut, remove the window dough now. Carefully sprinkle the colored sugar dust from the smashed up candies into the cavity from the window. If you want a solid color window, only use one color. If you want more of a 'stained glass window' effect, feel free to sprinkle in different colors of candies in different sections of the window area. Or, sprinkle in a layer of gold candy dust, then sprinkle on a wee bit of color here and there for a more marbled effect. I personally fill the entire window cavity. Then I use a pastry brush to brush off any excess sugar from the surface of my gingerbread house. If you don't brush this off, you'll end up with a kind of shiny, candy coated area around the window. It's okay, but looks a bit more sloppy. After the windows are filled, simply pop the gingerbread house back in the oven for another 7 minutes. The windows should have melted by now, and the dough should be firm, but not burnt. Remove from the oven, and let the cookie cool on the cookie sheet until the candied windows have hardened completely. Then remove the GBH piece from the cookie sheet and allow the GBH piece to cool COMPLETELY before moving on to the next step.
I usually allow my cookie pieces to cool overnight, and I assemble in the morning. But hey, that's just me. You can do whatever you want to do, because you are a rockstar.
While you're waiting for your gingerbread house pieces to cool, make your frosting by whipping the ingredients together in a mixer, and placing the fluffy goodness into a piping bag. If you're not going to assemble your house until the morning, wait until the morning to make your frosting.
Prepare the surface where your Gingerbread House is going to live.
You can really assemble your gingerbread house on any number of flat surfaces. I've done so on large decorative plates, on cookie sheets, and on cardboard. My most favorite, so far, is thick white cardboard with foam between the two white boards. I buy big pieces at Office Depot (like this), cut them down so that they're about six inches larger on each side (so a FOOT larger all the way around) than my gingerbread house. I like to have a nice outdoorsy area to decorate, as well as the house itself. By using the thick white cardboard, I have a lovely 'snowy' looking backdrop. It also dusts off fairly easily, although it can show some grease stains should your GBH be a bit greasy. If you find your surface a wee bit greasy, just sprinkle with a bit of powdered sugar, and voilá, fresh snow.
To assemble:
So, I've made a million GBH over the years, and my favorite weapon of choice is the full soda can. Doesn't matter what flavor. I tend to use 7-up, because then my fav hubby can serve up mixed drinks at the GBH decorating party and he simply washes off the cans, pops them in the fridge. Anywhoooo, here's how I assemble my houses.
1. I take one side of my house (the side that doesn't have a cut hole for the Christmas lights). I use the piping bag and frost the bottom edge. I put down the piping bag. I place the frosted edge onto the white cardboard. I prop up the GBH piece with a can of soda on both sides so that the piece stands upright. Kinda like using training wheels for a the BGH piece.
2. I take the END piece of my house (the side that doesn't have a cut hole for the Christmas lights). I use the piping bag and frost the bottom edge. Then I frost the edge of the SIDE piece (the side of the house that is currently being propped up by the 2 soda cans. Then I carefully set this end piece at a 90º angle and press it up against the edge of the SIDE piece. I prop the end piece up with 1 soda can on the outside edge. So you should now have three soda cans, and both pieces should be standing erect (propped up by cans) in the shape of an L or a backwards L.
3. Then, if you want to have Christmas lights, now is the time to insert them into your house. Make sure you adjust the Christmas lights so that the cord leads outside of the house. If you made the archway for the cord in your side piece, then add the side piece now, making sure the cord goes through the archway. If you added the archway to your end piece, you can just add on the side piece now.
4. Then, I frost the bottom of the second SIDE piece. Then, making sure I know which side is to face out, and which side is to face in, I frost the outer edge of the SIDE piece that will butt right up against the END piece. I carefully set it in place, right up against the END piece, and adjust soda cans as necessary.
If you haven't yet added Christmas lights, and want to do so, add them now. Make sure that you thread your cord so that the wire goes through the little archway/cut off corner of your end piece. If you forgot to cut a corner off to make room for the cord, you CAN do it now. Just be VERY gentle. When I trim dried gingerbread house pieces, I scrape a little tiny bit at a time. I NEVER chop. You're less likely to break a piece of you just sort of scrape and scrape and scrape until the edge looks like you want/need it to, or until the little edge piece is cut off for your cord.
4. I then pipe frosting on both ends of the two sides of the house. Then, I take the last remaining end of my house, I pipe frosting on the bottom. Then, I make sure my Christmas light cord goes through the archway in my end piece. Then I press it gently up against the two sides. I prop it up with soda cans.
Then I leave everything well enough alone for quite some time.
Depending upon the size of my house, and my eagerness to continue, I will come back in 15 minutes (or let it rest over night) to see how dry and how hard set everything has become. I usually leave this stage alone for a good couple hours. But sometimes I'm in a big hurry.
Your house should be VERY solid by now, and shouldn't wiggle or jiggle or move at all. So you should be just fine. If your house is still wriggly, I suggest WAITING until it's completely hard before putting on the roof. Or, you may end up with a bunch of roofs on the floor, as if a disastrous 9.0 earthquake has hit 1970's California. Because as we've recently seen, a 9.0 earthquake in 2018 Alaska didn't really do a whole lot to anything other than the roads. And since you're not making a gingerbread road, well, you should be just fine. Once your house is solid and ready for its roof,
REMOVE ALL SODA CANS FROM INSIDE THE HOUSE.
This stage is important.
Because if you don't, you'll have a house filled with soda, and there won't be anything you can do about it until deconstruction time.
Did you double check? No soda cans? Okay. So you're good to continue.
Next up I go to the base of my house and I frost my edges of my end pieces for the roof, and I lay ONLY ONE of the roof pieces down. I borrow a friend, or a husband, or a child, to hold that piece in place. Try not to use the dog to hold the roof in place, because the dog will eat your house. No matter how much they promise not to. If I haven't got one of those, I try to jerryrig the soda cans to prop up the piece.
Double check to make sure all your cans are out of your house.
If not, take out all the soda cans now.
Then I frost the other two edges of the end pieces, *AND* I frost a thick layer across the top edge of the roof (the edge that is going to meet the other roof edge) and place the other roof piece in place. If I have a hubby with more than one hand, or if I have more than one hubby, or if I have a hubby and a kiddo, then I have each of them hold up a side while I put on another layer of frosting between the two roof pieces, JUST to make sure that it's all going to be secure. Adjust the roof pieces as necessary to make the gaps as minimal as possible.
Then I hold up one roof piece while hubby holds up the other roof piece, and we have a nice chat for a few minutes while everything starts to dry and set. I have tried jerryrigging up soda cans for this part, but sometimes a hubby or kiddo works best. Again, not the best job for the dog.
Then, I let the whole thing rest for a bit, or until the roof feels pretty secure, and then I'm all set!
Now, if all of this seems a bit too much of a pain in the catookus for you, they sell ready made houses, fully assembled, at Costco. For $10. Why on Earth would you go to all this hassle of making your own GBH when you can buy a ready made, fully assembled GBH?!? You could skip the whole baking the house part, and go straight for the decorating part.
But.
There are some people out there, people like you, people like me, who want to have that full gingerbread house experience, and want to make their own gingerbread house from scratch.
Maybe we're sadistic and want to make our own designs. Or maybe we want to steal other people's designs. Or maybe we're just nuts.
So for the rest of you who are nuts, like me, knock your socks off and make an awesome homemade GBH. Then send me a picture, so I can steal your idea for next year!
For the rest of you who just want to decorate a house, buy one from Costco. They're the best ones. Honestly. I've made ones from JoAnn's, Michael's the grocery store, and some weird little mini houses that I picked up as a kit from somewhere else. And trust me. After putting together hundreds of houses, the Costco ones are truly my favorite. And you can't beat the price!
I'll write up some decorating ideas in another blog post... along with some pictures of former homemade GBHouses from yours truly.
Meanwhile, enjoy! And happy baking!
* * * * *
For those of you anxiously awaiting book number 2, it is currently on hiatus until the holiday season has passed. I am knee-deep in holiday bliss at the moment, and Jack Diamond and his friends are just going to have to wait until January to pick up where we left off ... editing the final draft!
Meanwhile, if you *HAVEN'T* yet read Jack Diamond book number 1, you can buy it below. Click on the picture, and it'll pop you straight over to Amazon where you can buy the paperback (great stocking stuffer!) or you can buy a copy for your kindle!
Now who doesn't love to read a great murder mystery while snuggled up under the Christmas tree, cocoa in hand, fire blazing away?
* * * * *
I wrote a murder mystery! Here is the link so you can buy it:
You can buy my book in both e-book and paperback on Amazon here: Diamonds for Diamond by Kay Nimitz Smith
* * * * *
source
Every year I strive to make a gingerbread house for the holidays.
Sometimes I get around to it. Sometimes I don't. But I always want to.I've used cookie cutters to make houses. I've made up my own designs. I've 'borrowed' designs from other people. I've bought books with designs in them.
This book is my favorite so far, although it has its flaws.
You can buy it hereAnd yes, I've even bought ready made houses, and just decorated a house.
For those of you who are inspired this year to make your own house, here's a link to a GBH cookie cutter kit that has a tried and true recipe that I've used for a gajillion years.

You can buy it new here
The cookie cutters look like this:

The kit is basic and simple, and it does a fair enough job at putting together a decent, but simple, GBH.
Here's the recipe, slightly adjusted, and some of my notes on how to put the whole thing together.Recipe4 to 4 1/2 cups flour1 cup sugar3 teaspoons powdered ginger1 teaspoon cinnamon1 teaspoon baking soda1 teaspoon nutmeg1/2 teaspoon salt1 cup Crisco1 cup molassesoptional: clear, solid colored candies (I usually pick out three different colors -- most fav colors are red (cinnamon), green (apple), gold (butterscotch). But if you're using Jolly Ranchers, you can choose from a wider variety of colors).
Icing:4 egg whites3 to 4 cups of powdered sugar2 teaspoons cream of tartarDirectionsMelt shortening in saucepan. Add sugar and molasses and mix well. Make sure the sugar is fully dissolved. Sift the flour, baking soda, nutmeg, salt and ginger together in a mixing bowl. Gradually stir in 3 1/2 cups of the flour. Place the dough on the counter, and knead in the remaining cup of flour little by little. Your dough may need less flour (or more) depending upon the humidity in your kitchen. Wrap your dough in plastic wrap and let the dough rest for about 15 minutes.
Unwrap your colored candies. Make a pile of each color. Place all the candies of one color in a heavy zip lock bag. Release all the air out of the bag. Place the bag on top of a dishtowel. With a hammer, bash the bajizzles out of the candies until they've been pulverized into smithereens.
Repeat with new bags for each of the separate colors of candy. Set aside.
Split the dough into three sections. I wrap up the two sections I am not currently using. With your first section, place a piece of parchment paper onto your cookie sheet, and roll the dough out into a lovely rectangle (or as close to it as you can get).
Cut 2 fronts and a back from ball #1. Cut 2 ends from ball #2. Cut roofs from ball #3. Cut chimneys from excess dough.
If you want windows & doors, feel free to use a cookie cutter (or a knife) to cut those out now. I have been known to cut the windows, but leave the dough inside the holes until the dough has baked for 7 minutes. Then, I pull the cookie sheet out of the oven, cut the windows out again, and remove inner part. Then I put the dough back in the oven for another 7 minutes. **
*If you want to have lights INSIDE your house, you will need to cut a little small arch out of the corner of one of your sides (or one of your ends) just big enough for your Christmas light cord can go through so you can plug in your lights. I've tried battery operated lights, but they always seem to run out of batteries before I'm done having people look at my house. And, since the batteries are perma-glued inside the house, it's not like you can just pop in there and change your batteries. So I just run a cord through my house, and I put the lights on a timer. The lights WILL warm up your gingerbread, making it smell amazing, but they will also making the gingerbread soften, so it might not last quite as long as if you don't add lights on the inside. If you're not doing stained glass windows, don't bother with the lights.*
Only bake one cookie sheet at a time. Trust me.
Straighten all your edges before putting the shaped/cut dough into the oven, and then trim then IMMEDIATELY after removing them from the oven. The dough will spread, so it's important to trim & straighten your edges AFTER they've been cooked.
Bake only one cookie sheet at a time so that you will have time to fuss with the edges and the windows without having to worry about the other pieces.
Bake the dough for 7 minutes, and then adjust the dough as needed, then bake for another 7 minutes.
**If you want a 'stained glass window' effect, you will be baking your dough for 7 minutes. Then remove the cookie sheet from the oven. If you haven't yet removed the window dough out from the window you previously cut, remove the window dough now. Carefully sprinkle the colored sugar dust from the smashed up candies into the cavity from the window. If you want a solid color window, only use one color. If you want more of a 'stained glass window' effect, feel free to sprinkle in different colors of candies in different sections of the window area. Or, sprinkle in a layer of gold candy dust, then sprinkle on a wee bit of color here and there for a more marbled effect. I personally fill the entire window cavity. Then I use a pastry brush to brush off any excess sugar from the surface of my gingerbread house. If you don't brush this off, you'll end up with a kind of shiny, candy coated area around the window. It's okay, but looks a bit more sloppy. After the windows are filled, simply pop the gingerbread house back in the oven for another 7 minutes. The windows should have melted by now, and the dough should be firm, but not burnt. Remove from the oven, and let the cookie cool on the cookie sheet until the candied windows have hardened completely. Then remove the GBH piece from the cookie sheet and allow the GBH piece to cool COMPLETELY before moving on to the next step.
I usually allow my cookie pieces to cool overnight, and I assemble in the morning. But hey, that's just me. You can do whatever you want to do, because you are a rockstar.
While you're waiting for your gingerbread house pieces to cool, make your frosting by whipping the ingredients together in a mixer, and placing the fluffy goodness into a piping bag. If you're not going to assemble your house until the morning, wait until the morning to make your frosting.
Prepare the surface where your Gingerbread House is going to live.
You can really assemble your gingerbread house on any number of flat surfaces. I've done so on large decorative plates, on cookie sheets, and on cardboard. My most favorite, so far, is thick white cardboard with foam between the two white boards. I buy big pieces at Office Depot (like this), cut them down so that they're about six inches larger on each side (so a FOOT larger all the way around) than my gingerbread house. I like to have a nice outdoorsy area to decorate, as well as the house itself. By using the thick white cardboard, I have a lovely 'snowy' looking backdrop. It also dusts off fairly easily, although it can show some grease stains should your GBH be a bit greasy. If you find your surface a wee bit greasy, just sprinkle with a bit of powdered sugar, and voilá, fresh snow.
To assemble:
So, I've made a million GBH over the years, and my favorite weapon of choice is the full soda can. Doesn't matter what flavor. I tend to use 7-up, because then my fav hubby can serve up mixed drinks at the GBH decorating party and he simply washes off the cans, pops them in the fridge. Anywhoooo, here's how I assemble my houses.
1. I take one side of my house (the side that doesn't have a cut hole for the Christmas lights). I use the piping bag and frost the bottom edge. I put down the piping bag. I place the frosted edge onto the white cardboard. I prop up the GBH piece with a can of soda on both sides so that the piece stands upright. Kinda like using training wheels for a the BGH piece.
2. I take the END piece of my house (the side that doesn't have a cut hole for the Christmas lights). I use the piping bag and frost the bottom edge. Then I frost the edge of the SIDE piece (the side of the house that is currently being propped up by the 2 soda cans. Then I carefully set this end piece at a 90º angle and press it up against the edge of the SIDE piece. I prop the end piece up with 1 soda can on the outside edge. So you should now have three soda cans, and both pieces should be standing erect (propped up by cans) in the shape of an L or a backwards L.
3. Then, if you want to have Christmas lights, now is the time to insert them into your house. Make sure you adjust the Christmas lights so that the cord leads outside of the house. If you made the archway for the cord in your side piece, then add the side piece now, making sure the cord goes through the archway. If you added the archway to your end piece, you can just add on the side piece now.
4. Then, I frost the bottom of the second SIDE piece. Then, making sure I know which side is to face out, and which side is to face in, I frost the outer edge of the SIDE piece that will butt right up against the END piece. I carefully set it in place, right up against the END piece, and adjust soda cans as necessary.
If you haven't yet added Christmas lights, and want to do so, add them now. Make sure that you thread your cord so that the wire goes through the little archway/cut off corner of your end piece. If you forgot to cut a corner off to make room for the cord, you CAN do it now. Just be VERY gentle. When I trim dried gingerbread house pieces, I scrape a little tiny bit at a time. I NEVER chop. You're less likely to break a piece of you just sort of scrape and scrape and scrape until the edge looks like you want/need it to, or until the little edge piece is cut off for your cord.
4. I then pipe frosting on both ends of the two sides of the house. Then, I take the last remaining end of my house, I pipe frosting on the bottom. Then, I make sure my Christmas light cord goes through the archway in my end piece. Then I press it gently up against the two sides. I prop it up with soda cans.
Then I leave everything well enough alone for quite some time.
Depending upon the size of my house, and my eagerness to continue, I will come back in 15 minutes (or let it rest over night) to see how dry and how hard set everything has become. I usually leave this stage alone for a good couple hours. But sometimes I'm in a big hurry.
Your house should be VERY solid by now, and shouldn't wiggle or jiggle or move at all. So you should be just fine. If your house is still wriggly, I suggest WAITING until it's completely hard before putting on the roof. Or, you may end up with a bunch of roofs on the floor, as if a disastrous 9.0 earthquake has hit 1970's California. Because as we've recently seen, a 9.0 earthquake in 2018 Alaska didn't really do a whole lot to anything other than the roads. And since you're not making a gingerbread road, well, you should be just fine. Once your house is solid and ready for its roof,
REMOVE ALL SODA CANS FROM INSIDE THE HOUSE.
This stage is important.
Because if you don't, you'll have a house filled with soda, and there won't be anything you can do about it until deconstruction time.
Did you double check? No soda cans? Okay. So you're good to continue.
Next up I go to the base of my house and I frost my edges of my end pieces for the roof, and I lay ONLY ONE of the roof pieces down. I borrow a friend, or a husband, or a child, to hold that piece in place. Try not to use the dog to hold the roof in place, because the dog will eat your house. No matter how much they promise not to. If I haven't got one of those, I try to jerryrig the soda cans to prop up the piece.
Double check to make sure all your cans are out of your house.
If not, take out all the soda cans now.
Then I frost the other two edges of the end pieces, *AND* I frost a thick layer across the top edge of the roof (the edge that is going to meet the other roof edge) and place the other roof piece in place. If I have a hubby with more than one hand, or if I have more than one hubby, or if I have a hubby and a kiddo, then I have each of them hold up a side while I put on another layer of frosting between the two roof pieces, JUST to make sure that it's all going to be secure. Adjust the roof pieces as necessary to make the gaps as minimal as possible.
Then I hold up one roof piece while hubby holds up the other roof piece, and we have a nice chat for a few minutes while everything starts to dry and set. I have tried jerryrigging up soda cans for this part, but sometimes a hubby or kiddo works best. Again, not the best job for the dog.
Then, I let the whole thing rest for a bit, or until the roof feels pretty secure, and then I'm all set!
Now, if all of this seems a bit too much of a pain in the catookus for you, they sell ready made houses, fully assembled, at Costco. For $10. Why on Earth would you go to all this hassle of making your own GBH when you can buy a ready made, fully assembled GBH?!? You could skip the whole baking the house part, and go straight for the decorating part.
But.
There are some people out there, people like you, people like me, who want to have that full gingerbread house experience, and want to make their own gingerbread house from scratch.
Maybe we're sadistic and want to make our own designs. Or maybe we want to steal other people's designs. Or maybe we're just nuts.
So for the rest of you who are nuts, like me, knock your socks off and make an awesome homemade GBH. Then send me a picture, so I can steal your idea for next year!
For the rest of you who just want to decorate a house, buy one from Costco. They're the best ones. Honestly. I've made ones from JoAnn's, Michael's the grocery store, and some weird little mini houses that I picked up as a kit from somewhere else. And trust me. After putting together hundreds of houses, the Costco ones are truly my favorite. And you can't beat the price!
I'll write up some decorating ideas in another blog post... along with some pictures of former homemade GBHouses from yours truly.
Meanwhile, enjoy! And happy baking!
* * * * *
For those of you anxiously awaiting book number 2, it is currently on hiatus until the holiday season has passed. I am knee-deep in holiday bliss at the moment, and Jack Diamond and his friends are just going to have to wait until January to pick up where we left off ... editing the final draft!
Meanwhile, if you *HAVEN'T* yet read Jack Diamond book number 1, you can buy it below. Click on the picture, and it'll pop you straight over to Amazon where you can buy the paperback (great stocking stuffer!) or you can buy a copy for your kindle!
Now who doesn't love to read a great murder mystery while snuggled up under the Christmas tree, cocoa in hand, fire blazing away?
* * * * *
I wrote a murder mystery! Here is the link so you can buy it:
You can buy my book in both e-book and paperback on Amazon here: Diamonds for Diamond by Kay Nimitz Smith
* * * * *
November 16, 2018
Granini's Thanksgiving Recipes
Thanksgiving Recipes

This year as I make plans to put together a lovely Thanksgiving dinner, I thought it might be nice to have all my recipes on one page.
Many of my recipes do not (yet) have photos. When I'm making Thanksgiving dinner, I rarely have time to breathe, let alone take photos of the lovely yummy dishes that I'm making. So, alas. I shall try to do better this year.
But for now, here are my recipes:(I will add the links as I post the recipes)
Appetizers and Other Tasty Savory TreatsSpinach Artichoke Dip
Granini's Stuffed Mushrooms
Cream Cheese Red Pepper Dip
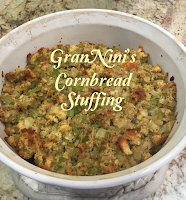
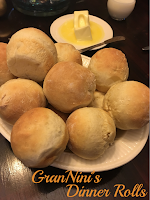
Side DishesCornbread Stuffing / Cornbread DressingMashed Potatoes
Sweet Potatoes with MarshmallowsGravyDinner Rolls (aka Parker House Rolls)Ratatouille (for the vegetarians!)Cranberry Orange Relish
Glazed CarrotsCreamed Corn CasseroleSautéd Green Beans with peppers and onions
Sinful Macaroni & Cheese
Additional Recipes you may want to peruse:
Cornbread
Spaghetti Sauce (for the Ratatouille)
Chicken (or Turkey) Pot Pie for the days after Thanksgiving
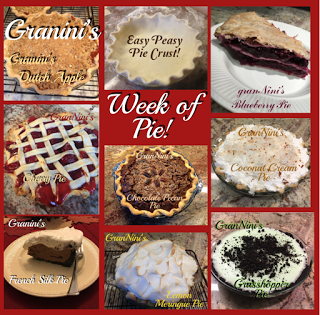
Pies!The week of Pie
(all of my pie recipes in one place)
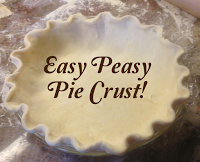
Pie Crust recipe & instructions
Traditional Apple Pie
Dutch Apple Pie with caramel drizzle
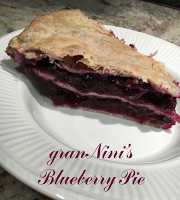
Blueberry Pie (with 3 crusts!)
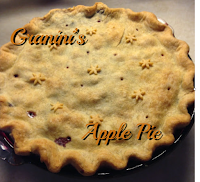
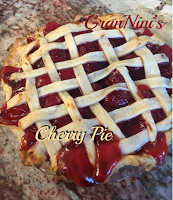
Cherry Pie
Chocolate Cream Pie
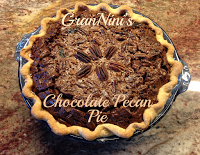
Chocolate Pecan Pie
Chocolate Eclair Pie
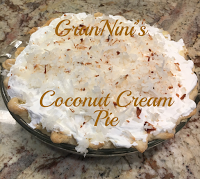
Coconut Cream Pie
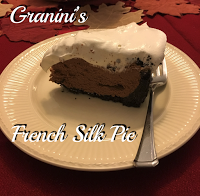
French Silk Pie
(it's a fancy chocolate cream pie with chocolate crumb crust)
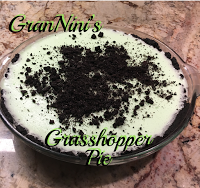
Grasshopper Pie
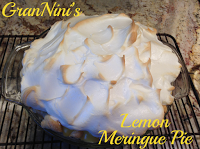
Lemon Meringue Pie
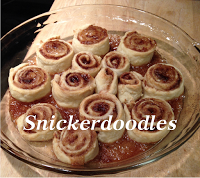
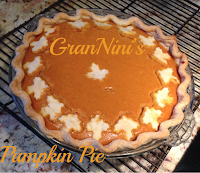
Pumpkin PieSnickerdoodles(What to make with the leftover pie crust)
OR, if you prefer to drool over recipes with pictures, see below:
 Dutch Apple Pie with homemade caramel sauce
Appetizers and Other Tasty Savory TreatsSpinach Artichoke Dip
Granini's Stuffed Mushrooms
Links to all Granini's Desserts and Sweet Treats
Pie Crust
Traditional Apple Pie
Dutch Apple Pie
Blueberry Coffee Cake
Blueberry Pie
Cherry Pie
Chocolate Cream Pie
Chocolate Pecan Pie
Cream Cheese Chocolate Chip Chocolate Cupcakes
Cinnamon Sugar Cookies
Cinnamon Rolls and Caramel Sticky Buns
Coconut Cream Pie
Coffee Cake
Danish Pastry Dough
French Silk Pie
Grasshopper Pie
Lemon Almond Cake
Lemon Breakfast Cake
Lemon Crinkle Cookies
Lemon Meringue Pie
Lemon Pound Cake
Oreo Cheesecake
Oreo Truffles
Peanut Butter Rice Krispie Treats with chocolate on top
Pecan Tassies (Mini Pecan Pies)
Pumpkin Pie
Raspberry Thumbprint Cookies
Sugar Cookies
Snickerdoodles (Cookies made from leftover Pie Crust)
Thin Mint Truffles
* * * * *
I wrote a murder mystery! Here is the link so you can buy it:
You can buy my book in both e-book and paperback on Amazon here:
Diamonds for Diamond by Kay Nimitz Smith
My next book, No One Noticed, is officially in rewrites!! The editor will be getting a copy shortly. I'm SO excited! Now that the second official draft is finished, I feel so relieved. I'm glad I was able to finish it before the mad rush of Thanksgiving! So in between packing for Thanksgiving and making a gajillion pies, I will be running through this draft, and hopefully, within a very short turn around, the editor will get the copy, and we'll be back on track. Yipee!
* * * * *

This year as I make plans to put together a lovely Thanksgiving dinner, I thought it might be nice to have all my recipes on one page.
Many of my recipes do not (yet) have photos. When I'm making Thanksgiving dinner, I rarely have time to breathe, let alone take photos of the lovely yummy dishes that I'm making. So, alas. I shall try to do better this year.
But for now, here are my recipes:(I will add the links as I post the recipes)
Appetizers and Other Tasty Savory TreatsSpinach Artichoke Dip
Granini's Stuffed Mushrooms
Cream Cheese Red Pepper Dip
Side DishesCornbread Stuffing / Cornbread DressingMashed Potatoes
Sweet Potatoes with MarshmallowsGravyDinner Rolls (aka Parker House Rolls)Ratatouille (for the vegetarians!)Cranberry Orange Relish
Glazed CarrotsCreamed Corn CasseroleSautéd Green Beans with peppers and onions
Sinful Macaroni & Cheese
Additional Recipes you may want to peruse:
Cornbread
Spaghetti Sauce (for the Ratatouille)
Chicken (or Turkey) Pot Pie for the days after Thanksgiving
Pies!The week of Pie
(all of my pie recipes in one place)
Pie Crust recipe & instructions
Traditional Apple Pie
Dutch Apple Pie with caramel drizzle
Blueberry Pie (with 3 crusts!)
Cherry Pie
Chocolate Cream Pie
Chocolate Pecan Pie
Chocolate Eclair Pie
Coconut Cream Pie
French Silk Pie
(it's a fancy chocolate cream pie with chocolate crumb crust)
Grasshopper Pie
Lemon Meringue Pie
Pumpkin PieSnickerdoodles(What to make with the leftover pie crust)
OR, if you prefer to drool over recipes with pictures, see below:
Dutch Apple Pie with homemade caramel sauce
Appetizers and Other Tasty Savory TreatsSpinach Artichoke Dip
Granini's Stuffed Mushrooms
Links to all Granini's Desserts and Sweet Treats
Pie Crust
Traditional Apple Pie
Dutch Apple Pie
Blueberry Coffee Cake
Blueberry Pie
Cherry Pie
Chocolate Cream Pie
Chocolate Pecan Pie
Cream Cheese Chocolate Chip Chocolate Cupcakes
Cinnamon Sugar Cookies
Cinnamon Rolls and Caramel Sticky Buns
Coconut Cream Pie
Coffee Cake
Danish Pastry Dough
French Silk Pie
Grasshopper Pie
Lemon Almond Cake
Lemon Breakfast Cake
Lemon Crinkle Cookies
Lemon Meringue Pie
Lemon Pound Cake
Oreo Cheesecake
Oreo Truffles
Peanut Butter Rice Krispie Treats with chocolate on top
Pecan Tassies (Mini Pecan Pies)
Pumpkin Pie
Raspberry Thumbprint Cookies
Sugar Cookies
Snickerdoodles (Cookies made from leftover Pie Crust)
Thin Mint Truffles
* * * * *
I wrote a murder mystery! Here is the link so you can buy it:
You can buy my book in both e-book and paperback on Amazon here:
Diamonds for Diamond by Kay Nimitz Smith
My next book, No One Noticed, is officially in rewrites!! The editor will be getting a copy shortly. I'm SO excited! Now that the second official draft is finished, I feel so relieved. I'm glad I was able to finish it before the mad rush of Thanksgiving! So in between packing for Thanksgiving and making a gajillion pies, I will be running through this draft, and hopefully, within a very short turn around, the editor will get the copy, and we'll be back on track. Yipee!
* * * * *
Granini's Cream Cheese Red Pepper Dip
Granini's Cream Cheese Red Pepper Dip
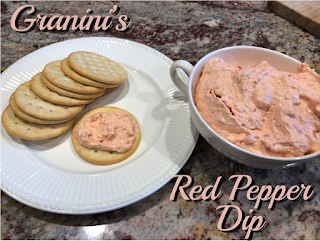
Ingredients:
1 red pepper1 garlic clove, crushed1 (8 ounce) package of cream cheesesmoked paprikacayenne peppercajun seasoning
Directions:
Crush the clove of garlic. Cut the red pepper into small pieces, removing the seeds and stem. Blend together in a small cuisinart. Using a rubber spatula, squeeze as much of the liquid out of the pepper as possible. Add in a dash of smoked paprika, cayenne pepper, and cajun seasoning. Add in the package of cream cheese and blend thoroughly.
Serve with crackers or on veggies
It's so good, you almost won't want to eat the turkey.
For those of you who like pictures, here you go:
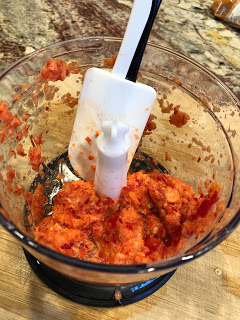 Blend the garlic and the red pepper in a quisinart. Drain any liquid.
 Sprinkle on some smoked paprika, cajun seasoning and some cayenne pepper
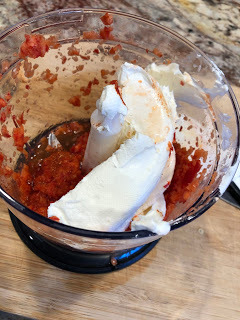 Add in the cream cheese and blend until all mixed together.
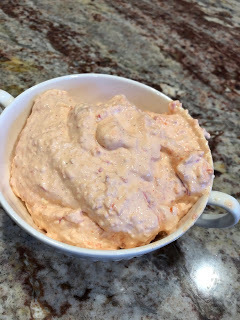 Shlop all of that into a nice dish, and spread onto crackers! or veggies.
If you like those.
Or a spoon.
Or your finger.

Click here for more Thanksgiving Recipes
* * * * *
Buy my book!
Or, you can buy either my e-book or the paperback version on Amazon here: Diamonds for Diamond by Kay Nimitz Smith
My next book, No One Noticed, is still missing a rather sizable chunk in the middle. It was finished. But now it's not. Rewrites suck. But hopefully, if I don't get too distracted by Thanksgiving Pies, it will be finished very, very soon!
* * * * *
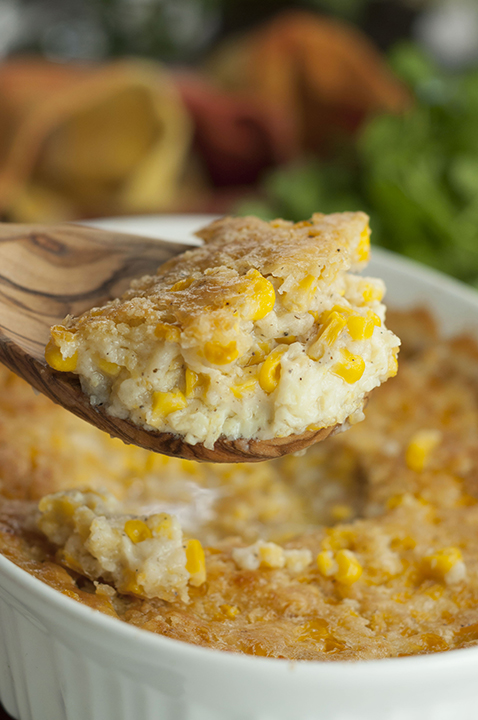
Granini's Creamed Corn Casserole
Granini's Creamed Corn Casserole
 source
Again, I'm sorry the picture isn't mine. I'll post one as soon as I make it again. Mine doesn't have that odd looking crusty stuff on top. But the insides look just like that.
Nowadays, I tend to stick with just heating up a can of corn, or heating up frozen corn, and serving it plain. I have enough items on the buffet that are filled with eggs and butter and sugar and every other way you can disguise a vegetable. But when I was growing up, creamed corn casserole was a staple and a favorite. My father-in-law will eat the entire dish by himself if we let him. I haven't made this dish in years, but it's on the list of things we're serving this year, so I needed to include it along with all my other recipes. It is truly tasty. Even if it isn't even remotely healthy.
Ingredients:
2 eggs1/2 teaspoon salt1 Tablespoon flour1/2 Tablespoon sugar2 Tablespoons melted butter1 can cream style corn1 cup milkdash of pepper
Directions:
Spray a large casserole dish with cooking spray. Beat two eggs in the bottom of the casserole dish. Add in the salt, flour, sugar and butter and mix completely. Add in the can of creamed corn and the milk. Stir until mixed thoroughly. Sprinkle pepper on the top. Bake at 350º for 30 to 35 minutes, or until the top is lightly browned.
Super easy.
Or, you can just open up a can of regular corn, add in a dash of water, allow to heat thoroughly, and then drain and serve. That's even easier. And better for you. Then you can eat more pie.
Enjoy!
Click for more Thanksgiving Recipes
* * * * *Buy my book!
Or, you can buy either my e-book or the paperback version on Amazon here: Diamonds for Diamond by Kay Nimitz Smith
My next book, No One Noticed, is still missing a rather sizable chunk in the middle. It was finished. But now it's not. Rewrites suck. But hopefully, if I don't get too distracted by Thanksgiving Pies, it will be finished very, very soon!
* * * * *
Granini's Glazed Carrots
Granini's Glazed Carrots

source
So I hate cooked carrots.
And I never eat them.
But the thing is, my family loves (!!) glazed carrots. And I mean LOVES them. Loves them as in no matter how many pounds of glazed carrots I make, they will eat them all.
And lick the plate clean.
And ask for more
So that must mean they like my recipe.
So I'll share it with you.
The bummer part is that I've never really written down the recipe. I just wing it. So the amounts may be a little bit off. You'll just have to taste the glaze and see if it tastes just right, and then adjust as necessary. Because, I'm sorry to say, I can't do it for you. If you want to know why, please see below. If you couldn't care less, which I suppose will be 99% of you, please feel free to just read on.
Ingredients:
2 (16 ounce or so) bags of wee baby carrots, OR
3 or 4 large carrots peeled and sliced (at an angle) into 1/2 inch slices (or so)
2 Tablespoons salted butter (if you don't have salted, then just sprinkle on a wee little bit salt)
1/4 cup brown sugar
1/2 teaspoon ginger
1/2 teaspoon cinnamon
1 large squirt honey or maple syrup. Probably 1/8 of a cup? maybe 1/4 of a cup? Depends upon how many carrots. Not too much. Try squirting in just a little, and then tasting it. Then add in more if you need more.
Directions:
**I usually steam the carrots when I have time on Thanksgiving day, and then let them sit in the corner somewhere until I'm ready to make the glaze. I make the glaze as one of the very last things before serving my dinner, because I want them piping hot. Sometimes, I have people start gathering around the buffet before I even start glazing the carrots, just so that they're the last thing out.**
Steam carrots for 5-8 minutes or so, until they're al dente.
Don't oversteam, or they'll be mushy. Drain.
In a large saucepan, melt the butter. Add in the drained carrots, and stir, until they're all coated with butter. If you have a lot more carrots, feel free to add in a little more butter.
Once the carrots are all coated in butter, sprinkle on top the brown sugar, ginger, and cinnamon. Once all the carrots are coated, squirt in a wee bit of honey or maple syrup. Yep, the kind you put on your pancakes. Stir.
Cook on a medium low heat, stirring often, cook for 3 minutes or so, allowing the ingredients to melt and bubble. Do not overheat or the sugar will burn and ruin your carrots. Once the topping starts smelling delish, dip in the tip of a spoon, blow on it (or you'll burn your tongue), blow on it again, and then give it a good taste. If it needs a wee bit more syrup, or brown sugar, or salt, add in just a weeeee bit more, and mix together. Get a fresh spoon (or wash the first), and taste again. If it tastes good, then you're ready to serve immediately. While piping hot.
Enjoy! That is, if you can get any. I'm guessing they'll all be gone before you even make it around to that end of the buffet.
Click here for more Thanksgiving Recipes
* * * * *
So. If anyone cares, here's why I don't eat carrots.
First of all, I hate cooked carrots.
And I never eat them. I don't know what it is about them that I don't like. The mushy texture, the weird taste? I've tried smothering them in gravy, but that's usually the only way I can gulp them down. But now, get this...
I'm actually allergic to them.
Which is awesome.
Because when you're allergic to something and you hate that something, and you can NEVER EVER EVER eat it again, it's a fine thing.
Best excuse ever.
Because when you're allergic to something and you love that something, and you can never ever ever eat that again, it's a very, very sad thing.
And I know this from first hand experience.
Because I am allergic to SO many things, and I still crave them. Dream about them. Yearn for them. And it's a sad, sad thing.
But, the funny thing about carrots is that I'm not actually allergic to carrots. And no, I'm not cheating. It's that I'm allergic to birch trees. Evidently my body thinks that carrots are birch trees, and every time I try to eat a carrot, my throat closes off, my nose plugs up, and I start going into anaphylactic shock. Because my stupid body can't tell the difference between a carrot and a birch tree.
Which is ridiculous.
But true.
And why I never have to eat my vegetables ever again.
hahahaha.
And I'm not even joking.
* * * * *
Buy my book!
Or, you can buy either my e-book or the paperback version on Amazon here: Diamonds for Diamond by Kay Nimitz Smith
My next book, No One Noticed, is still missing a rather sizable chunk in the middle. It was finished. But now it's not. Rewrites suck. But hopefully, if I don't get too distracted by Thanksgiving Pies, it will be finished very, very soon!
* * * * *
Granini's Holiday Green Beans
Granini's Green Beans
 source
Sorry it's not my picture. I'll try to take one at some point... But I wanted to get my recipes up, and this is as close to what mine look like as I could find.
Ingredients:
2 Tablespoons olive oil1 clove minced garlic1/3 diced red pepper1/3 diced onion1 package Trader Joe's frozen green beans. I get mine from Trader Joe's, because they're delish, and easy, and I pop open a bag and just dump out a few as needed whenever, and then pop it back into the freezer. But that's just me. Now, if you have access to FRESH green beans, and you don't mind putting someone else to work popping off the ends and de-veining them, by all means, use those! Give them a quick wash and a drain, and follow the recipe below. I, however, can never seem to find lovely green beans that are fresh at the end of November. And I NEVER EVER use canned green beans. Because that's mushy. And these are not. These, these are lovely.1 teaspoon onion powder1 teaspoon garlic powderdash of saltdash of pepper
Directions:
In a large skillet, heat olive oil. Add in minced garlic, red pepper, and onion, and sauté for a few minutes. Add in the frozen green beans and toss them around. Cook for a few minutes until they are no longer frozen. Sprinkle on onion powder, garlic powder, salt and pepper. Serve.
Super easy.
And always the second to last thing I serve at Thanksgiving. The last thing I serve are my glazed carrots. But these are the second to last. I don't even start making them until everything else is sitting on the buffet, ready and waiting.
Hey, I wonder if any of you want to see my crazy Thanksgiving to do list, which tells me exactly when to put what in the oven, and when to make whatever, and organizes the whole thing for me. I also have a shopping list. And it's organized by store. And by dish. And by ingredient. And there's a whole separate spreadsheet just for pies. If I posted that link, do you think it might be helpful? Hmmmm.
Anywhoo, these green beans are super tasty and delicious, and the red peppers add a pretty contrasting color to the bright green of the beans. And I'd like to shout out a special thank you to my sister-in-law Adrienne for making them this way a hundred years ago at her very first Thanksgiving dinner with our family. I'd never seen them done like that before, and I've been using her idea ever since. So here's to Adrienne! Thank you!
Enjoy!
Click for more Thanksgiving Recipes
* * * * *Buy my book!
Or, you can buy either my e-book or the paperback version on Amazon here: Diamonds for Diamond by Kay Nimitz Smith
My next book, No One Noticed, is still missing a rather sizable chunk in the middle. It was finished. But now it's not. Rewrites suck. But hopefully, if I don't get too distracted by Thanksgiving Pies, it will be finished very, very soon!
* * * * *
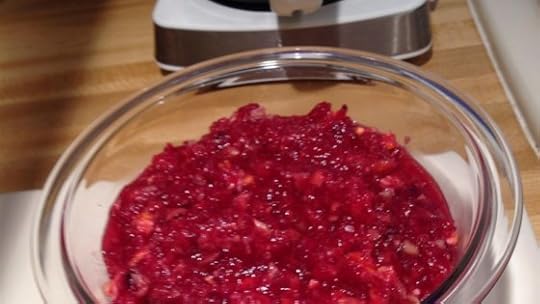
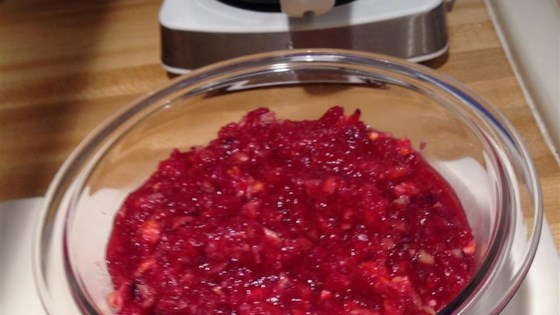
Granini's Cranberry Orange Relish
Granini's Cranberry Orange Relish
 Source
Again, I apologize for not using my own pic. I promise I will do my best to take pictures this year! I say that every year though. So perhaps you'd best not hold your breath. I do know the number for the paramedics, should you hold your breath, and turn blue, and start to pass out. Or actually pass out. But if you're all the way over there, and I'm all the way over here, however am I going to tell when it's time to call them?! So maybe, just this once, don't hold your breath.
Anywhoooo...
My recipe for cranberry orange relish, which I prefer to call:
Mmmmm. Thanksgiving Jelly. Mmmmmm.
is a recipe I made up a gajillion years ago. I've seen many people make variations of the recipe, but their's never seemed to come out sweet, and not bitter.
So I looked up "how not to make cranberries bitter" and found out that if you cook them too long, THAT'S why they turn out bitter!!! Good to know!And now YOU know too!So yay me for sharing!
I don't like bitter.
So the trick to this recipe is to only cook the cranberries until the very first few cranberries start to pop.
So here we go:
Ingredients:1 bag (12 ounces) fresh cranberries1 cup water2 peeled and roughly chopped satsuma oranges. You know, the sweet little oranges that you can eat five of at lunch time before you realize that you should probably stop.3/4 cup sugar1 teaspoon lemon zest1 cup water
Directions:
Wash the cranberries. Don't bother draining them, just plunk them into a saucepan. I prefer a nonstick saucepan because they can get a bit 'stainy,' and that's just what I prefer. Easy clean up.
Peel and roughly chop up two satsuma oranges. Plunk those into the saucepan.
Add in one cup of water. Ish. A little more or a little less won't kill you.
At this point, bring those items to a boil on medium high, stirring away every now and again. But keep your eye on them, because you only want to cook them JUST until the first few cranberries pop. And by pop, I mean kinda burst open in a rather traumatic way.
Once two or three cranberries have popped, add in your sugar and your lemon zest and turn down the heat to a simmer. Stir merrily away as necessary, and allow the rest of the cranberries to soften up, about 7 or 8 minutes or so.
Remove from heat and allow to rest.
Do NOT be tempted to overcook.
They WILL soften up on their own when you let them rest.
And if you overcook them, they will be nasty bitter.
And who likes bitter cranberries?!?!?!
Blech.
So just cook them like I suggested, then take them off the heat and let them sit on the counter until they're cool enough to chill in the fridge.
Once the mixture has cooled, place it in an airtight container (so that it doesn't spill over in the fridge and then STAIN EVERYTHING IN SIGHT, which it will, because it's a sneaky little toad), and then let it chill completely.
I usually make my thanksgiving jelly, er, um, I mean cranberry orange relish, about two or three days before thanksgiving. Because frankly, I'm usually too darned busy making pies to make jelly on the day of thanksgiving. I mean really, this year I'm making sixteen pies. Blissful sigh. It's no where near my magical week of twenty three thanksgiving pies. Alas. I'll just have to make do with only sixteen. Sixteen should keep me on my toes. Or at least give my arms a wee bit of a work out before the BIG DAY, my most FAVORITE DAY, the DAY OF GLUTTONY!
mmmmmm. Gluttony. mmmmm
Click for more Thanksgiving Recipes
* * * * *Buy my book!
Or, you can buy either my e-book or the paperback version on Amazon here: Diamonds for Diamond by Kay Nimitz Smith
My next book, No One Noticed, is still missing a rather sizable chunk in the middle. It was finished. But now it's not. Rewrites suck. But hopefully, if I don't get too distracted by Thanksgiving Pies, it will be finished very, very soon!
* * * * *
November 14, 2018
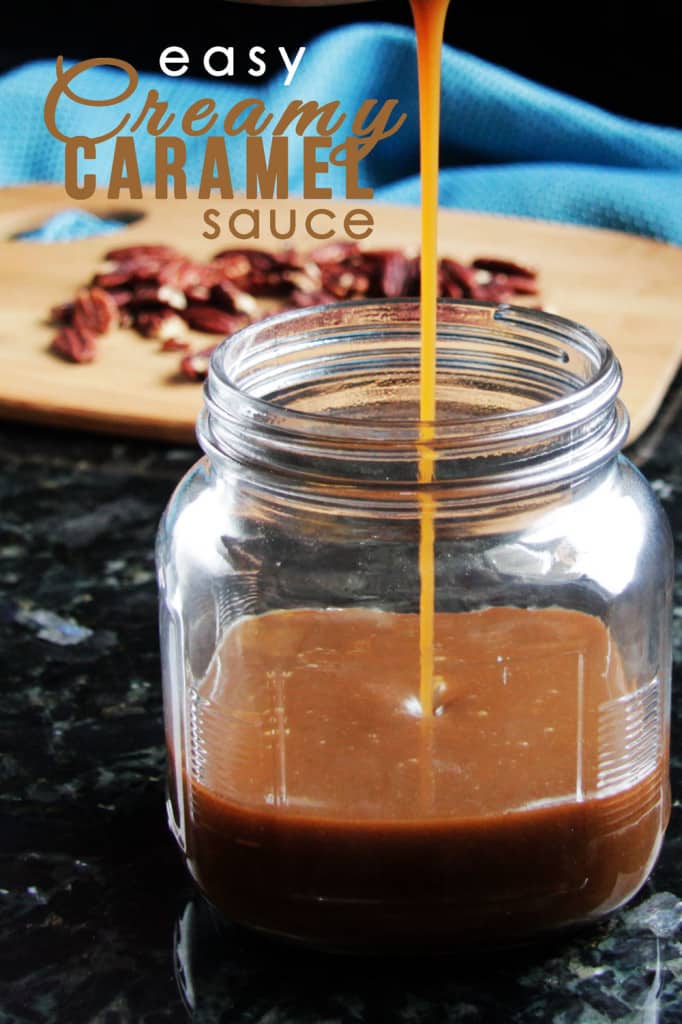
Granini's Homemade Caramel Sauce
Granini's Homemade Caramel Sauce
 source
I was so grateful to come upon this recipe for homemade caramel sauce when I was pinteresting one day. The first time I made it I was eager with anticipation. Now I almost regret having made it, as it is SO good that I can't ever go back to anything else.
It is a simple and easy recipe. And it tastes mmmm good on top of, well, anything. But it particularly tastes yummy on my apple pies.
Ingredients:
3/4 cup butter1 1/2 cups brown sugar2 Tablespoons water1/4 teaspoon salt (if you're using unsalted butter. If you're using salted butter, no need to add in the extra salt)1/2 to 3/4 cup evaporated milk *1 Tablespoon vanilla
Directions:In a heavy saucepan, add butter, brown sugar, water, and (optional) salt. Cook over medium heat until the butter begins to melt.
Allow the mixture to boil for five minutes. It will bubble. A lot. Just keep stirring. Constantly.
Once the five minutes are up, remove from heat. Slowly pour in the evaporated milk and stir completely. Mix in the vanilla.
When you dip in your spoon to taste, because you're going to have to, make sure you blow on the spoon first to cool the caramel down. It is mighty hot, and you will burn every.single.taste.bud.off.your.tongue. And then you won't be able to taste the caramel on your pie! And that, my dear, is a travesty.
If you happen to have any of the caramel sauce leftover, simply pour it into an air tight container and keep it in the fridge. Mine never seems to last very long in the fridge -- not because it goes bad, but because I'm a fat chick with a sweet tooth, and there's no way I'm going to allow a container of caramel sauce go to waste.
And I promise, neither will you.
Enjoy!
Yummmm!
Click here for more Thanksgiving Recipes
Or for more of my pie recipesclick here for The Week of Pie
*Now, once upon a time, I got my evaporated milk and my sweetened condensed milk all mixed up in my head. It happens. Particularly when I'm at the grocery store, and I'm supposed to buy the one for the pumpkin pie, and I can't remember which one it's supposed to be, and they're all out of the pumpkin I like, so I can't even look at the back of the can of pumpkin for their recipe to see which one they use, and my phone's internet is not connecting in the baking aisle, and people are pushing and shoving and irritated because they have to bake and cook for their relatives, and their stress levels are growing by the instant, and I'm all alone. So yeah. It happens.
So. This one time I made this caramel sauce with sweetened condensed milk rather than evaporated milk. And that one time, well, let's just say I was not disappointed!! I'd be curious to taste the two recipes side to side, to see which recipe I preferred. And I'm thinking if you used the sweetened condensed milk you could probably cut back on the amount of brown sugar that you need for the rest of the recipe. Perhaps I shall do an experiment in January when my sugar coma has subsided from all the holiday treats, and I'm yearning for something delish to experiment on.
Maybe I'll just do that.
* * * * *Buy my book!
Or, you can buy either my e-book or the paperback version on Amazon here: Diamonds for Diamond by Kay Nimitz Smith
My next book, No One Noticed, is still missing a rather sizable chunk in the middle. It was finished. But now it's not. Rewrites suck. But hopefully, if I don't get too distracted by Thanksgiving Pies, it will be finished very, very soon!
* * * * *
Granini's Traditional Apple Pie
Granini's Traditional Apple Pie
 Actually, this picture is a total sham. This is actually a picture of my blueberry pie. But honestly, when the pie's lid is on the top, can you reallllllly tell?
My traditional apple used to be the star of the show. It has a light and crispy tender pie crust, two types of mouth watering apples, it tastes fantabulous served piping hot with vanilla ice cream, and is equally as delicious served stone cold with a slice of sharp cheddar cheese. Or vanilla ice cream.
And everyone loved it.
That is, until I made a Dutch Apple Pie for a friend.
With homemade caramel sauce.
And then my family looked at me with a deeply offended glare, wondering why I ever made them suffer through my traditional apple pie when this whole time I could have been making Dutch apple pie.
My favorite sister-in-law still loves and adores my traditional apple pie the best. And so, for her, I'll put my recipe up here. I got the recipe from the Oregonian a gajillion years ago. Evidently some guy named Nicholas Hooten made it and won all sorts of awards, and had his recipe posted in the newspaper. Back when there were such things as newspapers. That's how old this recipe is.
The awesome thing about this pie is that it caters to those folks who like sweet apples, those folks who like sour apples, those folks who like their apple pie apples crunchy, and those folks who like their apple pie apples mushy. Everyone is happy with this pie. It is mouthwatering delicious. Truly, a to-die-for pie. And up until the day I started making Dutch Apple pie with homemade caramel sauce, this pie was lauded as one of my all time best pies I ever made.
And for those of you who are seeking that one recipe to beat all recipes, here it is. Sir Nicholas, as I like to refer to him, did a mighty fine job of coming up with a delicious traditional apple pie recipe, and I'll share his recipe with you here.
Ingredients:
2 pie crusts, uncookedEnjoy!
6 sweet apples1 teaspoon cinnamon1 teaspoon nutmeg1 cup sugar2 Tablespoons flour2 Tablespoons butter
6 sour apples (like Granny Smiths)1 Tablespoon lemon juice1 teaspoon cinnamon1/2 teaspoon salt1 cup sugar3 Tablespoons flour
Directions:
Make 2 pie crusts, but don't bake them just yet. Allow them to rest for at least 15 minutes before rolling. Line the bottom of a pie plate with one of the crusts.
Peel, core, and slice the sweet apples and place them in a large microwaveable bowl. Cover them in the cinnamon, nutmeg, sugar and flour. Stir to make sure all the apples are coated. Plop in the butter. Pop the whole thing in the microwave and microwave on high for 20 minutes. Yes, 20. Your whole house will smell like heaven after about 10 minutes. While the apples are cooking in the microwave, peel, core, and slice the sour apples.
When the sweet apples are finished in the microwave, allow them to cool a bit on the counter while you finish up with your sour apples.
Peel, core and slice the sour apples. Place them in a large bowl. Cover them in the lemon juice, cinnamon, salt, sugar, and flour. Stir to make sure all the apples are coated.
Once the sour apples are ready, take a pastry knife, or simply use a couple of regular knives, and cut and mash the cooked sweet apples until they resemble apple sauce.
Pour the sweet applesauce into the awaiting pie pan. Set the bowl aside so that you can lick it clean later. Yeah yeah, you'll wash it too. With soap and everything. Or even put it through the dishwasher. But you know what I mean. Then, carefully pour in the sour apples on the top. If you're on the great British baking show, you can place each apple slice by hand into the pie dish in a beautiful arrangement. But, since you're here in America, and since your pie is going to have a crust on the top, feel free to just pour that whole mess into your pie plate, making sure to mound them toward the middle.
Roll out your remaining pie dough into a large circle. Carefully lay your pie crust on top of your mound of apples. Trim the excess dough from around the edges. Pinch the lower crust and the upper crust together, and then make a decorative pattern around the edge. Pierce the top of the pie crust in several places to allow the steam to leave the pie. If you don't do this, the steam won't be able to escape, and your crust could end up soggy. And no one likes a soggy bottom.At least according to Mary Berry.
Meanwhile, you can use any excess pie crust to make decorations for the top. Or you can make snickerdoodles. Either way, your mouth will thank you later.
At this point you can choose to sprinkle on some cinnamon sugar on top of your pie crust. Or you can cover it with an egg wash. Or you can cover it with both an egg wash and a sprinkling of cinnamon sugar. Me? I prefer a naked crust. Because I inevitably smother my pie with French vanilla ice cream and homemade caramel sauce. But that's just me.
Pop that whole heavy mass of a pie into the oven and bake at 350º for 45 minutes to an hour, or until the bubbly goodness inside is thick and not watery.
Serve hot or cold. But either way, make sure you serve it with French Vanilla Ice Cream.
And, if you want to be decadent, with homemade caramel sauce.
For those of you who like pictures, I have several, but not all...
 Here's a sideways picture of me popping out some maple leaves out of leftover pie crust. I try not to roll out my dough more than once. So if I have a whole large strip left over, instead of mashing it into a ball and rolling it out again, I simply lay it out flat, and then cut out my pieces.
So first things first, peel, slice and core your apples.
You can use a fancy machine like this:

 Your apples can come out looking like this, and you can slice them yourselves, or you can get the machine to slice them into relatively perfect, evenly sliced wedges. 'sup to you.
Once they're sliced, add in the cinnamon and sugar and so forth, pop the whole thing into the microwave, and then cook them for 20 minutes.
 I know you can't smell this, but it smells like heaven. Mmmm. So tempting. And so difficult not to eat the whole thing just like this.
 Use your pastry knife to mash them all up.
 And place them in the bottom of your unbaked pie crust.
 Then slice up your sour apples.
 And put cinnamon, sugar and the rest on top, and mix together.
Then put the sour apples on top of the sweet apple mush, cover with a pie crust, cut a few holes out for steam, and bake.
Yummmm!
Click here for more Thanksgiving Recipes
Or for more of my pie recipesclick here for The Week of Pie
* * * * *Buy my book!
Or, you can buy either my e-book or the paperback version on Amazon here: Diamonds for Diamond by Kay Nimitz Smith
My next book, No One Noticed, is still missing a rather sizable chunk in the middle. It was finished. But now it's not. Rewrites suck. But hopefully, if I don't get too distracted by Thanksgiving Pies, it will be finished very, very soon!
* * * * *