Rachel Preston Prinz's Blog, page 3
February 17, 2016
Our Earthship Survey
In 2014, we started collecting information from Earthship owners, builders, and renters in an online survey. The questions we asked were: Have you owned, rented, or built an Earthship?What is the Zip Code of your Earthship? (We collect this for climate analysis)Was your Earthship designed or built by Earthship Biotecture?In what year was your Earthship finished?If you built your Earthship, how long did it take you to build it?How long have you lived in or did you live in your Earthship?Do you still own or rent your Earthship?If you do not still own or rent your Earthship, why did you sell it or move?Is/was your Earthship a standard or custom design?Did you purchase drawings? If so, how much did they cost?What was the cost to build your Earthship? Does this include your own time?Is your Earthship oriented due south?If your Earthship has slanted glass, does it tend to overheat in the buffer zone/greenhouse? If yes, what is too hot by your standards?If your Earthship overheats, is it doing so year round or certain months only?Does your Earthship have the buffer zone/greenhouse separated from the body of the house by windows and doors?If the buffer zone/greenhouse is separated by windows and doors, are they pre-fabricated exterior grade doors and windows or custom made doors and windows?Do you use custom diagonal shades on your slanted front windows?If you look out from your slanted windows, is the ground higher than the floor you are standing on?Did you have any issues with the aluminum cans in your build during construction or after completion?Do you know how many tires you used?Did you have any issues with the tires in your build during construction or after completion?Did you have any issues with the glass bottle walls in your build during construction or after completion?What type of finishes did you use on your wall?Do you have pets? Have they had any impact on your use of the home?Does your Earthship utilize a cistern or is it connected to city water? Is it an open cistern or closed?Does your roof work like a teacup (have a V in it for water collection) or is it a shed roof draining to one side of the house?Do you utilize a solar electric system?Are the planting beds at or below the ground level?Are you able to grow all the vegetables you would like in your Earthship?Do you have any pest issues in your Earthship?Are you using composting or flush toilets?Are there any issues with your systems?Does your septic include an exterior blackwater recharge area?Do you find your earth-bermed rooms in the habitable area to be cold or dark?Are your rooms on multiple levels? Has that ever not worked for you? (i.e. have you had trouble while on crutches or in a wheelchair, tripped, etc.?)Are you as satisfied with the Earthship today as when you moved in or decided to build it?Do you feel like you got a great deal on your Earthship?Would you like to be made aware as new questions get asked, or as we collect the data from these surveys and share it? Read: Would you like to be added to our mailing list?Is there more you would like to share? Do you have ideas you think would make them better or tweaks that you used successfully that you want to pass on? Asking these questions allowed us to collect and analyze the data on the Earthships, including climate data, without assuming that we knew what the outcome would be. This gave us access to unbiased information which we used to build upon the foundations of our research.
if you would like to submit your answers for the survey, please add to the conversation HERE.
if you would like to submit your answers for the survey, please add to the conversation HERE.


February 16, 2016
Givin it all away
So here's the deal. I, and many of my co-authors, ran out of steam for the earthship idea halfway through writing the first Hacking book. That's why we moved on to helping you design a home that speaks to your place, culture, and desires in the second half.
We just cannot argue with
A) the research... the standard earthship models don't work as designed,
B) the mythology... that's full of fluffy yarns spun into a tale of total sustainability bull, or
C) the dated aesthetic.
I hear day and day out now from former earthship wanters that they really want...
MORE. BETTER. AFFORDABLE. NATURAL. NOW.
and despite the jackhole stalker who posted a scary and many kinds of of factually wrong Amazon review and tried to make me a bad guy because I share the truth and think bigger, (what? Zen doesn't matter? Teaching people how to be empowered through design doesn't matter? You LIVE in a space! It SHOULD feed your soul! And where you build matters very much!)
1) I KNOW MY AUDIENCE, (AND LOVE YOU! MUAH!) and 2) I aim to please.
So here it is.
Every week, starting this week, I'll give away another section of the book. FOR FREE. Here. And I'll update them with new info as it comes available. I'll leave the intact first edition of the book up for sale for those who want to buy it so they can have a one-workbook approach to designing their perfect home. I might even update the second edition that myself and the guys who WERE Earthship Europe have been building since immediately after the book came out last year. Because better IS doable. It's possible. It's affordable. It's natural. And it's BULLSHIT FREE! WOO HOO! Their version of it is called Permahome.
And, as it happens, as I intended to in the book, I started the non-profit called Architecture for EveryBody so I could share more with you! Because I believe that architecture and design improve lives and that just because people are not wealthy doesn't mean they don't deserve an awesome home. And until I wake up and my good eye isn't working any more at all, I will do everything in my power to EMPOWER you with good design! And I've brought on all the former authors and 20+ NEW ones to talk about earth sheltering and design around the world!!!!
That's my promise to you. We WILL help you through it!Peace. And GOOD LUCK!

August 11, 2015
Tiny house class in Taos has a new name and new number
filler

fill
Buy the book nowThe University of New Mexico just updated the course name and the reference number. For those interested in registering, the new name is Design for Green Building CRN#55475 :-D
Hacking the Earthship will be our text.
Download a pdf here, purchase online or purchase in class.
We're looking forward to a tiny house design chapter and sharing lessons learned in the next edition.
The Semester starts next week in Taos. Hope to see you there.
August 3, 2015
Quick and Dirty: What does an Earthship cost to build versus a "traditional house"?
So someone found us the other day by googling this question:
What does an Earthship cost to build versus a "traditional house"?
And the Answer is:
It Depends! Always with the "It depends" thing... yes. I know. LOL!But it does. It depends how much of an earthship you build, how much you build yourself, how many volunteers you have, how much your plans cost ($50k is not unusual for a custom home... including earthships... and that's not mortgageable!), etc.
The EASIEST answer is this:
A normal Earthship, built in Taos by the powers that be... costs $225 per square foot.
A normal house, built nearly anywhere in the US, will cost you probably
$150 per square foot, if you do the "green" version.
So you are paying $75 per square foot more... plus... in many cases, that doesn't cover the entire cost of the earthship. If you live somewhere like Alaska, where solar energy storage is challenging
because of low light levels for part of the year,
you can add another $75k to the cost for solar batteries.
But here's the kicker! A research study conducted by the website RealAssetsJunkie.com noted that the resale cost of an Earthship averages $191 per square foot (PSF). This means that a builder stands to lose up to $34 PSF if they choose to resell their home. An average Global Model Earthship is 1,700 square feet, which results in:COST TO BUILD 1700 X $225 = $382,500(-)RESALE VALUE 1700 X $191 = $324,700 NET LOSS = $ 57,800 To help address these issues, a great floor plan, an inviting home, and thus, great detailing, is required. Start with our section Secrets of Great Curb Appeal for more information about how to build a home that people will pay more to buy.♥
Buy the book now
July 26, 2015
It's THAT time of year again: the monsoons have been dr...
It's THAT time of year again: the monsoons have been drenching the fertile soil with a nightly dose of liquid gold and the mushrooms are springing forth like treasures to be hunted in the mist. The weather is warm, but not too hot, and the nights are getting cool again. Its the Goldylox Effect in action; this time of year Taos is like a little slice of heaven.
This time last term I was burning the midnight oil. I remember one particular night I was planning the curriculum for another semester of Green Building at UNM Taos, and drafting and editing text for Rachel's soon-to-be published Hacking The Earthship. I was straining to imagine how best to guide a new group of students through an analysis of buildings, systems and materials, as well as their impacts, interactions and footprints.
It was after midnight (even my cat had ceased to weave between my legs) and everything was still, except my fingers at the keyboard. All were asleep, but a perfect storm was brewing. I was charting a course through familiar waters, leading a group of students in an exploration of Natural and High Performance Materials but with a twist: we were hoping to select materials for our class project, a TINY High-Performance Trailer-House.
What I needed was an outline, some bones to stick the meat to. The structure was right in front of me, blurry through my sleep deprived eyes. The scaffolding I needed to frame our selection was outlined in Rachel's text: in her chapter on the Enclosure System, she introduces several different wall systems using a common format, just what I needed. With her blessing my students used this framework to evaluate materials, energy and waste treatment systems for our Tiny House.
We created a form, much like the one used in chapter seven, to evaluate wall materials. Last term my students and I took that framework and ran with it. Based on the information we reviewed and the design criteria we set, we decided to use an enclosed cargo trailer as our platform. It already has a weather-proof shell, and just needs insulation.
Over the course of the term we experimented with insulation materials. Inspired by a start up called Ecovative (https://en.wikipedia.org/wiki/Ecovative_Design), we attempted to grow insulation out of cardboard and mushroom mycelium. We have a long way to go but I'm ready to try it again this year. Last term we developed a great design and collected a lot of necessary materials. This term, we will focus on systems. We will finalize the floor plan, then the plumbing and mechanical/electrical plans... then, if we have the right group and and we stay focused, we will build the systems hands-on with help from local experts.
Comparing this year to last, I can say one thing for sure: this year I have it easy because Hacking the Earthship is here and we'll be using it as our class text. Register for CRN 54214 CNST 293 804 Topics: Green Building at UNM -Taos.
Thank you Rachel Preston Prinz and Archinia! And thank you to Mark Goldman and Luis Moya of the Taos Sustainability Institute www.sustaintaos.com/ ; Daniel Garvey and Prescott College www.prescott.edu/ ; Antony Brown and the Ecosa Institute http://ecosa.org/about/ ; Pliny Fisk III and the Center For Maximum Potential Building Systems www.cmpbs.org/ ; the U of O Holistic Options For Planet Earth Sustainability Conference www.hopes.uoregon.edu/ ; Bryan Bell and Design Corps https://designcorps.org/ ; John Quale of the UNM School of Architecture and Planning www.saap.unm.edu/ ; and all of you readers.
This is going to be fun! Want to learn more and stay involved?
Contact TeachingTinyTaos@gmail.com
 Asha Stout Taos, New MexicoAsha Stout serves on the faculty at the University of New Mexico-Taos where he teaches hands-on building and design courses in the Green Technology Program. Asha has experience in conventional to radical off-grid building, sustainable forestry, wildland firefighting, and disaster response. These perspectives inform his view of safe housing as an unalienable right and ecological restoration as a grave necessity. Asha is passionate about the pursuit of “Lomakatsi” - life in balance. Asha offered insights into how we could address sustainability in entirely new ways. Buy the book now
fill
June 18, 2015
Adapting your #home to changing circumstances: #UniversalDesign Tips and Tricks for #Accessibility
Most home designers these days fail their clients in regard to the long-term livability of their homes. We build homes that cannot easily be modified when someone becomes disabled or ill, or when our child is born with special needs.
Universal Design makes architecture that works for everybody, whether they be in a wheelchair permanently, on crutches for a couple of weeks, just having a little issue with “a hitch in their giddyup”, or even are just too little to manage bunches of steps and tight pathways. We find that our clients love the ease of getting around in spaces designed on Universal Design principles, and believe it or not, it also reduces the efforts required in mundane tasks like cleaning, which can be a bear when hoisting a vacuum and cleaning supplies up and around steps and landings. What is awesome about this, for us, is that many users of Universal Design in their home designs are finding that they are ready-made for the market for Baby Boomers who want something a little more manageable to buy for a home. So, they are selling their homes for a premium.
Here are the ways we can tweak the home’s design to make it work for everyone:
Use 1:12 slope ramps instead of single steps. Use a 3 foot door with a threshold less than ½” high. Make a lightly textured non-slip path 36 inches wide and without steps from the street curb and driveway to the home entrance. Use 1:12 slope ramps as needed and place 36” long landings at top and bottom of any ramps. Use handrails at locations where the path has a drop off of 12 inches or more at the side. Place trees so they do not drop berries or leaves onto the path. If trees already exist, make sure to maintain the path free of debris. Provide path lighting on the major access to the house. Provide a handrails and good lighting at steps. Have a ground floor bedroom and complete bath. Place the washer and dryer on the main floor and use front-loading machines. Design halls and stair treads at least 36 inches wide. Use one landing for every 10 steps in a staircase. Provide a light switch at the top and bottom of stairways. Have a 5 foot square space available inside and outside at the front door. Cover the front entry so it is weather protected. Provide exterior lighting at the front door. Have a wipe off mat on both sides of the door to keep dirt and pollen minimized. Kitchen and Bath
Use sinks that can be “pulled in to”, without casework below, and install them 34” above the floor. Vary the height of countertops so little ones and big people can use them too. For instance, really tall people might want to use a kitchen cabinet in the bath. Those extra inches of height can keep a back from going out! Provide extra-long hoses for spray attachments. Use lever handles, not knobs, on sinks, baths, and tubs and use one handle to control both hot and cold water if at all possible. Locate the handles and faucet at the side of the sink instead of the back if possible. Locate the kitchen close to the entrance where you bring groceries in. Have a fire extinguisher located within easy reach between 27 and 48 inches above the floor. Use a sink 6 ½ inches deep. Use a dishwasher, and any other appliance, with button or push controls instead of knobs. Use heat resistant countertops. Use a side-by-side type refrigerator with sliding shelves and a water and ice dispenser in the door. Store heavy pots and pans in bottom shelves and drawers. Mount the oven with the top pull less than 48 inches above the floor. Use a range with push button controls at the front instead of sides. Provide a shower bench in a walk-in shower with a 36 wide opening at the entrance. Have a shelf for shampoo and soap in the shower at 48 inches above the floor or below. Provide a hand-held shower sprayer with extra-long hose (these are great for washing dogs and little ones too!). Add 1 ½” textured grip grab bars to the bath, toilet, and shower or install blocking for them, when framing the walls. Use a raised toilet seat. Use a door that opens out instead of in. Have a 5 foot wide circle open between all the fixtures and cabinets. Have a sitting bench on the edge of the tub. Have a non-slip bathtub and shower floor. Make the top shelf of the medicine cabinet less than 50 inches above the floor. Use a tilting mirror. For wheelchair users, leave 42 inches of open floor space on one side of the toilet. Locate the TP holder at 27 inches above the floor. Use shelves less than 12 inches deep throughout. Use lazy-susan corner cabinets. Use rolling carts under counters. Use pull-out shelves. Use height-adjustable cabinets and closet shelves. Use loop or lever shaped drawer pulls and handles. Use easy-gliding hardware. Locate some wall cabinets at 48 inches above the floor or lower. Use cabinets on 6 or 8 inch tall toe kicks (spaces under the bottom shelf for toes to go underneath). Use clothing rods 22 inches to 44 inches above the floor. Use drawers 40 inches or less above the floor. Use 18 inch deep or less shelves in closets and pantries. Locate the light switch in pantries and closets close to the entrance. Use 3 foot wide doors throughout, with 18 inches minimum of clear floor space on the handle side of the door. Use 5inch long lever type handles that curve towards the door and hinges with the tension reduced on them. Set them at no higher than 44 inches above the floor. Use swing-clear door hinges. Electrical
Locate switches and thermostats less than 48 inches above the floor. Locate outlets 27 inches or higher above the floor. Provide direct and indirect lighting in every room. Switch lamps at the door of the room they are in. Use nightlights in night-visited rooms like baths and kitchens, as well as the halls between them. Use non-slip flooring.Use low pile carpets with a firm pad.Secure the corners and edges of rugs.
Of course, some of this costs more. We are offering all the suggestions we know of, because we have a wide range of clients to serve. Some people will want all of this and will be happy to pay for it. Others maybe not so much. Just know that you do have a choice!
June 15, 2015
Why you should NOT retrofit your home to be more " like an #Earthship ”
Recently, I got an email asking me what could be done to an existing home to make it “earthship-like”. The text of the email I received was this:
Hi, do you know of any resources available about converting an existing
traditional home structure into an "earthship" or more sustainable design?
It would seem to be an important niche, especially if a simple system could be
installed that easily bypasses traditional water/electric/waste systems.
Thank you.
I offered that you wouldn’t really want to do that with a bit of justification why, and we built on the conversation over a couple of days. During that time, the asker let me know that they had also asked the Earthship concept's main cheerleader/builder about what could be done to retrofit a traditional home to be more Earthship-like, and they were offered some ideas.
The asker shared the response with me, and I am sharing the four ideas they were offered with you today… because the better part of what they were offered was TERRIBLE ADVICE. It was so bad that it took me a couple of days to begin to formulate a response. Even then, I was so distraught about how to actually help them that I called in backup... bringing in Marcus Lewitski, the founder of what was Earthship Europe (now Permahome), to help explain WHY these are bad ideas.
So. Let’s just start at the beginning - we don’t really know here what we are dealing with. Before ANY answer should be offered, we need to establish some baseline criteria by answering two important questions.
1) WHERE IS THE BUILDING? There is no way to know what type of design techniques will work without knowing where the building is. The orientation of the building on the site, its location, landscape, and climate are all critical factors in good design.
2) WHAT IS THE BUILDING MADE OF?There is no way to know what you can potentially do to retrofit a building without knowing something about the existing construction of the home. Is it frame? CMU (concrete block)? Brick? Concrete? Is it in-ground, on-ground, or on piles? How many stories is it? When was it built? What are the insulating materials, what are the windows, and what is the roof construction? Is it designed for passive solar gain?
These details are necessary to understand before we offer any ideas design-wise regarding retrofitting.We will endeavor to explain what each of the Earthship firm's suggestions (in italics) mean to the potential re-builder in the Northern hemisphere.
EB Idea #1: “If your house has a South facing side with lots of windows or if you can add windows then maybe you can add a greenhouse.”
This answer seems to be predicated on the idea that the Earthship-style greenhouse with windows along the south side of the home is the only way to add a greenhouse. That’s just not true. AND the Earthship greenhouse is poorly designed, for a variety of reasons it took me two chapters of the book to explain. Let me do what I can to help illustrate how those issues apply to this particular question.
So, let’s assume that you can build the earthship-style greenhouse on the south. Here’s how that can go wrong:
A. If your house has lots of windows on the south intended for passive solar gain and you add a greenhouse, then you will be diminishing the performance of the passive solar. And if you are in a cold, wet climate, and your home uses passive solar, you can increase your heating load significantly by adding a greenhouse. B. You will be adding high humidity to a building that is most likely not designed for it. Marcus reminds us that “in this scenario we are combining the moisture transpired by the plants with the moisture transpired by people, so in other words – a lot more moisture.” The reason the earthships work as well as they do is because the interior walls are made of concrete, which is forgiving, humidity-wise. A frame building will slowly start to rot from inside if the greenhouse is open to the home. C. The greenhouse may also cause the home to overheat, as it does in the traditional Earthships themselves for up to 9months a year. D. The greenhouse addition will change the way natural ventilation works. E. The typical Earthship greenhouse design adds thermal bridges that cause heat loss during winter and heat gain during the summer. So you have a much higher potential for uncomfortable hot and cold spots in the home.
To add to that, some locations don’t require greenhouses for growing food. In the American South, for instance, you can grow everything you need outside. So to add a greenhouse “just because” is an unnecessary expense that can actually cause more harm than good. And a greenhouse can easily cost $20,000 to build.
Here's how we recommend addressing these issues:
If you do want a greenhouse, you can put it quite literally anywhere except directly north of the home if it is attached. And, for that matter, it doesn’t need to be attached to the house at all. As Marcus points out so perfectly, “Attaching a greenhouse to a building shouldn't be a major problem. Ventilation will of course have to be taken into consideration and if the intention is to use the greenhouse all year round in a cold climate (i.e. a heated greenhouse) – one should implement a heat exchanger into the ventilation system to save on heating as much as possible. But then again – effective and energy saving ventilation shouldn't be exclusively utilized in the greenhouse.”
To resolve the issue of diminishing passive solar performance, a solution for locating a greenhouse without diminishing the performance of the passive solar heating is to simply locate the greenhouse on the west side of the house instead, like a wing facing south. In this way the sun's path to the thermal mass won't get obstructed by the greenhouse or the plants therein, and your plants will still be able to receive a lot of sun. The north wall of the greenhouse could then be constructed of a continuous wall of thermal mass (cob, adobe, bricks, stones etc.), insulated on its outside with straw or some other natural insulation material. There's really no point in having windows on the north side of a greenhouse.
Another factor that needs to be taken into consideration when trying to answer this question is what kind of passive solar we are talking about here. Passive solar in the sense that you want to store the Sun's heat from daytime to nighttime? Or a so called PAHS-system (Passive Annual Heat Storage) that stores heat from summer to winter? OR the kind of combined daily AND annual heat storage system that the Earthship concept aims at? This third kind of passive solar doesn’t really make any sense really, because the two first systems implement thermal mass in different ways. An annual system (PAHS) needs vast amounts of insulated thermal mass in order to store heat from summer to winter. You also need to consider the different alternatives of how to store and deliver the captured heat. But no matter what choices you make you will still need an appropriate location for this to work properly, and it needs to be a place with many sun hours even during winter. Especially in the great many areas that do not have adequate sunshine, this system doesn't make any sense, mainly due to the laws of thermodynamics. (The issues of which we describe in detail in the Passive Solar design chapter in the book.)
Marcus continues, “As I see it the daily system is a bit more universal in its application since it works quite well even with other heat sources than the Sun. It will even out the temperatures during the day by absorbing excess heat which it will later release during the night when the indoor air temperature falls. And since you have a substantially lower mass, it won't take as long to equalize the temperature of the thermal mass with the indoor air temperature and you don't have to burn extensive amounts of fuel in order for the house to stay warm during cloudy periods...
These are major issues and factors to consider whenever you build a house, no matter where you build it. Especially if you want to build sustainably. Good designers won't just blurt out advice like that just because it agrees with the product they are trying to sell. People are starting to become more interested in sustainability and it is in everyone's best interest that people get the best advice available... and that's simply not the case here, far from it.”
EB Idea #2: “The North side windows should be closed up. You can add insulation.”
We shouldn’t close up the North windows “just because.” The reason the earthships do this is because of the berm. If you do not have a berm, and do not live where there is ice or snow, there is NO reason to close up your north windows. In fact, there are many reasons not to. For one, earthships use operable skylights in those rooms in lieu of windows. Without natural light and ventilation, those rooms will be dark, moldy, and dank. This gets exacerbated when you introduce humidity into the home with a greenhouse. Also, artists and people with light sensitivity like the cool light that comes in from north windows. It’s more even and gentler on tired eyes.
Ventilation is critical, and to get that, we ideally want two windows on opposite sides of the room. That allows air in one side and out the other. If the south and north are no longer accessible for adequate air, then we can get sick. That’s not okay. These two bad ideas (the greenhouse and closing North windows) put together can destroy what is already working with your home!
Adding insulation to the home is only a good idea if you live in an area that is either a) very cold, or b) hot and arid. The house should be ultra-light and raised above the ground in tropical or humid regions. So this advice is also not well considered for many potential remodelers. This is why we explain in detail in the book what the impacts of climate can be on the design of the home.
EB Idea #3: “If you install a metal roof you can do water catchment.”
Absolutely true. The cost of a new metal roof these days, with an upgrade for most homes to the recommended energy-efficient insulation, can cost upwards of $35k. Adding cisterns can set you back another $7k. Excavating for them can be another $3k or so. Gutters and piping can be around $1k. So that upgrade will cost you $45k and allow you to catch water you can take a shower in but not drink. That’s an awfully expensive shower. Adding water filtration will tack on another $2k, at least, usually.
EB Idea #4 “And you could add solar power.”
Absolutely. You can. That’s a great idea and in many places, the solar power companies will get you into a system suitable for your area for around the same cost per month as your old utilities. Unless you live in far northern climates like Alaska, where the batteries required to make solar work can bring the system cost up to $100k or more. The good news is… while the battery technology is moving forward in terms of efficiency, durability and cost effectiveness, they are still very expensive. Hopefully that will change soon.
I hope this effort helps people to understand what could go wrong in their buildings if they blindly follow bad advice from people whose job it is to propagate the idea they are wanting to sell you. You deserve better information. That's what we are trying to get to you. That said, if you have been successful or unsuccessful at adding details from Earthships to YOUR traditional building, please let us know how it went, and we'll adjust this accordingly.
Blessings, everybody.
May 18, 2015
EARTHBAGS! A newly FREE chapter inspired by Cal-Earth Institutes latest earthbag success! #BuildSimple #GreenerByDesign
Sometimes the Universe shows up so clearly there is NO way to ignore her.
This week was one of those moments. I got the following post sent to me three times in a few hours.
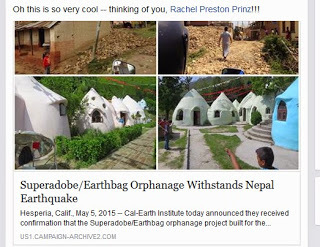
I knew there was a way I could share with people some tips about how to make earthbags work for them.
And it's time.
So, here is our Earthbags chapter. For Free. Yep, I mean it.
Tip: USE the details from Build Simply linked at the end of the article to get good design advice for seismic locations. And if you live in a humid place, consider all your other options before going with earthbags. These are the PERFECT quick build for emergency situations where the materials are available. But these are NOT a long term option for really humid locations, unless a supernatural amount of ventilation is possible (and preferable). Trust us, 'kay?
Buy the book now
Wall Type: Thermal Mass Appropriate Climate: All regionsStructural Capability: Load-bearingSuitable for Berm: PossiblyNatural: MostlyLearning: EasyDoing: EasyEngineering Required: If bermedKit Available: No
Earthbag construction is a natural building technique that evolved from military bunker construction and temporary flood-control methods. Rooms in earthbag structures often are circular in shape and have a dome roof, though square rooms are achievable with buttressing and/or interlocking of the bags at the corners.
Earthbag building usually begins by digging a trench down to undisturbed stable subsoil. The trench is then partially filled with cobbles or gravel to create a rubble trench foundation. On this foundation, several rows of doubled woven bags are filled with gravel and placed into the trench, and another two courses are stacked above grade to form a water-resistant foundation dampcourse. Then the actual earthbag wall starts.
The most popular type of bag is made of solid-weave polypropylene, like those used to transport rice or other grains. Polypropylene is very affordable and is resistant to water damage, rot, and insects. These bags can be purchased as mis-prints or bought used at agricultural warehouses and producers. Alternative bags include those made of hemp, burlap or other natural-fibers. Though, when exposed to air, water, and time, these natural options may deteriorate.
Moist subsoil that contains 5 - 50% clay, enough to become cohesive when tamped, or an angular gravel or crushed rock is used to fill the bags. Portland cement, lime, or bitumen stabilizers can be used to allow earths with high clay content to withstand flooding. The addition of stabilizers in a ratio of 5-10% may be required to meet Code. The thermal insulating value of the fill material is directly related to both the porosity of the material and the thickness of the wall. Crushed volcanic rock, pumice or rice hulls yield higher insulation value than clay or sand. However, thermal mass properties are also an important consideration, particularly for climates that experience temperature extremes. Materials like clay or sand have excellent heat retention characteristics.
Each successive layer of earth-filled bags is placed like bricks, with one or two strands of barbed wire placed on top to increase friction between each row of bags and improve tensile strength. Bags can be pre-filled with material and hoisted into position or filled in place. A light tamping and twisting of the bags serves to consolidate them and creates a wall with a strength between that of adobe and rammed earth. The same process continues layer upon layer, forming walls.
The completed structure is then quickly covered with earth plaster to prevent solar radiation from degrading the polypropylene. Natural earth stuccos allow the wall to breathe and natural mineral pigments can be added to provide beautiful color effects. A standard mix for earth plaster for covering earthbag superstructures is: 1 part clay, 3 parts earth, 1 part straw, and 1 part lime.
Windows and doors can be formed with a traditional masonry lintel or by using earthbags in traditional masonry corbeling or brick-arch techniques using temporary forms. Light may be brought in by skylights, glass-capped pipes, or bottle bricks placed between the rows of bags during construction.
A roof can be formed by gradually sloping the walls inward to construct a dome. This inherently limits the size of the space you can create and increases the size of the volume, because you want to use the minimum overlap on the bag that you possibly can: an inch or less of bag overhanging the bag below is best. Keeping the angle of the dome walls to no more than 60 degrees will usually work adequately. The trick with domes is waterproofing the roof; this can be difficult, and requires the use of commercial roof sealers. Using a traditional framed roof of panels or shingles is another option.
It is possible to combine earthbag building with earth-sheltering.
Self-built earthbag homes can start at $20 per square foot of floor space. Earthbag Pros· Heat (or cold) penetration of the wall is slow and the internal temperature of the building remains relatively stable. · Allows the building to be constructed in culturally and regionally appropriate styles. This preserves the look and feel of the community. · The tools needed to complete an earthbag build are limited to those that are readily available pretty much everywhere: gloves, picks, shovels, hoes, hammers, barbed wire, twine… · Earthbag structures can easily be built solo or with just a few friends. The effort is much easier than that of traditional Earthships. · Earthbag homes are the only way to get an Earthship in some European countries like Belgium who have outlawed the use of tires in architectural projects.· Earthbag homes can range from cozy huts and domes to multi-story traditional homes. · Earthbag construction uses the least energy of any durable construction method. With on-site soil being used, practically no energy is expended on transportation. The energy-intensive materials that are used — plastic (for bags & twine), steel wire, cement or lime, and perhaps the outer shell of plaster or stucco — are used in relatively small quantities compared to other types of construction, adding up to only 1-4% of the total construction materials. · The buildings last a long time; however, when they are no longer useful they may simply erode with no serious threat to the environment, or even be recycled into new earthbag-constructed buildings.· Earthbag buildings last many years with low maintenance. Earthbag structures do not rot or mold and they deter pests including termites, roaches and the like, because there is no wood to chew through.· Building with earthbags means not contributing to the deforestation, air pollution, or build-up of landfill materials. · Only 1-4% of earthbag construction uses manufactured resources. The main materials used are dirt, straw, and water.· Earthbag structures can survive fire, flood, wind, tornado, hurricanes and earthquakes.
Earthbag Challenges· The process of filling earthbags and tamping them requires a fair amount of physical strength for the self-builder; United Earth Builders has developed a skid-steer operated earth home building machine. It fills earthbag tubes of many sizes at a rate as fast as 400 feet per hour. At production speed, a crew could fill about 30 feet per hour of earthbag by hand (depending on bag width). Another option is using a small concrete-mixer on-site to blend materials.· Earth plasters are an acquired skill requiring practice to get the mix right. The difficulty is there is no list of definitive ingredients, and it all depends on your mud. · Waterproofing earthbag buildings is a complex and sometimes expensive process for humid regions. · Earthbag buildings might take more work to meet with approval by building officials, bankers and insurers. · If an earthbag home gets damaged it is nearly impossible to fully repair. Large sections of the wall must be removed and replaced to complete a repair that could be considered more than a band-aid. Same with additions. They require a great deal of demolition if not planned for in advance.· Polypropylene, which the bags are most often constructed of, is a toxic agent known to cause cancer, allergies/immunotoxicity, organ system toxicity, and neurotoxicity. Though, rats and bugs are not keen on eating this material and rot is rarely a concern. Like tires, this material is encased, and may present no threat. That has yet to be determined.· Water Alert: earthbags cannot withstand prolonged soaking.
Since 2010, earthbags have been used moderate and high seismic risk areas with new reinforcement techniques. Areinforced concrete footing or grade beam may be recommended. Additionally, corner reinforcing is required, since corners are one of the most vulnerable parts of buildings in earthquakes, and can often be pulled apart. A typical and easy-to-build solution suggests barbed wire should be cut to extend 24″ past each corner, and when the next course is laid and tamped, tightly pull this extra wire back up onto the upper course. Then lay the next set of bags and barbed wire, extending again out past the corners. However, the Build Simple Institute, an architectural research firm in Placitas, New Mexico, suggests using a 2 foot deep buttress, extending each wall beyond the intersection at corners in earthquake prone areas. They have several alternatives if buttressing is not preferred, just visit their website at http://buildsimple.org/earthbag.php for details.
This week was one of those moments. I got the following post sent to me three times in a few hours.
I knew there was a way I could share with people some tips about how to make earthbags work for them.
And it's time.
So, here is our Earthbags chapter. For Free. Yep, I mean it.
Tip: USE the details from Build Simply linked at the end of the article to get good design advice for seismic locations. And if you live in a humid place, consider all your other options before going with earthbags. These are the PERFECT quick build for emergency situations where the materials are available. But these are NOT a long term option for really humid locations, unless a supernatural amount of ventilation is possible (and preferable). Trust us, 'kay?
Buy the book now
Wall Type: Thermal Mass Appropriate Climate: All regionsStructural Capability: Load-bearingSuitable for Berm: PossiblyNatural: MostlyLearning: EasyDoing: EasyEngineering Required: If bermedKit Available: No
Earthbag construction is a natural building technique that evolved from military bunker construction and temporary flood-control methods. Rooms in earthbag structures often are circular in shape and have a dome roof, though square rooms are achievable with buttressing and/or interlocking of the bags at the corners.
Earthbag building usually begins by digging a trench down to undisturbed stable subsoil. The trench is then partially filled with cobbles or gravel to create a rubble trench foundation. On this foundation, several rows of doubled woven bags are filled with gravel and placed into the trench, and another two courses are stacked above grade to form a water-resistant foundation dampcourse. Then the actual earthbag wall starts.
The most popular type of bag is made of solid-weave polypropylene, like those used to transport rice or other grains. Polypropylene is very affordable and is resistant to water damage, rot, and insects. These bags can be purchased as mis-prints or bought used at agricultural warehouses and producers. Alternative bags include those made of hemp, burlap or other natural-fibers. Though, when exposed to air, water, and time, these natural options may deteriorate.
Moist subsoil that contains 5 - 50% clay, enough to become cohesive when tamped, or an angular gravel or crushed rock is used to fill the bags. Portland cement, lime, or bitumen stabilizers can be used to allow earths with high clay content to withstand flooding. The addition of stabilizers in a ratio of 5-10% may be required to meet Code. The thermal insulating value of the fill material is directly related to both the porosity of the material and the thickness of the wall. Crushed volcanic rock, pumice or rice hulls yield higher insulation value than clay or sand. However, thermal mass properties are also an important consideration, particularly for climates that experience temperature extremes. Materials like clay or sand have excellent heat retention characteristics.
Each successive layer of earth-filled bags is placed like bricks, with one or two strands of barbed wire placed on top to increase friction between each row of bags and improve tensile strength. Bags can be pre-filled with material and hoisted into position or filled in place. A light tamping and twisting of the bags serves to consolidate them and creates a wall with a strength between that of adobe and rammed earth. The same process continues layer upon layer, forming walls.
The completed structure is then quickly covered with earth plaster to prevent solar radiation from degrading the polypropylene. Natural earth stuccos allow the wall to breathe and natural mineral pigments can be added to provide beautiful color effects. A standard mix for earth plaster for covering earthbag superstructures is: 1 part clay, 3 parts earth, 1 part straw, and 1 part lime.
Windows and doors can be formed with a traditional masonry lintel or by using earthbags in traditional masonry corbeling or brick-arch techniques using temporary forms. Light may be brought in by skylights, glass-capped pipes, or bottle bricks placed between the rows of bags during construction.
A roof can be formed by gradually sloping the walls inward to construct a dome. This inherently limits the size of the space you can create and increases the size of the volume, because you want to use the minimum overlap on the bag that you possibly can: an inch or less of bag overhanging the bag below is best. Keeping the angle of the dome walls to no more than 60 degrees will usually work adequately. The trick with domes is waterproofing the roof; this can be difficult, and requires the use of commercial roof sealers. Using a traditional framed roof of panels or shingles is another option.
It is possible to combine earthbag building with earth-sheltering.
Self-built earthbag homes can start at $20 per square foot of floor space. Earthbag Pros· Heat (or cold) penetration of the wall is slow and the internal temperature of the building remains relatively stable. · Allows the building to be constructed in culturally and regionally appropriate styles. This preserves the look and feel of the community. · The tools needed to complete an earthbag build are limited to those that are readily available pretty much everywhere: gloves, picks, shovels, hoes, hammers, barbed wire, twine… · Earthbag structures can easily be built solo or with just a few friends. The effort is much easier than that of traditional Earthships. · Earthbag homes are the only way to get an Earthship in some European countries like Belgium who have outlawed the use of tires in architectural projects.· Earthbag homes can range from cozy huts and domes to multi-story traditional homes. · Earthbag construction uses the least energy of any durable construction method. With on-site soil being used, practically no energy is expended on transportation. The energy-intensive materials that are used — plastic (for bags & twine), steel wire, cement or lime, and perhaps the outer shell of plaster or stucco — are used in relatively small quantities compared to other types of construction, adding up to only 1-4% of the total construction materials. · The buildings last a long time; however, when they are no longer useful they may simply erode with no serious threat to the environment, or even be recycled into new earthbag-constructed buildings.· Earthbag buildings last many years with low maintenance. Earthbag structures do not rot or mold and they deter pests including termites, roaches and the like, because there is no wood to chew through.· Building with earthbags means not contributing to the deforestation, air pollution, or build-up of landfill materials. · Only 1-4% of earthbag construction uses manufactured resources. The main materials used are dirt, straw, and water.· Earthbag structures can survive fire, flood, wind, tornado, hurricanes and earthquakes.
Earthbag Challenges· The process of filling earthbags and tamping them requires a fair amount of physical strength for the self-builder; United Earth Builders has developed a skid-steer operated earth home building machine. It fills earthbag tubes of many sizes at a rate as fast as 400 feet per hour. At production speed, a crew could fill about 30 feet per hour of earthbag by hand (depending on bag width). Another option is using a small concrete-mixer on-site to blend materials.· Earth plasters are an acquired skill requiring practice to get the mix right. The difficulty is there is no list of definitive ingredients, and it all depends on your mud. · Waterproofing earthbag buildings is a complex and sometimes expensive process for humid regions. · Earthbag buildings might take more work to meet with approval by building officials, bankers and insurers. · If an earthbag home gets damaged it is nearly impossible to fully repair. Large sections of the wall must be removed and replaced to complete a repair that could be considered more than a band-aid. Same with additions. They require a great deal of demolition if not planned for in advance.· Polypropylene, which the bags are most often constructed of, is a toxic agent known to cause cancer, allergies/immunotoxicity, organ system toxicity, and neurotoxicity. Though, rats and bugs are not keen on eating this material and rot is rarely a concern. Like tires, this material is encased, and may present no threat. That has yet to be determined.· Water Alert: earthbags cannot withstand prolonged soaking.
Since 2010, earthbags have been used moderate and high seismic risk areas with new reinforcement techniques. Areinforced concrete footing or grade beam may be recommended. Additionally, corner reinforcing is required, since corners are one of the most vulnerable parts of buildings in earthquakes, and can often be pulled apart. A typical and easy-to-build solution suggests barbed wire should be cut to extend 24″ past each corner, and when the next course is laid and tamped, tightly pull this extra wire back up onto the upper course. Then lay the next set of bags and barbed wire, extending again out past the corners. However, the Build Simple Institute, an architectural research firm in Placitas, New Mexico, suggests using a 2 foot deep buttress, extending each wall beyond the intersection at corners in earthquake prone areas. They have several alternatives if buttressing is not preferred, just visit their website at http://buildsimple.org/earthbag.php for details.
Funny Haha Don't lock yourself into a box...
A little levity today brought to you by OffGridBuild, who does the BEST earthship videos!
Thanks to our super engaged pal Will Ferguson for the share!
Buy the book now
Thanks to our super engaged pal Will Ferguson for the share!
Buy the book now
May 8, 2015
Links to AMAZING workshops you can learn from - right here in New Mexico!
Traditional Living - Canning, making your own solar panels, making cheeses, etc.
ABQ Old School run by Leila Salim Earthbag Construction Programs
The Hive UNM’s Sustainability Studies Program
Permaculture Training Courses Lama Foundation north of Taos the Four Bridges Traveling Permaculture Institute in Española Santa Clara Pueblo’s Flowering Tree Permaculture Institute
Adobe Making Cornerstones Partnership
EarthPlaster Carole Crews or join in at one of the traditional enjarres like that at the San Francisco de Asis church in Ranchos de Taos
Natural Building / Tiny Houses / PRACTICAL PROGRAM (not academic, but it is college!) Green technology program at UNM Taos. They cover how to build and install solar panels, how to make a horno or rocket stove fireplace, how to do electrical systems, how to do an earth berm, how to do adobe... They literally tear apart the building and put it back together piece by piece.
Other Courses you might be interested in (not in New Mexico) Cob and Strawbale Building with Sigi Koko Cordwood with Richard Flatau.
Our friend Oliver Swann’s Natural Homes website is the largest online natural building resource in the WORLD, and he has a list of workshops that might be a bit closer to you.
Buy the book now