How to Find the Picture When You Already Got the Picture: Reverse-Image Searching Made Easy
 Suppose you’ve been looking all over the place for that perfect picture for your blog or your book cover? You’ve been collecting possibilities in a folder on your desktop, and just now you’ve finally decided on that perfect shot. Oh no! Where did I get this photo from? Who do I attribute? Who do I pay? The answer is pretty simple: Reverse-image searching. And there are two great ways that are very easy to accomplish that.
The first is Google Images. It’s real simple to find: Just go to Google and click on Images at the top of the screen. And you’re there. If you click on the little camera in the search bar you can search using the image’s original URL, but you probably don’t have that. So here’s the easy way to do it:
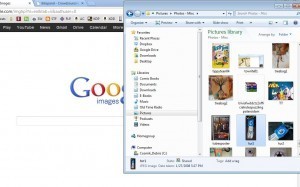
With Google Images as a full-size window, open Windows Explorer.
Re-size Windows Explorer until you can see about half of the Google Images window.
In Windows Explorer, go to the directory that has the image you want to find or identify.
Click-and-drag that image over to the search box on the Google Images page. If you’ve done it correctly, when you mouse over, the box will get bigger. Release the mouse button to let the image drop.
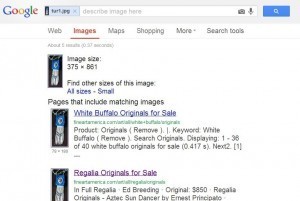
Wait for Google Image to do its work and show you versions of the image you selected, and similar images, on the Internet.

This is how your screen should look for Step #2-4
The results screen will look something like this:
 From those links, you can hopefully determine the actual nature of the picture you’re trying to identify. It still may take a bit of detective work, but like Mulder says, the truth is out there.
You can also add keywords to refine your search after you’ve uploaded your questionable pic; if you know you have a picture of a house from a realtor in Florida, you could add “Florida” and “realty” to it to hopefully refine things until you pinpoint the source of your photo.

The main page for Tineye.com
The second website that’s good for this kind of reverse-searching is Tineye.com. It is very similar in usage as Google Images, and in fact you can use the exact same steps as listed above. As with Google, you can also put in an image URL, so if you find a pic you like on the web, you might have an easier time of finding where it came from. Tineye has a much smaller database (at the moment) than Google Images, of course, but I think it’s worth the time and effort to search in both places.
Other important tips are to not be afraid to go past the first page of results on either search engine. Don’t rely just on the Google description of an item – click on it and go to the actual webpage where you can find the picture. And try to do this for EVERY photo you want to use and can’t identify. Better safe than sorry.
Both of these are old trivia-playing tricks I’ve used for years, since the contests often send out pamphlets full of obscure photos to be identified. For indie authors, this is part of the due diligence you have to apply to your work to keep yourself out of legal and financial problems. That neat picture of an 1850 daguerreotype may look old and out of copyright, but it may have been created yesterday with Photoshop. If you don’t remember who took a photo, don’t use it! Photographers deserve attribution and compensation as much as authors or any other artists do.


