Give It Away
 One of the tools in the promotional arsenal of an author (and also companies, websites, and many other organizations) is a giveaway. People love a chance to win free stuff. Many authors do book giveaways on Goodreads which has some positives (lots of people become aware of your book and add it to their to-be-read list), but some downsides as well. Goodreads only allows paper books to be given away, which has financial implications, not only the cost of the book, but shipping costs that could easily get out of hand if you don’t limit entrants to readers from your home country. By using a 100% off coupon code on Smashwords or emailing an ebook file directly to winners it is possible for an author to do a giveaway of ebooks outside of Goodreads at no cost or, if they prefer, at low cost using their promotional dollars for other prizes (Amazon gift cards or some kind of book swag).
However, not too long ago running a giveaway was full of work and issues. A few years ago, I did a giveaway where someone entered by leaving a comment on a blog post. I then assigned a number to each entry (work), picked a winner using random.org (easy enough), and had to notify winners via another blog post (more work), who then had to email me to make arrangements to claim their prize (yet more work as well as error prone, not to mention that some prizes went unclaimed). All in all a big pain in the patoot.
Now there is a website called Rafflecoptor.com that makes giveaways much easier to run by eliminating much of the work. It is not only a way to give your book added visibility, but can have the added benefit of picking up additional followers on social media. When you’re done you’ll have a list of winners, their email addresses for notification, and the winners will be listed on the same post (part of a form) that was used to enter. The only downside I’ve found is that it doesn’t work with older versions of Internet Explorer (IE6 or IE7). Those browsers have problems with many websites, not just this one. In this post, I’ll give a quick tutorial on the basics of setting up a giveaway using Rafflecopter.
To start, go to Rafflecopter.com, click on the “Get Started” link in the upper right, then the button that says “sign up for free” on the next page, and fill out the short form to setup an account. Then click the link near the top center of the page that says “New Giveaway” to get this screen.
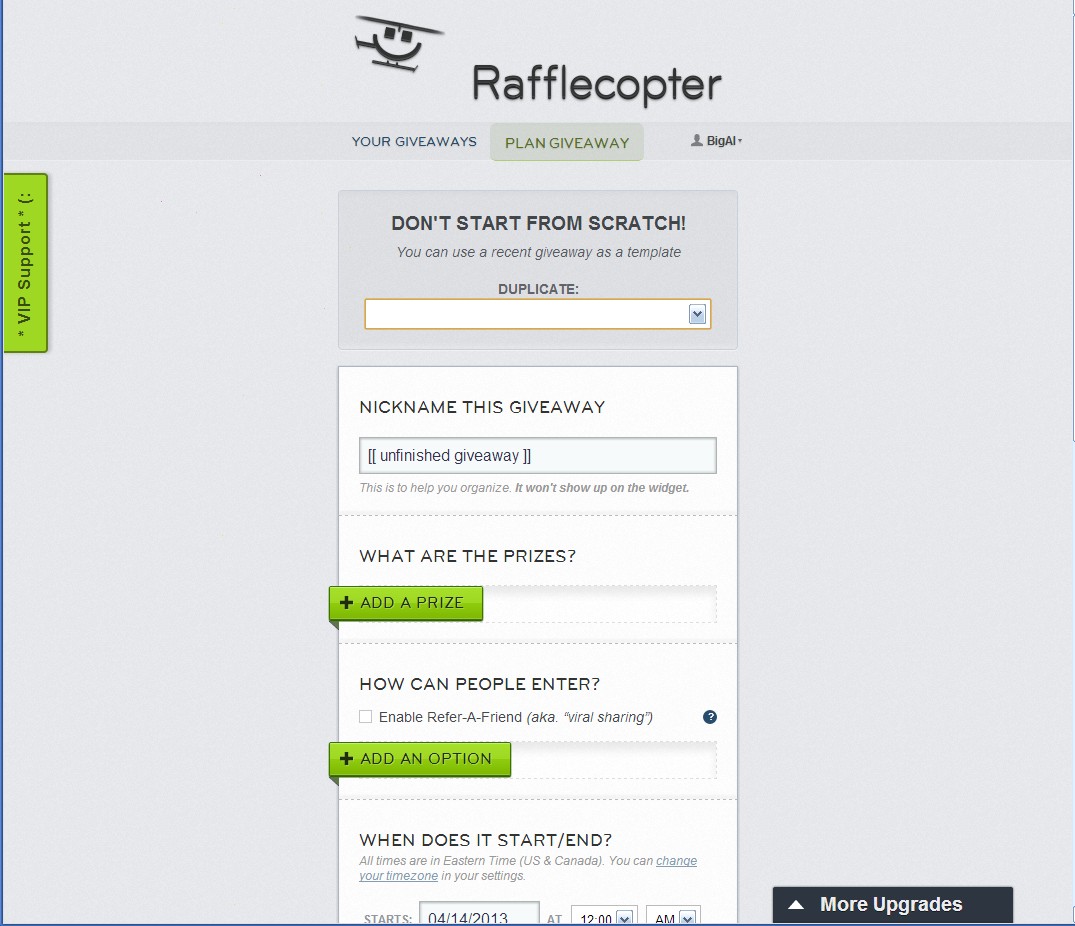
Pick a name for your giveaway in the space provided (I’m going with “Indies Unlimited Million Dollar Sweepstakes”). This name won’t appear anywhere, but is used for you to keep track of which giveaway you’re working with (as well as to identify past giveaways to potentially use in setting up a new one). Now click on the “Add A Prize” button where you can enter your first prize, like this.
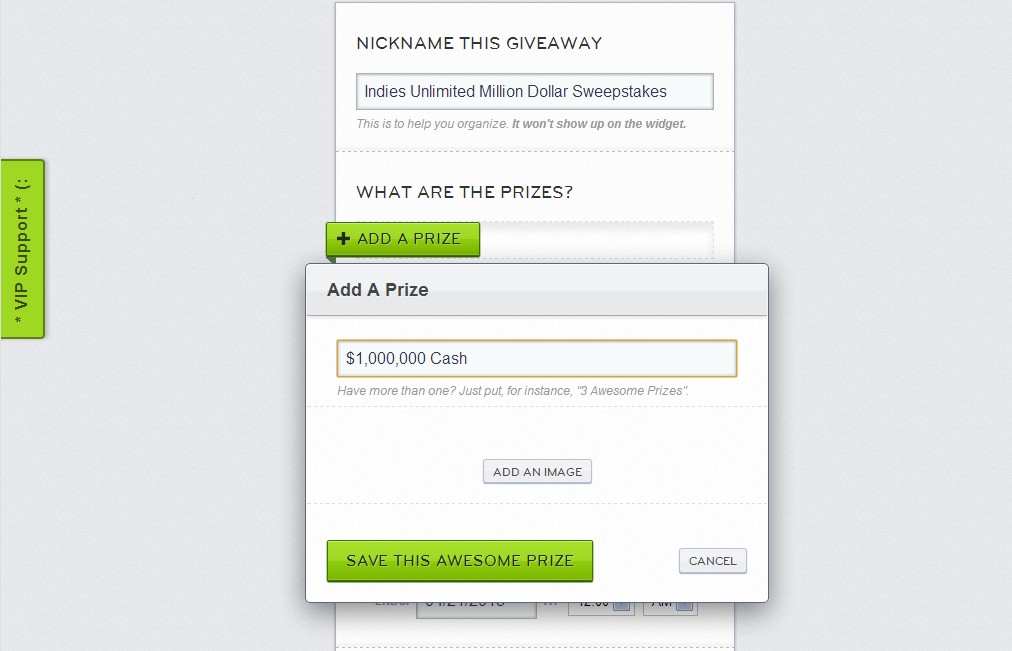
Click on the “Save This Awesome Prize” button and repeat for each of the prizes. You’ll see on the picture above that you can also add a picture of each prize by clicking on “add an image.” If you choose to do so, the image and description will be displayed on the entry form (which you’ll understand better by the end of this post) like this.
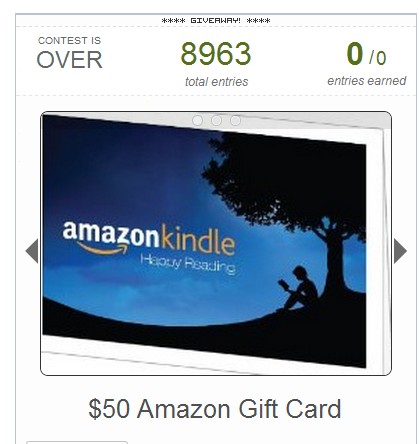
Potential entrants will have to click on the triangles to the left and right of the picture to scroll through the prizes and, from experience, I know many won’t realize this. Although using a picture may look better, it turns out that a picture isn’t always worth a thousand words. Not using pictures will list all the prizes, which you’ll see on our final screen.
Next click on the “Add An Option” button in the “How Can People Enter?” section. (Note that the box to “Enable Refer-A-Friend” is not available for those with the free plan.) You’ll be given a list of options.
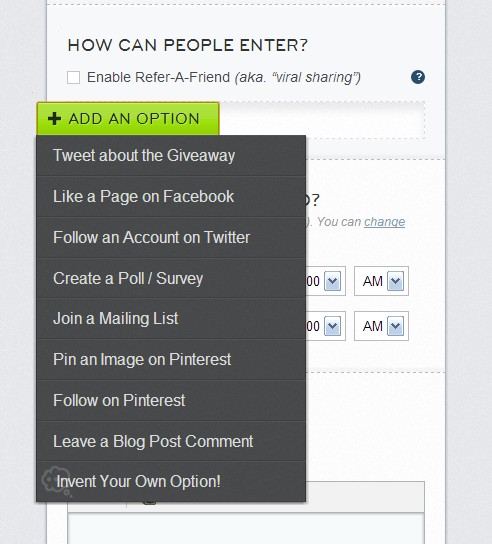
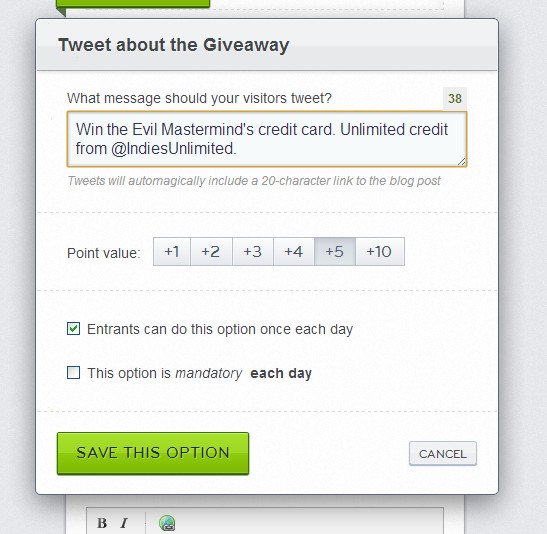
I’ve chosen the option to “Tweet about the Giveaway” to bring up a form like the one below. First, enter suggested verbiage for the tweet. I like to include my twitter handle with the @ so that I’ll be able to monitor mentions of the giveaway on twitter. Next is a “point value.” Look at points the same as giving out entry tickets to a raffle. You have the option of making each entry method worth a different number of entries (1, 2, 3, 4, 5, or 10). Here I’ve made tweeting about the giveaway worth five entries. I’ve also clicked a box that allows someone to enter by tweeting about the giveaway once a day (and they’ll receive 5 entries each time they do). Last, is the option to make this entry method mandatory. Because I’ve allowed this method of entry every day, clicking the mandatory button would make it a requirement to send this tweet every day to be entered in the giveaway. I’d advise against the mandatory button for most entry types because it limits the people who can enter, in this case to those who have twitter accounts. Click on “Save this Option” and move onto the next entry method.
Most of the possible entry methods have screens that are like the last one. Some detail specific to the method (twitter handle, url to facebook page, etc), a number of points to give for that entry method, and the ability to make it mandatory. (Only a few methods have the “allow daily” option because many things, such as liking your facebook page, don’t make sense with a daily option.) Two of these methods “Create a Poll/Survey” and “Join a Mailing List” aren’t available under the free plan. Two of the methods, follow on twitter or like on facebook, allow those who already follow you or like your page to also get credit and entries, not just new followers.
The last entry method I’ll discuss in detail is the ability to “Invent Your Own Option.” Here you’ve got a chance to get creative. I’ve made a questionable attempt to increase the sales on the Evil Mastermind’s book. Note that the icons at the top of the description box that allow making all or part of your instructions in bold or italics, and to include hyperlinks, all of which I’ve taken advantage of here. (Words bracketed by ** are bold and those by underscores are in italics.) In addition to the return of the daily and mandatory options, this method also includes a way to have the person verify they’ve done what they are supposed to. You could also use the honor system or not complete this option if you have a way to verify without action required from the participant.

The last steps in defining your giveaway are setting the date and time your giveaway will start accepting entries and the same for when it will stop, plus adding the legal fine print. The date and time should be easy enough. Note that it defaults to the Eastern Time zone in the US, but can be changed to another time zone. I’m not going to walk you through the steps for the Terms & Conditions, but clicking on the “use our easy template” will guide you through doing this step.
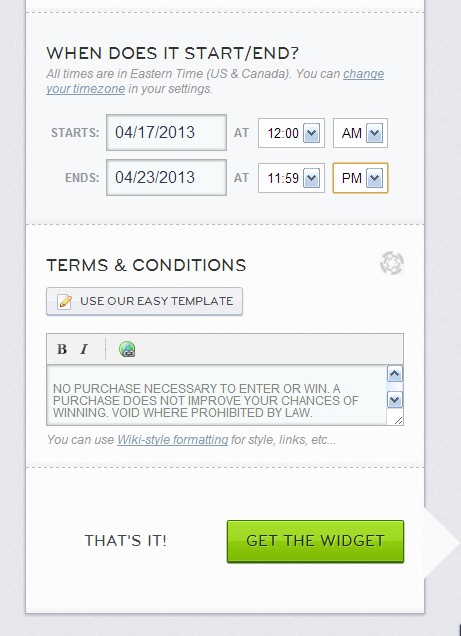
Now click on the “Get The Widget” button and you’ll get a page like this.
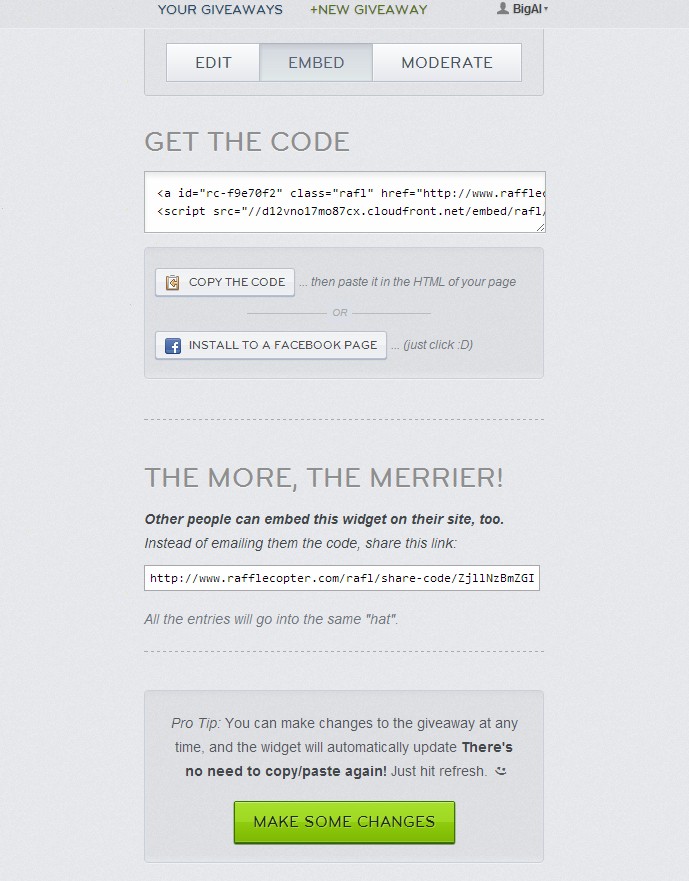
You can now post the form to enter on your facebook page (by clicking the obvious button), copy a link to send out via email or newsletter from the box in the section labeled “The More, The Merrier,” or do what most will want to do, embed the entry form in a blog post. To do this, click the “copy the code” button and, using the HTML editor in your blog software, paste the code in the appropriate spot, usually at the bottom after whatever explanation you have above the form.
We’re all set and here’s a picture of how the entry form will appear on the screen, if only you can find the right page on the web.

I sure hope the Evil Mastermind has this in the budget. I’m hoping to win third prize.