Marina Delio's Blog
March 24, 2018
Korean BBQ Chickpea Bento Bowls
Korean BBQ chickpeas, fresh vegetables and rice come together to make the most delicious bento bowls! These nourishing bowls are perfect for lunches and kid friendly dinners. They are packed with flavor, protein, fiber, and plant-based iron. This fabulous recipe comes to us from the cookbook, Nourishing Superfood Bowls, by Lindsay Cotter. I received a free review copy of the book, and this post contains an Amazon affiliate link, but all opinions are my own.

When I found out my friend Lindsay from Cotter Crunch was publishing a cookbook filled with nourishing superfood bowls, I jumped at the chance to request a copy. I'm a huge fan of colorful bowl meals, from smoothie bowls to Buddha bowls and everything in between. I usually stick to Mexican or Mediterranean style bowls, so this book is just what I needed to broaden my Buddha bowl repertoire. This week I made Lindsay's Korean BBQ Chickpea Bento Bowls and I'm thrilled to have been given permission to share the recipe with you.
These Korean BBQ style chickpea bowls are loaded with flavor and nutrition. My whole family loved this meal. I wasn't sure at first if my kids would love it, but they did! As the marinade isn't spicy, this dish is kid-approved. The slightly sweet marinade is what really makes these bowls special. I want to put it on so many things. I know I'm going to be craving this meal frequently and am so happy to have another flavor option for our bowl meals. The day I made this recipe I actually made it twice. I made it during the photo shoot and planned to save it for dinner, but, it was so delicious I accidentally ate practically the entire batch. Oops. So I made it again for dinner and wasn't mad at all to have it twice that day. You're going to love this one.

The ingredient list may look a bit long, but this recipe comes together quickly. The marinade ingredients include tamari, tomato sauce, honey or coconut sugar, garlic, ginger, and sesame oil. They get whisked together in a bowl before coating chickpeas. At this point you know the dish is going to be delicious because you can already smell all those wonderful umami flavors.

The book says edamame can be added in with the chickpeas if desired, and I chose to add them in. I only just now realized I made a mistake. The recipe calls for unshelled edamame and I used shelled. Oh well, it worked well anyway! Once the beans are coated in the marinade they get roasted in the oven for 15-20 minutes. During this time I cooked my rice in the Instant Pot and prepared the fresh vegetables.
 Ribbons of carrots and zucchini (I use a vegetable peeler to make the ribbons), chopped Brussels sprouts, tomatoes, micro greens, cilantro, lime, and sesame seeds are the perfect additions to these Korean BBQ chickpea bowls. I loved every single one of these ingredients with the BBQ chickpeas and rice, especially lots of cilantro and micro greens. One of the reasons I love Buddha bowl style meals so much is that everyone can assemble their own bowls. I gave the kids their bowls with just the rice and roasted chickpea mixture and let them top their bowls with the veggies they wanted to use.

This Korean BBQ bowl was one of the best lunches I've had in a long time. I'll be making this recipe again and again.

I highly recommend grabbing a copy of Nourishing Superfood Bowls. It's filled with "75 Healthy and Delicious Gluten-Free Meals to Fuel Your Day." Most of the recipes have vegetarian/vegan options and I love that the book has so many pictures. Flipping through the book it seems to have a beautiful picture for every recipe! I've long admired Lindsay's photography, and it adds so much to this wonderful cookbook. You can get a copy wherever books are sold. I find Amazon to be an easy option so I'll leave a link here. This is an affiliate link, so I get a small commission if you order through it - thank you!
 Don't miss the short video!
Yield: Serves 2-3Author: Lindsay CotterPrint Recipe
With ImageWithout Image Korean BBQ Chickpea Bento BowlsIf you love Korean BBQ, I think you'll love this plant-based bento bowl version. Perfect for lunches and kid friendly dinners, this veggie dish is rich in protein, fiber and plant-based iron.prep time: 10 MINScook time: 20 MINStotal time: 30 minsingredientsMarinade
3 tablespoons (45 ml) tamari2 tablespoons (30 ml) water2 tablespoons (30 ml) tomato sauce2 teaspoons (10 ml) honey or coconut sugar (see notes)1/4 teaspoon ground ginger1/4 teaspoon pepper1 teaspoon minced garlic1 tablespoon (15 ml) sesame oil2 to 3 tablespoons (30-40 ml) chopped green onion or red onion1 (15 oz [400 g]) can cooked chickpeas1/2 cup unshelled cooked edamame, optional Bowls
2 cups (420 g) cooked rice1 cup (340 g) chopped Brussels sprouts or shredded cabbage (see notes) 1 zucchini, ribbon cut1 carrot, ribbon cut 1 cup (160 g) sliced grape tomatoes Toppings
1/2 lime, juiced1 to 2 tablespoons (10 to 20 g) sesame seeds1/2 tablespoon (1 g) crushed red pepper flakesFine sea saltPepper1 cup (40 g) microgreens or sproutsHandful of fresh cilantro instructions
Preheat the oven to 400 degrees F (204 C). Line a baking sheet with foil. To make the Korean BBQ marinade, combine the tamari, water, tomato sauce, honey, ginger, pepper, garlic, sesame oil and green onion in a medium-size bowl. Add the chickpeas and edameme, if desired, to the marinade bowl and toss thoroughly to cover. Reserve 1 to 2 tablespoons (15 to 30 ml) of the marinade for topping the bowl. Spread out the chickpea mixture on the prepared baking sheet. Roast for 15-20 minutes, turning once, until the chickpeas are crispy. Remove from the oven and set aside. Let the chickpeas cool while preparing the bowls. For the bowls, divide the cooked rice into 2 bowls, or 3 bowls for smaller portions. Top the rice bowls with the Brussels sprouts, zucchini, carrot and tomatoes, followed by the BBQ roasted chickpeas. Squeeze the fresh lime juice on top of each bowl, then sprinkle with the sesame seeds and red pepper flakes. Season with salt or pepper, to taste, and garnish with the microgreens and fresh cilantro. For more BBQ zing, drizzle the reserved marinade sauce on top, or swap it out for your favorite BBQ sauce. notesFor a vegan option, omit the honey and use coconut sugar. This bowl if full of flavor and great texture. Feel free to roast the chopped Brussels sprouts along with the chickpeas. this adds a smoky flavor to the vegetables.
*Marina's note: I double this recipe to serve my family of 4.http://www.yummymummykitchen.com/2018/03/korean-bbq-chickpea-bento-bowls.htmlThis recipe was reprinted with permission from Nourishing Superfood Bowls by Lindsay Cotter.Created using The Recipes Generator.recipe-inner{text-align:left;max-width:620px;border:6px double #009BFF;padding:20px;background:#f2f2f2;margin: 40px auto;font-family:Lato, sans-serif;}.recipe-inner a{color: #4193f0;}#recipe .recipe-name{font-size: 21px;}#recipe .info{position:relative;font-size:13px;text-transform:capitalize;border-bottom:2px solid #000;padding-bottom:7px;margin-bottom:20px}.info:after{content:'';display:table;clear:both}#recipe .info span:first-child{margin-right:30px}#printbutton{border:0;margin:0;color:#fff;float:right;background:#555; padding:5px;border-radius:3px;cursor:pointer}#recipe .time{text-transform:uppercase;font-size:12px;text-align:center;background:#fff;padding:15px 0;margin-bottom:20px}#recipe .time span:not(:last-child){margin-right:12px}#recipe .time span:not(:last-child):after{content:'';display:inline-block;height:10px;width:1px;background:#000;vertical-align:middle;margin-left:12px}#recipe .summary{line-height:1.7;font-style:italic}.ingredients{line-height:1.7;clear:both}.ingredients h3,.instructions h3,.notes h3{font-size:20px !important;font-weight:400 !important;margin-bottom:0;color:#000;text-transform: uppercase;}.ingredients ul{margin:0!important;margin-top:5px !important;}.instructions li{margin-bottom:15px !important;line-height:1.6;text-align:left;}.ingredients li{text-align:left}#recipe .instructions{margin-top: 30px;}#recipe .instructions ol,#recipe .instructions ol li {list-style:decimal !important;}#recipe .instructions ol{padding-left:39px;margin:0!important;margin-top:6px !important;}.posturl{border-top:1px solid #ccc;padding-top:10px;}.ing-section{padding-left:20px;margin: 10px 0;}.ing-section > span{font-weight:700}.recipe-credit{font-size:13px;border-top: 1px solid #ccc;padding:10px;text-align:center;background:#ffffff;margin:-20px;margin-top:15px;}.recipe-credit a{color:blue;text-decoration:none;}.copyright-statement{font-size: 13px;font-style:italic;border-top: 1px solid #ccc;margin-top:15px;padding-top:15px;line-height:1.6;}.notes pre{font-size: 15px;margin: 10px 0;padding-left: 20px;font-family: inherit;line-height: 1.7;white-space: pre-line;}.notes h3{margin: 0}.nutrition-info{font-size: 0;margin: 20px 0;padding: 10px;background: #fff;}.nutrition-info>div {display: inline-block;font-size: 14px;width: 20%;text-align: center;}.nutrition-info>div:nth-child(5) ~ div{margin-top: 20px;}.nutrition-info>div p{margin-top: 0;margin-bottom: 7px;}.print-options {display:none;position: absolute; top: 0; right: 0; background: #fff; border: 1px solid #ccc;z-index: 1;}.show-print-options{display:block}.print-options button { display: block; background: transparent; border: 0; cursor: pointer; padding: 10px; width: 100%; text-align: left; } .print-options button:hover { background: #555; color: #fff;}#recipe .info{position:relative}#recipe .image{text-align:center;margin:25px 0}#recipe .image img{max-width:100%;width:150px;height:150px;-o-object-fit:cover;object-fit:cover;border-radius:150px}#recipe .recipe-name{margin-top: 20px;text-align:center}#recipe .summary{margin:20px 0;clear:both;line-height:1.7;font-style:italic}#recipe .time{clear:both;border-top:1px dotted #000;border-bottom:1px dotted #000;border-right:0;border-left:0}


When I found out my friend Lindsay from Cotter Crunch was publishing a cookbook filled with nourishing superfood bowls, I jumped at the chance to request a copy. I'm a huge fan of colorful bowl meals, from smoothie bowls to Buddha bowls and everything in between. I usually stick to Mexican or Mediterranean style bowls, so this book is just what I needed to broaden my Buddha bowl repertoire. This week I made Lindsay's Korean BBQ Chickpea Bento Bowls and I'm thrilled to have been given permission to share the recipe with you.
These Korean BBQ style chickpea bowls are loaded with flavor and nutrition. My whole family loved this meal. I wasn't sure at first if my kids would love it, but they did! As the marinade isn't spicy, this dish is kid-approved. The slightly sweet marinade is what really makes these bowls special. I want to put it on so many things. I know I'm going to be craving this meal frequently and am so happy to have another flavor option for our bowl meals. The day I made this recipe I actually made it twice. I made it during the photo shoot and planned to save it for dinner, but, it was so delicious I accidentally ate practically the entire batch. Oops. So I made it again for dinner and wasn't mad at all to have it twice that day. You're going to love this one.
The ingredient list may look a bit long, but this recipe comes together quickly. The marinade ingredients include tamari, tomato sauce, honey or coconut sugar, garlic, ginger, and sesame oil. They get whisked together in a bowl before coating chickpeas. At this point you know the dish is going to be delicious because you can already smell all those wonderful umami flavors.
The book says edamame can be added in with the chickpeas if desired, and I chose to add them in. I only just now realized I made a mistake. The recipe calls for unshelled edamame and I used shelled. Oh well, it worked well anyway! Once the beans are coated in the marinade they get roasted in the oven for 15-20 minutes. During this time I cooked my rice in the Instant Pot and prepared the fresh vegetables.
Ribbons of carrots and zucchini (I use a vegetable peeler to make the ribbons), chopped Brussels sprouts, tomatoes, micro greens, cilantro, lime, and sesame seeds are the perfect additions to these Korean BBQ chickpea bowls. I loved every single one of these ingredients with the BBQ chickpeas and rice, especially lots of cilantro and micro greens. One of the reasons I love Buddha bowl style meals so much is that everyone can assemble their own bowls. I gave the kids their bowls with just the rice and roasted chickpea mixture and let them top their bowls with the veggies they wanted to use.This Korean BBQ bowl was one of the best lunches I've had in a long time. I'll be making this recipe again and again.
I highly recommend grabbing a copy of Nourishing Superfood Bowls. It's filled with "75 Healthy and Delicious Gluten-Free Meals to Fuel Your Day." Most of the recipes have vegetarian/vegan options and I love that the book has so many pictures. Flipping through the book it seems to have a beautiful picture for every recipe! I've long admired Lindsay's photography, and it adds so much to this wonderful cookbook. You can get a copy wherever books are sold. I find Amazon to be an easy option so I'll leave a link here. This is an affiliate link, so I get a small commission if you order through it - thank you!
Don't miss the short video! Yield: Serves 2-3Author: Lindsay CotterPrint Recipe
With ImageWithout Image
Korean BBQ Chickpea Bento BowlsIf you love Korean BBQ, I think you'll love this plant-based bento bowl version. Perfect for lunches and kid friendly dinners, this veggie dish is rich in protein, fiber and plant-based iron.prep time: 10 MINScook time: 20 MINStotal time: 30 minsingredientsMarinade3 tablespoons (45 ml) tamari2 tablespoons (30 ml) water2 tablespoons (30 ml) tomato sauce2 teaspoons (10 ml) honey or coconut sugar (see notes)1/4 teaspoon ground ginger1/4 teaspoon pepper1 teaspoon minced garlic1 tablespoon (15 ml) sesame oil2 to 3 tablespoons (30-40 ml) chopped green onion or red onion1 (15 oz [400 g]) can cooked chickpeas1/2 cup unshelled cooked edamame, optional Bowls
2 cups (420 g) cooked rice1 cup (340 g) chopped Brussels sprouts or shredded cabbage (see notes) 1 zucchini, ribbon cut1 carrot, ribbon cut 1 cup (160 g) sliced grape tomatoes Toppings
1/2 lime, juiced1 to 2 tablespoons (10 to 20 g) sesame seeds1/2 tablespoon (1 g) crushed red pepper flakesFine sea saltPepper1 cup (40 g) microgreens or sproutsHandful of fresh cilantro instructions
Preheat the oven to 400 degrees F (204 C). Line a baking sheet with foil. To make the Korean BBQ marinade, combine the tamari, water, tomato sauce, honey, ginger, pepper, garlic, sesame oil and green onion in a medium-size bowl. Add the chickpeas and edameme, if desired, to the marinade bowl and toss thoroughly to cover. Reserve 1 to 2 tablespoons (15 to 30 ml) of the marinade for topping the bowl. Spread out the chickpea mixture on the prepared baking sheet. Roast for 15-20 minutes, turning once, until the chickpeas are crispy. Remove from the oven and set aside. Let the chickpeas cool while preparing the bowls. For the bowls, divide the cooked rice into 2 bowls, or 3 bowls for smaller portions. Top the rice bowls with the Brussels sprouts, zucchini, carrot and tomatoes, followed by the BBQ roasted chickpeas. Squeeze the fresh lime juice on top of each bowl, then sprinkle with the sesame seeds and red pepper flakes. Season with salt or pepper, to taste, and garnish with the microgreens and fresh cilantro. For more BBQ zing, drizzle the reserved marinade sauce on top, or swap it out for your favorite BBQ sauce. notesFor a vegan option, omit the honey and use coconut sugar. This bowl if full of flavor and great texture. Feel free to roast the chopped Brussels sprouts along with the chickpeas. this adds a smoky flavor to the vegetables.
*Marina's note: I double this recipe to serve my family of 4.http://www.yummymummykitchen.com/2018/03/korean-bbq-chickpea-bento-bowls.htmlThis recipe was reprinted with permission from Nourishing Superfood Bowls by Lindsay Cotter.Created using The Recipes Generator.recipe-inner{text-align:left;max-width:620px;border:6px double #009BFF;padding:20px;background:#f2f2f2;margin: 40px auto;font-family:Lato, sans-serif;}.recipe-inner a{color: #4193f0;}#recipe .recipe-name{font-size: 21px;}#recipe .info{position:relative;font-size:13px;text-transform:capitalize;border-bottom:2px solid #000;padding-bottom:7px;margin-bottom:20px}.info:after{content:'';display:table;clear:both}#recipe .info span:first-child{margin-right:30px}#printbutton{border:0;margin:0;color:#fff;float:right;background:#555; padding:5px;border-radius:3px;cursor:pointer}#recipe .time{text-transform:uppercase;font-size:12px;text-align:center;background:#fff;padding:15px 0;margin-bottom:20px}#recipe .time span:not(:last-child){margin-right:12px}#recipe .time span:not(:last-child):after{content:'';display:inline-block;height:10px;width:1px;background:#000;vertical-align:middle;margin-left:12px}#recipe .summary{line-height:1.7;font-style:italic}.ingredients{line-height:1.7;clear:both}.ingredients h3,.instructions h3,.notes h3{font-size:20px !important;font-weight:400 !important;margin-bottom:0;color:#000;text-transform: uppercase;}.ingredients ul{margin:0!important;margin-top:5px !important;}.instructions li{margin-bottom:15px !important;line-height:1.6;text-align:left;}.ingredients li{text-align:left}#recipe .instructions{margin-top: 30px;}#recipe .instructions ol,#recipe .instructions ol li {list-style:decimal !important;}#recipe .instructions ol{padding-left:39px;margin:0!important;margin-top:6px !important;}.posturl{border-top:1px solid #ccc;padding-top:10px;}.ing-section{padding-left:20px;margin: 10px 0;}.ing-section > span{font-weight:700}.recipe-credit{font-size:13px;border-top: 1px solid #ccc;padding:10px;text-align:center;background:#ffffff;margin:-20px;margin-top:15px;}.recipe-credit a{color:blue;text-decoration:none;}.copyright-statement{font-size: 13px;font-style:italic;border-top: 1px solid #ccc;margin-top:15px;padding-top:15px;line-height:1.6;}.notes pre{font-size: 15px;margin: 10px 0;padding-left: 20px;font-family: inherit;line-height: 1.7;white-space: pre-line;}.notes h3{margin: 0}.nutrition-info{font-size: 0;margin: 20px 0;padding: 10px;background: #fff;}.nutrition-info>div {display: inline-block;font-size: 14px;width: 20%;text-align: center;}.nutrition-info>div:nth-child(5) ~ div{margin-top: 20px;}.nutrition-info>div p{margin-top: 0;margin-bottom: 7px;}.print-options {display:none;position: absolute; top: 0; right: 0; background: #fff; border: 1px solid #ccc;z-index: 1;}.show-print-options{display:block}.print-options button { display: block; background: transparent; border: 0; cursor: pointer; padding: 10px; width: 100%; text-align: left; } .print-options button:hover { background: #555; color: #fff;}#recipe .info{position:relative}#recipe .image{text-align:center;margin:25px 0}#recipe .image img{max-width:100%;width:150px;height:150px;-o-object-fit:cover;object-fit:cover;border-radius:150px}#recipe .recipe-name{margin-top: 20px;text-align:center}#recipe .summary{margin:20px 0;clear:both;line-height:1.7;font-style:italic}#recipe .time{clear:both;border-top:1px dotted #000;border-bottom:1px dotted #000;border-right:0;border-left:0}


March 20, 2018
Mango Avocado Salsa
Bright, fresh, and tangy mango avocado salsa is perfect with tacos, chips, on burgers, or almost anything! It's naturally vegan, gluten-free, paleo, and Whole30 approved.

When I originally wrote up this mango avocado salsa recipe years ago, it was to go on top of my black bean burgers. At the time we also used this tangy sweet salsa on fish tacos. One of my friends recently mentioned that she loves this salsa, as it's written in my cookbook. It had been years since I'd made it, so I was happy to have the reminder to revisit the recipe. Next I'll have to revisit my black bean burgers, because this salsa is so good on them! Mango avocado salsa is the perfect combination of savory shallots and garlic, sweet tart mango and lime, and creamy avocado. It's amazing on many different foods, and a beautiful addition to any taco bar. In fact, I'm now dreaming of hosting a taco bar party with a bunch of different salsas and guacamoles. Wouldn't that be fun? If you need a good guacamole recipe, I have my standard guacamole as well as four ways to fancy it up right here.

I just love it when such simple ingredients from nature come together to make something so delicious. This easy mango avocado salsa comes together in under 10 minutes with 5 or 6 everyday ingredients. No oil or salt is needed for this fresh salsa, just a mango, avocado, shallot, lime, and garlic. When choosing your avocado for this recipe, look for one that's just ripe. An avocado that's on the firm side will hold up better in this recipe and won't get smashed.
 Do you use a lot of mangoes? We almost always have a couple on the countertop, as mango is one of my kids' favorite foods. Mangoes can be confusing to cut however, as they have a big seed in the middle. To make larger pieces I first peel the whole fruit and then cut the flesh away from the seed. When I'm making recipes that use cubes of mango, however, I cut them "hedgehog style" as we like to call it. You'll be able to understand the hedgehog method better by watching the video but basically I cut each side away from the pit, score the inside and then flip the pieces inside out. Using a paring knife, I cut the cubes away from the skin.

I've shared other salsa recipes, like my Fresh Tomato Salsa that I love to make with our garden tomatoes in the summer. Mango avocado salsa is one that I love to make year round. It's simple and requires just a handful of everyday ingredients. This salsa is mild and kid-friendly. If you would like to make it spicy, you could add some diced jalapeno.

One last burning topic: cilantro. For an herb, people have very strong feelings about cilantro. If you're in the U.K. you probably know cilantro as coriander. Nearly every time I post a recipe video on Facebook with cilantro I get a comment along the lines of, "You had me until that ghastly cilantro! Yuck!" It turns out that whether cilantro tastes like soap or not may be genetic. Me? I love cilantro on most Mexican dishes, as well as Indian and Thai curries. I love the mild flavor and freshness. I've tried this mango avocado salsa both with, and without cilantro, and it's delicious both ways. I prefer it with cilantro, for that extra bit of earthy flavor.

Don't forget to bring this mango avocado salsa to the next BBQ or taco night!
Yield: Makes about 2 cupsAuthor: Yummy Mummy KitchenPrint Recipe
With ImageWithout ImageMango Avocado SalsaA sweet and tangy mango avocado salsa that's perfect for any taco bar.prep time: 10 MINScook time: total time: 10 minsingredients
1 medium sized ripe mango, peeled, pitted and diced1 avocado, peeled, pitted, and diced1 small shallot, finely dicedjuice of 1 lime1 clove garlic, finely minced or crushed 1/4 cup chopped fresh cilantro instructions
Place the chopped mango, avocado and shallot into a medium sized bowl. Add the lime juice, garlic, and cilantro, and very gently stir to combine, taking care not to mash the avocado. Cover the bowl and store in the refrigerator until ready to serve. notesStorage:
I like this salsa best after it's had about an hour to chill in the refrigerator.
This salsa can be made up to one day in advance. The lime juice keeps the avocado fresh, so be sure to use plenty if making early.
Options:
If you like spicy foods, you can add 1/2 to 1 whole jalapeno, seeded and finely diced.
Nutrition:
Nutrition information is approximate and calculated by a third party site. Information for this recipe represents 1/6 of the total recipe.calories
107fat (grams)
7sat. fat (grams)
1carbs (grams)
13protein (grams)
1http://www.yummymummykitchen.com/2018/03/mango-avocado-salsa.htmlCreated using The Recipes Generator.recipe-inner{text-align:left;max-width:620px;border:6px double #009BFF;padding:20px;background:#f2f2f2;margin: 40px auto;font-family:Lato, sans-serif;}.recipe-inner a{color: #4193f0;}#recipe .recipe-name{font-size: 21px;}#recipe .info{position:relative;font-size:13px;text-transform:capitalize;border-bottom:2px solid #000;padding-bottom:7px;margin-bottom:20px}.info:after{content:'';display:table;clear:both}#recipe .info span:first-child{margin-right:30px}#printbutton{border:0;margin:0;color:#fff;float:right;background:#555; padding:5px;border-radius:3px;cursor:pointer}#recipe .time{text-transform:uppercase;font-size:12px;text-align:center;background:#fff;padding:15px 0;margin-bottom:20px}#recipe .time span:not(:last-child){margin-right:12px}#recipe .time span:not(:last-child):after{content:'';display:inline-block;height:10px;width:1px;background:#000;vertical-align:middle;margin-left:12px}#recipe .summary{line-height:1.7;font-style:italic}.ingredients{line-height:1.7;clear:both}.ingredients h3,.instructions h3,.notes h3{font-size:20px !important;font-weight:400 !important;margin-bottom:0;color:#000;text-transform: uppercase;}.ingredients ul{margin:0!important;margin-top:5px !important;}.instructions li{margin-bottom:15px !important;line-height:1.6;text-align:left;}.ingredients li{text-align:left}#recipe .instructions{margin-top: 30px;}#recipe .instructions ol,#recipe .instructions ol li {list-style:decimal !important;}#recipe .instructions ol{padding-left:39px;margin:0!important;margin-top:6px !important;}.posturl{border-top:1px solid #ccc;padding-top:10px;}.ing-section{padding-left:20px;margin: 10px 0;}.ing-section > span{font-weight:700}.recipe-credit{font-size:13px;border-top: 1px solid #ccc;padding:10px;text-align:center;background:#ffffff;margin:-20px;margin-top:15px;}.recipe-credit a{color:blue;text-decoration:none;}.copyright-statement{font-size: 13px;font-style:italic;border-top: 1px solid #ccc;margin-top:15px;padding-top:15px;line-height:1.6;}.notes pre{font-size: 15px;margin: 10px 0;padding-left: 20px;font-family: inherit;line-height: 1.7;white-space: pre-line;}.notes h3{margin: 0}.nutrition-info{font-size: 0;margin: 20px 0;padding: 10px;background: #fff;}.nutrition-info>div {display: inline-block;font-size: 14px;width: 20%;text-align: center;}.nutrition-info>div:nth-child(5) ~ div{margin-top: 20px;}.nutrition-info>div p{margin-top: 0;margin-bottom: 7px;}.print-options {display:none;position: absolute; top: 0; right: 0; background: #fff; border: 1px solid #ccc;z-index: 1;}.show-print-options{display:block}.print-options button { display: block; background: transparent; border: 0; cursor: pointer; padding: 10px; width: 100%; text-align: left; } .print-options button:hover { background: #555; color: #fff;}#recipe .info{position:relative}#recipe .image{text-align:center;margin:25px 0}#recipe .image img{max-width:100%;width:150px;height:150px;-o-object-fit:cover;object-fit:cover;border-radius:150px}#recipe .recipe-name{margin-top: 20px;text-align:center}#recipe .summary{margin:20px 0;clear:both;line-height:1.7;font-style:italic}#recipe .time{clear:both;border-top:1px dotted #000;border-bottom:1px dotted #000;border-right:0;border-left:0}


When I originally wrote up this mango avocado salsa recipe years ago, it was to go on top of my black bean burgers. At the time we also used this tangy sweet salsa on fish tacos. One of my friends recently mentioned that she loves this salsa, as it's written in my cookbook. It had been years since I'd made it, so I was happy to have the reminder to revisit the recipe. Next I'll have to revisit my black bean burgers, because this salsa is so good on them! Mango avocado salsa is the perfect combination of savory shallots and garlic, sweet tart mango and lime, and creamy avocado. It's amazing on many different foods, and a beautiful addition to any taco bar. In fact, I'm now dreaming of hosting a taco bar party with a bunch of different salsas and guacamoles. Wouldn't that be fun? If you need a good guacamole recipe, I have my standard guacamole as well as four ways to fancy it up right here.
I just love it when such simple ingredients from nature come together to make something so delicious. This easy mango avocado salsa comes together in under 10 minutes with 5 or 6 everyday ingredients. No oil or salt is needed for this fresh salsa, just a mango, avocado, shallot, lime, and garlic. When choosing your avocado for this recipe, look for one that's just ripe. An avocado that's on the firm side will hold up better in this recipe and won't get smashed.
Do you use a lot of mangoes? We almost always have a couple on the countertop, as mango is one of my kids' favorite foods. Mangoes can be confusing to cut however, as they have a big seed in the middle. To make larger pieces I first peel the whole fruit and then cut the flesh away from the seed. When I'm making recipes that use cubes of mango, however, I cut them "hedgehog style" as we like to call it. You'll be able to understand the hedgehog method better by watching the video but basically I cut each side away from the pit, score the inside and then flip the pieces inside out. Using a paring knife, I cut the cubes away from the skin. I've shared other salsa recipes, like my Fresh Tomato Salsa that I love to make with our garden tomatoes in the summer. Mango avocado salsa is one that I love to make year round. It's simple and requires just a handful of everyday ingredients. This salsa is mild and kid-friendly. If you would like to make it spicy, you could add some diced jalapeno.
One last burning topic: cilantro. For an herb, people have very strong feelings about cilantro. If you're in the U.K. you probably know cilantro as coriander. Nearly every time I post a recipe video on Facebook with cilantro I get a comment along the lines of, "You had me until that ghastly cilantro! Yuck!" It turns out that whether cilantro tastes like soap or not may be genetic. Me? I love cilantro on most Mexican dishes, as well as Indian and Thai curries. I love the mild flavor and freshness. I've tried this mango avocado salsa both with, and without cilantro, and it's delicious both ways. I prefer it with cilantro, for that extra bit of earthy flavor.
Don't forget to bring this mango avocado salsa to the next BBQ or taco night!
Yield: Makes about 2 cupsAuthor: Yummy Mummy KitchenPrint Recipe
With ImageWithout Image
Mango Avocado SalsaA sweet and tangy mango avocado salsa that's perfect for any taco bar.prep time: 10 MINScook time: total time: 10 minsingredients1 medium sized ripe mango, peeled, pitted and diced1 avocado, peeled, pitted, and diced1 small shallot, finely dicedjuice of 1 lime1 clove garlic, finely minced or crushed 1/4 cup chopped fresh cilantro instructions
Place the chopped mango, avocado and shallot into a medium sized bowl. Add the lime juice, garlic, and cilantro, and very gently stir to combine, taking care not to mash the avocado. Cover the bowl and store in the refrigerator until ready to serve. notesStorage:
I like this salsa best after it's had about an hour to chill in the refrigerator.
This salsa can be made up to one day in advance. The lime juice keeps the avocado fresh, so be sure to use plenty if making early.
Options:
If you like spicy foods, you can add 1/2 to 1 whole jalapeno, seeded and finely diced.
Nutrition:
Nutrition information is approximate and calculated by a third party site. Information for this recipe represents 1/6 of the total recipe.calories
107fat (grams)
7sat. fat (grams)
1carbs (grams)
13protein (grams)
1http://www.yummymummykitchen.com/2018/03/mango-avocado-salsa.htmlCreated using The Recipes Generator.recipe-inner{text-align:left;max-width:620px;border:6px double #009BFF;padding:20px;background:#f2f2f2;margin: 40px auto;font-family:Lato, sans-serif;}.recipe-inner a{color: #4193f0;}#recipe .recipe-name{font-size: 21px;}#recipe .info{position:relative;font-size:13px;text-transform:capitalize;border-bottom:2px solid #000;padding-bottom:7px;margin-bottom:20px}.info:after{content:'';display:table;clear:both}#recipe .info span:first-child{margin-right:30px}#printbutton{border:0;margin:0;color:#fff;float:right;background:#555; padding:5px;border-radius:3px;cursor:pointer}#recipe .time{text-transform:uppercase;font-size:12px;text-align:center;background:#fff;padding:15px 0;margin-bottom:20px}#recipe .time span:not(:last-child){margin-right:12px}#recipe .time span:not(:last-child):after{content:'';display:inline-block;height:10px;width:1px;background:#000;vertical-align:middle;margin-left:12px}#recipe .summary{line-height:1.7;font-style:italic}.ingredients{line-height:1.7;clear:both}.ingredients h3,.instructions h3,.notes h3{font-size:20px !important;font-weight:400 !important;margin-bottom:0;color:#000;text-transform: uppercase;}.ingredients ul{margin:0!important;margin-top:5px !important;}.instructions li{margin-bottom:15px !important;line-height:1.6;text-align:left;}.ingredients li{text-align:left}#recipe .instructions{margin-top: 30px;}#recipe .instructions ol,#recipe .instructions ol li {list-style:decimal !important;}#recipe .instructions ol{padding-left:39px;margin:0!important;margin-top:6px !important;}.posturl{border-top:1px solid #ccc;padding-top:10px;}.ing-section{padding-left:20px;margin: 10px 0;}.ing-section > span{font-weight:700}.recipe-credit{font-size:13px;border-top: 1px solid #ccc;padding:10px;text-align:center;background:#ffffff;margin:-20px;margin-top:15px;}.recipe-credit a{color:blue;text-decoration:none;}.copyright-statement{font-size: 13px;font-style:italic;border-top: 1px solid #ccc;margin-top:15px;padding-top:15px;line-height:1.6;}.notes pre{font-size: 15px;margin: 10px 0;padding-left: 20px;font-family: inherit;line-height: 1.7;white-space: pre-line;}.notes h3{margin: 0}.nutrition-info{font-size: 0;margin: 20px 0;padding: 10px;background: #fff;}.nutrition-info>div {display: inline-block;font-size: 14px;width: 20%;text-align: center;}.nutrition-info>div:nth-child(5) ~ div{margin-top: 20px;}.nutrition-info>div p{margin-top: 0;margin-bottom: 7px;}.print-options {display:none;position: absolute; top: 0; right: 0; background: #fff; border: 1px solid #ccc;z-index: 1;}.show-print-options{display:block}.print-options button { display: block; background: transparent; border: 0; cursor: pointer; padding: 10px; width: 100%; text-align: left; } .print-options button:hover { background: #555; color: #fff;}#recipe .info{position:relative}#recipe .image{text-align:center;margin:25px 0}#recipe .image img{max-width:100%;width:150px;height:150px;-o-object-fit:cover;object-fit:cover;border-radius:150px}#recipe .recipe-name{margin-top: 20px;text-align:center}#recipe .summary{margin:20px 0;clear:both;line-height:1.7;font-style:italic}#recipe .time{clear:both;border-top:1px dotted #000;border-bottom:1px dotted #000;border-right:0;border-left:0}
March 19, 2018
Tempeh Tacos
Tempeh tacos are an easy plant based dinner that's hearty and delicious. These protein rich vegetarian/vegan tacos are so easy that after you make them once you won't even need a recipe.
 I've been getting a lot of questions about tempeh recently, so I wanted to share one of my favorite tempeh recipes with you. Tempeh tacos are quick and easy, loaded with plant based protein, and absolutely delicious. They're hearty, filling, and perfect for Taco Tuesday - or any day! Taco night is one of my favorites, and truth be told, rarely falls on an actual Tuesday. It's one of the rare dinners that everyone in my family loves. I like to serve our tacos on a big platter or lazy Susan taco bar style. That way everyone can assemble their tacos just the way they like. Less work for me and more enjoyment for them? That's a win-win in my book.
These easy tempeh tacos are made with crumbled tempeh cooked with taco seasoning, black beans, salsa, lettuce, and of course guacamole. Sometimes I mix the black beans in with the tempeh "taco meat" and other times I keep them separate. Tempeh makes a great vegetarian and vegan alternative to taco meat because it has a similar texture when crumbled and is high in protein.

What is tempeh, anyway? I've you've come to this post via a Google or Pinterest search you probably already know what tempeh is. Otherwise, you may have seen these packages on the shelf near the tofu but never really known what to do with them. Tempeh is meaty, but doesn't have the texture of those faux meats like seitan. It has an earthy nuttiness and absorbs other flavors well. I usually bake it in BBQ sauce. I absolutely love BBQ tempeh in veggie sandwiches. Have you seen the craze that is the Whole Foods TTLA sandwich? Yes, I've tried and and it's good, but I prefer to make them at home.
Tempeh is made from fermented soy beans. Soy has become a hot and controversial topic. Because soy contains some phytoestrogen, some people worry that it can cause hormonal problems. However, many other foods contain phytoestrogens as well, including flax, apples, carrots, sesame seeds, yams, oats, lentils, and more. Given that tofu and tempeh have been eaten daily by one of the healthiest groups of people on Earth for over 2,000 years, I can't imagine it being harmful. A local nutritionist, SB Nutrition Geek, summed it up on Instagram well, "A small serving of soy is fine overall but when you isolate the estrogenic properties of soy (think soy isolates usually found in protein bars, soy milk, and veggie burgers) you are getting these phytoestrogens in bulk. Instead focus on soy in it's natural forms such as tofu, edamame, and tempeh...)." Of course if you have a soy or wheat allergy, you'll want to avoid tempeh. I'm not saying it's good for all bodies.
Ironically, "most of the world's soy crop ends up in feed for poultry, pork, cattle and even farmed fish." according to WWF. Sorry for geeking out there, I just find this all fascinating. For more information on soy, visit this article on NutritionFacts.org.

Making tempeh "taco meat" is incredibly easy. I saute a little onion, then add the crumbled tempeh and taco seasoning. You could make your own taco seasoning, but I usually keep it simple and use a store bought blend. Add just a little at first, as you can always add more heat, but can't easily remove it.

Now the tempeh taco meat is ready to be used to fill tacos. Let's talk about taco shells for a minute. When I was a kid I thought of tacos as having crispy shells. You know, the kind you buy at the grocery store wrapped in plastic and boxed. Over the years of eating really good Mexican tacos here in southern California, I've found that authentic tacos usually are made with fresh soft tortillas. I'm not Mexican though, and it's been awhile since I've travelled to Mexico, so please correct me if I'm wrong! Though I like warm soft tortillas best, my kids still do love the crunchy tacos. Side note: my daughter recently went on a field trip to La Purisima Mission and learned how to make fresh homemade tortillas. She couldn't believe how delicious they were. If you can get your hands on fresh corn tortillas, do it! Some grocery stores sell uncooked tortillas that you can cook on the stove.


Do you need a salsa recipe? My easy homemade salsa gets the best reviews! Check it out here. If you're not sure how to make a killer guacamole, be sure to head to this post next.
Yield: Serves 4-6Author: Yummy Mummy KitchenPrint Recipe
With ImageWithout Image Tempeh TacosThese easy tempeh tacos are an easy meatless dinner that's hearty and delicious!prep time: 5 MINScook time: 15 MINStotal time: 20 minsingredients
1 tablespoon olive or avocado oil1 small yellow onion, diced1 (8 oz.) package tempeh, crumbled 1-2 tablespoons taco seasoning 1/3 cup water or vegetable brothsea salt to taste warmed tortillas, for serving 2 cups shredded romaine lettuce, for serving1 cup salsa, for serving1 cup guacamole, for serving15 oz. black beans, warmed, for serving instructions
In a large skillet, heat the oil over medium heat. Add the onion and saute until tender, about 5 minutes. Add the tempeh, 1 tablespoon of taco seasoning, and water. The water helps the tempeh to absorb the flavors. Saute until the water has cooked off. Add more taco seasoning and salt to taste. Serve the warm tempeh taco filling with tortillas, beans, lettuce, salsa, guacamole, and any other favorite taco toppings! notes*You can mix drained black beans in with the tempeh taco meat at the end, serve them on the side, or not at all. As one of my children doesn't love tempeh, I keep the beans separate for her.
*I do my best to calculate approximate nutrition information for my readers who like it. However, I can't guarantee accuracy as I'm not a nutritionist and I use a third party site. If your health depends on nutrition information, please use your favorite calculator to re-calculate. Nutrition information is based on 1/4 of the tempeh "taco meat" filling only.
*Tempeh contains soy and usually wheat. Please avoid it if you have an allergy to either.calories
162fat (grams)
10sat. fat (grams)
2carbs (grams)
10protein (grams)
11sugar (grams)
2http://www.yummymummykitchen.com/2018/03/tempeh-tacos.htmlCreated using The Recipes Generator.recipe-inner{text-align:left;max-width:620px;border:6px double #009BFF;padding:20px;background:#f2f2f2;margin: 40px auto;font-family:Lato, sans-serif;}.recipe-inner a{color: #4193f0;}#recipe .recipe-name{font-size: 21px;}#recipe .info{position:relative;font-size:13px;text-transform:capitalize;border-bottom:2px solid #000;padding-bottom:7px;margin-bottom:20px}.info:after{content:'';display:table;clear:both}#recipe .info span:first-child{margin-right:30px}#printbutton{border:0;margin:0;color:#fff;float:right;background:#555; padding:5px;border-radius:3px;cursor:pointer}#recipe .time{text-transform:uppercase;font-size:12px;text-align:center;background:#fff;padding:15px 0;margin-bottom:20px}#recipe .time span:not(:last-child){margin-right:12px}#recipe .time span:not(:last-child):after{content:'';display:inline-block;height:10px;width:1px;background:#000;vertical-align:middle;margin-left:12px}#recipe .summary{line-height:1.7;font-style:italic}.ingredients{line-height:1.7;clear:both}.ingredients h3,.instructions h3,.notes h3{font-size:20px !important;font-weight:400 !important;margin-bottom:0;color:#000;text-transform: uppercase;}.ingredients ul{margin:0!important;margin-top:5px !important;}.instructions li{margin-bottom:15px !important;line-height:1.6;text-align:left;}.ingredients li{text-align:left}#recipe .instructions{margin-top: 30px;}#recipe .instructions ol,#recipe .instructions ol li {list-style:decimal !important;}#recipe .instructions ol{padding-left:39px;margin:0!important;margin-top:6px !important;}.posturl{border-top:1px solid #ccc;padding-top:10px;}.ing-section{padding-left:20px;margin: 10px 0;}.ing-section > span{font-weight:700}.recipe-credit{font-size:13px;border-top: 1px solid #ccc;padding:10px;text-align:center;background:#ffffff;margin:-20px;margin-top:15px;}.recipe-credit a{color:blue;text-decoration:none;}.copyright-statement{font-size: 13px;font-style:italic;border-top: 1px solid #ccc;margin-top:15px;padding-top:15px;line-height:1.6;}.notes pre{font-size: 15px;margin: 10px 0;padding-left: 20px;font-family: inherit;line-height: 1.7;white-space: pre-line;}.notes h3{margin: 0}.nutrition-info{font-size: 0;margin: 20px 0;padding: 10px;background: #fff;}.nutrition-info>div {display: inline-block;font-size: 14px;width: 20%;text-align: center;}.nutrition-info>div:nth-child(5) ~ div{margin-top: 20px;}.nutrition-info>div p{margin-top: 0;margin-bottom: 7px;}.print-options {display:none;position: absolute; top: 0; right: 0; background: #fff; border: 1px solid #ccc;z-index: 1;}.show-print-options{display:block}.print-options button { display: block; background: transparent; border: 0; cursor: pointer; padding: 10px; width: 100%; text-align: left; } .print-options button:hover { background: #555; color: #fff;}#recipe .info{position:relative}#recipe .image{text-align:center;margin:25px 0}#recipe .image img{max-width:100%;width:150px;height:150px;-o-object-fit:cover;object-fit:cover;border-radius:150px}#recipe .recipe-name{margin-top: 20px;text-align:center}#recipe .summary{margin:20px 0;clear:both;line-height:1.7;font-style:italic}#recipe .time{clear:both;border-top:1px dotted #000;border-bottom:1px dotted #000;border-right:0;border-left:0}


I've been getting a lot of questions about tempeh recently, so I wanted to share one of my favorite tempeh recipes with you. Tempeh tacos are quick and easy, loaded with plant based protein, and absolutely delicious. They're hearty, filling, and perfect for Taco Tuesday - or any day! Taco night is one of my favorites, and truth be told, rarely falls on an actual Tuesday. It's one of the rare dinners that everyone in my family loves. I like to serve our tacos on a big platter or lazy Susan taco bar style. That way everyone can assemble their tacos just the way they like. Less work for me and more enjoyment for them? That's a win-win in my book. These easy tempeh tacos are made with crumbled tempeh cooked with taco seasoning, black beans, salsa, lettuce, and of course guacamole. Sometimes I mix the black beans in with the tempeh "taco meat" and other times I keep them separate. Tempeh makes a great vegetarian and vegan alternative to taco meat because it has a similar texture when crumbled and is high in protein.
What is tempeh, anyway? I've you've come to this post via a Google or Pinterest search you probably already know what tempeh is. Otherwise, you may have seen these packages on the shelf near the tofu but never really known what to do with them. Tempeh is meaty, but doesn't have the texture of those faux meats like seitan. It has an earthy nuttiness and absorbs other flavors well. I usually bake it in BBQ sauce. I absolutely love BBQ tempeh in veggie sandwiches. Have you seen the craze that is the Whole Foods TTLA sandwich? Yes, I've tried and and it's good, but I prefer to make them at home.
Tempeh is made from fermented soy beans. Soy has become a hot and controversial topic. Because soy contains some phytoestrogen, some people worry that it can cause hormonal problems. However, many other foods contain phytoestrogens as well, including flax, apples, carrots, sesame seeds, yams, oats, lentils, and more. Given that tofu and tempeh have been eaten daily by one of the healthiest groups of people on Earth for over 2,000 years, I can't imagine it being harmful. A local nutritionist, SB Nutrition Geek, summed it up on Instagram well, "A small serving of soy is fine overall but when you isolate the estrogenic properties of soy (think soy isolates usually found in protein bars, soy milk, and veggie burgers) you are getting these phytoestrogens in bulk. Instead focus on soy in it's natural forms such as tofu, edamame, and tempeh...)." Of course if you have a soy or wheat allergy, you'll want to avoid tempeh. I'm not saying it's good for all bodies.
Ironically, "most of the world's soy crop ends up in feed for poultry, pork, cattle and even farmed fish." according to WWF. Sorry for geeking out there, I just find this all fascinating. For more information on soy, visit this article on NutritionFacts.org.
Making tempeh "taco meat" is incredibly easy. I saute a little onion, then add the crumbled tempeh and taco seasoning. You could make your own taco seasoning, but I usually keep it simple and use a store bought blend. Add just a little at first, as you can always add more heat, but can't easily remove it.
Now the tempeh taco meat is ready to be used to fill tacos. Let's talk about taco shells for a minute. When I was a kid I thought of tacos as having crispy shells. You know, the kind you buy at the grocery store wrapped in plastic and boxed. Over the years of eating really good Mexican tacos here in southern California, I've found that authentic tacos usually are made with fresh soft tortillas. I'm not Mexican though, and it's been awhile since I've travelled to Mexico, so please correct me if I'm wrong! Though I like warm soft tortillas best, my kids still do love the crunchy tacos. Side note: my daughter recently went on a field trip to La Purisima Mission and learned how to make fresh homemade tortillas. She couldn't believe how delicious they were. If you can get your hands on fresh corn tortillas, do it! Some grocery stores sell uncooked tortillas that you can cook on the stove.
Do you need a salsa recipe? My easy homemade salsa gets the best reviews! Check it out here. If you're not sure how to make a killer guacamole, be sure to head to this post next.
Yield: Serves 4-6Author: Yummy Mummy KitchenPrint Recipe
With ImageWithout Image
Tempeh TacosThese easy tempeh tacos are an easy meatless dinner that's hearty and delicious!prep time: 5 MINScook time: 15 MINStotal time: 20 minsingredients1 tablespoon olive or avocado oil1 small yellow onion, diced1 (8 oz.) package tempeh, crumbled 1-2 tablespoons taco seasoning 1/3 cup water or vegetable brothsea salt to taste warmed tortillas, for serving 2 cups shredded romaine lettuce, for serving1 cup salsa, for serving1 cup guacamole, for serving15 oz. black beans, warmed, for serving instructions
In a large skillet, heat the oil over medium heat. Add the onion and saute until tender, about 5 minutes. Add the tempeh, 1 tablespoon of taco seasoning, and water. The water helps the tempeh to absorb the flavors. Saute until the water has cooked off. Add more taco seasoning and salt to taste. Serve the warm tempeh taco filling with tortillas, beans, lettuce, salsa, guacamole, and any other favorite taco toppings! notes*You can mix drained black beans in with the tempeh taco meat at the end, serve them on the side, or not at all. As one of my children doesn't love tempeh, I keep the beans separate for her.
*I do my best to calculate approximate nutrition information for my readers who like it. However, I can't guarantee accuracy as I'm not a nutritionist and I use a third party site. If your health depends on nutrition information, please use your favorite calculator to re-calculate. Nutrition information is based on 1/4 of the tempeh "taco meat" filling only.
*Tempeh contains soy and usually wheat. Please avoid it if you have an allergy to either.calories
162fat (grams)
10sat. fat (grams)
2carbs (grams)
10protein (grams)
11sugar (grams)
2http://www.yummymummykitchen.com/2018/03/tempeh-tacos.htmlCreated using The Recipes Generator.recipe-inner{text-align:left;max-width:620px;border:6px double #009BFF;padding:20px;background:#f2f2f2;margin: 40px auto;font-family:Lato, sans-serif;}.recipe-inner a{color: #4193f0;}#recipe .recipe-name{font-size: 21px;}#recipe .info{position:relative;font-size:13px;text-transform:capitalize;border-bottom:2px solid #000;padding-bottom:7px;margin-bottom:20px}.info:after{content:'';display:table;clear:both}#recipe .info span:first-child{margin-right:30px}#printbutton{border:0;margin:0;color:#fff;float:right;background:#555; padding:5px;border-radius:3px;cursor:pointer}#recipe .time{text-transform:uppercase;font-size:12px;text-align:center;background:#fff;padding:15px 0;margin-bottom:20px}#recipe .time span:not(:last-child){margin-right:12px}#recipe .time span:not(:last-child):after{content:'';display:inline-block;height:10px;width:1px;background:#000;vertical-align:middle;margin-left:12px}#recipe .summary{line-height:1.7;font-style:italic}.ingredients{line-height:1.7;clear:both}.ingredients h3,.instructions h3,.notes h3{font-size:20px !important;font-weight:400 !important;margin-bottom:0;color:#000;text-transform: uppercase;}.ingredients ul{margin:0!important;margin-top:5px !important;}.instructions li{margin-bottom:15px !important;line-height:1.6;text-align:left;}.ingredients li{text-align:left}#recipe .instructions{margin-top: 30px;}#recipe .instructions ol,#recipe .instructions ol li {list-style:decimal !important;}#recipe .instructions ol{padding-left:39px;margin:0!important;margin-top:6px !important;}.posturl{border-top:1px solid #ccc;padding-top:10px;}.ing-section{padding-left:20px;margin: 10px 0;}.ing-section > span{font-weight:700}.recipe-credit{font-size:13px;border-top: 1px solid #ccc;padding:10px;text-align:center;background:#ffffff;margin:-20px;margin-top:15px;}.recipe-credit a{color:blue;text-decoration:none;}.copyright-statement{font-size: 13px;font-style:italic;border-top: 1px solid #ccc;margin-top:15px;padding-top:15px;line-height:1.6;}.notes pre{font-size: 15px;margin: 10px 0;padding-left: 20px;font-family: inherit;line-height: 1.7;white-space: pre-line;}.notes h3{margin: 0}.nutrition-info{font-size: 0;margin: 20px 0;padding: 10px;background: #fff;}.nutrition-info>div {display: inline-block;font-size: 14px;width: 20%;text-align: center;}.nutrition-info>div:nth-child(5) ~ div{margin-top: 20px;}.nutrition-info>div p{margin-top: 0;margin-bottom: 7px;}.print-options {display:none;position: absolute; top: 0; right: 0; background: #fff; border: 1px solid #ccc;z-index: 1;}.show-print-options{display:block}.print-options button { display: block; background: transparent; border: 0; cursor: pointer; padding: 10px; width: 100%; text-align: left; } .print-options button:hover { background: #555; color: #fff;}#recipe .info{position:relative}#recipe .image{text-align:center;margin:25px 0}#recipe .image img{max-width:100%;width:150px;height:150px;-o-object-fit:cover;object-fit:cover;border-radius:150px}#recipe .recipe-name{margin-top: 20px;text-align:center}#recipe .summary{margin:20px 0;clear:both;line-height:1.7;font-style:italic}#recipe .time{clear:both;border-top:1px dotted #000;border-bottom:1px dotted #000;border-right:0;border-left:0}
March 14, 2018
Vegan Spinach Artichoke Dip
The best ever creamy, warm, hearty, baked spinach artichoke dip. This addictive artichoke dip is naturally vegan, paleo, and gluten free! This post is sponsored by Reese Specialty Foods.
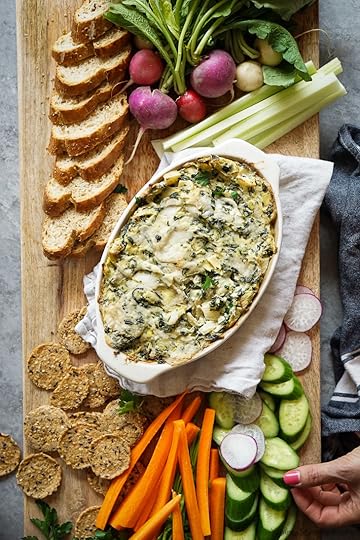
Warm, creamy, cheesy, and satisfying, baked spinach artichoke dip has always been one of my favorite comfort food appetizers. Spinach artichoke dip is traditionally made with a lot of dairy. Think sour cream, mayo, cream cheese, and Parmesan all mixed together. I prefer using nut based cream sauces over dairy sauces both in terms of taste and nutrition. Made with cashews as the base of the sauce, this irresistible baked spinach artichoke dip is vegan and paleo friendly. The whole food ingredients are simple and less processed, but the classic spinach artichoke dip flavor is all there.
If you follow my Instagram stories, you may have seen me unboxing an awesome package from Reese Specialty Foods. They sent me some of my family's favorite ingredients: artichoke hearts, capers, horseradish, and hearts of palm. All of these ingredients are such a simple way to add delicious flavor to many different recipes. Reese has been a trusted name in gourmet cooking for nearly a century. A bunch of you messaged me on Instagram to tell me that you loved harts of palm and were excited to see what I did with it. Though it's an ingredient that I haven't used much in the past, it was so much fun to step out of my comfort food zone and try it in new ways. I tested several ways of using it, but this spinach artichoke and hearts of palm dip was the clear winner.

You may be wondering, "What are hearts of palm, anyway?" My daughter calls hearts of palm "palm trees" and she's not far off. Hearts of palm are the edible core of the stem of a particular type of palm tree. They are most often grown in South America and common in Brazilian cooking. One of the things I love about cooking is that I can take a little trip to anywhere in the world without ever leaving my kitchen. They're a little bit crunchy, a little bit creamy, and remind me a lot of artichoke hearts. Hearts of palm are a delicious addition to salads, but are a versatile ingredient that can be used many ways. I've seen them used in everything from vegan "crab cakes" to ceviche. This vegan spinach artichoke dip recipe has to be my favorite use, however. The combination of the artichokes and hearts of palm creates the best hearty and comforting dip ever.
 The bulk of the ingredients for this baked spinach artichoke dip are pretty straightforward: artichoke hearts, hearts of palm, and frozen spinach that has been thawed and well drained. The creamy sauce, however, is something special. I've raved about the magic that is cashew cream in the past. It's what makes my favorite Broccoli Soup so rich and creamy. Cashew cream is simply raw cashews, soaked overnight and blended with water. Using raw cashews is important. Using roasted cashews will create a cashew cream that tastes nutty, rather than mild and creamy. To give our creamy sauce for this spinach artichoke dip that irresistible cheesy umami flavor, we need to add a little garlic powder, salt and pepper, and nutritional yeast. If you aren't a fan of nutritional yeast, you can omit it, and if you absolutely love it, you can double the amount in this recipe. If you haven't used this type of diary-free cashew sauce before this may sound a little strange, but trust me when I tell you that it is absolutely delicious. There isn't even the slightest hint of nuts in the finished dip, just delicious creaminess.

This is the best spinach artichoke dip I've had, and no one would ever know it's dairy free. Yummy Hubby, who loves cheese, had no idea. After eating half the dish of my first test with this recipe, he said, "Uh oh, I've eaten half the dish!" He was glad to hear that this recipe is made with such wholesome ingredients that eating the whole batch is totally fine.

I love this spinach artichoke dip as a party appetizer, served with crostini, crackers, and veggies. But can I be honest? Just give me a fork.

If you'd like to stock your pantry with these ingredients, you can find deals on Ibotta. Click here to check them out! Don't miss the short video to see the step-by-step. You can also share the video to your timeline on Facebook here!
Yield: Serves 6Author: Yummy Mummy KitchenPrint Recipe
With ImageWithout Image Vegan Spinach Artichoke DipA delicious warm spinach artichoke dip with hearts of palm and a creamy cashew based sauce. This wholesome dip is perfect for snacking or as part of a crudite platter.prep time: 8 hourcook time: 25 MINStotal time: 8 hours and 25 minsingredients
1 cup raw cashews, soaked in water overnight 3/4 cup water 1/8 cup nutritional yeast1 teaspoon garlic powder 1/2 teaspoon sea salt1/4 teaspoon pepper1 (14 oz.) can Reese artichoke hearts, drained and quartered1 (14 oz.) can Reese hearts of palm, drained and roughly chopped1/2 cup frozen spinach, thawed and drained 1/4 cup dairy-free mozzarella (optional) instructions
Preheat the oven to 425 degrees F. To make the cashew cream sauce, drain and rinse the soaked cashews. Place the cashews into a blender or food processor. Add 1/2 cup of the fresh water and blend until smooth and creamy. Add the nutritional yeast, garlic powder, salt and pepper and blend again until very smooth and creamy. Add more water as needed to create a smooth sauce. Set aside. Place the chopped artichoke hearts, hearts of palm, and spinach into a medium sized bowl. Pour the cashew cream over the top and stir in until thoroughly combined. Transfer to a small casserole or Au Gratin dish. I used an 8 1/2-inch oval baker. Top with mozzarella if using. Bake for 25 minutes, until the dip is very warm and the top is bubbly. Serve with pita chips, crackers, sliced baguette, or veggies. notesIf you're in a hurry you can quick soak the cashews by pouring boiling water over them and leaving them covered for 2-3 hours. They should be soft and easy to break apart with your fingers.
*I do my best to calculate approximate nutrition information for my readers who like it. However, I can't guarantee accuracy as I'm not a nutritionist and I use a third party site. If your health depends on nutrition information, please use your favorite calculator to re-calculate. Nutrition information is based on 1/6 of this recipe.calories
157fat (grams)
9sat. fat (grams)
2carbs (grams)
13protein (grams)
6.5sugar (grams)
2http://www.yummymummykitchen.com/2018/03/vegan-spinach-artichoke-dip-paleo.htmlCreated using The Recipes Generator.recipe-inner{text-align:left;max-width:620px;border:6px double #009BFF;padding:20px;background:#f2f2f2;margin: 40px auto;font-family:Lato, sans-serif;}.recipe-inner a{color: #4193f0;}#recipe .recipe-name{font-size: 21px;}#recipe .info{position:relative;font-size:13px;text-transform:capitalize;border-bottom:2px solid #000;padding-bottom:7px;margin-bottom:20px}.info:after{content:'';display:table;clear:both}#recipe .info span:first-child{margin-right:30px}#printbutton{border:0;margin:0;color:#fff;float:right;background:#555; padding:5px;border-radius:3px;cursor:pointer}#recipe .time{text-transform:uppercase;font-size:12px;text-align:center;background:#fff;padding:15px 0;margin-bottom:20px}#recipe .time span:not(:last-child){margin-right:12px}#recipe .time span:not(:last-child):after{content:'';display:inline-block;height:10px;width:1px;background:#000;vertical-align:middle;margin-left:12px}#recipe .summary{line-height:1.7;font-style:italic}.ingredients{line-height:1.7;clear:both}.ingredients h3,.instructions h3,.notes h3{font-size:20px !important;font-weight:400 !important;margin-bottom:0;color:#000;text-transform: uppercase;}.ingredients ul{margin:0!important;margin-top:5px !important;}.instructions li{margin-bottom:15px !important;line-height:1.6;text-align:left;}.ingredients li{text-align:left}#recipe .instructions{margin-top: 30px;}#recipe .instructions ol,#recipe .instructions ol li {list-style:decimal !important;}#recipe .instructions ol{padding-left:39px;margin:0!important;margin-top:6px !important;}.posturl{border-top:1px solid #ccc;padding-top:10px;}.ing-section{padding-left:20px;margin: 10px 0;}.ing-section > span{font-weight:700}.recipe-credit{font-size:13px;border-top: 1px solid #ccc;padding:10px;text-align:center;background:#ffffff;margin:-20px;margin-top:15px;}.recipe-credit a{color:blue;text-decoration:none;}.copyright-statement{font-size: 13px;font-style:italic;border-top: 1px solid #ccc;margin-top:15px;padding-top:15px;line-height:1.6;}.notes pre{font-size: 15px;margin: 10px 0;padding-left: 20px;font-family: inherit;line-height: 1.7;white-space: pre-line;}.notes h3{margin: 0}.nutrition-info{font-size: 0;margin: 20px 0;padding: 10px;background: #fff;}.nutrition-info>div {display: inline-block;font-size: 14px;width: 20%;text-align: center;}.nutrition-info>div:nth-child(5) ~ div{margin-top: 20px;}.nutrition-info>div p{margin-top: 0;margin-bottom: 7px;}.print-options {display:none;position: absolute; top: 0; right: 0; background: #fff; border: 1px solid #ccc;z-index: 1;}.show-print-options{display:block}.print-options button { display: block; background: transparent; border: 0; cursor: pointer; padding: 10px; width: 100%; text-align: left; } .print-options button:hover { background: #555; color: #fff;}#recipe .info{position:relative}#recipe .image{text-align:center;margin:25px 0}#recipe .image img{max-width:100%;width:150px;height:150px;-o-object-fit:cover;object-fit:cover;border-radius:150px}#recipe .recipe-name{margin-top: 20px;text-align:center}#recipe .summary{margin:20px 0;clear:both;line-height:1.7;font-style:italic}#recipe .time{clear:both;border-top:1px dotted #000;border-bottom:1px dotted #000;border-right:0;border-left:0}


Warm, creamy, cheesy, and satisfying, baked spinach artichoke dip has always been one of my favorite comfort food appetizers. Spinach artichoke dip is traditionally made with a lot of dairy. Think sour cream, mayo, cream cheese, and Parmesan all mixed together. I prefer using nut based cream sauces over dairy sauces both in terms of taste and nutrition. Made with cashews as the base of the sauce, this irresistible baked spinach artichoke dip is vegan and paleo friendly. The whole food ingredients are simple and less processed, but the classic spinach artichoke dip flavor is all there.
If you follow my Instagram stories, you may have seen me unboxing an awesome package from Reese Specialty Foods. They sent me some of my family's favorite ingredients: artichoke hearts, capers, horseradish, and hearts of palm. All of these ingredients are such a simple way to add delicious flavor to many different recipes. Reese has been a trusted name in gourmet cooking for nearly a century. A bunch of you messaged me on Instagram to tell me that you loved harts of palm and were excited to see what I did with it. Though it's an ingredient that I haven't used much in the past, it was so much fun to step out of my comfort food zone and try it in new ways. I tested several ways of using it, but this spinach artichoke and hearts of palm dip was the clear winner.
You may be wondering, "What are hearts of palm, anyway?" My daughter calls hearts of palm "palm trees" and she's not far off. Hearts of palm are the edible core of the stem of a particular type of palm tree. They are most often grown in South America and common in Brazilian cooking. One of the things I love about cooking is that I can take a little trip to anywhere in the world without ever leaving my kitchen. They're a little bit crunchy, a little bit creamy, and remind me a lot of artichoke hearts. Hearts of palm are a delicious addition to salads, but are a versatile ingredient that can be used many ways. I've seen them used in everything from vegan "crab cakes" to ceviche. This vegan spinach artichoke dip recipe has to be my favorite use, however. The combination of the artichokes and hearts of palm creates the best hearty and comforting dip ever.
The bulk of the ingredients for this baked spinach artichoke dip are pretty straightforward: artichoke hearts, hearts of palm, and frozen spinach that has been thawed and well drained. The creamy sauce, however, is something special. I've raved about the magic that is cashew cream in the past. It's what makes my favorite Broccoli Soup so rich and creamy. Cashew cream is simply raw cashews, soaked overnight and blended with water. Using raw cashews is important. Using roasted cashews will create a cashew cream that tastes nutty, rather than mild and creamy. To give our creamy sauce for this spinach artichoke dip that irresistible cheesy umami flavor, we need to add a little garlic powder, salt and pepper, and nutritional yeast. If you aren't a fan of nutritional yeast, you can omit it, and if you absolutely love it, you can double the amount in this recipe. If you haven't used this type of diary-free cashew sauce before this may sound a little strange, but trust me when I tell you that it is absolutely delicious. There isn't even the slightest hint of nuts in the finished dip, just delicious creaminess. This is the best spinach artichoke dip I've had, and no one would ever know it's dairy free. Yummy Hubby, who loves cheese, had no idea. After eating half the dish of my first test with this recipe, he said, "Uh oh, I've eaten half the dish!" He was glad to hear that this recipe is made with such wholesome ingredients that eating the whole batch is totally fine.
I love this spinach artichoke dip as a party appetizer, served with crostini, crackers, and veggies. But can I be honest? Just give me a fork.
If you'd like to stock your pantry with these ingredients, you can find deals on Ibotta. Click here to check them out! Don't miss the short video to see the step-by-step. You can also share the video to your timeline on Facebook here!
Yield: Serves 6Author: Yummy Mummy KitchenPrint Recipe
With ImageWithout Image
Vegan Spinach Artichoke DipA delicious warm spinach artichoke dip with hearts of palm and a creamy cashew based sauce. This wholesome dip is perfect for snacking or as part of a crudite platter.prep time: 8 hourcook time: 25 MINStotal time: 8 hours and 25 minsingredients1 cup raw cashews, soaked in water overnight 3/4 cup water 1/8 cup nutritional yeast1 teaspoon garlic powder 1/2 teaspoon sea salt1/4 teaspoon pepper1 (14 oz.) can Reese artichoke hearts, drained and quartered1 (14 oz.) can Reese hearts of palm, drained and roughly chopped1/2 cup frozen spinach, thawed and drained 1/4 cup dairy-free mozzarella (optional) instructions
Preheat the oven to 425 degrees F. To make the cashew cream sauce, drain and rinse the soaked cashews. Place the cashews into a blender or food processor. Add 1/2 cup of the fresh water and blend until smooth and creamy. Add the nutritional yeast, garlic powder, salt and pepper and blend again until very smooth and creamy. Add more water as needed to create a smooth sauce. Set aside. Place the chopped artichoke hearts, hearts of palm, and spinach into a medium sized bowl. Pour the cashew cream over the top and stir in until thoroughly combined. Transfer to a small casserole or Au Gratin dish. I used an 8 1/2-inch oval baker. Top with mozzarella if using. Bake for 25 minutes, until the dip is very warm and the top is bubbly. Serve with pita chips, crackers, sliced baguette, or veggies. notesIf you're in a hurry you can quick soak the cashews by pouring boiling water over them and leaving them covered for 2-3 hours. They should be soft and easy to break apart with your fingers.
*I do my best to calculate approximate nutrition information for my readers who like it. However, I can't guarantee accuracy as I'm not a nutritionist and I use a third party site. If your health depends on nutrition information, please use your favorite calculator to re-calculate. Nutrition information is based on 1/6 of this recipe.calories
157fat (grams)
9sat. fat (grams)
2carbs (grams)
13protein (grams)
6.5sugar (grams)
2http://www.yummymummykitchen.com/2018/03/vegan-spinach-artichoke-dip-paleo.htmlCreated using The Recipes Generator.recipe-inner{text-align:left;max-width:620px;border:6px double #009BFF;padding:20px;background:#f2f2f2;margin: 40px auto;font-family:Lato, sans-serif;}.recipe-inner a{color: #4193f0;}#recipe .recipe-name{font-size: 21px;}#recipe .info{position:relative;font-size:13px;text-transform:capitalize;border-bottom:2px solid #000;padding-bottom:7px;margin-bottom:20px}.info:after{content:'';display:table;clear:both}#recipe .info span:first-child{margin-right:30px}#printbutton{border:0;margin:0;color:#fff;float:right;background:#555; padding:5px;border-radius:3px;cursor:pointer}#recipe .time{text-transform:uppercase;font-size:12px;text-align:center;background:#fff;padding:15px 0;margin-bottom:20px}#recipe .time span:not(:last-child){margin-right:12px}#recipe .time span:not(:last-child):after{content:'';display:inline-block;height:10px;width:1px;background:#000;vertical-align:middle;margin-left:12px}#recipe .summary{line-height:1.7;font-style:italic}.ingredients{line-height:1.7;clear:both}.ingredients h3,.instructions h3,.notes h3{font-size:20px !important;font-weight:400 !important;margin-bottom:0;color:#000;text-transform: uppercase;}.ingredients ul{margin:0!important;margin-top:5px !important;}.instructions li{margin-bottom:15px !important;line-height:1.6;text-align:left;}.ingredients li{text-align:left}#recipe .instructions{margin-top: 30px;}#recipe .instructions ol,#recipe .instructions ol li {list-style:decimal !important;}#recipe .instructions ol{padding-left:39px;margin:0!important;margin-top:6px !important;}.posturl{border-top:1px solid #ccc;padding-top:10px;}.ing-section{padding-left:20px;margin: 10px 0;}.ing-section > span{font-weight:700}.recipe-credit{font-size:13px;border-top: 1px solid #ccc;padding:10px;text-align:center;background:#ffffff;margin:-20px;margin-top:15px;}.recipe-credit a{color:blue;text-decoration:none;}.copyright-statement{font-size: 13px;font-style:italic;border-top: 1px solid #ccc;margin-top:15px;padding-top:15px;line-height:1.6;}.notes pre{font-size: 15px;margin: 10px 0;padding-left: 20px;font-family: inherit;line-height: 1.7;white-space: pre-line;}.notes h3{margin: 0}.nutrition-info{font-size: 0;margin: 20px 0;padding: 10px;background: #fff;}.nutrition-info>div {display: inline-block;font-size: 14px;width: 20%;text-align: center;}.nutrition-info>div:nth-child(5) ~ div{margin-top: 20px;}.nutrition-info>div p{margin-top: 0;margin-bottom: 7px;}.print-options {display:none;position: absolute; top: 0; right: 0; background: #fff; border: 1px solid #ccc;z-index: 1;}.show-print-options{display:block}.print-options button { display: block; background: transparent; border: 0; cursor: pointer; padding: 10px; width: 100%; text-align: left; } .print-options button:hover { background: #555; color: #fff;}#recipe .info{position:relative}#recipe .image{text-align:center;margin:25px 0}#recipe .image img{max-width:100%;width:150px;height:150px;-o-object-fit:cover;object-fit:cover;border-radius:150px}#recipe .recipe-name{margin-top: 20px;text-align:center}#recipe .summary{margin:20px 0;clear:both;line-height:1.7;font-style:italic}#recipe .time{clear:both;border-top:1px dotted #000;border-bottom:1px dotted #000;border-right:0;border-left:0}
March 8, 2018
No Bake Superfood Energy Bars
Easy no-bake energy bars made with a handful of natural ingredients like gluten-free oats, flax meal, pumpkin seeds, and cranberries. These delicious bars make such a great plant based snack or breakfast on the go. 
I love stocking my fridge with homemade energy balls and bites. You may have noticed... I've already shared a few favorites: Nut-Free Energy Balls, Trail Mix Energy Balls, Cacao Almond Bliss Balls, Cookie Dough Balls, and Raw Brownie Bars. I love having these easy grab-and-go snacks for before or after the gym, an afternoon snack, or when there's no time for breakfast. Yummy Hubby has long been a lover of energy bars. Rather than spending more money on store-bought bars that are often quite processed, I prefer to make them at home whenever possible. And also, why can I never cut bars into equal, straight, squares?! You'd think it wouldn't be that difficult.
These no-bake energy bars made with superfoods like flax, pumpkin seeds, and cranberries are delicious for snacking, breakfast, and life on-the-go. For a school-friendly, nut-free version, simply use sunflower seed butter instead of peanut butter. These no-bake granola bars are easy to make, hearty, satisfying, just sweet enough, with a little crunch. If you like granola bars, you'll love these.

I've been trying to add more flax and pumpkin seeds into our diets lately. Flax is a great plant-based source of Omega-3s, and since I've been adding flax (in oil or seed form) to Yummy Hubby's smoothies for the past several months, we have actually noticed some health benefits. Pumpkin seeds or pepitas, are a good source of zinc, so I've been keeping a jar around for snacking and adding to salads. I'm not sure if I've mentioned this here before, but a few months ago I started using a nutrition app called Cronometer. I was getting nearly all the recommended vitamins and minerals daily, but noticed zinc was one I wasn't getting enough of. Enter pumpkin seeds. Tracking micronutrients for even a week is an interesting experiment.

When I first started making homemade energy balls and bars, I used a bowl and spoon to mix everything together. I've discovered though, that using a food processor just slightly chops the ingredients and helps everything stick together more easily. It's also super quick and easy.
 These homemade energy bars come together in under 5 minutes with just a few pulses of the food processor. Press the dough firmly into a pan and refrigerate until very chilled and firm. If you prefer bite-sized balls, you can absolutely use this recipe to make energy balls instead. I haven't decided if I prefer energy balls or bars. What you you think? Be sure to store these bars in an airtight container so they don't dry out.
Yield: About 9 (2.5") squaresAuthor: Yummy Mummy KitchenPrint Recipe
With ImageWithout Image No Bake Superfood Energy BarsDelicious no-bake energy bars made with oats, flax seed meal, and peanut butter. These bars are easy to make vegan and gluten-free with the recommended ingredients. These superfood energy bars are great for snacking, breakfast, and taking to-go on busy days.prep time: 5 MINScook time: 1 hourtotal time: 1 hours and 5 minsingredients
1 cup rolled oats (certified gluten free if necessary) 1/2 cup flax meal1/2 cup crunchy peanut butter1 teaspoon vanilla extract1/3 cup maple syrup 1/3 cup pumpkin seeds (pepitas) 1/3 cup mini chocolate chips (Enjoy Life brand) 1/3 cup dried cranberries pinch of pink or sea salt to taste instructions
In the bowl of a food processor, pulse together the oats, flax meal, peanut butter, vanilla, and maple syrup a few times just until combined. Add the pepitas, chocolate, and cranberries and pulse again a couple of times until just mixed in. Line an 8-inch baking dish with parchment paper. Press the energy bar mix into the bottom very firmly. I find it helps to use the back of a cup to really pack it in. I like to sprinkle just a tiny bit of salt on top. Refrigerate until chilled and firm, at least an hour. Cut into squares. Store in an airtight container in the refrigerator. notes*I do my best to calculate approximate nutrition information for my readers who like it. However, I can't guarantee accuracy as I'm not a nutritionist and I use a third party site. If your health depends on nutrition information, please use your favorite calculator to re-calculate. calories
219fat (grams)
14sat. fat (grams)
2carbs (grams)
21protein (grams)
7sugar (grams)
11http://www.yummymummykitchen.com/2018/03/no-bake-superfood-energy-bars.htmlCreated using The Recipes Generator.recipe-inner{text-align:left;max-width:620px;border:6px double #009BFF;padding:20px;background:#f2f2f2;margin: 40px auto;font-family:Lato, sans-serif;}.recipe-inner a{color: #4193f0;}#recipe .recipe-name{font-size: 21px;}#recipe .info{position:relative;font-size:13px;text-transform:capitalize;border-bottom:2px solid #000;padding-bottom:7px;margin-bottom:20px}.info:after{content:'';display:table;clear:both}#recipe .info span:first-child{margin-right:30px}#printbutton{border:0;margin:0;color:#fff;float:right;background:#555; padding:5px;border-radius:3px;cursor:pointer}#recipe .time{text-transform:uppercase;font-size:12px;text-align:center;background:#fff;padding:15px 0;margin-bottom:20px}#recipe .time span:not(:last-child){margin-right:12px}#recipe .time span:not(:last-child):after{content:'';display:inline-block;height:10px;width:1px;background:#000;vertical-align:middle;margin-left:12px}#recipe .summary{line-height:1.7;font-style:italic}.ingredients{line-height:1.7;clear:both}.ingredients h3,.instructions h3,.notes h3{font-size:20px !important;font-weight:400 !important;margin-bottom:0;color:#000;text-transform: uppercase;}.ingredients ul{margin:0!important;margin-top:5px !important;}.instructions li{margin-bottom:15px !important;line-height:1.6;text-align:left;}.ingredients li{text-align:left}#recipe .instructions{margin-top: 30px;}#recipe .instructions ol,#recipe .instructions ol li {list-style:decimal !important;}#recipe .instructions ol{padding-left:39px;margin:0!important;margin-top:6px !important;}.posturl{border-top:1px solid #ccc;padding-top:10px;}.ing-section{padding-left:20px;margin: 10px 0;}.ing-section > span{font-weight:700}.recipe-credit{font-size:13px;border-top: 1px solid #ccc;padding:10px;text-align:center;background:#ffffff;margin:-20px;margin-top:15px;}.recipe-credit a{color:blue;text-decoration:none;}.copyright-statement{font-size: 13px;font-style:italic;border-top: 1px solid #ccc;margin-top:15px;padding-top:15px;line-height:1.6;}.notes pre{font-size: 15px;margin: 10px 0;padding-left: 20px;font-family: inherit;line-height: 1.7;white-space: pre-line;}.notes h3{margin: 0}.nutrition-info{font-size: 0;margin: 20px 0;padding: 10px;background: #fff;}.nutrition-info>div {display: inline-block;font-size: 14px;width: 20%;text-align: center;}.nutrition-info>div:nth-child(5) ~ div{margin-top: 20px;}.nutrition-info>div p{margin-top: 0;margin-bottom: 7px;}.print-options {display:none;position: absolute; top: 0; right: 0; background: #fff; border: 1px solid #ccc;z-index: 1;}.show-print-options{display:block}.print-options button { display: block; background: transparent; border: 0; cursor: pointer; padding: 10px; width: 100%; text-align: left; } .print-options button:hover { background: #555; color: #fff;}#recipe .info{position:relative}#recipe .image{text-align:center;margin:25px 0}#recipe .image img{max-width:100%;width:150px;height:150px;-o-object-fit:cover;object-fit:cover;border-radius:150px}#recipe .recipe-name{margin-top: 20px;text-align:center}#recipe .summary{margin:20px 0;clear:both;line-height:1.7;font-style:italic}#recipe .time{clear:both;border-top:1px dotted #000;border-bottom:1px dotted #000;border-right:0;border-left:0}


I love stocking my fridge with homemade energy balls and bites. You may have noticed... I've already shared a few favorites: Nut-Free Energy Balls, Trail Mix Energy Balls, Cacao Almond Bliss Balls, Cookie Dough Balls, and Raw Brownie Bars. I love having these easy grab-and-go snacks for before or after the gym, an afternoon snack, or when there's no time for breakfast. Yummy Hubby has long been a lover of energy bars. Rather than spending more money on store-bought bars that are often quite processed, I prefer to make them at home whenever possible. And also, why can I never cut bars into equal, straight, squares?! You'd think it wouldn't be that difficult.
These no-bake energy bars made with superfoods like flax, pumpkin seeds, and cranberries are delicious for snacking, breakfast, and life on-the-go. For a school-friendly, nut-free version, simply use sunflower seed butter instead of peanut butter. These no-bake granola bars are easy to make, hearty, satisfying, just sweet enough, with a little crunch. If you like granola bars, you'll love these.
I've been trying to add more flax and pumpkin seeds into our diets lately. Flax is a great plant-based source of Omega-3s, and since I've been adding flax (in oil or seed form) to Yummy Hubby's smoothies for the past several months, we have actually noticed some health benefits. Pumpkin seeds or pepitas, are a good source of zinc, so I've been keeping a jar around for snacking and adding to salads. I'm not sure if I've mentioned this here before, but a few months ago I started using a nutrition app called Cronometer. I was getting nearly all the recommended vitamins and minerals daily, but noticed zinc was one I wasn't getting enough of. Enter pumpkin seeds. Tracking micronutrients for even a week is an interesting experiment.
When I first started making homemade energy balls and bars, I used a bowl and spoon to mix everything together. I've discovered though, that using a food processor just slightly chops the ingredients and helps everything stick together more easily. It's also super quick and easy.
These homemade energy bars come together in under 5 minutes with just a few pulses of the food processor. Press the dough firmly into a pan and refrigerate until very chilled and firm. If you prefer bite-sized balls, you can absolutely use this recipe to make energy balls instead. I haven't decided if I prefer energy balls or bars. What you you think? Be sure to store these bars in an airtight container so they don't dry out.Yield: About 9 (2.5") squaresAuthor: Yummy Mummy KitchenPrint Recipe
With ImageWithout Image
No Bake Superfood Energy BarsDelicious no-bake energy bars made with oats, flax seed meal, and peanut butter. These bars are easy to make vegan and gluten-free with the recommended ingredients. These superfood energy bars are great for snacking, breakfast, and taking to-go on busy days.prep time: 5 MINScook time: 1 hourtotal time: 1 hours and 5 minsingredients1 cup rolled oats (certified gluten free if necessary) 1/2 cup flax meal1/2 cup crunchy peanut butter1 teaspoon vanilla extract1/3 cup maple syrup 1/3 cup pumpkin seeds (pepitas) 1/3 cup mini chocolate chips (Enjoy Life brand) 1/3 cup dried cranberries pinch of pink or sea salt to taste instructions
In the bowl of a food processor, pulse together the oats, flax meal, peanut butter, vanilla, and maple syrup a few times just until combined. Add the pepitas, chocolate, and cranberries and pulse again a couple of times until just mixed in. Line an 8-inch baking dish with parchment paper. Press the energy bar mix into the bottom very firmly. I find it helps to use the back of a cup to really pack it in. I like to sprinkle just a tiny bit of salt on top. Refrigerate until chilled and firm, at least an hour. Cut into squares. Store in an airtight container in the refrigerator. notes*I do my best to calculate approximate nutrition information for my readers who like it. However, I can't guarantee accuracy as I'm not a nutritionist and I use a third party site. If your health depends on nutrition information, please use your favorite calculator to re-calculate. calories
219fat (grams)
14sat. fat (grams)
2carbs (grams)
21protein (grams)
7sugar (grams)
11http://www.yummymummykitchen.com/2018/03/no-bake-superfood-energy-bars.htmlCreated using The Recipes Generator.recipe-inner{text-align:left;max-width:620px;border:6px double #009BFF;padding:20px;background:#f2f2f2;margin: 40px auto;font-family:Lato, sans-serif;}.recipe-inner a{color: #4193f0;}#recipe .recipe-name{font-size: 21px;}#recipe .info{position:relative;font-size:13px;text-transform:capitalize;border-bottom:2px solid #000;padding-bottom:7px;margin-bottom:20px}.info:after{content:'';display:table;clear:both}#recipe .info span:first-child{margin-right:30px}#printbutton{border:0;margin:0;color:#fff;float:right;background:#555; padding:5px;border-radius:3px;cursor:pointer}#recipe .time{text-transform:uppercase;font-size:12px;text-align:center;background:#fff;padding:15px 0;margin-bottom:20px}#recipe .time span:not(:last-child){margin-right:12px}#recipe .time span:not(:last-child):after{content:'';display:inline-block;height:10px;width:1px;background:#000;vertical-align:middle;margin-left:12px}#recipe .summary{line-height:1.7;font-style:italic}.ingredients{line-height:1.7;clear:both}.ingredients h3,.instructions h3,.notes h3{font-size:20px !important;font-weight:400 !important;margin-bottom:0;color:#000;text-transform: uppercase;}.ingredients ul{margin:0!important;margin-top:5px !important;}.instructions li{margin-bottom:15px !important;line-height:1.6;text-align:left;}.ingredients li{text-align:left}#recipe .instructions{margin-top: 30px;}#recipe .instructions ol,#recipe .instructions ol li {list-style:decimal !important;}#recipe .instructions ol{padding-left:39px;margin:0!important;margin-top:6px !important;}.posturl{border-top:1px solid #ccc;padding-top:10px;}.ing-section{padding-left:20px;margin: 10px 0;}.ing-section > span{font-weight:700}.recipe-credit{font-size:13px;border-top: 1px solid #ccc;padding:10px;text-align:center;background:#ffffff;margin:-20px;margin-top:15px;}.recipe-credit a{color:blue;text-decoration:none;}.copyright-statement{font-size: 13px;font-style:italic;border-top: 1px solid #ccc;margin-top:15px;padding-top:15px;line-height:1.6;}.notes pre{font-size: 15px;margin: 10px 0;padding-left: 20px;font-family: inherit;line-height: 1.7;white-space: pre-line;}.notes h3{margin: 0}.nutrition-info{font-size: 0;margin: 20px 0;padding: 10px;background: #fff;}.nutrition-info>div {display: inline-block;font-size: 14px;width: 20%;text-align: center;}.nutrition-info>div:nth-child(5) ~ div{margin-top: 20px;}.nutrition-info>div p{margin-top: 0;margin-bottom: 7px;}.print-options {display:none;position: absolute; top: 0; right: 0; background: #fff; border: 1px solid #ccc;z-index: 1;}.show-print-options{display:block}.print-options button { display: block; background: transparent; border: 0; cursor: pointer; padding: 10px; width: 100%; text-align: left; } .print-options button:hover { background: #555; color: #fff;}#recipe .info{position:relative}#recipe .image{text-align:center;margin:25px 0}#recipe .image img{max-width:100%;width:150px;height:150px;-o-object-fit:cover;object-fit:cover;border-radius:150px}#recipe .recipe-name{margin-top: 20px;text-align:center}#recipe .summary{margin:20px 0;clear:both;line-height:1.7;font-style:italic}#recipe .time{clear:both;border-top:1px dotted #000;border-bottom:1px dotted #000;border-right:0;border-left:0}
March 4, 2018
Instant Pot Vegetarian Chili
An easy vegetarian bean, quinoa, and sweet potato chili made in the Instant Pot pressure cooker or slow cooker.

We've had a few days of cold weather lately and that always leaves me wanting something really warm for dinner. Chili has long been my go-to cold weather dinner. I make it on the stove, in the slow cooker, and now in my Instant Pot electric pressure cooker too. My Instant Pot Lentil Soup was such a big hit (thanks, guys!) that I wanted to share another hearty Instant Pot recipe with you. If you don't have an Instant Pot, don't worry, I'll leave slow cooker instructions too. If it seems like I'm posting a lot of Instant Pot recipes lately, there are two reasons for that. First, I'm really enjoying using it. I love that I can toss everything in and forget about it while I go about tending to other things. Second, I know many of my blog visitors are looking for Instant Pot recipes, so I'd like to have a nice batch of recipes living here. CONTINUE READING THIS POST »


We've had a few days of cold weather lately and that always leaves me wanting something really warm for dinner. Chili has long been my go-to cold weather dinner. I make it on the stove, in the slow cooker, and now in my Instant Pot electric pressure cooker too. My Instant Pot Lentil Soup was such a big hit (thanks, guys!) that I wanted to share another hearty Instant Pot recipe with you. If you don't have an Instant Pot, don't worry, I'll leave slow cooker instructions too. If it seems like I'm posting a lot of Instant Pot recipes lately, there are two reasons for that. First, I'm really enjoying using it. I love that I can toss everything in and forget about it while I go about tending to other things. Second, I know many of my blog visitors are looking for Instant Pot recipes, so I'd like to have a nice batch of recipes living here. CONTINUE READING THIS POST »
February 27, 2018
Orange Vinaigrette
Naturally sweet, tangy, and low-oil, this happy orange vinaigrette is a great citrus-season salad dressing. Try it on my favorite antioxidant salad! 
One of my favorite salads to grab while I'm out and about here in Santa Barbara is the Superfood Salad from The Honey Bee. I feel like The Honey Bee just gets me. The menu is filled with nourishing items that are so similar to what I make myself at home. They even have a Yellow Curry Bowl just like mine! Back to the superfood salad... It's packed with quinoa, kale, berries, avocado, and slivered almonds, with a lemon poppy seed dressing. When I can't get downtown I like to recreate this salad for myself for lunch. My only switch up is to use a homemade orange vinaigrette. The great thing about using orange juice as the base for dressings is that it's naturally sweet, so you need very little additional sweetener. This is such a bright and sunny salad and homemade dressing, I know you're going to love it. And the superfood salad is filled with fiber, protein, and you know it's got tons of vitamins going on with all those colors. But of course you can use this orange vinaigrette any way you like.
CONTINUE READING THIS POST »
February 25, 2018
Gluten Free Carrot Muffins
Simple ingredients like oats, nuts, carrots, and maple syrup come together to make the most irresistible (and secretly healthy) carrot cake muffins. Top them with vegan cream cheese frosting, or just a sprinkle of coconut sugar. 
This week has been complete muffin madness over here as I worked on this recipe. You know that song that goes... "Do you know, the Muffin Man, the Muffin Man, the Muffin man..." yeah, I feel like that man. Not one, not two, not three, but four batches of these were made. I tried them with coconut sugar (not sweet enough and too dry) and with various amounts of oat flour and additions until they were just right. My 7 year old taste-tester was happy to lend her services and approved this recipe. Carrot cake is one of my favorite cakes. Every time I go to Jeannine's bakery, it's like those glorious carrot cupcakes with swirly cream cheese frosting are calling my name. I've meant to work on a more wholesome carrot muffin recipe for years now. To make these muffins a bit healthier than typical muffins, in my opinion, I swapped out any processed flours for oat flour, which is simply oats grounded in the blender. White sugar also got thrown out and replaced with maple syrup.
These oat flour carrot muffins are tender with a little crunch from the walnuts, lightly sweet, made easy in the blender, and great for breakfast or snacking. They're made with wholesome ingredients and are naturally gluten-free and vegan. You'd never know these muffins are free of added oils, bleached flours, and refined sugar. CONTINUE READING THIS POST »
February 22, 2018
Golden Spiced Turmeric Rice
Wonderfully aromatic golden turmeric rice with Indian spices is the perfect side dish! This delicious rice recipe is made easy with the help of the Instant Pot pressure cooker or rice cooker.

As I mentioned when I posted the Chana Masala recipe a couple of months ago, Yummy Hubby and I are big huge fans of Indian food. I got the nicest message to my Facebook page inbox from a gal in India who was thrilled I'd posted chana masala and recommended I try aloo gobi next! Can't wait! I love the way blogging connects us foodies from all over the world. And I really love the rich, flavorful spices in Indian cooking, and that there are so many vegetarian options.
I almost always order chana masala, while hubby orders baingan bharta, a delicious vegetarian eggplant dish. I've discovered that mixing our two dishes together is the most delicious option of all though. Both of these dishes, like many Indian dishes, taste best with rice to soak up all of the flavorful sauces. I've been switching things up lately from the regular white rice, and quinoa, to an aromatic golden spiced rice for our Indian dinner nights.

Golden spiced turmeric rice is a wonderful side dish that would go with many recipes, from grilled kabobs to channa masala and Buddha bowls. I've found myself making rice much more frequently now that I have an Instant Pot. I have never owned a rice cooker, so I never understood how much easier cooking rice could be in either a rice or pressure cooker. I add the handful of ingredients to the pot, turn it on, and it cooks itself and turns off when it should. Burned rice because I forgot to turn on a timer is a thing of the past.

The golden rice at our most frequented Indian restaurant, Flavor of India, is called Pilau Rice and has peas in addition to a lovely yellow color. I learned that some pilau rice recipes are made with saffron, while others are made with turmeric. I went with turmeric for this spiced rice since it's an ingredient I try to use every day and less expensive than saffron. Turmeric is a very common spice in Indian cooking, and has many health benefits. Turmeric is perhaps most famous for its anti-inflammatory properties.

Look at that golden color!

The kids agreed that this golden rice is much tastier than my usual white or brown rice. It's so delicious, in fact, that I have to restrain myself from eating too much straight from the pot before dinner. A touch of pink Himalayan salt and pat of dairy-free butter (Miyoko's is my favorite) bring out the flavors of this rice beautifully, so don't skip that part. My favorite way to serve this golden turmeric rice is with chana masala, so don't forget to grab that recipe too!
Yield: Serves 6-8Author: Yummy Mummy KitchenPrint Recipe Golden Turmeric RiceAn aromatic Indian inspired spiced turmeric rice that's the perfect accompaniment to curries.prep time: 5 MINScook time: 10 MINStotal time: 15 minsingredients
2 cups basmati rice, rinsed 2 teaspoons ground turmeric6 whole cloves1 bay leaf1/2 teaspoon fennel seeds 2 1/2 cups vegetable broth2 tablespoons non-dairy butter (I love Miyoko's) Himilayan sea salt instructions
Place the rice, turmeric, cloves, bay leaf, fennel, and broth in the bowl of an Instant pot, electric pressure cooker, or rice cooker. If using a pressure cooker, turn the valve to sealing. Hit the "rice" button and let it do its thing until it turns off automatically when the rice is done. Let sit for 10 minutes, then release any pressure if using a pressure cooker. Stir in the butter and sprinkle with salt. Fluff with a fork. Taste and add more salt as needed - it makes a big difference so don't be shy. notesYou can play with the aromatics by adding a cinnamon stick, cardamom pods, or mustard seed.
Nutrition information has been calculated for 1/6 of this recipe not including the peanut sauce. Calculations are done on a third party site, and I am not a certified nutritionist, so I can't guarantee accuracy. If your health depends on nutrition facts, please calculate again using your favorite calculator.calories
279fat (grams)
5sat. fat (grams)
2carbs (grams)
50protein (grams)
7http://www.yummymummykitchen.com/2018/02/golden-spiced-turmeric-Indian-rice.htmlCreated using The Recipes Generator.recipe-inner{text-align:left;max-width:620px;border:6px double #009BFF;padding:20px;background:#f2f2f2;margin: 40px auto;font-family:Lato, sans-serif;}.recipe-inner a{color: #4193f0;}#recipe .recipe-name{font-size: 21px;}#recipe .info{font-size:13px;text-transform:capitalize;border-bottom:2px solid #000;padding-bottom:7px;margin-bottom:20px}.info:after{content:'';display:table;clear:both}#recipe .info span:first-child{margin-right:30px}#printbutton{border:0;margin:0;color:#fff;float:right;background:#555; padding:5px;border-radius:3px;cursor:pointer}#recipe .time{text-transform:uppercase;font-size:12px;text-align:center;background:#fff;padding:15px 0;margin-bottom:20px}#recipe .time span:not(:last-child){margin-right:12px}#recipe .time span:not(:last-child):after{content:'';display:inline-block;height:10px;width:1px;background:#000;vertical-align:middle;margin-left:12px}#recipe .summary{line-height:1.7;font-style:italic}.ingredients{line-height:1.7;clear:both}.ingredients h3,.instructions h3,.notes h3{font-size:20px !important;font-weight:400 !important;margin-bottom:0;color:#000;text-transform: uppercase;}.ingredients ul{margin:0!important;margin-top:5px !important;}.instructions li{margin-bottom:15px !important;line-height:1.6;text-align:left;}.ingredients li{text-align:left}#recipe .instructions{margin-top: 30px;}#recipe .instructions ol,#recipe .instructions ol li {list-style:decimal !important;}#recipe .instructions ol{padding-left:39px;margin:0!important;margin-top:6px !important;}.posturl{border-top:1px solid #ccc;padding-top:10px;}.ing-section{padding-left:20px;margin: 10px 0;}.ing-section > span{font-weight:700}.recipe-credit{font-size:13px;border-top: 1px solid #ccc;padding:10px;text-align:center;background:#ffffff;margin:-20px;margin-top:15px;}.recipe-credit a{color:blue;text-decoration:none;}.copyright-statement{font-size: 13px;font-style:italic;border-top: 1px solid #ccc;margin-top:15px;padding-top:15px;line-height:1.6;}.notes pre{font-size: 15px;margin: 10px 0;padding-left: 20px;font-family: inherit;line-height: 1.7;white-space: pre-line;}.notes h3{margin: 0}.nutrition-info{font-size: 0;margin: 20px 0;padding: 10px;background: #fff;}.nutrition-info>div {display: inline-block;font-size: 14px;width: 20%;text-align: center;}.nutrition-info>div:nth-child(5) ~ div{margin-top: 20px;}.nutrition-info>div p{margin-top: 0;margin-bottom: 7px;}#recipe .info{position:relative}#recipe .image{text-align:center;margin:25px 0}#recipe .image img{max-width:100%;width:150px;height:150px;-o-object-fit:cover;object-fit:cover;border-radius:150px}#recipe .recipe-name{margin-top: 20px;text-align:center}#recipe .summary{margin:20px 0;clear:both;line-height:1.7;font-style:italic}#recipe .time{clear:both;border-top:1px dotted #000;border-bottom:1px dotted #000;border-right:0;border-left:0}


As I mentioned when I posted the Chana Masala recipe a couple of months ago, Yummy Hubby and I are big huge fans of Indian food. I got the nicest message to my Facebook page inbox from a gal in India who was thrilled I'd posted chana masala and recommended I try aloo gobi next! Can't wait! I love the way blogging connects us foodies from all over the world. And I really love the rich, flavorful spices in Indian cooking, and that there are so many vegetarian options.
I almost always order chana masala, while hubby orders baingan bharta, a delicious vegetarian eggplant dish. I've discovered that mixing our two dishes together is the most delicious option of all though. Both of these dishes, like many Indian dishes, taste best with rice to soak up all of the flavorful sauces. I've been switching things up lately from the regular white rice, and quinoa, to an aromatic golden spiced rice for our Indian dinner nights.
Golden spiced turmeric rice is a wonderful side dish that would go with many recipes, from grilled kabobs to channa masala and Buddha bowls. I've found myself making rice much more frequently now that I have an Instant Pot. I have never owned a rice cooker, so I never understood how much easier cooking rice could be in either a rice or pressure cooker. I add the handful of ingredients to the pot, turn it on, and it cooks itself and turns off when it should. Burned rice because I forgot to turn on a timer is a thing of the past.
The golden rice at our most frequented Indian restaurant, Flavor of India, is called Pilau Rice and has peas in addition to a lovely yellow color. I learned that some pilau rice recipes are made with saffron, while others are made with turmeric. I went with turmeric for this spiced rice since it's an ingredient I try to use every day and less expensive than saffron. Turmeric is a very common spice in Indian cooking, and has many health benefits. Turmeric is perhaps most famous for its anti-inflammatory properties.
Look at that golden color!
The kids agreed that this golden rice is much tastier than my usual white or brown rice. It's so delicious, in fact, that I have to restrain myself from eating too much straight from the pot before dinner. A touch of pink Himalayan salt and pat of dairy-free butter (Miyoko's is my favorite) bring out the flavors of this rice beautifully, so don't skip that part. My favorite way to serve this golden turmeric rice is with chana masala, so don't forget to grab that recipe too!
Yield: Serves 6-8Author: Yummy Mummy KitchenPrint Recipe
Golden Turmeric RiceAn aromatic Indian inspired spiced turmeric rice that's the perfect accompaniment to curries.prep time: 5 MINScook time: 10 MINStotal time: 15 minsingredients2 cups basmati rice, rinsed 2 teaspoons ground turmeric6 whole cloves1 bay leaf1/2 teaspoon fennel seeds 2 1/2 cups vegetable broth2 tablespoons non-dairy butter (I love Miyoko's) Himilayan sea salt instructions
Place the rice, turmeric, cloves, bay leaf, fennel, and broth in the bowl of an Instant pot, electric pressure cooker, or rice cooker. If using a pressure cooker, turn the valve to sealing. Hit the "rice" button and let it do its thing until it turns off automatically when the rice is done. Let sit for 10 minutes, then release any pressure if using a pressure cooker. Stir in the butter and sprinkle with salt. Fluff with a fork. Taste and add more salt as needed - it makes a big difference so don't be shy. notesYou can play with the aromatics by adding a cinnamon stick, cardamom pods, or mustard seed.
Nutrition information has been calculated for 1/6 of this recipe not including the peanut sauce. Calculations are done on a third party site, and I am not a certified nutritionist, so I can't guarantee accuracy. If your health depends on nutrition facts, please calculate again using your favorite calculator.calories
279fat (grams)
5sat. fat (grams)
2carbs (grams)
50protein (grams)
7http://www.yummymummykitchen.com/2018/02/golden-spiced-turmeric-Indian-rice.htmlCreated using The Recipes Generator.recipe-inner{text-align:left;max-width:620px;border:6px double #009BFF;padding:20px;background:#f2f2f2;margin: 40px auto;font-family:Lato, sans-serif;}.recipe-inner a{color: #4193f0;}#recipe .recipe-name{font-size: 21px;}#recipe .info{font-size:13px;text-transform:capitalize;border-bottom:2px solid #000;padding-bottom:7px;margin-bottom:20px}.info:after{content:'';display:table;clear:both}#recipe .info span:first-child{margin-right:30px}#printbutton{border:0;margin:0;color:#fff;float:right;background:#555; padding:5px;border-radius:3px;cursor:pointer}#recipe .time{text-transform:uppercase;font-size:12px;text-align:center;background:#fff;padding:15px 0;margin-bottom:20px}#recipe .time span:not(:last-child){margin-right:12px}#recipe .time span:not(:last-child):after{content:'';display:inline-block;height:10px;width:1px;background:#000;vertical-align:middle;margin-left:12px}#recipe .summary{line-height:1.7;font-style:italic}.ingredients{line-height:1.7;clear:both}.ingredients h3,.instructions h3,.notes h3{font-size:20px !important;font-weight:400 !important;margin-bottom:0;color:#000;text-transform: uppercase;}.ingredients ul{margin:0!important;margin-top:5px !important;}.instructions li{margin-bottom:15px !important;line-height:1.6;text-align:left;}.ingredients li{text-align:left}#recipe .instructions{margin-top: 30px;}#recipe .instructions ol,#recipe .instructions ol li {list-style:decimal !important;}#recipe .instructions ol{padding-left:39px;margin:0!important;margin-top:6px !important;}.posturl{border-top:1px solid #ccc;padding-top:10px;}.ing-section{padding-left:20px;margin: 10px 0;}.ing-section > span{font-weight:700}.recipe-credit{font-size:13px;border-top: 1px solid #ccc;padding:10px;text-align:center;background:#ffffff;margin:-20px;margin-top:15px;}.recipe-credit a{color:blue;text-decoration:none;}.copyright-statement{font-size: 13px;font-style:italic;border-top: 1px solid #ccc;margin-top:15px;padding-top:15px;line-height:1.6;}.notes pre{font-size: 15px;margin: 10px 0;padding-left: 20px;font-family: inherit;line-height: 1.7;white-space: pre-line;}.notes h3{margin: 0}.nutrition-info{font-size: 0;margin: 20px 0;padding: 10px;background: #fff;}.nutrition-info>div {display: inline-block;font-size: 14px;width: 20%;text-align: center;}.nutrition-info>div:nth-child(5) ~ div{margin-top: 20px;}.nutrition-info>div p{margin-top: 0;margin-bottom: 7px;}#recipe .info{position:relative}#recipe .image{text-align:center;margin:25px 0}#recipe .image img{max-width:100%;width:150px;height:150px;-o-object-fit:cover;object-fit:cover;border-radius:150px}#recipe .recipe-name{margin-top: 20px;text-align:center}#recipe .summary{margin:20px 0;clear:both;line-height:1.7;font-style:italic}#recipe .time{clear:both;border-top:1px dotted #000;border-bottom:1px dotted #000;border-right:0;border-left:0}
February 18, 2018
Spring Rolls
Find out how to make healthy veggie spring or summer rolls with this easy recipe! Fresh spring rolls are a simply delicious combination of fresh vegetables, herbs, rice paper, and a flavorful peanut sauce for dipping. These spring rolls are naturally vegan and gluten-free.

Fresh rice paper spring rolls are one of my favorite things right now. I've been getting them pre-made at Whole Foods and Trader Joe's for years, and finally decided it was time to make them myself. The "salad roll" from the Whole Foods sushi department is one of my favorite grab-and-go lunches, as are the tofu spring rolls. I'm so glad I decided to make them at home, because spring rolls are so much easier to make than I had imagined, and of course less expensive. I also find making my spring rolls at home means they are fresher than the store-bought rolls that may have been sitting on the shelf all day, or longer. Fresh spring rolls are refreshing, crunchy, and so satisfying when dipped into a sweet and savory peanut sauce. They have to be one of the easiest ways to eat "salad" and are perfectly portable. I love making a few on Sundays to use in work or school packed lunches.
CONTINUE READING THIS POST »